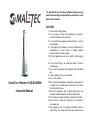
MALTEC Wentylator Stojący Kolumnowy WK300Wt Instrukcja obsługi
- Typ
- Instrukcja obsługi

MALTEC Wentylator Kolumnowy +Pilot
+LED WK300Wt
Instrukcja Obsługi I Konserwacji
Przed rozpoczęciem korzystania z produktu należy zapoznać się z niniejszą
instrukcją i zdecydowanie zalecamy przechowywanie jej w bezpiecznym
miejscu do wykorzystania w przyszłości.
UWAGA!
1. Stosować zgodnie z napięciem znamionowym.
2. Nie naprawiaj ani nie przerabiaj urządzenia samodzielnie, powinno
to zostać wykonane przez mechanika.
3. Nie obsługuj urządzenia mokrymi rękami, aby uniknąć uszkodzenia.
4. Jeśli przewód zasilający jest uszkodzony, musi zostać wymieniony
przez producenta, jego przedstawiciela serwisowego lub podobnie wy-
kwalifikowaną osobę w celu uniknięcia zagrożenia.
5. Gdy urządzenie nie jest używane, wyłącz je i wyjmij wtyczkę z
gniazdka.
6. Nie wkładaj żadnych przedmiotów do wylotów i wlotów powietrza,
aby uniknąć uszkodzenia.
7. Nie używaj urządzenia w pobliżu gazów wybuchowych i palnych.
8. Używaj urządzenia tylko na płaskiej powierzchni.
9. Nie używać na zewnątrz.
10. Nie przewróć urządzenia. Jeżeli się to zdarzy - odłącz zasilanie, je-
śli znajduje się w nim przez to woda. Osusz całkowicie przed użyciem.
11. Czyść lekko wilgotną szmatką, można czyścić neutralnymi deter-
gentami. Nie spłukiwać wodą.
12. Nie należy umieszczać wylotów ani wlotów powietrza w pobliżu
ściany lub zasłony.
13. Nie uderzaj ani nie potrząsaj urządzeniem podczas używania, w
przeciwnym razie może to spowodować zatrzymanie.
14. Urządzenie nie może znajdować się bezpośrednio pod gniazdem
elektrycznym. Prąd znamionowy gniazda nie powinien przekraczać
10A.
15. Nie używaj urządzenia w bezpośrednim sąsiedztwie wanny, prysz-
nica lub basenu.
16. To urządzenie nie jest przeznaczone do użytku przez osoby, w tym

dzieci o ograniczonych zdolnościach fizycznych, sensorycznych lub
umysłowych, lub osoby bez doświadczenia i wiedzy, chyba że będą
one nadzorowane lub poinstruowane w zakresie użytkowania urządze-
nia przez osobę odpowiedzialną za ich bezpieczeństwo.
17. Należy pilnować, aby dzieci nie bawiły się urządzeniem.
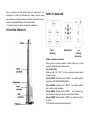
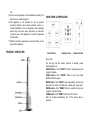
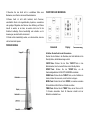
STRUKTURA PRODUKTU
FUNKCJE I DZIAŁANIE
Panel Wyświetlacz Pilot
Kontrolny zdalnego
sterowania
Podłącz urządzenie do zasilania.
Włóż wtyczkę do gniazda zasilania, produkt znajdzie się w trybie
gotowości, lampka kontrolna zasilania świeci.
Przycisk WŁ. / WYŁ.:
Wciśnij przycisk „WŁ. / WYŁ.”Do stanu roboczego, ponownie wciśnij
do trybu czuwania.
Przycisk SPEED: Naciśnij przycisk „SPEED”, aby ustawić prędkość
wentylatora od WYSOKA-ŚREDNIA-NISKA.
Przycisk MODE: Naciśnij przycisk „MODE”, aby ustawić normalny
wiatr - naturalny- wiatr usypiający.
Przycisk SWING: Naciśnij przycisk „SWING’’ aby uruchomić oscy-
lację wentylatora, naciśnij go ponownie, aby zatrzymać funkcję.
Przycisk TIMER: Naciśnij przycisk „TIMER”aby ustawić timer od 00-
15 godzin.
Po 60 sekundach automatycznie wyłącza ekran

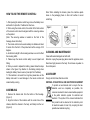
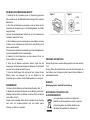
JAK KORZYSTAĆ Z PILOTA:
1. Po wyjęciu pilota z opakowania, zdejmij pokrywę baterii i włóż
2 sztuki odpowiednich baterii.
2. Podczas korzystania z pilota, nadajnik w przedniej części pilota
musi być ustawiony w jednej linii z okienkiem odbiorczym na
produkcie.
(Uwaga: okienko odbiorcze znajduje się z przodu kadłuba, nad
przyciskiem)
3. Pilota można normalnie używać w odległości około 5 metrów
od przodu produktu oraz w zakresie 30 stopni.
4. Unikaj bezpośredniego światła słonecznego na okienko
odbiorcze, aby nie wpływać na efekt odbioru.
5. Pilota należy przechowywać w bezpiecznym miejscu, aby
uniknąć uderzenia i upadku.
6. Kiedy zajdzie potrzeba wymiany baterii, należy postępować
zgodnie z instrukcją. Podczas umieszczania baterii należy
zwrócić uwagę na biegunowość. Nigdy na odwrót.
7. Jeśli urządzenie nie jest używane przez dłuższy czas, wyjmij
baterię i uszczelnij ją, aby uniknąć uszkodzenia pilota i
zmniejszyć zużycie baterii.
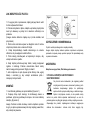
MONTAŻ
1. Usuń blokadę podstawy ze spodu kadłuba. (Rysunek 1)
2. Dopasuj dolną część maszyny do środkowego otworu w
podstawie, przymocuj podstawę do korpusu i na koniec zablokuj
nakrętką. (Rysunek 2)
Uwaga: Podczas montażu obudowy umieść urządzenie spodem
do góry na piance opakowaniowej lub innej miękkiej powierzchni,
aby uniknąć zarysowania.
CZYSZCZENIE I KONSERWACJA
Czyścić neutralnym detergentem i miękką szmatką.
Uwaga: odłącz wtyczkę zasilania podczas czyszczenia urządzenia,
ponieważ w korpusie panuje wysokie napięcie. Nie pozostawiaj wody
na panelu sterowania.
AKCESORIA
Nakrętka mocująca; Baza; Pilot zdalnego sterowania
UTYLIZACJA SPRZĘTU ELEKTRYCZNEGO I
ELEKTRONICZNEGO
Aby chronić nasze środowisko i jak najpełniej poddać
recyklingowi zużyte surowce, konsument proszony jest o
zwrócenie niesprawnego sprzętu do publicznego
systemu zbiórki sprzętu elektrycznego i elektronicznego.
Symbol z krzyżykiem oznacza, że ten produkt należy
zwrócić do punktu zbiórki odpadów elektronicznych w celu ich
podania poprzez recykling jak najlepszy możliwy recykling surowców.
Zapewniając ten produkt, zapobiegniesz możliwym negatywnym
skutkom dla środowiska i zdrowia ludzi, które mogłyby być

spowodowane niewłaściwą utylizacją tego produktu. Recykling
materiałów z tego produktu pomoże Ci zachować zdrowe środowisko i
zasoby naturalne.
Deklaracja CE
Malis B. Machoński sp. k. Deklaruje że urządzenie MALTEC
Wentylator Kolumnowy +Pilot +LED WK300Wt spełnia wszelkie
wymogi dotyczące dyrektyw LVD 2014/35/EU, EMC 2014/30/EU
oraz spełnia następujące standardy:
EN 603351:2012+A11:2014+A13:2017+A1:2019+A14:2019+A2:2019
EN 60335-2-80:2003+A1:2004+A2:2009
EN 62233:2008
EN 55014-1:2017
EN 55014-2:2015
EN 61000-3-2:2014
EN 61000-3-3:2013
Importer:
Malis B. Machoński sp. k.
ul. Zbożowa 2E, Wysogotowo
62-081 Przeźmierowo
www.maltec.pl

Stand Fan +Remote +LED WK300Wt
Instruction Manual
It is important that you read these instructions before using your
product and we strongly recommend that you keep them in a safe
place for future reference.
CAUTION
1. Use as per the rating voltage.
2. Do not repair or remake the appliance by yourself, it
should be repaired by the repairmen.
3. Do not operate the appliance with wet hands, in order to
avoid damage.
4. If the supply cord is damaged, it must be replaced by the
manufacturer, its service agent or similarly qualified
persons in order to avoid a hazard.
5. When the appliance is not in use, switch it off and unplug
it.
6. Do not insert things to air outlets and inlets, in order to
avoid damage.
7. Do not use the appliance near explosive and combustible
gas.
8. Use the appliance only on a flat surface.
9. Do not use outdoors.
10.Do no turnover the appliance. Unplug the power supply If it
is toppled over and there have some water in the body.
Dry the body before use.
11.Clean the appearance with a lightly damp cloth.It can
clean with neutral detergents. Do not rinse with water.
12.Do not make air outlets and inlets near the wall or curtain.
13.Do not knock or shake the body when use, otherwise it
may cause stop.
14.The appliance must not located immediately below a
socket outlet. The rating current of socket should exceed

10A.
15.Do not use the appliance in the immediate surrounding of a
bath,a show or a swimming pool.
16.This appliance is not intended for use by persons
(including children) with reduced physical, sensory or
mental capabilities or lack of experience and knowledge
unless they have been given supervision or instruction
concerning use of the appliance by a person responsible
for their safety.
17.Children should be supervised to ensure that they do not
play with the appliance.
PRODUCT STRUCTURE
FUNCTIONS & OPERATION
Control Panel Display Screen Remote Control
Plug in first
Put the plug into the socket, products in standby, power
indicating light is on.
ON/OFF button: Push “ON/OFF” button to working state, push
it again to standby .
SPEED button: Push “SPEED” button to set from HIGH-
MIDDLE-LOW fan speed.
MODE button: Push “MODE” button repeatedly, and the wind
will cycle in the order of "normal wind - natural wind - sleep wind"
SWING button : Push “SWING” button to oscillate the fan, push
it again to stop the function.
TIMER button: Push”TIMER” button from 00-15 hours.
After 60 seconds automatically turn off the screen with no
operation.

HOW TO USE THE REMOTE CONTROL:
1. After opening the remote control bag, remove the battery cover
and load it into 2pcs No. 7 batteries for direct use.
2. When using the remote control, the emitter of the front section
of the remote control must be aligned with the receiving window
on the product.
(Note: The receiving window is located on the front of the
fuselage, above the button)
3. The remote control can be used normally at a distance of about
5 meters from the front of the product and within a range of 30
degrees.
4. Avoid direct sunlight to the receiving window, so as not to affect
the receiving effect.
5. Please keep the remote control safely to avoid impact and
falling.
6. When you need to replace the battery, please follow the steps
shown in the figure. Pay attention to the battery polarity when
loading the battery. Never reverse. (Use 2pcs No.7 batteries)
7. If the machine is not used for a long time, please take out the
battery and seal it to avoid damage to the remote control and
reduce battery running.
ASSEMBLING
1. Remove the chassis lock from the bottom of the fuselage.
(Figure 1)
3. Align the bottom of the machine with the center hole of the
chassis, attach the chassis to the body, and finally lock the nut.
(Figure 2)
Note: When installing the chassis, place the machine upside
down on the packaging foam or other soft surface to avoid
scratching.
CLEANING AND MAINTENANCE
Clean with neutral detergent and soft cloth.
Attention: unplug the power plug when clean the appliance ,since
there have high pressure in the body. Do not leave any water on
the control panel.
ACCESSORY
Fixing Lock Nut; Base; Remote control
DISPOSAL OF ELECTRICAL AND ELECTRONIC EQUIPMENT
To protect our environment and to recycle the raw
materials used as completely as possible, the
consumer is asked to return unserviceable equipment
to the public collection system for electrical and
electronic. The symbol of the crossed indicates that
this product must be returned to the collection point
for electronic waste to feed it by recycling the best
possible raw material recycling.

By ensuring this product you will prevent possible negative
effects on the environment and human health, which could
otherwise be caused due to improper disposal of that product.
The recycling of materials from this product, you will help to
preserve a healthy environment and natural resources.
CE declaration
Malis B. Machoński sp. K. Declares that the MALTEC Column
Fan + Pilot + LED WK300Wt device meets all the requirements of
the LVD 2014/35 / EU, EMC 2014/30 / EU directives and meets
the following standards:
EN 603351:2012+A11:2014+A13:2017+A1:2019+A14:2019+A2:2019
EN 60335-2-80:2003+A1:2004+A2:2009
EN 62233:2008
EN 55014-1:2017
EN 55014-2:2015
EN 61000-3-2:2014
EN 61000-3-3:2013
Importer:
Malis B. Machoński sp. k.
ul. Zbożowa 2E, Wysogotowo
62-081 Przeźmierowo
www.maltec.pl

MALTEC Turmventilator +
Fernbedienung + LED WK300Wt
Bedienungs- und Wartungsanleitung
Bitte lesen Sie diese Anleitung bevor Sie das Gerät verwenden, und
bewahren Sie sie an einem sicheren Ort auf, damit Sie sie bei Bedarf
zur Hand haben.
ACHTUNG!
1. Verwenden Sie es entsprechend der Nennspannung.
18. Reparieren oder modifizieren Sie das Gerät nicht selbst, sondern
lassen Sie dies von einem Mechaniker durchführen.
19. Fassen Sie das Gerät nicht mit nassen Händen an, um Schäden zu
vermeiden.
20. Wenn das Netzkabel beschädigt ist, muss es durch den Hersteller,
seinen Kundendienst oder eine ähnlich qualifizierte Person ersetzt
werden, um eine Gefährdung zu vermeiden.
21. Wenn das Gerät nicht benutzt wird, schalten Sie es aus und ziehen
Sie den Netzstecker aus der Steckdose.
22. Stecken Sie keine Gegenstände in die Luftauslässe und -einlässe,
um Beschädigungen zu vermeiden.
23. Verwenden Sie das Gerät nicht in der Nähe von explosiven oder
entflammbaren Gasen.
24. Verwenden Sie das Gerät nur auf einer ebenen Grundfläche.
25. Nicht im Freien verwenden.
26. Stoßen Sie das Gerät nicht um. Sollte dies der Fall sein,
unterbrechen Sie die Stromversorgung, falls Wasser im Gerät ist. Vor
Gebrauch vollständig trocknen lassen.
27. Reinigen Sie mit einem leicht feuchten Tuch, Sie können das Gerät
mit neutralen Reinigungsmitteln reinigen. Nicht mit Wasser abspülen.
28. Die Luftauslässe oder -einlässe dürfen nicht in der Nähe einer
Wand oder eines Vorhangs angebracht werden.
29. Schlagen oder schütteln Sie das Gerät während des Gebrauchs
nicht, da es sonst ausfallen kann.
30. Das Gerät darf nicht direkt unter einer Steckdose aufgestellt
werden. Der Nennstrom der Steckdose sollte 10 A nicht überschreiten.

31. Benutzen Sie das Gerät nicht in unmittelbarer Nähe einer
Badewanne, einer Dusche oder eines Schwimmbeckens.
32. Dieses Gerät ist nicht dafür bestimmt, durch Personen,
einschließlich Kinder mit eingeschränkten physischen, sensorischen
oder geistigen Fähigkeiten oder Personen ohne Erfahrung und Wissen
benutzt zu werden, es sei denn, sie werden durch eine für ihre
Sicherheit zuständige Person beaufsichtigt oder erhielten von ihr
Anweisungen, wie das Gerät zu benutzen ist.
33. Kinder sollten beaufsichtigt werden, um sicherzustellen, dass sie
nicht mit dem Gerät spielen.
PRODUKTAUFBAU
FUNKTIONEN UND BEDIENUNG
Bedienfeld Display Fernbedienung
Schließen Sie das Gerät an das Stromnetz an.
Stecken Sie den Stecker in die Steckdose, das Gerät befindet sich im
Standby-Modus, die Betriebsanzeige leuchtet.
ON/OFF-Taste: Drücken Sie die Taste "ON/OFF"-Taste in den
Betriebszustand, durch erneutes Drücken in den Standby-Modus.
SPEED"-Taste: Drücken Sie die "SPEED"-Taste, um die
Geschwindigkeitsstufen HOCH-MITTLE-NIEDRIG einzustellen.
SWING-Taste: Drücken Sie die "SWING"-Taste, um die Oszillation zu
starten, drücken Sie sie erneut, um die Funktion zu stoppen.
MODE-Taste: Drücken Sie die Taste "MODE", um zwischen normalem
Wind-natürlichem Wind-Wind zum Schlafen zu wählen.
TIMER-Taste: Drücken Sie die "TIMER"-Taste, um den Timer von 00-
15 Stunden einzustellen. Nach 60 Sekunden schaltet sich der
Bildschirm automatisch aus.

WIE MAN DIE FERNBEDIENUNG BENUTZT:
1. Nachdem Sie die Fernbedienung aus der Verpackung genommen
haben, entfernen Sie den Batteriefachdeckel und legen Sie 2 passende
Batterien ein.
2. Wenn Sie die Fernbedienung verwenden, muss der Sender auf der
Vorderseite der Fernbedienung auf das Empfangsfenster des Geräts
ausgerichtet sein.
(Hinweis: Das Empfangsfenster befindet sich auf der Vorderseite des
Ventilators, oberhalb der Taste)
3. Die Fernbedienung kann normalerweise in einem Abstand von etwa
5 Metern von der Vorderseite des Geräts und in einem Winkel von 30
Grad verwendet werden.
4.Vermeiden Sie direkte Sonneneinstrahlung auf das Empfangsfenster,
um den Empfangseffekt nicht zu beeinträchtigen.
5. Bewahren Sie die Fernbedienung an einem sicheren Ort auf, um
Stöße und Stürze zu vermeiden.
6. Wenn Sie die Batterien austauschen müssen, folgen Sie den
Anweisungen. Achten Sie beim Einlegen der Batterien auf die Polarität
und legen Sie sie niemals verkehrt herum ein.
7. Wenn das Gerät längere Zeit nicht benutzt wird, nehmen Sie die
Batterie heraus und versiegeln Sie sie, um Schäden an der
Fernbedienung zu vermeiden und den Batterieverbrauch zu verringern.
ZUSAMMENBAU
1. Entfernen Sie die Mutter an der Unterseite des Rumpfes. (Abb. 1)
2. Stecken Sie den Boden der Maschine in das Mittelloch des Sockels,
befestigen Sie den Sockel am Gehäuse und sichern Sie ihn schließlich
mit der Mutter. (Abb. 2)
Hinweis: Bei der Montage, stellen Sie den Ventilator mit der Oberseite
nach unten, auf Verpackungsschaum oder eine andere weiche
Unterlage, um Kratzer zu vermeiden.
REINIGUNG UND WARTUNG
Reinigen Sie mit einem neutralen Reinigungsmittel und einem weichen
Tuch.
Achtung: Ziehen Sie den Netzstecker, wenn Sie das Gerät reinigen, da
das Gehäuse unter Hochspannung steht. Lassen Sie kein Wasser auf
dem Bedienfeld stehen.
ZUBEHÖR
Befestigungsmutter, Standfuß, Fernbedienung
ENTSORGUNG VON ELEKTRO- UND
ELEKTRONIKGERÄTEN
Um unsere Umwelt zu schützen und gebrauchte
Rohstoffe so weit wie möglich zu recyceln, werden die
Verbraucher gebeten, die defekten Geräte bei den
öffentlichen Sammelstellen für elektrische und

elektronische Geräte abzugeben. Das Symbol mit dem Kreuz weist
darauf hin, dass dieses Produkt zur bestmöglichen Wiederverwertung
von Rohstoffen an eine Sammelstelle für Elektronikschrott
zurückgegeben werden sollte. Indem Sie dieses Produkt sicherstellen,
tragen Sie dazu bei, mögliche negative Folgen für die Umwelt und die
menschliche Gesundheit zu vermeiden, die andernfalls durch eine
unsachgemäße Entsorgung dieses Produkts verursacht werden
könnten. Das Recycling von Materialien aus diesem Produkt hilft
Ihnen, eine gesunde Umwelt und natürliche Ressourcen zu erhalten.
EU-Konformitätserklärung
Malis B. Machoński sp. k. erklärt, dass das Gerät MALTEC
Turmventilator + Fernbedienung + LED WK300Wt allen Anforderungen
der Richtlinien LVD 2014/35/EU, EMC 2014/30/EU entspricht und die
folgenden Normen erfüllt:
EN 603351:2012+A11:2014+A13:2017+A1:2019+A14:2019+A2:2019
EN 60335-2-80:2003+A1:2004+A2:2009
EN 62233:2008
EN 55014-1:2017
EN 55014-2:2015
EN 61000-3-2:2014
EN 61000-3-3:2013
Importeur:
Malis B. Machoński sp. k.
ul. Zbożowa 2E, Wysogotowo
62-081 Przeźmierowo
www.maltec.pl
-
 1
1
-
 2
2
-
 3
3
-
 4
4
-
 5
5
-
 6
6
-
 7
7
-
 8
8
-
 9
9
-
 10
10
-
 11
11
-
 12
12


MALTEC Wentylator Stojący Kolumnowy WK300Wt Instrukcja obsługi
- Typ
- Instrukcja obsługi
w innych językach
Powiązane artykuły
-
 MALTEC Termowentylator Grzejnik Elektryczny Farelka Ogrzewacz 1500w Ptc Led Pilot Instrukcja obsługi
-
 MALTEC Grzejnik Olejowy Termostat ProOil2500W WiFi Instrukcja obsługi
-
 MALTEC Lampa Owadobójcza 4W EGS-01-4W Instrukcja obsługi
-
 MALTEC Piecyk Gazowy na Butlę GAS-5000Wt Składany Promiennik Cieplny Instrukcja obsługi
-
 MALTEC Myjka Parowa Czyścik Parowy Parownica HDS3350W Instrukcja obsługi
-
 MALTEC Aerator Wertykulator Elektryczny MasterLawn-PRO2800 Instrukcja obsługi
-
 MALTEC Czujnik Czadu Tlenku Węgla Certyfikowany SafeSensor1000 Instrukcja obsługi
-
 MALTEC Suszarka Spożywcza Do Grzybów Owoców Warzyw 450w Instrukcja obsługi
-
 MALTEC Lampa Do Paznokci Uv Led 168w Manicure Pedicure Instrukcja obsługi
-
 MALTEC Nagrzewnica Elektryczna Grzejnik INFERNO4000 2kW Instrukcja obsługi


