
AHD-91
TV tuner DVB-T
Tuner telewizyjny DVB-T
Instruction Manual 3
Instrukcja obsługi 21

2
This product meets all the requirements and provisions of the applicable European Union directives.
Declaration of Conformity (DoC) is available on the www.apollo.eu
Detailed warranty information can be found in the warranty card.
The information contained in this document is subject to change without notice.
Apollo Electronics reserves the right to calculation mistakes and printing errors.
Copyright © 2012 Apollo Electronics. All rights reserved.
Any reproduction, reprint, adaptation or translation without permission is prohibited
Niniejszy produkt spełnia wszystkie wymogi i przepisy obowiązujących dyrektyw Unii Europejskiej.
Deklaracja zgodności (DoC) jest dostępna na stronie www.apollo.eu
Szczegółowe informacje gwarancyjne znajdują się w karcie gwarancyjnej.
Informacje znajdujące się w tym dokumencie mogą ulec zmianie bez powiadomienia.
Apollo Electronics zastrzega sobie prawo do pomyłek i błędów w druku.
Copyright © 2012 Apollo Electronics. Wszystkie prawa zastrzeżone.
Jakakolwiek reprodukcja, przedruk, adaptacja lub tłumaczenie bez uprzedniego zezwolenia jest zabronione.

3
ENG
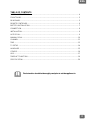
TABLE OF CONTENTS
SAFETY INSTRUCTIONS ................................................................................................................ 4
FRONT PANEL ................................................................................................................................ 5
REAR PANEL .................................................................................................................................. 5
REMOTE CONTROLER ................................................................................................................... 6
BATTERY INSTALLATION............................................................................................................... 7
CONNECTION ................................................................................................................................. 8
INSTALLATION ................................................................................................................................ 9
AUTO SCAN .................................................................................................................................... 9
MANUAL SCAN ............................................................................................................................. 10
CHANNEL ...................................................................................................................................... 11
TIME .............................................................................................................................................. 13
TV SETUP ..................................................................................................................................... 14
LANGUAGE ................................................................................................................................... 15
OTHERS ........................................................................................................................................ 16
USB ............................................................................................................................................... 17
TIMESHIFT FUNCTION ................................................................................................................. 19
SPECIFICATION ............................................................................................................................ 20
The instruction should be thoroughly read prior to set the appliance in.

4
ENG
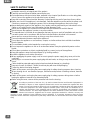
SAFETY INSTRUCTIONS
Instruction manual is an integral part of the product.
Carefully read and follow the below manual before use.
Get acquaintance with the technical data, available in the chapter Specification or on the rating plate,
prior to connect the appliance to the electrical source of power.
Keep this Instruction Manual and the Warranty Card along with the proof of purchase for any claims.
Before use check if the appliance is not damaged. Particular attention must be paid to the power cord.
Should any component, including the power cord, be damaged the appliance must not be used.
Never attempt any repairs of the appliance. Any repairs must be performed by an Authorized Service
Station or a Central Service (more information see the Warranty Card).
Never use the appliance in a manner inconsistent with the intended use and this Manual.
Never immerse the appliance in water or any other solution.
The manufacturer is not liable for any damages that may arise as a result of installation and use of the
car audio system not in accordance with the technical specification described in this manual.
Never open nor remove the housing, as doing so may cause electric shock.
Ensure unobstructed clearance around the appliance.
Do not place the appliance on soft surfaces, carpets, or similar surfaces that could block ventilation
from the bottom.
The ventilation should not be impeded by covering the housing.
Do not expose the appliance to rain or an environment where it may be splashed by water or other
liquids.
Do not place containers or objects containing liquid (e.g. vases) on top of the appliance.
Keep the appliance away from naked flames (e.g. burning candles).
Install the appliance on a stable, flat surface.
When unplugging the power supply cord, be sure to grasp the power supply plug; never pull on the
cord itself.
Never plug in nor remove the power supply plug with wet hands, as doing so may cause electric
shock.
Cable should be protected against physical and mechanical damage (e.g. bending).
Keep out of reach of children. Children should not play with tuner and packaging.
Protect the device from being dropped.
Switch off the power, and unplug the power supply plug for safety cleaning purposes when cleaning.
When cleaning do not use abrasive sponges, substances and products containing solvents, benzene
or alcohol.
Switch off the power, and unplug the power supply plug for safety purposes during storm or before
leaving the appliance unused for an extended period.
Before using the tuner, remove all the protective foils from the housing.
According to provisions of the Law of 1 July 2005 on Waste Electrical and Electronic Equipment it is
forbidden to dispose of waste equipment marked with crossed out wheeled bin together with other
wastes. The user who intends to dispose of such an equipment is obliged to deliver the waste electrical
or electronic equipment to the waste equipment collection points. Such points are established by i.a.
retailers and wholesalers of the equipment and the commune organizational units operating in waste
collection business. The above legal obligations have been introduced to reduce the amount of waste
electrical and electronic equipment and to ensure appropriate standard for collection, recovery and
recycling of waste equipment. Proper fulfilment of those obligations is of particular importance when the waste
equipment contains hazardous components of particularly adverse effect on environment and human health. Weight:
0,4kg.

5
ENG
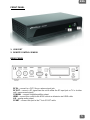
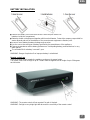
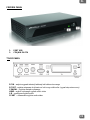
FRONT PANEL
1. USB PORT
2. REMOTE CONTROL SENSOR
REAR PANEL
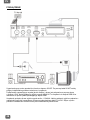
RF IN – connect to a CATV line or antenna input jack
RF OUT – connect a RF signal from the unit to either the RF input jack on TV or to other
unit ( unprocessed signal )
COAXIAL – connect a digital amplifier output
HDMI – connect this socket to the HDMI socket on television via HDMI cable
L/R – analog audio output
SCART – connect this port to the TV via SCART cable

6
ENG
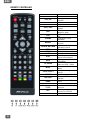
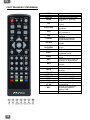
REMOTE CONTROLER
POWER
Switch on / off
0-9
Numeric keys
CH+/ CH-
Change next/previous
channel
MENU
Display the main menu
OK
Confirm the function
VOL+/ VOL-
Increase/ Decrease the
volume
EPG
Display electronic
program guide
FAV
Display favorite channels
list
V-MODE
Change the screen
resolution
RECALL
Return to last selected
channel
COLOUR BUTTONS
Operate different
functions in menu
TTX
Display Teletext contents
SUB-T
Display subtitles
LANG
Changes Audio language
EXIT
Exits current menu or
return to the previous
INFO
Display channel
information
TV / RADIO
Switch between digital
radio and DVB-T mode
MUTE
Enable on disable
audio
PAGE-/PAGE+
Navigation through the
menus
ASPECT
Switch aspect ratio
TIMESHIFT
Use to start Timeshift
function
TIMER
Use to access Adv Timer
menu
PVR
Record a TV program
PLAY/PAUSE/STOP/
FF/FB
Use for multimedia
playback
REC
Start recording current
channel to USB disk
ZOOM
Zoom in current picture

7
ENG
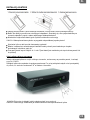
BATTERY INSTALLATION
Remove the battery cover from the Remote Control and put 2xAAA size
batteries inside the compartment.
Batteries should not be disposed together with household waste. Contact the company responsible for
waste disposal and ask for the address of the nearest waste equipment collection point.
Incorrect use of battery threatens leakage and corrosion.
Use the correct size and type of battery specified by the manufacturer of the appliance.
Extreme temperatures reduce battery performance. Avoid putting battery-powered devices in very
warm places.
The estimate life for a battery is around 1 year.
WARNING: Danger of explosion if an improper battery is substituted.
Remote control use
Point the remote control towards the appliance and press the power button.
The remote control has a range of up to 7 meters from the appliance at an angle of up to 30 degrees
each direction.
WARNING: The remote control will not operate if its path is blocked.
WARNING: Sunlight or very bright light will decrease the sensitivity of the remote control.

8
ENG
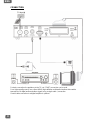
CONNECTION
For basic connection the appliance to the TV set, SCART connection can be used.
For a higher quality sound, use a direct HDMI (high-definition multimedia interface that enables
transmission of digital audio and video signals using a single cable ) connection.
Coaxial cable connection to a digital amplifier is optional.

9
ENG
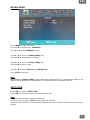
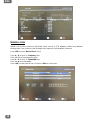
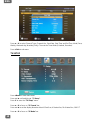
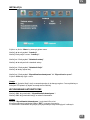
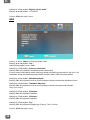
INSTALLATION
Press <Menu> to enter main menu.
Press ◄ / ► until switching to “Installation”.
Press ▼ to enter the “Installation” menu.
Press ▲ / ▼ to focus on "Antenna setting” bar.
Press ◄ / ► to change antenna settings.
Press ▲ / ▼ to focus on "Country Setting” bar.
Press ◄ / ► to select country.
Press ▲ / ▼ to select “Auto Scan” or “Manual Scan”.
Press <Exit> to exit menu.
Note:
After changing “Country Setting”, current time zone would adjust to the corresponding region of the
country. At the same time, the time display on STB would base on the new time zone too.
AUTO SCAN
Press <OK> to confirm “AUTO SCAN“.
Press <OK> to confirm the empty action and start auto scan.
Note:
Auto scan implementation needs several minutes
In scanning, user can press <Exit> to cancel auto scan any time.
And when scan finished, the result would be showed to tell user how many TV&Radio services are found
this time.

10
ENG
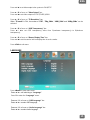
MANUAL SCAN
Manual scan function would only add newly found services to STB database, without any database
clearing action. User needs to know the target scan frequency and bandwidth in advance.
Press <OK> to enter “Manual Scan” menu.
Press ▲ / ▼ to focus on “Frequency” bar.
Press <0 ~ 9> to input frequency value.
Press ▲ / ▼ to focus on “Bandwidth” bar.
Press ◄ / ► to set bandwidth.
Press <OK> to start manual scan. And press <Exit> to cancel scan.

11
ENG
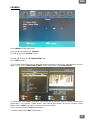
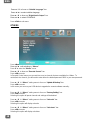
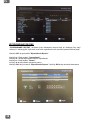
CHANNEL
Press <Menu> to enter main menu.
Press ◄ / ► until switching to “Channel".
Press ▼ to enter the “Channel” menu.
Press ▲ / ▼ to focus on “TV Channel Editor” bar.
Press <OK> to select.
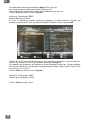
In TV Channel Editor Menu you can edit your program preferences (lock, skip, sort, edit name, move or
delete) . You can use “Radio Channel Editor” in the same way as “TV Channel Editor”
To edit channel select Edit (Red button) it will display menu which will allow to change channel name
(Red button), sort channels (Yellow button), skip channel (Blue button) and move channels (Green
button). Select <Exit> to go back to main menu of channel editor.
To lock the channel select Lock (Green button).
To delete channel select Del (Yellow button).

12
ENG
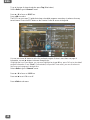
To go to the type of channel selection press Top (Blue button).
Select <Exit> to go to“Channel” menu.
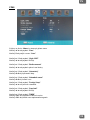
Press ▲ / ▼ to focus on “EPG” bar.
Press <OK> to select.
The EPG is an on-screen TV guide that shows scheduled programs seven days in advance for every
tuned channel. Press the EPG button on the Remote Control to access to the guide.
You can use the ▲ / ▼ button to select the preferred program. If there is more than one page of
information, use ◄ / ► buttons to browse through them.
If highlight bar is on Event Name, you can move highlight bar by ▲ / ▼key, press OK key to view detail
program information. Press "Book” (Yellow button) to open Adv Timer menu, you can set a timer to
view or record a program in desired time.
Select <Exit> to go to “Channel” menu.
Press ▲ / ▼ to focus on “LCN” bar.
Press ◄ / ► to set LCN on or off.
Press <Exit> to exit menu.

13
ENG
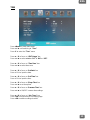
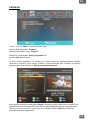
TIME
Press <Menu> to enter main menu.
Press ◄ / ► until switching to “Time".
Press ▼ to enter the “Time” menu.
Press ▲ / ▼ to focus on “GMT Usage” bar.
Press ◄ / ► to select whether GMT is “ON” or “OFF”.
Press ▲ / ▼ to focus on “Time Zone” bar.
Press ◄ / ► to select time zone.
Press ▲ / ▼ to focus on “Set Date” bar.
Press <0~9> to input the date.
Press ▲ / ▼ to focus on “Set Time” bar.
Press <0~9> to input the time.
Press ▲ / ▼ to focus on “Sleep Time” bar.
Press ◄ / ► to set sleep time.
Press ▲ / ▼ to focus on “Summer Time” bar.
Press ◄ / ► to ON/OFF summer time settings.
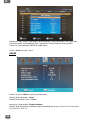
Press ▲ / ▼ to focus on “Adv Timer” bar.
Press <OK> to enter auto-record setting page.
Press <OK> to add recording schedule.

14
ENG
Press ▲ / ▼ to select Channel Type, Channele No., Start Date, Start Time and End Time, Mode (Once,
Weekly, Weekend day, Weekday, Daily). Then set the Timer Mode (Schedule, Recorder).
Press <Exit> to exit menu.
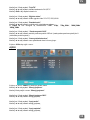
TV SETUP
Press <Menu> to enter main menu.
Press ◄ / ► until switching to “TV Setup".
Press ▼ to enter the “TV Setup” menu.
Press ▲ / ▼ to focus on “TV Format” bar.
Press ◄ / ► to set the display format to either4:3 PanScan, 4:3Letter Box, 16: 9Letter Box, 16:9 FIT
Press ▲ / ▼ to focus on “TV Mode” bar.

15
ENG
Press ◄ / ► to set video output color system to PAL/NTSC.
Press ▲ / ▼ to focus on “Video Output” bar.
Press ◄ / ►to set video output to SCART(CVBS)/HDMI.
Press ▲ / ▼ to focus on “TV Resolution” bar.
When “TV mode” is PAL, the modes of “576i”, “720p_50Hz”, “1080i_50Hz” and “1080p_50Hz” can be
selected.
Press ▲ / ▼ to focus on “OSD Transparency” bar.
Press ◄ / ►to set OSD transparency value from 1(maximum transparency) to 8(minimum
transparency).
Press ▲ / ▼ to focus on “Banner Display Time” bar.
Press ◄ / ►to set the service info bar display time in service mode..
Press <Exit> to exit menu.
LANGUAGE
Press <Menu> to enter main menu.
Press ◄ / ► until switching to “Language”
Press ▼ to enter the “Language” menu.
Press ▲ / ▼ to focus on “OSD Language” bar.
Press ◄ / ► to select OSD language.
Press ▲ / ▼ to focus on “Audio Language” bar.
Press ◄ / ► to select Audio language.

16
ENG
Press ▲ / ▼ to focus on “Subtitle Language” bar.
Press ◄ / ► to select subtitles language.
Press ▲ / ▼ to focus on “Digital Audio Output” bar.
Press ◄ / ► to select LPCM/RAW.
Press <Exit> to exit menu.
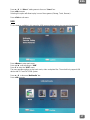
OTHERS
Press <Menu> to enter main menu.
Press ◄ / ► until switching to “Others”
Press ▼ to enter the “Others” menu.
Press ▲ / ▼ to focus on “Parental Control” bar.
Press <OK> to enter
In Parental Control menu you can restrict access to channels that are unsuitable for children. To
restrict/lock the channel, you will need to enter either the default password '0000' or your own password.
Press ▲ / ▼ in “Others” setting menu to focus on “Update & Backup” bar.
Press <OK> to enter
In this menu you can use your USB device to upgrade the newest software manually.
Press ▲ / ▼ in “Others” setting menu to focus on “Factory Setting” bar.
Press <OK> to enter
Selecting this option all preset channel and settings will be deleted.
Press ▲ / ▼ in “Others” setting menu to focus on “Calendar” bar.
Press <OK> to enter
Selecting this option will display calendar.
Press ▲ / ▼ in “Others” setting menu to focus on “Calculator” bar.
Press <OK> to enter
Selecting this option will display calculator.

17
ENG
Press ▲ / ▼ in “Others” setting menu to focus on “Game” bar.
Press <OK> to enter
Selecting this option will allow to play in one of three games (Gobang, Tetris, Boxman).
Press <Exit> to exit menu.
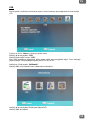
USB
To use features available in this menu the USB memory device have to be connected to the tuner.
Press <Menu> to enter main menu.
Press ◄ / ► until switching to “USB”
Press ▼ to enter the “USB” menu.
The menu provides options to play back music, video and photo files. The unit will only support USB
device with FAT and FAT32 file system.
Press ▲ / ▼ to focus on “Multimedia” bar.
Press <OK> to enter

18
ENG
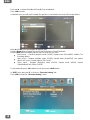
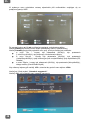
Press ◄ / ► to select Movie/Music/Photo/My Record playback.
Press <OK> to enter
In selected menu you will see the media files present on connected to the tuner USB storage device.
Using ▲/ ▼/◄/► you can navigate through the files.
Pressing Green button changes the view of the file explorer (Folder/Thumbnail)
Pressing Red button will display options menu in which you can set in:
Movie menu - Random playback mode (On/Off), Repeat mode (One/All/Off), subtitles Tex
Encoding options
Music menu - Random playback mode (On/Off), Repeat mode (One/All/Off), Info options
(Music Info/ Lyrics), Display options (EQ/ Cover)
Photo menu - Random displaying mode (On/Off), Repeat mode (All/Off), Interval
(Slow/Medium/Fast), Effect (On/Off).
To play media file press <OK> button to exit menu press <Exit> button.
In “USB” menu press ▲ / ▼ to focus on “Recorder Setting” bar.
Press <OK> to enter the “Recorder Setting” menu.

19
ENG
By pressing ▲ / ▼ you can select and set Timeshift (Auto, Pause, Off), One Button Recording option
(On/Off), Default recording period , Time Shift Size.
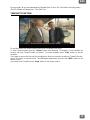
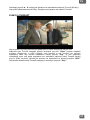
TIMESHIFT FUNCTION
To use this fuction USB memory device have to be connected to the tuner.
To enter Timeshift mode press the “Pause” button while watching TV program, in such situation the
receiver will enter Timeshift mode and pause. To resume playback press ”Play” button on remote
controller.
If you want to remove the bar and the recording time from the screen but remain the Timeshift function,
press EXIT button on remote control. They will appear again when you press the “INFO” button on the
remote control.
If you want to exit Timeshift, press “Stop” button on the remote control.

20
ENG
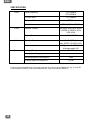
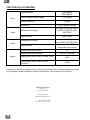
SPECIFICATION
Tuner
Input Frequency
174~230MHz
470~862MHz
RF Input level
-78~-20dBm
IF Bandwidth
7/8MHz
Modulation
QPSK, 16QAM, 64QAM
Video
Decoder Format
AVI, MKV, Xvid, divx, MPEG-
1, MPEG-2, MPEG-4, MP4,
VOB, H264
Output Format
HDMI, SCART
Audio
Decoder Format
mp3, E-AC-3 (DD+), wma,
wav, MPEG-2 (LAYER 1 & 2)
Audio output
Digital audio: S/PDIF,
Analogue audio L/R
General
Voltage (Tuner)
5,0V DC
Voltage (power sypply)
100-240~ 50/60Hz
Maximum power consumption
<5W
Standby power consumption
<0,5W
Channel frequencies displayed in the tuner menu are the channel center frequencies (e.g. channel 69,
center frequency 858MHz, channel bandwidth 8MHz, range received 854-862MHz)
Strona się ładuje...
Strona się ładuje...
Strona się ładuje...
Strona się ładuje...
Strona się ładuje...
Strona się ładuje...
Strona się ładuje...
Strona się ładuje...
Strona się ładuje...
Strona się ładuje...
Strona się ładuje...
Strona się ładuje...
Strona się ładuje...
Strona się ładuje...
Strona się ładuje...
Strona się ładuje...
Strona się ładuje...
Strona się ładuje...
Strona się ładuje...
Strona się ładuje...
-
 1
1
-
 2
2
-
 3
3
-
 4
4
-
 5
5
-
 6
6
-
 7
7
-
 8
8
-
 9
9
-
 10
10
-
 11
11
-
 12
12
-
 13
13
-
 14
14
-
 15
15
-
 16
16
-
 17
17
-
 18
18
-
 19
19
-
 20
20
-
 21
21
-
 22
22
-
 23
23
-
 24
24
-
 25
25
-
 26
26
-
 27
27
-
 28
28
-
 29
29
-
 30
30
-
 31
31
-
 32
32
-
 33
33
-
 34
34
-
 35
35
-
 36
36
-
 37
37
-
 38
38
-
 39
39
-
 40
40


Apollo AHD-121 Instrukcja obsługi
- Typ
- Instrukcja obsługi
- Niniejsza instrukcja jest również odpowiednia dla
w innych językach
- English: Apollo AHD-121 User manual
Powiązane artykuły
-
Apollo AHD-102 Instrukcja obsługi
-
-
-
-
-
-
-