

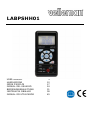
LABPSHH01
V. 04 – 10/03/2022 2 ©Velleman Group nv

LABPSHH01
V. 04 – 10/03/2022 3 ©Velleman Group nv
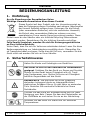
USER MANUAL
1. Introduction
To all residents of the European Union
Important environmental information about this product
This symbol on the device or the package indicates that disposal
of the device after its lifecycle could harm the environment. Do
not dispose of the unit (or batteries) as unsorted municipal
waste; it should be taken to a specialized company for recycling.
This device should be returned to your distributor or to a local
recycling service. Respect the local environmental rules.
If in doubt, contact your local waste disposal authorities.
Thank you for choosing Velleman! Please read the manual thoroughly before
bringing this device into service. If the device was damaged in transit, do
not install or use it and contact your dealer.
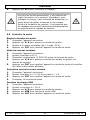
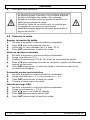
2. Safety Instructions
Keep this device away from children and unauthorized
users.
Indoor use only. Keep this device away from rain,
moisture, splashing and dripping liquids. Never put objects
filled with liquids on top of or close to the device.
DO NOT disassemble or open the cover under any
circumstances. Touching live wires can cause life-
threatening electroshocks. There are no user-serviceable
parts inside the device. Refer to an authorized dealer for
service and/or spare parts.
Always disconnect mains power when device not in use or
when servicing or maintenance activities are performed.
Handle the power cord by the plug only.
Keep this device away from dust and extreme
temperatures.
Protect this device from shocks and abuse. Avoid brute
force when operating the device.
Do not use the device when damage to housing or cables
is noticed. Do not attempt to service the device yourself
but contact an authorised dealer.

LABPSHH01
V. 04 – 10/03/2022 4 ©Velleman Group nv
3. General Guidelines
Refer to the Velleman® Service and Quality Warranty on the last pages
of this manual.
• Familiarise yourself with the functions of the device before actually
using it.
• All modifications of the device are forbidden for safety reasons. Damage
caused by user modifications to the device is not covered by the
warranty.
• Only use the device for its intended purpose. Using the device in an
unauthorised way will void the warranty.
• Damage caused by disregard of certain guidelines in this manual is not
covered by the warranty and the dealer will not accept responsibility for
any ensuing defects or problems.
• Keep this manual for future reference.
4. Features
• handheld DC switching power supply
• large LCD display for voltage and current
• compact and lightweight design
• adjustable from 0.3-30 V, up to 3.75 A with maximum continuous
power of 50 W
• works in constant voltage and current mode
• 2 built-in USB ports (2 x 2 A)
• short-circuit protection
• fuse-protected
• test leads not included
5. Quick Start
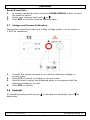
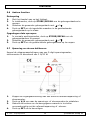
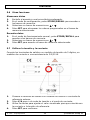
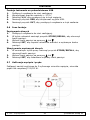
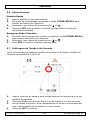
5.1 Overview
Refer to the illustrations on page 2 of this manual.
1
current setting
4
keypad
2
voltage setting
5
USB ports
3
measured value
6
DC outputs
5.2 Preparation
Connect the device to the mains to switch it on. The device will start the
self-check process.

LABPSHH01
V. 04 – 10/03/2022 5 ©Velleman Group nv
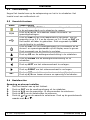
5.3 Keypad
key
description
Press the STORE/RECALL button to store/recall a pre-set
value to/from the memory bank.
V/A
Press V/A to switch between the current and voltage
measurements.
Press the USB button to enter the USB power-charging
mode. Adjust the voltage to 5.2 V and the current to 3 A.
Press the OUT button to use the device as power charger.
Press the USB button again to exit the function.
Press the OUT button to put the power supply in output
status and read the current and voltage values on the
display. Press again to exit the function.
Press the UP button to activate the backlight.
Press the DOWN button to deactivate the backlight.
Press the LEFT button to decrease the display contrast.
Press the RIGHT button to increase the display contrast.
SET
Press SET and adjust the values with the arrow keys. Press
V/A to switch between current and voltage.
5.4 Basic Operations
Voltage and Current Setting
1. Connect the device to the mains.
2. Press the OUT button to deactivate the output mode.
3. Press V/A to select the voltage or current mode.
4. Press the SET button to enter the setting mode.
5. Press or to select the digit, adjust the selected value with or .
6. Press SET to confirm your setting.
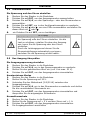
REMARK
It is possible to set the voltage or current once the
outputs are valid. However, for the protection of
the load, it is recommended to stop the output
before voltage or current setting.
Due to the total power limit, current settings might
be decreased automatically once the voltage
setting is increased.

LABPSHH01
V. 04 – 10/03/2022 6 ©Velleman Group nv
5.5 Checking the Output
Output Voltage Regulation
1. Connect the device to the mains.
2. Press V/A to switch to voltage mode.
3. Adjust to the desired value (from 1 to max. 30 V).
4. Press the OUT button to put the device in output mode.
Output Constant Current Mode
1. Connect the device to the mains.
2. Adjust the voltage to 30 V.
3. Connect the resistance (3 Ω/50 W) between the output terminals.
4. Press V/A to switch to current mode and adjust the various current
values.
5. Press the OUT button to put the device in output mode and check the
displayed current values.
Output Short-Circuit Protection
1. Connect the device to the mains.
2. Adjust the voltage to > 5 V and the current to > 1 A.
3. Press the OUT button to put the device in output mode.
4. Connect the output terminals
USB Charging Function
1. Connect the device to the mains.
2. Adjust the current to > 2.5 A.
3. Press V/A to switch to voltage mode.
4. Press the USB button to activate the USB output.
5. Press the OUT button to put the device in output mode.
5.6 Other Functions
Data Saving
1. Connect the device to the mains.
2. In setting mode, press the STORE/RECALL button to open the
memory banks.
3. Select your memory bank with or .
4. Press SET to save the set values into the selected memory bank.

LABPSHH01
V. 04 – 10/03/2022 7 ©Velleman Group nv
Recall Saved Data
1. In normal operating mode, press the STORE/RECALL button to open
the memory banks.
2. Select your memory bank with or .
3. Press SET to load the selected memory bank.
5.7 Voltage and Current Calibration
Connect the output terminals to a 5-digit voltage meter, current meter or
3 Ω/50 W resistance.
1. Connect the output terminal to an external reference voltage or
current meter.
2. Press V/A to switch to voltage or current mode.
3. Use the keys to adjust the displayed value to correspond with the
reference voltage or current.
4. Press SET to confirm.
5.8 Backlight
In normal operating mode, press to activate the backlight; press to
deactivate.

LABPSHH01
V. 04 – 10/03/2022 8 ©Velleman Group nv
6. Cleaning and Maintenance
• Disconnect the device from the mains prior to maintenance activities.
• The power supply cables must not show any damage. Have a qualified
technician maintain the device.
• Wipe the device regularly with a moist, lint-free cloth. Do not use
alcohol or solvents.
• There are no user-serviceable parts, apart from the fuse. Contact your
dealer for spare parts if necessary.
• Store the device in a dry, well-ventilated, dust-free room and keep it
clean. Remove the power plug if the device is to be stored for a
prolonged period of time.
7. Technical Specifications
input
voltage ..................................................... 220-240 V~, 50/60 Hz
current ............................................................................... 1 A
output
max. voltage ................................................................ 0.3-30 V
max. current ................................................................. 0-3.75 A
max. continuous power ....................................................... 50 W
line regulation (± % of output + offset)
voltage ....................................................... CV ≤ 0.01 % + 3 mV
current ....................................................... CC ≤ 0.01 % + 3 mA
load regulation (± % of output + offset)
voltage ....................................................... CV ≤ 0.02 % + 3 mV
current ....................................................... CC ≤ 0.02 % + 3 mA
measurement accuracy
voltage ........................................................................... 10 mV
current ............................................................................. 1 mA
measured value accuracy @ 25 °C (± % of output + offset)
voltage ........................................................... ≤ 0.05 % + 5 mV
current ........................................................... ≤ 0.05 % + 5 mA
measurement speed
voltage ....................................................................... 100 ms/s
current ....................................................................... 100 ms/s
setting value accuracy @ 25 °C (± % of output + offset)
voltage ........................................................... ≤ 0.05 % + 5 mV
current ........................................................... ≤ 0.05 % + 5 mA

LABPSHH01
V. 04 – 10/03/2022 9 ©Velleman Group nv
ripple and noise (20 Hz-20 MHz)
voltage ................................................ ≤ 10 mV rms/150 mV p-p
current ................................................ ≤ 10 mV rms/150 mV p-p
temperature coefficient @ 0-40 °C (± % of output + offset)
voltage ....................................................................... ≤ 0.05 %
current ........................................................................ ≤ 0.1 %
dimensions ............................................................... 185 x 88 x 38 mm
weight ...................................................................................... 370 g
power cable ............................ CEE 7/16 Euro plug type C to C7 connector
power cable length ................................................................... 1.20 m
Use this device with original accessories only. Velleman Group nv
cannot be held responsible in the event of damage or injury
resulting from (incorrect) use of this device. For more info
concerning this product and the latest version of this manual, please
visit our website www.velleman.eu. The information in this manual
is subject to change without prior notice.
© COPYRIGHT NOTICE
The copyright to this manual is owned by Velleman Group nv. All
worldwide rights reserved. No part of this manual may be copied,
reproduced, translated or reduced to any electronic medium or otherwise
without the prior written consent of the copyright holder.

LABPSHH01
V. 04 – 10/03/2022 10 ©Velleman Group nv
HANDLEIDING
1. Inleiding
Aan alle ingezetenen van de Europese Unie
Belangrijke milieu-informatie betreffende dit product
Dit symbool op het toestel of de verpakking geeft aan dat, als
het na zijn levenscyclus wordt weggeworpen, dit toestel schade
kan toebrengen aan het milieu. Gooi dit toestel (en eventuele
batterijen) niet bij het gewone huishoudelijke afval; het moet bij
een gespecialiseerd bedrijf terechtkomen voor recyclage. U
moet dit toestel naar uw verdeler of naar een lokaal
recyclagepunt brengen. Respecteer de plaatselijke milieuwetgeving.
Hebt u vragen, contacteer dan de plaatselijke autoriteiten
betreffende de verwijdering.
Dank u voor uw aankoop! Lees deze handleiding grondig door voor u het
toestel in gebruik neemt. Werd het toestel beschadigd tijdens het transport,
installeer het dan niet en raadpleeg uw dealer.
2. Veiligheidsvoorschriften
Houd dit toestel buiten het bereik van kinderen en
onbevoegden.
Gebruik het toestel enkel binnenshuis. Bescherm het
toestel tegen regen, vochtigheid en opspattende
vloeistoffen. Plaats nooit objecten gevuld met vloeistof op
of naast het toestel.
Demonteer of open dit toestel NOOIT. Raak geen
kabels aan die onder stroom staan om dodelijke
elektrische schokken te vermijden. Er zijn geen onderdelen
in het toestel die door de gebruiker gerepareerd kunnen
worden. Contacteer uw verdeler voor eventuele
reserveonderdelen.
Trek de stekker uit het stopcontact voordat u het toestel
reinigt of als u het niet gebruikt. Houd de voedingskabel
altijd vast bij de stekker en niet bij de kabel.
Bescherm tegen stof en extreme temperaturen.
Bescherm tegen schokken. Vermijd brute kracht tijdens de
bediening van het toestel.

LABPSHH01
V. 04 – 10/03/2022 11 ©Velleman Group nv
Gebruik het toestel niet indien de behuizing of de
bekabeling beschadigd is. Probeer in geen geval het
toestel zelf te repareren maar contacteer uw verdeler.
3. Algemene richtlijnen
Raadpleeg de Velleman® service- en kwaliteitsgarantie achteraan deze
handleiding.
• Leer eerst de functies van het toestel kennen voor u het gaat
gebruiken.
• Om veiligheidsredenen mag u geen wijzigingen aan het apparaat
aanbrengen. Schade door wijzigingen die de gebruiker heeft
aangebracht aan het toestel valt niet onder de garantie.
• Gebruik het toestel enkel waarvoor het gemaakt is. De garantie vervalt
automatisch bij ongeoorloofd gebruik.
• De garantie geldt niet voor schade door het negeren van bepaalde
richtlijnen in deze handleiding en uw dealer zal de verantwoordelijkheid
afwijzen voor defecten of problemen die hier rechtstreeks verband mee
houden.
• Bewaar deze handleiding voor verdere raadpleging.
4. Eigenschappen
• draagbare DC-schakelende voeding
• groot LCD-display voor spanning en stroom
• compact en discreet
• instelbaar van 0.3 V - 30 V, tot 3.75 A met max. continuvermogen van
50 W
• functioneert in constante spannings- of constante stroommodus
• met 2 ingebouwde USB-poorten (2 x 2 A)
• beveiligd tegen kortsluiting
• beveiligd door zekering
• meetsnoeren niet meegeleverd
5. Startmenu
5.1 Omschrijving
Raadpleeg de afbeeldingen op pagina 2 van deze handleiding.
1
stroominstelling
4
toetsen
2
spanningsinstelling
5
USB-poorten
3
meetwaarde
6
DC-uitgangen

LABPSHH01
V. 04 – 10/03/2022 12 ©Velleman Group nv
5.2 Voorbereiding
Koppel het toestel aan op de netspanning om het in te schakelen. Het
toestel voert een zelfcontrole uit.
5.3 Overzicht toetsen
toets
omschrijving
Druk op STORE/RECALL om een vooraf ingestelde waarde
in de geheugenbank op te slaan/op te roepen.
V/A
Druk op V/A om te schakelen tussen de stroom- en
spanningsmetingen.
Druk op USB om de USB-laadmodus te activeren. Stel de
spanning in op 5.2 V en de stroom op 3 A. Druk op OUT om
het toestel als lader te gebruiken. Druk nogmaals op USB
om de functie te verlaten.
Druk op OUT om de voedingsuitgang in te schakelen en de
stroom- en spanningswaarden op de display weer te geven.
Druk nogmaals om de functie te verlaten.
Druk op UP om de achtergrondverlichting in te schakelen.
Druk op DOWN om de achtergrondverlichting uit te
schakelen.
Druk op LEFT om het schermcontrast te verlagen.
Druk op RIGHT om het schermcontrast te verhogen.
SET
Druk op SET en stel de waarden in met de pijltjestoetsen.
Druk op V/A om tussen stroom en spanning te schakelen.
5.4 Basisfuncties
Spanning en stroom instellen
1. Sluit het toestel aan op het lichtnet.
2. Druk op OUT om de voedingsuitgang uit te schakelen.
3. Druk op V/A om de spannings- of stroommodus te selecteren.
4. Druk op SET om de instelmodus te activeren.
5. Druk op of om de waarde te selecteren. Druk op de geselecteerde
waarde met of .

LABPSHH01
V. 04 – 10/03/2022 13 ©Velleman Group nv
6. Druk op SET om de instelling te bevestigen.
OPMERKING
De spanning of stroom is instelbaar na het
inschakelen van de voedingsuitgangen. Om de
belasting te beschermen, is het aanbevolen om de
voedingsuitgang uit te schakelen voor de
spanning- of stroominstelling.
Door de stroombegrenzing kunnen de
stroominstellingen automatisch verlaagd worden,
als u de spanning hoger wilt instellen.
5.5 De uitgang controleren
De uitgangsspanning regelen
1. Sluit het toestel aan op het lichtnet.
2. Druk op V/A om naar de spanningsmodus te schakelen.
3. Stel de gewenste waarde in (1 tot max. 30 V).
4. Druk op OUT om de voedingsuitgang in te schakelen.
Constante stroommodus
1. Sluit het toestel aan op het lichtnet.
2. Stel de spanning in op 30 V.
3. Verbind de weerstand (3 Ω/50 W) tussen de uitgangsaansluitingen.
4. Druk op V/A om naar de stroommodus te schakelen en de
verschillende stroomwaarden in te stellen.
5. Druk op OUT om de voedingsuitgang in te schakelen en de controleer
de weergegeven stroomwaarden.
Kortsluitbeveiliging op de uitgang
1. Sluit het toestel aan op het lichtnet.
2. Stel de spanning in op > 5 V en de stroom op > 1 A.
3. Druk op OUT om de voedingsuitgang in te schakelen.
4. Verbind de uitgangsaansluitingen.
USB-laadfunctie
1. Sluit het toestel aan op het lichtnet.
2. Stel de stroom in op > 2.5 A.
3. Druk op V/A om naar de spanningsmodus te schakelen.
4. Druk op USB om de USB-uitgang te activeren.
5. Druk op OUT om de voedingsmodus in te schakelen.

LABPSHH01
V. 04 – 10/03/2022 14 ©Velleman Group nv
5.6 Andere functies
Dataopslag
1. Sluit het toestel aan op het lichtnet.
2. In instelmodus, druk op STORE/RECALL om de geheugenbanken te
openen.
3. Selecteer de gewenste geheugenbank met of .
4. Druk op SET om de ingestelde waarden in de geselecteerde
geheugenbank op te slaan.
Opgeslagen data oproepen
1. In normale werkingsmodus, druk op STORE/RECALL om de
geheugenbanken te openen.
2. Selecteer de gewenste geheugenbank met of .
3. Druk op SET om de geselecteerde geheugenbank op te roepen.
5.7 Spanning en stroom kalibreren
Koppel de uitgangsaansluitingen aan een 5-digit spanningsmeter,
stroommeter of weerstand van 3 Ω/50 W.
1. Koppel de uitgangsaansluiting aan een externe referentiespanning of
stroommeter.
2. Druk op V/A om naar de spannings- of stroommodus te schakelen.
3. Gebruik de toetsen om de weergegeven waarde in te stellen
overeenkomstig met de referentiespanning of -stroom.
4. Druk op SET om te bevestigen.

LABPSHH01
V. 04 – 10/03/2022 15 ©Velleman Group nv
5.8 Achtergrondverlichting
In normale werkingsmodus, druk op om de achtergrondverlichting in te
schakelen. Druk op om uit te schakelen.
6. Reiniging en onderhoud
• Ontkoppel het toestel van het lichtnet voor u aan
onderhoudswerkzaamheden begint.
• De voedingskabels mogen niet beschadigd zijn. Laat het toestel
onderhouden door een geschoolde technicus.
• Maak het toestel geregeld schoon met een vochtige, niet pluizende
doek. Gebruik geen alcohol of solventen.
• De gebruiker mag geen onderdelen vervangen, behalve de zekering.
Bestel eventuele reserveonderdelen bij uw dealer.
• Bewaar het apparaat op een droge, geventileerde, stofvrije ruimte en
houd het schoon. Ontkoppel de voedingskabel indien het apparaat
gedurende langere tijd niet gebruikt wordt.
7. Technische specificaties
ingang
spanning ................................................... 220-240 V~, 50/60 Hz
stroom ................................................................................ 1 A
uitgang
max. spanning .............................................................. 0.3-30 V
max. stroom ................................................................. 0-3.75 A
max. continuvermogen ........................................................ 50 W
lijnregulatie (± % uitgang + offset)
spanning ..................................................... CV ≤ 0.01 % + 3 mV
stroom ........................................................ CC ≤ 0.01 % + 3 mA
lastregulatie (± % uitgang + offset)
spanning ..................................................... CV ≤ 0.02 % + 3 mV
stroom ........................................................ CC ≤ 0.02 % + 3 mA
meetnauwkeurigheid
spanning ......................................................................... 10 mV
stroom .............................................................................. 1 mA
nauwkeurigheid van de meetwaarde @ 25 °C (± % uitgang + offset)
spanning ......................................................... ≤ 0.05 % + 5 mV
stroom ............................................................ ≤ 0.05 % + 5 mA
meetsnelheid
spanning ..................................................................... 100 ms/s
stroom ........................................................................ 100 ms/s
nauwkeurigheid van de instelwaarde @ 25 °C (± % uitgang + offset)
spanning ......................................................... ≤ 0.05 % + 5 mV
stroom ............................................................ ≤ 0.05 % + 5 mA

LABPSHH01
V. 04 – 10/03/2022 16 ©Velleman Group nv
rimpel en ruis (20 Hz - 20 MHz)
spanning .............................................. ≤ 10 mV rms/150 mV p-p
stroom ................................................. ≤ 10 mV rms/150 mV p-p
temperatuurcoëfficiënt @ 40 °C (± % uitgang + offset)
spanning ..................................................................... ≤ 0.05 %
stroom ......................................................................... ≤ 0.1 %
afmetingen ............................................................... 185 x 88 x 38 mm
gewicht ...................................................................................... 370g
voedingskabel ..................... CEE 7/16-eurostekker type C naar C7-stekker
kabellengte ............................................................................. 1.20 m
Gebruik dit toestel enkel met originele accessoires. Velleman Group
nv is niet aansprakelijk voor schade of kwetsuren bij (verkeerd)
gebruik van dit toestel. Voor meer informatie over dit product en de
laatste versie van deze handleiding, zie www.velleman.eu. De
informatie in deze handleiding kan te allen tijde worden gewijzigd
zonder voorafgaande kennisgeving.
© AUTEURSRECHT
Velleman Group nv heeft het auteursrecht voor deze handleiding.
Alle wereldwijde rechten voorbehouden. Het is niet toegestaan om
deze handleiding of gedeelten ervan over te nemen, te kopiëren, te
vertalen, te bewerken en op te slaan op een elektronisch medium zonder
voorafgaande schriftelijke toestemming van de rechthebbende.

LABPSHH01
V. 04 – 10/03/2022 17 ©Velleman Group nv
MODE D'EMPLOI
1. Introduction
Aux résidents de l'Union européenne
Informations environnementales importantes concernant ce produit
Ce symbole sur l'appareil ou l'emballage indique que
l’élimination d’un appareil en fin de vie peut polluer
l'environnement. Ne pas jeter un appareil électrique ou
électronique (et des piles éventuelles) parmi les déchets
municipaux non sujets au tri sélectif ; une déchetterie traitera
l’appareil en question. Renvoyer l'appareil à votre fournisseur ou
à un service de recyclage local. Il convient de respecter la réglementation
locale relative à la protection de l’environnement.
En cas de questions, contacter les autorités locales pour élimination.
Nous vous remercions de votre achat ; Lire attentivement le présent mode
d'emploi avant la mise en service de l’appareil. Si l'appareil a été
endommagé pendant le transport, ne pas l’installer et consulter votre
revendeur.
2. Consignes de sécurité
Garder l'appareil hors de la portée des enfants et des
personnes non autorisées.
Utiliser cet appareil uniquement à l'intérieur.
Protéger l'appareil de la pluie, de l'humidité,
d'éclaboussures et des projections d’eau. Ne jamais placer
d’objets contenant du liquide sur ou près de l’appareil.
NE JAMAIS désassembler ni ouvrir le boîtier. Toucher un
câble sous tension peut causer des électrochocs mortels. Il
n’y a aucune pièce réparable par l’utilisateur dans
l'appareil. Commander des pièces de rechange éventuelles
chez votre revendeur.
Toujours déconnecter l’appareil s’il n’est pas utilisé et
avant le nettoyage ou l'entretien. Tirer sur la fiche pour
débrancher l'appareil ; non pas le câble.
Protéger contre la poussière et les températures extrêmes.
Protéger l’appareil des chocs et de l'abus. Traiter l'appareil
avec circonspection pendant l’opération.

LABPSHH01
V. 04 – 10/03/2022 18 ©Velleman Group nv
Ne pas utiliser l'appareil si le boîtier ou le câblage sont
endommagés. Ne pas essayer de réparer l'appareil soi-
même, contacter votre revendeur.
3. Directives générales
Se référer à la garantie de service et de qualité Velleman® en fin de ce
mode d'emploi.
• Se familiariser avec le fonctionnement de l'appareil avant de l'utiliser.
• Toute modification est interdite pour des raisons de sécurité. Les
dommages occasionnés par des modifications par le client ne tombent
pas sous la garantie.
• N’utiliser l'appareil qu’à sa fonction prévue. Un usage impropre annule
d'office la garantie.
• La garantie ne se s’applique pas aux dommages survenus en négligeant
certaines directives de ce mode d'emploi et votre revendeur déclinera
toute responsabilité pour les problèmes et les défauts qui en résultent.
• Garder ce mode d'emploi pour toute référence ultérieure.
4. Caractéristiques
• source d'alimentation à découpage CC portable
• large afficheur LCD pour la tension et le courant
• compact et léger
• réglable de 0.3 V - 30 V, jusqu'à 3.75 A avec puissance continue max.
de 50 W
• fonctionne en mode de tension constante et courant constant
• avec 2 ports USB intégrés (2 x 2 A)
• protection contre les courts-circuits
• protégée par fusible
• cordons de mesure non inclus
5. Démarrage rapide
5.1 Description
Se référer aux illustrations en page 2 de ce mode d'emploi.
1
réglage de courant
4
pavé
2
réglage de tension
5
ports USB
3
valeur de mesure
6
sorties CC

LABPSHH01
V. 04 – 10/03/2022 19 ©Velleman Group nv
5.2 Préparations
Connecter l'appareil au réseau électrique pour l'allumer. L'appareil lance
l'autocontrôle.
5.3 Pavé
touche
description
Appuyer sur STORE/RECALL pour sauvegarder en
mémoire une valeur préréglée ou de la rappeler.
V/A
Appuyer sur V/A pour commuter entre les mesures de
courant et de tension.
Appuyer sur USB pour activer le mode de charge USB.
Ajuster la tension à 5.2 V et le courant à 3 A. Appuyer sur
OUT pour utiliser l'appareil comme chargeur. Appuyer à
nouveau sur USB pour quitter la fonction.
Appuyer sur OUT pour activer la sortie d'alimentation et
pour lire les valeurs de courant et de tension affichées.
Appuyer à nouveau pour quitter la fonction.
Appuyer sur UP pour activer le rétroéclairage.
Appuyer sur DOWN pour désactiver le rétroéclairage.
Appuyer sur LEFT pour diminuer le contraste de l'affichage.
Appuyer sur RIGHT pour augmenter le contraste de
l'affichage.
SET
Appuyer sur SET et ajuster les valeurs avec les boutons
fléchés. Appuyer sur V/A pour commuter entre courant et
tension.
5.4 Fonctions de base
Régler la tension et le courant
1. Connecter l'appareil au secteur.
2. Appuyer sur OUT pour désactiver la sortie d'alimentation.
3. Appuyer sur V/A pour sélectionner le mode de tension ou le mode de
courant.
4. Appuyer sur SET pour activer le mode de configuration.
5. Appuyer sur ou pour sélectionner la valeur. Ajuster la valeur
sélectionnée avec ou .

LABPSHH01
V. 04 – 10/03/2022 20 ©Velleman Group nv
6. Appuyer sur SET pour confirmer le réglage.
REMARQUE
Une fois les sorties désactivées, il est possible de
régler la tension ou le courant. Cependant, pour
protéger la charge, il est conseillé de désactiver la
sortie avant de régler la tension ou le courant.
Suite à la limitation de courant, il est possible que
les réglages de courant baissent automatiquement
en augmentant le réglage de tension.
5.5 Contrôler la sortie
Régler la tension de sortie
1. Connecter l'appareil au secteur.
2. Appuyer sur V/A pour passer en mode de tension.
3. Ajuster à la valeur souhaitée (de 1 à max. 30 V).
4. Appuyer sur OUT pour mettre l'appareil en mode de sortie.
Mode de courant constant
1. Connecter l'appareil au secteur.
2. Ajuster la tension à 30 V.
3. Connecter la résistance (3 Ω/50 W) entre les bornes de sortie.
4. Appuyer sur V/A pour passer en mode de courant et ajuster les
valeurs de courant.
5. Appuyer sur OUT pour mettre l'appareil en mode de sortie et contrôler
les valeurs de courant affichées.
Protection contre les court-circuits
1. Connecter l'appareil au secteur.
2. Ajuster la tension à > 5 V et le courant à > 1 A.
3. Appuyer sur OUT pour mettre l'appareil en mode de sortie.
4. Connecter les bornes de sortie
Fonction de charge USB
1. Connecter l'appareil au secteur.
2. Ajuster le courant à > 2.5 A.
3. Appuyer sur V/A pour passer en mode de tension.
4. Appuyer sur USB pour activer la sortie USB.
5. Appuyer sur OUT pour mettre l'appareil en mode de sortie.
Strona się ładuje...
Strona się ładuje...
Strona się ładuje...
Strona się ładuje...
Strona się ładuje...
Strona się ładuje...
Strona się ładuje...
Strona się ładuje...
Strona się ładuje...
Strona się ładuje...
Strona się ładuje...
Strona się ładuje...
Strona się ładuje...
Strona się ładuje...
Strona się ładuje...
Strona się ładuje...
Strona się ładuje...
Strona się ładuje...
Strona się ładuje...
Strona się ładuje...
Strona się ładuje...
Strona się ładuje...
Strona się ładuje...
Strona się ładuje...
Strona się ładuje...
Strona się ładuje...
Strona się ładuje...
Strona się ładuje...
Strona się ładuje...
Strona się ładuje...
Strona się ładuje...
Strona się ładuje...
Strona się ładuje...
Strona się ładuje...
Strona się ładuje...
-
 1
1
-
 2
2
-
 3
3
-
 4
4
-
 5
5
-
 6
6
-
 7
7
-
 8
8
-
 9
9
-
 10
10
-
 11
11
-
 12
12
-
 13
13
-
 14
14
-
 15
15
-
 16
16
-
 17
17
-
 18
18
-
 19
19
-
 20
20
-
 21
21
-
 22
22
-
 23
23
-
 24
24
-
 25
25
-
 26
26
-
 27
27
-
 28
28
-
 29
29
-
 30
30
-
 31
31
-
 32
32
-
 33
33
-
 34
34
-
 35
35
-
 36
36
-
 37
37
-
 38
38
-
 39
39
-
 40
40
-
 41
41
-
 42
42
-
 43
43
-
 44
44
-
 45
45
-
 46
46
-
 47
47
-
 48
48
-
 49
49
-
 50
50
-
 51
51
-
 52
52
-
 53
53
-
 54
54
-
 55
55


w innych językach
- español: Velleman LABPSHH01 Manual de usuario
- Deutsch: Velleman LABPSHH01 Benutzerhandbuch
- português: Velleman LABPSHH01 Manual do usuário
- français: Velleman LABPSHH01 Manuel utilisateur
- Nederlands: Velleman LABPSHH01 Handleiding
Powiązane artykuły
-
Velleman LABPS3005D Instrukcja obsługi
-
-
-
Velleman EMDIN03 Instrukcja obsługi
-
Velleman LABPS3005N Instrukcja obsługi
-
Velleman LABPS3005NDC Instrukcja obsługi
-
Velleman KSR10-USBN Instrukcja obsługi
-
AVTech - Velleman CCTVPROM16 Instrukcja obsługi
-
-
Velleman DVM898 Instrukcja obsługi
