Sharp sj f800 sp sl Instrukcja obsługi
- Kategoria
- Lodówko-zamrażarki
- Typ
- Instrukcja obsługi
Niniejsza instrukcja jest również odpowiednia dla

REFRIGERATOR-FREEZER
OPERATION MANUAL . . . . . . . . . . . . . . . . 2
FRIGORIFICO-CONGELADOR
MANUAL DE MANEJO . . . . . . . . . . . . . . . 11
FRIGORIFERO-FREEZER
MANUALE DI ISTRUZIONI . . . . . . . . . . . . .20
REFRIGERATEUR-CONGELATEUR
MODE D'EMPLOI . . . . . . . . . . . . . . . . . . . .29
FRIGORÍFICO-CONGELADOR
FUNCIONAMENTO MANUAL. . . . . . . . . . .38
ΨΥΓΕΙΟ - ΚΑΤΑΨΥΚΤΗΖ
ΕΓΧΕΙΡ’ΙΔΙ
Ο ΛΕΙΤΟΥΡΓΙΚ’ΩΝ ΟΔΗΓΙ’ΩΝ
. .47
KÜHLSCHRANK MIT TIEFKÜHLFACH
BEDIENUNGSANLEITUNG . . . . . . . . . . . .56
KOELKAST-VRIEZER
GEBRUIKSAANWIJZING . . . . . . . . . . . . . .65
CHŁODZIARKO - ZAMRAŻA
RKA
INSTRUKCJA OBSŁUGI
. . . . . . . . . . . . . .74
HŰTŐSZEKRÉNY
-FAGYASZTÓ
HASZNÁLATI UTASÍTÁS . . . . . . . . . . . . . .83
FRIGIDER-CONGELATOR
MANUAL DE UTILIZARE . . . . . . . . . . . . . .92
CHLADNIČKA-MRAZÁK
NÁVOD K OBSLUZE . . . . . . . . . . . . . . . .101
CHLADNIČKA-MRAZNIČKA
NÁVOD NA OBSLUHU . . . . . . . . . . . . . . . 110
ŠALDYTUVAS - ŠALDIKLIS
EKSPLOATAVIMO INSTRUKCIJA . . . . . . 119
LEDUSSKAPIS – SALDĒTĀJKAMERA
ROKASGRĀMA
TA . . . . . . . . . . . . . . . . . . 128
KÜLMIK-SÜGAVKÜLMIK
KASUTUSJUHEND . . . . . . . . . . . . . . . . . .137
HLADILNIK-ZAMRZOVALNIK
PRIROČNIK Z NAVODILI ZA DELOVANJE
. .146
ХОЛОДИЛЬНИК-МОР
ОЗИЛЬНИК
ІНСТРУКЦІЯ З Е
КСПЛУАТАЦІЇ . . . . . . . .155
ХЛАДИЛНИК – ФРИ
ЗЕР
РЪКОВОДСТВО ЗА РА
БОТА . . . . . . . . .164
• Household use only • Free standing type
• Sólo para uso tidomésco •
De estructura independiente
• Solo per uso domestico • Libera installazione
• Usage domestique • Produit pose libre
•
Apenas para uso doméstico
• Tipo isolado
• Οικιακή χρήση μόνο • Μη σταθερού τύπου
•
Nur für den Haushaltsgebrauch
• Freistehender Typ
•
Enkel voor huishoudelijk gebruik
• Vrijstaand type
•
Tylko do użytku domowego
• Typ wolnostojący
•
Kizárólag háztartási használatra
• Szabadon álló típus
• Doar pentru uz casnic • Tip stabil neancorat
•
Pouze pro použití v domácnostech
• Volně stojící provedení
•
Len na používanie v domácnosti
• Voľne stojaci typ
• Tik namų ūkio naudojimui • Laisvai pastatomas
•
Tikai izmantošanai mājsaimniecībās
• Brīvi novietojams tips
•
Ainult majapidamises kasutamiseks
• Eraldi seisvat tüüpi
•
Le za gospodinjsko uporabo
• Samostojna postavitev
• Призначений лише для
домашнього користування
• Вільностоячий тип
• Да сvе използва само за
домакински цели
• Свободно (отделно) стоящ
тип
SJ-F800SP
Plasmacluster is a trademark
of SHARP Corporation
SJ-F750SP
SJ-F800SP
(A946)表1-3版.fm Page 1 Thursday, July 7, 2011 1:27 PM
Strona się ładuje...

3
GB
E
I
F
P
GR
D
NL
PL
H
RO
CZ
SK
LT
LV
EST
SLO
UA
BG
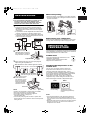
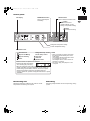
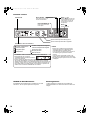
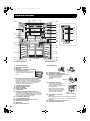
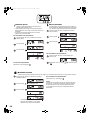
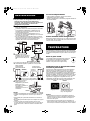
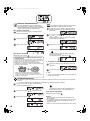
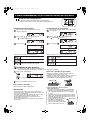
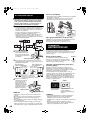
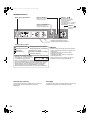
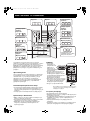
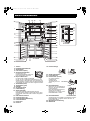
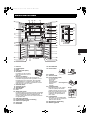
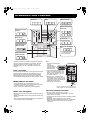
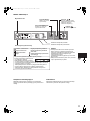
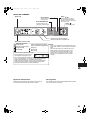
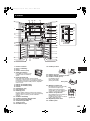
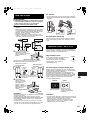
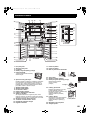
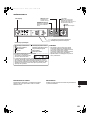
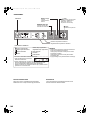
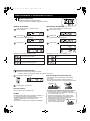
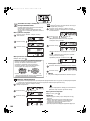
WARNING
■ Do not install the refrigerator in a damp or wet
location as this may cause damage to the
insulation and a leak. Condensation may also
build on the outer cabinet and cause rust.
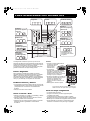
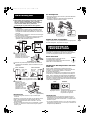
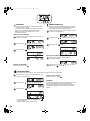
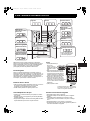
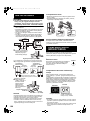
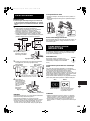
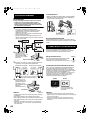
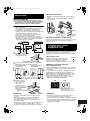
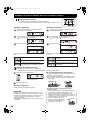
1
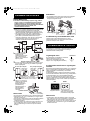
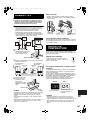
Keep adequate ventilation space around the refrigerator.
•
The figure shows the minimum required space for
installing the refrigerator. It differs from the space in
the measurement condition of the amount of power
consumption.
•
It is possible to use the refrigerator with a less amount
of power consumption by keeping greater space.
•
If using the refrigerator in the space below dimension
of the figure, it may cause the temperatures in the unit
to rise, loud noise, and failure.
2
Using the two front
adjustable feet, ensure that
the refrigerator is positioned
firmly and level on the floor.
3
When right and left doors are not properly aligned,
adjust using the adjustable feet.
4
Remove the 4 screws
of the cabinet lower
part, and then set the
foot cover (supplied
inside the refrigerator
compartment) with
removed 4 screws.
NOTE
• Position your refrigerator so that the plug is accessible.
• Keep your refrigerator out of direct sunlight.
• Do not place next to heat generating appliance.
• Do not place directly on the ground.
Provide suitable stand.
• To insert the power plug when the door is opened, door
alarm sounds but it is not abnormal. This sound stops when
closing the door.
When transporting
• Using the casters, it is possible to move back and forth.
• Carry the refrigerator by holding the handles located on
the rear and bottom.
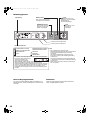
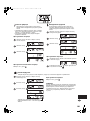
Before using your refrigerator
Clean the inside parts with a cloth soaked in warm water.
If soapy water is used, wipe it off thoroughly with water.
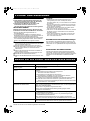
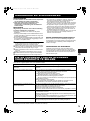
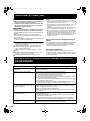
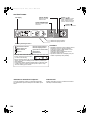
This refrigerator is provided with a indicator of temperature
in the refrigerator compartment to allow you to control the
average temperature in the coldest zone.
Coldest zone
The symbol indicates the coldest zone in the
refrigerator compartment.
(The door pocket positioned at the same
height isn’t the coldest zone.)
Checking the temperature in the
coldest zone
You can carry out regular checks to ensure the
temperature in the coldest zone is correct and, if
necessary, adjust the refrigerator temp. control.
To maintain a correct temperature inside the appliance,
check that the indicator of temperature is always BLUE.
If the indicator of temperature turns WHITE, the
temperature is too high; in this case, increase the
refrigerator temp. control setting and wait for 6 hours
before checking the indicator of temperature again.
NOTE
• The internal temperature of the refrigerator depends on
various factors such as the ambient temperature of the
room, the amount of food stored and the frequency of door
opening.
• When fresh food has been introduced or the door has been
left open for some time, it is normal for the indicator of
temperature to turn WHITE.
INSTALLATION
90mm
or more
60mm
or more
60mm
or more
1180 mm
1500 mm
60mm or more
Lower the right side. Lower the left side.
(Until the adjustable foot on the
other side is slightly off-ground.)
When the left door is raised. When the right door is raised.
Screw
(4 screws)
Casters
rear bottom
INDICATOR OF
TEMPERATURE
Symbol
BLUE
WHITE
Correct setting
Temperature too high,
adjust the refrigerator temp.
control.
Adjustable foot
Foot cover
(A946)02-10_Eng.fm Page 3 Sunday, December 21, 2008 4:07 PM

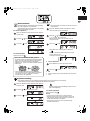
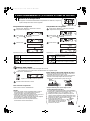
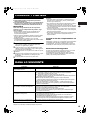
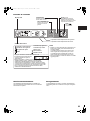
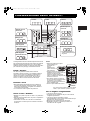
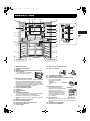
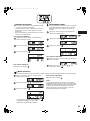
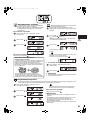
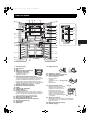
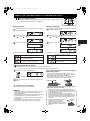
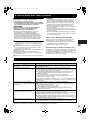
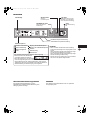
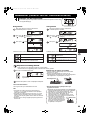
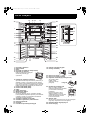
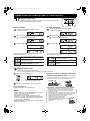
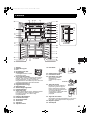
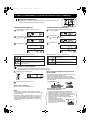
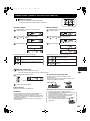
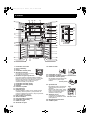
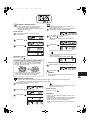
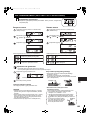
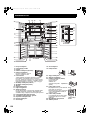
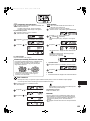
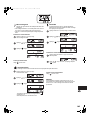
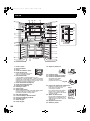
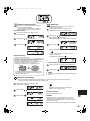
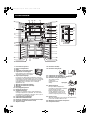
4
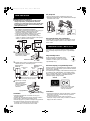
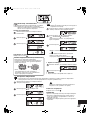
1. Door pocket
2. Refrigerator shelf
3. Shelf
4. Bottle pocket (left)
5. Vegetable crisper
The cover of the Vegetable crisper
opens as the case is pulled.
6. Quick ice maker
The bottom of the tray contains refrigerant material
used in ice packs to speed up the ice making process.
The tray can also be used to freeze small food items
such as meat and fruits by removing the ice making
partition.
7. Freezer case (small)
8. Freezer case (large)
9. Casters
10. Adjustable feet
11. Foot cover
12. Aluminum panel
The panel is cooled from the rear, thus indirectly cool-
ing the refrigerator compartment. In this way, food is
refrigerated gently, without exposing it to cold air flow.
13. Refrigerator LED light
14. Plasmacluster light
15. Utility pocket cover
16. Utility pocket
17. Egg holder
18. Egg pocket
19. Bottle rack
20. Fruit case
21. Fresh case
22. Bottle pocket (right)
To store large-size bottles,
move the partition all the
way back.
23. Ice cube maker
• Do not over fill the tray;
otherwise the ice cubes will be
joined together when frozen.
• When the ice cubes are made, turn
the lever clockwise to empty the ice
into the Ice cube box.
24. Ice cube box
To prevent damage to the Ice cube
box, do not make ice in the Ice cube
box or pour oil into it.
25. Magnetic door seal
26. Control panel
DESCRIPTION
25
13 12 14 13
25
15
1
17
18
19
20
22
21
26
23
24
7
8
25
9
10
1
2
3
4
5
6
7
8
25
9
10
11
16
15
16
1
22
17
SJ-F800SP
SJ-F750SP
Partition
Lever
Ice cube box
(A946)02-10_Eng.fm Page 4 Sunday, December 21, 2008 4:07 PM

5
GB
E
I
F
P
GR
D
NL
PL
H
RO
CZ
SK
LT
LV
EST
SLO
UA
BG
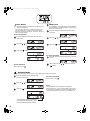
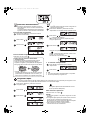
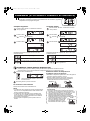
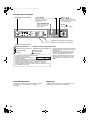
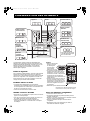
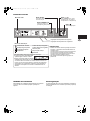
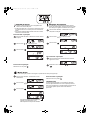
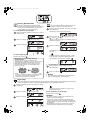
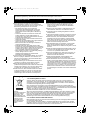
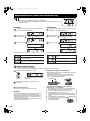
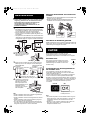
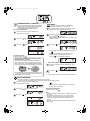
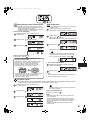
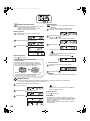
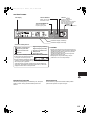
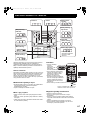
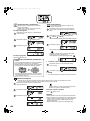
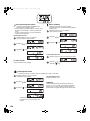
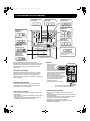
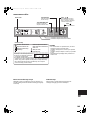
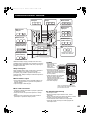
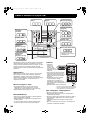
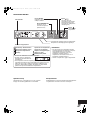
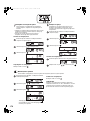
Control panel
Deodorizing unit
Deodorizing catalyst is installed on the routes of cold air.
No operation and cleaning are required.
Defrosting
Defrosting is fully automatic due to a unique energy saving
system.
ḥ
SELECT
EXPRESS
ICE
LCD display
button
button
Finalizes the setting.
SELECT button
Press to select the Feature mark.
Plasmacluster
Express Ice Making
Express Freezing
Timer
• Features that start automatically
when inserting the power plug.
NOTE
• When no operation is made for 30 seconds,
the display will automatically return to the
initial content.
The backlight will become dark when there
is no operation for 3 minutes.
The backlight will turn off when there is no
operation for 6 minutes.
• Do not hit or apply sharp object on to the
LCD panel.
Refrigerator temperature setting
Freezer temperature setting
Each feature mark
Use to turn the select.
(Feature ON/OFF, or timer
setting, or temperature setting)
• Marks of features in operation are displayed.
EXPRESS ICE button
Press to start Express
Ice Making.
Refrigerator temp. control
Freezer temp. control
Door alarm
Child lock
Vacation mode
• When the refrigerator stops with power failure and the like,
display at the time of re-power distribution shows similarly as
before having a power failure. However, when it has a power
failure during operation of Express Ice Making, Express
Freezing, and Timer, operation is stopped at the time of re-power
distribution.
(A946)02-10_Eng.fm Page 5 Sunday, December 21, 2008 4:07 PM

6
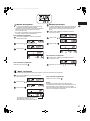
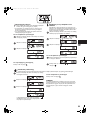
Controlling Temperature
The refrigerator controls its temperature automatically.
However, if needed, adjust the temperature as follows.
Express Ice Making
Ice cubes can be made quicker than normal.
• This feature cannot be used simultaneously with Express Freezing.
Press the "EXPRESS ICE" button.
The mark appears and operation starts.
When the ice is completed, remove the ice.
To cancel operation
Press the "EXPRESS ICE" button again.
NOTE
• Express Ice Making ends automatically in about 1 hour
regardless of ice condition. (The mark disappears.)
• Express Ice Making may require more than
1 hour
in the
case operation overlaps with defrosting as operation is
started after defrosting is completed.
• Avoid opening the door as much as possible during
operation of this feature.
How to use the Quick ice maker
• Cool the Quick ice maker beforehand in the freezer
(for at least 1 day).
• When the ice cubes are made, remove the partition from
the tray, after that twist the both ends of the partition and
drop the ice.
• Standard time until the ice is completed :
approx. 20 minutes
•
When using the water stored in the refrigerator
compartment, at a room temperature of 30°C and with
the refrigerator set to 3°C and the freezer to -18°C.
• Ice making time may become longer than above
description depending upon room temperature and
water temperature and the opening and closing
frequency of the door etc.
• Ice making cannot be completed
in approx. 20 minutes if pouring
the water exceeding the water
level line. Also it becomes difficult
to remove the ice.
OPERATION
(USING THE CONTROL PANEL)
Refrigerator compartment
Press the "SELECT" button and select the
"Refrigerator temp." mark.
Press the / button and set the temperature.
[ : increase, : decrease ]
Press the " " button.
Adjustable between 0°C and 6°C in steps of 0.5°C.
When the refrigerator provides excessive
cooling.
For normal operation.
For keeping foods fresher tasting. When the
refrigerator does not provide sufficient cooling.
Freezer compartment
Press the "SELECT" button and select the
"Freezer temp." mark.
Press the / button and set
the temperature.
[ : increase, : decrease ]
Press the " " button.
Adjustable between -13°C and -21°C in steps of 0.5°C.
For normal freezing.
When frozen food or ice cream is not
stored.
For making ice rapidly or fast freezing.
Partition
Water level
(A946)02-10_Eng.fm Page 6 Sunday, December 21, 2008 4:07 PM

7
GB
E
I
F
P
GR
D
NL
PL
H
RO
CZ
SK
LT
LV
EST
SLO
UA
BG
Plasmacluster
The plasmacluster automatically starts operating
when the refrigerator is powered on.
Plasmacluster light of the refrigerator compartment
lights up blue during operation.
To cancel operation
Press the "SELECT" button and select the "Plasma-
cluster" mark.
Press the / button and
select "OFF".
Press the " " button.
To start operation
Select "ON" in step .
Notes about PLASMACLUSTER operation
The ionizer inside your refrigerator releases clusters
of ions, which are collective masses of positive and
negative ions, into the freezer and refrigerator
compartments. These ion clusters inactivate airborne
mold fungus.
• There may be a slight odors in the refrigerator.
This is the smell of ozone generated by the ionizer.
The amount of ozone is minimal, and quickly
decomposes in the refrigerator.
mold
fungus
Timer
Up to 99 minutes 30 seconds can be set in interval
of 30 seconds.
Press the "SELECT" button and select the "Timer"
mark. Previous set time is displayed.
Press the / button and
set the time.
[ : increase, : decrease ]
Push the button continuously, the setting can be
configured quickly.
Press the " " button.
Timer starts. The remaining time is displayed.
When the set time is reached, the end tone will
sound. (About 30 sec.)
To stop the end tone, press " ".
To cancel the timer
Press "SELECT" to select the "Timer" mark.
Press the " " button.
NOTE
During Timer operating it is not possible for the second time to
set Timer.
Express Freezing
High-quality frozen foods can be made using this feature and is convenient for home-freezing.
• This feature cannot be used simultaneously with Express Ice Making.
Press the "SELECT" button and select the "Express
freezing" mark.
Press the / button and
select "ON".
Press the " " button.
Express Freezing ends automatically in about 2 hours.
(The mark disappears.)
To cancel operation
Select "OFF" in step .
NOTE
• Large foods cannot be frozen in a single operation.
• Express Freezing may require more than 2 hours in the
case operation overlaps with defrosting as operation is
started after defrosting is completed.
• Avoid opening the door as much as possible during
operation of this feature.
(A946)02-10_Eng.fm Page 7 Sunday, December 21, 2008 4:07 PM

8
Door Alarm
When the refrigerator or freezer door is left open, the
door alarm will sound.
• The door alarm will sound 1 minute after opening the
door and again after 1 minute (once in each case).
• If the door is left open for approx. 3 minutes, the alarm
will sound continuously.
To cancel operation
Press the "SELECT" button and select the "Door
alarm" mark.
P
ress the / button and
select "OFF".
Press the " " button.
To start operation
Select "ON" in step .
Child Lock
Key operations of the control panel can be disabled.
Use this feature to prevent children or someone from
tampering with the panel.
Press the "SELECT" button and select the "Child
lock" mark.
P
ress the / button and
select "ON".
Press the " " button.
To cancel operation
Press the "SELECT" button continuously 2 seconds
or more.
Select "OFF" with
the / button
and press the
" " button.
Vacation Mode
Use this feature when going on a trip or leaving the house for a long time.
Press the "SELECT" button and select the
"Vacation mode" mark.
P
ress the / button and
select "ON".
Press the " " button.
To cancel operation
Select "OFF" in step .
NOTE
Food storage period in the refrigerator compartment
becomes approx.1/2 - 1/3 of normal operation, because the
temperature of the refrigerator compartment inside becomes
10°C. Please utilize only when there is no perishable food.
The temperature inside the refrigerator
compartment will be adjusted to 10°C.
This temperature cannot be modified.
(A946)02-10_Eng.fm Page 8 Sunday, December 21, 2008 4:07 PM

9
GB
E
I
F
P
GR
D
NL
PL
H
RO
CZ
SK
LT
LV
EST
SLO
UA
BG
Refrigeration reduces the rate of food spoilage.
To maximize the shelf life of perishable food products,
ensure that the food is the freshest possible quality.
The following is a general guide to help promote longer
food storage.
Fruit / Vegetables
To minimize moisture loss, fruit and vegetables should be
loosely enclosed in a plastic material e.g. wrap, bags (do
not seal) and place in the Vegetable crisper or the Fruit
case. Those fruits and vegetables with thick skins e.g.
oranges do not require wrapping.
Dairy Products & Eggs
• Most dairy products have a use by date on the outer
packaging which informs the recommended temperature
and shelf life of the product.
• Eggs should be stored in the Egg holder.
Meats / Fish / Poultry
• Place on a plate or dish and cover with paper or plastic
wrap.
• For larger cuts of meat, fish, or poultry, place to the rear
of the shelves.
• Ensure all cooked food is wrapped securely or placed in
an airtight container.
NOTE
• Evenly place the food on
the shelves to allow
the cooling air to
circulate
efficiently.
• Hot foods should be
cooled before storing. Storing hot
foods increases the temperature in
the unit and increases the risk of food
spoilage.
• Do not block the outlet and inlet of the
cool air circulating circuit with foods or
containers; otherwise the foods will
not be evenly cooled throughout the
refrigerator.
• Keep the door securely closed.
Do not place food directly in front of cold air
outlet. This may lead to the food freezing.
For best freezing
• Quality of foods should be fresh.
• Freeze small quantities of food at a time to freeze them
quickly.
• Food should be properly stored or covered and the air
should be removed to seal tightly.
• Evenly place the food in the freezer.
• Label bags or containers to keep an inventory of freezing
food.
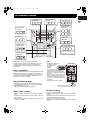
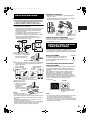
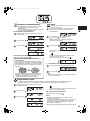
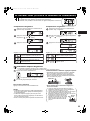
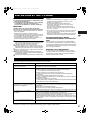
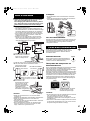
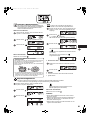
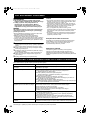
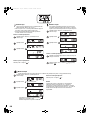
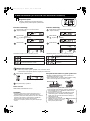
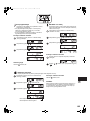
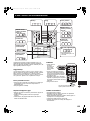
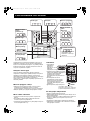
STORING FOOD
Meat, Fish, Poultry etc.
Vegetables are improper
in this case. They may
be frozen.
Bottles etc.
Bottles etc.
(Big size)
Small foods
Eggs etc.
Dairy products
FruitsVegetables
Juice etc.
Small foods
Frozen foods
(Small size)
Frozen foods
(Big size)
IN
OUT
(A946)02-10_Eng.fm Page 9 Sunday, December 21, 2008 4:07 PM
Strona się ładuje...
Strona się ładuje...
Strona się ładuje...

13
1. Compartimiento de la puerta
2. Estantería del frigorífico
3. Estante
4. Compartimiento para botellas
(izquierdo)
5. Gaveta para Vegetales
La tapa de la gaveta para
vegetales se abre al tirar del
compartimiento.
6. Generador rápido de hielos
La parte inferior de la bandeja contiene material
refrigerante que se utiliza en los paquetes para hacer
hielo para acelerar el proceso de hacer hielo. La
bandeja también se puede utilizar para congelar
alimentos pequeños tales como carne y frutas
quitando primero la pieza divisoria.
7. Compartimiento del congelador (pequeño)
8. Compartimiento del congelador (grande)
9. Ruedecillas
10. Pies ajustables
11. Cubierta de protección inferior
12. Panel de aluminio
El panel se enfría por la parte de atrás, enfriando así
de forma indirecta el compartimiento refrigerador. De
esta forma, los alimentos se congelan suavemente,
sin exponerlos a la corriente de aire frío.
13. Luz del LED del frigorífico
14. Luz del ionizador Plasmacluster
15. Tapa del compartimiento de usos múltiples
16. Compartmiento de usos multiples
17. Huevera
18. Bandeja huevera
19. Botellero
20. Compartimiento de la fruta
21. Compartimiento de frescos
22. Compartimiento para botellas (derecho)
Para meter botellas de
tamaño grande, mueva la
pieza divisoria
completamente hacia
atrás.
23. Dispositivo para hacer cubitos de hielo
• No llene excesivamente la bandeja;
de lo contrario los cubitos de hielo
quedarían pegados al congelarse.
• Cuando estén hechos los cubitos,
gire la palanca en el sentido horario
para vaciarlos en la cubitera.
24. Cubitera
No haga hielo con la cubitera ni
vierta aceite en ella pues ésta
puede agrietarse.
25. Cierre magnético de la puerta
26. Panel de control
DESCRIPCION
25
13 12 14 13
25
15
1
17
18
19
20
22
21
26
23
24
7
8
25
9
10
1
2
3
4
5
6
7
8
25
9
10
11
16
15
16
1
22
17
SJ-F800SP
SJ-F750SP
Pieza
divisoria
Palanca
Cubitera
(A946)11-19_Spa.fm Page 13 Thursday, January 8, 2009 1:57 PM
Strona się ładuje...

15
Control de la temperatura
El frigorífico controla automáticamente la temperatura. No obstante, si es preciso,
ajuste la temperatura de la manera siguiente.
Hacer hielo rápido
Los cubitos de hielo se pueden hacer más rápido de lo normal.
• Esta característica no se puede utilizar simultáneamente con Congelado rápido.
Pulse el botón “EXPRESS ICE”.
Cuando el hielo está hecho, retírelo.
Para cancelar la operación
Pulse de nuevo el botón “EXPRESS ICE”.
NOTAS
• Hacer hielo rápido, termina automáticamente al cabo de
aproximadamente 1 hora independientemente de la
condición del hielo. (El símbolo desaparece).
• Hacer hielo rápido puede que requiera más de 1 hora en el
caso de que la operación se sobreponga con la
descongelación en cuanto comienza la operación después
de que se haya completado el descongelado.
• Trate al máximo de no abrir la puerta durante el
funcionamiento de esta característica.
Cómo utilizar el Generador rápido de hielos
• Enfríe el generador rápido de hielos de ante mano en el
congelador (durante por lo menos 1 día).
• Cuando estén hechos los cubitos de hielo, retire la pieza
divisoria de la bandeja después de retorcer ambos
extremos de la pieza divisoria y dejar caer el hilo.
• Tiempo estándar para que se haga el hielo:
aproximadamente 20 minutos
•
Cuando utilice el agua almacenada en el compartimiento
del frigorífico a temperatura ambiente de 30°C y con el
frigorífico ajustado a 3°C y el congelador a -18°C.
• El tiempo necesario para hacer hielo puede que sea
superior al de la descripción anterior dependiendo de la
temperatura ambiente y la temperatura del agua y de la
frecuencia de cierre y abertura de la puerta etc.
• No se puede hacer hielo en
aproximadamente 20 minutos si al
poner el agua se pasa de la línea de
nivel. También es más difícil retirar
el hielo una vez hecho.
FUNCIONAMIENTO (UTILIZANDO EL PANEL DE CONTROL)
Compartimiento frigorífico
Pulse el botón “SELECT” y seleccione el símbolo
“Temperatura del frigorífico”.
Pulse el botón / y ajuste la temperatura.
[ : aumentar, : disminuir]
Pulse el botón “ ”.
Ajustable entre 0°C y 6°C en intervalos de 0,5°C .
Cuando el frigorífico demasiado.
Para funcionamiento normal.
Para conservar los alimentos más frescos.
Cuando el frigorífico no enfría lo suficiente.
Compartimiento congelador
Pulse el botón “SELECT” y seleccione el símbolo
“Temperatura del congelador”.
Pulse el botón / y ajuste la temperatura.
[ : aumentar, : disminuir]
Pulse el botón “ ”.
Ajustable entre -13°C y -21°C en intervalos de 0,5°C.
Para congelado normal.
Cuando el alimento congelado o el helado
no son almacenados.
Para hacer hielo o congelar con rapidez.
Aparece el símbolo y comienza la operación.
Pieza
divisoria
Nivel de
agua
(A946)11-19_Spa.fm Page 15 Sunday, December 21, 2008 4:07 PM
Strona się ładuje...
Strona się ładuje...

18
La refrigeración enlentece el proceso por el cual se
estropean los alimentos. Para maximizar la vida útil de los
productos alimenticios perecederos, asegúrese de que la
comida que compra sea lo más fresca posible.
A continuación se dan unas guías generales para poder
guardar los alimentos el mayor tiempo posible.
Frutas / Vegetales
Para minimizar la pérdida de humedad, las frutas y
vegetales deben ser envueltas seguramente en material
plástico, p.ej. bolsas, papel de envolver (sin sellar) y
colocadas en la gaveta para vegetales o compartimiento
de la fruta. Las frutas y vegetales con cáscaras delgadas
como p.ej. las naranjas, no requieren ser envueltas.
Productos lácteos y huevos
• La mayoría de los productos lácteos tienen una fecha de
caducidad impresa en el envoltorio que indica la vida útil
y temperatura de conservación recomendada del
producto.
• Coloque los huevos en la huevera.
Carne / Pescado / Aves
• Coloque el producto en un plato o una bandeja y cúbralo
con papel o una lámina de plástico.
• Coloque piezas grandes de carne, pescado o aves lo
más atrás posible en las estanterías.
• Asegúrese de que cuando guarde comida ya cocinada
esté bien envuelta o guardada en contenedores
herméticos.
NOTAS
• Coloque de manera balanceada la
comida en los estantes
para permitir que el
aire frío circule
eficientemente.
• Los alimentos
calientes deben enfriarse antes de
colocarlos en el frigorífico. Si coloca
alimentos calientes se eleva la
temperatura de la unidad y aumenta
el riesgo de que se estropeen.
• No bloquee la salida ni la entrada del
circuito de circulación de aire frío con
alimentos ni recipientes, de lo
contrario los alimentos no se
enfriarían de forma uniforme en el
frigorífico.
• Mantenga bien cerrada la puerta.
No coloque los alimentos directamente delante de la
salida de aire frío. Esto puede hacer que se congelen.
Para una mejor congelación
• La comida debe ser fresca.
• Congele la comida en porciones pequeñas para
congelarla más rápido.
• La comida tiene que estar bien envuelta o cubierta,
eliminando el aire del contenedor para un mejor sellado.
• Distribuya los contenidos del congelador uniformemente.
• Ponga etiquetas en las bolsas o contenedores para
mantener un inventario de lo que tenga congelado.
PARA ALMACENAR LOS ALIMENTOS
Vegetales Frutas
Productos lácteos
Comida de
dimensiones pequeñas
Huevos etc.
Botellas etc.
(Tamaño grande)
Carne, Pescado, Aves etc.
• Los vegetales son
inadecuados en este
compartimiento. Podrían
congelarse.
Comida de
dimensiones pequeñas
Jugo etc.
Botellas etc.
Alimentos
congelados
(Tamaño pequeño)
Alimentos
congelados
(Tamaño grande)
ENTRADA
SALIDA
(A946)11-19_Spa.fm Page 18 Sunday, December 21, 2008 4:07 PM
Strona się ładuje...
Strona się ładuje...
Strona się ładuje...

22
1. Balconcini sportello
2. Mensola del frigorifero
3. Mensola
4. Balconcino portabottiglie (sinistra)
5. Cassetto per verdura
Il coperchio del cassetto per verdura
si apre quando la vaschetta viene
tirata.
6. Dispositivo di produzione veloce ghiaccio
La parte inferiore del vassoio contiene materiale
refrigerante utilizzato nella vaschetta per produrre il
ghiaccio. Il vassoio può inoltre essere utilizzato per
congelare piccoli alimenti, quali carne e frutta,
rimuovendo il divisore del ghiaccio.
7. Cassetti freezer (piccoli)
8. Cassetti freezer (grandi)
9. Ruote orientabili
10. Piedini aggiustabili
11. Copripiedini
12. Pannello di alluminio (Hybrid cooling)
Il pannello è raffreddato dal retro, quindi il comparto
frigorifero viene raffreddato indirettamente. In questo
modo, il cibo viene raffreddato delicatamente, senza
essere esposto al flusso di aria fredda.
13. Luce LED del frigorifero
14. Luce del Plasmacluster
15. Coperchio del balconcino di servizio
16. Balconcino di servizio
17. Portauova
18. Balconcino portauova
19. Portabottiglie
20. Cassetto per frutta
21. Scomparto alimenti freschi
22. Balconcino portabottiglie (destra)
Per conservare bottiglie di
grandi dimensioni, spostare
completamente a lato il
divisore.
23. Produzione ghiaccio
• Non riempire eccessivamente il
vassoio, poiché i cubetti di
ghiaccio potrebbero unirsi durante
il congelamento.
• Quando sono pronti i cubetti di
ghiaccio, girate la leva in senso
orario per scaricare il ghiaccio
nella vaschetta sottostante.
24. Vaschetta per cubetti di
ghiaccio
Non preparare il ghiaccio con la vaschetta per cubetti di
ghiaccio né versare olio in essa. La vaschetta potrebbe
spaccarsi.
25. Guarnizione magnetica della porta
26. Pannello di controllo LCD
DESCRIZIONE
25
13 12 14 13
25
15
1
17
18
19
20
22
21
26
23
24
7
8
25
9
10
1
2
3
4
5
6
7
8
25
9
10
11
16
15
16
1
22
17
SJ-F800SP
SJ-F750SP
Divisore
Leva
Vaschetta per
cubetti di ghiaccio
(A946)20-28_Ita-2版.fm Page 22 Tuesday, March 10, 2009 1:34 PM

23
Pannello di controllo
Unità di deodorizzazione
Un catalizzatore di deodorizzazione è installato nel
percorso del flusso d’aria fredda. Non sono necessarie
manutenzione e pulizia.
Scongelamento
Lo scongelamento avviene in maniera completamente
automatica grazie ad un sistema di recupero energetico
unico.
ḥ
SELECT
EXPRESS
ICE
Display LCD
Tasto /
Tasto
Per finalizzare
l'impostazione.
Tasto SELECT
Premere per selezionare il
simbolo della funzione.
NOTA
• Quando non viene eseguita alcuna operazione per
30 secondi, il display torna automaticamente al
contenuto iniziale.
La retroilluminazione diventa scura quando non
viene eseguita alcuna operazione per 3 minuti.
La retroilluminazione si disattiverà quando non
viene eseguita alcuna operazione per 6 minuti.
• Non urtare il display LCD né farlo entrare in contatto
oggetti appuntiti.
Impostazione della temperatura del frigorifero
Impostazione della temperatura del freezer
Simboli delle funzioni
Utilizzare per impostare la
selezione (funzione attivata/
disattivata, impostazione timer o
impostazione temperatura)
• Vengono visualizzati i simboli delle funzioni in uso.
• Funzioni attivate automaticamente
quando si inserisce la spina di
alimentazione.
• Quando il frigorifero si arresta a causa di un'interruzione
dell'alimentazione o simili, il display al momento della
ridistribuzione dell'alimentazione è simile a quello prima
dell'interruzione di alimentazione. Tuttavia, quando si verifica
un'interruzione di alimentazione durante il funzionamento della
produzione veloce del ghiaccio, del congelamento rapido e del
timer, il funzionamento viene interrotto al momento della
ridistribuzione dell'alimentazione.
Tasto EXPRESS ICE
Premere per avviare la
produzione veloce di
ghiaccio.
Controllo temp. frigorifero
Controllo temp. freezer
Allarme porta
Blocco bambini
Modalità vacanza
Ionizzatore “Plasmacluster”
Produzione veloce ghiaccio
Congelamento rapido
Timer
(A946)20-28_Ita-2版.fm Page 23 Tuesday, March 10, 2009 1:34 PM
Strona się ładuje...

25
Ionizzatore “Plasmacluster”
Lo ionizzatore “Plasmacluster” inizia a funzionare
automaticamente quando viene acceso il
frigocongelatore.
La luce del Plasmacluster del comparto frigorifero è di
colore blu durante il funzionamento.
Per annullare il funzionamento
Premere il tasto “SELECT” e selezionare il simbolo
“Plasmacluster”.
Premere il tasto / e selezionare “OFF”.
Premere il tasto “ ”.
Per avviare l'operazione
Selezionare “ON” al passaggio .
Note sul funzionamento dello ionizzatore
“Plasmacluster”
Lo ionizzatore contenuto all'interno del frigocongelatore
rilascia gruppi di ioni, cioè masse di ioni positivi e negativi,
nello scomparto del congelatore e in quello del frigorifero.
Questi gruppi di ioni riducono la formazione della muffa, e
dei batteri.
• Nel frigocongelatore potrebbero esserci alcuni odori
leggeri. Si tratta dell'odore dell'ozono, generato dallo
ionizzatore. La quantità di ozono è minima, e si
decompone rapidamente nel frigocongelatore.
fungo della
muffa
Timer
È possibile impostare fino a 99 minuti e 30 secondi in
intervalli di 30 secondi.
Premere il tasto “SELECT” e selezionare il simbolo
“Timer”. Viene visualizzato il tempo impostato
precedentemente.
Premere il tasto / e impostare il tempo.
[ : aumento, : diminuzione]
Premere il tasto continuamente per configurare
velocemente l'impostazione.
Premere il tasto “ ”.
Viene avviato il timer. Viene visualizzato il tempo
rimanente.
Quando viene raggiunto il tempo impostato, il tono
finale suonerà (circa 30 sec.).
Per interrompere il tono finale, premere “ ”.
Per annullare il timer
Premere “SELECT” e selezionare il simbolo “Timer”.
Premere il tasto “ ”.
NOTA
Durante il funzionamento del timer, non è possibile impostare
il timer per la seconda volta.
Congelamento rapido
È possibile congelare alimenti di alta qualità utilizzando questa funzione, adatta per il congelamento domestico.
• Questa funzione non può essere utilizzata contemporaneamente alla produzione veloce di ghiaccio.
Premere il tasto “SELECT” e selezionare il simbolo
“Congelamento rapido”.
Premere il tasto / e selezionare “ON”.
Premere il tasto “ ”.
Il congelamento rapido termina automaticamente dopo
circa 2 ore (il simbolo scompare).
Per annullare il funzionamento
Selezionare “OFF” al passaggio .
NOTA
• Gli alimenti di grandi dimensioni non possono essere
congelati in un'unica volta.
• Il congelamento rapido può richiedere più di 2 ore nel caso
in cui questa operazione si sovrapponga a quella dello
scongelamento quando l'operazione viene avviata al
termine dello scongelamento.
•
Evitare di aprire lo sportello quando questa funzione è attivata.
(A946)20-28_Ita-2版.fm Page 25 Tuesday, March 10, 2009 1:34 PM

26
Allarme porte
Quando la porta del frigorifero e del freezer viene
lasciata aperta, l'allarme suona.
• L'allarme della porta suonerà 1 minuto dopo l'apertura
dello sportello e di nuovo dopo 1 minuto (una volta in ogni
situazione).
• Se la porta viene lasciata aperta per circa 3 minuti,
l'allarme suona continuamente.
Per annullare il funzionamento
Premere il tasto “SELECT” e selezionare il simbolo
"Allarme porta".
Premere il tasto / e selezionare “OFF”.
Premere il tasto “ ”.
Per avviare l'operazione
Selezionare “ON” al passaggio .
Blocco bambini
Il funzionamento dei tasti del pannello di controllo può
essere disattivato. Utilizzare questa funzione per evitare
che i bambini o altre persone manomettano il pannello.
Premere il tasto “SELECT” e selezionare il simbolo
“Blocco bambini”.
Premere il tasto / e selezionare “ON”.
Premere il tasto “ ”.
Per annullare il funzionamento
Premere il tasto “SELECT” continuamente per 2
secondi o più.
Selezionare “OFF” con il tasto / e premere il tasto
“”.
Modalità vacanza
Utilizzare questa funzione quando si parte per un viaggio o se si rimane lontani da casa per un lungo periodo di tempo.
Premere il tasto “SELECT” e selezionare il simbolo
“Modalità vacanza”.
Premere il tasto / e selezionare “ON”.
Premere il tasto “ ”.
Per annullare il funzionamento
Selezionare “OFF” al passaggio .
NOTA
Il periodo di conservazione del cibo nel comparto frigorifero
diventa circa 1/2-1/3 del funzionamento normale, poiché la
temperatura all'interno del comparto frigorifero diventa di
10°C. Utilizzare solo quando non sono presenti alimenti
deteriorabili.
La temperatura all'interno del comparto
frigorifero sarà regolata a 10°C. Questa
temperatura non può essere modificata.
(A946)20-28_Ita-2版.fm Page 26 Tuesday, March 10, 2009 1:34 PM
Strona się ładuje...
Strona się ładuje...
Strona się ładuje...
Strona się ładuje...

31
1. Balconnet de porte
2. Clayette de réfrigérateur
3. Etagère
4. Balconnet de rangement bouteilles (gauche)
5. Bac à légumes
Le couvercle du bac à légumes
s’ouvre en tirant sur le bac.
6. Machine à glaçons express
Le dessous du plateau contient un produit réfrigérant
utilisé dans les sachets réfrigérants pour accélérer le
processus de fabrication des glaçons. Ce plateau
peut également servir à congeler de petites portions
d’aliment, comme de la viande et des fruits en retirant
la séparation de fabrication des glaçons.
7. Casier congélateur (petit)
8. Casier congélateur (grand)
9. Roulettes
10. Pieds réglables
11. Plinthe
12. Panneau d’aluminium
Le panneau est refroidi par l’arrière, permettant ainsi
de refroidir indirectement le compartiment
réfrigérateur. De cette façon, les aliments sont
réfrigérés en douceur, sans les exposer à un flux d’air
froid.
13. LED d’éclairage réfrigérateur
14. Éclairage Plasmacluster
15. Couvercle du balconnet fonctionnel
16. Balconnet fonctionnel
17. Casier à œufs
18. Balconnet de rangement œufs
19. Casier à bouteilles
20. Compartiment à fruits
21. Compartiment fraîcheur
22. Balconnet de rangement bouteilles (droit)
Pour ranger de grandes
bouteilles, repoussez la
séparation
complètement en
arrière.
23. Fabrication des glaçons
• Ne remplissez pas trop le
plateau, sinon les glaçons seront
collés les uns aux autres.
• Lorsque les glaçons sont prêts,
tournez le modérateur dans le
sens des aiguilles d’une montre,
pour vider les glaçons dans le
bac à glaçons.
24. Bac à glaçons
Ne fabriquez pas de glaçons avec le bac à glaçons,
et n’y versez pas d’huile. Le bac à glaçons risque de
se briser.
25. Joint de porte magnétique
26. Panneau de commandes
DESCRIPTION
25
13 12 14 13
25
15
1
17
18
19
20
22
21
26
23
24
7
8
25
9
10
1
2
3
4
5
6
7
8
25
9
10
11
16
15
16
1
22
17
SJ-F800SP
SJ-F750SP
Séparation
Modérateur
Bac à glaçons
(A946)29-37_Fra.fm Page 31 Tuesday, January 13, 2009 1:05 PM
Strona się ładuje...
Strona się ładuje...
Strona się ładuje...
Strona się ładuje...
Strona się ładuje...
Strona się ładuje...
Strona się ładuje...
Strona się ładuje...

40
1. Receptáculo da porta
2. Prateleira do frigorífico
3. Prateleira
4. Receptáculo para garrafas (esquerda)
5. Gaveta para legumes
A tampa da gaveta para legumes
abre quando a gaveta é puxada.
6. Produtor de gelo rápido
O fundo da cuvete contém material refrigerante usado
nas bolsas de gelo, para abreviar o processo de fazer
gelo. A cuvete também pode ser usada para congelar
pequenos artigos alimentares tais como carne ou fruta,
removendo a partição para o gelo.
7. Caixa do congelador (pequena)
8. Caixa do congelador (grande)
9. Rodas de apoio
10. Pés ajustáveis
11. Saia
12. Painel de alumínio
O painel é arrefecido por trás, arrefecendo assim
indirectamente o compartimento frigorífico. Desta forma
os alimentos são arrefecidos suavemente, não sendo
expostos a uma corrente de ar frio.
13. LED do frigorífico
14. Lâmpada de iluminação do “Plasmacluster”
ionizado
15. Tampa do receptáculo para diversos fins
16. Receptáculo para diversos fins
17. Suporte para ovos
18. Caixa para conservar ovos
19. Prateleira de garrafas
20. Caixa da fruta
21. Caixa de géneros alimentícios frescos
22. Receptáculo para garrafas (direita)
Para colocar garrafas
grandes, desloque a
partição para trás.
23. Recipiente para fazer cubos de gelo
• Não encha demais a cuvete, senão
os cubos de gelo ficam colados uns
aos outros.
• Quando os cubos de gelo estão
prontos, rode a alavanca no sentido
dos ponteiros do relógio para
esvaziar o gelo na caixa para cubos
de gelo.
24. Caixa para cubos de gelo
Não faça gelo na caixa para cubos de gelo ou derrame
óleo sobre ela. A caixa para cubos de gelo poderá
trincar.
25. Fecho magnético da porta
26. Painel de controlo
DESCRIÇÃO
25
13 12 14 13
25
15
1
17
18
19
20
22
21
26
23
24
7
8
25
9
10
1
2
3
4
5
6
7
8
25
9
10
11
16
15
16
1
22
17
SJ-F800SP
SJ-F750SP
Partição
Alavanca
Caixa para cubos
de gelo
(A946)38-46_Por.fm Page 40 Friday, January 16, 2009 3:15 PM

41
Painel de controlo
Unidade desodorizante
Está instalado um catalizador desodorizante nas condutas
de ar frio. Não é necessária qualquer operação ou
limpeza.
Descongelação
A descongelação faz-se de forma totalmente automática,
devido à existência de um sistema especial de poupança
de energia.
ḥ
SELECT
EXPRESS
ICE
Mostrador LCD
Botão /
Botão
Termina a regulação.
Botão SELECT
Prima para seleccionar a
marca da função.
OBSERVAÇÕES
• Quando não é feita nenhuma operação durante 30
segundos, o mostrador volta automaticamente ao
conteúdo inicial.
A iluminação de fundo torna-se escura quando não
houver nenhuma operação durante 3 minutos.
A iluminação de fundo apaga quando não houver
nenhuma operação durante 6 minutos.
• Não golpeie nem utilize objectos aguçados no
painel LCD.
Regulação da temperatura do frigorífico
Regulação da temperatura do congelador
Marca de cada função
Use para seleccionar. (Ligar/
desligar função, ou regular o
temporizador ou a temperatura)
• São apresentadas marcas das funções em execução.
•
Funções que iniciam automaticamente
quando é ligada a ficha de corrente.
• Quando o frigorífico parar por falta de corrente ou similar, ao ser
restabelecida a alimentação de corrente, o mostrador apresentará
os mesmos itens do momento do corte de corrente. Contudo, se
houver um corte de corrente durante o processo de produção de
gelo expresso, de congelamento expresso e do temporizador, a
operação é interrompida no momento do restabelecimento da
corrente.
Botão EXPRESS ICE
Prima para começar a
produção de gelo expresso.
Controlo de temp. do frigorífico
Controlo de temp. do congelador
Alarme da porta
Bloqueio para crianças
Modo férias
“Plasmacluster” ionizado
Produção de gelo expresso
Congelamento expresso
Temporizador
(A946)38-46_Por.fm Page 41 Friday, January 16, 2009 3:15 PM

42
Controlo das temperaturas
O frigorífico controla automaticamente a sua temperatura.
Contudo, se necessário, regule a temperatura da seguinte forma.
Produção de gelo expresso
Os cubos de gelo podem ser feitos mais rapidamente.
• Esta função não pode ser utilizada em simultâneo com o congelamento expresso.
Prima o botão “EXPRESS ICE”.
Quando o gelo estiver pronto, remova-o.
Para cancelar a operação
Prima novamente o botão “EXPRESS ICE”.
OBSERVAÇÕES
• A produção de gelo expresso termina automaticamente
dentro de cerca de 1 hora independentemente do estado do
gelo. (A marca desaparece.)
• A produção de gelo expresso pode demorar mais de 1 hora
no caso da operação se sobrepor à operação de
descongelamento, iniciando-se esta operação após o
descongelamento terminar.
• Evite o mais possível abrir a porta durante o funcionamento
desta função.
Como usar o produtor de gelo rápido
• Arrefeça previamente o produtor de gelo rápido no
congelador (durante pelo menos 1 dia).
• Quando os cubos de gelo estiverem prontos, remova a
partição da cuvete e em seguida torça ambas as
extremidades da partição para fazer cair o gelo.
• Tempo normal até o gelo ficar pronto:
cerca de 20 minutos
• Quando usar a água guardada no compartimento
frigorífico numa temperatura ambiente de 30°C e
com o frigorífico regulado em 3°C e o congelador
a –18°C.
• Pode demorar mais tempo do que descrito acima a
fazer o gelo, dependendo da temperatura ambiente,
da temperatura da água e da frequência com que é
aberta e fechada a porta, etc.
• A produção de gelo não pode ser
efectuada em cerca de 20
minutos se for ultrapassada a
linha de nível de água. Além disso
torna-se difícil remover o gelo.
FUNCIONAMENTO
(UTILIZANDO O PAINEL DE CONTROLO)
Compartimento de frigorífico
Prima o botão “SELECT” e seleccione a marca
“Temp. Do frigorífico”.
Prima o botão / e regule a temperatura.
[ : aumentar, : diminuir ]
Prima o botão “ ”.
Regulável entre 0°C e 6°C em passos de 0,5°C.
Quando o frigorífico faz demasiada refrigeração.
Para funcionamento normal.
Para manter os alimentos frescos. Quando o
frigorífico não faz refrigeração suficiente.
Compartimento de congelador
Prima o botão “SELECT” e seleccione a marca “Temp.
Do congelador”.
Prima o botão / e regule a temperatura.
[ : aumentar, : diminuir ]
Prima o botão “ ”.
Regulável entre –13 °C e –21°C em passos de 0,5°C.
Para congelação normal.
Quando não tem alimentos para conservar
ou gelados.
Para fazer gelo ou congelar rapidamente.
A marca aparece e a operação é iniciada.
Partição
Nível da água
(A946)38-46_Por.fm Page 42 Friday, January 16, 2009 3:15 PM
Strona się ładuje...

44
Alarme da porta
Quando a porta do frigorífico ou do congelador ficar
aberta, soa o alarme da porta.
• O alarme da porta soa 1 minuto após a abertura da porta
e novamente ao fim de 1 minuto (uma vez em ambos os
casos).
• Se a porta for deixada aberta durante cerca de 3 minutos,
o alarme soa continuamente.
Para cancelar a operação
Prima o botão “SELECT” e seleccione a marca “Alarme
da porta”.
Prima o botão / e seleccione “OFF”.
Prima o botão “ ”.
Para iniciar a operação
Seleccione “ON” no passo .
Bloqueio de crianças
O funcionamento das teclas do painel de controlo
podem ser desactivadas. Use esta função para evitar
que crianças ou alguém mais interfira com o painel.
Prima o botão “SELECT” e seleccione a marca
“Bloqueio de crianças”.
Prima o botão “ / ” e seleccione “ON”.
Prima o botão “ ”.
Para cancelar a operação
Prima continuamente o botão “SELECT” durante 2
segundos ou mais.
Seleccione “OFF” com o botão / e prima o botão
“”.
Modo férias
Use esta função quando for de viagem ou quando sair de casa por longo tempo.
Prima o botão “SELECT” e seleccione a marca
“Modo férias”.
Prima o botão “ / ” e seleccione “ON”.
Prima o botão “ ”.
Para cancelar a operação
Seleccione “OFF” no passo .
OBSERVAÇÕES
O tempo de armazenagem no compartimento frigorífico
torna-se aproximadamente 1/2 a 1/3 da operação normal,
dado que a temperatura do compartimento frigorífico fica em
10°C. Utilize apenas quando não houver alimentos
perecíveis.
A temperatura dentro do compartimento
frigorífico será regulada em 10°C.
Esta temperatura não pode ser alterada.
(A946)38-46_Por.fm Page 44 Friday, January 16, 2009 3:15 PM
Strona się ładuje...
Strona się ładuje...
Strona się ładuje...
Strona się ładuje...
Strona się ładuje...
Strona się ładuje...
Strona się ładuje...
Strona się ładuje...
Strona się ładuje...
Strona się ładuje...
Strona się ładuje...
Strona się ładuje...
Strona się ładuje...
Strona się ładuje...
Strona się ładuje...
Strona się ładuje...
Strona się ładuje...
Strona się ładuje...
Strona się ładuje...
Strona się ładuje...
Strona się ładuje...
Strona się ładuje...
Strona się ładuje...
Strona się ładuje...
Strona się ładuje...
Strona się ładuje...
Strona się ładuje...
Strona się ładuje...
Strona się ładuje...
Strona się ładuje...
Strona się ładuje...
Strona się ładuje...
Strona się ładuje...
Strona się ładuje...
Strona się ładuje...
Strona się ładuje...
Strona się ładuje...
Strona się ładuje...
Strona się ładuje...
Strona się ładuje...
Strona się ładuje...
Strona się ładuje...
Strona się ładuje...
Strona się ładuje...
Strona się ładuje...
Strona się ładuje...
Strona się ładuje...
Strona się ładuje...
Strona się ładuje...
Strona się ładuje...
Strona się ładuje...
Strona się ładuje...
Strona się ładuje...
Strona się ładuje...
Strona się ładuje...
Strona się ładuje...
Strona się ładuje...
Strona się ładuje...
Strona się ładuje...
Strona się ładuje...
Strona się ładuje...
Strona się ładuje...
Strona się ładuje...
Strona się ładuje...
Strona się ładuje...
Strona się ładuje...
Strona się ładuje...
Strona się ładuje...
Strona się ładuje...
Strona się ładuje...
Strona się ładuje...
Strona się ładuje...
Strona się ładuje...
Strona się ładuje...
Strona się ładuje...
Strona się ładuje...
Strona się ładuje...
Strona się ładuje...
Strona się ładuje...
Strona się ładuje...
Strona się ładuje...
Strona się ładuje...
Strona się ładuje...
Strona się ładuje...
Strona się ładuje...
Strona się ładuje...
Strona się ładuje...
Strona się ładuje...
Strona się ładuje...
Strona się ładuje...
Strona się ładuje...
Strona się ładuje...
Strona się ładuje...
Strona się ładuje...
Strona się ładuje...
Strona się ładuje...
Strona się ładuje...
Strona się ładuje...
Strona się ładuje...
Strona się ładuje...
Strona się ładuje...
Strona się ładuje...
Strona się ładuje...
Strona się ładuje...
Strona się ładuje...
Strona się ładuje...
Strona się ładuje...
Strona się ładuje...
Strona się ładuje...
Strona się ładuje...
Strona się ładuje...
Strona się ładuje...
Strona się ładuje...
Strona się ładuje...
Strona się ładuje...
Strona się ładuje...
Strona się ładuje...
Strona się ładuje...
Strona się ładuje...
Strona się ładuje...
Strona się ładuje...
Strona się ładuje...
Strona się ładuje...
Strona się ładuje...
Strona się ładuje...
Strona się ładuje...
Strona się ładuje...
Strona się ładuje...
Strona się ładuje...
-
 1
1
-
 2
2
-
 3
3
-
 4
4
-
 5
5
-
 6
6
-
 7
7
-
 8
8
-
 9
9
-
 10
10
-
 11
11
-
 12
12
-
 13
13
-
 14
14
-
 15
15
-
 16
16
-
 17
17
-
 18
18
-
 19
19
-
 20
20
-
 21
21
-
 22
22
-
 23
23
-
 24
24
-
 25
25
-
 26
26
-
 27
27
-
 28
28
-
 29
29
-
 30
30
-
 31
31
-
 32
32
-
 33
33
-
 34
34
-
 35
35
-
 36
36
-
 37
37
-
 38
38
-
 39
39
-
 40
40
-
 41
41
-
 42
42
-
 43
43
-
 44
44
-
 45
45
-
 46
46
-
 47
47
-
 48
48
-
 49
49
-
 50
50
-
 51
51
-
 52
52
-
 53
53
-
 54
54
-
 55
55
-
 56
56
-
 57
57
-
 58
58
-
 59
59
-
 60
60
-
 61
61
-
 62
62
-
 63
63
-
 64
64
-
 65
65
-
 66
66
-
 67
67
-
 68
68
-
 69
69
-
 70
70
-
 71
71
-
 72
72
-
 73
73
-
 74
74
-
 75
75
-
 76
76
-
 77
77
-
 78
78
-
 79
79
-
 80
80
-
 81
81
-
 82
82
-
 83
83
-
 84
84
-
 85
85
-
 86
86
-
 87
87
-
 88
88
-
 89
89
-
 90
90
-
 91
91
-
 92
92
-
 93
93
-
 94
94
-
 95
95
-
 96
96
-
 97
97
-
 98
98
-
 99
99
-
 100
100
-
 101
101
-
 102
102
-
 103
103
-
 104
104
-
 105
105
-
 106
106
-
 107
107
-
 108
108
-
 109
109
-
 110
110
-
 111
111
-
 112
112
-
 113
113
-
 114
114
-
 115
115
-
 116
116
-
 117
117
-
 118
118
-
 119
119
-
 120
120
-
 121
121
-
 122
122
-
 123
123
-
 124
124
-
 125
125
-
 126
126
-
 127
127
-
 128
128
-
 129
129
-
 130
130
-
 131
131
-
 132
132
-
 133
133
-
 134
134
-
 135
135
-
 136
136
-
 137
137
-
 138
138
-
 139
139
-
 140
140
-
 141
141
-
 142
142
-
 143
143
-
 144
144
-
 145
145
-
 146
146
-
 147
147
-
 148
148
-
 149
149
-
 150
150
-
 151
151
-
 152
152
-
 153
153
-
 154
154
-
 155
155
-
 156
156
-
 157
157
-
 158
158
-
 159
159
-
 160
160
-
 161
161
-
 162
162
-
 163
163
-
 164
164
-
 165
165
-
 166
166
-
 167
167
-
 168
168
-
 169
169
-
 170
170
-
 171
171
-
 172
172
-
 173
173


Sharp sj f800 sp sl Instrukcja obsługi
- Kategoria
- Lodówko-zamrażarki
- Typ
- Instrukcja obsługi
- Niniejsza instrukcja jest również odpowiednia dla
w innych językach
- čeština: Sharp sj f800 sp sl Návod k obsluze
- español: Sharp sj f800 sp sl El manual del propietario
- italiano: Sharp sj f800 sp sl Manuale del proprietario
- Deutsch: Sharp sj f800 sp sl Bedienungsanleitung
- eesti: Sharp sj f800 sp sl Omaniku manuaal
- slovenčina: Sharp sj f800 sp sl Návod na obsluhu
- português: Sharp sj f800 sp sl Manual do proprietário
- français: Sharp sj f800 sp sl Le manuel du propriétaire
- English: Sharp sj f800 sp sl Owner's manual
- Nederlands: Sharp sj f800 sp sl de handleiding
- română: Sharp sj f800 sp sl Manualul proprietarului
Powiązane artykuły
-
Sharp SJ-SC440V Instrukcja obsługi
-
Sharp SJ-F78PE Instrukcja obsługi
-
Sharp SJF79PSSL Instrukcja obsługi
-
Sharp SJ-F74PSSL Instrukcja obsługi
-
Sharp SJ-F740STSL Instrukcja obsługi
-
Sharp SJ-MB300SST Instrukcja obsługi
-
Sharp SJ-FP760VBE Instrukcja obsługi
-
-
Sharp SJ-SC700VWH Instrukcja obsługi
-