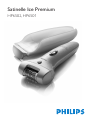
Philips HP6501/00 Instrukcja obsługi
- Kategoria
- Depilatory
- Typ
- Instrukcja obsługi
Niniejsza instrukcja jest również odpowiednia dla

Satinelle Ice Premium
HP6502, HP6501

2

3
111

4

HP6502,HP6501
ENGLISH 6
LIETUVIŠKAI
17
POLSKI 28
40
52
SLOVENSKY
66
78
SRPSKI
89
100

6
Introduction
With your new Satinelle ICE PREMIUM you can remove unwanted hairs
quickly, easily and effectively. The combination of the ceramic epilating
system with the contour-following skin cooler and the new
sonic massaging system constitutes a revolution in epilation. Thanks to the
natural numbing effect of ice and massaging, the new Satinelle ICE
PREMIUM makes epilation more comfortable and less painful than ever.
The result is a silky-smooth skin and a hair growth reduction of up to
50%, assuming you use the appliance regularly (every 4 weeks).
The rapidly rotating epilating discs catch even the shortest hairs (down to
0.5 millimetre!) and pull them out by the roots. As a result, your skin stays
smooth for up to four weeks and regrowth is soft and downy.
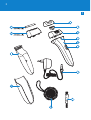
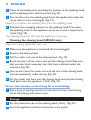
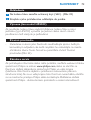
General description (Fig. 1)
A Sensitive area cap
B Massaging element
C Epilating head
D Release button
E Appliance
F On/off slide
G Protective cap of shaving head (HP6502 only)
H Shaving head (HP6502 only)
I Leg skin cooler with pivoting cooling head
J Insulating sleeve for skin cooler
K Adapter
L Exfoliating body puff
M Cleaning brush
Important
Read this user manual carefully before you use the appliance and save it
for future reference.
Check if the voltage indicated on the adapter corresponds to the
local mains voltage before you connect the appliance.
Only use the appliance in combination with the adapter supplied.
,
,
ENGLISH

Do not use the appliance if the adapter or the appliance itself is
damaged.
If the adapter is damaged, always have it replaced with one of the
original type in order to avoid a hazard.
The adapter contains a transformer. Do not cut off the adapter to
replace it with another plug, as this causes a hazardous situation.
Keep the appliance and the adapter dry.
Keep the appliance out of the reach of children.
Do not expose the appliance to temperatures lower than 5°C or
higher than 35°C.
To prevent damage and injuries, keep the running appliance away
from your scalp hair, eyebrows, eyelashes, clothes, threads, cords,
brushes etc.
Do not use the epilating head on irritated skin or skin with
varicose veins, rashes, spots, moles (with hairs) or wounds without
consulting your doctor rst. People with a reduced immune
response or people who suffer from diabetes mellitus, Raynaud’s
disease or immunodeciency should contact their doctor rst.
Always check the shaving head before you use the appliance. Do
not use the shaving head if the foil or the trimmers are damaged, as
this may cause injury.
Noise level: Lc = 75.8dB [A]
This Philips appliance complies with all standards regarding
electromagnetic elds (EMF). If handled properly and according to
the instructions in this user manual, the appliance is safe to use based on
scientic evidence available today.
Preparing for use
Freezing the skin cooler
1 Put the skin cooler WITHOUT the insulating sleeve in the freezer
or freezing compartment (***) at least 4 hours before you start to
epilate. When the uid has turned completely blue, the skin cooler
is ready for use.
,
,
,
,
,
,
,
,
,
,
ENGLISH 7

Make sure the outside of the skin cooler is completely dry before you
freeze it.
Tip:You can store the skin cooler in the freezer permanently.
Using the appliance
General information about epilation
Epilation is easier just after a bath or shower. Make sure your skin
is completely dry when you start to epilate.
When you use the appliance for the rst time, we advise you to try
it out on an area with only light hair growth. This helps you get
accustomed to the epilation process.
For optimal epilating results, the hairs should not be longer than 10
millimetres (Fig. 2)
To epilate longer hairs: (Fig. 2)
shorten the hairs to a maximum length of 10mm with a trimmer. In
this case, you can start to epilate right away.
shave the hairs completely. In this case you can start to epilate after a
few days (the hairs must be at least 0.5mm long).
Your skin may become a little red and irritated the rst few times
you use the epilator. This phenomenon is absolutely normal
and quickly disappears. As you use the appliance more often, your
skin gets used to epilation, skin irritation decreases and
regrowth becomes thinner and softer. If the irritation has not
disappeared within three days, we advise you to consult a doctor.
We advise you to epilate before you go to bed at night, as
this allows any skin irritation that may develop to diminish
overnight.
Epilating with the skin cooler
Make sure your skin is clean, entirely dry and free from grease. Do not
use any cream before you start to epilate.
1 Slide the insulating sleeve onto the skin cooler. (Fig. 3)
,
,
,
,
-
-
,
,
ENGLISH8

The insulating sleeve prevents an unpleasant sensation of coldness in your
hand while you use the appliance. It also keeps the skin cooler cold as
long as possible.
Sometimes the pivoting cooling head freezes onto the skin cooler and
does not move when you take the skin cooler from the freezer. The
pivoting cooling head starts to pivot again after you have passed it over
your leg a few times.
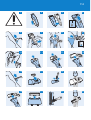
2 Snap the appliance onto the skin cooler (Fig. 4).
3 Insert the appliance plug into the bottom of the appliance and put
the adapter in the wall socket.
4 Select the desired speed to switch on the appliance (Fig. 5).
Select speed I for areas with little hair growth and for areas where bones
are located directly beneath the skin, such as knees and ankles.
Select speed II for larger areas with stronger hair growth.
5 Stretch your skin with your free hand to make the hairs stand
upright.
6 Place the appliance perpendicularly onto the skin with the epilating
head pointing forward. Move the appliance against the direction of
hair growth at a moderate speed. (Fig. 6)
Make sure both the epilating discs and the skin cooler are in proper
contact with the skin.
Press the appliance lightly onto the skin.
If you are not completely satised with the epilation result, try
moving the epilator more slowly over your skin.
7 Use the tab on the bottom end of the appliance to remove the
appliance from the skin cooler (Fig. 7).
Epilating without skin cooler
If you do not want to use the skin cooler, for instance because you
have grown accustomed to the sensation of epilation, you can also
use the appliance without the skin cooler.
Make sure that you place the epilator perpendicularly onto your
skin and that you move it against the direction of hair growth.
,
,
,
ENGLISH 9

Epilating the underarms and bikini line
Your epilator comes with a sensitive area cap that reduces the number of
active epilating discs. This makes the appliance ideal for epilating the more
delicate areas of the body, such as the underarms and bikini line.
Note: You get the best results when the hairs are not too long (max.1cm).
1 Put the sensitive area cap on the epilating head (Fig. 8).
The sensitive area cap can only be tted onto the appliance in one way.
2 Switch on the appliance by selecting the desired speed. (Fig. 5)
We advise you to use speed II.
3 Stretch the skin with your free hand.
4 Place the appliance perpendicularly onto your skin, with the on/off
slide pointing in the direction in which you are going to move the
appliance (Fig. 6).
5 Move the appliance slowly over the skin, against the direction of
the hair growth (Fig. 6).
Epilate your bikini line as shown in the gure (Fig. 9).
Epilate your underarms as shown in the gure (Fig. 10).
For a cool sensation, you can dab the area you have just epilated with
a cloth soaked in cold water.
6 Remove the sensitive area cap from the epilator after use (Fig. 11).
Using the exfoliating body puff
Use the exfoliating body puff in the shower.
Regular massages with the puff may help to prevent ingrown hairs. Do
not use the puff immediately before or after epilation.
Shaving (HP6502 only)
You can use the shaving head to shave sensitive body parts, such as your
underarms and bikini line. With the shaving head, you obtain a smooth
result in a comfortable and gentle way.
1 Make sure the appliance is switched off.
-
-
-
ENGLISH10

2 Remove the skin cooler (Fig. 7).
3 Remove epilating head (Fig. 12).
Press the release button (1) and move the epilating head in the direction
of the arrow (2).
4 Place the shaving head on the appliance and press it onto the
appliance until it snaps home (‘click’) (Fig. 13).
5 Switch on the appliance by selecting speed II.
6 Place the shaving head onto your skin and move the appliance
slowly and smoothly against the direction of hair growth. Press the
appliance lightly (Fig. 14).
Cleaning and maintenance
Never rinse the adapter or the appliance itself with water.
Do not use any corrosive detergents, scouring pads or cloths, petrol,
acetone etc. to clean the appliance.
1 Make sure the appliance is switched off and unplugged.
2 Remove the skin cooler from the appliance and slide the insulating
sleeve off the skin cooler.
3 Clean the pivoting cooling head of the leg skin cooler with the
brush supplied or with a moist cloth after each use.
Make sure the outside of the skin cooler is completely dry before
you freeze it again.
Cleaning the epilating head
Clean the epilating head after every use.
1 Make sure the appliance is switched off and unplugged.
2 Remove the epilating head (Fig. 12).
Press the release button (1) and move the epilating head in the direction
of the arrow (2).
3 Remove the massaging element (Fig. 15).
ENGLISH 11

4 Clean all accessible parts, including the bottom of the epilating head
and the epilating discs, with the brush (Fig. 16).
5 You can also rinse the epilating head (not the appliance!) under the
tap to clean it more thoroughly (Fig. 17).
Never try to detach the epilating discs from the epilating head.
6 Reattach the massaging element to the epilating head. Then place
the epilating head on the appliance and press it until it snaps home
(‘click’) (Fig. 18).
The epilating head only ts onto the appliance in one way.
Cleaning the shaving head (HP6502 only)
Clean the shaving head after every use.
1 Make sure the appliance is switched off and unplugged.
2 Remove the shaving head.
3 Pull the cutter unit out of the shaving head. (Fig. 19)
4 Brush the hairs off the cutter unit and the shaving head. Make sure
that you also brush away any hairs that have collected under the
trimmers (Fig. 20).
5 You can also rinse the cutter unit and the rest of the shaving head
(not the appliance!) under the tap (Fig. 21).
6 Put the cutter unit back into the shaving head and snap the shaving
head back onto the appliance (‘click’) (Fig. 22).
Do not exert pressure on the shaving foil to avoid damage.
7 Rub a drop of sewing machine oil onto the trimmers and shaving
foil of the shaving unit twice a year.
Storage
1
Put the protective cap on the shaving head (‘click’). (Fig. 23)
2 Store the appliance and the accessories in the pouch.
ENGLISH12

Replacement (HP6502 only)
If you use the shaving head several times a week, replace the shaving foil
and the cutter unit (type HP6193) after one or two years of use or if it is
damaged.
Environment
Do not throw away the appliance with the normal household waste
at the end of its life, but hand it in at an ofcial collection point for
recycling. By doing this, you help to preserve the
environment (Fig. 24).
Guarantee & service
If you need information or if you have a problem, please visit the Philips
website at www.philips.com or contact the Philips Customer Care
Centre in your country (you nd its phone number in the worldwide
guarantee leaet). If there is no Customer Care Centre in your country,
go to your local Philips dealer or contact the Service Department of
Philips Domestic Appliances and Personal Care BV.
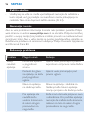
Troubleshooting
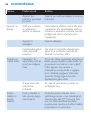
Problem Possible cause Solution
Reduced
epilating
performance.
You moved the
epilator in the
wrong direction.
Move the appliance against the
direction of hair growth.
You placed the
epilating
head on the
skin at the
wrong angle.
Make sure you place the appliance
perpendicularly onto the skin.
-
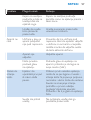
ENGLISH 13

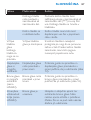
Problem Possible cause Solution
The epilating
head did not
touch the skin.
Make sure both the epilating head
and the skin cooler are in proper
contact with your skin during
epilation.
You moistened
your skin with
water or a
cream or other
skincare
product prior to
epilation.
Make sure your skin is entirely dry
and free from grease. Do not put
any cream, body milk or other
skincare product on your skin
before you start to epilate.
The sensitive
area cap was on
the appliance
when you
epilated your
legs.
Only use the sensitive area cap to
epilate your underarms and bikini
line.
The appliance
has been
moved over the
skin too fast.
Move the appliance over the skin
at a moderate speed.
The appliance
does not work.
The socket to
which the
appliance is
connected is
not live.
Make sure the socket you use is
live. If you use a socket in a
bathroom cabinet, you may need
to switch on the light to activate
the socket.
The appliance is
not switched
on.
Switch on the appliance.
ENGLISH14

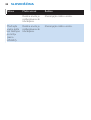
Problem Possible cause Solution
You did not
attach the
epilating
head correctly.
Place the epilating head on the
appliance and press it onto the
appliance until it snaps home
(‘click’).
Skin irritation
occurs.
You used the
epilator for the
rst time or
after a long
period of disuse.
Some skin irritation may occur the
rst few times you use the
appliance. This is absolutely normal
and usually disappears quickly. For
tips to reduce skin irritation, see
the rst section of chapter ‘Using
the appliance’. Also make sure you
keep the epilating head clean.
You have
applied too
much pressure
to the appliance
Do not use any pressure when
moving the appliance over skin
The skin cooler
is not cold
enough.
You did not
freeze the skin
cooler long
enough.
Put the skin cooler without the
insulating sleeve in the freezer or
freezing compartment (***) for at
least 4 hours. When the colour of
the uid has changed from white
to completely blue, the skin cooler
is ready for use.
You did not put
the skin
cooler in the
freezer or
freezing
compartment.
Put the skin cooler without the
insulating sleeve in the freezer or
freezing compartment (***) for at
least 4 hours. Do not store the
skin cooler in the refrigerator.
The skin cooler
did not touch
the skin.
Make sure the skin cooler is
always in proper contact with your
skin during epilation.
ENGLISH 15

Problem Possible cause Solution
The pivoting
cooling head of
the leg skin
cooler does
not move.
The pivoting
cooling head is
frozen.
Pass the skin cooler over your leg
a few times to make it pivot again.
Always make sure the outside of
the skin cooler is completely dry
before you freeze it.
It is not
possible to
remove the
epilating head.
You did not
move the
epilating head in
the right
direction.
Press the release button and move
the epilating head in the direction
of the arrow to remove it. (Fig. 12)
It is not
possible to
remove the
shaving head
(HP6502 only).
You did move
the shaving
head in the right
direction.
Press the release button and move
the shaving head in the direction
of the arrow to remove it. (Fig. 12)
Reduced
shaving
performance
(HP6502 only).
The shaving
head is dirty.
Switch off the appliance, unplug it
and remove the shaving head.
Then clean the cutter unit and the
shaving head with the cleaning
brush supplied. Remove any hairs
that are stuck under the trimmers.
The cutter unit
is damaged or
worn.
Replace the cutter unit.
Stronger skin
irritation than
usual after
shaving
(HP6502 only).
The cutter unit
is damaged or
worn.
Replace the cutter unit.
ENGLISH16

17
Savo naujuoju „Satinelle ICE PREMIUM“ plaukus galite pašalinti greitai,
lengvai ir efektyviai. Keraminės depiliavimo sistemos derinys su odos
vėsintuvu, prisitaikančiu prie odos linkių, ir nauja garsinio masažo sistema
yra tikra revoliucija depiliavimo srityje. Dėl natūralaus nejautros poveikio,
kurį sukelia ledas ir masažas, depiliavimas naujuoju „Satinelle ICE
PREMIUM“ yra patogesnis ir mažiau skausmingas nei anksčiau. Rezultatas
– lygi ir švelni lyg šilkas oda, o plaukų augimas sumažėja iki 50%, jei
prietaisas naudojamas reguliariai (kas 4 savaites).
Greitai besisukantys depiliaciniai diskai sugriebia ir išrauna net trumpiausius
plaukelius (iki 0,5 mm ilgio!). Dėl to jūsų oda lieka švelni net keturias
savaites, o plaukai atauga švelnūs ir silpni.
Bendrasis aprašas (Pav. 1)
A Jautrių vietų gaubtelis
B Masažo elementas
C Depiliavimo galvutė
D Atjungimo mygtukas
E Prietaisas
F Įjungimo / išjungimo slankiklis
G Apsauginis skutimo galvutės dangtelis (tik HP6502)
H Skutimo galvutė (tik HP6502)
I Kojų odos vėsintuvas su slankiąja vėsinimo galvute
J Apsauginė odos vėsintuvo mova
K Adapteris
L Grandomoji kūno kempinė
M Valymo šepetėlis
Svarbu
Prieš pradėdami naudotis prietaisu, atidžiai perskaitykite šį vartotojo
vadovą ir saugokite jį, nes jo gali prireikti ateityje.
Prieš įjungdami prietaisą patikrinkite, ar ant adapterio nurodyta
įtampa atitinka jūsų elektros tinklo įtampą.
Prietaisą naudokite tik su rinkinyje esančiu adapteriu.
Nenaudokite prietaiso, jei adapteris ar pats prietaisas yra sugadinti.
,
,
,
LIETUVIŠKAI

Jei adapteris pažeistas, kad išvengtumėte pavojaus, visada pakeiskite
jį originaliu adapteriu.
Adapteryje yra transformatorius. Kad nesukeltumėte pavojingų
situacijų, jokiu būdu nenupjaukite adapterio, norėdami jį pakeisti
kitu kištuku.
Prietaisą ir adapterį laikykite sausoje vietoje.
Neleiskite vaikams naudotis prietaisu.
Nelaikykite prietaiso žemesnėje nei 5 °C ir aukštesnėje nei 35 °C
temperatūroje.
Kad nesusižeistumėte, veikiančio prietaiso nelaikykite arti plaukų,
antakių, blakstienų, rūbų, siūlų, laidų, šepečių ir t. t.
Nepasitarę su gydytoju, nenaudokite prietaiso depiliuoti vietoms,
kuriose oda sudirginta, išsiplėtusios venos, oda išberta, spuoguota,
su apgamais (su plaukeliais) arba žaizdota. Žmonės, kurių imuninė
sistema nusilpusi arba kurie serga cukriniu diabetu, Reino liga arba
kurie turi imunodecitą, visų pirma turėtų pasitarti su savo gydytoju.
Prieš naudodami prietaisą visada patikrinkite skutimo galvutę.
Skutimo galvutės nenaudokite, jei pažeista skutimo plokštelė arba
koreguojantys peiliukai, nes galite susižeisti.
Skleidžiamo triukšmo lygis: LC = 75,8 db [A]
Elektromagnetiniai laukai
Šis „Philips“ prietaisas atitinka visus elektromagnetinių laukų (EMF)
standartus. Tinkamai eksploatuojant prietaisą pagal šiame vartotojo
vadove pateiktus nurodymus, remiantis dabartine moksline informacija, jis
yra saugus naudoti.
Paruošimas naudoti
1 Mažiausiai 4 valandas prieš depiliavimą odos vėsintuvą BE
apsauginės movos įdėkite į šaldiklį arba šaldymo kamerą (***). Kai
skystis pamėlynuoja, odos vėsintuvą galima naudoti.
Prieš šaldydami įsitikinkite, kad odos vėsintuvo išorė visiškai sausa.
Patarimas: Odos vėsintuvą šaldiklyje galite laikyti nuolat.
,
,
,
,
,
,
,
,
,
LIETUVIŠKAI18

Prietaiso naudojimas
Depiliavimas būna daug lengvesnis po maudymosi vonioje ar duše.
Prieš depiliuodami, įsitikinkite, kad jūsų oda visiškai sausa.
Naudojant prietaisą pirmą kartą, patariama jį išbandyti plotelyje, kur
auga nedaug plaukų, – taip oda įpras prie depiliavimo.
Siekiant geriausių depiliavimo rezultatų, plaukai turėtų būti ne ilgesni
nei 10 milimetrų (Pav. 2)
Jei norite depiliuoti ilgesnius plaukus: (Pav. 2)
koreguojančiu peiliuku sutrumpinkite plaukus iki ne ilgesnių kaip 10
mm. Tada galėsite depiliuoti iš karto.
visiškai nuskuskite plaukus. Tada galėsite depiliuoti po kelių dienų
(plaukai turi būti bent 0,5 mm ilgio).
Po pirmųjų depiliavimo kartų jūsų oda gali parausti ir truputį
sudirgti. Šis reiškinys yra normalus ir greitai išnyks. Ilgiau naudojantis
prietaisu, jūsų oda pripras prie depiliavimo, jos sudirginimas mažės,
o išaugantys plaukeliai taps vis plonesniais ir švelnesniais. Odos
sudirginimui neišnykus per tris dienas, patartina pasikonsultuoti su
gydytoju.
Patariame depiliuotis prieš einant miegoti, kad per naktį išnyktų
galimas odos sudirgimas.
Įsitikinkite, kad jūsų oda švari, visiškai sausa ir neriebaluota. Prieš
depiliuodami nenaudokite jokio kremo.
1 Užstumkite apsauginę movą ant odos vėsintuvo. (Pav. 3)
Apsauginė mova panaikina nemalonų šalčio pojūtį, juntamą ranka jums
naudojantis prietaisu, o odos vėsintuvas ilgiau išlaiko vėsą.
Kartais, išėmus odos vėsintuvą iš šaldiklio, slankioji galvutė gali prišalti prie
odos vėsintuvo ir nejudėti. Slankioji galvutė vėl pradės judėti, perbraukus ja
kelis kartus per koją.
2 Pritaisykite prietaisą prie odos vėsintuvo (Pav. 4).
3 Įkiškite prietaiso kištuką į lizdą apatinėje prietaiso dalyje, o adapterį
įkiškite į elektros lizdą.
,
,
,
,
-
-
,
,
LIETUVIŠKAI 19

4 Pasirinkdami norimą greitį, įjunkite prietaisą (Pav. 5).
I greitį pasirinkite mažai plaukuotiems plotams ir plotams, kur kaulai yra
iškart po oda (keliai ar čiurnos).
II greitį pasirinkite didesniems plotams, kur auga daugiau plaukų.
5 Laisva ranka ištempkite odą taip, kad plaukai styrotų.
6 Priglauskite prietaisą statmenai odai, depiliavimo galvute į priekį, ir
vidutiniu greičiu braukite juo plaukų augimui priešinga
kryptimi. (Pav. 6)
Įsitikinkite, kad depiliaciniai diskai ir odos vėsintuvas tinkamai liečia jūsų
odą.
Prietaisą lengvai prispauskite prie odos.
Jei nesate patenkinti depiliavimo rezultatu, pamėginkite stumti
depiliatorių odos paviršiumi mažesniu greičiu.
7 Norėdami nuimti odos vėsintuvą, suimkite už prietaiso gale
esančios auselės (Pav. 7).
Jei nenorite naudoti odos vėsintuvo, pavyzdžiui, jei esate įpratę
depiliuotis, prietaisą galite naudoti ir be jo.
Įsitikinkite, kad depiliatorius laikomas statmenai jūsų odai ir yra
judinamas priešinga plaukų augimui kryptimi.
Šis epiliatorius pateikiamas su jautrių vietų gaubteliu, sumažinančiu aktyvių
epiliavimo diskų skaičių. Todėl šis prietaisas idealiai tinka epiliuoti jautresnes
kūno vietas, tokias kaip pažastis ir bikini liniją.
Pastaba: Geriausių rezultatų pasieksite, kai plaukeliai nėra labai ilgi
(maks. 1 cm).
1 Uždėkite jautrių vietų gaubtelį ant epiliacinės galvutės (Pav. 8).
Jautrių vietų gaubtelis gali būti uždėtas ant prietaiso tik vienu būdu.
2 Pasirinkdami norimą greitį, įjunkite prietaisą. (Pav. 5)
Patariame naudoti II greitį.
3 Laisva ranka ištempkite odą.
,
,
,
LIETUVIŠKAI20
Strona się ładuje...
Strona się ładuje...
Strona się ładuje...
Strona się ładuje...
Strona się ładuje...
Strona się ładuje...
Strona się ładuje...
Strona się ładuje...
Strona się ładuje...
Strona się ładuje...
Strona się ładuje...
Strona się ładuje...
Strona się ładuje...
Strona się ładuje...
Strona się ładuje...
Strona się ładuje...
Strona się ładuje...
Strona się ładuje...
Strona się ładuje...
Strona się ładuje...
Strona się ładuje...
Strona się ładuje...
Strona się ładuje...
Strona się ładuje...
Strona się ładuje...
Strona się ładuje...
Strona się ładuje...
Strona się ładuje...
Strona się ładuje...
Strona się ładuje...
Strona się ładuje...
Strona się ładuje...
Strona się ładuje...
Strona się ładuje...
Strona się ładuje...
Strona się ładuje...
Strona się ładuje...
Strona się ładuje...
Strona się ładuje...
Strona się ładuje...
Strona się ładuje...
Strona się ładuje...
Strona się ładuje...
Strona się ładuje...
Strona się ładuje...
Strona się ładuje...
Strona się ładuje...
Strona się ładuje...
Strona się ładuje...
Strona się ładuje...
Strona się ładuje...
Strona się ładuje...
Strona się ładuje...
Strona się ładuje...
Strona się ładuje...
Strona się ładuje...
Strona się ładuje...
Strona się ładuje...
Strona się ładuje...
Strona się ładuje...
Strona się ładuje...
Strona się ładuje...
Strona się ładuje...
Strona się ładuje...
Strona się ładuje...
Strona się ładuje...
Strona się ładuje...
Strona się ładuje...
Strona się ładuje...
Strona się ładuje...
Strona się ładuje...
Strona się ładuje...
Strona się ładuje...
Strona się ładuje...
Strona się ładuje...
Strona się ładuje...
Strona się ładuje...
Strona się ładuje...
Strona się ładuje...
Strona się ładuje...
Strona się ładuje...
Strona się ładuje...
Strona się ładuje...
Strona się ładuje...
Strona się ładuje...
Strona się ładuje...
Strona się ładuje...
Strona się ładuje...
Strona się ładuje...
Strona się ładuje...
Strona się ładuje...
Strona się ładuje...
Strona się ładuje...
Strona się ładuje...
Strona się ładuje...
Strona się ładuje...
-
 1
1
-
 2
2
-
 3
3
-
 4
4
-
 5
5
-
 6
6
-
 7
7
-
 8
8
-
 9
9
-
 10
10
-
 11
11
-
 12
12
-
 13
13
-
 14
14
-
 15
15
-
 16
16
-
 17
17
-
 18
18
-
 19
19
-
 20
20
-
 21
21
-
 22
22
-
 23
23
-
 24
24
-
 25
25
-
 26
26
-
 27
27
-
 28
28
-
 29
29
-
 30
30
-
 31
31
-
 32
32
-
 33
33
-
 34
34
-
 35
35
-
 36
36
-
 37
37
-
 38
38
-
 39
39
-
 40
40
-
 41
41
-
 42
42
-
 43
43
-
 44
44
-
 45
45
-
 46
46
-
 47
47
-
 48
48
-
 49
49
-
 50
50
-
 51
51
-
 52
52
-
 53
53
-
 54
54
-
 55
55
-
 56
56
-
 57
57
-
 58
58
-
 59
59
-
 60
60
-
 61
61
-
 62
62
-
 63
63
-
 64
64
-
 65
65
-
 66
66
-
 67
67
-
 68
68
-
 69
69
-
 70
70
-
 71
71
-
 72
72
-
 73
73
-
 74
74
-
 75
75
-
 76
76
-
 77
77
-
 78
78
-
 79
79
-
 80
80
-
 81
81
-
 82
82
-
 83
83
-
 84
84
-
 85
85
-
 86
86
-
 87
87
-
 88
88
-
 89
89
-
 90
90
-
 91
91
-
 92
92
-
 93
93
-
 94
94
-
 95
95
-
 96
96
-
 97
97
-
 98
98
-
 99
99
-
 100
100
-
 101
101
-
 102
102
-
 103
103
-
 104
104
-
 105
105
-
 106
106
-
 107
107
-
 108
108
-
 109
109
-
 110
110
-
 111
111
-
 112
112
-
 113
113
-
 114
114
-
 115
115
-
 116
116


Philips HP6501/00 Instrukcja obsługi
- Kategoria
- Depilatory
- Typ
- Instrukcja obsługi
- Niniejsza instrukcja jest również odpowiednia dla
w innych językach
- slovenčina: Philips HP6501/00 Používateľská príručka
- română: Philips HP6501/00 Manual de utilizare
Powiązane artykuły
-
Philips HP6490/00 Instrukcja obsługi
-
Philips HP6475 Instrukcja obsługi
-
Philips HP2843/01 Instrukcja obsługi
-
Philips BRE652/00 Instrukcja obsługi
-
Philips HP6482/02 Instrukcja obsługi
-
-
-
Philips HP6583/02 Instrukcja obsługi
-
Philips HP6493 Instrukcja obsługi
-