LARK FreeBird 50.8HD-DVR Instrukcja obsługi
- Kategoria
- Monitory dotykowe
- Typ
- Instrukcja obsługi


Thank you for choosing Lark FreeBird GPS device!
Please, kindly read the user manual carefully before you start
using the device.
Please, keep the manual for future reference.
The provider of the device reserves the right to modify the device or introduce
any changes to this user manual without any prior notice.
The actual layout of OSD menu screens in your device can differ from the one
showed in this manual (it depends on the software version).
Updated user manuals can be found on .
On the website you can also find Frequently Asked Questions answers and other
useful tips how to use your GPS device.
www.lark.com.pl
1

Contents
2
Precautions and safety tips . . . . . . . . . . . . . . . . . . . . . . . . . . . . . . . . . . . . . . . . . . . . . . . . 3
Using the device . . . . . . . . . . . . . . . . . . . . . . . . . . . . . . . . . . . . . . . . . . . . . . . . . . . . . . . . 9
Getting to know the device. . . . . . . . . . . . . . . . . . . . . . . . . . . . . . . . . . . . . . . . . . . . . . . . . . 5
Changing GSP device settings . . . . . . . . . . . . . . . . . . . . . . . . . . . . . . . . . . . . . . . . . . . . . . 13
Connecting the GPS device to PC . . . . . . . . . . . . . . . . . . . . . . . . . . . . . . . . . . . . . . . . . . . . 18
Troubleshooting. . . . . . . . . . . . . . . . . . . . . . . . . . . . . . . . . . . . . . . . . . . . . . . . . . . . . . . . . 20
Specifications . . . . . . . . . . . . . . . . . . . . . . . . . . . . . . . . . . . . . . . . . . . . . . . . . . . . . . . . . . 22
Features of the device . . . . . . . . . . . . . . . . . . . . . . . . . . . . . . . . . . . . . . . . . . . . . . . . . . 5
What's in the box? . . . . . . . . . . . . . . . . . . . . . . . . . . . . . . . . . . . . . . . . . . . . . . . . . . . . . 5
Parts and buttons of the device . . . . . . . . . . . . . . . . . . . . . . . . . . . . . . . . . . . . . . . . . . . . 6
Charging the device . . . . . . . . . . . . . . . . . . . . . . . . . . . . . . . . . . . . . . . . . . . . . . . . . . . . 8
Mounting the car holder. . . . . . . . . . . . . . . . . . . . . . . . . . . . . . . . . . . . . . . . . . . . . . . . . . 8
Getting started. . . . . . . . . . . . . . . . . . . . . . . . . . . . . . . . . . . . . . . . . . . . . . . . . . . . . . . . 8
Connecting the GPS device to PC . . . . . . . . . . . . . . . . . . . . . . . . . . . . . . . . . . . . . . . . . . 8
Switching ON/OFF the device . . . . . . . . . . . . . . . . . . . . . . . . . . . . . . . . . . . . . . . . . . . . . 9
Pointing pen . . . . . . . . . . . . . . . . . . . . . . . . . . . . . . . . . . . . . . . . . . . . . . . . . . . . . . . . . 9
System reset. . . . . . . . . . . . . . . . . . . . . . . . . . . . . . . . . . . . . . . . . . . . . . . . . . . . . . . . . 9
Navigation mode . . . . . . . . . . . . . . . . . . . . . . . . . . . . . . . . . . . . . . . . . . . . . . . . . . . . . . 10
Music mode . . . . . . . . . . . . . . . . . . . . . . . . . . . . . . . . . . . . . . . . . . . . . . . . . . . . . . . . . 10
Playing video files . . . . . . . . . . . . . . . . . . . . . . . . . . . . . . . . . . . . . . . . . . . . . . . . . . . . . 11
Viewing text files . . . . . . . . . . . . . . . . . . . . . . . . . . . . . . . . . . . . . . . . . . . . . . . . . . . . . . 12
GPS info. . . . . . . . . . . . . . . . . . . . . . . . . . . . . . . . . . . . . . . . . . . . . . . . . . . . . . . . . . . . 14
Photos viewing . . . . . . . . . . . . . . . . . . . . . . . . . . . . . . . . . . . . . . . . . . . . . . . . . . . . . . . 11
FM transmitter . . . . . . . . . . . . . . . . . . . . . . . . . . . . . . . . . . . . . . . . . . . . . . . . . . . . . . . . 12
Display backlight settings . . . . . . . . . . . . . . . . . . . . . . . . . . . . . . . . . . . . . . . . . . . . . . . . 13
Volume adjustment. . . . . . . . . . . . . . . . . . . . . . . . . . . . . . . . . . . . . . . . . . . . . . . . . . . . . 13
Language settings . . . . . . . . . . . . . . . . . . . . . . . . . . . . . . . . . . . . . . . . . . . . . . . . . . . . . 13
Date and time settings . . . . . . . . . . . . . . . . . . . . . . . . . . . . . . . . . . . . . . . . . . . . . . . . . . 14
Calibration of the touch screen. . . . . . . . . . . . . . . . . . . . . . . . . . . . . . . . . . . . . . . . . . . . . 15
Choose navigation . . . . . . . . . . . . . . . . . . . . . . . . . . . . . . . . . . . . . . . . . . . . . . . . . . . . . 15
Power . . . . . . . . . . . . . . . . . . . . . . . . . . . . . . . . . . . . . . . . . . . . . . . . . . . . . . . . . . . . . 15
Factory settings . . . . . . . . . . . . . . . . . . . . . . . . . . . . . . . . . . . . . . . . . . . . . . . . . . . . . . . 16
System info . . . . . . . . . . . . . . . . . . . . . . . . . . . . . . . . . . . . . . . . . . . . . . . . . . . . . . . . . . 16
USB connection. . . . . . . . . . . . . . . . . . . . . . . . . . . . . . . . . . . . . . . . . . . . . . . . . . . . . . . 16
Explorer . . . . . . . . . . . . . . . . . . . . . . . . . . . . . . . . . . . . . . . . . . . . . . . . . . . . . . . . . . . . 17
Installing USB ActiveSync software . . . . . . . . . . . . . . . . . . . . . . . . . . . . . . . . . . . . . . . . . . 18

WE KINDLY REQUEST NOT TO ADD/DELETE ANY FILES TO AND FROM THE INTERNAL
MEMORY OF THE DEVICE. TO STORE MULTIMEDIA FILES
(LIKE JPG, WMA, WMV AND OTHERS) PLEASE KINDLY USE EXTERNAL
MEMORY MEDIA (microSD CARDS)!
CAUTION!
IMPORTANT REMARK
The driver is fully responsible for securing safety on the road; using the navigation
device/ software does not constitute any excuse in case of any traffic regulations breach,
collision or accident.
The navigation device and the navigation software are designed to provide route
suggestions. They are absolutely not meant to release the driver from the obligation to
pay special attention to road conditions, weather or any other factors that may affect
safety while driving.
Always drive the vehicle in a safe manner.
Never operate the navigation device (input destinations, change settings etc.) while
driving as this may distract your attention from the happenings on the road and cause
potentially hazardous situations. You must be always fully aware of all driving conditions.
When installing the device in your vehicle please make sure it does not obstruct the
driver’s view of the road or interfere with vehicle operating controls.
Do not place the device unsecured on the vehicle dashboard.
Do not place the device on or above any airbag.
The provider of the device does not bear any responsibility for the adequacy of the
device/ software to any particular purpose.
The user should be aware of the current GPS technology development stage and
all its limitations.
The provider of the device in particular does not bear any responsibility for the accuracy
of the maps/navigation software which are delivered by independent companies that are
solely responsible for their products.
Precautions and safety tips
3

4
Safety tips
CAUTION!
1. Protect the device from dust, humidity, water, shocks, very low and high temperatures.
Do not store the device where prolonged exposure to extreme temperatures may occur
(as in the windshield). Do not expose the device to water as permanent malfunction may
result.
2. A strong shock, hit or indentation of the housing may cause serious, irrepairable damage
to the device itself or the battery.
3. Always charge the battery or connect the device to the car charger when:
the battery icon indicates the need to charge the battery,
the device switches off right after being switched on,
the device does not react to any buttons operations.
4. Never disconnect the device from the PC during upload or download of any data – this may
causa a permanent damage to the device as well as the data.
5. The user must take all necesary measures to secure all important data (copies on various
media etc.) The device provider does not bear any responsibility for any loss of user’s data
due to the device malfunction.
6. To minimize the risk of data loss protect the device from stron electromagnetic fields;
in particular do not store it near TV sets, speakers, mobile phones etc.
7. Protect your ears! Doctors warn that prolonged use of in-ear earphones and listening to loud
music may affect your hearing.
8. Be careful when listening to music while driving. You must be always aware of the situation
on the road which also includes attentiveness to audio signals
The music and video player with which the device is equipped can be only used to play
musi and video files to which the user has legal rights. Any breach of copyrights is at the
sole responsibility of the user.
Precautions and safety tips

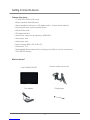
Features of the device
What's in the box?
5" HIGH DEFINITION LCD screen
Display resolution 800x480 pixels
Stereo headphone connector, 1.5W speaker built-in, volume can be adjusted
Key-press and touch screen operated device
Built-in GPS module
GPS antenna built-in
Video player: wmv
Audio player: wma
Picture browser: BMP, JPG, PNG, GIF
File browser: TXT
Rechargeable lithium battery built-in (recharged via USB port, can be connected to
CIG LIGHTER directly)
microSD slot, support to the capacity of 8GB SDHC
5
Lark FreeBird 50.6HD Vehicle suction cup mount
Car adapter Pointing pen
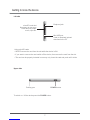
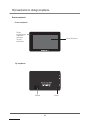
Getting to know the device


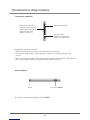
Left side
Upper side
Using microSD cards
NEVER remove the card from the slot while the device is ON.
If you want to remove the card: switch off the device, than remove the card from the slot.
The card can be properly insterted in one way only. Insert the card and push until it clicks.
To switch on / off the device press the button.
POWER
7
Getting to know the device
microSD cards slot
Necessary to use some
extra data, like maps,
music, clips etc.
Mini-USB port
Used to download/ upload
data from/to the PC
Earphone jack
buttonPOWER
Pointing pen

Charging the device
Mounting the car holder (vehicle suction mount)
Getting started – acquiring satellites’ signal
Connecting the GPS device to PC
To charge the battery of the device please place the USB jack of the car charger in the USB
slot of the device. The other end of the charger place in the car lighter jack (make sure the car
electricity is on). The battery will be charging regardless of the fact if the device is on or off.
Red LED blinking indicate the charging is in progess. When the battery is fully charged,
the LED will turn green.
1. If you are using the device during the charging process, the charging will take longer.
2. After charging is complete or when you want to stop charging the device, simple detach
the charger’s cable from the device.
3. Never crush the battery or throw it to fire! Fire or electric shock hazard!
4. While travelling it is recommended to have the car charger attached to the device all the
time.
5. Please, make sure that the device and the cable do not obstruct the driver’s view of the
road and do not interfere with the vehicle operating controls.
Press the rubber part of the mount to the windscreen and move the latch to fasten the
mount.
Using the knobs adjust the position of the mount to your needs.
When installing the device in your vehicle please make sure it does not obstruct the
driver’s view of the road or interfere with vehicle operating controls.
Do not place the device unsecured on the vehicle dashboard.
Do not place the device on or above any airbag.
When you switch ON the device for the first time, please make sure you are in an open
space, with no large objects near (like tall buildings and trees).
Hold the device steadily until the acquisition of satellites’ signal. Pls note that acquiring
the satellites can take a few minutes.
Than you can set your route.
It is always recommended to acquire the GPS signal before placing the device in the car.
After installing the ActiveSyc software (see page 18)
connect the GPS device to your PC using the USB
cabel (mini-A USB type). The cable must be obtained
separately, it is not included in the set.
Step 1
Step 2
Getting to know the device
8

Switching ON/OFF the device
Pointing pen
System reset
All unstored data will be removed after resetting the system.
WARNING!
Press the POWER button. The welcome screen will
appear and the software will load up.
When the device is in navigation, music or video mode
you can return to the main menu screen simply touching
the POWER button on the upper part of the device.
Switching off
After pressing the POWER button the device will ask you
to choose between switching off and stand-by mode.
Stand-by mode means the screen will be temporarily
shut down and when you press the POWER button again
the device will restore the last active screen. Switching off
means that when you press the POWER again the system
will be loaded again. If you do not choose any option within
20 seconds, the device will switch off automatically.
The pointing pen is inserted to a slot in the back side of the device.
1. Single click – touch the screen once.
2. Double click – touch the screen twice quickly.
3. Dragging – touch the screen in the starting point than move the pen to the destination.
If the system seems jammed please use the pointing pen to press the RESET button
(on the back side of the device).
Using the device
9

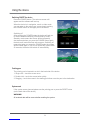
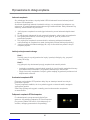
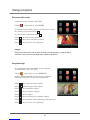
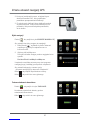
Navigation mode
Music mode
Play list
REMARK!
More info on converting the files you can easily find in the Internet.
Touch to enter mode.
If any map application is installed in the device,
it will start now.
Details concerning the usage of map application
you will find in the separate map user manual.
The device can play WAV and WMA files.
Any MP3 files must be converted to WMA format before
they can be played on the device (pls use any music files
converter available free of charge on the Internet).
Touch to enter mode.
To play music click .
To stop playing music click .
Click to move to the next file .
Click to move to the previous file.
Click for repeating.
Click to enter the random playback.
Click to adjust volume.
Click to play music from the play list.
Click to select the sound effect.
Click to minimize the window, still you can listen to music.
Click to return the main menu.
Click
Click to select all files to add to the play list.
Click to
Click to select all files to delete from the play list.
NAVIGATION
MUSIC
On the list you can see audio files and folders containing
such files.
to select a file to add to the play list.
select a file to delete from the play list.
Using the device
10

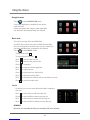
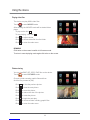
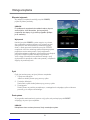
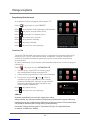
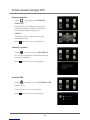
Playing video files
Photos viewing
Click twice on the screen to switch to full screen mode.
To return to normal playing mode again click twice on the screen.
REMARK!
The device can play WMV video files.
Touch to enter mode.
After entering the MOVIES mode will be started video
player.
To play movie click .
To stop playing a file click .
Click to adjust volume.
Click to choose video file from the folder.
Click to return the main menu.
You can view BMP, GIF, JPEG, PNG files on the device.
Touch to enter mode.
Choose a folder containg graphic files and than
click the file you want to play.
Click to view the previous picture.
Click to view the next picture.
Click to zoom the picture.
Click to reduce the size of the picture.
Click to rotate the picture.
Click to begin the auto-play.
Click to choose a folder containg graphic files.
Click to return the main menu.
MOVIES
PICTURES
Using the device
11

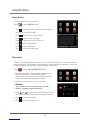
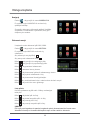
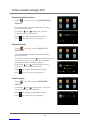
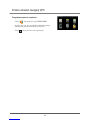
Viewing text files
FM transmitter
This frequency cannot be occupied by any radio
station to avoid any signal interference.
REMARK!
You can view txt files on the device.
Touch to enter mode.
Click to choose a folder containg txt files and than
click the file you want to view.
Click to move to the previous page.
Click to move to the next page.
Click to change the colour of the text.
Click to show a bookmark.
Click to add a bookmark.
Click to return the main menu.
Thanks to the FM transmitter the sound from the GPS device (music or voice commands) is
played through an FM broadcast band frequency. Hence the voice commands or music can
be played through your car stereo ensuring better sound quality.
Touch to enter mode.
1. Mark the ‘ON’ option. Remove the marking when you
want to deactivate the FM transmitter mode.
While listening to music you can minimise the player
screen and activate the navigation software.
2. Set the chosen frequency on your car radio.
3. Using and buttons set the same frequency on the
device. You can also drag the bar to set the frequency.
4. Click to save the changes.
5. Click to return the main menu.
E-BOOK
FM TRANSMITTER
Using the device
12

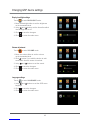
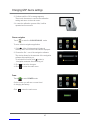
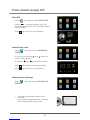
Display backlight settings
Volume adjustment
Language settings
Touch to enter mode.
1. Move the backlight slider to set the brightness
on the demanded level.
2. Using and buttons set the time after which
the backlight will be off.
3. Click to save the changes.
4. Click to return the main menu.
Touch to enter mode.
1. Move the volume slider to set the volume
on the demanded level.
2. Click button if you wish the device to emit
sound each time the screen is touched.
3. Using and buttons to set the sound.
4. Click to save the changes.
5. Click to return the main menu.
Touch to enter mode.
1. Using and buttons to set the OSD menu
language.
2. Click to save the changes.
3. Click to return the main menu.
BACKLIGHT
VOLUME
LANGUAGE
Changing GSP device settings
13
+

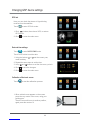
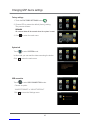
GPS info
Date and time settings
Calibration of the touch screen
Here you can check the stream of signals being
received from the satellites.
Touch to enter GPS info mode.
1. Click button, than choose YES, to restore
GPS device.
2. Click to return the main menu.
Touch to enter mode.
Touch DATE button to set the date.
1. Using the buttons or set the current year,
month and day.
2. Repeat the same steps to set the time.
3. Using and buttons to set the time zone you're in.
4. Click to save the changes.
5. Click to return the main menu.
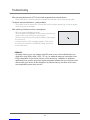
Touch to start the calibration process.
1. When a black cross appears on the screen
press the very centre of the cross, using your
pointing pen.
Than the cross will move to another position,
again press the centre of it.
DATE&TIME
Changing GSP device settings
14

2. Continue until the ‘OK’ message appears.
Than touch the screen to confirm the calibration
setting and return to the main menu.
3. In case the calibration process fails, it will be
repeated until successful.
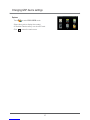
Touch to enter the . mode.
To set a default navigation application:
Click . A list of folders stored in internal
memory and in the microSD card will be displayed.
Choose the file *. exe of the navigation software.
The device allows for the autostart of the navigation
software after switching on.
To activate this function click button to
„Navigation autostart after switching on”.
3. Click to save the changes.
4. Click to return the main menu.
Touch to enter mode.
On the screen you will see a current level
of charging the battery.
Click to return the main menu.
CHOOSE NAVIG
POWER
1.
2.
Choose navigation
Power
Changing GSP device settings
15
3,7V

Factory settings
System info
USB connection
All unsaved data will be erased when the system is reset.
REMARK
FACTORY SETTINGS
SYSTEM
USB CONNECTION
1. Touch the button .
2. Choose YES to restore the default (factory) setting.
The process will start.
3. Click to return the main menu.
Touch to enter mode.
In this mode you can read the data concerning the device.
Click to return the main menu.
Touch to enter mode.
Choose an option:
“MASS STORAGE” or “MS ACTIVESYNC”
Click to return the Settings menu.
Changing GSP device settings
16


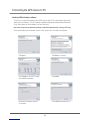
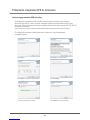
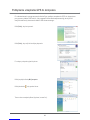
Installing USB ActiveSync software
http://www.microsoft.com/windowsmobile/en-us/downloads/eulas/eula_activesync45.mspx
To set up a connection between the GPS device and PC the ActiveSync Microsoft
software is necessary. This is a widely available apllication distributed by Microsoft
Corp. More data on the software you can find here:
After downloading the software double click “setup.msi” to install the software.
Click Click to continue
Click , if you wish to change Click
the installation destination
Wait until the installation process Click and restart your PC
is completed
Next Next >
Change Install
Finish
>
18
Connecting the GPS device to PC

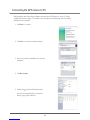
After installing the ActiveSync software connect the GPS device to your PC using
a USB cable (mini A type). The cable is not included in the package, but it is widely
available on the market.
1.
2.
4.
Click to continue
Click to enter the connection interface
3. After the connection is established such a screen
will appear:
Click
5. Double click to enter the following interface:
Now you can manage the files in the device’s
memory (copy, paste, delete etc.)
Next >
Next >
My computer
Connecting the GPS device to PC
19
Strona się ładuje...
Strona się ładuje...
Strona się ładuje...
Strona się ładuje...
Strona się ładuje...
Strona się ładuje...
Strona się ładuje...
Strona się ładuje...
Strona się ładuje...
Strona się ładuje...
Strona się ładuje...
Strona się ładuje...
Strona się ładuje...
Strona się ładuje...
Strona się ładuje...
Strona się ładuje...
Strona się ładuje...
Strona się ładuje...
Strona się ładuje...
Strona się ładuje...
Strona się ładuje...
Strona się ładuje...
Strona się ładuje...
Strona się ładuje...
Strona się ładuje...
Strona się ładuje...
-
 1
1
-
 2
2
-
 3
3
-
 4
4
-
 5
5
-
 6
6
-
 7
7
-
 8
8
-
 9
9
-
 10
10
-
 11
11
-
 12
12
-
 13
13
-
 14
14
-
 15
15
-
 16
16
-
 17
17
-
 18
18
-
 19
19
-
 20
20
-
 21
21
-
 22
22
-
 23
23
-
 24
24
-
 25
25
-
 26
26
-
 27
27
-
 28
28
-
 29
29
-
 30
30
-
 31
31
-
 32
32
-
 33
33
-
 34
34
-
 35
35
-
 36
36
-
 37
37
-
 38
38
-
 39
39
-
 40
40
-
 41
41
-
 42
42
-
 43
43
-
 44
44
-
 45
45
-
 46
46


LARK FreeBird 50.8HD-DVR Instrukcja obsługi
- Kategoria
- Monitory dotykowe
- Typ
- Instrukcja obsługi
w innych językach
- English: LARK FreeBird 50.8HD-DVR User manual
Powiązane artykuły
Inne dokumenty
-
GOCLEVER NAVIO 505 Instrukcja obsługi
-
 Smailo HD 4.3 Instrukcja obsługi
-
 Modecom FreeWay Instrukcja obsługi
-
GOCLEVER DRIVE NAVIO 2 540 Skrócona instrukcja obsługi
-
LG LGE410I.ASWSWH Instrukcja obsługi
-
LG LG Swift L3 II Instrukcja obsługi
-
LG LGP875.ABYTWH Instrukcja obsługi
-
LG LGE610.AOREBK Instrukcja obsługi
-
-
 NAVROAD UNI Instrukcja obsługi


