
IAN
292900
VIBRATION
VIBRATIONVIBRATION
VIBRATION
BOARD
BOARDBOARD
BOARD
GB
GBGB
GB
PL
PLPL
PL
VIBRATION
VIBRATIONVIBRATION
VIBRATION
BOARD
BOARDBOARD
BOARD
Instructions
GB
GBGB
GB
VIBRATIONSBOARD
VIBRATIONSBOARDVIBRATIONSBOARD
VIBRATIONSBOARD
Nutzungs- und Sicherheitshinweise
DE
DEDE
DE
AT
ATAT
AT
PŁYTA WIBRACYJNA
Wskazówki bezpieczeństwa i obsługi
PL
PLPL
PL
DE
DEDE
DE

I
II
I
NDEX
NDEXNDEX
NDEX
1
(GB) Instruction manual _______________________________________________________________ 4
2
Important safety information ___________________________________________________________ 4
3
List of parts _________________________________________________________________________ 5
4
Instructions for use ___________________________________________________________________ 5
4.1
General instructions ____________________________________________________________ 5
4.2
Computer _____________________________________________________________________ 5
4.3
Remote control _________________________________________________________________ 6
4.4
Programs _____________________________________________________________________ 6
5
Training notes _______________________________________________________________________ 6
5.1 General Training Notes _________________________________________________________ 6
5.2 Exercise instructions ____________________________________________________________ 7
6
Maintenance and care ________________________________________________________________ 8
7
Product information __________________________________________________________________ 8
7.1 Batteries ______________________________________________________________________ 8
7.2 Declaration of conformity ________________________________________________________ 9
7.3 Disposal ______________________________________________________________________ 9
8
Warranty ___________________________________________________________________________ 9
9
Service _____________________________________________________________________________ 9
S
PIS TREŚCI
10
(PL) Instrukcji _______________________________________________________________ 10
11
Ważne informacje dotyczące bezpieczeństwa ______________________________________ 10
12
Lista części _________________________________________________________________ 11
13
Instrukcja użytkowania ________________________________________________________ 11
13.1 Ogólne wskazówki ______________________________________________________ 11
13.2 Komputer _____________________________________________________________ 12
13.3 Pilot zdalnego sterowania ________________________________________________ 12
13.4 Programy _____________________________________________________________ 12
14
Wskazówki treningowe ________________________________________________________ 12
14.1 Ogólne wskazówki treningowe _____________________________________________ 12
14.2 Ogólne wskazówki dotyczące ćwiczeń ______________________________________ 13
14.3 Instrukcja obsługi _______________________________________________________ 13
15
Konserwacja i pielęgnacja _____________________________________________________ 14
16
Wskazówki dotyczące produktu _________________________________________________ 14
16.1 Baterie _______________________________________________________________ 15
16.2 Deklaracja zgodności ____________________________________________________ 15
16.3 Utylizacja _____________________________________________________________ 15
17
Gwarancja _________________________________________________________________ 15
18
Serwis _____________________________________________________________________ 16

I
II
I
NHALTSVERZEICHNIS
NHALTSVERZEICHNISNHALTSVERZEICHNIS
NHALTSVERZEICHNIS
19
(D) Nutzungsanleitung ______________________________________________________________ 17
20
Achtung: Wichtige Sicherheitsinformationen ____________________________________________ 17
21
Liste der Teile _____________________________________________________________________ 18
22
Nutzungsanleitung _________________________________________________________________ 19
22.1 Allgemeine Hinweise __________________________________________________________ 19
22.2 Computer ___________________________________________________________________ 19
22.3 Fernbedienung _______________________________________________________________ 19
22.4 Programme _________________________________________________________________ 19
23
Trainingsanleitung _________________________________________________________________ 20
23.1 Allgemeine Hinweise __________________________________________________________ 20
23.2 Übungshinweise______________________________________________________________ 20
24
Wartung und Pflege ________________________________________________________________ 21
25
Produkthinweise ___________________________________________________________________ 21
25.1 Batterien ____________________________________________________________________ 22
25.2 Konformitätserklärung _________________________________________________________ 22
25.3 Entsorgung __________________________________________________________________ 22
26
Garantie _________________________________________________________________________ 22
27
Service ___________________________________________________________________________ 23

GB
4
1
11
1 (GB)
(GB)(GB)
(GB)
I
II
I
NSTRUCTION MANUAL
NSTRUCTION MANUALNSTRUCTION MANUAL
NSTRUCTION MANUAL
Congratulations!
With your purchase you have decided on a high-
quality product. Get to know the product before you
start to use it. Carefully read the following assembly
instructions. Use the product only as described and
only for the given areas of application. Keep these
instructions safe. When passing the product on to a
third party, always make sure that the documentation is
included.
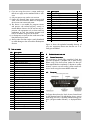
Included in the package is your new training unit itself,
its instructions for use, the power cable, the remote
control and the stretch tubes with handles.
Please note that this equipment is intended for normal
home use only. It is not designed for commercial use.
Please follow the instructions on how to use and care
for the equipment to enjoy using for a long time.
2
22
2 I
II
I
MPORTANT SAFETY INFO
MPORTANT SAFETY INFOMPORTANT SAFETY INFO
MPORTANT SAFETY INFORMATION
RMATIONRMATION
RMATION
a) Please carefully read this manual and keep it for
future use!
b) Read and follow the instructions
before using the product. Safe use
of the device can only be reached
when it is properly used. It is your
responsibility to ensure that all users of this device
are informed regarding the warnings and precau-
tionary measures.
c) Check possible health risks with your doctor be-
fore starting any exercise program. The advice of
your physician regarding your heart rate, your
blood pressure or your cholesterol levels needs to
be followed.
d) Observe your body's signals. Incorrect or exces-
sive exercise can pose a risk to your health. If at
any time during the workout you feel pain, tight-
ness in the chest, irregular heartbeat, extreme
shortness of breath, dizziness or light-headedness,
stop your workout immediately and consult your
doctor.
e) Keep children and pets away from the product.
This item is intended for use only by adults.
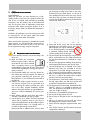
f) Use the device on a stable, level and horizontal
surface with a protective cover for your floor or
carpet. The safety distance to other objects and/or
walls should be at least 2.1 m in length and 1 m
in width. Compensate for uneven floors.
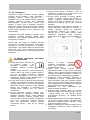
Please note that in addition to the exercise area
you must keep a safety area of 60 cm into every
direction free of any other objects. In case two or
more multipurpose fitness items are set up next to
each other, they can share one safety area. Please
compare for the following drawing to illustrate the
exercise and safety area.
g) Check that all the screws and nuts are properly
tightened every time before using it. The safety of
the equipment can only be maintained
if it is checked regularly. Pay attention
to potential shearing points marked
with the symbol shown on the right.
h) The item should be checked every time for exam-
ple for cracks before use. The safety of the device
can only be maintained if it is checked on a regu-
lar basis.
i) Always wear appropriate clothing during training.
Wear appropriate footwear with non-slip soles.
j) Use the equipment only as directed. If you find a
defective part when you assemble or test the
equipment or if you hear strange noises when us-
ing it, stop using it until the problem is eliminated.
k) Keep a sufficiently large distance from other peo-
ple and / or objects. Be careful when using the
product to not hurt yourself or others.
l) The equipment is particularly suitable for training
the legs, upper body, arm and torso muscles and
to improve overall endurance and burn fat.
m) The equipment has been tested, Standard EN ISO
20957-1, Class H. It is intended for domestic use
only. The equipment is designed to carry a maxi-
mum user weight of 100 kg.
n) The device is not suitable for therapeutic use.
o) Do not pull the plug out by the cord.
p) Do not jump on the plate as this can damage the
unit.
q) Never try to repair the unit yourself, but contact
the salesperson or customer service centre.
r) Switch off and unplug the equipment after every
use.
s) Turn off the machine and disconnect the power
supply before cleaning it.

GB
5
t) If you are using the unit on a carpet, make sure
that the air supply to the ventilation holes is suffi-
cient.
u) Only one person may use the unit at a time.
v) Protect the vibration plate against moisture and
water, and ensure that the electrical components
do not come into contact with water.
w) This device is not suitable for pregnant women
and persons with reduced physical, sensory or
mental abilities. Persons who do not have any ex-
perience with equipment such as these need an
explanation on how the machine operates and
how to use before using it for the first time.
x) It is dangerous to reach into the inside area of the
foot plate with your hand.
y) Always make sure that weight is evenly distributed
to avoid damage to the unit and the development
of noise.
3
33
3 L
LL
L
IST OF PAR
IST OF PARIST OF PAR
IST OF PARTS
TSTS
TS
No.
No.No.
No.
Description
DescriptionDescription
Description
#
##
#
1
Remote control
1
2
Display cover
1
3
Display
1
4
Transparent panel
1
5
Upper housing cover
1
6
Centre section of housing
1
7
Phillips screw ST4 x 12
18
8
Base plate
1
9
Plastic connector
2
10
Motor
1
11
Motor mounting
bracket
1
12
Main frame
1
13
Bottom plate
1
14
Transport roller
1
15
R clamp
2
16
Cable connection
3
17
Magnetic ring
1
18
Stretch tube with handle (
L
60 cm)
2
19
Lower housing cover
1
20
Base supports
4
21
Power cable with power plug
1
22
Power switch
1
23
Fitting for power switch
1
24
Fuse
1
25
Rubber mat
1
26
Hexagonal head bolt M8 x 25
2
27
Motor mounting bracket
1
28
Hook
2
29
Phillips screw ST3 x 10
4
No.
No.No.
No.
Description
DescriptionDescription
Description
#
##
#
30
Connecting pin
2
31
Ball bearing sleeve
2
32
Screw M5 x 30
8
33
Nut
with nylon insert M8
4
34
Cover for axle mounting bracket
2
35
Axle mounting bracket
2
36
Ball bearing 6201
2
37
Flywheel
1
38
Spring washer ±8
6
39
Hex bolt M8 x 20
2
40
Bushing
1
41
Axle
1
42
V
-
belt
1
43
Washer ±4
1
44
Insulation
2
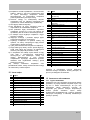
Figure A shows the exploded assembly drawing of
your new equipment. Please note that the unit is al-
ready pre-assembled.
4
44
4 I
II
I
NSTRUCTIONS FOR USE
NSTRUCTIONS FOR USENSTRUCTIONS FOR USE
NSTRUCTIONS FOR USE
4.1
4.14.1
4.1 General instructions
General instructionsGeneral instructions
General instructions
The equipment is already fully assembled. Check that
your new equipment is complete with no parts missing
before using it for the first time. Make sure that you
have emptied the box completely. If, despite our quality
controls, a part or two are missing, please contact our
service centre using the contact details at the end.
4.2
4.24.2
4.2 Computer
ComputerComputer
Computer
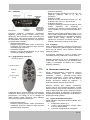
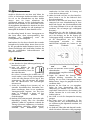
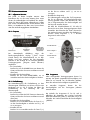
The figure above shows the Touch Screen Control Panel
on the vibration board. The LED display shows, among
other things, the time. A possibly selected training pro-
gram („Program Mode Indicator‰) is displayed below
it.

GB
6
Switch on/off
Press the POWER button to start the equipment and
press this button again to turn it off.
Setting the speed
Press the MODE/SPEED button to increase the
speed in manual mode.
4.3
4.34.3
4.3 Remote control
Remote controlRemote control
Remote control
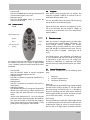
The remote control uses infrared to transmit the data to
the vibration unit and has a range of approximately
2.5 m. Therefore, point the remote control at the vibra-
tion board.
Switch on/off
Press the ON/OFF button to start the equipment
and press this button again to turn off.
Setting the speed
Press the S (+) button to increase the speed and S (-)
to decrease it.
Setting the time
Press the T (+) button to increase the time and T (-)
to decrease it.
Setting the program
The vibration board has five programs designed for
efficient and varied training. Please note that you
cannot adjust the speed and time in the program
mode.
Use the quick selection keys P1, P3 or P5 to directly
select one of these training programs described be-
low. Press the P button to select the next program,
which means pressing once starts program 1, while
pressing twice starts program 2 and so forth.
4.4
4.44.4
4.4 Programs
ProgramsPrograms
Programs
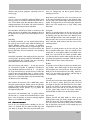
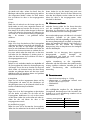
Each preset training program lasts 10 minutes. The
respective set speed is held for an interval of 30 sec-
onds before the next speed is set.
You can manually control the speed and the training
time at all times in the manual program.
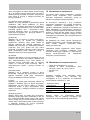
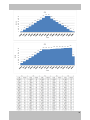
Figure (B) shows the sequences of programs P1 to P5.
The X axis describes the time sequence („TIME‰) at
intervals of 30 seconds each. The Y-axis describes the
speed („SPEED‰).
5
55
5 T
TT
T
RAINING NOTES
RAINING NOTESRAINING NOTES
RAINING NOTES
With your interest in strength training you have taken
an important step towards mobility and health - be-
cause strength training strengthens the muscles.
Strength training not only prevents the loss of muscle
mass and strength, but improves on this even. The mo-
bility of the joints is increased - reducing the risk of
injury.
Your blood pressure, your cholesterol, your blood sug-
ar, your motivation and even your mood can be great-
ly improved by a little sport. You can change your
character in moderation. In conjunction with proper
diet will reduce your body fat and improve your silhou-
ette.
5.1
5.15.1
5.1 General Training Notes
General Training NotesGeneral Training Notes
General Training Notes
Each exercise should consist of the following three
parts:
1. Warm Up
2. Cardio or weight exercise
3. Cool Down & stretching
Warm Up
This stage helps get the blood flowing around the body
and the muscles working properly. It will also reduce
the risk of cramp and muscle injury. It is advisable to
do a few stretching exercises. Each stretch should be
held for approximately 30 seconds, do not force or jerk
your muscles into a stretch - if it hurts, STOP.
The Training
The start of endurance (often also called cardiovascular
or cardio training because of the positive effects on the
cardiovascular system) or a force or muscle training is
the first step in the fight against civilization infectious
On/off
Quick selection keys
Speed +
Time +
Manual quick selec-
tion keys
Speed –
Time –
Program
selection

GB
7
diseases and physical symptoms, especially with ad-
vancing age.
Cool Down
Just as a warm-up should be performed before each
training session, a cool-down should take place after a
unit. A Cool Down starts the relaxation phase; the op-
erating temperature of the body will come back down
and shows the transition of stress relaxation.
The cool-down should last at least 10 minutes (as the
Warm Up) and is controlled slowly dropping down to
the lowest level. The pulse rate should drop as low as
possible.
Stretching
As already mentioned, you can stretch before/during
the warm-up your muscles easily. After the training you
should definitely stretch your muscles. A stretching
afterwards returns the muscle to its original length, thus
preventing muscle shortening. The more strenuous the
training has been, the more important is the stretching
afterwards.
Particularly important is the stretching for the exercised
muscle groups. Stretching should be noticeable for the
muscle addressed, but it should never hurt. Stretching
should take 20 to 30 seconds per muscle.
Start your training with about 7 - 8 reps per exercise
set. Increase the number of repetitions according to
your individual preferences slowly to 11 - 12 reps per
set. If you notice that your muscles are tired, reduce the
scope of your training. Ideally train 3 - 4 times a week.
However, be sure that between individual exercises one
day of rest is inserted so that the muscles and the body
are able to recover sufficiently.
Also, perform all exercises with a stable body centre.
The spine (particularly the lumbar spine) must be kept
straight, so that the individual vertebrae are held in the
biomechanically correct position, e.g. to protect the
disc against faulty loads.
Do not train with momentum and / or jerkily. Perform
all exercises in a smooth and controlled manner. Note
that in case of improper or excessive training negative
effects on your health are possible.
5.2
5.25.2
5.2 Exercise instructions
Exercise instructionsExercise instructions
Exercise instructions
First of all, you should practice standing on the unit
when it is switched off. First stand on both legs with
your body up straight. Then lift a leg and stretch your
arms out. Change legs. Do this to get the feeling of
standing on the unit.
Body tension will always be in the core when you are
in the normal standing position on the vibration plate.
For this, keep your back straight and bend your knees
slightly. The leg muscles are now also slightly tightened.
Never train with straight arms or legs, always keep
them bent.
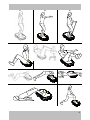
(C) Squats
Stand in a normal position on the unit with your feet
about shoulder-width apart. Go into the squat position
by bending your legs and move your buttocks back-
wards and downwards in the same movement. To sta-
bilise yourself, raise your arms upwards in front of your
body. Hold the squat position and then return to the
standing position.
(D) Biceps
Stand in a normal position on the unit with your feet
about shoulder-width apart. Take one handle of the
stretch tube in each hand at about waist height. Now
bend your arms and lift your hands upwards. Make
sure that the elbows remain stable against the sides of
your body throughout the movement. Hold this position
briefly and then return to the initial position.
(E) Dips
Sit upright in front of the unit. With your thumbs point-
ing inwards, place both hands on the training plate
and straighten your arms to lift your body into the air.
Bend your arms back and lower your body. Now lift it
again. You can perform this exercise with bent legs or
– as a variation – with stretched legs.
(F) Sit-ups
Lie with your back on the training plate and place your
feet on a chair or similar, place your feet in front of
your body on the floor with bent knees for more stabil-
ity or lift your feet for a more strenuous variation. Now
hold your arms to the side of your head or chest and
lift your upper body towards your knees. Hold this
position briefly and then return to the initial position.
(G) Push-ups
Support yourself with both hands as shown on the
training plate. Keep your body straight and stiff and
bend your arms now. Then straighten your arms again.
You can vary this exercise by doing it either with bent
legs on the knees (see figure) or with straight legs and
straight back on the feet.

GB
8
(H) Core exercise
Lie with tightened legs on the training plate and support
the upper body on bent arms in front of the plate. Hold
your body and back straight while keeping the posi-
tion.
(I) Back
Lie in front of the training plate with your back on the
floor and place your feet on the training plate. Stabilise
yourself with your arms on the sides. Now raise your
hips. Hold this position and then return to the initial
position.
(J) Lunge
Place one foot in the middle of the training plate. Move
the other leg slightly to the side and to the back. Now
lower your body keeping the centre of your body
straight. Be careful not to let your front knee bend over
the tip of your toes. Hold this position and then return
to the initial position. Change sides.
6
66
6 M
MM
M
AINTENANCE AND CARE
AINTENANCE AND CAREAINTENANCE AND CARE
AINTENANCE AND CARE
After training, treat you new equipment as follows so
that you can enjoy it for a long time:
1. Store the equipment as far as possible, where it
is not in anyoneÊs way.
2. Wipe the equipment and the handles with a dry
cloth. Do this to clean the components and pre-
venting sweat from drying on the equipment.
The unit is maintenance-free under normal conditions
and use. Nevertheless, the user is responsible to regu-
larly check that all parts fit tightly and that wear is not
impairing the performance of the equipment. In ac-
cordance with EN ISO 20957-1: 2013 Point 5.15, pay
special attention to the condition of particularly stressed
parts such as the hand grips or the shock absorber.
Do not use aggressive cleaning agents on the equip-
ment, but remove any dirt and dust with a soft or slight-
ly damp cloth.
Any modification to the original parts, materials or the
construction of the multipurpose fitness equipment can
significantly reduce its performance. The same applies
in the case of severe soiling, misuse or incorrect appli-
cation.
7
77
7 P
PP
P
RODUCT INFORMATION
RODUCT INFORMATIONRODUCT INFORMATION
RODUCT INFORMATION
Weight without packaging: approximately 13.2
kg
Dimensions when assembled: approximately
(L) 69.5 x (W) 39 x (H) 13.5 cm
220-240V AC
200 W
The extension of the training band is indicated in a
closed (i.e. circular) state with a tolerance of +/- 20%.
Lengthening training band
Strength (N)
80 cm
ca. 22 N
100 cm
ca. 33 N
120 cm
ca. 48 N
150 cm
ca. 48 N
Do not stretch the band over a length of 150 cm!
The item you have purchased has been manufactured
between 01 July 2017 and 30 November 2017. It is
made of the following materials:
Housing, display, remote control & stretch tube
bracket: ABS & PVC
Screws: steel
Training surface: TPR
Shock absorber & feet: rubber
Motor & motor cover: steel
Main adapter housing: ABS
Stretch tube with handle: Polyester, ABS & nylon
7.1
7.17.1
7.1 Batteries
BatteriesBatteries
Batteries
The remote control operates with the two supplied type
AAA LR03 1,5V batteries.
Make sure that the polarity is correct when insert-
ing the battery.
Remove the battery if you do not use the unit for
an extended period of time to prevent damage
from leakage. Leaking or damaged batteries can
cause acid burns when coming into contact with
the skin. Wear protective gloves when handling
damaged batteries.
Keep batteries out of the reach of children. Do not
leave batteries lying around, as they could be
swallowed by children or pets.
Do not short-circuit or take the battery apart, or
throw it into the fire.
Never try to charge non-rechargeable batteries.
Risk of explosion!

GB
9
7.2
7.27.2
7.2 Declaration of conformity
Declaration of conformityDeclaration of conformity
Declaration of conformity
The EU Declaration of Conformity can be obtained
from the address given on the enclosed warranty card.
7.3
7.37.3
7.3 Disposal
DisposalDisposal
Disposal
Disposing of the packaging
This product is delivered in packaging to
prevent transport damage. The packaging
materials are produced from recyclable raw
materials. Dispose of the packaging as single variety
waste. Dispose of the cardboard as waste paper and
plastic film as recyclable material.
Disposing of the product
Recyclable material collection. Dispose of the
product according to the laws and regula-
tions applicable in your country. Information
can be obtained from the local authorities.
This product may not be disposed of as normal house-
hold waste when it has reached the end of its service
life, but must be disposed of at a collection point for the
recycling of electrical and electronic equipment. Re-
move all batteries/rechargeable batteries and dispose
of them separately from the product.
Disposing of batteries
End users are legally obliged (according to
the battery ordinance) to return all used bat-
teries/rechargeable batteries. Disposal in the
household waste is prohibited.
Batteries/rechargeable batteries containing harmful
substances are marked with the adjacent symbol, which
indicates the prohibition of disposal in the household
waste. The designations for the determining heavy
metal are: Cd (cadmium), Hg (mercury) & Pb (lead).
The designation is on the batteries/rechargeable bat-
teries below the depicted garbage bin symbol.
You can dispose of your used batteries/rechargeable
batteries free of charge at municipal collection points
or wherever batteries/rechargeable batteries are sold.
This way you comply with the statutory obligations and
contribute to environmental protection.
8
88
8 W
WW
W
ARRANTY
ARRANTYARRANTY
ARRANTY
The product was produced with great care and under
constant supervision. You receive a three-year warran-
ty for this product from the date of purchase. Please
retain your receipt. The warranty applies only to mate-
rial and workmanship and does not apply to misuse or
improper handling. Your statutory rights, especially the
warranty rights, are not affected by this warranty.
With regard to complaints, please contact the following
service hotline or contact us by e-mail. Our service
employees will advise as to the subsequent procedure
as quickly as possible. We will be personally available
to discuss the situation with you.
Any repairs under the warranty, statutory guarantees
or through goodwill do not extend the warranty period.
This also applies to replaced and repaired parts. Re-
pairs after the warranty are subject to a charge.
9
99
9 S
SS
S
ERVICE
ERVICEERVICE
ERVICE
Name: ISM Service Center
E-Mail: service@la-sports.de
Tel:° ++800 52776787 (free of charge)
Corporate Address:
I.S.M. GmbH, Rathenaustr. 4,
D-51427 Berg. Gladbach, Germany

PL
10
10 (PL)
I
NSTRUKCJI
Gratulujemy zakupu! Dokonali Państwo zakupu
wysokiej jakości produktu. Przed montażem i
pierwszym użyciem należy zapoznać się z
produktem. W tym celu należy uważnie przeczytać
poniższą instrukcję montażu oraz wskazówki
bezpieczeństwa. Produkt należy używać tylko
zgodnie z opisem oraz w podanych obszarach
zastosowań. Należy dobrze przechowywać niniejszą
instrukcję. Podczas przekazania produktu osobom
trzecim należy przekazać wraz z produktem całą
dokumentację.
Urządzenie treningowe zawiera w komplecie samo
urządzenie, niniejszą instrukcję obsługi, kabel
elektryczny, pilot zdalnego sterowania oraz taśmy
treningowe z uchwytami.
Proszę wziąć pod uwagę, że kupiliście Państwo
przyrząd do normalnego domowego użytkowania.
Przyrząd ten nie jest przeznaczony na potrzeby
przemysłowe. Aby produkt dostarczał przyjemności
przez długi czas należy przestrzegać poniższej
instrukcji użytkowania oraz informacji dotyczących
pielęgnacji.
11 W
AŻNE INFORMACJE DOTYCZĄCE
BEZPIECZEŃSTWA
a) Proszę przeczytać i stosować się
do instrukcji obsługi i do
wszystkich informacji, zanim
zaczniecie Państwo stosować
produkt.
Produkt można stosować w sposób bezpieczny
dopiero wtedy, gdy został on dobrze złożony i
gdy jest on dobrze użytkowany. Jesteście
Państwo odpowiedzialni za to, aby wszyscy
użytkownicy artykułu zostali poinformowani o
ostrzeżeniach i środkach ostrożności.
b) Proszę udać się do swojego lekarza pierwszego
kontaktu, aby stwierdzić i zapobiec ewentualnym
ryzykom zdrowotnym, zanim zaczniecie Państwo
jakikolwiek program treningowy. Rada Państwa
lekarza jest miarodajna w odniesieniu do
Państwa tętna, ciśnienia krwi, czy poziomu
cholesterolu.
c) Proszę uwzględnić sygnały Państwa ciała.
Nieprawidłowy lub nadmierny trening może
zagrażać Państwa zdrowiu. Jeżeli będziecie
Państwo odczuwać podczas treningu bóle,
uczucie ucisku w klatce piersiowej, nieregularne
bicie serca, ekstremalne duszności, zawroty
głowy lub oszołomienie, proszę przerwać
natychmiast trening i udać się do swojego
lekarza.
d) Proszę trzymać dzieci i zwierzęta z dala od
urządzenia. Urządzenie to przeznaczone jest
tylko do użytku przez osoby dorosłe.
e) Proszę używać przyrządu na stałym, płaskim
podłożu z osłoną ochronną dla podłogi lub
dywanu. Odległość bezpieczeństwa powinna
wynosić na długości co najmniej 210 cm, a na
szerokości co najmniej 100 cm (por. poniższa
ilustracja).
Proszę pamiętać, że wolny obszar (obejmuje on
obszar demontażu awaryjnego) w kierunku, z
którego następuje dostęp do urządzenia
treningowego, powinien być większy o co
najmniej 0,6 m, niż obszar ćwiczeń. Jeżeli
urządzenia treningowe będą ustawiane
bezpośrednio obok siebie, mogą współdzielić ze
sobą wolny obszar.
f) Zwracać uwagę w szczególności na
miejsca, w których występuje
możliwość zmiażdżenia i obcięcia
części ciała oznaczone symbolem
przedstawionym obok.
g) Proszę nosić podczas treningu zawsze
odpowiednie ubranie. Proszę unikać szerokiego
ubrania, które mogłoby pozostać zaczepione na
Państwa przyrządzie treningowym. Proszę nosić
odpowiednie buty z antypoślizgową podeszwą.
h) Urządzenie należy użytkować wyłącznie w
przedstawiony sposób. Użytkowania sprzętu
należy zaniechać, jeżeli przy rozłożeniu sprzętu
albo przy jego kontroli znajdą Państwo zepsute
części, bądź gdy usłyszą Państwo przy dalszym
jego użytkowaniu nietypowe dźwięki.
i) Urządzenie nie jest odpowiednie dla
terapeutycznego stosowania.
j) Wybrany przez Państwa sprzęt do ćwiczeń
doskonale nadaje się do treningu mięśni nóg, rąk
i mięśni tułowia, jak i do poprawy ogólnej
wytrzymałości fizycznej i do spalania tkanki
tłuszczowej.
k) Przed każdorazowym użyciem należy sprawdzić,
czy wszystkie śrubki i nakrętki są odpowiednio
dokręcone. Bezpieczeństwo zapewnić mogą
wyłącznie regularne kontrole.
l) Należy w szczególności zwracać uwagę na stan
szczególnie obciążonych części i regularnie je
kontrolować.

PL
11
m) Urządzenie zostało sprawdzone, norma EN ISO
20957-1, klasa H. Jest ono przeznaczone tylko
do użytku domowego. Urządzenie zostało
zaprojektowane na maksymalne obciążenie
przez użytkownika wynoszące 120 kg.
n) Zwracać uwagę na maksymalną długość
rozciągania 150 cm (długość rozciągania jest
ograniczona, unikać nadmiernego wydłużania)!
o) Nie ciągnąć kabla za wtyczkę.
p) Nie wskakiwać na płytę, ponieważ może to
doprowadzić do uszkodzenia urządzenia.
q) Nie próbować nigdy samodzielnie naprawiać
urządzenia, proszę się w tym celu zwrócić do
sprzedawcy lub do centrum serwisowego klienta.
r) Po każdym użyciu wyłączyć urządzenie i wyjąć
wtyczkę z gniazda.
s) Wyłączyć maszynę i przerwać dopływ prądu
przed rozpoczęciem jej czyszczenia.
t) Użytkując urządzenie na dywanie należy się
upewnić, że otwory wentylacyjne mają jeszcze
wystarczający dopływ powietrza.
u) Tylko jedna osoba może korzystać z urządzenia.
v) Płytę wibracyjną należy chronić przed wilgocią i
wodą oraz należy się upewnić, że elektryczne
elementy nie będą miały kontaktu z wodą.
w) To urządzenie nie nadaje się dla kobiet w ciąży
oraz osób o ograniczonych zdolnościach
sensorycznych lub mentalnych. Osoby nie
mające doświadczenia z tego rodzaju
urządzaniami wymagają objaśnienia sposobu
działania oraz użytkowania maszyny przed
pierwszym użyciem.
Aby uniknąć uszkodzeń urządzenia oraz
powstawania hałasu, należy zawsze zwracać uwagę
na równomierny rozkład ciężaru
12 L
ISTA CZĘŚCI
Nr
Opis
#
1 Pilot zdalnego sterowania 1
2 Pokrywa wyświetlacza 1
3 Wyświetlacz 1
4 Przeźroczysty panel 1
5 Górna pokrywa obudowy 1
6 Środkowa część obudowy 1
7 Wkręt z rowkiem krzyżowym ST4 x
12
18
8 Płyta bazowa 1
9 Wtyczka tworzywowa 2
10 Silnik 1
11 Uchwyt silnika 1
12 Rama główna 1
13 Dolna płytka 1
14 Rolka transportowa 1
15 Zacisk R 2
16 Łącznik kablowy 3
Nr
Opis
#
17 Pierścień magnetyczny 1
18 Taśma transportowa z uchwytem
(dł. 60 cm)
2
19 Dolna pokrywa obudowy 1
20 Stopy 4
21 Kabel elektryczny z wtyczką
sieciową
1
22 Wyłącznik sieciowy 1
23 Oprawka wyłącznika sieciowego 1
24 Bezpiecznik 1
25 Gumowa mata 1
26 Śruba z łbem 6-kątnym M8 x 25 2
27 Uchwyt silnika 1
28 Hak 2
29 Wkręt z rowkiem krzyżowym ST3 x
10
4
30 Trzpień połączeniowy 2
31 Osłona łożyska kulkowego 2
32 Śruba M5 x 30 8
33 Nakrętka z nylonowym
bezpiecznikiem M8
4
34 Pokrywa uchwytu osi 2
35 Uchwyt osi 2
36 Łożysko kulkowe 6201 2
37 Koło zamachowe 1
38 Podkładka sprężysta Ø8 6
39 Śruba sześciokątna M8 x 20 2
40 Tuleja 1
41 Oś 1
42 Pasek klinowy 1
43 Podkładka Ø4 1
44 Izolacja 2
Ilustracja A przedstawia rysunek złożeniowy
Państwa nowego urządzenia. Proszę pamiętać, że
jest ono już wstępnie zmontowane.
13 I
NSTRUKCJA UŻYTKOWANIA
13.1 Ogólne wskazówki
Urządzenie jest już kompletnie zmontowane Należy
sprawdzić, czy sprzęt zawiera wszystkie części i czy
są one w stanie nienaruszonym. W tym celu
opakowanie należy całkowicie opróżnić. W
przypadku gdy pomimo naszych skrupulatnych
kontroli jakości zabraknie części należy
bezzwłocznie skontaktować się z naszym serwisem
usługowym korzystając z informacji kontaktowych
podanych poniżej.

PL
12
13.2 Komputer
Powyższa ilustracja przedstawia wyświetlacz
dotykowy („Touch Screen Control Panel“) płyty
wibracyjnej. Na wyświetlaczu LED wyświetlany jest
między innymi czas. Poniżej umieszczono wskaźnik
dla ewentualnie wybranego programu treningowego
(„Program Mode Indicator”).
Włączanie/wyłączanie
Nacisnąć przycisk POWER celem uruchomienia
urządzenia, ponowne naciśnięcie tego przycisku
spowoduje jego wyłączenie.
Ustawianie prędkości
Nacisnąć przycisk MODE/SPEED, aby w trybie
manualnym zwiększyć prędkość.
13.3 Pilot zdalnego sterowania
Transmisja danych z pilota zdalnego sterowania do
urządzenia wibracyjnego funkcjonuje na zasadzie
podczerwieni i ma zasięg ok. 2,5 m. Dlatego też
celem obsługi należy skierować pilot zdalnego
sterowania na urządzenie wibracyjne.
Włączanie/wyłączanie
Nacisnąć przycisk ON/OFF celem uruchomienia
urządzenia, ponowne naciśnięcie tego przycisku
spowoduje jego wyłączenie.
Ustawianie prędkości
Nacisnąć w trybie manualnym przycisk S (+), aby
zwiększyć prędkość, oraz S (-), aby ją
zmniejszyć.
Ustawianie czasu
Nacisnąć w trybie manualnym przycisk T (+), aby
wydłużyć czas, oraz T (-), aby go skrócić.
Ustawianie programu
Urządzenie wibracyjne ma pięć programów, które
zostały stworzone dla wydajnego i
urozmaiconego treningu. Proszę pamiętać, że w
trybie programu nie można zmieniać prędkości i
czasu.
Za pomocą przycisków szybkiego wyboru P1, P3
lub P5 można bezpośrednio wybrać jeden z tych
programów szkoleniowych. Naciskając przycisk P
można wybrać kolejny program, to znaczy
pojedyncze naciśnięcie uruchamia program 1,
podwójne naciśnięcie program 2 i tak dalej.
13.4 Programy
Każdy wstępnie ustawiony program treningowy trwa
10 minut. Ustawiona prędkość będzie utrzymywana
przez czas 30 sekund, zanim zostanie ustawiona
następna prędkość.
W programie manualnym można w każdej chwili
manualnie sterować prędkością i czasem treningu.
Przebiegi programów P1 do P5 przedstawiono na
ilustracji (B). Oś X opisuje przy tym przebieg czasu
(„TIME”) w interwałach 30 sekund. Oś Y opisuje
prędkość („SPEED”).
14 W
SKAZÓWKI TRENINGOWE
Swoim zainteresowaniem ćwiczeniami siłowymi
zrobiliście Państwo ważny krok w kierunku
mobilności i zdrowia – ponieważ trening siłowy
wzmacnia muskulaturę. Trening siłowy zapobiega
nie tylko utracie masy mięśni i siły, lecz także je
ulepsza. Ruchomość stawów się zwiększa – a
niebezpieczeństwo kontuzji się zmniejsza.
Państwa ciśnienie krwi, wartość cholesterolu,
poziom cukru we krwi, Państwa motywacja, a nawet
Państwa nastrój mogą zostać polepszone w dużym
stopniu dzięki małej ilości sportu. Możecie Państwo
zmienić swoją figurę. W połączeniu z odpowiednim
odżywianiem zredukujecie Państwo udział tłuszczu i
polepszycie swoją sylwetkę.
14.1 Ogólne wskazówki treningowe
Każda jednostka treningowa powinna składać się z
trzech części:
1. Rozgrzewka („Warm Up”)
2. Trening wytrzymałościowy/ trening cardio
oraz / lub trening siłowy
3. Cool Down (ostygnięcie) & rozciąganie
Włączanie/wyłączanie
Kluczem wygoda
Prędkość +
Czas +
Kluczem wygoda
ręcznie
Prędkość –
Czas –
Wybór
programu

PL
13
Rozgrzewka („Warm Up”)
Państwa trening powinien zacząć się zawsze
rozgrzewką. Im bardziej wyczerpująca jest
późniejsza jednostka treningowa, tym ważniejsza
jest rozgrzewka.
Rozgrzewka przygotowuje ciało na obciążenie,
pobudza układ krążenia i chroni wiązadła, ścięgna i
stawy przed kontuzjami. Rozgrzewka pomaga także
zmniejszyć ryzyko skurczów i kontuzji mięśni. Przed
rozpoczęciem treningu należy rozluźnić trochę
stawy.
Trening
Początek treningu wytrzymałościowego (z powodu
pozytywnych wpływów na układ krążenia, określany
często treningiem układu krążenia lub treningiem
cardio) lub treningu siłowego, czy mięśniowego jest
pierwszym krokiem w walce przeciwko chorobom
cywilizacyjnym, i dolegliwościom ciała, w
szczególności w zaawansowanym wieku.
Cool Down (ochłonięcie)
Tak samo, jak przed każdą jednostką treningową
należy przeprowadzić rozgrzewkę, tak po jednostce
treningowej należy przeprowadzić fazę stygnięcia.
Stygnięcie wprowadza fazę odprężenia, zmniejsza
temperaturę ciała i uwydatnia zmianę obciążenia na
odprężenie.
Faza stygnięcia powinna trwać tak, jak rozgrzewka,
co najmniej 10 minut i powinna być skierowana na
najniższy poziom. Tętno powinno spaść tak nisko,
jak to możliwe.
W ten sposób zapobiegacie Państwo m.in.
zakwasom mięśni, ponieważ prawdopodobnie
powstałe produkty przemiany materii będą mogły
zostać odtransportowane.
Rozciąganie
Jak już wspomniano powyżej, możecie Państwo
lekko rozciągnąć swoje mięśnie przed rozgrzewką.
Po treningu musicie Państwo koniecznie
porozciągać swoje mięśnie. Rozciąganie po treningu
sprawi, że mięśnie będą miały swoją poprzednią
długość i w ten sposób unikamy skurczy mięśni. Im
bardziej wyczerpujący był trening, tym ważniejsze
jest rozciąganie po nim.
Szczególnie ważne jest rozciąganie po treningu dla
absorbowanych podczas treningu głównych grup
mięśni. Rozciąganie powinno być odczuwalne, ale
nie powinno być bolesne. Czas trwania rozciągania
wynosi ok. 20 sekund na każdy mięsień.
14.2 Ogólne wskazówki dotyczące ćwiczeń
Proszę zacząć trening ok. 7 – 8 powtórzeniami na
dany zestaw ćwiczeń. Następnie proszę powoli
zwiększyć liczbę powtórzeń zgodnie z
indywidualnymi preferencjami aż do 11 – 12
powtórzeń na zestaw. Jeśli zauważycie Państwo, że
muskulatura się męczy, proszę zredukować zakres
treningu.
Idealnie byłoby trenować ok. 3 – 4 razy na tydzień.
Proszę jednak uważać na to, że pomiędzy
poszczególnymi jednostkami treningowymi należy
zrobić dzień odpoczynku, aby muskulatura i ciało
mogły wystarczająco odpocząć.
Do tego proszę uważać podczas wszystkich
ćwiczeń, aby wykonywać je ze stabilnego środka
tułowia. Kręgosłup (szczególnie jego lędźwiowa
część) musi być prosty, aby pojedyncze trzony
kręgu były w biomechanicznej prawidłowej pozycji,
aby np. chronić krążek międzykręgowy przed
błędnymi obciążeniami.
Nie należy trenować z zamachem i/lub gwałtownie,
lecz należy wykonywać wszystkie ćwiczenia
równomiernie i w sposób kontrolowany. Proszę
uwzględnić fakt, że trenując w sposób
nieodpowiedni lub nadmierny może dojść do
uszczerbków na zdrowiu.
14.3 Instrukcja obsługi
Należy najpierw przećwiczyć stabilne stanie na
wyłączonym urządzeniu. Najpierw należy stanąć na
obu nogach, z wyprostowanym ciałem. Następnie
podnieść nogę i wyciągnąć ramiona. Stanąć na
drugiej nodze. Przyzwyczaić się do stania na
urządzeniu.
W postawie zasadniczej na płycie wibracyjnej ciało
zawsze jest napięte na środku pleców. W tym celu
należy trzymać plecy prosto i lekko ugiąć kolana.
Muskulatura nóg również jest lekko napięta. Nigdy
nie trenować z rozciągniętymi ramionami lub
nogami, muszą one zawsze być ugięte (ilustracja C).
(D) Przysiad
Stajemy na urządzeniu w postawie zasadniczej,
stopy rozstawione mniej więcej na szerokość
ramion. Proszę bardziej przykucnąć lub przejść do
większego przysiadu zginając nogi i przesuwając
pośladki do tyłu i w dół. Dla stabilizacji podnieść
ramiona do przodu i do góry. Utrzymujemy przez
chwilę pozycję przysiadu, a następnie wracamy do
pozycji wyjściowej.
E) Biceps
Stajemy na urządzeniu w postawie zasadniczej,
stopy rozstawione mniej więcej na szerokość
ramion. Ręce na rozłożone na wysokości bioder
chwytają za uchwyty linek treningowych. Zginamy

PL
14
ręce i przyciągamy do siebie. Należy zwrócić uwagę
na to, by podczas ćwiczeń łokcie przez cały czas w
stabilnej pozycji przylegały do tułowia. Utrzymujemy
przez chwilę tę pozycję, a następnie wracamy do
pozycji wyjściowej.
(F) Ćwiczenie mięśni trójgłowych
Siadamy w pozycji pionowej, wyprostowanej przed
urządzenie. Obie dłonie kładziemy na płycie
treningowej, z kciukami skierowanymi do wewnątrz,
a następnie rozprostowujemy ręce, unosząc tułów.
Ponownie zginamy ręce i opuszczamy tułów.
Ponownie podnosimy tułów. To ćwiczenie można
wykonywać ze zgiętymi, lub - jako jego odmiana - z
wyprostowanymi nogami.
(G) Brzuszki
Kładziemy się na plecach na płycie treningowej i
układamy stopy na krześle lub podobnym
przedmiocie, stawiamy stopy przed ciałem ze
zgiętymi kolanami dla większej stabilności na
podłodze lub podnosimy je w trudniejszej odmianie.
Trzymamy ręce przy głowie lub przy klatce
piersiowej, a następnie podnosimy tułów w kierunku
kolan. Utrzymujemy przez chwilę tę pozycję, a
następnie wracamy do pozycji wyjściowej.
(H) Pompki
Opieramy obie dłonie na płycie treningowej, jak na
rysunku. Ciało powinno być napięte, zginamy tylko
ręce. Rozprostowujemy ręce. Jako wariant, to
ćwiczenie można wykonywać albo ze zgiętymi
nogami na kolanach (patrz ilustracja), albo z
wyprostowanymi nogami i prostymi plecami na
stopach.
(I) Środek pleców
Kładziemy się z napiętymi nogami na płycie
treningowej i opieramy się górną częścią ciała na
zgiętych ramionach przed płytą. Utrzymujemy
pozycję ze stabilnym tułowiem i plecami.
(J) Plecy
Kładziemy się przed płytą treningową plecami na
podłodze i stawiamy stopy na płycie treningowej.
Stabilizujemy się za pomocą ramion po bokach.
Podnosimy biodra w górę. Utrzymujemy przez
chwilę tę pozycję, a następnie wracamy do pozycji
wyjściowej.
(K) Wykrok („płuco“)
Stawimy jedną stopę na środku płyty treningowej.
Stawiamy drugą nogę lekko przesuniętą w bok do
tyłu. Teraz opuszczamy tułów prosto w dół. Należy
zwrócić uwagę, aby nie ocierać przednim kolanem o
czubek stopy. Utrzymujemy przez chwilę tę pozycję,
a następnie wracamy do pozycji wyjściowej.
Podczas ćwiczeń zmieniamy strony.
15 K
ONSERWACJA I PIELĘGNACJA
Po treningu należy wytrzeć urządzenie i wysuszyć
poręcze suchą ściereczką. Przy zachowaniu
wymogów użytkowania uniwersalny sprzęt do
ćwiczeń nie wymaga częstej konserwacji.
W normalnych warunkach i przy normalnym
użytkowaniu urządzenie nie wymaga konserwacji.
Jednakże użytkownik odpowiedzialny jest za
regularne sprawdzanie wszystkich elementów pod
kątem właściwego ich zamocowania i stopnia ich
zużycia, mogącego wpływać na właściwości sprzętu.
Zgodnie z normą EN ISO 20957-1:2013, punktem
5.15 należy zwracać szczególną uwagę na stan
newralgicznych elementów, jak na przykład poręcze
czy amortyzatory.
Do pielęgnacji nie należy używać agresywnych
środków czyszczących. Przy usuwaniu zabrudzeń i
kurzu używać miękkich, ewentualnie lekko
zwilżonych ściereczek.
Jakakolwiek zmiana oryginalnych części sprzętu,
materiałów bądź konstrukcji urządzenia może
znacznie obniżyć jego wydajność. To samo dotyczy
silnego zanieczyszczenia lub użytkowania
niezgodnie z przeznaczeniem.
16 W
SKAZÓWKI DOTYCZĄCE PRODUKTU
Ciężar bez opakowania ok. 13,2 kg
Wymiary w stanie zmontowanym: około
(dł.) 69,5 x (szer.) 39 x (wys.) 13,5 cm
220-240V AC
200 W
Wszystkie poniższe dane załączonej taśmy
treningowej względnie tuby odnośnie siły
rozciągającej w N w zależności od wydłużenia
zostały podane z tolerancją +/- 20%
Wydłużenie taśmy
transportowej
Siła (N)
80 cm ok. 22 N
100 cm ok. 33 N
120 cm ok. 48 N
150 cm ok. 96 N
Zwracać uwagę na maksymalną długość
rozciągania 150 cm (długość rozciągania jest
ograniczona, unikać nadmiernego wydłużania)!

PL
15
Zakupiony przez Państwa artykuł został
wyprodukowany w okresie od 1 sierpnia 2017 do 30
listopada 2017. Składa się on z następujących
materiałów:
obudowa, wyświetlacz, pilot zdalnego
sterowania i uchwyt taśn: ABS i PVC
śruby: stal
powierzchnia treningowa: TPR
amortyzator i stopy: guma
silnik i pokrywa silnika: stal
obudowa adaptera sieciowego: ABS
taśma treningowa z uchwytem: poliester, ABS i
nylon
16.1 Baterie
Pilot zdalnego sterowania jest zasilany
dostarczonymi dwiema bateriami 1,5 V typu AAA
LR03.
Podczas wkładania baterii zwracać uwagę na
prawidłową polaryzację.
Gdy urządzenie nie będzie użytkowane przez
dłuższy czas należy wyjąć baterie, aby uniknąć
uszkodzeń na skutek ich wylania. Wylane lub
uszkodzone baterie mogą w przypadku
kontaktu ze skórą spowodować oparzenia
kwasem. Dlatego też podczas pracy z
uszkodzonymi bateriami należy nosić rękawice
ochronne.
Baterie należy trzymać poza zasięgiem dzieci.
Nie kłaść baterii w przypadkowe miejsca,
ponieważ mogą one zostać połknięte przez
dzieci lub zwierzęta domowe.
Nie rozbierać baterii, nie zwierać ich i nie
wrzucać do ognia.
Nigdy nie próbować ładować baterii, które nie
są do tego przeznaczone. Istnieje
niebezpieczeństwo eksplozji!
16.2 Deklaracja zgodności
Deklarację zgodności można otrzymać pod adresem
podanym w załączonej karcie gwarancyjnej.
16.3 Utylizacja
Utylizacja opakowania
Ten produkt jest dostarczany w opakowaniu
zabezpieczającym przed uszkodzeniami
transportowymi. Materiały opakowaniowe
są wykonane z surowców nadających się
do recyklingu. Opakowanie usunąć po
posortowaniu. Tekturę i papier przekazać na
makulaturę, folię utylizować jako surowce do
recyklingu.
Utylizacja produktu
Recykling surowców Artykuł należy
utylizować zgodnie z przepisami i
postanowieniami obowiązującymi w
Państwa kraju. Informacji na ten temat
udziela lokalny komunalny punkt
informacyjny.
Ten produkt po zakończeniu swojego cyklu życia nie
może być usuwany z normalnymi odpadami
domowymi, lecz należy go oddać do punktu zbiórki
dla recyklingu urządzeń elektrycznych i
elektronicznych. Wyjąć ewentualnie włożone
baterie/akumulatory i poddać je utylizacji oddzielnie
od produktu.
Utylizacja baterii
Użytkownicy końcowi są zobowiązani
prawnie (zgodnie z rozporządzeniem
odnośnie baterii) do oddawania wszystkich
zużytych baterii/akumulatorów; usuwanie
razem z odpadami domowymi jest zabronione.
Baterie/akumulatory są oznaczone przedstawionym
obok symbolem, który informuje o zakazie usuwania
razem z odpadami domowymi. Baterie zawierające
szkodliwe substancje mają dodatkowo oznaczenie
danego metalu ciężkiego: Cd (kadm), Hg (rtęć) & Pb
(ołów). Oznaczenie znajduje się na
baterii/akumulatorze pod przedstawionym symbolem
kosza na śmieci).
Zużyte baterie/akumulatory można bezpłatnie
oddawać w komunalnych punktach zbiórki lub
wszędzie tam, gdzie sprzedawane są
baterie/akumulatory. W ten sposób spełniają
Państwo zobowiązania prawne i przyczyniają się do
ochrony środowiska.
17 G
WARANCJA
Szanowna Klientko, Szanowny Kliencie,
Na produkt obowiązuje dwuletnia gwarancja licząc
od daty zakupu. Jeśli produkt posiada wady,
przysługują Państwu ustawowe prawa wobec
sprzedawcy produktu. Nasze poniższe warunki
gwarancyjne nie ograniczają tych ustawowych praw.
Warunki gwarancji
Okres gwarancji rozpoczyna upływać w dniu
zakupu. Należy zachować paragon zakupu. Jest on
dowodem zakupu.
Jeśli w ciągu dwóch lat od daty zakupu tego
produktu pojawią się wady materiałowe lub
produkcyjne, wówczas bezpłatnie naprawimy
produkt lub wymienimy na nowy. Zastrzegamy sobie
prawo wyboru sposobu usunięcia wad
(naprawa/zwrot pieniędzy). Niniejsza gwarancja
wymaga przedstawienia uszkodzonego produktu

PL
16
oraz dowodu zakupu (paragonu) w w.w. okresie, a
także krótkiego opisania wady i daty jej wystąpienia.
Jeśli nasza gwarancja pokrywa daną wadę,
otrzymają Państwo naprawiony lub no-wy produkt.
Naprawa ani wymiana produktu nie powoduje
wydłużenia okresu gwarancji.
Zakres gwarancji
Produkt został wyprodukowany zgodnie z surowymi
wymaganiami jakościowymi oraz skrupulatnie
skontrolowany przed dostawą.
Gwarancja obejmuje wady materiałowe lub
produkcyjne. Niniejsza gwarancja nie obejmuje
elementów produktu narażonych na normalne
zużycie, które można uznać za części podlegające
zużyciu.
Niniejsza gwarancja traci swoją ważność w
przypadku, gdy produkt zostanie uszkodzony,
będzie niewłaściwie użytkowany lub serwisowany.
W celu prawidłowego użytkowania produktu należy
dokładnie przestrzegać wszystkich wskazówek
zawartych w instrukcji obsługi. Należy bezwzględnie
unikać używania produktów w celu i sposób inny niż
podany w instrukcji obsługi.
Postępowanie gwarancyjne
Aby zagwarantować szybką realizację zgłoszeń
reklamacyjnych prosimy o postępowanie zgodnie z
poniższymi wskazówkami:
W przypadku każdego zgłoszenia należy
zachować paragon zakupu oraz nu-mer
artykułu jako dowód zakupu.
Numer artykułu znajduje się na stronie tytułowej
Państwa instrukcji (na dołu z lewej strony) oraz
na opakowaniu.
W przypadku nieprawidłowego działania lub
wystąpienia innych wad, należy skontaktować
się telefonicznie lub drogą elektroniczną z niżej
wymienionym działem serwisu.
Produkt uznany za wadliwy mogą Państwo
bezpłatnie przesłać na podany przez
pracowników działu serwisu adres serwisu.
Należy wówczas dołączyć dowód zakupu
(paragon) oraz opis wady i datę jej wystąpienia.
Niniejszą instrukcja oraz inne podręczniki,
materiały wideo dotyczące produktów oraz
oprogramowanie mogą Państwo pobrać ze
strony www.lidl-service.com.
18 S
ERWIS
Name: ISM Service Center
E-Mail: service@la-sports.de
Tel:° ++800 52776787 (free of charge)
Corporate Address:
I.S.M. GmbH, Rathenaustr. 4,
D-51427 Berg. Gladbach, Germany

DE
17
19
1919
19 (D)
(D)(D)
(D)
N
NN
N
UTZUNGSANLEITUNG
UTZUNGSANLEITUNGUTZUNGSANLEITUNG
UTZUNGSANLEITUNG
Herzlichen Glückwunsch! Mit Ihrem Kauf haben Sie
sich für ein hochwertiges Produkt entschieden. Machen
Sie sich vor der Inbetriebnahme mit dem Produkt
vertraut. Lesen Sie hierzu aufmerksam die
nachfolgende Anleitung und die Sicherheitshinweise.
Benutzen Sie das Produkt nur wie beschrieben und für
die angegebenen Einsatzbereiche. Bewahren Sie diese
Anleitung gut auf. Händigen Sie alle Unterlagen bei
Weitergabe des Produkts an Dritte ebenfalls mit aus.
Im Lieferumfang besteht Ihr neues Trainingsgerät aus
dem Gerät selber, dieser Nutzungsanleitung, dem
Stromkabel, der Fernbedienung sowie den
Trainingsbändern mit Handgriffen.
Bitte beachten Sie, dass Sie ein Gerät für den normalen
Heimgebrauch erworben haben. Dieses Gerät ist nicht
für den gewerblichen Bedarf bestimmt. Damit Sie mit
diesem Produkt lange viel Freude haben, beachten Sie
bitte die nachfolgenden Gebrauchshinweise und
Pflegeinformationen.
20
2020
20 A
AA
A
CHTUNG
CHTUNGCHTUNG
CHTUNG
:
::
:
W
WW
W
ICHTIGE
ICHTIGE ICHTIGE
ICHTIGE
S
SS
S
ICHERHEITSI
ICHERHEITSIICHERHEITSI
ICHERHEITSIN
NN
NFORM
FORMFORM
FORMA
AA
ATIONEN
TIONENTIONEN
TIONEN
a) Bitte beachten Sie diese Bedienungsanleitung und
bewahren Sie sie auf!
b) Lesen und befolgen Sie die
Gebrauchsanleitung und alle
weiteren Informationen, bevor Sie
den Artikel benutzen.
Eine sichere Verwendung des Artikels kann nur
erreicht werden, wenn er richtig zusammengebaut
wurde und richtig benutzt wird. Es liegt in Ihrer
Verantwortung, dass alle Benutzer des Artikels
über die Warnhinweise und Vorsichtsregeln
informiert sind.
c) Suchen Sie unbedingt Ihren Hausarzt auf, um
eventuelle Gesundheitsrisiken festzustellen bzw.
diesen vorzubeugen, bevor Sie mit irgendeinem
Trainingsprogramm beginnen. Der Rat Ihres
Arztes ist maßgebend in Bezug auf Ihre
Pulsfrequenz, Ihren Blutdruck oder
Cholesterinspiegel.
d) Beachten Sie Ihre Körpersignale. Unkorrektes oder
übermäßiges Training kann Ihre Gesundheit
gefährden. Sollten Sie irgendwann während des
Trainings Schmerzen, Beklemmung im Brustkorb,
unregelmäßigen Herzschlag, extreme Atemnot,
Schwindel oder Benommenheit spüren,
unterbrechen Sie bitte sofort Ihr Training und
suchen Sie Ihren Hausarzt auf.
e) Halten Sie Kinder und Tiere von dem Gerät fern.
Dieses Gerät ist nur für den Gebrauch durch
Erwachsene bestimmt.
f) Benutzen Sie das Gerät auf einem festen, ebenen
Untergrund mit einer Schutzabdeckung für Ihren
Boden oder Teppich. Der Sicherheitsabstand sollte
in der Länge mindestens 210 cm und in der Breite
mindestens 100 cm betragen (vgl. nachfolgende
Illustration).
Bitte beachten Sie, dass der Freibereich (dieser
schließt den Bereich für die Notfall-Demontage
ein) in der Richtung, aus der der Zugang zum
Trainingsgerät erfolgt, mindestens 0,6 m größer
als der Übungsbereich sein muss. Sollten
Trainingsgeräte zueinander in direkter
Nachbarschaft aufgestellt sein, können sie sich
einen Freibereich teilen.
g) Achten Sie besonders auf die mit dem
nebenstehenden Symbol
gekennzeichneten möglichen Quetsch-
und Scherstellen.
h) Tragen Sie während des Trainings immer
geeignete Kleidung. Vermeiden Sie weite
Kleidung, die an Ihrem Trainingsgerät hängen
bleiben könnte. Tragen Sie geeignete Schuhe mit
rutschfester Sohle.
i) Benutzen Sie das Gerät nur wie angegeben.
Finden Sie beim Zusammenbau oder bei
Überprüfung ein defektes Teil oder hören Sie
ungewohnte Geräusche bei der Benutzung des
Gerätes, benutzen Sie es nicht weiter, bis das
Problem gelöst ist.
j) Das Gerät ist nicht für therapeutische Nutzung
geeignet.
k) Das Gerät eignet sich insbesondere für das
Training der Bein-, Arm- & Rumpfmuskulatur und
zur Verbesserung der allgemeinen Ausdauer und
Fettverbrennung.
l) Vor Gebrauch sollte jedes Mal überprüft werden,
ob alle Schrauben und Muttern richtig angezogen

DE
18
sind. Die Sicherheit des Gerätes kann nur erhalten
bleiben, wenn es regelmäßig überprüft wird.
m) Achten Sie insbesondere auf den Zustand der
besonders beanspruchten Teile und kontrollieren
Sie diese regelmäßig.
n) Das Gerät wurde geprüft, Norm EN ISO 20957-
1, Klasse H. Es ist nur für den Hausgebrauch
bestimmt. Das Gerät ist für eine maximale
Benutzergewichtsbelastung von 120 kg ausgelegt.
o) Beachten Sie die maximale Strecklänge von 150
cm (Strecklänge ist begrenzt, Überdehnung
vermeiden)!
p) Ziehen Sie den Stecker nicht am Kabel heraus.
q) Springen Sie nicht auf die Platte, da dies zu
Beschädigungen am Gerät führen kann.
r) Versuchen Sie niemals, das Gerät selbst zu
reparieren sondern wenden Sie sich an den
Verkäufer oder das Kundenservicecenter.
s) Schalten Sie das Gerät nach jedem Gebrauch ab
und stecken Sie es aus.
t) Schalten Sie die Maschine aus und unterbrechen
Sie auch die Stromzufuhr, bevor Sie sie reinigen.
u) Wenn Sie das Gerät auf einem Teppich
verwenden, stellen Sie sicher, dass die
Ventilationslöcher noch ausreichende Luftzufuhr
haben.
v) Es darf jeweils nur eine Person das Gerät
verwenden.
w) Schützen Sie die Vibrationsplatte vor Nässe und
Wasser und stellen Sie sicher, dass die
elektrischen Bestandteile nicht mit Wasser in
Kontakt kommen.
x) Dieses Gerät ist nicht geeignet für Schwangere
und Personen mit verringerten körperlichen,
sensorischen oder mentalen Fähigkeiten.
Personen, die über keinerlei Erfahrung mit derlei
Geräten verfügen, benötigen eine Erläuterung der
Funktionsweise und des Gebrauchs der Maschine
vor der ersten Benutzung.
y) Um Schäden am Gerät und
Geräuscheentwicklung zu vermeiden, achten Sie
stets auf eine gleichmäßige Gewichtsverteilung.
21
2121
21 L
LL
L
ISTE DER
ISTE DER ISTE DER
ISTE DER
T
TT
T
EILE
EILEEILE
EILE
Nr.
Nr.Nr.
Nr.
Beschreibung
BeschreibungBeschreibung
Beschreibung
#
##
#
1
Fernbedienung
1
2
Displayabdeckung
1
3
Display
1
4
Transparentes Panel
1
5
Obere Gehäuseabdeckung
1
6
Gehäusemittelteil
1
7
Kreuzschlitzschraube ST4 x 12
18
8
Basisplatte
1
9
Kunststoffstecker
2
10
Motor
1
11
Motorhalterung
1
12
Hauptrahmen
1
13
Untere Platine
1
14
Transportrolle
1
15
R
-
Klemme
2
16
Kabelverbindung
3
17
Magnetischer Ring
1
18
Trainingsband mit Griff
(L 60 cm)
2
19
Untere Gehäuseabdeckung
1
20
Standfüße
4
21
Stromkabel mit Netzstecker
1
22
Netzschalter
1
23
Fassung für
Netzschalter
1
24
Sicherung
1
25
Gummimatte
1
26
Sechskantschraube M8 x 25
2
27
Motorhalterung
1
28
Haken
2
29
Kreuzschlitzschraube ST3 x 10
4
30
Verbindungsstift
2
31
Kugellagerhülle
2
32
Schraube M5 x 30
8
33
Mutter mit Nylon
-
Sicherung M8
4
34
Abdeckung für Achsenhalterung
2
35
Achsenhalterung
2
36
Kugellager 6201
2
37
Schwungrad
1
38
Feder
-
Unterlegscheibe ±8
6
39
Sechskantbolzen M8 x 20
2
40
Buchse
1
41
Achse
1
42
Keilriemen
1
43
Unterlegscheibe ±4
1
44
Isolierung
2
Abbildung A zeigt die Explosionszeichnung Ihres
neuen Geräts. Bitte beachten Sie, dass dieses bereits
vormontiert ist.

DE
19
22
2222
22 N
NN
N
UTZUNGS
UTZUNGSUTZUNGS
UTZUNGSANLEITUNG
ANLEITUNGANLEITUNG
ANLEITUNG
22.1
22.122.1
22.1 Allgemeine Hinweise
Allgemeine Hinweise Allgemeine Hinweise
Allgemeine Hinweise
Das Gerät ist bereits komplett montiert. Bitte
kontrollieren Sie vor der ersten Nutzung Ihres neuen
Geräts die Vollständigkeit und Intaktheit des Artikels.
Leeren Sie hierzu den Karton vollständig aus. Sollten
trotz unserer Qualitätskontrollen einmal einzelne Teile
fehlen, so kontaktieren Sie bitte unser Service-Center
unter den am Ende angegebenen Kontaktdaten.
22.2
22.222.2
22.2 Computer
ComputerComputer
Computer
Die obenstehende Abbildung zeigt das
berührungsempfindliche Display (ıTouch Screen
Control Panel„) des Vibrationsboards an. Im LED-
Display wird unter anderem die Zeit dargestellt.
Darunter ist die Anzeige für ein eventuell gewähltes
Trainingsprogramm (ıProgram Mode Indicator„)
angebracht.
Ein-/Ausschalten
Drücken Sie auf die POWER-Taste zum Starten des
Geräts und drücken Sie zum Ausschalten erneut auf
diese Taste.
Einstellen der Geschwindigkeit
Drücken Sie die Taste MODE/SPEED, um im
manuellen Modus die Geschwindigkeit zu erhöhen.
22.3
22.322.3
22.3 Fernbedienung
FernbedienungFernbedienung
Fernbedienung
Die Datenübertragung der Fernbedienung zu dem
Vibrationsgerät funktioniert per Infrarot und hat eine
Reichtweite von ca. 2,5 m. Richten Sie daher die
Fernbedienung für die Benutzung auf das
Vibrationsgerät.
Ein-/Ausschalten
Drücken Sie auf die ON/OFF-Taste zum Starten des
Geräts und drücken Sie zum Ausschalten erneut auf
diese Taste.
Einstellen der Geschwindigkeit
Drücken Sie im manuellen Modus die Taste S (+),
um die Geschwindigkeit zu erhöhen und S (-), um
sie zu verringern.
Einstellen der Zeit
Drücken Sie im manuellen Modus die Taste T (+),
um die Zeit zu erhöhen und T (-), um sie zu
verringern.
Einstellen des Programms
Ihr Vibrationsgerät verfügt über fünf Programme,
die für ein effizientes und abwechselungsreiches
Training gestaltet wurden. Bitte beachten Sie, dass
Sie im Programmmodus die Geschwindigkeit und
die Zeit nicht verstellen können.
Mit Hilfe der Schnellwahltasten P1, P3 oder P5
können Sie eines dieser Trainingsprogramme direkt
auswählen. Durch Drücken der Taste P können Sie
das nächste Program auswählen, das bedeutet 1 x
Drücken startet Programm 1, 2 x Drücken
Programm 2 und so weiter.
22.4
22.422.4
22.4 Programme
ProgrammeProgramme
Programme
Jedes voreingestellte Trainingsprogramm dauert 10
Minuten. Die jeweils eingestellte Geschwindigkeit wird
dabei für ein Intervall von 30 Sekunden gehalten,
bevor die nächste Geschwindigkeit eingestellt wird.
Im manuellen Programm können Sie die
Geschwindigkeit und die Trainingszeit jederzeit
manuell steuern.
Die Verläufe der Programme P1 bis P5 sind in
Abbildung (B) dargestellt. Die X-Achse beschreibt
dabei den Zeitverlauf (ıTIME„) in Intervallen von je 30
Sekunden. Die Y-Achse beschreibt die Geschwindigkeit
(ıSPEED„).
An/Aus
Schnelllwahltasten
Geschwindigkeit +
Zeit +
Schnelllwahltasten
manuell
Geschwindig
keit
–
Zeit –
Programm-
wahl

DE
20
23
2323
23 T
TT
T
RAINI
RAINIRAINI
RAININGSANLEITUNG
NGSANLEITUNGNGSANLEITUNG
NGSANLEITUNG
Mit Ihrem Interesse am Krafttraining haben Sie einen
wichtigen Schritt in Richtung Mobilität und Gesundheit
getan – denn Krafttraining stärkt die Muskulatur. Kraft-
training verhindert nicht nur den Verlust von
Muskelmasse und Kraft, sondern verbessert diese
sogar. Die Beweglichkeit der Gelenke wird erhöht – die
Gefahr von Verletzungen reduziert.
Ihr Blutdruck, Ihre Cholesterinwerte, Ihr Blutzucker, Ihre
Motivation und sogar Ihre Laune können durch ein
wenig Sport enorm verbessert werden. Ihre Figur
können Sie in Maßen verändern. In Verbindung mit
entsprechender Ernährung reduzieren Sie Ihren Körper-
fettanteil und verbessern Ihre Silhouette.
23.1
23.123.1
23.1 Allgemeine Hinweise
Allgemeine Hinweise Allgemeine Hinweise
Allgemeine Hinweise
Jede Trainingseinheit sollte aus den folgenden drei
Teilen bestehen:
1. Aufwärmen (ıWarm Up„)
2. Ausdauer-/Cardiotraining und / oder
Krafttraining
3. Cool Down & Nachdehnen
Das Aufwärmen (ıWarm Up„)
Ihr Training sollte immer mit einen Warm Up beginnen.
Je anstrengender die anschließende Trainingseinheit
ist, desto wichtiger ist das Aufwärmen. Ein Warm Up
bereitet den Körper auf die Belastung vor, regt das
Herz-Kreislauf-System an und schützt Bänder, Sehnen
und Gelenke vor Verletzungen. Es hilft auch, das Risiko
von Krämpfen und Muskelverletzungen zu verringern.
Das Training
Der Beginn eines Ausdauer- (wegen der positiven
Auswirkungen auf das Herz-Kreislauf-System häufig
auch Herz-Kreislauf- oder Cardio-Training genannt)
oder auch eines Kraft- oder Muskeltrainings ist der
erste Schritt im Kampf gegen Zivilisationskrankheiten
und körperliche Beschwerden insbesondere bei
fortschreitendem Lebensalter.
Das Cool Down
Genauso wie vor jeder Trainingseinheit ein Warm Up
durchgeführt werden sollte, sollte nach einer Einheit ein
Cool Down stattfinden. Ein Cool Down leitet die
Entspannungsphase ein, fährt die Betriebstemperatur
des Körpers wieder herunter und verdeutlicht den
Wechsel von Belastung zur Entspannung.
Das Cool Down sollte wie das Warm Up mindestens 10
Minuten dauern und langsam bis auf den niedrigsten
Level hinunter gesteuert werden. Die Pulsfrequenz sollte
so tief wie möglich sinken. Sie beugen so unter
anderem Muskelkater vor, da möglicherweise
entstandene Stoffwechselendprodukte abtransportiert
werden können.
Das Nachdehnen
Wie bereits erwähnt, können Sie während des Warm
Up Ihre Muskeln leicht vordehnen. Nach dem Training
sollten Sie Ihre Muskeln unbedingt nachdehnen. Ein
Nachdehnen bringt den Muskel wieder in
Ausgangslänge und verhindert so Muskelverkürzungen.
Je anstrengender das Training war, desto wichtiger ist
das Nachdehnen.
Besonders wichtig ist das Nachdehnen für die im
Training beanspruchten Hauptmuskelgruppen. Die
Dehnung sollte zu spüren sein, aber nicht schmerzen.
Die Dehndauer beträgt etwa 20 Sekunden für jeden
Muskel.
Üben Sie zunächst das stabile Stehen auf dem
ausgeschalteten Gerät. Stehen Sie zunächst auf beiden
Beinen mit einer geraden Körperachse. Heben Sie
dann ein Bein an uns preizen Sie die Arme ab.
Wechseln Sie das Standbein. Gewinnen Sie so ein
Gefühl für das Stehen auf dem Gerät.
In der Grundhaltung auf der Vibrationsplatte hat der
Körper immer eine Körperspannung in der Rumpfmitte.
Halten Sie dazu den Rücken gerade und gehen Sie
leicht in die Knie. Die Beinmuskulatru ist nun ebenfalls
leicht gespannt. Trainieren Sie niemals mit gestreckten
Armen oder Beinen sondern halten Sie diese immer
gebeugt (Abbildung C).
23.2
23.223.2
23.2 Übungshinweise
ÜbungshinweiseÜbungshinweise
Übungshinweise
(D) Kniebeuge
Stellen Sie sich in der Grundhaltung auf das Gerät, die
Füße stehen etwa schulterbreit auseinander. Gehen Sie
tiefer in die Hocke bzw. Kniebeuge, in dem Sie die
Beine beugen und das Gesäß nach hinten und unten
bewegen. Zur Stabilisierung heben Sie die Arme nach
vorne oben an. Halten Sie die Hocke und kehren Sie
dann in die Ausgangsposotion zurück.
(E) Bizeps
Stellen Sie sich in der Grundhaltung auf das Gerät, die
Füße stehen etwa schulterbreit auseinander. Nehmen
Sie in jede Hand etwa auf Hüfthöhe den Griff eines
Trainingsbands. Beugen Sie nun die Arme und führen
Strona się ładuje...
Strona się ładuje...
Strona się ładuje...
Strona się ładuje...
Strona się ładuje...
Strona się ładuje...
Strona się ładuje...
Strona się ładuje...
-
 1
1
-
 2
2
-
 3
3
-
 4
4
-
 5
5
-
 6
6
-
 7
7
-
 8
8
-
 9
9
-
 10
10
-
 11
11
-
 12
12
-
 13
13
-
 14
14
-
 15
15
-
 16
16
-
 17
17
-
 18
18
-
 19
19
-
 20
20
-
 21
21
-
 22
22
-
 23
23
-
 24
24
-
 25
25
-
 26
26
-
 27
27
-
 28
28


w innych językach
- Deutsch: Crivit 292900
- English: Crivit 292900
Powiązane artykuły
-
Crivit FB-1539 Instructions For Use Manual
-
-
-
-
-
-
-
Inne dokumenty
-
Spokey JONI Instrukcja obsługi
-
Kettler 7974-100.A Computer Manual
-
-
-
-
-
ProForm PFICVU49608 Instrukcja obsługi
-
Beurer MG 280 Instrukcja obsługi
-
Merrithew Health & Fitness Stability Chair Instrukcja obsługi
-