Philips HD7762/00 Instrukcja obsługi
- Kategoria
- Akcesoria do parzenia kawy
- Typ
- Instrukcja obsługi

HD7762
11575.pdf 1 26-09-17 16:13


1
3
2
4 5
6
7
8
9
10
11
12
13
14
1715
16 18 21 23
19 20 22
24
25
26
1


English
Introduction
Congratulations on your purchase and welcome to Philips! To fully benefit from the support that
Philips offers, register your product at www.philips.com/welcome.
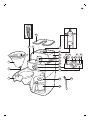
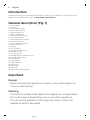
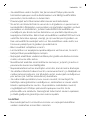
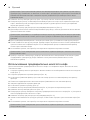
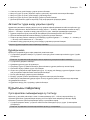
General description (Fig. 1)
1 Filter basket
2 Drip stop
3 Filter basket holder
4 Water level indicator
5 Water reservoir lid
6 Bean container lid
7 Bean container selector
8 Coarseness knob
9 Fresh bean duo container
10 Grinder funnel lid
11 Lock of grinder funnel lid
12 Water filling hole
13 Display
14 On/off button
15 Pre-ground coffee icon
16 Number of cups
17 Coffee cup icon
18 Strength select coffee bean icon
19 Strength select button
20 Timer button
21 Control knob
22 Time indication
23 Timer icon
24 Glass jug lid
25 Glass jug
26 Bean chute cleaning brush
Important
Danger
-
Never immerse the appliance in water or any other liquid, nor
rinse it under the tap.
Warning
-
Check if the voltage indicated on the appliance corresponds to
the local mains voltage before you connect the appliance.
-
Do not use the appliance if the plug, the mains cord or the
appliance itself is damaged.
6
English

-
If the mains cord is damaged, you must have it replaced by
Philips, a service center authorized by Philips or similarly qualified
persons in order to avoid a hazard.
-
Connect the appliance to an earthed wall socket.
-
This appliance can be used by children aged from 8 years and
above and by persons with reduced physical, sensory or mental
capabilities or lack of experience and knowledge if they have
been given supervision or instruction concerning use of the
appliance in a safe way and if they understand the hazards
involved. Cleaning and user maintenance shall not be made by
children unless they are older than 8 and supervised. Keep the
appliance and its cord out of reach of children aged less than 8
years.
-
Children shall not play with the appliance.
-
Only use this appliance for its intended purpose to avoid
potential hazard or injury.
-
Do not let the mains cord hang over the edge of the table or
worktop on which the appliance stands.
-
Do not touch the grinding burrs of the of the appliance, especially
when the appliance is connected to a wall socket.
-
Do not touch the hot surfaces of the appliance when it operates.
-
Do not empty the water reservoir by tilting the appliance, as this
can damage the appliance. To empty the appliance, follow the
instructions for flushing the appliance (see 'Flushing the
appliance').
-
If a problem occurs that you cannot solve by means of this user
manual, contact the Consumer Care Center in your country. If the
problem cannot be solved, take the appliance to a service center
authorized by Philips for examination or repair. Do not attempt to
repair the appliance yourself, otherwise your warranty becomes
invalid.
7
English

Caution
-
Do not place the appliance on a hot surface and prevent the
mains cord from coming into contact with hot surfaces.
-
Unplug the appliance if problems occur during grinding or
brewing and before you clean it.
-
Keep the plug and the wall socket dry.
-
Do not lift and move the appliance while it is operating.
-
The jug is hot during and after brewing. Always hold the jug by its
handle.
-
Never use the jug in a microwave oven.
-
Wait until the appliance has cooled down before you store it. The
hotplate and the coffee jug may be hot.
-
After you have unpacked the appliance, make sure it is complete
and undamaged. If in doubt, do not use the appliance but contact
the Consumer Care Center in your country.
-
This machine is intended for normal household use only. It is not
intended for use in environments such as staff kitchens of shops,
offices, farms or other work environments.
Electromagnetic fields (EMF)
This Philips appliance complies with all applicable standards and regulations regarding exposure to
electromagnetic fields.
Before first use
Setting the clock
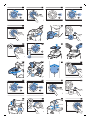
1 Put the mains plug in the wall socket. The time indication flashes on the display to indicate that
you have to set the clock time (Fig. 2).
2 Turn the control knob to set the hour. The hour indication flashes (Fig. 3).
3 Press the center of the control knob to confirm the hour.
4 The minutes indication starts flashing to indicate that you have to set the minutes (Fig. 4).
5 Turn the control knob to set the minutes (Fig. 5).
6 Press the center of the control knob to confirm the minutes (Fig. 6).
7 The display shows the set clock time. The coffeemaker is now ready for use.
Setting the automatic switch-off time
You can choose how long you want your coffee to stay hot after brewing by adjusting the time after
which the appliance automatically switches off. The default automatic switch-off time is 30 minutes.
8
English

The maximum automatic switch-off time is 120 minutes. To adjust the automatic switch-off time,
follow the steps below.
1 Make sure that the appliance is switched off but the mains plug is in the wall socket.
2 Press the center of the control knob until the display starts flashing.
3 Turn the control knob to increase or decrease the time. 1 is 10 minutes, 2 is 20 minutes, 3 is 30
minutes and so on until 12 is 120 minutes.
4 Press the center of the control knob to confirm the automatic switch-off time.
Note: The appliance always saves the last setting.
Flushing the appliance
Always flush the coffeemaker once before first use.
1 Open the water reservoir lid. Fill the water reservoir with fresh cold water up to the 8-cup indication
(Fig. 7).
Note: Do not put coffee beans or pre-ground coffee in the water reservoir.
2 Close the water reservoir lid.
3 Put the jug in the appliance (Fig. 8).
4 Press the on/off button (Fig. 9). The display lights up and the appliance beeps.
5 Press the strength select button (Fig. 10).
6 Turn the control knob to choose the pre-ground coffee setting (Fig. 11). The pre-ground coffee icon
starts flashing.
7 Press the center of the control knob to confirm.
8 Press the center of the control knob again. The appliance starts the flushing process.
9 Let the appliance operate until the flushing process is finished. It is finished when the appliance
stops beeping.
10 Empty the jug.
11 Press the on/off button to switch off the appliance.
Using the appliance
Filling the water reservoir
There are indications for 2 to 10 cups (275ml to 1375ml) on the water-level window. You can use these
indications to determine how much water to put in the water reservoir. The reflection changes from
light to dark for each cup of water added.
1 Open the water reservoir lid and fill the water reservoir with the required amount of cold water (Fig.
7).
Note: Do not fill the water reservoir beyond the 10-cup indication.
Note: Make sure that the amount of water you pour into the water reservoir is consistent with the
number of cups you want to brew. The coffeemaker uses all the water in the water reservoir.
9
English

Using coffee beans
Warning: Always keep the water reservoir lid closed when you fill the coffee bean
container with coffee beans. Otherwise coffee beans can fall into the water reservoir
and block up the water inlet.
1 Open the coffee bean container lid (Fig. 12).
2 Fill the fresh bean duo container with coffee beans. You can fill the two containers with two
different types of coffee beans. Make sure that there are enough coffee beans in the duo container
for the amount of coffee you want to brew (Fig. 13).
Note: Always make sure that the fresh bean duo bean container is at least half full.
Warning: To prevent the grinder from jamming, do not use unroasted or caramelized
beans. Use coffee beans instead of espresso beans, as espresso beans may damage
the grinder.
3 Open the filter basket holder (Fig. 14).
4 Place a paper filter (type 1x4 or no. 4) or the permanent filter in the filter basket (Fig. 15).
5 Close the filter basket holder.
6 Turn the coarseness knob to select the desired type of grind (from fine to coarse). There are nine
grind settings (Fig. 16).
Tip: The coarseness knob allows you to choose between 9 different settings. The icons indicate 3
preselected optimal settings, but you can choose any setting in between. We advise you to
experiment with the different grind settings to find out which setting you prefer.
7 Turn the container selector to choose between the two containers.
Note: Whenever you switch between coffee bean containers or coffee beans, there will always be
traces of coffee left of the previously ground type of coffee beans. Clean the grinder funnel after
you switch to a new type of coffee bean to prevent this.
8 Press the strength button (Fig. 10). The coffee bean icons start flashing.
9 Turn the control knob to select the desired coffee strength: 1 bean for mild coffee, 2 beans for
medium-strong coffee or 3 beans for strong coffee.
10 Press the center of the control knob to confirm the strength (Fig. 6).
11 To select the number of cups, turn the control knob until the desired number of cups flashes on the
display.
Note: Please keep in mind that the coffeemaker uses all the water in the water reservoir. If you
select a number of cups that is smaller than the amount of water, the coffee becomes weaker than
you intended.
12 Press the center of the control knob to confirm the number of cups (Fig. 6).
13 Press the center of the control knob again. The appliance beeps and starts grinding the required
amount of coffee beans. When the grinding process is finished, the appliance starts brewing coffee
14 Wait until the coffeemaker has stopped beeping before you remove the jug.
Note: After brewing, coffee drips from the filter basket for several seconds.
15 The appliance keeps your coffee hot until it switches off automatically. If you do not need your
coffee to be kept hot, press the on/off button to switch off the appliance.
Using pre-ground coffee
If you want to use pre-ground coffee instead of coffee beans, follow the steps below.
10
English

1 Open the water reservoir lid and fill the water reservoir with the required amount of cold water (Fig.
7).
2 Open the filter basket holder (Fig. 14).
3 Place a paper filter (type 1x4 or no. 4) or the permanent filter in the filter basket.
4 Put pre-ground coffee in the paper filter or in the permanent filter.
5 Close the filter basket holder.
6 Put the jug in the appliance (Fig. 8).
7 Press the on/off button (Fig. 9). The display lights up.
8 Press the strength select button (Fig. 10).
9 Turn the control knob to choose the pre-ground coffee setting (Fig. 11). The pre-ground coffee icon
lights up.
10 Press the center of the control knob to confirm (Fig. 6).
11 Then press the center of the control knob again to start the brewing process (Fig. 6).
12 Wait until the coffeemaker has stopped beeping before you remove the jug.
Note: After brewing, coffee drips from the filter basket for several seconds.
13 The appliance keeps your coffee hot until it switches off automatically. If you do not need your
coffee to be kept hot, press the on/off button to switch off the appliance.
Setting the timer
The timer enables you to program the time at which you want the brewing process to start. Make sure
that all steps of brewing coffee with either preground coffee or coffee beans have been taken before
setting the timer.
1 Press the timer button (Fig. 17). The hour indication flashes to indicate that you have to set the
hour.
2 Turn the knob to set the hour (Fig. 18).
3 Press the center of the control knob to confirm the hour. The minutes starts to flash to indicate that
you have to set the minutes.
4 Turn the control knob to set the minutes (Fig. 19).
5 Press the center of the knob to confirm the minutes and the time set (Fig. 21). The timer is set and
the brewing process will start at the preset time.
Drip stop function
The drip stop function enables you to remove the jug from the coffeemaker before the brewing
process is finished. When you remove the jug, the drip stop stops the flow of coffee into the jug.
Note: The brewing process does not stop when you remove the jug. If you do not put the jug back in
the appliance within 20 seconds, the filter basket overflows.
Cleaning and maintenance
Cleaning after every use
Never immerse the appliance in water or any other liquid, nor rinse it under the tap.
1 Remove the mains plug from the wall socket.
2 Wipe the outside of the coffeemaker with a damp cloth.
11
English

3 Clean the filter basket and the permanent filter with hot water and some washing-up liquid or
clean them in the dishwasher.
Cleaning the grinder funnel
Important: Clean the grinder funnel every 1 to 2 weeks to prevent clogging with ground coffee. This
is easily and quickly done by following the steps below.
Note: Make sure the coffee bean container is empty before you start the cleaning procedure.
1 Press the on/off button to switch off the appliance (Fig. 21).
2 Open the filter basket holder (Fig. 14).
3 Place a paper filter (type 1x4 or no. 4) or the permanent filter in the filter basket (Fig. 15).
4 Close the filter basket holder.
5 Use the end of the bean chute cleaning brush to open the grinder funnel lid (Fig. 22).
6 Press and hold the strength select button for 4 seconds (Fig. 23). The grinder starts cleaning itself.
7 When the grinder has stopped cleaning, use the bean chute cleaning brush to brush ground coffee
residues into the lower part of the funnel (Fig. 24). The ground coffee residues fall into the filter
basket.
8 Close the lid of the grinder funnel.
9 Remove the paper filter or permanent filter with the ground coffee residues.
Descaling the coffeemaker
Descale the coffeemaker when you notice excessive steaming or when the brewing time increases. It
is advisable to descale the coffeemaker every two months. Only use white vinegar to descale, as other
products may cause damage to the coffeemaker. For more information on descaling, see
www.philips.com/descale-coffeemaker.
Warning: Never use vinegar with an acetic acid content of 8% or more, natural vinegar,
powder descalers or tablet descalers to descale the appliance, as this may cause
damage.
1 Open the water reservoir lid.
2 Fill the water reservoir with white vinegar (4% acetic acid) up to the 10-cup indication.
3 Place a paper filter (type 1x4 or no. 4) or the permanent filter in the filter basket and close the filter
basket holder.
4 Put the empty jug in the appliance.
5 Put the mains plug in the wall socket.
6 Press the on/off button to switch on the appliance (Fig. 9). The display lights up.
7 Press the strength select button and turn the control knob to choose the pre-ground coffee setting
(Fig. 11).
8 Press the center of the control knob to confirm (Fig. 6).
9 Press the center of the control knob again to start the brewing process.
10 Wait until half of the vinegar has flowed into the jug. Then press the on/off button to interrupt the
brewing process. Let the vinegar act for at least 15 minutes.
11 Press the on/off button to switch the coffeemaker back on.
12 Press the center of the control knob twice to let the appliance complete the brewing process (Fig.
25).
13 Empty the jug and remove the paper filter or the permanent filter with the scale residues.
12
English

14 Fill the water reservoir with fresh cold water and press the center of the control knob twice to start
another brewing process (Fig. 25). Let the coffeemaker complete the entire brewing process and
empty the jug.
Note: If necessary, repeat step 14 until the water that comes out of the appliance no longer tastes
or smells of vinegar.
15 Clean the filter basket and the jug with hot water and some washing-up liquid.
16 Press the on/off button on the front of the appliance to switch off the appliance (Fig. 21).
Ordering accessories
To buy accessories or spare parts, visit www.shop.philips.com/service or go to your Philips dealer.
You can also contact the Philips Consumer Care Center in your country (see the international warranty
leaflet for contact details).
Warranty and support
If you need information or support, please visit www.philips.com/support or read the international
warranty leaflet.
Recycling
-
This symbol means that this product shall not be disposed of with normal household waste
(2012/19/EU) (Fig. 26).
-
Follow your country's rules for the separate collection of electrical and electronic products. Correct
disposal helps prevent negative consequences for the environment and human health.
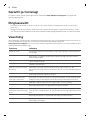
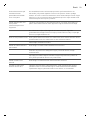
Troubleshooting
This chapter summarizes the most common problems you could encounter with the appliance. If you
are unable to solve the problem with the information below, visit www.philips.com/support for a list
of frequently asked questions or contact the Consumer Care Center in your country.
Problem
Solution
The appliance does not
work.
Put the mains plug in the wall socket and press the on/off button to
switch on the appliance.
Make sure that the voltage indicated on the appliance corresponds to
the local mains voltage.
Fill the water reservoir with water.
Close the lid of the grinder funnel.
The grinder does not work
or does not work properly.
Make sure that you did not select pre-ground coffee. If the symbol for
pre-ground coffee is visible on the display, you selected pre-ground
coffee.
Clean the grinder funnel by following the instructions.
When I use the grinder,
the coffee is too weak.
Make sure that the number of cups you selected is consistent with the
amount of water in the water reservoir. Please keep in mind that the
coffeemaker uses all the water in the water reservoir.
13
English

Use the strength button to set the coffee strength to ‘strong’.
Use coffee beans of a stronger blend or flavor.
When I use pre-ground
coffee, the coffee is too
weak.
Make sure that the amount of pre-ground coffee in the filter is
consistent with the amount of water in the water reservoir. Please keep
in mind that the appliance uses all the water in the water reservoir.
Use ground coffee of a stronger blend or flavor.
To increase the coffee strength, increase the amount of pre-ground
coffee or decrease the amount of water.
The filter overflows when I
remove the jug from the
appliance while it is
brewing coffee.
If you remove the jug for more than 20 seconds during the brewing
process, the drip stop causes the filter basket to overflow. Also note that
the coffee does not reach its full taste before the end of the brewing
process. Therefore we advise you not to remove the jug and pour out
the coffee before the end of the brewing process.
The appliance continues
to drip long after the
brewing process has
ended.
The dripping is caused by condensation of steam. It is completely
normal that the appliance drips for some time.
If the dripping does not stop, the drip stop may be clogged. To clean the
drip stop, open the filter basket holder and take out the filter basket.
Rinse the filter basket and the drip stop under the tap.
The coffee is not hot
enough.
The coffee in the jug cools down faster if you brew only a few cups. The
coffee stays hot longer if you brew 10 cups, which is a full jug.
Descale the appliance.
The appliance does not
start cleaning the grinder
funnel.
Make sure that the appliance is plugged in.
Open the lid of the grinder funnel before you press and hold the
strength select button.
Press and hold the strength select button for 4 seconds until the grinder
starts cleaning itself.
The appliance works but
makes a beeping sound.
Please check if the lid of the grinder funnel is closed properly.
The coffee beans seem to
be used up quickly.
To brew a perfect cup of coffee, the appliance needs a certain amount
of ground coffee. The amount of coffee beans the appliance uses to
obtain the optimal amount of ground coffee per cup is normal.
14
English

Eesti
Sissejuhatus
Õnnitleme ostu puhul ja tervitame Philipsi poolt! Philipsi pakutava tootetoe eeliste täielikuks
kasutamiseks registreerige oma toode veebisaidil www.philips.com/welcome.
Üldine kirjeldus (joon. 1)
1 Filtrikorv
2 Tilgalukk
3 Filtrikorvi hoidja
4 Veetaseme näidik
5 Veepaagi kaas
6 Oasalve kaas
7 Oasalve valikunupp
8 Jahvatusjämeduse nupp
9 Värskete ubade kaksiksalv
10 Veskiava kaas
11 Veskiava kaane lukk
12 Vee täiteava
13 Ekraan
14 Toitenupp
15 Eeljahvatatud kohvi ikoon
16 Tasside arv
17 Kohvitassi ikoon
18 Kohviubade kanguse valimise ikoon
19 Kanguse valimise nupp
20 Taimeri nupp
21 Juhtnupp
22 Ajanäidik
23 Taimeri ikoon
24 Klaasist kannu kaas
25 Klaasist kann
26 Oašahti puhastushari
Tähtis
Oht
-
Ärge kastke seadet vette ega muudesse vedelikesse ega loputage
seda kraani all.
Hoiatus
-
Enne seadme ühendamist vooluvõrku kontrollige, kas seadmele
märgitud toitepinge vastab kohaliku elektrivõrgu pingele.
-
Ärge kasutage seadet, kui selle pistik, toitekaabel või seade ise on
kahjustatud.
15
Eesti

-
Kui toitejuhe on kahjustatud, peab selle ohtlike olukordade
vältimiseks uue vastu vahetama Philips, Philipsi volitatud
hoolduskeskus või samaväärset kvalifikatsiooni omav isik.
-
Ühendage seade maandatud seinakontakti.
-
Seda seadet võivad kasutada lapsed alates 8. eluaastast ning
füüsilise, meele- või vaimse häirega isikud või isikud, kellel
puuduvad kogemused ja teadmised, kui neid valvatakse või neile
on antud juhised seadme ohutu kasutamise kohta ja nad
mõistavad sellega seotud ohte. Ärge laske lastel seadet
puhastada ja hooldada, kui nad ei ole vähemalt 8 aastat vanad ja
nad on järelevalveta. Hoidke seadet ja selle toitejuhet alla
8-aastastele lastele kättesaamatus kohas.
-
Lapsed ei tohi seadmega mängida.
-
Kasutage seda seadet üksnes selleks ettenähtud otstarbel, et
vältida võimalikku ohtu või vigastust.
-
Ärge laske toitejuhtmel rippuda üle seadme all oleva laua või
tööpinna serva.
-
Ärge puudutage seadme jahvatuspindu, eriti ajal, mil seade on
seinapistikusse ühendatud.
-
Ärge puudutage töötava masina kuumi pindu.
-
Ärge tühjendage veenõud selleks seadet kallutades, sest see võib
seadet kahjustada. Seadme tühjendamiseks järgige seadme
loputamise juhiseid (vaadake 'Seadme loputamine').
-
Kui tekib probleem, mida Te ei saa lahendada kasutades
käesolevat kasutusjuhendit, võtke ühendust oma asukohariigi
klienditeeninduskeskusega. Kui probleemi ei ole võimalik
lahendada, viige seade uurimiseks või paranduseks Philips'i poolt
heaks kiidetud teeninduskeskusesse. Ärge parandage seadet ise,
vastasel juhul muutub Teie garantii kehtetuks.
Ettevaatust
-
Ärge pange seadet tulisele pinnale ning vältige toitejuhtme
kokkupuudet tuliste pindadega.
16
Eesti

-
Tõmmake pistik kohvi jahvatamisel või valmistamisel tekkinud
probleemide korral ning enne seadme puhastamist pistikupesast
välja.
-
Hoidke pistik ja seinakontakt kuivana.
-
Ärge tõstke ega liigutage seadet töötamise ajal.
-
Kann on kuum kohvikeetmise ajal ja pärast selle lõppu. Hoidke
kohvikannu alati käepidemest.
-
Ärge kunagi kasutage kannu mikrolaineahjus.
-
Enne hoiukohta panekut laske seadmel täielikult maha jahtuda.
Soojendusplaat ja kohvikann võivad olla kuumad.
-
Pärast seadme lahtipakkimist veenduge, et see oleks terviklik ja
kahjustusteta. Kahtluste korral ärge seadet kasutage, vaid võtke
ühendust oma asukohariigi Philipsi klienditeeninduskeskusega.
-
Masin on mõeldud kasutamiseks ainult tavalises
kodumajapidamises. See ei ole mõeldud kasutamiseks poodide
personali köökides, kontorites, talude puhkeruumides ega teistes
töökeskkondades.
Elektromagnetväljad (EMF)
See Philips seade vastab kõikidele elektromagnetiliste väljadega kokkupuudet käsitlevatele
kohaldatavatele standarditele ja õigusnormidele.
Enne esimest kasutamist
Kella seadistamine
1 Pange pistik pistikupessa. Ajanäidik hakkab ekraanil vilkuma, andes märku, et teil tuleb seadistada
kellaaeg (joon. 2).
2 Tunni seadistamiseks keerake juhtnuppu. Tunninäit hakkab vilkuma (joon. 3).
3 Tunni kinnitamiseks vajutage juhtnupu keskosa.
4 Minutite näidik hakkab vilkuma, näidates, et peate seadistama minutid (joon. 4).
5 Minutite seadistamiseks keerake juhtnuppu (joon. 5).
6 Minutite kinnitamiseks vajutage juhtnupu keskosa (joon. 6).
7 Näidik kuvab seadistatud kellaaja. Kohvimasin on nüüd kasutusvalmis.
Automaatse väljalülitusaja seadistamine
Kohvi kuumaks jäämise aega pärast keetmist saate valida muutes aega, pärast mida seade
automaatselt välja lülitub. Vaikimisi automaatne väljalülitusaeg on 30 minutit. Pikim automaatne
väljalülitusaeg on 120 minutit. Kohandamaks automaatset väljalülitusaega, järgige alltoodud samme.
1 Veenduge, et seade oleks välja lülitatud (kuid pistik on pistikupesas).
17
Eesti

2 Vajutage juhtnupu keskosale kuni näidik hakkab vilkuma.
3 Keerake juhtnuppu, et pikendada või lühendada aega. 1 vastab 10 minutile, 2 vastab 20 minutile, 3
vastab 30 minutile ja nii edasi kuni 12-ni, mis vastab 120 minutile.
4 Vajutage juhtnupu keskosale kinnitamaks automaatset väljalülitusaega.
Märkus. seade salvestab alati viimati kasutatud seadistuse.
Seadme loputamine
Alati loputage kohvimasinatenne esimest kasutamist.
1 Avageveenõu kaas. Täitke veenõu värske külma veega kuni 8-tassi märgiseni (joon. 7).
Märkus. ärge pange kohviube ega eeljahvatatud kohvi veenõusse.
2 Sulgege veenõu kaas.
3 Asetage kann seadmesse (joon. 8).
4 Vajutage toitenuppu (joon. 9). Ekraan läheb heledaks ja seade piiksub.
5 Vajutage kanguse valimise nuppu (joon. 10).
6 Eeljahvatatud kohvi seadistuse (joon. 11) valimiseks keerake juhtnuppu. Eeljahvatatud kohvi ikoon
hakkab vilkuma.
7 Kinnitamiseks vajutage juhtnupu keskosa.
8 Vajutage juhtnupu keskosa uuesti. Seade alustab loputusprotsessi.
9 Lubage seadmel töötada, kuni loputamisprotsess on lõpetatud. See on lõpetatud, kui seade enam
ei piiksu.
10 Tühjendage kann.
11 Seadme väljalülitamiseks vajutage toitenuppu.
Seadme kasutamine
Veenõu täitmine
Veetasemenäidikul on jooned, tähistamaks 2 kuni 10 tassi (275 ml kuni 1375 ml). Kasutage antud jooni
tuvastamaks, kui palju vett tuleb veenõusse panna. Näidik muutub heledast tumedaks iga lisatud
tassitäie vee korral.
1 Avage veenõu kaas ja täitke veenõu vajaliku koguse külma veega (joon. 7).
Märkus. Ärge valage veenõusse vett üle 10 tassi tähise.
Märkus. Veenduge, et veekogus, mille te veenõusse valate, vastaks tasside arvule, mida soovite
valmistada. Kohvimasin kasutab ära kogu veenõus oleva vee.
Kohviubade kasutamine
Hoiatus. Kohviubade salve kohviubadega täites hoidke veepaagi kaas alati suletud.
Vastasel korral satuvad kohvioad veepaaki ja ummistavad vee sisselaskeava.
1 Avage kohviubade salve kaas (joon. 12).
2 Täitke värskete ubade kaksiksalv kohviubadega. Võite salved täita kahte erinevat tüüpi
kohviubadega. Veenduge, et kaksiksalves oleks soovitud koguse kohvi valmistamiseks (joon. 13)
piisavalt kohviube.
Märkus. Veenduge, et värskete ubade topeltsalv oleks vähemalt poolenisti täidetud.
18
Eesti

Hoiatus. Vältimaks kohviveski ummistust, ärge kasutage röstimata või karamellitud
ube. Kasutage espressoubade asemel kohviube, kuna espressooad võivad veskit
kahjustada.
3 Avage filtrikorvi hoidja (joon. 14).
4 Asetage filtrikorvi (joon. 15) püsifilter või paberfilter (tüüp 1x4 või nr 4).
5 Sulgege filtrikorvi hoidja.
6 Soovitud jahvatusastme (peenest jämedani) valimiseks keerake jahvatuse jämeduse nuppu.
Jahvatamiseks on üheksa seadistust (joon. 16).
Nõuanne. Jahvatamise jämedust reguleeriv nupp lubab valida üheksa erineva seadistuse vahel.
Ikoonid tähistavad kolme eelvalitud optimaalset seadistust, kuid saate valida ka kõiki vahepealseid
seadistusi. Soovitame proovida erinevaid jahvatamisseadistusi, et leida endale sobivaim.
7 Salvede vahel valimiseks keerake oasalve valikunuppu.
Märkus. Oasalvede või kohviubade vahetamisel jäävad eelnevalt jahvatatud kohviubadest alati
jäägid. Jääkide eemaldamiseks puhastage veskiava uue kohviubade tüübi valimise järel.
8 Vajutage kanguse nuppu (joon. 10). Kohviubade ikoonid hakkavad vilkuma.
9 Soovitud kohvi kanguse valimiseks keerake juhtnuppu: 1 uba lahja kohvi, 2 uba keskmise
kangusega kohvi või 3 uba kange kohvi valmistamiseks.
10 Kanguse (joon. 6) kinnitamiseks vajutage juhtnupu keskosa.
11 Tasside arvu valimiseks keerake juhtnuppu, kuni ekraanil vilgub soovitud tasside arv.
Märkus. Pidage meeles, et kohvimasin kasutab ära kogu veepaagis oleva vee. Kui valitud tasside
arv on väiksem veepaagis olevast veekogusest, tuleb kohv soovitust lahjem.
12 Tasside (joon. 6) arvu kinnitamiseks vajutage juhtnupu keskosa.
13 Vajutage juhtnupu keskosa uuesti. Seade piiksub ja alustab vajaliku koguse kohviubade
jahvatamist. Kui jahvatamisprotsess on lõppenud, alustab seade kohvi valmistamist.
14 Enne kannu eemaldamist oodake, kuni kohvimasin on piiksumise lõpetanud.
Märkus. Pärast valmistamise lõppu tilgub kohv filtrikorvist veel mitu sekundit.
15 Seade hoiab kuni automaatse väljalülitumiseni kohvi kuumana. Kui te ei soovi kohvi kuumana
hoidmist, lülitage seade toitenupule vajutades välja.
Eeljahvatatud kohvi kasutamine
Kui soovite kohviubade asemel kasutada eeljahvatatud kohvi, toimige alljärgnevalt.
1 Avage veenõu kaas ja täitke veenõu vajaliku koguse külma veega (joon. 7).
2 Avage filtrikorvi hoidja (joon. 14).
3 Asetagefiltrikorvi püsifilter või paberfilter(tüüp 1x4 või nr 4).
4 Asetage eeljahvatatud kohv paberfiltrisse või püsifiltrisse.
5 Sulgege filtrikorvi hoidja.
6 Asetage kann seadmesse (joon. 8).
7 Vajutage toitenuppu (joon. 9). Ekraan läheb heledaks.
8 Vajutage kanguse valimise nuppu (joon. 10).
9 Eeljahvatatud kohvi seadistuse (joon. 11) valimiseks keerake juhtnuppu. Süttib eeljahvatatud kohvi
ikoon.
10 Kinnitamiseks (joon. 6) vajutage juhtnupu keskosa.
11 Keetmisprotsessi (joon. 6) alustamiseks vajutage uuesti juhtnupu keskosale.
12 Oodake, kuni kohvimasin on piiksumise lõpetanud, enne kui kannu eemaldate.
Märkus. Pärast valmistamise lõpputilgub kohv filtrikorvist veel mitu sekundit.
19
Eesti

13 Seade hoiab Teie kohvi kuumana, kuni see automaatselt välja lülitub. Kui Te ei soovi, et Teie kohvi
kuumana hoitaks, vajutage seadme välja lülitamiseks selle toitenuppu.
Taimeri seadistamine
Taimer võimaldab programmeerida aega, millal soovite valmistamisprotsessi alustada. Veenduge, et
enne taimeri seadistamist oleks läbi viidud kõik nii jahvatatud kohvi kui ka kohviubadega kohvi
valmistamisetapid.
1 Vajutage taimeri nupule (joon. 17). Tunninäidik vilgub, andes märku, et peate seadistama tunni.
2 Tunni seadistamiseks keerake nuppu (joon. 18).
3 Tunni kinnitamiseks vajutage juhtnupu keskosa. Minutid hakkavad vilkuma, näidates, et peate
seadistama minutid.
4 Minutite seadistamiseks keerake juhtnuppu (joon. 19).
5 Minutite ja seadistatud kellaaja kinnitamiseks vajutage juhtnupu keskosa (joon. 21). Taimer on
seadistatud ja valmistamisprotsess algab eelseadistatud ajal.
Tilgaluku funktsioon
Tilgaluku funktsioon võimaldab Teil kannu enne keetmisprotsessi lõpule jõudmist kohvimasinast
eemaldada. Kannu eemaldamisel takistab tilgaluku funktsioon kohvi voolamise kannu.
Märkus. Keetmisprotsess kannu eemaldamisel ei peatu. Kui Te kannu 20 sekundi jooksul tagasi
seadmesse ei aseta, siis hakkab filtrikorv üle ajama.
Puhastamine ja hooldus
Puhastamine pärast iga kasutuskorda
Ärge kastke seadet vette ega muudesse vedelikesse ega loputage seda kraani all.
1 Tõmmake pistik pistikupesast välja.
2 Puhastage kohvimasina välispinda niiske lapiga.
3 Puhastage filtrikorv ja püsifilter kuuma vee ja vähese nõudepesuvahendiga või peske
nõudepesumasinas.
Veskiava puhastamine
Tähtis! Puhastage veskiava regulaarselt iga ühe kuni kahe nädala tagant, et vältida ummistumist
jahvatatud kohviga. Järgides allolevaid nõuandeid saab seda teha kiirelt ja lihtsalt.
Märkus. Veenduge, et oasalv oleks enne puhastustoimingu alustamist tühi.
1 Seadme (joon. 21) väljalülitamiseks vajutage toitenuppu.
2 Avage filtrikorvi hoidja (joon. 14).
3 Asetagefiltrikorvi (joon. 15) püsifilter või paberfilter(tüüp 1x4 või nr 4).
4 Sulgege filtrikorvi hoidja.
5 Veskiava kaane avamiseks kasutage oašahti puhastusharja otsa (joon. 22).
6 Vajutage ja hoidke kanguse valimise nuppu nelja sekundi jooksul all (joon. 23). Jahvataja hakkab
ennast ise puhastama.
20
Eesti
Strona się ładuje...
Strona się ładuje...
Strona się ładuje...
Strona się ładuje...
Strona się ładuje...
Strona się ładuje...
Strona się ładuje...
Strona się ładuje...
Strona się ładuje...
Strona się ładuje...
Strona się ładuje...
Strona się ładuje...
Strona się ładuje...
Strona się ładuje...
Strona się ładuje...
Strona się ładuje...
Strona się ładuje...
Strona się ładuje...
Strona się ładuje...
Strona się ładuje...
Strona się ładuje...
Strona się ładuje...
Strona się ładuje...
Strona się ładuje...
Strona się ładuje...
Strona się ładuje...
Strona się ładuje...
Strona się ładuje...
Strona się ładuje...
Strona się ładuje...
Strona się ładuje...
Strona się ładuje...
Strona się ładuje...
Strona się ładuje...
Strona się ładuje...
Strona się ładuje...
Strona się ładuje...
Strona się ładuje...
Strona się ładuje...
Strona się ładuje...
Strona się ładuje...
Strona się ładuje...
Strona się ładuje...
Strona się ładuje...
Strona się ładuje...
Strona się ładuje...
Strona się ładuje...
Strona się ładuje...
Strona się ładuje...
Strona się ładuje...
Strona się ładuje...
Strona się ładuje...
Strona się ładuje...
Strona się ładuje...
Strona się ładuje...
Strona się ładuje...
Strona się ładuje...
Strona się ładuje...
Strona się ładuje...
Strona się ładuje...
Strona się ładuje...
Strona się ładuje...
Strona się ładuje...
Strona się ładuje...
Strona się ładuje...
Strona się ładuje...
-
 1
1
-
 2
2
-
 3
3
-
 4
4
-
 5
5
-
 6
6
-
 7
7
-
 8
8
-
 9
9
-
 10
10
-
 11
11
-
 12
12
-
 13
13
-
 14
14
-
 15
15
-
 16
16
-
 17
17
-
 18
18
-
 19
19
-
 20
20
-
 21
21
-
 22
22
-
 23
23
-
 24
24
-
 25
25
-
 26
26
-
 27
27
-
 28
28
-
 29
29
-
 30
30
-
 31
31
-
 32
32
-
 33
33
-
 34
34
-
 35
35
-
 36
36
-
 37
37
-
 38
38
-
 39
39
-
 40
40
-
 41
41
-
 42
42
-
 43
43
-
 44
44
-
 45
45
-
 46
46
-
 47
47
-
 48
48
-
 49
49
-
 50
50
-
 51
51
-
 52
52
-
 53
53
-
 54
54
-
 55
55
-
 56
56
-
 57
57
-
 58
58
-
 59
59
-
 60
60
-
 61
61
-
 62
62
-
 63
63
-
 64
64
-
 65
65
-
 66
66
-
 67
67
-
 68
68
-
 69
69
-
 70
70
-
 71
71
-
 72
72
-
 73
73
-
 74
74
-
 75
75
-
 76
76
-
 77
77
-
 78
78
-
 79
79
-
 80
80
-
 81
81
-
 82
82
-
 83
83
-
 84
84
-
 85
85
-
 86
86


Philips HD7762/00 Instrukcja obsługi
- Kategoria
- Akcesoria do parzenia kawy
- Typ
- Instrukcja obsługi
w innych językach
Powiązane artykuły
Inne dokumenty
-
Unold 28736 Instrukcja obsługi
-
Gaggia MAGENTA PLUS Instrukcja obsługi
-
-
Scarlett sc-cg44502 Instrukcja obsługi
-
-
KALORIK TKG CM 1019 BT Instrukcja obsługi
-
-
Maestro MR410 Instrukcja obsługi
-
Saeco HD8924/09 Instrukcja obsługi
-
Tefal CM272132 Instrukcja obsługi