
o
t I
�
■
User Manuał
ov=�MAX
u • unlimited
PL
EN

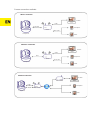
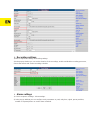
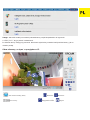
Camera connection methods:
Camspot 4.8
RJ45 cable
Router
Cable
Wi-Fi LAN
Wired connection
Wireless connection
Camspot 4.8
Router
Wi-Fi
Cable
Wi-Fi LAN
PC/MAC
Smartphone
Tablet
PC/MAC
Smartphone
Tablet
Internet connection
Camspot 4.8
Cable
or
Wi-Fi
Wireless router
ADSL modem
3G/4G or Wi-Fi
PC/MAC
Smartphone
Tablet
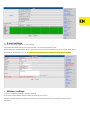
Chapter 1: Software installation
Install the Camspot software. You can download it from our website: www.overmax.eu.
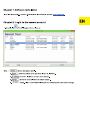
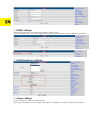
Chapter 2: Login to the camera account
1. Double click . The following interface will pop up:
Note: 1. indicates the camera model.
2. shows the camera name (the default name is
„IPCAM”).
3. shows the IP address and port of the camera.
4. Shows the camera ID used for remote access.
5.
button - click it if the search tool prompts the “Subnet mask does not match” message.


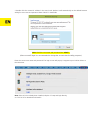
2. Double click the camera IP address in the search tool window. It will automatically run the default browser
asking for user name and password. Enter
“admin” in both fields.
Note: Both the user name and password are “admin”.
(After successful login it is recommended to change the account data for safety purposes)
Enter the correct user name and password. The login screen will pop up. It supports up to 6 online visitors at
the same time.
Note: If the OCX has already been installed, skip the
“A” step and login directly.
A. Click
“OCX” to download and install it.
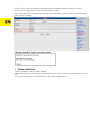
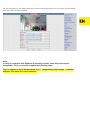
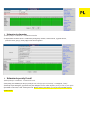
B. Refresh the page and login again. The following camera video interface will be displayed on the screen:
Live video interface (IE browser):
Camera control (PTZ) Listen Talk
Cruise Video recording Photo
Digital zoom Video/photo saving folder
Settings Video/photo online playback
Chapter 3: Settings configuration
Video settings
1)Click in sequence: Settings - Video settings.
2)
In the pop-up window you can set the main stream, sub-stream and mobile picture resolution options.

2. Double click the camera IP address in the search tool window. It will automatically run the default browser
asking for user name and password. Enter
“admin” in both fields.
Note: Both the user name and password are “admin”.
(After successful login it is recommended to change the account data for safety purposes)
Enter the correct user name and password. The login screen will pop up. It supports up to 6 online visitors at
the same time.
Note: If the OCX has already been installed, skip the
“A” step and login directly.
A. Click
“OCX” to download and install it.
B. Refresh the page and login again. The following camera video interface will be displayed on the screen:
Live video interface (IE browser):
Camera control (PTZ) Listen Talk
Cruise Video recording Photo
Digital zoom Video/photo saving folder
Settings Video/photo online playback
Chapter 3: Settings configuration
Video settings
1)Click in sequence: Settings - Video settings.
2)
In the pop-up window you can set the main stream, sub-stream and mobile picture resolution options.

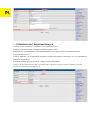
Recording settings
1)Click in sequence: Settings - Recording settings.
2)In the pop-up window you can set the duration of the recordings, enable and disable recording processes,
choose the stream and set the recording schedule.
Alarm settings
1) Click in sequence: Settings - Alarm settings.
2) In the pop-up window you can configure such parameters as path, relay time, signal, preset positions,
number of captured photos or set the alarm schedule.
E-mail settings
1)Click in sequence: Settings - E-mail settings.
2)Complete the fields with the correct E-mail data. Click "Apply" and then "Test".
3)This function is available when the IP camera has an access to the network. If you use G-mail, enter 465 in
the port field, and set SSL as TLS. It is also very important that your e-mail has SMTP server enabled.
Wireless settings
1) Click in sequence: Settings - Wireless settings.
2) Click the Search button and then enter the SSID of your choice.
3) Make sure that the entered data is the same as the router
’s and enter your wireless network (Wi-Fi)
password.

4) Click “Check”. After 30 seconds the notification pops out showing whether the settings are correct.
5) If so, press the Apply button and disconnect the Internet cable.
Note: If the Search Tool has not been able to find the camera's IP address, please re-connect the Internet cable and
check your Wi-Fi settings.
Checking the Wi-Fi signal connection status
Motion detection
1)Click in sequence: Settings - Motion detection.
2)This function allows you to set up to 4 motion detection areas. In the event of an alarm, the green line turns
red.
3) You can also modify the size and position of a given motion detection area.
Video shade
1) Click in sequence: Settings - Video shade.
2) This function allows you to set up to 4 areas, in which the video stream is hidden (the default colour is
black).
3) You can also modify the size and position of a given shade area.
Chapter 4: Basic function settings
FTP settings

DDNS settings
1)Make sure that there is port forwarding enabled in UPNP section.
2) Then enter the server, user name, password and domain, and confirm the changes with the Apply button.
Multiple devices settings
Image settings
1)Click in sequence: Settings - Image settings.
2)In the pop-up window you can configure such options as brightness, saturation, contrast or sharpness.
3)If the configuration of the image parameters results in bad image quality, you can always click the Default
button to restore the default settings.
Note:
In case of computers with Windows 8 operating system, some functions may be
unavailable. Then, you should complete the following steps:
Click in sequence: the IE browser tools icon -- Compatibility View settings -- Add this
website. Then enter the correct address.

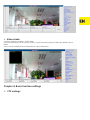
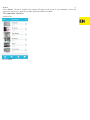
Mobile view
A. Run (please refer to Picture 1.).
B
. A
dd the camera (please refer to Picture 2.).
1. 2.
3 methods of adding an IP camera:
Method 1:
Enter the P2P ID, user name and password of the camera manually. Then click “Save”.
Met
hod 2: Scan the QR code:
There is a label with the QR code at the bottom of the camera. Click the “Scan QR code” button and use your
smartphone to scan the QR code. The app will automatically obtain the IP address of the camera. Then enter the
user name and password and click the “Save” button.
Method 3:
Click "Search". The list of available local cameras will appear on the screen of your smartphone. Choose the
camera you want to log in, enter the user name and password and click "Save".
The operation interface:
A.Device list
B. Live video

Mobile view
A. Run (please refer to Picture 1.).
B. Add the camera (please refer to Picture 2.).
1. 2.
3 methods of adding an IP camera:
Method 1:
Enter the P2P ID, user name and password of the camera manually. Then click “Save”.
Met
hod 2: Scan the QR code:
There is a label with the QR code at the bottom of the camera. Click the “Scan QR code” button and use your
smartphone to scan the QR code. The app will automatically obtain the IP address of the camera. Then enter the
user name and password and click the “Save” button.
Method 3:
Click "Search". The list of available local cameras will appear on the screen of your smartphone. Choose the
camera you want to log in, enter the user name and password and click "Save".
The operation interface:
A.Device list
B. Live video

Frequently Asked Questions
1. Why does my computer (antivirus software) see the camera software as a virus (dangerous
content)?
Sometimes a newly detected network device can be seen as a virus.
In such case, please ignore the warning and continue the configuration process.
2. W
hy can
’t the wizard detect the camera?
Make sure the network cable is plugged in and turn off the firewall and computer security software.
3. W
hy does the wizard prompt a massage:
“The camera cannot be accessed. Please choose Auto IP
Set or set it manually
” after we have already gone through this process?
Connect the camera to a router / ADSL router. Do NOT connect the camera directly to a computer.
4. W
hy does the camera always ask for user name and password or prompt the
“Incorrect User”
message?
Menu
Auto pan/tilt
VGA
Preset
Exit
Mirror
Brightnes
s
Contrast
Default
settings
Audio
Snapsho
t
Video
Pattern
Alarm / IR switch
Auto zoom
Both the user name and password are “admin”.
I
n case you have forgotten your user name or password, you can restore the factory settings of the
camera and thus restore the default user name and password.
5. How to restore the camera factory settings?
Press the reset button located at the bottom (or top) of the camera and hold it for about 1 minute (until
the camera reboots). During the process the camera must be connected to the power supply.
6. Why is there no audio / video stream from the camera?
No sound: Please login in Internet Explorer mode.
No video: The IE browser does not support the Firefox mode, and variety of other browsers does not
support ActiveX components. Please choose the correct video mode, compatible with your browser.
Some mobile applications (although they support video) do not support audio. If you want to use the audio
functions of the camera, please look for an alternative 3rd party application supporting the audio features.
7. Why is the image blurry?
Remove the protective film from the camera lens. Rotate the lens of the camera to get a clear image.
8. Why doesn
’t the camera pan/tilt properly?
Make sure the camera is not stuck. In order to do so, try to rotate the camera head manually.
9. Why does the camera always drop wireless connection?
Please tighten the antenna of the camera. Make sure the camera is not too far away from the router and
there are no big obstacles between the two devices that could interfere with the wireless signal.
10. The comparison of web browsers
IE
Firefox, Chrome, Safari in all platforms
Video
YES
YES
Recording
YES
NO
Alarm recording
YES (only in live video interface)
NO
By E-mail or FTP
YES
YES
Multiple View
YES
NO
Audio
2-way
NO

Frequently Asked Questions
1. Why does my computer (antivirus software) see the camera software as a virus (dangerous
content)?
Sometimes a newly detected network device can be seen as a virus.
In such case, please ignore the warning and continue the configuration process.
2. Why can
’t the wizard detect the camera?
Make sure the network cable is plugged in and turn off the firewall and computer security software.
3. Why does the wizard prompt a massage:
“The camera cannot be accessed. Please choose Auto IP
Set or set it manually
” after we have already gone through this process?
Connect the camera to a router / ADSL router. Do NOT connect the camera directly to a computer.
4. Why does the camera always ask for user name and password or prompt the
“Incorrect User”
message?
Menu
Auto pan/tilt
VGA
Preset
Exit
Mirror
Brightnes
s
Contrast
Default
settings
Audio
Snapsho
t
Video
Pattern
Alarm / IR switch
Auto zoom
Both the user name and password are “admin”.
In case you have forgotten your user name or password, you can restore the factory settings of the
camera and thus restore the default user name and password.
5.
H
ow to restore the camera factory settings?
Press the reset button located at the bottom (or top) of the camera and hold it for about 1 minute (until
the camera reboots). During the process the camera must be connected to the power supply.
6.
W
hy is there no audio / video stream from the camera?
No sound: Please login in Internet Explorer mode.
No video: The IE browser does not support the Firefox mode, and variety of other browsers does not
support ActiveX components. Please choose the correct video mode, compatible with your browser.
Some mobile applications (although they support video) do not support audio. If you want to use the audio
functions of the camera, please look for an alternative 3rd party application supporting the audio features.
7. Why is the image blurry?
Remove the protective film from the camera lens. Rotate the lens of the camera to get a clear image.
8. W
hy doesn
’t the camera pan/tilt properly?
Make sure the camera is not stuck. In order to do so, try to rotate the camera head manually.
9.
W
hy does the camera always drop wireless connection?
Please tighten the antenna of the camera. Make sure the camera is not too far away from the router and
there are no big obstacles between the two devices that could interfere with the wireless signal.
10. T
he comparison of web browsers
IE
Firefox, Chrome, Safari in all platforms
Video
YES
YES
Recording
YES
NO
Alarm recording
YES (only in live video interface)
NO
By E-mail or FTP
YES
YES
Multiple View
YES
NO
Audio
2-way
NO

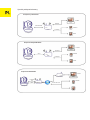
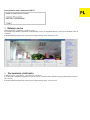
Sposób podłączenia kamery:
Camspot 4.8
Przewód RJ45
Ruter
Przewód
LAN Wi-Fi
Połączenie przewodowe
Połączenie bezprzewodowe
Camspot 4.8
Ruter
Wi-Fi
Przewód
LAN Wi-Fi
PC/MAC
Smartfon
Tablet
PC/MAC
Smartfon
Tablet
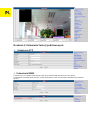
Połączenie internetowe
Camspot 4.8
Przewód
lub
Wi-Fi
Ruter bezprzewodowy
Modem ADSL
3G/4G lub Wi-Fi
PC/MAC
Smartfon
Tablet


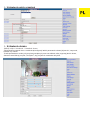
2. Kliknij dwukrotnie adres IP kamery w narzędziu Wyszukiwarki. Spowoduje to automatyczne uruchomienie
domyślnej przeglądarki, która poprosi o podanie nazwy użytkownika oraz hasła. W obu przypadkach należy
wtedy wpisać
„admin”.
Uwaga: Zarówno nazwa użytkownika, jak i hasło, to “admin”
(W celach bezpieczeństwa, po zalogowaniu się zalecana jest zmiana danych konta)
Wprowadź poprawny login i hasło. Na ekranie pojawi się okno logowania (za pośrednictwem Internetu może
je obserwować maksymalnie 6 odwiedzających w tym samym czasie)
Uwaga: Jeśli OCX zostało już wcześniej zainstalowane, przejdź bezpośrednio do logowania.
A. Kliknij
“OCX”, aby je pobrać i zainstalować.
B. Odśwież stronę i zaloguj się ponownie. Na ekranie wyświetlony zostanie interfejs wideo kamery, jak na
obrazku poniżej.
Obraz z kamery „na żywo” w przeglądarce IE:
Sterowanie kamerą (PTZ) Słuchanie Mówienie
Ruch kamery Nagrywanie wideo Zdjęcie

Zoom cyfrowy Folder zapisu plików wideo oraz zdjęć
Ustawienia Odtwarzanie wideo i przeglądanie zdjęć online
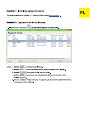
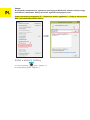
Rozdział 3: Konfiguracja ustawień
Ustawienia wideo
1)Kliknij kolejno: Ustawienia - Ustawienia wideo.
2)Wyświetlone zostanie okno z możliwością konfiguracji opcji zarówno strumienia głównego jak i
pomocniczego oraz rozdzielczość obrazu wyświetlanego na urządzeniu mobilnym.
Ustawienia nagrywania
1)Kliknij kolejno: Ustawienia - Ustawienia nagrywania.
2)Wyświetlone zostanie okno z możliwością konfiguracji długości nagrań, włączenia/wyłączenia nagrywania,
wyboru strumienia oraz ustalenia harmonogramu nagrań.
Ustawienia alarmów
1) Kliknij kolejno: Ustawienia - Ustawienia alarmów.
2) Wyświetlone zostanie okno z możliwością konfiguracji ścieżki, czasu trwania, sygnału alarmu,
predefiniowanej pozycji, liczby zdjęć oraz harmonogramu.
Ustawienia poczty E-mail
1)Kliknij kolejno: Ustawienia - Ustawienia E-mail.
2)Uzupełnij pola dokładnymi danymi poczty E-mail, kliknij przycisk
„Zastosuj”, a następnie „Testuj”.
3)Funkcja ta jest dostępna, gdy kamera IP jest dostępna w sieci. Jeśli używasz poczty G-mail, w polu portu
wprowadź numer 465, a SSL ustaw jako TLS. Bardzo ważne jest także, by Twój E-mail posiadał aktywny
serwer SMTP.
Strona się ładuje...
Strona się ładuje...
Strona się ładuje...
Strona się ładuje...
Strona się ładuje...
Strona się ładuje...
Strona się ładuje...
Strona się ładuje...
Strona się ładuje...
Strona się ładuje...
Strona się ładuje...
Strona się ładuje...
-
 1
1
-
 2
2
-
 3
3
-
 4
4
-
 5
5
-
 6
6
-
 7
7
-
 8
8
-
 9
9
-
 10
10
-
 11
11
-
 12
12
-
 13
13
-
 14
14
-
 15
15
-
 16
16
-
 17
17
-
 18
18
-
 19
19
-
 20
20
-
 21
21
-
 22
22
-
 23
23
-
 24
24
-
 25
25
-
 26
26
-
 27
27
-
 28
28
-
 29
29
-
 30
30
-
 31
31
-
 32
32


w innych językach
- English: Overmax Camspot 4.8 User manual
Powiązane artykuły
-
Overmax Camspot 4.2 Instrukcja obsługi
-
-
-
-
-
-
-
-
-