Parkside PSS 65 A1 Original Instructions Manual
- Typ
- Original Instructions Manual

SHARPENING STATION PSS 65 A1
SCHÄRFSTATION
Originalbetriebsanleitung
SHARPENING STATION
Translation of the original instructions
URZĄDZENIE DO OSTRZENIA
Tłumaczenie oryginalnej instrukcji obsługi
OSTŘIČKA
Překlad originálního provozního návodu
BRÚSKA
Preklad originá lneho návodu na obsluhu
OSTRILNA POSTAJA
Prevod originalnega navodila za uporabo
ÉLEZŐGÉP
Az originál használati utasítás fordítása
IAN 102874
102874_par_Schärfstation_cover_PL_HU_SI_CZ_SK.indd 2 14.11.14 09:52

GB Translation of the original instructions Page
P L Tłumaczenie oryginalnej instrukcji obsługi Strona
HU Az originál használati utasítás fordítása Oldal
SI Prevod originalnega navodila za uporabo Stran
CZ Překlad originálního provozního návodu Strana
SK Preklad originálneho návodu na obsluhu Strana
DE / AT / CH Originalbetriebsanleitung Seite
Before reading, unfold the page containing the illustrations and familiarise yourself with all
functions of the device.
Przed przeczytaniem proszę rozłożyć stronę z ilustracjami, a następnie proszę zapoznać się
z wszystkimi funkcjami urządzenia.
Olvasás előtt kattintson az ábrát tartalmazó oldalra és végezetül ismerje meg a készülék mindegyik
funkcióját.
Pred branjem odprite stran s slikami in se nato seznanite z vsemi funkcijami naprave.
Před čtením si otevřete stranu s obrázky a potom se seznamte se všemi funkcemi přístroje.
Pred čítaním si odklopte stranu s obrázkami a potom sa oboznámte so všetkými funkciami prístroja.
Klappen Sie vor dem Lesen die Seite mit den Abbildungen aus und machen Sie sich anschließend
mit allen Funktionen des Gerätes vertraut.
102874_par_Schärfstation_cover_PL_HU_SI_CZ_SK.indd 3 14.11.14 09:52
4
18
33
49
63
78
93

1 54
78910111213
632
1415
10
13
16

4
GB IE
Content
Introduction ................................. 4
Intended use ................................4
General description ...................... 5
Scope of delivery .............................5
Function description..........................5
Summary ........................................5
Technical specications .................5
Safety Instructions........................6
Symbols and icons ...........................6
General Safety Instructions for Power
Tools ...............................................6
Further Safety Instructions ..................8
Residual risks ...................................9
Assembly ..................................... 9
Mount the sharpener ......................10
Operation ..................................10
Switching on and off ......................10
Grinding with the grinding disc .......11
Sharpening drills ............................11
Sharpening picks and chisels ...........11
Sharpening knives ..........................12
Sharpening scissors ........................12
Change grinding disc .....................12
Cleaning and maintenance .........13
Cleaning .......................................13
Storage ......................................13
Waste disposal and environmental
protection .................................. 13
Replacement parts/accessories ...14
Trouble Shooting ........................15
Guarantee .................................16
Repair Service ............................17
Service-Center ............................ 17
Importer ....................................17
Translation of the original
EC declaration of conformity ....109
Exploded Drawing ................... 117
Introduction
Congratulations on the purchase of your
new device. With it, you have chosen a
high quality product.
During production, this equipment has
been checked for quality and subjected to
a nal inspection.
The operating instructions constitute
part of this product. They contain
important information on safety, use
and disposal.
Before using the product, familiarise
yourself with all of the operating
and safety instructions. Use the
product only as described and for
the applications specied.
Keep this manual safely and in the
event that the product is passed on,
hand over all documents to the third
party.
Intended use
The sharpening station is suitable for sharp-
ening tools (e.g. drills, knives, scissors,
picks, chisel).
The device is not intended for all other
types of applications (e.g. grinding with
unsuitable grinding tools, grinding with a
coolant solution, grinding hazardous mate-
rials such as asbestos).
The equipment is intended for use in the
eld of DIY. It is not designed for commer-
cial use.
The equipment is designed for use by
adults. Young people under the age of 16
are permitted to use the equipment only
under supervision.
The manufacturer shall not be liable for
damages caused by use other than for the
intended purpose or by incorrect opera-
tion.

5
GB IE
General description
The illustrations can be found
on the front and rear fold-out
pages.
Scope of delivery
Unpack the equipment and check that it is
complete. Dispose of the packaging mate-
rial correctly.
• Appliance
• Sharpener for
knives and scissors
• Sharpener for drills
• Sharpener for picks and chisels
• Spare grinding wheel
• Translation of the original instructions
for use
Function description
The sharpening station is suitable for
sharpening tools (e.g. drills, knives, scis-
sors, picks, chisels). The scope of delivery
contains three sharpeners for this purpose,
which, as a guide and safety device, en-
able precise sharpening and grinding.
Refer to the following descriptions for a
functional description of the controls.
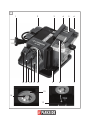
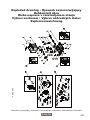
Summary
1 Mains plug
2 Sharpener for knives and
scissors
3 On/off switch
4 Spacer
5 Magnet holder
6 Tool table
7 Retaining screw for
angular adjustment
8 Protective hood
9 Mounting holes for
work bench assembly
10 Grinding disc
11 rotatable drill mount
12 Knurled nut for drill-fastening
13 Release lever for
sharpener
14 Drill holder
15 Adjusting device
16 Grinding wheel nuts
Technical specications
Nominal input voltage
............................. 220 - 240 V~, 50 Hz
Power consumption ...................... 65 W
(S2 10 min)*
Measurement idling speed n
0
... 6700 min
-1
Safety class ..................................... II
Protection category......................... IP 20
Weight ................................ ca. 1,25 kg
Grinding angle range ................15° - 50°
Sharpness drill diameter ............ 3 -10 mm
Sharpness knife width .............. 6 - 51 mm
Sound pressure level
(L
pA
) .............59,3 dB (A); K
pA
= 3 dB (A)
Sound power level (L
wA
)
measured ........73,5 dB(A); K
wA
= 3 dB(A)
* A break is introduced after 10 minutes of
uninterrupted operating duration until the
device temperature differs 2 K (2°C) less than
room temperature.
Noise and vibration values have been
determined according to the standards and
regulations mentioned in the declaration of
conformity.
Technical and optical changes may be
undertaken in the course of further develop-
ment without notice. All dimensions, refer-
ences and information in this instruction
manual are therefore not guaranteed. Legal
claims made on the basis of the instruction

6
GB IE
manual can therefore not be considered as
valid.
The stated vibration emission value was
measured in accordance with a standard
testing procedure and may be used to com-
pare one power tool to another.
The stated vibration emission value may
also be used for a preliminary exposure
assessment.
Warning!
The vibration emission value may
differ during actual use of the
power tool from the stated value
depending on the manner in which
the power tool is used.
Safety precautions aimed at protect-
ing the user should be based on
estimated exposure under actual
usage conditions (all parts of the
operating cycle are to be consid-
ered, including, for example, times
during which the power tool is
turned off and times when the tool
is turned on but is running idle).
Safety Instructions
Symbols and icons
Symbols on the device:
Warning!
Read the instruction manual.
Wear ear protection.
Risk of electric shock! Disconnect
from the mains before carrying out
maintenance and repair work.
Safety class II
Do not dispose of electrical equip-
ment in household waste.
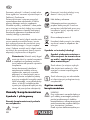
Symbols in the manual:
Warning symbols with in-
formation on damage and
injury prevention.
Instruction symbols (the instruction is
explained at the place of the excla-
mation mark) with information on
preventing damage.
Help symbols with information on
improving tool handling.
General Safety Instructions
for Power Tools
WARNING! Read all safety in-
structions and guidelines care-
fully. Failure to follow the safety
instructions and guidelines may result
in electric shock, re and/or serious
injuries.
The term „power tool“ used in the safety
instructions refers to mains-operated electric
tools (with a mains cable) and to battery-op-
erated electric tools (without a mains cable.
Safe operation:
• Keep work area clear. Cluttered
areas and benches invite injuries.
• Consider work area environ-
ment.
- Do not expose tools to rain. Do not use
tools in damp or wet locations.
Water entering a power tool will in-
crease the risk of electric shock.
- Keep work area well lit.

7
GB IE
lecting equipment, ensure these are
connected and properly used.
• Do not abuse the cord. Never
yank the cord do disconnect it from the
socket. Keep the cord away from heat,
oil and sham edges.
• Secure work. Where possible use
clamps or a vice to hold the work. It is
safer than using your hand.
• Do not overreach. Keep proper
footing and balance at all times.
This enables better control of the power
tool in unexpected situations.
• Maintain tools with care.
Many accidents are caused by poorly
maintained power tools.
- Keep cutting tools sharp and clean for
better and safer performance.
- Follow instruction for lubricating and
changing accessories.
- Inspect tool cords periodically and if
damaged have them repaired by an
authorized service facility.
- Inspect extension cords periodically
and replace if damaged.
- Keep handles dry, clean and free from
oil and grease.
• Disconnect tools. When not in use,
before servicing and when changing
accessories disconnect tools from the
power supply.
Such preventive safety measures reduce
the risk of starting the power tool acci-
dentaIly.
• Remove adjusting keys and
wrenches. Form the habit of check-
ing to see that keys and adjusting
wrenches are removed from the tool
before turning it on. A wrench or a key
left attached to a rotating part of the
power tool may result in personal injury.
• Avoid unintentional starting.
Ensure switch is in “off” position when
plugging in.
- Do not use tools in the presence of
ammable liquids or gases.
Power tools create sparks which may
ignite the dust or fumes.
• Guard against electric shock.
Avoid body contact with earthed or
grounded surfaces (e.g. pipes, radia-
tors, ranges, refrigerators).
• Keep other persons away.
Do not let persons, especially children,
not involved in the work touch the tool
or the extension cord and keep them
away from the work area.
• Store idle tools. When not in use,
tools should be stored in a dry locked-
up place, out of reach of children.
• Do not force the tool. It will do
the job better and safer at the rate for
which it was intended.
• Use the right tool.
- Do not force small tools to do the job
of a heavy duty tool.
- Do not use tools for purposes not in-
tended; for example do not use circular
saws to cut tree limbs or logs.
Use of the power tool for operations dif-
ferent from those intended could result in
a hazardous situation.
• Dress properly.
- Do not wear loose clothing or jewel-
lery, they can be caught in moving
parts.
- Anti-slip footwear is recommended
when working outdoors.
- Wear protective hair covering to con-
tain long hair.
• Use protective equipment.
- Use safety glasses.
- Use face or dust mask if working op-
erations create dust.
• Connect dust extraction equip-
ment. If the tool is provided for the
connection of dust extraction and col-

8
GB IE
• Use outdoor extension leads.
When the tool is used outdoors, use
only extension cords intended for out-
door use and so marked.
• Stay alert, watch what you are
doing and use common sense
when operating a power tool.
Do not use a power tool while you are
tired or under the inuence of drugs,
alcohol or medication. A moment of
inattention white operating power tools
may result in serious personal injury.
• Check damaged parts. This will
ensure that the safety of the power tool
is maintained.
- Before further use of tool, it should be
carefully checked to determine that it
will operate properly and perform its
intended function.
- Check for alignment of moving parts,
binding of moving parts, breakage of
parts, mounting and any other condi-
tions that may affect its operation.
- A guard or other part that is dam-
aged should be properly repaired or
replaced by an authorized service cen-
tre unless otherwise indicated in this
instruction manual.
- Have defective switches replaced by
an authorized service centre.
- Do not use the tool if the switch does
not turn it on and off.
There is a risk of injury.
• Warning.
The use of any accessory or attach-
ment other than one recommended in
this instruction manual may present a
risk of personal injury.
• Have your tool repaired by a
qualied person. This electric tool
complies with the relevant safety rules.
Repairs should only be carried out by
qualied persons using original spare
parts, otherwise this may result in con-
siderable danger to the user..
Further Safety Instructions
• Connect the device only to a power
point with a residual current protective
device (RCD) with a measured residual
current of not more than 30 mA.
• Keep the mains cable and extension
cable away from the grinding disk and
saw chain. In the event that it is dam-
aged or severed, immediately discon-
nect the plug from the socket.
Do not touch the cable before it has
been disconnected from the mains.
Risk of electric shock.
• The replacement of the plug or the con-
nection line must always be executed
by the manufacturer of the electric tool
or his/her customer service in order to
avoid any hazards.
• Only switch the device on once it is
safely xed to the worktop.
• For your own safety only use acces-
sories and attachments which were
stated in the operating instructions or
recommended or specied by the tool
manufacturer.
• Only use grinding discs where the
printed rotational speed is at least as
high as what has been specied on the
name plate of the device.
• Carry out a visual inspection of the
grinding disc before use. Do not use
any damaged or deformed grinding
discs. Replace any damaged or worn
grinding discs.
• Make sure that the sparks produced
by grinding do not present a danger,
e.g. reach people or ignite ammable
substances.

9
GB IE
• Never keep the ngers between the
grinding disc and spark protection
or in close proximity to the protective
hoods. There is a risk of crushing.
• The rotating parts of the device cannot
be covered due to functional reasons.
Therefore, proceed cautiously and hold
the workpiece rmly in order to avoid
slipping which could cause your hands
to come into contact with the grinding
belt or grinding disc.
• The workpiece gets hot during grind-
ing. Do not touch the machined area,
allow it to cool down. There is a risk
of burning. Do not use coolants or the
like.
• If you are tired or have consumed al-
cohol or tablets, do not work with the
device. Always have a break on time.
• Switch the device off and remove the
mains plug
- to loosen a blocked insertion tool,
- if the connection line is damaged or
entangled,
- in case of unusual sounds.
Residual risks
Even if properly operating and handling
this electric tool, some residual risks will
remain. Due to its construction and build,
this electric tool may present the following
hazards:
a) Lung damage, if suitable respiratory
protection is not worn.
b) Hearing damage, if suitable ear pro-
tection is not worn.
c) Damages to health due to
- touching the area of the grinding tool
which was not covered;
- the ejection of pieces from workpiece
or damaged grinding discs.
d) Damage to your health caused by
swinging your hands and arms when
operating the appliance for longer pe-
riods of time or if the unit is not held or
maintained properly.
Warning! During operation, this
electric tool generates an electro-
magnetic eld which, under certain
circumstances, may impair the
functionality of active or passive
medical implants. To reduce the risk
of serious or lethal injuries, we rec-
ommend that persons with medical
implants consult their doctor and the
manufacturer of their medical im-
plant before operating the machine.
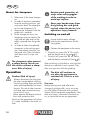
Assembly
Caution! Risk of injury!
- Ensure that you have sufcient
space in which to work, and that
you do not endanger other peo-
ple.
- All covers and protective devices
must be assembled properly be-
fore commissioning.
- Disconnect the mains plug before
changing the setting on the de-
vice.
Setting up
Place the sharpening station on rm sur-
face and fasten the device. Ideally, bolt the
drill to the surface. Use the mounting holes
for the work bench assembly (9) in the
baseplate for this.
The screws and nuts required for as-
sembly are not part of the scope of
delivery.

10
GB IE
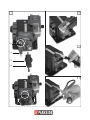
Mount the sharpener
1. Select one of the three sharpen-
ers.
2. In order to remove a sharpener
from the working position, you
must press down the release le-
ver for the sharpener (13).
3. Remove the sharpener from the
guide rails, upwards.
4. In the storage positions, the
sharpeners are not xed to the
right and left side and can be
easily removed from the guide
rails.
5. In order to fasten the selected
sharpener in the working posi-
tion, from above push this into
the guide rails. Press the sharp-
ener down until it snaps into
place.
The sharpeners also present
a safety device. Never use
this device without a sharp-
ener. Risk of injury!
Operation
Caution! Risk of injury!
- Always disconnect the plug from
the mains socket before working.
- Use only grinding disks and acces-
sories recommended by the manu-
facturer. The use of other insertion
tools and other accessories may
cause risk of injury.
- Never operate the device without
the visual protection disk.
- Switch on the equipment only when
it is safely installed on the work sur-
face.
Despite spark protection, al-
ways wear safety goggles
while working in order to
avoid eye injuries.
Keep your hands away from
the grinding disc and grind-
ing belt when the device is in
operation. Injury hazard!.
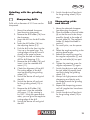
Switching on and off
Ensure that the mains voltage
matches the specications on the
rating plate.
Connect the equipment to the mains.
1. To switch on, press the “I” On switch
and the device starts up (see
3).
2. To switch off, press the “0” off switch
and the device switches off (see
3).
After switching on the device, wait until the
device has reached its max. speed. Only
then must you start with the grinding.
The disk will continue to
run after the equipment is
switched off. There is a risk
of injury.
Test run:
Before starting work and after each
change of grinding disk, carry out a test
run of at least 60 seconds with no load.
Switch off the equipment immediately if the
disk runs lumpy, substantial vibrations oc-
cur, or abnormal noises are generated.

11
GB IE
Grinding with the grinding
disc
Sharpening drills
Drills with a diameter of 3-10 mm can be
sharpened.
1. Mount the selected sharpener
(see Mounting sharpener).
2. Remove the drill holder (14) from
the sharpener.
3. Insert the drill into the drill holder
(14).
4. Insert the drill holder (14) into
the adjusting device (15).
5. Push the drill to the front into the
V-nut up to the metal stop. The
cutting edges of the drill must t
closely to the metal surfaces.
6. Using the knurled nut fasten the
drill for drill-fastening (12).
7. Remove the drill holder (14) and
insert it into the rotatable drill
mount (11).
8. Check the alignment of the drill.
The cutting edges of the drill
must be touching the grinding
wheel (10).
9. Switch the device off and grind
the drill.
10. Switch the device off and wait
for the grinding wheel (10) to
stop.
11. Remove the drill holder (14)
and insert it into the rotatable
drill mount (11) by rotating in
by 180°. Using the same adjust-
ment, you can grind the opposite
cutting edge of the drill.
12. Switch the device off and grind
the drill.
13. Switch the device off and wait
for the grinding wheel (10) to
stop.
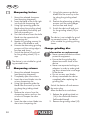
Sharpening picks
and chisels
1. Mount the selected sharpener
(see Mounting sharpener).
2. Place the blade on the tool table
(6) so that the end to be sharp-
ened ts closely to the edge of
the tool table (6). The magnetic
holder (5) keeps the blade in
position.
3. For small picks, use the spacer
(4).
4. Select the angle according to the
existing bevel angle.
5. Release the retaining screw for
the angular adjustment (7) and
turn the tool table (6) into posi-
tion.
6. Tighten the retaining screw for
angular adjustment (7) again.
7. Switch the device on and move
the tool table (6) equally back
and forth along the grinding
wheel (10).
8. Always use light pressure while
sharpening and slowly push
the blade towards the grinding
wheel (10).
9. Repeat the sharpening process
until all irregularities have been
removed.
10. Switch the device off and wait
for the grinding wheel (10) to
stop.

12
GB IE
Sharpening knives
1. Mount the selected sharpener
(see Mounting sharpener).
2. Insert the blade of the knife right
into the knife sharpening slot.
3. Using light pressing guide the
blade along the grinding wheel
(10) and evenly and slowly pull
the knife towards you.
4. Turn the knife and insert the knife
blade into the opposite knife
sharpening slot.
5. Repeat this grinding process for
this side of the blade as well.
6. Execute the alternating grinding
process until the cutting edge is
burr-free and sharp.
7. Switch the device off and wait
for the grinding wheel (10) to
stop.
The device is not suitable for grind-
ing serrated knives.
Sharpening scissors
1. Mount the selected sharpener
(see Mounting sharpener).
2. Completely open the scissors.
3. Insert the scissor blades into the
scissor sharpening slot.
4. Using light pressure guide the
blade from the screw up to the
tip along the grinding wheel
(10).
5. Remove the scissors from the
sharpening station and turn the
scissors to sharpen the other
blade.
6. Insert the other scissor blade into
the scissor sharpening slot.
7. Using light pressure guide the
blade from the screw up to the
tip along the grinding wheel
(10).
8. Execute the alternating grinding
process until the cutting edges
are burr-free and sharp.
9. Switch the device off and wait
for the grinding wheel (10) to
stop.
The device is not suitable for grind-
ing serrated scissors. The device
is not suitable for grinding pinking
shears.
Change grinding disc
Information on replacement:
• Never operate the device without
protective equipment.
• Ensure that the grinding disc
dimensions match those of the
device.
• Never use separate bushings or
adapters in order to make grind-
ing discs whose hole is too large
t the device.
• Do not use any saw blades.
• Always reassemble the device
completely after replacing the
grinding disc.
Switch the device off and remove
the mains plug.
Allow the device to cool down.
1. Release the grinding wheel nut
(16) in the clockwise direction
(left-handed thread).
2. Remove the grinding wheel (10).

13
GB IE
3. Set up a new grinding wheel
(10). Screw the grinding wheel
nut (16) in the anti- clockwise di-
rection (left-handed thread).
4. Test run:
Before starting work and after
each change of grinding disk,
carry out a test run of at least
60 seconds with no load. Switch
off the equipment immediately if
the disk runs lumpy, substantial
vibrations occur, or abnormal
noises are generated.
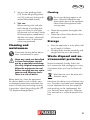
Cleaning and
maintenance
Disconnect the plug before adjust-
ment, maintenance or repair.
Have any work not described
in these instructions carried
out by a specialist workshop.
Use only original components.
Allow the equipment to cool
before carrying out any main-
tenance and cleaning work.
There is a risk of burns.
Before each use, check the equipment
for obvious defects such as loose, worn
or damaged components and check that
screws or other parts are sitting correctly.
In particular, check the grinding disk (
10). Replace damaged parts.
Cleaning
Do not use cleaning agents or sol-
vents. Chemical substances may
attack plastic parts of the equipment.
Never clean the equipment under
running water.
• Clean the equipment thoroughly after
each use.
• Clean the surface of the device with a
soft brush or cloth.
Storage
• Store the appliance in a dry place well
out of reach of children.
• Grinding disks must be stored dry and
upright and are not to be stacked.
Waste disposal and en-
vironmental protection
Be environmentally friendly. Return the
tool, accessories and packaging to a recy-
cling centre when you have nished with
them.
Machines are not to be place with
domestic waste.
Hand over the device at an utilization loca-
tion. The plastic and metal parts employed
can be separated out into pure materials
and recycling can be implemented. Ask
your Service Center about this. Defective
units returned to us will be disposed of for
free.

14
GB IE
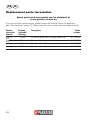
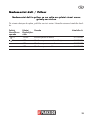
Replacement parts/accessories
Spare parts and accessories can be obtained at
www.grizzly-service.eu
If you do not have internet access, please contact the Service Centre via telephone
(see “Service-Center” page 17). Please have the order number mentioned below ready.
Position Position Description Order
Instruction Exploded number
manual drawing
10 19+20 Grinding wheel with Grinding wheel nuts 91103590
2 100 Sharpener for knives and scissors 91103591
101 Sharpener for drills 91103592
102 Sharpener for picks and chisels 91103593

15
GB IE
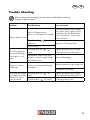
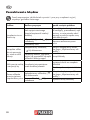
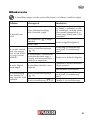
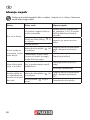
Trouble Shooting
Always disconnect the plug from the mains socket before working.
Danger of electric shock.
Problem Possible Cause Error correction
Device doesn‘t start
Mains voltage missing
Main circuit breaker is tripped
Check the socket, mains cable,
line, mains plug, repairs to be
carried out by qualied electri-
cian if necessary, check main
circuit breaker.
On/off switch (
3) may be
defective
Repair by Customer Care
Engine faulty
Grinding tools do
not move although
the engine is run-
ning
Grinding disc nut (
16)
loose
Tighten grinding disc nut (see
„Changing the grinding disc“)
Workpiece, remaining work-
pieces or remaining grinding
tools block drive
Remove blockages
Engine is slower
and stops
Device is overloaded through
workpiece
Reduce pressure on grinding tool
Workpiece unsuitable
Grinding disc does
not rotate smoothly,
abnormal noises
can be heard
Grinding disc nut (
16)
loose
Tighten grinding disc nut (see
„Changing the grinding disc“)
Grinding disc (
10) faulty
Change grinding disc

16
GB IE
Guarantee
Dear Customer,
This equipment is provided with a 3-year
guarantee from the date of purchase.
In case of defects, you have statutory rights
against the seller of the product. These
statutory rights are not restricted by our
guarantee presented below.
Terms of Guarantee
The term of the guarantee begins on the
date of purchase. Please retain the original
receipt. This document is required as proof
of purchase.
If a material or manufacturing defect
occurs within three years of the date of
purchase of this product, we will repair or
replace – at our choice – the product for
you free of charge. This guarantee requires
the defective equipment and proof of pur-
chase to be presented within the three-year
period with a brief written description of
what constitutes the defect and when it oc-
curred.
If the defect is covered by our guarantee,
you will receive either the repaired product
or a new product. No new guarantee pe-
riod begins on repair or replacement of the
product.
Guarantee Period and Statutory
Claims for Defects
The guarantee period is not extended by
the guarantee service. This also applies for
replaced or repaired parts. Any damages
and defects already present at the time of
purchase must be reported immediately af-
ter unpacking. Repairs arising after expiry
of the guarantee period are chargeable.
Guarantee Cover
The equipment has been carefully pro-
duced in accordance with strict quality
guidelines and conscientiously checked
prior to delivery.
The guarantee applies for all material and
manufacturing defects. This guarantee
does not extend to cover product parts that
are subject to normal wear and may there-
fore be considered as wearing parts (e.g.
lters or attachments) or to cover damage
to breakable parts (e.g. switches, batteries,
or parts made of glass).
This guarantee shall be invalid if the prod-
uct has been damaged, used incorrectly or
not maintained. Precise adherence to all of
the instructions specied in the operating
manual is required for proper use of the
product. Intended uses and actions against
which the operating manual advises or
warns must be categorically avoided.
The product is designed only for private
and not commercial use. The guarantee
will be invalidated in case of misuse or
improper handling, use of force, or inter-
ventions not undertaken by our authorised
service branch.
Processing in Case of Guarantee
To ensure quick handling of you issue,
please follow the following directions:
• Please have the receipt and item num-
ber (IAN 102874) ready as proof of
purchase for all enquiries.
• Please nd the item number on the rat-
ing plate.
• Should functional errors or other de-
fects occur, please initially contact the
service department specied below by
telephone or by e-mail. You will then
receive further information on the pro-
cessing of your complaint.

17
GB IE
GB
IE
• After consultation with our customer
service, a product recorded as defec-
tive can be sent postage paid to the
service address communicated to you,
with the proof of purchase (receipt)
and specication of what constitutes
the defect and when it occurred. In or-
der to avoid acceptance problems and
additional costs, please be sure to use
only the address communicated to you.
Ensure that the consignment is not sent
carriage forward or by bulky goods,
express or other special freight. Please
send the equipment inc. all accessories
supplied at the time of purchase and
ensure adequate, safe transport pack-
aging.
Repair Service
For a charge, repairs not covered by the
guarantee can be carried out by our ser-
vice branch, which will be happy to issue
a cost estimate for you.
We can handle only equipment that has
been sent with adequate packaging and
postage.
Attention: Please send your equipment to
our service branch in clean condition and
with an indication of the defect.
Equipment sent carriage forward or by
bulky goods, express or other special
freight will not be accepted.
We will dispose of your defective devices
free of charge when you send them to us.
Service-Center
Service Great Britain
Tel.: 0871 5000 720
(£ 0.10/Min.)
E-Mail: [email protected]
IAN 102874
Service Ireland
Tel.: 1890 930 034
(0,08 EUR/Min., (peak))
(0,06 EUR/Min., (off peak))
E-Mail: [email protected]
IAN 102874
Importer
Please note that the following address is
not a service address. Please initially con-
tact the service centre specied above.
Grizzly Tools GmbH & Co. KG
Stockstädter Straße 20
63762 Großostheim
Germany
www.grizzly-service.eu

18
PL
Spis tresci
Wstęp ........................................18
Przeznaczenie ............................ 18
Opis ogólny ............................... 19
Zawartość opakowania ..................19
Opis działania ..............................19
Przegląd .......................................19
Dane techniczne ......................... 19
Zasady bezpieczeństwa .............20
Symbole i piktogramy .....................20
Dalsze zasady bezpieczeństwa .......23
Zagrożenia ogólne ........................24
Montaż ...................................... 24
Montaż przyrządów do ostrzenia ....25
Obsługa.....................................25
Włączanie i wyłączanie .................25
Szlifowanie z tarczą szlierską ............
Ostrzenie wierteł ...........................26
Ostrzenie przecinaków i dłut ...........26
Ostrzenie noży ..............................27
Ostrzenie nożyc ............................27
Wymiana tarczy szlierskiej ............27
Oczyszczanie i konserwacja ....... 28
Oczyszczanie ...............................28
Przechowywanie urządzenia ..... 28
Usuwanie i ochrona środowiska 29
Części zamienne/Akcesoria ........ 29
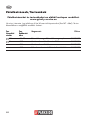
Poszukiwanie błędów ................30
Gwarancja .................................31
Serwis naprawczy .....................32
Service-Center ............................ 32
Importer ....................................32
Tłumaczenie oryginalnej
deklaracji zgodności WE............. 110
Rysunek samorozwijający .......117
Wstęp
Gratulujemy zakupu nowego urządzenia.
Zdecydowali się Państwo na zakup warto-
ściowego produktu.
Nie da się wykluczyć tego, że w pojedyn-
czych przypadkach w urządzeniu lub przy
nim wzgl. w wężach mogą się znaleźć
pozostałości wody lub smaru. Nie jest to
brakiem ani uszkodzeniem, czy powodem
do troski o urządzenie.
Instrukcja obsługi jest częścią składo-
wą produktu. Zawiera ona ważne
wskazówki dotyczące bezpieczeń-
stwa, eksploatacji i utylizacji. Przed
rozpoczęciem użytkowania produktu
należy się zapoznać ze wszystkimi
wskazówkami dotyczącymi obsługi
i bezpieczeństwa. Produkt należy
użytkować tylko zgodnie z opisem i
podanym przeznaczeniem. Instrukcję
należy przechowywać starannie, a
w przypadku przekazania produktu
osobom trzecim należy dostarczyć
nabywcy kompletną dokumentację.
Przeznaczenie
Stacja ostrzenia przeznaczona jest do
ostrzenia narzędzi (np. wierteł, noży, no-
życ, przecinaków, dłut).
Urządzenie nie nadaje się do wszelkich
innych rodzajów zastosowań (np. do szli-
fowania z użyciem nieodpowiednich na-
rzędzi szlierskich, szlifowania z użyciem
chłodziwa, szlifowania materiałów niebez-
piecznych dla zdrowia, np. azbestu).
Urządzenie jest przeznaczone do amator-
skich prac w gospodarstwie domowym.
Nie jest ono przeznaczone do stałego sto-
sowania w celach zarobkowych.
Urządzenie może być używane tylko

19
PL
przez osoby dorosłe. Osoby młodociane
powyżej 16 roku życia mogą używać
urządzenia tylko pod nadzorem.
Producent nie odpowiada za szkody wy-
wołane niezgodnym z przeznaczeniem
użytkowaniem lub nieprawidłową obsługą
urządzenia.
Opis ogólny
Ilustracje znajdują się na okład-
ce przedniej i tylnej.
Zawartość opakowania
Rozpakuj urządzenie i sprawdź, czy jest
ono kompletne. Prawidłowo posegreguj i
usuń materiały opakowania.
• Urządzenie
• Przyrząd do ostrzenia
noży i nożyc
• Przyrząd do ostrzenia wierteł
• Przyrząd do ostrzenia przecinaków i dłut
• Zamienna tarcza szlierska
• Instrukcja obsługi
Opis działania
Stacja ostrzenia przeznaczona jest do
ostrzenia narzędzi (np. wierteł, noży,
nożyc, przecinaków, dłut). W komple-
cie zawarte są trzy różne przyrządy do
ostrzenia, obejmujące prowadnicę i za-
bezpieczenie ochronne i umożliwiające
precyzyjne ostrzenie oraz szlifowanie.
Funkcje elementów urządzenia są podane
w poniższym opisie.
Przegląd
1 wtczka
2 Przyrząd do ostrzenia noży i
nożyc
3 Włącznik/wyłącznik
4 przykładka dystansowa
5 uchwyt magnetyczny
6 podkładka narzędziowa
7 śruba ustalająca do
regulacji kąta
8 Osłona ochronna tarczy szlier-
skiej
9 otwory montażowe do
montażu do stołu roboczego
10 tarcza szlierska
11 obrotowy uchwyt wiertarski
12 nakrętka radełkowana do moco-
wania wiertła
13 dźwignia zwalniająca do
przyrządów do ostrzenia
14 uchwyt wiertła
15 przyrząd do regulacji
16 nakrętka tarczy szlierskiej
Dane techniczne
Znamionowe napięcie
wejścia
............................. 220 - 240 V~, 50 Hz
Pobór mocy ................................. 65 W
(S2 10 min)*
Prędkość obrotowa
znamionowa n
0
..................... 6700 min
-1
Klasa zabezpieczenia ...................... II
Typ zabezpieczenia ....................... IP 20
Ciężar ................................. ca. 1,25 kg
Zakres kąta ostrzenia ................15° - 50°
Ostrzenie wierteł o średnicy ...... 3 -10 mm
Ostrzenie noży o szerokości ..... 6 - 51 mm
Poziom ciśnienia akustycznego
(L
pA
) .............59,3 dB (A); K
pA
= 3 dB (A)
Poziom mocy akustycznej (L
wA
)
zmierzony ......73,5 dB(A); K
wA
= 3 dB(A)
* Po nieprzerwanej pracy przez 10 minut na-
stępuje przerwa, do momentu schłodzenia się
urządzenia do temperatury odbiegającej od
temperatury otoczenia o mniej niż 2 K (2°C).

20
PL
Parametry akustyki i wibracji zostały okre-
ślone zgodnie z normami wymienionymi w
Deklaracji Producenta.
Zmiany techniczne i optyczne mogą być
wprowadzane bez zapowiedzi w trakcie
procesu dalszego rozwoju urządzenia.
Wszelkie wymiary, wskazówki i dane poda-
ne w niniejszej instrukcji obsługi są w związ-
ku z tym podawane w sposób niewiążący.
Roszczenia zgłaszane na podstawie treści
instrukcji obsługi są nieważne.
Podana wartość emisji drgań została zmie-
rzona metodą znormalizowaną i może
być wykorzystywana do porównań urzą-
dzenia elektrycznego z innymi urządze-
niami. Podana wartość emisji drgań może
też służyć do szacunkowej oceny stopnia
ekspozycji użytkownika na drgania.
Ostrzeżenie: Wartość emisji drgań
może się różnić w czasie korzystania
z urządzenia od podanej wartości,
jest to zależne od sposobu używania
urządzenia.
Istnieje konieczność określenia i
zastosowania środków ochrony
użytkownika, opartych na ocenie
ekspozycji w rzeczywistych warun-
kach używania urządzenia (należy
przy tym uwzględnić wszystkie części
cyklu roboczego, na przykład okresy
czasu, w których urządzenie elek-
tryczne jest wyłączone bądź jest włą-
czone, ale pracuje bez obciążenia).
Zasady bezpieczeństwa
Symbole i piktogramy
Zasady bezpieczeństwa/symbole
na urządzeniu
Uwaga!
Przeczytaj instrukcję obsługi urzą-
dzenia i stosuj się do niej.
Noś okulary ochronne.
Niebezpieczeństwo porażenia
prądem elektrycznym! Przed roz-
poczęciem jakichkolwiek prac przy
urządzeniu wyjmij wtyczkę siecio-
wą z gniazdka.
Klasa zabezpieczenia II
Urządzeń elektrycznych nie należy
wyrzucać razem z odpadami do-
mowymi
Symbole w instrukcji obsługi
Symbol niebezpieczeństwa z
informacjami na temat ochro-
ny osób i zapobiegania szko-
dom materialnym.
Znak nakazu (w miejscu wykrzyk-
nika objaśnienie nakazu) z infor-
macjami na temat zapobiegania
szkodom.
Znak informacyjny ze wskazówka-
mi ułatwiającymi posługiwanie się
urządzeniem.
Ogólne zasady
bezpieczeństwa
UWAGA!
Przy użytkowaniu narzędzi elektrycz-
nych należy przestrzegać podanych
poniżej podstawowych środków
bezpieczeństwa, zabezpieczających
przed porażeniem prądem elektrycz-
nym, zranieniem i pożarem.
Przed użyciem elektronarzędzia pro-
Strona się ładuje...
Strona się ładuje...
Strona się ładuje...
Strona się ładuje...
Strona się ładuje...
Strona się ładuje...
Strona się ładuje...
Strona się ładuje...
Strona się ładuje...
Strona się ładuje...
Strona się ładuje...
Strona się ładuje...
Strona się ładuje...
Strona się ładuje...
Strona się ładuje...
Strona się ładuje...
Strona się ładuje...
Strona się ładuje...
Strona się ładuje...
Strona się ładuje...
Strona się ładuje...
Strona się ładuje...
Strona się ładuje...
Strona się ładuje...
Strona się ładuje...
Strona się ładuje...
Strona się ładuje...
Strona się ładuje...
Strona się ładuje...
Strona się ładuje...
Strona się ładuje...
Strona się ładuje...
Strona się ładuje...
Strona się ładuje...
Strona się ładuje...
Strona się ładuje...
Strona się ładuje...
Strona się ładuje...
Strona się ładuje...
Strona się ładuje...
Strona się ładuje...
Strona się ładuje...
Strona się ładuje...
Strona się ładuje...
Strona się ładuje...
Strona się ładuje...
Strona się ładuje...
Strona się ładuje...
Strona się ładuje...
Strona się ładuje...
Strona się ładuje...
Strona się ładuje...
Strona się ładuje...
Strona się ładuje...
Strona się ładuje...
Strona się ładuje...
Strona się ładuje...
Strona się ładuje...
Strona się ładuje...
Strona się ładuje...
Strona się ładuje...
Strona się ładuje...
Strona się ładuje...
Strona się ładuje...
Strona się ładuje...
Strona się ładuje...
Strona się ładuje...
Strona się ładuje...
Strona się ładuje...
Strona się ładuje...
Strona się ładuje...
Strona się ładuje...
Strona się ładuje...
Strona się ładuje...
Strona się ładuje...
Strona się ładuje...
Strona się ładuje...
Strona się ładuje...
Strona się ładuje...
Strona się ładuje...
Strona się ładuje...
Strona się ładuje...
Strona się ładuje...
Strona się ładuje...
Strona się ładuje...
Strona się ładuje...
Strona się ładuje...
Strona się ładuje...
Strona się ładuje...
Strona się ładuje...
Strona się ładuje...
Strona się ładuje...
Strona się ładuje...
Strona się ładuje...
Strona się ładuje...
Strona się ładuje...
Strona się ładuje...
Strona się ładuje...
Strona się ładuje...
Strona się ładuje...
-
 1
1
-
 2
2
-
 3
3
-
 4
4
-
 5
5
-
 6
6
-
 7
7
-
 8
8
-
 9
9
-
 10
10
-
 11
11
-
 12
12
-
 13
13
-
 14
14
-
 15
15
-
 16
16
-
 17
17
-
 18
18
-
 19
19
-
 20
20
-
 21
21
-
 22
22
-
 23
23
-
 24
24
-
 25
25
-
 26
26
-
 27
27
-
 28
28
-
 29
29
-
 30
30
-
 31
31
-
 32
32
-
 33
33
-
 34
34
-
 35
35
-
 36
36
-
 37
37
-
 38
38
-
 39
39
-
 40
40
-
 41
41
-
 42
42
-
 43
43
-
 44
44
-
 45
45
-
 46
46
-
 47
47
-
 48
48
-
 49
49
-
 50
50
-
 51
51
-
 52
52
-
 53
53
-
 54
54
-
 55
55
-
 56
56
-
 57
57
-
 58
58
-
 59
59
-
 60
60
-
 61
61
-
 62
62
-
 63
63
-
 64
64
-
 65
65
-
 66
66
-
 67
67
-
 68
68
-
 69
69
-
 70
70
-
 71
71
-
 72
72
-
 73
73
-
 74
74
-
 75
75
-
 76
76
-
 77
77
-
 78
78
-
 79
79
-
 80
80
-
 81
81
-
 82
82
-
 83
83
-
 84
84
-
 85
85
-
 86
86
-
 87
87
-
 88
88
-
 89
89
-
 90
90
-
 91
91
-
 92
92
-
 93
93
-
 94
94
-
 95
95
-
 96
96
-
 97
97
-
 98
98
-
 99
99
-
 100
100
-
 101
101
-
 102
102
-
 103
103
-
 104
104
-
 105
105
-
 106
106
-
 107
107
-
 108
108
-
 109
109
-
 110
110
-
 111
111
-
 112
112
-
 113
113
-
 114
114
-
 115
115
-
 116
116
-
 117
117
-
 118
118
-
 119
119
-
 120
120


Parkside PSS 65 A1 Original Instructions Manual
- Typ
- Original Instructions Manual
w innych językach
- Deutsch: Parkside PSS 65 A1
- slovenčina: Parkside PSS 65 A1
Powiązane artykuły
-
Parkside 316707 1904 Translation Of The Original Instructions
-
Parkside PSBS 240 B2 Translation Of The Original Instructions
-
-
Parkside PBSG 95 C3 Translation Of The Original Instructions
-
-
Inne dokumenty
-
Scheppach BG200AL Instrukcja obsługi
-
Scheppach GS650 Translation Of Original Operating Manual
-
-
YATO YT-84990 Instrukcja obsługi
-
Hendi 210017 Instrukcja obsługi
-
Scheppach KS1200 Translation Of Original Operating Manual
-
Hendi 970294 Instrukcja obsługi
-
ATIKA KSG 220 A - Instrukcja obsługi
-
Scheppach BG 200 Instrukcja obsługi
-
Bavaria 11013 Instrukcja obsługi