Sony XR-4800 Instrukcja obsługi
- Kategoria
- Odtwarzacze kasetowe
- Typ
- Instrukcja obsługi

1998 by Sony Corporation
3-861-510-31 (1)
FM/MW/LW
Cassette Car
Stereo
XR-4800
For installation and connections, see the supplied installation/connections
manual.
Szczegóły dotyczące instalacji i podłączeń, proszę sprawdzić w dostarczonym,
osobnym podręczniku
Informace o instalaci a zapojení naleznete v přiložené příručce Instalace /
zapojení.
Για την εγκατάσταση και τις συνδέσεις, δείτε τï συνïδευτικÞ εγøειρίδιï
Εγκατάσταση/Συνδέσεις.
Kurma ve bağlantı işlemleri için ünite beraberindeki Kurma/Bağlantılar kılavuzuna
bakınız.
Operating Instructions
Instrukcje Obsługi
Návod k obsluze
Ãδηγίες Λειτïυργίας
Kullanım kılavuzu
PL
CZ
GR
EN
TU

2
EN
Welcome!
Thank you for purchasing the Sony Cassette
Car Stereo. This unit lets you enjoy a variety of
features by using an optional rotary
commander.

3
EN
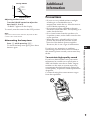
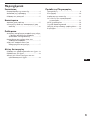
Additional Information
Precautions ........................................................... 9
Maintenance ....................................................... 10
Dismounting the unit ....................................... 11
The rotary commander labels ......................... 11
Location of controls .......................................... 12
Specifications ..................................................... 13
Troubleshooting guide ..................................... 14
Index ................................................................... 15
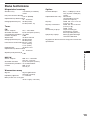
Table of contents
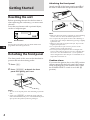
Getting Started
Resetting the unit ................................................ 4
Detaching the front panel .................................. 4
Setting the clock .................................................. 5
Cassette Player
Listening to a tape ............................................... 5
Playing a tape in various modes ....................... 6
Radio
Memorising stations automatically
— Best Tuning Memory (BTM) ................... 7
Memorising only the desired stations.............. 7
Receiving the Memorised stations.................... 7
Other Functions
Adjusting the sound characteristics ................. 8
Attenuating the sound ....................................... 8
Changing the sound and beep tone ................. 8

4
EN
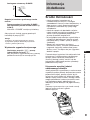
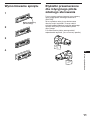
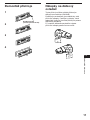
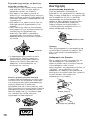
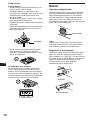
Attaching the front panel
Attach part A of the front panel to part B of
the unit as illustrated and push until it clicks.
Notes
• Make sure the front panel is right side up when attaching
it to the unit as it cannot be attached upside down.
• Do not press the front panel too hard when attaching it
to the unit. It can easily be attached by pressing it lightly
against the unit.
• When you carry the front panel with you, keep it in the
supplied front panel case.
• Do not press hard or put excessive pressure on the
display windows of the front panel.
• Do not expose the front panel to direct sunlight, heat
sources such as hot air ducts or leave it in a humid place.
Never leave it on the dashboard etc. of a car parked in
direct sunlight where there may be a considerable rise in
temperature inside the car.
Caution alarm
If you turn the ignition key to the OFF position
without removing the front panel, the caution
alarm will beep for a few seconds (only when
the POWER SELECT switch is set to the A
position).
Getting Started
Resetting the unit
Before operating the unit for the first time or
after replacing the car battery, you must reset
the unit.
Press the reset button with a pointed object,
such as a ballpoint pen.
Note
Pressing the reset button will erase all the Memorised
programme and memory functions.
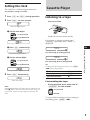
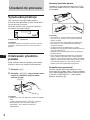
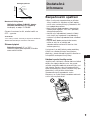
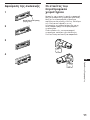
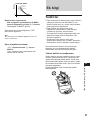
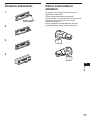
Detaching the front panel
The front panel of this unit can be detached to
prevent the unit from being stolen.
1 Press (OFF).
2 Press (RELEASE) to detach the front
panel then gently pull it out.
Notes
• Be sure not to drop the panel when detaching it from the
unit.
• If you press (RELEASE) to detach the panel while the
unit is still turned on, the power will automatically turn
off to protect the speakers from being damaged.
B
A
Reset button
(RELEASE)

5
EN
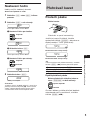
Setting the clock
The clock has a 24-hour digital indication.
For example, setting it to 10:08
1 Press (OFF) or (DSPL) during operation.
2 Press (DSPL) for two seconds.
1 Set the hour digits.
2 Press (SEL) momentarily.
3 Set the minute digits.
3 Press (DSPL) momentarily.
Note
If the POWER SELECT switch on the top of the unit is set
to the B position, the clock cannot be set unless the power
is turned on. Set the clock after you have turned on the
radio.
The hour digit flashes.
To go backward
To go forward
The minute digits flashes.
To go backward
To go forward
The clock starts.
Getting Started/Cassette Player
Cassette Player
Listening to a tape
Insert a cassette.
Playback will start automatically.
If a cassette is already inserted, press
(SOURCE) repeatedly until “TAPE” is
displayed.
The side facing up is being played.
The side facing down is being played.
Tip
To change the tape transport direction, press (MODE)
(*) during tape playback.
Fast-winding the tape
During playback, press either side of
(SEEK/AMS) for two seconds.
To start playback during fast-forwarding or
rewinding, press (MODE) (*).
Press
(OFF)
6
To
Stop playback
Eject the cassette
Fast-forward
Rewind
100
1000
1000
1008
1008
TAPE
TAPE
SEEK
AMS

6
EN
SEEK
AMS
To locate the succeeding tracks
To locate the preceding tracks
Switching to the radio while fast-
winding a tape
— Automatic Tuner Activation (ATA)
Press (5) during playback.
“ATA” appears on the display.
When fast-forwarding or rewinding with
(SEEK/AMS) for two seconds, the tuner will
turn on automatically.
To cancel this function, press (5) again.
Skipping blanks during tape
playback — Blank skip
Press (6) during playback.
“BL SKIP” appears on the display.
Blanks longer than eight seconds will
automatically be skipped during tape
playback.
To cancel this function, press (6) again.
Playing a CrO2 or metal tape
Press (4) when you want to listen to a
CrO2 (TYPE II) or metal (TYPE IV) tape.
“MTL” appears on the display.
To cancel this function, press (4) again.
Locating the beginning of a track
— Automatic Music Sensor (AMS)
You can skip up to nine tracks at one time.
During playback, press either side of
(SEEK/AMS) momentarily.
Note
The AMS function may not work when :
• the blanks between tracks are shorter than 4 seconds
• there is noise between tracks
• there are long sections of low volume or quiet sections.
Changing the displayed items
Each time you press (DSPL) momentarilly
during tape playback, the displayed item
changes as follows:
z Tape playback z Clock z Frequency*
* While the ATA function is activated.
Playing a tape in various
modes
Searching for the desired track
— Intro scan
Press (1) during playback.
“INTRO” appears on the display.
The first 10 seconds of all the tracks are played.
When you find the desired track, press again.
The unit returns to the normal playback mode.
To cancel this mode, press (1) again.
Playing tracks repeatedly
— Repeat play
Press (2) during playback.
“REP” appears on the display.
When the current played track is over, it will
be played again from the beginning.
To cancel this mode, press (2) again.

7
EN
Cassette Player/Radio
Memorising only the
desired stations
Up to 6 stations on each band (FM1, FM2, FM3,
MW and LW) can be stored on the preset
number buttons in the order of your choice.
Therefore, 18 FM stations can be Memorised.
If you try to store another station on the same
preset number button, the most recently stored
station will be erased.
1 Press (SOURCE) repeatedly to select the
tuner.
2 Press (MODE) repeatedly to select the
band.
3 Press (SEEK/AMS) to search for the
station you wish to store on a preset
number button.
4 Press the desired preset number button
((1) to (6)) for two seconds.
The number of the selected preset number
button appears on the display.
Receiving the Memorised
stations
1 Press (SOURCE) repeatedly to select the
tuner.
2 Press (MODE) repeatedly to select the
band.
3 Press the preset number button
momentarily ((1) to (6)) on which the
desired station is stored.
Radio
Memorising stations
automatically
— Best Tuning Memory (BTM)
This function selects from the currently
received band the stations with the strongest
signals and Memorises them in order of their
frequency.
PREVENTING ACCIDENTS!
When tuning in while driving, use the
automatic tuning instead of manual tuning.
1 Press (SOURCE) repeatedly to select the
tuner.
Each time you press (SOURCE), the source
changes as follows:
TAPE ˜ TUNER
2 Press (MODE) repeatedly to select the
band.
Each time you press (MODE), the band
changes as follows:
FM1 n FM2 n FM3 n MW n LW
3 Press (BTM) for two seconds.
Notes
• The unit will not store stations with weak signals on the
preset number buttons. If there are only a few stations
received, some preset number buttons will remain empty.
• When a preset number indicated on the display, the unit
starts storing station from the one currently display.

8
EN
Changing the displayed items
Each time you press (DSPL), the display
changes between the frequency and the clock.
If you cannot tune in a preset
station
Press either side of (SEEK/AMS)
momentarily to search for the station
(automatic tuning).
Scanning stops when a station is received.
Press either side of (SEEK/AMS) repeatedly
until the desired station is received.
Note
If the automatic tuning stops too frequently, press
(LCL) to light up “LCL” on the display (local seek mode).
Only the stations with relatively strong signals are tuned
in.
Tip
If you know the frequency, press and hold either side of
(SEEK/AMS) until the desired station is received (manual
tuning).
Other Functions
Adjusting the sound
characteristics
1 Select the item you want to adjust by
pressing (SEL) repeatedly.
VOL (volume) n BAS (bass) n TRE
(treble) n BAL (left-right) n FAD
(front-rear)
2 Adjust the selected item by pressing
either (+) or (–).
Adjust within three seconds after selecting.
(After three seconds the button will again
serve as the volume control button.)
Attenuating the sound
Press (ATT).
The “ATT” indication flashes.
To restore the previous volume level, press
again.
Changing the sound and
beep tone
Boosting the bass sound — D-Bass
To enjoy clear and powerful bass sound, you
can boost only the low frequency signal with a
sharp curve. This is the effect you get when
use an optional subwoofer system.
For example, you can hear the bass line more
clearly even if the vocal volume remains the
same. You can emphasize and adjust the bass
sound easily with the D-BASS control.

9
EN
Additional
Information
Precautions
• If your car was parked in direct sunlight
resulting in a considerable rise in
temperature inside the car, allow the unit to
cool off before operating it.
• If no power is being supplied to the unit,
check the connections first. If everything is in
order, check the fuse.
• If no sound comes from the speakers of a
2-speaker system, set the fader control to the
center position.
• When the tape is played back for a long
period, the cassette may become warm
because of the built-in power amplifier.
However, this is not a sign of malfunction.
If you have any questions or problems
concerning your unit that are not covered in
this manual, please consult your nearest Sony
dealer.
To maintain high quality sound
If you have drink holders near your audio
equipment, be careful not to splash juice or
other soft drinks onto the car audio. Sugary
residues on this unit or cassette tapes may
contaminate the playback heads, reduce the
sound quality, or prevent sound reproduction
altogether.
Cassette cleaning kits cannot remove sugar
from the tape heads.
Adjusting the bass curve
Turn the D-BASS control to adjust the
bass level (1, 2 or 3).
“D-BASS” appears in the display.
To cancel, turn the control to the OFF position.
Note
If the bass sound becomes distorted, adjust the D-Bass
control or the volume button.
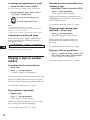
Attenuating the beep tone
Press (6) while pressing (SEL).
To obtain the beep tone again, press these
buttons again.
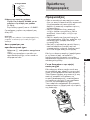
Analog D-BASS
Level
Frequency (Hz)
0dB
D-BASS 3
D-BASS 2
D-BASS 1
Radio/Other Functions/Additional Information

10
EN
Notes on Cassettes
Cassette care
• Do not touch the tape surface of a cassette, as
any dirt or dust will contaminate the heads.
• Keep cassettes ataryway from equipment
with built-in magnets such as speakers and
amplifiers, as erasure or distortion on the
recorded tape could occur.
• Do not expose cassettes to direct sunlight,
extremely cold temperatures or moisture.
• Slack in the tape may cause the tape to be
caught in the machine. Before you insert the
tape, use a pencil or similar object to turn the
reel and take up any slack.
• Distorted cassettes and loose labels can cause
problems when inserting or ejecting tapes.
Remove or replace loose labels.
Cassettes longer than 90 minutes
The use of cassettes longer than 90 minutes is
not recommended except for long continuous
play. The tapes used for these cassettes are
very thin and tend to be stretched easily.
Frequent playing and stopping of these tapes
may cause them to be pulled into the cassette
deck mechanism.
Slack
Maintenance
Fuse Replacement
When replacing the fuse, be sure to use one
matching the amperage rating stated on the
original fuse. If the fuse blows, check the
power connection and replace the fuse. If the
fuse blows again after replacement, there may
be an internal malfunction. In such a case,
consult your nearest Sony dealer.
Warning
Never use a fuse with an amperage rating
exceeding the one supplied with the unit as
this could damage the unit.
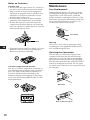
Cleaning the Connectors
The unit may not function properly if the
connectors between the unit and the front
panel are not clean. In order to prevent this,
open the front panel by pressing (RELEASE),
then detach it and clean the connectors with a
cotton swab dipped in alcohol. Do not apply
too much force. Otherwise, the connectors may
be damaged.
Fuse (10 A)
Main unit
Back of the front panel

11
EN
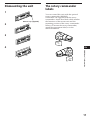
Dismounting the unit
1
2
3
4
Release key (supplied)
Additional Information
The rotary commander
labels
You can control this unit with the optional
rotary commander (RM-X4S).
Some labels are supplied with the rotary
commander. Attach that label which matches
the functions of the master unit and the
mounting position of the rotary commander.
When you mount the rotary commander,
attach the appropriate label, as in the
illustration below.
SEL
DSPL
MODE
SEL
DSPL
MODE

12
EN
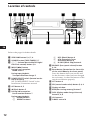
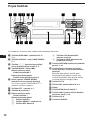
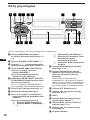
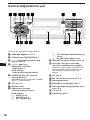
Location of controls
Refer to the pages for further details.
1 SEEK/AMS button 5, 6, 7, 8
2 SOURCE button (TAPE/TUNER) 5, 7
3 (+)(–) (volume/bass/treble/left-right/
front-rear control) button 5, 8
4 MODE (*) button
During tuner reception:
BAND select 7
During tape playback:
Transport direction change 5
5 POWER SELECT switch (located on the
top of the unit)
See “POWER SELECT Switch” in the
Installation/Connections manual.
6 OFF button 4, 5
7 6 (Eject) button 5
8 During radio reception:
Preset number buttons 7
During tape playback:
(1) INTRO button 6
(2) REPEAT button 6
(4) MTL (Metal) button 6
(5) ATA (Automatic Tuner
Activation) button 6
(6) BL SKIP (Blank Skip) button 6
9 RELEASE (front panel release) button
4, 10
!º Reset button (located on the front side
of the unit hidden by the front panel)
Press this button when you use this unit
for the first time, when you have changed
the car battery, or when the buttons of this
unit do not function properly.
!¡ ATT button 8
!™ SEL (control mode select) button 5, 8, 9
!£ Display window
!¢ BTM (Best tuning memory) button 7
!∞ DSPL (display mode change/time set)
button 5, 6, 8
!§ LCL button 8
!¶ D-BASS control 8
RELEASE
D-BASS
MODE
SEEK
AMS
SEL
SOURCE
ATT
OFF
213
546
INTRO REPEAT
ATA BL SKIP
BTM LCL
OFF
1
2
3
DSPL
MTL

13
EN
Specifications
Cassette player section
Tape track 4-track 2-channel stereo
Wow and flutter 0.08 % (WRMS)
Frequency response 30 – 18,000 Hz
Signal-to-noise ratio 58 dB (TYPE I)
61 dB (TYPE II, IV)
Tuner section
FM
Tuning range 87.5 – 108.0 MHz
Antenna terminal External antenna connector
Intermediate frequency 10.7 MHz
Usable sensitivity 8 dBf
Selectivity 75 dB at 400 kHz
Signal-to-noise ratio 65 dB (stereo),
68 dB (mono)
Harmonic distortion at 1 kHz
0.5 % (stereo),
0.3 % (mono)
Separation 35 dB at 1 kHz
Frequency response 30 – 15,000 Hz
Capture ratio 2 dB
MW/LW
Tuning range MW: 531 – 1,602 kHz
LW: 153 – 281 kHz
Antenna terminal External antenna connector
Intermediate frequency 10.71 MHz/450kHz
Sensitivity MW: 30 µV
LW: 50 µV
Power amplifier section
Outputs Speaker outputs
(sure seal connectors)
Speaker impedance 4 – 8 ohms
Maximum power output 35 W × 4 (at 4 ohms)
General
Tone controls Bass ±8 dB at 100 Hz
Treble ±8 dB at 10 kHz
Power requirements 12 V DC car battery
(negative ground)
Dimensions Approx. 188 × 58 × 181
mm (w/h/d)
Mounting dimensions Approx. 182 × 53 × 164 mm
(w/h/d)
Mass Approx. 1.2 kg
Supplied accessories Parts for installation and
connections (1 set)
Front panel case (1)
Optional accessories Rotary commander
RM-X4S
Design and specifications are subject to change without
notice.
Additional Information

14
EN
Troubleshooting guide
The following checklist will assist in the correction of most problems you may encounter with your
unit.
Before going through the checklist below, refer to the operating procedures.
General
Cause/Solution
• Adjust the volume with (+).
• Set the fader control to the center position for 2-speaker
systems.
Remove the front panel and clean the connectors. See “Cleaning
the Connectors” in “Maintenance” for details.
The beep tone is attenuated.
Problem
No sound.
Indications do not appear on
the display.
No beep tone.
Tape playback
Cause/Solution
Contamination of the tape head. n Clean the head.
• There is noise in the space between tracks.
• A blank space is too short (less than four seconds).
• + on (SEEK/AMS) is pressed immediately before the
following track.
• = on (SEEK/AMS) is pressed immediately after the track
starts.
• A long pause, or a passage of low frequencies or very low
sound level is treated as a blank space.
Problem
Playback sound is distorted.
The AMS does not operate
correctly.
Radio reception
Problem
Preset tuning is not possible.
Automatic tuning is not possible.
Cause/Solution
• Store the correct frequency.
• The broadcast is too weak.
The broadcast is too weak. n Use manual tuning.
If the above-mentioned solutions do not help to improve the situation, consult your nearest Sony
dealer.

15
EN
A
ATT 8
Automatic Music Sensor (AMS) 6
Automatic tuning 8
Automatic Tuner Activation (ATA) 6
B
BAL (left-right) 8
BAS (bass) 8
Best Tuning Memory (BTM) 7
Blank skip 6
C
Caution alarm 4
Clock 5
D, E
D-BASS (D-Bass) 8
Display 6
F, G, H
FAD (front-rear) 8
Fast-forward 5
Front panel 4
Fuse 10
I, J, K
Intro scan 6
L
Local seek mode (LCL) 8
M, N, O, P, Q
Manual tuning 8
METAL 6
Index
Additional Information
R, S
Radio 7
Repeat play 6
Reset 4
Rewind 5
Rotary commander 11
T, U, V, W, X, Y, Z
Tape playback 5
TRE (treble) 8

2
PL
Witamy!
Dziękujemy za zakupienie Stereofonicznego
Radio-Magnetofonu Kasetowego Sony.
Sterowanie rotacyjnym pilotem, przyczynia się
do zwiększenia przyjemności korzystanie z
wielu walorów, nabytego przez Państwa
sprzętu.

3
PL
Indice
Informacje dodatkowe
Środki Ostrożności ......................................... 9
Konserwacja .................................................10
Wymontowanie sprzętu ................................11
Etykietki przeznaczone dla rotycyjnego
pilota zdalnego sterowania ...................... 11
Umiejscowienie kontrolek ............................. 12
Dane techniczne ...........................................13
Przewodnik usuwania usterek ...................... 14
Indeks ...........................................................15

4
PL
Przygotowania
wstępne
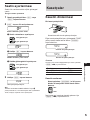
Wyzerowanie sprzętu
Sprzęt należy wyzerować przed rozpoczęciem
eksploatacji poraz pierwszy lub po wymianie
akumulatora pojazdu.
Proszę nacisnąć przycisk zerowania (reset)
przy pomocy szpiczasto zakończonego
przedmiotu, takiego jak np. długopis.
Uwaga
Naciśnięcie przycisku zerowania spowoduje
wymazanie wszystkich funkcji pamięci i programów.
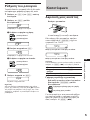
Zdejmowanie
przedniego panelu
Przedni panel sprzętu można usunąć,
zapobiegając w ten sposób ewentualnej
kradzieży urządzenia.
1 Proszę nacisnąć (OFF).
2 Proszę nacisnąć (RELEASE) aby
odłączyć przedni panel i zdjąć przez
lekkie pociągnięcie.
Uwagi
•
Proszę uważać by przy zdejmowaniu nie upuścić
panela.
•
Aby zapobiec uszkodzeniu głośników przy
zdejmowaniu panela, zasilanie zostaje
automatycznie wyłączone w momencie naciśnięcia
przycisku
(RELEASE)
.
Zakładanie przedniego panela
Część oznaczoną A na ilustracji, należy
połączyć z częścią oznaczoną B, na głównym
korpusie sprzętu, a następnie pchnąć do
zaskoczenia.
Uwagi
•
Panelu nie będzie można umocować, jeżeli
zostanie on założony odwrotnie.
•
Przy zakładaniu, nie dopychać przedniego panelu
na siłę do głównego korpusu sprzętu. Wystarczy
lekki nacisk.
•
Zabierając przedni panel ze sobą, proszę umieścić
go w przeznaczonym do tego celu etui.
•
Należy unikać wywierania nacisku na wyświetlacz
umieszczony na przednim panelu.
•
Należy unikać narażania przedniego panelu na
nadmierne działanie promieni słonecznych,
ciepłego powietrza pochodzącego z systemu
ogrzewczego pojazdu, lub na działanie wilgoci. Nie
należy też pozostawiać go na desce rozdzielczej
lub gdziekolwiek w samochodzie zaparkowanym
na nasłonecznionym miejscu powodującym
znaczny wzrost temperatury wewnątrz pojazdu.
Alarm ostrzegawczy
Po warunkiem, że uprzednio nie usunięto
przedniego panela, alarm ostrzegawczy
włączy się na parę sekund po przełączeniu
kluczyka zapłonu na pozycję OFF (wyłączenie)
(tylko w przypadku kiedy przełącznik źródła
zasilania “POWER SELECT” znajduje się w
pozycji A).
B
A
Przycisk “Reset” (zerowanie)
(RELEASE)

5
PL
Odtwarzana jest strona taśmy skierowana ku
dołowi.
Aby
Wstrzymać
odtwarzanie
Wysunąć kasetę
Odtwarzana jest strona taśmy skierowana ku
górze.
Nastawianie zegara
Zegar działa w cyfrowym systemie 24-
godzinnym.
Na przykład, nastawianie godziny 10:08
1 Podczas operacji zegara, proszę
nacisnąć (OFF) lub (DSPL).
2 Proszę przez dwie sekundy naciskać
(DSPL)
1 Nastawić cyfry oznaczające godzinę.
2 Proszę krótko nacisnąć (SEL).
3 Nastawić cyfry oznaczające minuty.
3 Proszę krótko nacisnąć (DSPL).
Uwaga
Jeżeli przełącznik zasilania POWER SELECT,
umieszczony na górnej powierzchni sprzętu,
znajduje się w pozycji
B
, proszę przed
rozpoczęciem nastawiania zegara, włączyć zasilanie
sprzętu. Proszę nastawić zegar po włączeniu radia.
Przygotowania wstępne/Magnetofon
Proszę nacisnąć
(OFF)
6
Wskaźnik godziny miga.
Aby przesunąć do przodu
Aby cofnąć
Wskaźniki minut migają.
Aby przesunąć do przodu
Aby cofnąć
Zegar został uaktywniony.
Szybki przesów do przodu
Cofanie
SEEK
AMS
100
1000
1000
1008
1008
TAPE
TAPE
Magnetofon
Odtwarzanie taśmy
Proszę wsunąć kasetę.
Odtwarzanie rozpoczyna się
automatycznie.
Jeżeli kaseta została uprzednio wsunięta,
proszę kilkakrotnie nacisnąć (SOURCE) do
wyświetlenia wskaźnika “TAPE”.
Wskazówka
Aby zmienić kierunek transportu taśmy, proszę w
trybie odtwarzania nacisnąć
(MODE)
(
*
).
Szybkie przesuwanie taśmy
W trybie odtwarzania, przez ponad dwie
sekundy naciskać jedną ze stron
przycisku (SEEK/AMS).
Aby rozpocząć odtwarzanie podczas
szybkiego przesuwania do przodu lub
podczas cofania, proszę nacisnąć przycisk
(MODE) (*).

6
PL
Zlokalizowanie początku nagrania
— Automatic Music Sensor (AMS) =
automatyczny czujnik muzyki
Każdorazowo można pominąć maksymalnie
dziewięć tytułów.
W trybie odtwarzania, krótko nacisnąć
jedną ze stron przycisku (SEEK/AMS).
Uwaga
Funkcja AMS może nie działać, jeżeli :
•
odstępy między tytułami wynoszą mniej niż 4
sekundy
•
między poszczególnymi tytułami występują dźwięki
zakłócające
•
występują długie odcinki niskiego poziomu
głośności lub bardzo spokojnej muzyki.
Zmienianie się wskaźników świetlnych
Każdorazowe naciśnięcie przycisku (DSPL) w
trybie odtwarzania taśmy, zmienia
wyświetlanie wskaźników w następującej
kolejności:
*
Jeżeli uaktywniono funkcję ATA.
Odtwarzanie taśmy w
różnych trybach pracy
Odszukiwanie poszczególnych tytułów
— Tryb “Intro scan”
W trybie odtwarzania taśmy, proszę
nacisnąć (1).
Ukazuje się wskaźnik “INTRO”.
Odtworzonych zostanie pierwszych 10 sekund
wszystkich tytułów.
Po zlokalizowaniu poszukiwanego tytułu,
proszę ponownie nacisnąć ten sam przycisk.
Zostaje przywrócony normalny tryb
odtwarzania.
Wyłączyć funkcję przez ponowne naciśnięcie
przycisku (1).
Powtórne odtwarzanie tytułów
— Tryb “Repeat play”
W trybie odtwarzania, proszę nacisnąć
przycisk (2).
Ukazuje się wskaźnik “REP”.
Po zakończeniu odtwarzania aktualnego
tytułu, odtwarzanie zostanie powtórzone od
początku.
Wyłączyć funkcję przez ponowne naciśnięcie
przycisku (2).
Włączenie radia podczas szybkiego
przewijania taśmy
— Automatic Tuner Activation
(ATA=automatyczne uaktywnianie
tunera)
W trybie odtwarzania, proszę nacisnąć
(5).
Ukazuje się wskaźnik “ATA”.
Tuner zostanie automatycznie włączony, jeżeli
trwające dwie sekundy, szybkie przesuwanie
lub cofanie taśmy, zostało uaktywnione przez
naciśnięcie przycisku (SEEK/AMS).
Wyłączyć funkcję przez ponowne naciśnięcie
przycisku (5).
Omijanie przerw między tytułami
podczas odtwarzanie taśmy
— tryb “Blank skip”
Podczas odtwarzania proszę nacisnąć
przycisk (6).
Ukazuje się wskaźnik “BL SKIP”.
Ponad ośmio-sekundowe przerwy między
nagraniami będą w trybie odtwarzania,
automatycznie omijane.
Wyłączyć funkcję przez ponowne naciśnięcie
przycisku (6).
Odtwarzanie taśmy typu CrO2 lub
“metal”
Proszę nacisnąć przycisk (4) aby
odtworzyć taśmę typu CrO2 (TYPE II) lub
metal (TYPE IV).
Ukazuje się wskaźnik “MTL”.
Wyłączyć funkcję przez ponowne naciśnięcie
przycisku (4).
Aby zlokalizować następne tytuły
Aby zlokalizować poprzednie tytuły
SEEK
AMS
” Odtwarzanie taśmy ” Zegar
Częstotliwość* “
Strona się ładuje...
Strona się ładuje...
Strona się ładuje...
Strona się ładuje...
Strona się ładuje...
Strona się ładuje...
Strona się ładuje...
Strona się ładuje...
Strona się ładuje...
Strona się ładuje...
Strona się ładuje...
Strona się ładuje...
Strona się ładuje...
Strona się ładuje...
Strona się ładuje...
Strona się ładuje...
Strona się ładuje...
Strona się ładuje...
Strona się ładuje...
Strona się ładuje...
Strona się ładuje...
Strona się ładuje...
Strona się ładuje...
Strona się ładuje...
Strona się ładuje...
Strona się ładuje...
Strona się ładuje...
Strona się ładuje...
Strona się ładuje...
Strona się ładuje...
Strona się ładuje...
Strona się ładuje...
Strona się ładuje...
Strona się ładuje...
Strona się ładuje...
Strona się ładuje...
Strona się ładuje...
Strona się ładuje...
Strona się ładuje...
Strona się ładuje...
Strona się ładuje...
Strona się ładuje...
Strona się ładuje...
Strona się ładuje...
Strona się ładuje...
Strona się ładuje...
Strona się ładuje...
Strona się ładuje...
Strona się ładuje...
Strona się ładuje...
Strona się ładuje...
Strona się ładuje...
Strona się ładuje...
-
 1
1
-
 2
2
-
 3
3
-
 4
4
-
 5
5
-
 6
6
-
 7
7
-
 8
8
-
 9
9
-
 10
10
-
 11
11
-
 12
12
-
 13
13
-
 14
14
-
 15
15
-
 16
16
-
 17
17
-
 18
18
-
 19
19
-
 20
20
-
 21
21
-
 22
22
-
 23
23
-
 24
24
-
 25
25
-
 26
26
-
 27
27
-
 28
28
-
 29
29
-
 30
30
-
 31
31
-
 32
32
-
 33
33
-
 34
34
-
 35
35
-
 36
36
-
 37
37
-
 38
38
-
 39
39
-
 40
40
-
 41
41
-
 42
42
-
 43
43
-
 44
44
-
 45
45
-
 46
46
-
 47
47
-
 48
48
-
 49
49
-
 50
50
-
 51
51
-
 52
52
-
 53
53
-
 54
54
-
 55
55
-
 56
56
-
 57
57
-
 58
58
-
 59
59
-
 60
60
-
 61
61
-
 62
62
-
 63
63
-
 64
64
-
 65
65
-
 66
66
-
 67
67
-
 68
68
-
 69
69
-
 70
70
-
 71
71
-
 72
72
-
 73
73


Sony XR-4800 Instrukcja obsługi
- Kategoria
- Odtwarzacze kasetowe
- Typ
- Instrukcja obsługi
w innych językach
- slovenčina: Sony XR-4800 Návod na používanie
- Türkçe: Sony XR-4800 Kullanma talimatları
Powiązane artykuły
-
Sony XR-3753 Instrukcja obsługi
-
-
-
-
-
-
-
Sony XR-M510 Instrukcja obsługi
-
Sony XR-C7200R Instrukcja obsługi
-