
f
1 2
1
4 5
6
6
7
7
8
[Fig. 1]
4
8
8
JA
/ Snare stand / Pied de caisse claire / Snare-Ständer / Supporto per snare drum
/ Owner’s Manual / Mode d'emploi / Bedienungsanleitung / Manuale di istruzioni
SS3/SS3H
ZY37441
Published 08/2020 : POA0
10-1 Nakazawa-cho, Naka-ku, Hamamatsu, 430-8650 Japan
Manual Development Group
© 2020 Yamaha Corporation
P. 1
(2)
(4)
(6)
(5)
(2)
(1)
(3)
(7)
(5)
(8)
(8)
(8)
(2)
(4)
(6)
(5)
(2)
(1)
(3)
(7)
(5)
(8)
(8)
(8)
(2)
(1)
(3)
(4)
(5)
[Fig. 1]
(8)
(8)
(8)
SS3 SS3H
SS3 SS3H
(2)
(1)
(3)
(4)
(5)
(6)
Thank you for purchasing this Yamaha product.
This product is made from aluminum, which makes it lighter yet retains the rigidity
of conventional drum hardware. To use the product safely and get the most out of
its features, be sure to read this Owner’s Manual carefully. After reading, be sure
to keep it with the product so that you can easily refer back to it again as needed.
Package Contents :
Inner bag (SS3 only), Precautions (leaflet), Service Offices list (leaflet)
Safety Precautions
• Compared to conventional chrome plating, the surface on this product tends to
scratch easily. When transporting, try to avoid hitting or scraping the product.
• Unusually heavy instruments may be difficult to balance on these stands as the
stand itself is light in weight. After setting up and before using for performance or
display, check the instrument for stability.
Setup
Setting Up the Snare Stand
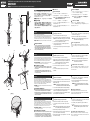
1 Loosen the wing bolt (1) and extend the three legs (2).
2 Place the stand in a stable position, and then tighten the wing bolt (
1
).
NOTE Make sure that the bottom of the pipe (3) is not in contact with
the floor, to avoid scratching the floor surface (SS3 only).
3 Loosen the rotary nut (4), and open the arms (5).
4 Loosen the wing nut (
6), adjust to the suitable height, and then
securely tighten the wing nut (
6).
5 Loosen the wing nut (
7), adjust the angle, and then securely tighten
the wing nut (
7).
Attaching the Snare Drum
1 Place the snare drum so that the three arm covers (8) are supporting
the snare drum’s hoop. [Fig. 1]
2 Tighten the rotary nut (
4) to lightly secure the drum in place.
NOTE Take care not to over-tighten the rotary nut. Doing so can pre-
vent the drum from resonating properly.
Arm Cover (8) Replacement
The arm covers (8) are removable and replaceable. If the arm covers (8)
become lost or damaged, contact the dealer from whom you purchased the
product.
English
EN
Nous vous remercions d'avoir acheté ce produit Yamaha.
Ce produit est fabriqué en aluminium, ce qui le rend plus léger que les batteries classi-
ques, mais tout aussi rigide. Pour utiliser le produit en toute sécurité et tirer pleinement
parti de ses fonctionnalités, veuillez lire attentivement ce mode d'emploi. Conservez-le
ensuite avec le produit afin de pouvoir le consulter chaque fois que nécessaire.
Contenu de l'emballage : Sac intérieur (SS3 uniquement), liste des précautions à
prendre (brochure), liste des bureaux de service clientèle (brochure)
Précautions de sécurité
• En comparaison avec un revêtement chromé traditionnel, la surface de ce produit a
tendance à rayer facilement. Lors du transport, évitez par conséquent de heurter ou
d'érafler le produit.
• Il peut être difficile d'équilibrer les instruments particulièrement lourds, car les
pieds sont légers. Après avoir installé l'instrument et avant de l'exposer ou de vous
en servir, vérifiez sa stabilité.
Configuration
Installation du pied de caisse claire
1 Desserrez la vis papillon (1) et écartez les trois pieds (2).
2 Installez le pied en position stable, puis resserrez la vis papillon (
1).
NOTE Vérifiez que le bas du tube (3) n'est pas en contact avec le sol
afin d'éviter de rayer la surface du sol (SS3 uniquement).
3 Desserrez l'écrou rotatif (4) et ouvrez les bras (5).
4 Desserrez la vis papillon (6), réglez la hauteur et resserrez la vis
papillon (6).
5 Desserrez la vis papillon (7), réglez l'angle et resserrez la vis
papillon (7).
Fixation de la caisse claire
1 Placez la caisse claire afin que les trois caches de l'arbre (8) sou-
tiennent le cerceau de la caisse claire. [Fig. 1]
2 Resserrez l'écrou rotatif (
4) afin de maintenir légèrement la caisse.
NOTE Ne serrez pas l'écrou rotatif trop fort. Vous empêcheriez la
caisse de résonner correctement.
Remplacement des caches des bras (8)
Les caches des bras (8) sont amovibles et remplaçables. Si vous les égarez
(
8) ou s'ils sont endommagés, contactez le revendeur auprès duquel vous
avez acheté le produit.
Français
FR
Vielen Dank für den Kauf dieses Produkts von Yamaha.
Dieses Produkt ist aus Aluminium und damit bei gleicher Steifigkeit leichter als
herkömmliche Drums-Hardware. Lesen Sie diese Bedienungsanleitung sorgfäl-
tig durch, um das Produkt sicher und mit zufriedenstellendem Ergebnis benutzen
zu können. Bewahren Sie sie nach dem Durchlesen in der Nähe des Produkts
auf, sodass Sie sie bei Bedarf jederzeit zur Hand haben.
Lieferumfang : Produktbeutel (nur beim SS3), Merkblatt mit Sicherheitsvorkehrungen,
Liste der Servicebüros
Sicherheitsvorkehrungen
• Verglichen mit verchromter Hardware kann diese leichter verkratzen. Achten Sie beim
Transport daher darauf, das Produkt nirgendwo anzustoßen oder entlangzuziehen.
• Da die Ständer leicht sind, lassen sich ungewöhnlich schwere Instrumente auf ihnen
nur schwer ausbalancieren. Prüfen Sie die Stabilität des Aufbaus, ehe Sie die Instru-
mente spielen oder aufstellen.
Vorbereitung
Aufbau des Snare-Ständers
1 Lösen Sie die Flügelschraube (
1
) und klappen Sie die drei Beine aus (
2
).
2 Bringen Sie den Ständer in eine stabile Position und ziehen Sie die
Flügelschraube fest (
1).
HINWEIS
Achten Sie darauf, mit dem Ende des Rohrs (3) nicht den
Boden zu berühren, um ihn nicht zu verkratzen (nur beim SS3).
3 Lösen Sie die Überwurfmutter (4), um die Arme (5) auszuklappen.
4 Lösen Sie die Flügelmutter (
6), stellen Sie die passende Höhe ein
und ziehen Sie die Flügelmutter wieder gründlich fest (
6).
5 Lösen Sie die Flügelmutter (
7), stellen Sie den Winkel ein und ziehen
Sie die Flügelmutter wieder gründlich fest (
7).
Befestigen der Snare
1 Setzen Sie die Snare so in die Trägerarme, dass deren Enden (8)
den Spannring der Snare greifen. [Abb. 1]
2 Ziehen Sie die Überwurfmutter (
4) an, bis die Trommel leicht gesi-
chert an Ort und Stelle sitzt.
HINWEIS Ziehen Sie die Überwurfmutter nicht zu fest an. Anderen-
falls kann das Resonanzverhalten der Trommel beeinträch-
tigt werden.
Austausch der Armenden (8)
Die Armenden (8) lassen sich abnehmen und austauschen. Verloren
gegangene oder beschädigte Armenden (
8) erhalten Sie bei dem Händler,
bei dem Sie das Produkt erworben haben.
Deutsch
DE
Grazie per aver acquistato questo prodotto Yamaha.
Questo prodotto è realizzato in alluminio che lo rende più leggero mantenendo
comunque la rigidità dell'hardware per batterie tradizionale. Per utilizzare il pro-
dotto in sicurezza e sfruttare al massimo le sue funzionalità, leggere attenta-
mente questo Manuale di istruzioni. Dopo averlo letto, conservarlo con il prodotto
in modo da poterlo consultare facilmente in futuro in caso di necessità.
Contenuto della confezione : Busta interna (solo SS3), precauzioni (opuscolo),
elenco dei centri di assistenza (opuscolo)
Precauzioni per la sicurezza
• Rispetto alla cromatura tradizionale, la superficie di questo prodotto tende a graffiarsi
facilmente. Durante il trasporto, cercare di evitare di colpire o graffiare il prodotto.
• Gli strumenti insolitamente pesanti possono essere difficili da bilanciare sui sup-
porti, perché il supporto stesso è leggero. Dopo la configurazione e prima di utiliz-
zarlo per una performance o l'esposizione, controllare la stabilità dello strumento.
Configurazione
Configurazione del supporto per snare drum
1 Allentare la vite ad alette (1) ed estendere le tre gambe (2).
2 Collocare il supporto in una posizione stabile e serrare la vite ad
alette (1).
NOTA
Verificare che la parte inferiore del tubo (3) non sia a contatto con il pavi-
mento, per evitare di graffiare la superficie del pavimento (solo SS3).
3 Allentare il dado girevole (4) e aprire i bracci (5).
4 Allentare il dado ad alette (
6), regolare il supporto a un'altezza ade-
guata e serrare saldamente il dado ad alette (
6).
5 Allentare il dado ad alette (
7), regolare l'angolazione e serrare salda-
mente il dado ad alette (7).
Montaggio dello snare drum
1 Posizionare lo snare drum in modo che le tre coperture dei bracci (8)
sostengano il cerchio del tamburo. [Fig. 1]
2 Serrare il dado girevole (
4) per fissare leggermente il tamburo in
posizione.
NOTA Prestare attenzione a non serrare eccessivamente il dado gire-
vole, altrimenti il tamburo potrebbe non risuonare corretta-
mente.
Sostituzione della copertura del braccio (8)
Le coperture dei bracci (8) sono rimovibili e sostituibili. In caso di danneg-
giamento o perdita delle coperture dei bracci (
8), contattare il rivenditore da
cui è stato acquisto il prodotto.
Italiano
IT

f???
Gracias por comprar este producto Yamaha.
Este producto está fabricado en aluminio, por eso es más ligero pero sigue conser-
vando la rigidez de un herraje para baterías convencional. Para usar el producto de
manera segura y sacar el máximo partido de sus funciones, lea atentamente el
Manual de instrucciones. Después de leerlo, asegúrese de guardarlo con el pro-
ducto para poder volver utilizarlo como referencia cuando lo necesite.
Contenido del paquete : Bolsa interior (sólo el SS3), precauciones (folleto), lista de
centros de servicio (folleto)
Precauciones de seguridad
• La superficie de este producto tiende a rayarse fácilmente, en comparación con revestimiento
de cromo convencional. Durante el transporte, intente evitar golpear o rayar el producto.
• Puede resultar difícil equilibrar instrumentos inusualmente pesados en estos pies,
ya que el pie es ligero. Tras la instalación y antes de usar el instrumento para inter-
pretar o exponer, compruebe la estabilidad del mismo.
Configuración
Instalación del soporte de caja
1 Afloje el tornillo de mariposa (1) y extienda los tres pies (2).
2 Coloque el soporte en una posición estable y, a continuación, apriete
el tornillo de mariposa (1).
NOTA
Asegúrese de que la parte inferior del tubo (3) no está en contacto
con el suelo para evitar rayar la superficie del suelo (sólo el SS3).
3 Afloje la tuerca giratoria (4) y abra los brazos (5).
4 Afloje la tuerca de mariposa (6), ajústela a la altura adecuada y, a
continuación, apriétela firmemente (6).
5 Afloje la tuerca de mariposa (7), ajuste el ángulo y, a continuación,
apriétela firmemente (7).
Acople de la caja
1 Coloque la caja de forma que las tres cubiertas de los brazos (8)
sostengan el aro inferior de la caja. [Fig. 1]
2 Apriete la tuerca giratoria (
4) para asegurar ligeramente la caja en la
posición adecuada.
NOTA Tenga cuidado de no apretar demasiado la tuerca giratoria. Si
se aprieta demasiado, es posible que la caja no resuene
correctamente.
Sustitución de la cubierta del brazo (8)
Las cubiertas de los brazos (8) se pueden desmontar y sustituir. Si las
cubiertas de los brazos (
8) se pierden o se dañan, póngase en contacto
con el distribuidor al que le compró el producto.
Español
ES
Soporte de caja / Estante de caixa / Стойка для малого барабана / /
Manual de instrucciones / Manual do proprietário / Руководство пользователя / /
P. 2
Obrigado por adquirir este produto Yamaha.
Este produto é feito de alumínio, o que o torna mais leve, porém conserva a rigidez
dos componentes de bateria convencionais. Para usar o produto com segurança e
aproveitar ao máximo suas funções, leia este Manual do Proprietário com atenção.
Após a leitura, guarde-o junto com o produto para consultá-lo conforme necessário.
Conteúdo do pacote : Bolsa interna (somente SS3), Precauções (folheto), lista de
assistências técnicas (folheto)
Precauções de segurança
• Diferentemente do revestimento cromado convencional, a superfície deste produto
está mais suscetível a arranhões. Evite bater ou raspar o produto ao transportá-lo.
• Pode ser difícil equilibrar instrumentos muito pesados sobre estas estantes, pois
elas são leves. Confirme a estabilidade do instrumento após montá-lo e antes de
utilizá-lo em apresentações ou para exposição.
Configuração
Montagem da estante de caixa
1 Afrouxe o parafuso borboleta (1) e alargue as três pernas (2).
2 Coloque a estante em uma posição estável e aperte o parafuso bor-
boleta (1).
OBSERVAÇÃO
Certifique-se de que a parte inferior do tubo (3) não esteja em
contato com o chão para evitar arranhões na superfície do chão (somente SS3).
3 Afrouxe a porca giratória (4) e abra os braços da estante (5).
4 Afrouxe a porca borboleta (
6), ajuste a uma altura adequada e
aperte firmemente a porca borboleta (
6).
5 Afrouxe a porca borboleta (
7), ajuste o ângulo e aperte firmemente a
porca borboleta (
7).
Fixação da caixa
1 Posicione a caixa de modo que o aro da caixa esteja apoiado sobre
as três coberturas dos braços (
8). [Figura 1]
2 Aperte a porca giratória (
4) para fixar levemente o tambor.
OBSERVAÇÃO
Tome cuidado para não apertar excessivamente a porca
giratória. Isso pode impedir a ressonância adequada do tambor.
Substituição das coberturas dos braços (8)
As coberturas dos braços (8) são removíveis e podem ser substituídas. Se
as coberturas dos braços (
8) forem perdidas ou danificadas, entre em con-
tato com o revendedor do qual você adquiriu o produto.
Português
PT
Благодарим вас за приобретение этого продукта Yamaha.
Он изготовлен из алюминия, поэтому легкий, но не менее жесткий, чем обычные
ударные инструменты и принадлежности к ним. Внимательно прочтите данное
руководство владельца, чтобы эффективно и безопасно пользоваться всеми
возможностями продукта. После прочтения сохраните руководство, чтобы к
нему всегда можно было обратиться, если возникнут вопросы по продукту.
Комплект поставки : внутренний чехол (только SS3), «Меры предосторожнос-
ти» (листовка), «Перечень сервисных центров» (листовка)
Меры предосторожности
• В отличие от традиционных хромированных изделий, данный продукт легко поца-
рапать. Во время транспортировки берегите его от ударов и острых предметов.
• Слишком тяжелые инструменты может быть трудно уравновесить на таких легких
стойках. После установки и перед использованием для исполнения или показа про-
верьте устойчивость инструмента.
Установка
Установка стойки для малого барабана
1 Ослабьте барашковый болт (1) и выдвиньте три ножки (2).
2 Установите стойку так, чтобы она не шаталась, а затем затяни-
те барашковый болт (
1
).
ПРИМЕЧАНИЕ.
Чтобы не поцарапать пол, проверьте, чтобы низ труб-
ки (3) его не касался (только SS3).
3 Ослабьте поворотную гайку (4) и раскройте держатели (5).
4 Ослабьте барашковую гайку (
6), выставьте нужную высоту и
затем надежно затяните барашковую гайку (
6).
5 Ослабьте барашковую гайку (
7), выставьте нужный угол и
затем надежно затяните барашковую гайку (
7).
Прикрепление малого барабана
1 Установите малый барабан таким образом, чтобы три наконеч-
ника держателей (
8) служили опорой для обруча малого бара-
бана. [Рис. 1]
2 Затяните поворотную гайку (
4), чтобы слегка зафиксировать
барабан.
ПРИМЕЧАНИЕ.
Не затягивайте поворотную гайку слишком сильно,
иначе барабан может резонировать неправильно.
Замена наконечника держателя (8)
Наконечники держателей (8) можно снимать и заменять. Если нако-
нечники держателей (
8) потеряются или повредятся, обратитесь к
дилеру, у которого вы приобрели данный продукт.
Pусский
RU
( ( (
•
•
1 2
1
4 5
6 6
7 7
8
4
8 8
ZH
1 2
1
4 5
6 6
7 7
8
4
8 8
KO
SS3/SS3H
(2)
(1)
(3)
(4)
(5)
[Fig. 1]
(8)
(8)
(8)
SS3 SS3H
SS3 SS3H
(2)
(1)
(3)
(4)
(5)
(2)
(4)
(6)
(5)
(2)
(1)
(3)
(7)
(5)
(8)
(8)
(8)
(2)
(4)
(6)
(5)
(2)
(1)
(3)
(7)
(5)
(8)
(8)
(8)
(6)
-
 1
1
-
 2
2


Yamaha SS3 Instrukcja obsługi
- Typ
- Instrukcja obsługi
- Ten podręcznik jest również odpowiedni dla
w innych językach
- čeština: Yamaha SS3 Návod k obsluze
- español: Yamaha SS3 El manual del propietario
- italiano: Yamaha SS3 Manuale del proprietario
- Deutsch: Yamaha SS3 Bedienungsanleitung
- português: Yamaha SS3 Manual do proprietário
- français: Yamaha SS3 Le manuel du propriétaire
- 日本語: Yamaha SS3 取扱説明書
- English: Yamaha SS3 Owner's manual
- dansk: Yamaha SS3 Brugervejledning
- Nederlands: Yamaha SS3 de handleiding
- română: Yamaha SS3 Manualul proprietarului