
Mount the snare drum to the
slide-at-tachment on the carrying holder
slide base. Tighten the clamp screw to
secure the snare drum.
Adjust the height and width of the carrying
holder arms, and then tighten the screws
to secure.
Insert the arms into the arm brackets on
the frame assembly. (Position the
instrument so that it is facing the holder
(refer to diagram C).) Once the position is
determined, tighten the screws on the arm
brackets to secure the arms. When the
instrument is properly positioned the
screws lock into the notches.
The snare drum can be flipped up as shown
at left to transport it or when changing
marching formations. Be careful that the
drum head or hoop does not come into
contact with the holder. Be sure to hold the
drum with your hand when flipped up.
Adjust the arm support Repositioning of the arm support brackets
Removing the Snare Drum from
the Carrying Holder
When removing the snare drum from the carrying
holder, the frame assembly is attached to the snare
drum so loosen the screws on the arm bracket and
remove the frame assembly from the arms.
Also, when the placing the snare drum back on
the carrying holder, make sure that the screws on
the arm brackets are tightened to secure.
Adjust the Height of the Drum
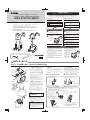
CARRYING HOLDER for MARCHING SNARE DRUM
OWNER’S MANUAL
Printed in Japan
Accessories
Hexagonal Wrench Wrench
MSH-9150
MSH-8250
Thank you for purchasing the Yamaha Carrying Holder for
Marching Snare Drum.
Please read this Owner’s Manual throughly before use.
Tighten all screws securely once adjustments have
been made. If any screw is loose there is a danger that
the drum may slip during performances or extraneous
noises may be produced.
To tighten the arm section screws, use the hexagonal
wrench provided. Tighten the wing nuts with your hands.
Be extra careful when removing the carrier with drum.
Never drop or throw the instrument.
Avoid using the instrument in the rain whenever
possible. If the instrument does get wet, wipe it with a
soft, dry cloth as soon as possible.
Use a soft, dry cloth to wipe the instrument regularly.
Never use thinners, benzene, or other similar solvents
to clean the instrument.
When tilting the multi toms, be careful that the drum
heads or hoops do not hit the holder when doing so.
Always take suitable breaks when playing the
instrument for a long period of time.
When lifting the snare drum, always use
your hands to support and hold onto
the drum so that it does not fall
forward, hitting the person in
front of you and causing
injury. When returning
the drum to its normal
playing position, never
hold onto the drum at
the positions marked
“A” or “B” in the
illustration on the right.
Hands or fingers can
become pinched.
A
B
Snare Drum Mounting
* 9150S: 2 positions
2500410 R3
The angle of the snare drum head can be adjusted by using the angle adjustment nut.
Before proceeding, place the instrument on a flat surface.
Fold the carrying holder.
Use the supplied wrench to
loosen the angle adjustment nuts,
located on the left and right sides.
To determine the angle, tilt the carrying
holder.
Use the supplied wrench to tighten and
secure the angle adjustment nuts making
sure both sides are level.
Snare Head Angle Adjustment
CAUTION
When tilting the drum up or returning it
to its playing position, keep your hands
away from the areas marked A as
shown in the diagram on the left. Hands
and/or fingers can get caught in this
area resulting in injury.
WARNING
Tighten
Loosen
3 positions
Loosen
Angle Adjustment Nut
Clamp Screw
Slide-attachment
Frame Assembly
Arm Bracket
Arm Bracket
Bolt
Notch for
securing
Carrying Holder
Arm
Arm
Slide Base
Snare Drum
A
B
C

Assemble the carrying holder as shown in the diagram below. To accommodate different body sizes., the
height and width of the harness is adjustable. Also, to provide the optimum playing position, the height
and angle of the snare head is adjustable.
Adjust the Height of the Drum
Carrying Holder Setup
The harness length is adjustable.
The height of the arm can be changed to set the height of the drum.
The shoulder width and height of the shoulder rests are adjustable.
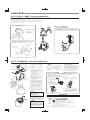
Mount the snare drum to the
slide-at-tachment on the carrying holder
slide base. Tighten the clamp screw to
secure the snare drum.
Adjust the height and width of the
carrying holder arms, and then tighten
the screws to secure.
Insert the arms into the arm brackets on
the frame assembly. (Position the
instrument so that it is facing the holder
(refer to diagram C).) Once the position
is determined, tighten the screws on the
arm brackets to secure the arms. When
the instrument is properly positioned
the screws lock into the notches.
Removing the Snare Drum from
the Carrying Holder
When removing the snare drum from the carrying
holder, the frame assembly is attached to the snare
drum so loosen the screws on the arm bracket and
remove the frame assembly from the arms.
Also, when the placing the snare drum back on
the carrying holder, make sure that the screws on
the arm brackets are tightened to secure.
Snare Drum Mounting
The angle of the snare drum head can be adjusted by using the angle adjustment nut.
Before proceeding, place the instrument on a flat surface.
Fold the carrying holder.
Use the supplied wrench to
loosen the angle adjustment nuts,
located on the left and right sides.
To determine the angle, tilt the carrying
holder.
Use the supplied wrench to tighten and
secure the angle adjustment nuts making
sure both sides are level.
Snare Head Angle Adjustment
The snare drum can be flipped up as
shown at left to transport it or when
changing marching formations. Be careful
that the drum head or hoop does not come
into contact with the holder. Be sure to hold
the drum with your hand when flipped up.
When tilting the drum up or returning
it to its playing position, keep your
hands away from the areas marked A
as shown in the diagram on the left.
Hands and/or fingers can get caught
in this area resulting in injury.
WARNING
Do not use this hole unless
the harness must be
extended to its full length.
* Do not use this hole.
Use either hole.
Use either hole.
Tighten
Loosen
Loosen
Angle Adjustment Nut
Arm Bracket
Bolt
Notch for
securing
Arm
Slide-attachment
Snare Drum
Clamp Screw
Slide Base
Frame Assembly
Arm Bracket
Arm
Carrying Holder
A
A
B
C
-
 1
1
-
 2
2


Yamaha MSH-9150 Instrukcja obsługi
- Kategoria
- Posiadacze
- Typ
- Instrukcja obsługi
w innych językach
- čeština: Yamaha MSH-9150 Návod k obsluze
- español: Yamaha MSH-9150 El manual del propietario
- italiano: Yamaha MSH-9150 Manuale del proprietario
- Deutsch: Yamaha MSH-9150 Bedienungsanleitung
- svenska: Yamaha MSH-9150 Bruksanvisning
- português: Yamaha MSH-9150 Manual do proprietário
- français: Yamaha MSH-9150 Le manuel du propriétaire
- 日本語: Yamaha MSH-9150 取扱説明書
- Türkçe: Yamaha MSH-9150 El kitabı
- English: Yamaha MSH-9150 Owner's manual
- dansk: Yamaha MSH-9150 Brugervejledning
- русский: Yamaha MSH-9150 Инструкция по применению
- suomi: Yamaha MSH-9150 Omistajan opas
- Nederlands: Yamaha MSH-9150 de handleiding
- română: Yamaha MSH-9150 Manualul proprietarului
Powiązane artykuły
-
Yamaha MSH-220 Instrukcja obsługi
-
-
-
-
-
-
-
-
-