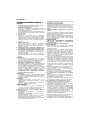
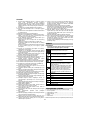
Hikoki C 8FSHG Cordless Cutting and Miter Saw Instrukcja obsługi
- Kategoria
- Piły ukośne
- Typ
- Instrukcja obsługi

C 8FSHG
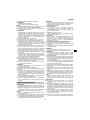
Handling instructions
Bedienungsanleitung
Instrukcja obsługi
Kezelési utasítás
Návod k obsluze
Kullanım talimatları
Instrucţiuni de utilizare
Navodila za rokovanje
Pokyny na manipuláciu
Инструкция за експлоатация
Uputstvo za rukovanje
Upute za rukovanje
en
de
ro
sl
sk
bg
sr
hr
hu
cs
tr
pl
en
de
pl
hu
cs
tr
ro
sl
sk
bg
sr
hr

2
1
q
!
5
%
3
e
#
7
&
9
(
w
@
6
^
4
$
8
1
2
*
0
)
r
s
a
t
;
h
f
u
k
od
y
j
g
i
l
p

3
23
h
2
c
v
zx
^
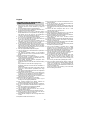
214 mm
4 – ø9 mm
214 mm
230 mm
4
n
b
m
5
.
j
,
/
*
6
8¡

4
7
™
j
£
8
o
¢&
(
9
bs
§
∞
l
as
∞
l
10
a
q
i
¶
b
q
i
¶
11 !
#
@
12
6

5
13 14
(
)o
15 16
i
ª
ª
º
•
•
⁄
ee
¤
¤
‹‹
17 18
e
e
e›
›

6
19
flfl
fifi
20 21
t
‡
y
$
0
‚
·
°
#
22
ⓐⓑ
´
ⓐ
ⓐ
ⓑ
ⓑ
„ŒŒ
i

7
23 ‰2
Áˇ
º
1
32
24
Ü
j
25
Ø
î
(
o
*)
26
ⓐ
ⓑ
∏
27
∞s
§
l
ⓑ
*
Å
28
a
Î
Î
Í
#
0
b
Î
Î
Ï
Í
0

8
29
b
Ó
˝
1
c
Ô
Ò
d
Ú
Ô
Ò
i
a
u
p
30
˛
¸
6 mm
17 mm
˛
110V 463
230V C Ç
◊
a
31
1
;
ı

9
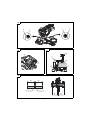
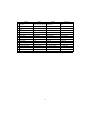
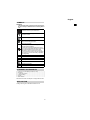
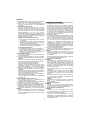
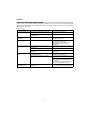
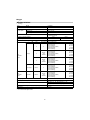
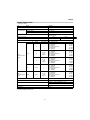
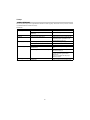
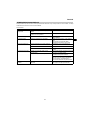
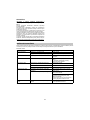
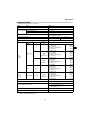
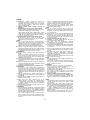
English Deutsch Polski Magyar
1Lower guard Unterer Schutz Dolna osłona Alsó védőelem
2Switch handle Schaltergriff Rękojeść przełącznika Kapcsolókar
3Motor head Motorkopf Głowica silnika Motorfej
4Gear case Getriebegehäuse Skrzynia biegów Hajtóműház
5Dust bag Staubbeutel Worek na pyłPorzsák
6Slide securing knob Führungssicherungsknopf Pokrętło blokujące
prowadnicy Csúszkarögzítő gomb
7Slide carriage Führungsträger Wózek prowadnicy Csúsztató sín
8Bevel pointer Schrägschnittanzeiger Wskaźnik skosu Ferdevágási szögmutató
9Holder (A) Halter (A) Uchwyt (A) Tartó (A)
0Vise assembly Schraubstocksatz Zespół imadła Satuszerelvény
!Sub fence Hilfsgitter Podogranicznik Alsó vezetőléc
@Lock knob Sperrknopf Pokrętło blokady Zárógomb
#Fence (A) Gitter (A) Ogranicznik (A) Vezetőléc (A)
$Vise lock knob Schraubstocksperrknopf Pokrętło blokady imadła Satu reteszelőgomb
%Left extention table Linker Anbautisch Lewe przedłużenie stołu Bal bővítő asztal
^Base Basis Podstawa Alap
&Miter pointer Gehrungsanzeiger Wskaźnik kąta Gérvágó mutató
*Turntable Drehscheibe Stół obrotowy Forgóasztal
(Positive stop locking lever Sperrhebel für den
Festanschlag Dźwignia blokująca
zatrzymania zupełnego Pozitív ütköző zárókar
)Miter handle Gehrungsgriff Uchwyt kątowy Gérvágó fogantyú
qTable insert Tischeinsatz Władka stołu Asztalbetét
wFence (B) Gitter (B) Ogranicznik (B) Vezetőléc (B)
eLaser marker Lasermarker Znacznik laserowy Lézer jelölő
rRotation direction Drehrichtung Kierunek obrotu Forgásirány
tLaser marker switch Schalter für Lasermarker Przełącznik znacznika
laserowego Lézeres jelölő kapcsolója
yTrigger switch Auslöseschalter Przełącznik spustowy Indító kapcsoló
uBlade guard locking lever Sperrhebel für den
Sägeblattschutz Dźwignia blokująca osłonę
tarczy Pengevédő zárókar
iBlade Sägeblatt Tarcza Penge
oQuick-cam locking lever Schnellspannhebel Dźwignia
szybkozamykacza Gyorsbütykös zárókar
pSpindle lock Spindelsperre Blokada wrzeciona Orsó zár
aMotor Motor Silnik Motor
sAnchor plate Ankerplatte Płyta kotwiąca Horgonylemez
dExtention wing lock knob Verriegelungsknopf für den
Anbaufl ügel Pokrętło blokady płyty
przedłużającej Bővítő szárny zárógomb
fRight extention table Rechter Anbautisch Prawe przedłużenie stołu Jobb bővítő asztal
gMounting hole Montagebohrung Otwór montażowy Szerelőfurat
hLocking pin Sicherungsstift Kołek blokujący Záró csap
jBevel lock knob Schrägschnitt-
Verriegelungsknopf Pokrętło blokady skosu Ferdevágási szög
zárógomb
kHinge Scharnier Zawias Zsanér
lStop knob Anschlagknopf Pokrętło ogranicznika Megállító gomb

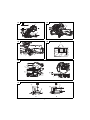
10
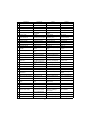
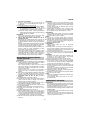
English Deutsch Polski Magyar
;Dust port Anschluss für
Staubabsaugung Port wyjścia pyłu Pornyílás
zWork bench Werkbank Stół warsztatowy Munkapad
x8 mm nut 8-mm-Mutter Nakrętka 8 mm 8 mm-es csavaranya
c25 mm thick work bench 25 mm dicke Werkbank Stół warsztatowy 25 mm 25 mm vastag munkapad
v8 mm nut 8-mm-Mutter Nakrętka 8 mm 8 mm-es csavaranya
bHolder Halter Uchwyt Tartó
nHole Loch Otwór Lyuk
mScrew Schraube Śruba Csavar
,Combination square Kombi-Winkelmaß Przymiar kombinacyjny Kombinált derékszögmérő
.Lock nut Sicherungsmutter Nakrętka blokująca Biztosítóanya
/Adjustment bolt Einstellschraube Śruba regulacyjna Állítócsavar
¡Bevel pointer screw
Schrägschnittzeigerschraube
Śruba wskaźnika ukosu Ferde mutató csavar
™Lock nut Sicherungsmutter Nakrętka blokująca Biztosítóanya
£Bolt Schraube Śruba Csavar
¢Screw Schraube Śruba Csavar
∞Stop block Anschlagblock Blok ogranicznika Megállító blokk
§Stop seat Anschlagsitz Gniazdo ogranicznika Megállító nyereg
¶4 mm machine screw 4-mm-Maschinenschraube Śruba maszynowa 4 mm 4 mm-es gépcsavar
•Laser line Laserlinie Linia laserowa Lézervonal
ªCutting line Schnittlinie Linia cięcia Vágási vonal
ºWorkpiece Werkstück Obrabiany przedmiot Munkadarab
⁄Top view Draufsicht Widok z góry Felülnézet
¤Rivet Stift Nit Szegecset
‹Laser housing Lasergehäuse Obudowa lasera Lézer burkolat
›Set screw Einstellschraube Śruba ustalająca Beállítócsavar
fiLine Linie Linia Vonal
flWarning sign Warnschild Znak ostrzegawczy Figyelmeztető jel
‡Hole Loch Otwór Lyuk
°Knob Knopf Pokrętło Gomb
·Vise plate Schraubstockplatte Płyta imakowa Satulemez
‚Workpiece Werkstück Obrabiany przedmiot Munkadarab
ŒMarking (pre-marked) Markierung (vormarkiert) Znakowanie (wstępnie
zaznaczone) Jelölés (előre jelölt)
„(Front view) (Vorderansicht) (Widok z przodu) (Elölnézet)
´Adjusting line Einstelllinie Regulacja linii Sor beállítása
‰Pull forward Nach vorn ziehen Pociągnąć do przodu Húzza előre
ˇPress down Herunterdrücken Nacisnąć w dółNyomja le
ÁPush backward Nach hinten drücken Popchnąć do tyłu Tolja vissza
¨Bevel scale Schrägschnittskala Skala skosu Ferdevágási szögskála
îMiter scale Gehrungsskala Skala uciosu Sarokillesztési skála
ØTurn the turntable Drehen Sie die
Drehscheibe Obrócić stołem Forgassa a forgóasztalt
∏Cut grooves with saw
blade Nuten mit dem Sägeblatt
schneiden Wyciąć rowki za pomocą
tarczy tnącej Vágjon hornyokat a
fűrészpengével
ÅBottom line of the groove Untere Linie der Nut Dolna linia rowka A horony alsó sora

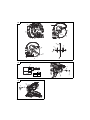
11
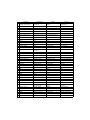
English Deutsch Polski Magyar
ÍAluminum sash Aluminiumrahmen Rama aluminiowa Alumínium párkány
ÎWood plate Holzplatte Płyta drewniana Falemez
ÏClamp Klemme Zacisk Fogó
˝Cover plate screw Schraube für die
Abdeckplatte Śruba płyty pokrywy Fedéllemez csavar
ÓCover plate Abdeckplatte Płyta pokrywy Fedéllemez
Ô8 mm bolt 8-mm-Schraube Śruba 8 mm 8 mm-es csavar
Blade spanner Sägeblattschlüssel Klucz do tarczy Penge csavarkulcs
ÒWasher (B) Unterlegscheibe (B) Podkładka (B) Alátét (B)
ÚWasher (A) Unterlegscheibe (A) Podkładka (A) Alátét (A)
¸Wear limit line Verschleißgrenzlinie Linia graniczna zużycia Kopási határvonal
˛No. of carbon brush Nr. der Kohlebürste Liczba szczotek
węglowych Szénkefék száma
ÇBrush cap Bürstenkappe Wkręt szczotki Perselysapka
◊Carbon brush Kohlebürste Szczotka węglowa Szénkefe
ıAir gun Druckluftpistole Pistolet nadmuchowy Levegőfúvóka

12
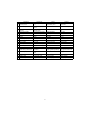
Čeština Türkçe RomânăSlovenščina
1Spodní ochranný kryt Alt koruyucu Protecţie inferioarăSpodnja zaščita
2Přepínací rukojeťAnahtar tutamağıMâner comutator Preklopni ročaj
3Hlava motoru Motor başlığıCapul motorului Glava motorja
4Převodová skříňDişli Kutusu Carcasa motorului Pogonsko ohišje
5Prachový sáček Toz torbasıSac de praf Vrečka za prah
6Zajišťovací knofl ík posunu Kızak sabitleme topuzu Mâner glisieră de fi xare Gumb za zavarovanje
pomika
7Posuvný jezdec Kızak arabasıCărucior glisierăVračalka drsnika
8Ukazatel úkosu Eğim işaretleyici Indicator unghi înclinat Kazalec poševnika
9Držák (A) Tutucu (A) Suport (A) Držalo (A)
0Sestava svěráku Mengene grubu Ansamblu menghinăSestav primeža
!Menší stavítko Alt çit Element de limitare inferior Stranska ograja
@Knofl ík zámku Kilit topuzu Mâner blocare Zaklepni gumb
#Stavítko (A) Çit (A) Element de limitare (A) Ograja (A)
$Knofl ík zámku svěráku Mengene kilitleme topuzu Mâner blocare menghinăGumb za zaklepanje
primeža
%Levý přídavný stůl Sol uzatma tablasıMasă stânga de prelungire Leva razširitvena miza
^Základna Altlık BazăOsnovna plošča
&Ukazatel pokosu Gönye işaretleyici Indicator tăiere înclinatăMiterski kazalec
*Otočný stůl Döner tabla Placă turnantăObračalna miza
(Zajišťovací páka pevného
dorazu Belirlenmiş durma noktası
kilitleme kolu
Manetă de blocare
a poziţiei de fi xare a
opritorului
Ročica za zaklepanje
nastavkov kotov rezanja
)Rukojeť pokosu Gönye tutamağıMâner tăiere înclinatăRočica mitra
qVložka stolu Tabla ek parçasıInserţie pentru masăPloščni vstavek
wStavítko (B) Çit (B) Element de limitare (B) Ograja (B)
eLaserový značkovačLazer işaretleyici Marcator cu laser Laserski označevalnik
rSměr rotace Dönüş yönü Direcţia de rotaţie Smer vrtenja
tVypínač laserového
značkovačeLazer işaretleyici anahtarıComutator marcator cu
laser Stikalo laserskega
označevanja
ySpínačTetik anahtarıComutator pentru pornire Sprožilno stikalo
uZajišťovací páka
ochranného krytu kotoučeBıçak muhafazası kilitleme
kolu Manetă de blocare
apărătoare lamăRočica za zaklepanje
ščitnika rezila
iČepel Bıçak Disc Žagin list
oZajišťovací páka s rychlou
vačkou Hızlı kam kilitleme kolu Manetă de blocare clemă
rapidăHitri zaklepni vzvod
pZámek vřetena Mil kilidi Blocare arbore Blokada vretena
aMotor Motor Motor Motor
sKotevní deska Ankraj levhasıPlacă de ancorare Sidrna plošča
dZajišťovací šroub
přídavného křídla Uzatma kanadı kilit topuzu Buton de blocare aripă de
prelungire Gumb za zaklepanje
podaljška krila
fPravý přídavný stůlSağ uzatma tablasıMasă dreapta de
prelungire Desna razširitvena miza
gOsazovací otvor Montaj deliği Orifi ciu de montare Pritrdilna luknja
hBlokovací kolík Kilitleme pimi Știft de blocare Zaklepni zatič
jZajišťovací šroub úkosu Eğim kilitleme topuzu Buton blocare unghi
înclinat Gumb za zaklepanje
poševnika
kZávěs Menteşe Balama Tečaj

13
Čeština Türkçe RomânăSlovenščina
lZastavovací knofl ík Durdurma topuzu Mâner oprire Gumb za zaustavitev
;Prachový otvor Toz ağzıDeschidere pentru praf Odprtina za prah
zPracovní stůlİş tezgahıMasă de lucru Delovna klop
x8 mm matice 8 mm somun Piuliţă de 8 mm 8-mm matica
cPracovní stůl silný 25 mm 25 mm kalınlığında iş
tezgahı
Masă de lucru de 25 mm
grosime Delovna klop debeline
25 mm
v8 mm matice 8 mm somun Piuliţă de 8 mm 8-mm matica
bDržák Tutucu Suport Držalo
nOtvor Delik Orifi ciu Odprtina
mŠroub Vida Şurub Vijak
,Kombinovaný úhelník Çok amaçlı gönye Echer combinat Kombinirani kvadrat
.Pojistná matice Kilit somunu Contrapiuliţă Protimatica
/Seřizovací šrouby Ayar cıvatasıŞuruburi de reglare Prilagoditveni sorniki
¡Šroub ukazatele úkosu Eğim işaretleyici vida Șurub cu ac indicator
pentru unghi Vijak kazalca poševnin
™Pojistná matice Kilit somunu Contrapiuliţă Protimatica
£Šroub Cıvata Şurub Sornik
¢Šroub Vida Şurub Vijak
∞Blokace zastavení Durdurma bloku Blocaj oprire Blokada zaustavitve
§Místo zastavení Durdurma mesnedi Reazem oprire Zaustavitveni sedež
¶4 mm šroub do železa 4 mm makine vidasıŞurub mecanic de 4 mm 4-mm strojni vijak
•Linie laseru Lazer çizgisi Linie laser Laserska linija
ªŘezací linka Kesme çizgisi Linia de tăiere Linija žaganja
ºObrobek İş parçasıPiesă de prelucrat Obdelovanec
⁄Pohled shora Üstten görünüşVedere de sus Pogled od zgoraj
¤Nýt Perçini Nituri Zakovica
‹Pouzdro laseru Lazer muhafazasıCarcasă laser Ohišje laserja
›Seřizovací šroub Ayar vidasıŞurub de reglare Nastavitveni vijak
fiPřímka Çizgi Linie Linija
flVarovný znak Uyarı işareti Semn de avertizare Opozorilni znak
‡Otvor Delik Orifi ciu Odprtina
°Knofl ík Topuz Mâner Gumb
·Deska svěráku Mengene levhasıPlacă menghinăPlošča primeža
‚Obrobek İş parçasıPiesă de prelucrat Obdelovanec
ŒZnačka (předem
označeno) İşaret (önceden işaretli) Marcaj (pre-marcat) Označevanje (vnaprej
označeno)
„(čelní pohled) (Önden görünüş) (Vedere frontală) (Pogled od spredaj)
´Nastavovací linie Ayarlama çizgisi Linie de reglare Prilagoditvena linija
‰Vytáhněte dopředu Öne çekin Trageţi înainte Potegni naprej
ˇStiskněte Aşağı bastırınApăsaţi în jos Pritisni
ÁZatlačte zpět Arkaya doğru itin Împingeţi înapoi Potisni nazaj
¨Stupnice úkosu Eğim ölçeği Gradaţie înclinare Merilo poševnika
îStupnice pokosu Gönye ölçeğiScala pentru tăiere
înclinatăZajerno merilo
ØOtočte otočným stolem Döner tablayı çevirin Rotiţi placa turnantăObrnite obračalno mizo

14
Čeština Türkçe RomânăSlovenščina
∏Řezné drážky s pilovým
kotoučem Testere bıçağı ile oluk açınTăiaţi canelurile cu lama
de fi erăstrăuIzrežite žlebove z žaginim
listom
ÅDolní linie drážky Oluğun alt çizgisi Linia de jos a canelurii Spodnja linija utora
ÍHliníkový rám stahovacího
okna Alüminyum çerçeve Profi l din aluminiu Aluminijast okvir
ÎDřevěná deska Ahşap levha Placă de lemn Lesena plošča
ÏSvěrka Kelepçe ClemăSpenjalo
˝Šroub krycí desky Kapak levhası vidasıȘurubul plăcii de protecţie Vijak pokrivne plošče
ÓKrycí deska Kapak levhasıPlacă protecţie Pokrivna plošča
Ô8 mm šroub 8 mm cıvata Șurub de 8 mm 8-mm sornik
Klíč na utahování kotoučeBıçak anahtarıCheie lamăKljuč za rezilo
ÒPodložka (B) Pul (B) Şaibă (B) Podložka (B)
ÚPodložka (A) Pul (A) Şaibă (A) Podložka (A)
¸Ryska mezního opotřebení Aşınma limit çizgisi Linie limită de uzurăLinija meje obrabe
˛Č. uhlíkového kartáče Karbon fırça sayısıNr. periei de cărbune Št. oglenih ščetk
ÇVíčko kartáčeFırça kapağıCapacul periei Pokrovček krtače
◊Uhlík Karbon fırça Perie de carbon Grafi tna ščetka
ıVzduchová pistole Hava tabancasıPistol cu aer Zračna pištola

15
Slovenčina Български Srpski Hrvatski
1Dolný kryt Долен капак Niži štit Donji štitnik
2Prepínacia rukoväť Дръжка на ключа Ručica prekidačaRučica prekidača
3Hlava motora Глава на циркуляра Glava motora Glava motora
4Skriňa prevodovky Защитен кожух Kutija sa zupčanicima Kutija mjenjača
5Prachové vrecko Торбичка за прах Kesa za prašinu Vreća za prašinu
6Posuvný poistný regulátor Обезопасителен бутон
на плъзгача Dugme za obezbeđivanje
klizačaVijak za fi ksiranje klizanja
7Posuvný vozík Плъзгач Nosač klizača Klizni nosač
8Ukazovateľ úkosu Показалец за скосяване Pokazivač kosine (ugla u
vertikalnoj ravni) Konusni pokazivač
9Držiak (A) Държач (A) Držač (A) Držač (A)
0Zostava zveráka Сглобка на стегата Montaža za stegu Sklop mengele
!Pomocná dorazová lišta Подограничител Pod-ograda Pod-branik
@Poistné koliesko Задържащо копче Dugme za zaključavanje Sigurnosni gumb
#Dorazová lišta (A) Ограничител (А) Ograda (A) Branik (A)
$Blokovacie koliesko
zveráka Копче за заключване на
стегата Dugme za zaključavanje
stege Gumb za zaključavanje
mengele
%Stôl ľavého predĺženia Ляво разширение на
маса Levi sto za produživanje Tablica lijevog proširenja
^ZákladňaОснова Osnova Baza
&Ukazovateľ pokosu Показалец за рязане
под ъгъл Pokazivač nagiba (ugla u
horizontalnoj ravni) Kutni pokazivač
*Otočný stôl Въртящ се плот Okretno postolje Okretna platforma
(Blokovacia páka kladného
zastavenia Блокиращ лост за
позитивен ограничител Ručica za zaključavanje
pozitivnog zaustavljanja Poluga za zaključavanje
pozitivne točke
)Rukoväť na pokos Дръжка за рязане под
ъгъл Ručka za nagib Kutna ručka
qVkladacia platnička Вложка Umetak za postolje Umetanje ploče
wDorazová lišta (B) Ограничител (B) Ograda (B) Branik (B)
eLaserový značkovač Лазерен маркер Laserski marker Laserski marker
rSmer otáčania Посока на въртене Smer okretanja Smjer rotacije
tSpínač laserového
značkovačaКлюч на лазерен маркер Laserski marker prekidačPrekidač laserskog
markera
ySpúšťový spínač Пусков ключ OkidačPrekidač okidača
uBlokovacia páka chrániča
kotúčaБлокиращ лост за
предпазителя на ножа Ručica za zaključavanje
štitnika sečiva Poluga za zaključavanje
štitnika oštrice
iČepeľ kotúčaДиск Oštrica Oštrica
oPáka rýchleho blokovania
vačky Бързо блокиращ лост с
палец Ručica za brzo
zaključavanje Poluga za brzo pokretanje
pZámok vretena Блокировка на шпиндела Brava vretena Brava osovine
aMotor Двигател Motor Motor
sUkotvovacia doska Плоча за закрепване Anker ploča Sidrena ploča
dPoistné koliesko
predlžovacieho krídla Копче за заключване на
удължителното крило
Dugme za zaključavanje
krila za produžavanje
radnog stola
Gumb za zaključavanje
krila produžetka
fStôl pravého predĺženia Дясно разширение на
маса Desni sto za produžavanje Tablica desnog proširenja
gMontážny otvor Монтажен отвор Rupa za montiranje Otvor za montažu
hPoistný kolík Осигурителен щифт Klin za zaključavanje Sigurnosna igla

16
Slovenčina Български Srpski Hrvatski
jPoistné koliesko úkosu Копче за заключване на
скосяването Dugme za zaključavanje
kosine Gumb za konusno
zaključavanje
kZáves Шарнирна връзка Šarka Šarka
lZastavovacie koliesko Копче за спиране Zaustavno dugme Gumb za zaustavljanje
;Prachový otvor Отвор за прах Ulaz za prašinu Ulaz za prašinu
zPracovná doska Работна маса Radna klupa Radna klupa
x8 mm matica Гайка 8 мм Navrtanj od 8 mm Matica od 8 mm
c25 mm hrubá pracovná
doska Работна маса с дебелина
25 мм Radna klupa debljine 25
mm Radna klupa debljine 25
mm
v8 mm matica Гайка 8 мм Navrtanj od 8 mm Matica od 8 mm
bDržiak Държач DržačDržač
nOtvor Отвор Rupa Rupa
mSkrutka Винт Šraf Vijak
,Kombinovaný uholník Комбиниран квадрат Kombinovani kvadrat Kombinirani kutnik
.Poistná matica Гайка Kontranavrtka Učvrsna matica
/Nastavovacia skrutka Регулиращ болт Zavrtanj za podešavanje Vijci za podešavanje
¡Skrutka ukazovateľa úkosu Болт на показалеца за
скосяване Šraf pokazivača uglomera Konusni šiljasti vijak
™Poistná matica Гайка Kontranavrtka Učvrsna matica
£Skrutka Болт Zavrtanj Vijak
¢Skrutka Винт Šraf Vijak
∞Zastavovací blok Спирачен блок Zaustavni blok Zaustavni blok
§Zastavovacie sedlo Спирачно гнездо Zaustavno sedište Sjedalo za zaustavljanje
¶4 mm montážna skrutka Крепежен винт 4 мм Šraf za mašinu od 4 mm Strojni vijak od 4 mm
•Laserová linka Лазерна линия Laserska linija Linija lasera
ªLínia rezu Линия на рязане Linija sečenja Linija reza
ºObrobok Обработван детайл Radni deo Izradak
⁄Pohľad zhora Изглед отгоре Odozgo Pogled s vrha
¤Nity Нит Nitne Nitna
‹Teleso lasera Корпус на лазера Lasersko kućište Kućište lasera
›Nastavovacia skrutka Рамо на стегата Utični šraf Vijak za postavljanje
fiLinka Линия Linija Traka
flVýstražná značka Предупредителен знак Znak upozorenja Znak upozorenja
‡Otvor Отвор Rupa Rupa
°Regulátor Бутон Dugme Gumb
·Doska zveráka Плоча на стегата Ploča za stegu Ploča mengele
‚Obrobok Обработван детайл Radni deo Izradak
ŒZnačenie (predznačené) Маркировка
(предварителна)Oznaka (unapred ucrtana
linija) Označavanje (prije
označeno)
„(Pohľad spredu) (Изглед отпред) (Spreda) (Pogled sprijeda)
´Nastavovacia čiara Регулираща линия Linija za podešavanje Linija podešavanja
‰Potiahnite dopredu Издърпайте напред Povucite napred Povucite naprijed
ˇStlačte Натиснете надолу Pritisnite dole Pritisnite prema dolje
ÁPotlačte dozadu Натиснете назад Povucite unazad Gurnite unatrag
¨Stupnica úkosu Скала за скосяване Skala kosine Skala konusa

17
Slovenčina Български Srpski Hrvatski
îRozsah pokosu Скала за рязане под
ъгъл.Skala uglomera u
horizontalnoj ravni Kutna skala
ØOtočte otočný tanier Въртене на въртящия
се плот Okrenite okretni sto Okrenite okretnu platformu
∏Vyrežte drážky s pílovým
kotúčom Нарязване на канали с
режещия диск Isecite žlebove sa testerom Izrežite utore s oštricom
pile
ÅSpodná línia drážky Долна линия на канала Donja linija žleba Dno utora
ÍHliníkový rám Алуминиево крило Aluminijumska krila Aluminijski okvir
ÎDrevená doska Дървена плоча Drvena ploča Drvena ploča
ÏSvorka Скоба Stezaljka Spona
˝Skrutka krycej dosky Винт за капака Šraf ploče za poklopac Vijak pokrovne ploče
ÓKrycia doska Капак Ploča za poklopac Pokrovna ploča
Ô8 mm skrutka Болт 8 мм Zavrtanj od 8 mm Vijak od 8 mm
Kotúčový kľúč Гаечен ключ за острието Ključ za sečivo Ključ oštrice
ÒPodložka (B) Подложна шайба (В) Perač (B) Podloška (B)
ÚPodložka (A) Подложна шайба (А) Perač (A) Podloška (A)
¸Čiara limitu opotrebovania Линия на граница на
износване Linija ograničenja habanja Linija granice istrošenosti
˛Č. uhlíkovej kefy Номер на въгленовата
четка Br. ugljenih četkica Br. ugljene četkice
ÇKryt kief Капачка на четката Poklopac četkice Kapa četkice
◊Uhlíková kefa Въглеродна четка Ugljene četkice Ugljena četkica
ıVzduchová pištoľ Въздушен пистолет Vazdušni pištolj Zračni pištolj

English
18
(Original instructions)
GENERAL POWER TOOL SAFETY
WARNINGS
WARNING
Read all safety warnings, instructions, illustrations and
specifi cations provided with this power tool.
Failure to follow all instructions listed below may result in
electric shock, fi re and/or serious injury.
Save all warnings and instructions for future reference.
The term “power tool” in the warnings refers to your mains-
operated (corded) power tool.
1) Work area safety
a) Keep work area clean and well lit.
Cluttered or dark areas invite accidents.
b) Do not operate power tools in explosive
atmospheres, such as in the presence of
fl ammable liquids, gases or dust.
Power tools create sparks which may ignite the dust
or fumes.
c) Keep children and bystanders away while
operating a power tool.
Distractions can cause you to lose control.
2) Electrical safety
a) Power tool plugs must match the outlet. Never
modify the plug in any way. Do not use any
adapter plugs with earthed (grounded) power
tools.
Unmodifi ed plugs and matching outlets will reduce
risk of electric shock.
b) Avoid body contact with earthed or grounded
surfaces, such as pipes, radiators, ranges and
refrigerators.
There is an increased risk of electric shock if your
body is earthed or grounded.
c) Do not expose power tools to rain or wet
conditions.
Water entering a power tool will increase the risk of
electric shock.
d) Do not abuse the cord. Never use the cord for
carrying, pulling or unplugging the power tool.
Keep cord away from heat, oil, sharp edges or
moving parts.
Damaged or entangled cords increase the risk of
electric shock.
e) When operating a power tool outdoors, use an
extension cord suitable for outdoor use.
Use of a cord suitable for outdoor use reduces the
risk of electric shock.
f) If operating a power tool in a damp location
is unavoidable, use a residual current device
(RCD) protected supply.
Use of an RCD reduces the risk of electric shock.
3) Personal safety
a) Stay alert, watch what you are doing and use
common sense when operating a power tool.
Do not use a power tool while you are tired
or under the infl uence of drugs, alcohol or
medication.
A moment of inattention while operating power tools
may result in serious personal injury.
b) Use personal protective equipment. Always
wear eye protection.
Protective equipment such as a dust mask, non-skid
safety shoes, hard hat or hearing protection used for
appropriate conditions will reduce personal injuries.
c) Prevent unintentional starting. Ensure the
switch is in the off -position before connecting
to power source and/or battery pack, picking up
or carrying the tool.
Carrying power tools with your fi nger on the switch
or energising power tools that have the switch on
invites accidents.
d) Remove any adjusting key or wrench before
turning the power tool on.
A wrench or a key left attached to a rotating part of
the power tool may result in personal injury.
e) Do not overreach. Keep proper footing and
balance at all times.
This enables better control of the power tool in
unexpected situations.
f) Dress properly. Do not wear loose clothing or
jewellery. Keep your hair and clothing away
from moving parts.
Loose clothes, jewellery or long hair can be caught in
moving parts.
g) If devices are provided for the connection of
dust extraction and collection facilities, ensure
these are connected and properly used.
Use of dust collection can reduce dust-related
hazards.
h) Do not let familiarity gained from frequent use
of tools allow you to become complacent and
ignore tool safety principles.
A careless action can cause severe injury within a
fraction of a second.
4) Power tool use and care
a) Do not force the power tool. Use the correct
power tool for your application.
The correct power tool will do the job better and safer
at the rate for which it was designed.
b) Do not use the power tool if the switch does not
turn it on and off .
Any power tool that cannot be controlled with the
switch is dangerous and must be repaired.
c) Disconnect the plug from the power source and/
or remove the battery pack, if detachable, from
the power tool before making any adjustments,
changing accessories, or storing power tools.
Such preventive safety measures reduce the risk of
starting the power tool accidentally.
d) Store idle power tools out of the reach of
children and do not allow persons unfamiliar
with the power tool or these instructions to
operate the power tool.
Power tools are dangerous in the hands of untrained
users.
e) Maintain power tools and accessories. Check
for misalignment or binding of moving parts,
breakage of parts and any other condition
that may aff ect the power toolʼs operation. If
damaged, have the power tool repaired before
use.
Many accidents are caused by poorly maintained
power tools.
f) Keep cutting tools sharp and clean.
Properly maintained cutting tools with sharp cutting
edges are less likely to bind and are easier to control.
g) Use the power tool, accessories and tool bits
etc. in accordance with these instructions,
taking into account the working conditions and
the work to be performed.
Use of the power tool for operations diff erent from
those intended could result in a hazardous situation.
h) Keep handles and grasping surfaces dry, clean
and free from oil and grease.

English
19
Slippery handles and grasping surfaces do not
allow for safe handling and control of the tool in
unexpected situations.
5) Service
a) Have your power tool serviced by a qualifi ed
repair person using only identical replacement
parts.
This will ensure that the safety of the power tool is
maintained.
PRECAUTION
Keep children and infi rm persons away.
When not in use, tools should be stored out of reach of
children and infi rm persons.
SAFETY INSTRUCTIONS FOR MITER
SAW
a) Miter saws are intended to cut wood or wood-like
products, they cannot be used with abrasive cut-
off wheels for cutting ferrous material such as bars,
rods, studs, etc.
Abrasive dust causes moving parts such as the lower
guard to jam. Sparks from abrasive cutting will burn the
lower guard, the kerf insert and other plastic parts.
b) Use clamps to support the workpiece whenever
possible. If supporting the workpiece by hand, you
must always keep your hand at least 100 mm from
either side of the saw blade. Do not use this saw to
cut pieces that are too small to be securely clamped
or held by hand.
If your hand is placed too close to the saw blade, there is
an increased risk of injury from blade contact.
c) The workpiece must be stationary and clamped or
held against both the fence and the table. Do not
feed the workpiece into the blade or cut "freehand"
in any way.
Unrestrained or moving workpieces could be thrown at
high speeds, causing injury.
d) Push the saw through the workpiece. Do not pull
the saw through the workpiece. To make a cut, raise
the saw head and pull it out over the workpiece
without cutting, start the motor, press the saw head
down and push the saw through the workpiece.
Cutting on the pull stroke is likely to cause the saw blade
to climb on top of the workpiece and violently throw the
blade assembly towards the operator.
e) Never cross your hand over the intended line of
cutting either in front or behind the saw blade.
Supporting the workpiece “cross handed” i.e. holding
the workpiece to the right of the saw blade with your left
hand or vice versa is very dangerous.
f) Do not reach behind the fence with either hand
closer than 100 mm from either side of the saw
blade, to remove wood scraps, or for any other
reason while the blade is spinning.
The proximity of the spinning saw blade to your hand
may not be obvious and you may be seriously injured.
g) Inspect your workpiece before cutting. If the
workpiece is bowed or warped, clamp it with the
outside bowed face toward the fence. Always make
certain that there is no gap between the workpiece,
fence and table along the line of the cut.
Bent or warped workpieces can twist or shift and may
cause binding on tile spinning saw blade while cutting.
There should be no nails or foreign objects in the
workpiece.
h) Do not use the saw until the table is clear of all
tools, wood scraps, etc., except for the workpiece.
Small debris or loose pieces of wood or other objects
that contact the revolving blade can be thrown with high
speed.
i) Cut only one workpiece at a time.
Stacked multiple workpieces cannot be adequately
clamped or braced and may bind on the blade or shift
during cutting.
j) Ensure the miter saw is mounted or placed on a
level, fi rm work surface before use.
A level and fi rm work surface reduces the risk of the miter
saw becoming unstable.
k) Plan your work. Every time you change the bevel or
miter angle setting, make sure the adjustable fence
is set correctly to support the workpiece and will
not interfere with the blade or the guarding system.
Without turning the tool “ON” and with no workpiece
on the table, move the saw blade through a complete
simulated cut to assure there will be no interference or
danger of cutting the fence.
I) Provide adequate support such as table extensions,
saw horses, etc. for a workpiece that is wider or
longer than the table top.
Workpieces longer or wider than the miter saw table
can tip if not securely supported. If the cut-off piece or
workpiece tips, it can lift the lower guard or be thrown by
the spinning blade.
m) Do not use another person as a substitute for a
table extension or as additional support.
Unstable support for the workpiece can cause the
blade to bind or the workpiece to shift during the cutting
operation pulling you and the helper into the spinning
blade.
n) The cut-off piece must not be jammed or pressed
by any means against the spinning saw blade.
If confi ned, i.e. using length stops, the cut-off piece could
get wedged against the blade and thrown violently.
o) Always use a clamp or a fi xture designed to properly
support round material such as rods or tubing.
Rods have a tendency to roll while being cut, causing the
blade to "bite" and pull the work with your hand into the
blade.
p) Let the blade reach full speed before contacting the
workpiece.
This will reduce the risk of the workpiece being thrown.
q) If the workpiece or blade becomes jammed, turn the
miter saw off . Wait for all moving parts to stop and
disconnect the plug from the power source and/
or remove the battery pack. Then work to free the
jammed material.
Continued sawing with a jammed workpiece could cause
lass of control or damage to the miter saw.
r) After fi nishing the cut, release the switch, hold
the saw head down and wait for the blade to stop
before removing the cut-off piece.
Reaching with your hand near the coasting blade is
dangerous.
s) Hold the handle fi rmly when making an incomplete
cut or when releasing the switch before the saw
head is completely in the down position.
The braking action of the saw may cause the saw head
to be suddenly pulled downward, causing a risk of injury.

English
20
PRECAUTIONS ON USING SLIDE
COMPOUND MITER SAW
1. Keep the fl oor area around the machine level. Well
maintained and free of loose materials e.g. chips and
cut-off s.
2. Provide adequate general or localized lighting.
3. Do not use power tools for applications other than those
specifi ed in the handling instructions.
4. Repairing must be done only by authorized service
facility. Manufacturer is not responsible for any damages
and injuries due to the repair by the unauthorized
persons as well as the mishandling of the tool.
5. To ensure the designed operational integrity of power
tools, do not remove installed covers or screws.
6. Do not touch movable parts or accessories unless the
power source has been disconnected.
7. Use your tool at lower input than specifi ed on the
nameplate; otherwise, the fi nish may be spoiled and
working effi ciency reduced due to motor overload.
8. Do not wipe plastic parts with solvent. Solvents such as
gasoline, thinner, benzine, carbon tetrachloride, alcohol,
may damage and crack plastic parts. Do not wipe them
with such solvent. Clean plastic parts with a soft cloth
lightly dampened with soapy water.
9. Use only original HiKOKI replacement parts.
10. This tool should only be disassembled for replacement
of carbon brushes.
11. The exploded assembly drawing on this handling
instructions should be used only for authorized service
facility.
12. Never cut ferrous metals or masonry.
13. Adequate general or localized lighting is provided.
Stock and fi nished workpieces are located close to the
operators normal working position.
14. Wear suitable personal protective equipment when
necessary, this could include:
Hearing protection to reduce the risk of induced hearing
loss.
Eye protection to reduce the risk of injuring an eye.
Respiratory protection to reduce the risk of inhalation of
harmful dust.
Gloves for handling saw blades (saw blades shall be
carried in a holder wherever practicable) and rough
material.
15. The operator is adequately trained in the use, adjustment
and operation of the machine.
16. Refrain from removing any cut-off s or other parts of the
workpiece from the cutting area whilst the machine is
running and the saw head is not in the rest position.
17. Never use the slide compound miter saw with its lower
guard locked in the open position.
18. Ensure that the lower guard moves smoothly.
19. Do not use the saw without guards in position, in good
working order and properly maintained.
20. Use correctly sharpened saw blades. Observe the
maximum speed marked on the saw blade.
21. Do not use saw blades which are damaged or deformed.
22. Do not use saw blades manufactured from high speed
steel.
23. Use only saw blades recommended by HiKOKI.
Use of saw blade comply with EN847-1.
24. The saw blades should be from 210 mm to 216 mm
external diameter ranges.
25. Select the correct saw blade for the material to be cut.
26. Never operate the slide compound miter saw with the
saw blade turned upward or to the side.
27. Ensure that the workpiece is free of foreign matter such
as nails.
28. Replace the table insert when worn.
29. Do not use the saw to cut other than aluminium, wood or
similar materials.
30. Do not use the saw to cut other materials than those
recommended by the manufacturer.
31. Blade replacement procedure, including the method for
repositioning and a warning that this must be carried out
correctly.
32. Connect the slide compound miter saw to a dust
collecting device when sawing wood.
33. Take care when slotting.
34. When transporting or carrying the tool, do not grasp the
holder. Grasp the handle instead of the holder.
35. There is the danger of the holder slipping out of the base.
Grasp the handle instead of the holder.
36. Start cutting only after motor revolution reaches
maximum speed.
37. Promptly cut OFF the switch when abnormality observed.
38. Shut off power and wait for saw blade to stop before
servicing or adjusting tool.
39. During a miter or bevel cut the blade should not be lifted
until it has stopped rotation completely.
40. During slide cutting operation, the saw must be pushed
and slided away from the operator.
41. Take all the possibility of residual risks in cutting
operation into your consideration, such as the laser
radiation to your eyes, the inadvertent access to moving
parts on slide mechanical parts on machine and so on.
42. Ensure before each cut that the machine is stable.
Use only saw blades whose maximum permitted speed
is higher than the no-load speed of the power tool.
Do not replace the laser with a diff erent type.
43. Do not stand in a line with the saw blade In front of the
machine. Always stand aside of the saw blade. This
protects your body against possible kickback. Keep
hands, fi ngers and arms away from the rotating saw
blade.
Do not cross your arms when operating the tool arm.
44. If the saw blade should become jammed, switch the
machine off and hold the workpiece until the saw blade
comes to a complete stop. To prevent kickback, the
workpiece may not be moved until after the machine has
come to a complete stop.
Correct the cause for the jamming of the saw blade
before restarting the machine.
Strona się ładuje...
Strona się ładuje...
Strona się ładuje...
Strona się ładuje...
Strona się ładuje...
Strona się ładuje...
Strona się ładuje...
Strona się ładuje...
Strona się ładuje...
Strona się ładuje...
Strona się ładuje...
Strona się ładuje...
Strona się ładuje...
Strona się ładuje...
Strona się ładuje...
Strona się ładuje...
Strona się ładuje...
Strona się ładuje...
Strona się ładuje...
Strona się ładuje...
Strona się ładuje...
Strona się ładuje...
Strona się ładuje...
Strona się ładuje...
Strona się ładuje...
Strona się ładuje...
Strona się ładuje...
Strona się ładuje...
Strona się ładuje...
Strona się ładuje...
Strona się ładuje...
Strona się ładuje...
Strona się ładuje...
Strona się ładuje...
Strona się ładuje...
Strona się ładuje...
Strona się ładuje...
Strona się ładuje...
Strona się ładuje...
Strona się ładuje...
Strona się ładuje...
Strona się ładuje...
Strona się ładuje...
Strona się ładuje...
Strona się ładuje...
Strona się ładuje...
Strona się ładuje...
Strona się ładuje...
Strona się ładuje...
Strona się ładuje...
Strona się ładuje...
Strona się ładuje...
Strona się ładuje...
Strona się ładuje...
Strona się ładuje...
Strona się ładuje...
Strona się ładuje...
Strona się ładuje...
Strona się ładuje...
Strona się ładuje...
Strona się ładuje...
Strona się ładuje...
Strona się ładuje...
Strona się ładuje...
Strona się ładuje...
Strona się ładuje...
Strona się ładuje...
Strona się ładuje...
Strona się ładuje...
Strona się ładuje...
Strona się ładuje...
Strona się ładuje...
Strona się ładuje...
Strona się ładuje...
Strona się ładuje...
Strona się ładuje...
Strona się ładuje...
Strona się ładuje...
Strona się ładuje...
Strona się ładuje...
Strona się ładuje...
Strona się ładuje...
Strona się ładuje...
Strona się ładuje...
Strona się ładuje...
Strona się ładuje...
Strona się ładuje...
Strona się ładuje...
Strona się ładuje...
Strona się ładuje...
Strona się ładuje...
Strona się ładuje...
Strona się ładuje...
Strona się ładuje...
Strona się ładuje...
Strona się ładuje...
Strona się ładuje...
Strona się ładuje...
Strona się ładuje...
Strona się ładuje...
Strona się ładuje...
Strona się ładuje...
Strona się ładuje...
Strona się ładuje...
Strona się ładuje...
Strona się ładuje...
Strona się ładuje...
Strona się ładuje...
Strona się ładuje...
Strona się ładuje...
Strona się ładuje...
Strona się ładuje...
Strona się ładuje...
Strona się ładuje...
Strona się ładuje...
Strona się ładuje...
Strona się ładuje...
Strona się ładuje...
Strona się ładuje...
Strona się ładuje...
Strona się ładuje...
Strona się ładuje...
Strona się ładuje...
Strona się ładuje...
Strona się ładuje...
Strona się ładuje...
Strona się ładuje...
Strona się ładuje...
Strona się ładuje...
Strona się ładuje...
Strona się ładuje...
Strona się ładuje...
Strona się ładuje...
Strona się ładuje...
Strona się ładuje...
Strona się ładuje...
Strona się ładuje...
Strona się ładuje...
Strona się ładuje...
Strona się ładuje...
Strona się ładuje...
Strona się ładuje...
Strona się ładuje...
Strona się ładuje...
Strona się ładuje...
Strona się ładuje...
Strona się ładuje...
Strona się ładuje...
Strona się ładuje...
Strona się ładuje...
Strona się ładuje...
Strona się ładuje...
-
 1
1
-
 2
2
-
 3
3
-
 4
4
-
 5
5
-
 6
6
-
 7
7
-
 8
8
-
 9
9
-
 10
10
-
 11
11
-
 12
12
-
 13
13
-
 14
14
-
 15
15
-
 16
16
-
 17
17
-
 18
18
-
 19
19
-
 20
20
-
 21
21
-
 22
22
-
 23
23
-
 24
24
-
 25
25
-
 26
26
-
 27
27
-
 28
28
-
 29
29
-
 30
30
-
 31
31
-
 32
32
-
 33
33
-
 34
34
-
 35
35
-
 36
36
-
 37
37
-
 38
38
-
 39
39
-
 40
40
-
 41
41
-
 42
42
-
 43
43
-
 44
44
-
 45
45
-
 46
46
-
 47
47
-
 48
48
-
 49
49
-
 50
50
-
 51
51
-
 52
52
-
 53
53
-
 54
54
-
 55
55
-
 56
56
-
 57
57
-
 58
58
-
 59
59
-
 60
60
-
 61
61
-
 62
62
-
 63
63
-
 64
64
-
 65
65
-
 66
66
-
 67
67
-
 68
68
-
 69
69
-
 70
70
-
 71
71
-
 72
72
-
 73
73
-
 74
74
-
 75
75
-
 76
76
-
 77
77
-
 78
78
-
 79
79
-
 80
80
-
 81
81
-
 82
82
-
 83
83
-
 84
84
-
 85
85
-
 86
86
-
 87
87
-
 88
88
-
 89
89
-
 90
90
-
 91
91
-
 92
92
-
 93
93
-
 94
94
-
 95
95
-
 96
96
-
 97
97
-
 98
98
-
 99
99
-
 100
100
-
 101
101
-
 102
102
-
 103
103
-
 104
104
-
 105
105
-
 106
106
-
 107
107
-
 108
108
-
 109
109
-
 110
110
-
 111
111
-
 112
112
-
 113
113
-
 114
114
-
 115
115
-
 116
116
-
 117
117
-
 118
118
-
 119
119
-
 120
120
-
 121
121
-
 122
122
-
 123
123
-
 124
124
-
 125
125
-
 126
126
-
 127
127
-
 128
128
-
 129
129
-
 130
130
-
 131
131
-
 132
132
-
 133
133
-
 134
134
-
 135
135
-
 136
136
-
 137
137
-
 138
138
-
 139
139
-
 140
140
-
 141
141
-
 142
142
-
 143
143
-
 144
144
-
 145
145
-
 146
146
-
 147
147
-
 148
148
-
 149
149
-
 150
150
-
 151
151
-
 152
152
-
 153
153
-
 154
154
-
 155
155
-
 156
156
-
 157
157
-
 158
158
-
 159
159
-
 160
160
-
 161
161
-
 162
162
-
 163
163
-
 164
164
-
 165
165
-
 166
166
-
 167
167
-
 168
168
-
 169
169
-
 170
170
-
 171
171
-
 172
172


Hikoki C 8FSHG Cordless Cutting and Miter Saw Instrukcja obsługi
- Kategoria
- Piły ukośne
- Typ
- Instrukcja obsługi

