
L
ED-AUSSENSTRAHLER / LED OUTDOOR
FLOODLIGHT / PROJECTEUR EXTÉRIEUR À LED
LED-AUSSENSTRAHLER
Montage-, Bedienungs- und Sicherheitshinweise
LED OUTDOOR FLOODLIGHT
Assembly, operating and safety instructions
PROJECTEUR EXTÉRIEUR À LED
Instructions de montage, d‘utilisation et consignes de sécurité
LED-BUITENSCHIJNWERPER
Montage-, bedienings- en veiligheidsinstructies
VENKOVNÍ LED REFLEKTOR
Pokyny k montáži, obsluze a bezpečnostní pokyny
REFLEKTOR ZEWNĘTRZNY LED
Wskazówki montażu, obsługi i bezpieczeństwa
LED VONKAJŠÍ REFLEKTOR
Pokyny pre montáž, obsluhu a bezpečnostné pokyny
IAN 345146_2004

DE / AT / CH Montage-, Bedienungs- und Sicherheitshinweise Seite 5
GB / IE Assembly, operating and safety instructions Page 12
FR / BE Instructions de montage, d‘utilisation et consignes de sécurité Page 18
NL / BE Montage-, bedienings- en veiligheidsinstructies Pagina 25
PL Wskazówki montażu, obsługi i bezpieczeństwa Strona 31
CZ Pokyny k montáži, obsluze a bezpečnostní pokyny Strana 37
SK Pokyny pre montáž, obsluhu a bezpečnostné pokyny Strana 43

E
D
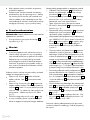
14 15 16
C
35-45 mm
7 mm
7 mm
15-20 mm
13
A
1
2 3 4 5
8
B9
10
11
12
6
7
11 12


5 DE/AT/CH
Legende der verwendeten Piktogramme ...........................................................Seite 6
Einleitung ......................................................................................................................................... Seite 6
Bestimmungsgemäße Verwendung ....................................................................................................Seite 6
Teilebeschreibung ...............................................................................................................................Seite 6
Technische Daten ................................................................................................................................Seite 6
Lieferumfang ........................................................................................................................................ Seite 6
Allgemeine Sicherheitshinweise ..................................................................................Seite 7
Vor der Montage ...................................................................................................................... Seite 7
Vor der Inbetriebnahme ....................................................................................................Seite 8
Montage ...........................................................................................................................................Seite 8
Inbetriebnahme ......................................................................................................................... Seite 9
Bewegungsmelder einstellen .............................................................................................................. Seite 9
Leuchtdauer einstellen .........................................................................................................................Seite 9
Empfindlichkeit des Sensors einstellen ...............................................................................................Seite 9
Tageslichtniveau einstellen .................................................................................................................Seite 9
Bewegungsmelder ausrichten ............................................................................................................Seite 9
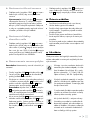
Reinigung und Pflege ............................................................................................................Seite 9
Entsorgung .....................................................................................................................................Seite 10
Garantie ........................................................................................................................................... Seite 10
Abwicklung im Garantiefall ................................................................................................................Seite 10
Service .................................................................................................................................................Seite 10

6 DE/AT/CH
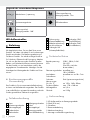
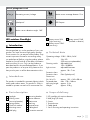
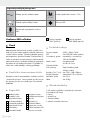
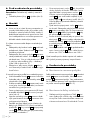
Legende der verwendeten Piktogramme
Wechselstrom / -spannung ca./approx./
env. 12 m
Erfassungsentfernung
Bewegungsmelder: 12 m
Spritzwassergeschützt LED-Lebensdauer
ca./approx./
env. 180°
Erfassungswinkel
Bewegungsmelder: 180 °
LED-Außenstrahler
Einleitung
Wir beglückwünschen Sie zum Kauf Ihres neuen
Produkts. Sie haben sich damit für ein hochwertiges
Produkt entschieden. Die Bedienungsanleitung ist
Teil dieses Produkts. Sie enthält wichtige Hinweise
für Sicherheit, Gebrauch und Entsorgung. Machen
Sie sich vor der Benutzung des Produkts mit allen
Bedien- und Sicherheitshinweisen vertraut. Benutzen
Sie das Produkt nur wie beschrieben und für die
angegebenen Einsatzbereiche. Händigen Sie alle
Unterlagen bei Weitergabe des Produkts an Dritte
mit aus.
Bestimmungsgemäße
Verwendung
Das Produkt ist für eine automatische Beleuchtung
i
m Innen- und Außenbereich vorgesehen. Das Prod
ukt
ist ausschließlich zur privaten Verwendung und nicht
für den gewerblichen Gebrauch vorgesehen.
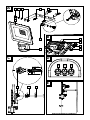
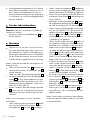
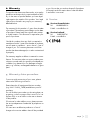
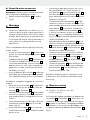
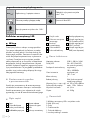
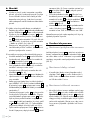
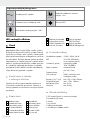
Teilebeschreibung
1 Spot
2 Arretierungsschraube
(Montagebügel)
3 Federscheibe
4 Zahnscheibe
5 Befestigungsschraube
6 Dübel
7 Montagebügel
8 Bewegungsmelder
9 Kunststoffabdeckung
10 Dichtungsring
11 Klemmenabdeckung
12 Kabelverschraubung
13 Anschlussklemme
14 Drehregler LUX
(Lichtempfindlichkeit)
15 Drehregler SENS
(Empfindlichkeit)
16 Drehregler TIME
(Einschaltdauer)
Technische Daten
Betriebsspannung: 230 V∼ 50 Hz, 24 W
LEDs: 28 x LED
(Die LEDs sind nicht
austauschbar.)
Dämmerungsschalter: einstellbar von
10 lx–20.000 lx
Leuchtdauer: einstellbar von ca.10 s–7 min
Schutzklasse: I
Schutzart: I
P44 (spritzwassergeschützt
)
Abmessungen
(H x B x T): ca. 192 x 160 x 90 mm
Projektionsfläche: max. 170 x 160 mm
Montagehöhe: ca. 2,5 m
Gewicht: ca. 510 g
Lieferumfang
1 LED-Außenstrahler mit Bewegungsmelder
2 Dübel (Ø 6 mm)
2 Schrauben
1 Klemmenabdeckung
1 Kabelverschraubung
1 Montage- und Bedienungs anleitung

7 DE/AT/CH
Allgemeine
Sicherheitshinweise
Machen Sie sich vor der ersten Benutzung des
Produkts mit allen Bedien- und Sicherheitshinweisen
vertraut! Händigen Sie alle Unterlagen bei Weiter-
gabe des Produkts an Dritte ebenfalls mit aus!
LEBENS- UND UNFALLGEFAHR
FÜR KLEINKINDER UND KIN-
DER! Lassen Sie Kinder niemals un-
beaufsichtigt mit dem Verpackungsmaterial. Es
besteht Erstickungsgefahr durch Verpackungs-
material. Kinder unterschätzen häufig die Ge-
fahren. Halten Sie Kinder stets vom Produkt fern.
Dieses Produkt kann von Kindern ab 8 Jahren
und darüber sowie von Personen mit verringer-
ten physischen, sensorischen oder mentalen
Fähigkeiten oder Mangel an Erfahrung und
Wissen benutzt werden, wenn sie beaufsichtigt
oder bezüglich des sicheren Gebrauchs des
Produkts unterwiesen wurden und die daraus
resultierenden Gefahren verstehen. Kinder dür-
fen nicht mit dem Produkt spielen. Reinigung
und Benutzerwartung dürfen nicht von Kindern
ohne Beaufsichtigung durchgeführt werden.
Lebensgefahr durch
elektrischen Schlag
Überprüfen Sie vor jedem Netzanschluss das
Produkt auf etwaige Beschädigungen. Benutzen
Sie das Produkt niemals, wenn Sie irgendwelche
Beschädigungen feststellen.
Vergewissern Sie sich vor der Montage, dass die
vorhandene Netzspannung mit der benötigten
Betriebsspannung des Produkts übereinstimmt
(230 V∼ 50 Hz). Montieren Sie das Produkt
nicht, wenn dies nicht der Fall ist.
VORSICHT! VERBRENNUNGSGEFAHR!
Stellen Sie sicher, dass das Produkt ausgeschal-
tet und mindestens 15 min abgekühlt ist, bevor
Sie diese berühren. Das Produkt kann eine große
Hitze entwickeln.
0,5 m
BRANDGEFAHR! Montieren Sie
das Produkt mit einer Entfernung von
mindestens 0,5 m zu angestrahlten
Materialien. Eine übermäßige Wärmeentwick-
lung kann zu Brandentwicklung führen.
VORSICHT! VERLETZUNGSGE-
FAHR! Ein beschädigtes Lamp
englas
ist vor einer weiteren Benutzung des
Produkts zu ersetzen.
Nur zur lnstallation außerhalb des Handbereichs
vorgesehen.
Dieser Artikel enthält keine Teile, die vom Ver-
braucher gewartet werden können. Die LEDs
können nicht durch den Benutzer ausgetauscht
werden.
Sollten die LEDs am Ende ihrer Lebensdauer
ausfallen, müssen sie durch einen qualifizierten
Elektriker repariert werden, ansonsten muss das
Produkt entsorgt werden.
Der LED-Strahler ist nur mit dem eingebauten
LED-Vorschaltgerät zu verwenden.
Solange das Produkt an eine Steckdose ange-
schlossen ist, zieht es ein wenig Strom–auch
wenn die Leuchte ausgeschaltet ist. Um das
Produkt komplett auszuschalten, sollte der Netz-
schalter ausgeschaltet werden.
Wenn das externe flexible Kabel oder das
Kabel dieser Leuchte beschädigt ist, darf es
ausschließlich vom Hersteller oder seinem Kun-
dendienst oder einer ähnlichen qualifizierten
Person ausgetauscht werden, um eine Gefahr
zu vermeiden.
Vor der Montage
Wichtig: Der elektrische Anschluss muss durch
einen ausgebildeten Elektriker oder eine für Elektro-
installationen eingewiesene Person erfolgen. Diese
muss Kenntnis über die Eigenschaften des Produkts
und Anschlussbestimmungen haben.
Stellen Sie vor der Installation sicher, dass an
der Leitung, an der das Produkt angeschlossen
werden soll, keine Spannung vorliegt. Entfernen
Sie hierfür die Sicherung oder schalten Sie den
Leitungsschutzschalter im Sicherungskasten aus
(0-Stellung).
Überprüfen Sie die Spannungsfreiheit mittels
Spannungsprüfer.

8 DE/AT/CH
Das beigelegte Montagematerial ist für übliches
festes Mauerwerk geeignet. Informieren Sie sich
auch, welches Montagematerial für den von
Ihnen gewählten Montageuntergrund geeignet
ist. Informieren Sie sich hierüber gegebenenfalls
bei einer Fachkraft.
Vor der Inbetriebnahme
Hinweis: Entfernen Sie sämtliches Verpackungs-
material vom Produkt.
Entfernen Sie die Kunststoffabdeckung 9 vom
Produkt (Abb. B).
Montage
Vergewissern Sie sich, dass Sie nicht auf Strom-,
Gas- oder Wasserleitungen stoßen, wenn Sie in
die Wand bohren. Ziehen Sie die Bedienungs-
anleitung Ihrer Bohrmaschine hinzu und beachte
n
Sie alle Sicherheitshinweise. Ansonsten drohen
Tod oder Verletzungsgefahr durch Stromschlag.
Achten Sie bei der Auswahl des Montageortes auf
folgende Dinge:
Stellen Sie sicher, dass der Spot
1
den gewün
sch-
ten Bereich ausleuchtet. Sie können den Spot
1
vertikal bewegen.
Stellen Sie sicher, dass der Bewegungsmelder
8
den gewünschten Bereich erfasst. Der Beweg
ungs-
melder 8 hat einen Erfassungsbereich von max.
12 m, bei einem Erfassungswinkel von ca. 180 °
(abhängig von der Montagehöhe – ideal ist ei
ne
Höhe von 2,50 m) (Abb. E).
Achten Sie darauf, dass der Bewegungsmelder
8 nachts nicht von Straßenbeleuchtung ange-
strahlt wird. Dies kann die Wirkungsweise be-
einflussen.
Gehen Sie zur Montage vor, wie im Folgenden
beschrieben:
Lösen Sie die Arretierungsschrauben 2 mithilfe
eines Kreuzschlitzschraubendrehers, um den
Montagebügel 7 vom Spot 1 zu entfernen.
Halten Sie den Montagebügel 7 waagerecht
(mit einer Wasserwaage ggf. prüfen) gegen die
Wand und markieren Sie die Befestigungslöcher.
Bohren Sie nun die Befestigungslöcher (Ø 6 mm)
und stecken Sie die Dübel 6 in die Befestigungs-
löcher (Abb. A).
Befestigen Sie den Montagebügel 7 mithilfe
der mitgelieferten Befestigungsschrauben 5 an
der Wand und überprüfen Sie den festen Sitz.
Führen Sie das Verbindungskabel (nicht enthal-
ten) vom Typ H05RN-F 3G 1,0 mm² durch die
Kabelverschraubung 12 und die Klemmenab-
deckung 11 zu der Anschlussklemme 13 . Die
geeignete Länge für die Verbindungsdrähte ist
in Abbildung C angegeben.
Öffnen Sie die Anschlussklemme 13 , indem Sie
die Schrauben mithilfe eines Kreuzschlitzschrau-
bendrehers lösen. Verbinden Sie das Verbindu
ngs-
kabel mit der Anschlussklemme 13 . Beachten
Sie dabei die Markierungen auf der Anschluss-
klemme 13 (L für den spannungsführenden Leiter,
N für den Nullleiter und für den Schutzleiter)
(Abb. C). Die Gesamtlänge des Verbindungs-
kabels sollte 2,5 m nicht überschreiten.
Schließen Sie die Anschlussklemme 13 wieder,
indem Sie die Schrauben festziehen. Stellen Sie
sicher, dass der Dichtungsring 10 richtig sitzt
(Abb. B). Schließen Sie dann die Klemmenab-
deckung 11 und die Kabelverschraubung 12 ,
um das Verbindungskabel zu fixieren.
Verwenden Sie einen Kreuzschlitzschraubendre-
her, um den Spot 1 mit den zuvor entfernten
Arretierungschrauben 2, Federscheiben 3 und
Zahnscheiben 4 an dem Montagebügel 7 zu
befestigen (Abb. A).
Richten Sie den Spot 1 in die gewünschte
Richtung aus. Der Bewegungsmelder 8 kann
horizontal um ca. 150 ° und vertikal um ca. 180 °
gedreht werden.
Setzen Sie die Sicherung wieder ein oder schalten
Sie den Leitungsschutzschalter wieder ein. Ihr Produkt
ist nun betriebsbereit.

9 DE/AT/CH
Inbetriebnahme
Bewegungsmelder einstellen
Je nach den Voreinstellungen des Bewegungsmelders
8 schaltet sich der Spot 1 für eine gewisse Zeit
ein, sobald der Bewegungsmelder
8
eine Beweg
ung
erfasst. Diese Voreinstellungen werden an den drei
Reglern auf der Unterseite des Bewegungsmelders 8
vorgenommen (Abb. D).
Leuchtdauer einstellen
Drehen Sie den Drehregler TIME 16 gegen den
Uhrzeigersinn, um die Beleuchtungsdauer zu
erhöhen. Die Beleuchtungsdauer können Sie
in einem Zeitfenster von ca. 10 Sekunden bis
7 Minuten einstellen.
Empfindlichkeit des
Sensors einstellen
Drehen Sie den Drehregler SENS 15 gegen den
U
hrzeigersinn, um die Empfindlichkeit des Sensor
s
zu erhöhen.
Hinweis: Der Bewegungsmelder 8 erfasst
Wärmestrahlung. Er reagiert bei niedrigen Auß
en-
temperaturen empfindlicher auf Körperwärme
als bei warmen Außentemperaturen. Achten Sie
darauf, ggf. die Empfindlichkeit des Sensors im
Laufe der Jahreszeiten zu regulieren.
Tageslichtniveau einstellen
Drehen Sie den Drehregler LUX 14 gegen den
Uhrzeigersinn, um das Tageslichtniveau zu erhöhen:
In der Position reagiert der Bewegungsmelder
nur bei Nacht (bei ca. 10 lx). In der Position
reagiert der Bewegungsmelder auch bei Tages-
lichtniveau, solange ca. 20.000 lx nicht über-
schritten werden.
Bewegungsmelder ausrichten
Hinweis: Sie sollten diese Einstellung bei Dämme-
rung durchführen.
Drehen Sie den Drehregler LUX 14 auf die
Position .
Richten Sie den Bewegungsmelder 8 in die
zentrale Richtung des gewünschten Erfassungs-
bereichs.
Bewegen Sie sich im Erfassungsbereich, bis Sie
mit dem Ansprechverhalten des Bewegungsmel-
ders 8 zufrieden sind. Verändern Sie dazu die
Position des Drehreglers SENS 15 oder die
Ausrichtung des Bewegungsmelders 8.
Hinweis: Beachten Sie, dass der Bewegungs-
melder 8 vorwiegend Bewegungen quer zum
Bewegungsmelder 8 erfasst. Wenn Sie sich ge-
radewegs auf den Bewegungsmelder 8 zu be-
wegen, kann er diese Bewegung nicht erfassen.
Wenn Sie den Bewegungsmelder 8 zufrieden-
stellend ausgerichtet haben, drehen Sie anschlie-
ßend den Drehregler LUX 14 in die gewünschte
Position. Sie können die geeignete Position des
Drehreglers LUX 14 während der Morgen- oder
Abenddämmerung bestimmen, in der der Spot 1
reagieren soll.
Drehen Sie den Drehregler LUX 14 langsam
gegen den Uhrzeigersinn, bis der Bewegungs-
melder 8 auf Bewegungen innerhalb des
Erfassungsbereiches reagiert.
Reinigung und Pflege
Entfernen Sie vor der Reinigung im Sicherungs-
kasten die Sicherung oder schalten Sie den
Leitungsschutzschalter aus.
Tauchen Sie das Produkt niemals in Wasser oder
in andere Flüssigkeiten. Andernfalls kann das
Produkt beschädigt werden.
Reinigen Sie das Produkt mit einem fusselfreien,
leicht angefeuchteten Tuch und mildem Reini-
gungsmittel.
Setzen Sie nach der Reinigung und vor der
erneuten Inbetriebnahme die Sicherung wieder
ei
n oder schalten Sie den Leitungsschutzschalter
wieder an.

10 DE/AT/CH
Entsorgung
Die Verpackung besteht aus umweltfreundlichen Ma-
terialien, die Sie über die örtlichen Recyclingstellen
entsorgen können.
b
a
Beachten Sie die Kennzeichnung der
Verpackungsmaterialien bei der Abfall-
trennung, diese sind gekennzeichnet mit
Abkürzungen (a) und Nummern (b) mit
folgender Bedeutung: 1–7: Kunststoffe /
20–22: Papier und Pappe / 80–98:
Verbundstoffe.
Das Produkt und die Verpackungsmateri-
alien sind recycelbar, entsorgen Sie diese
getrennt für eine bessere Abfallbehand-
l
ung. Das Triman-Logo gilt nur für Frankreich
.
Möglichkeiten zur Entsorgung des aus-
gedienten Produkts erfahren Sie bei Ihrer
Gemeinde- oder Stadtverwaltung.
Werfen Sie Ihr Produkt, wenn es ausge-
dient hat, im Interesse des Umweltschutzes
nicht in den Hausmüll, sondern führen Sie
es einer fachgerechten Entsorgung zu.
Über Sammelstellen und deren Öffnungs-
zeiten können Sie sich bei Ihrer zuständi-
gen Verwaltung informieren.
Garantie
Das Produkt wurde nach strengen Qualitätsrichtlin
ien
sorgfältig produziert und vor Anlieferung gewissen-
haft geprüft. Im Falle von Mängeln dieses Produkts
stehen Ihnen gegen den Verkäufer des Produkts ge-
setzliche Rechte zu. Diese gesetzlichen Rechte werden
durch unsere im Folgenden dargestellte Garantie
nicht eingeschränkt.
Sie erhalten auf dieses Produkt 3 Jahre Garantie ab
Kaufdatum. Die Garantiefrist beginnt mit dem Kauf-
datum. Bitte bewahren Sie den Original-Kassenbon
gut auf. Diese Unterlage wird als Nachweis für den
Kauf benötigt.
Tritt innerhalb von 3 Jahren ab dem Kaufdatum die-
ses Produkts ein Material- oder Fabrikationsfehler auf,
wird das Produkt von uns – nach unserer Wahl – für
Sie kostenlos repariert oder ersetzt. Diese Garantie
verfällt, wenn das Produkt beschädigt, nicht sachge-
mäß benutzt oder gewartet wurde.
Die Garantieleistung gilt für Material- oder Fabrika-
tionsfehler. Diese Garantie erstreckt sich nicht auf
Produktteile, die normaler Abnutzung ausgesetzt
sind (z. B. Batterien) und daher als Verschleißteile
angesehen werden können oder Beschädigungen
an zerbrechlichen Teilen, z. B. Schalter, Akkus oder
die aus Glas gefertigt sind.
Abwicklung im Garantiefall
Um eine schnelle Bearbeitung Ihres Anliegens zu ge-
währleisten, folgen Sie bitte den folgenden Hinweise
n:
Bitte halten Sie für alle Anfragen den Kassenbon und
die Artikelnummer (z. B. IAN 123456_7890) als
Nachweis für den Kauf bereit.
Die Artikelnummer entnehmen Sie bitte dem Typen-
schild, einer Gravur, auf dem Titelblatt Ihrer Bedie-
nungsanleitung (unten links) oder als Aufkleber auf
der Rück- oder Unterseite des Produkts.
Sollten Funktionsfehler oder sonstige Mängel auf-
treten, kontaktieren Sie zunächst die nachfolgend
benannte Serviceabteilung telefonisch oder per
E-Mail.
Ein als defekt erfasstes Produkt können Sie dann unter
Beifügung des Kaufbelegs (Kassenbon) und der An-
gabe, worin der Mangel besteht und wann er auf-
getreten ist, für Sie portofrei an die Ihnen mitgeteilte
Service-Anschrift übersenden.
Service
Service Deutschland
Tel.: 0800 5435 111
E-Mail: [email protected]
Service Österreich
Tel.: 0800 292726
E-Mail: [email protected]


12 GB/IE
List of pictograms used ........................................................................................................ Page 13
Introduction ................................................................................................................................... Page 13
Intended use ........................................................................................................................................ Page 13
Parts description ..................................................................................................................................Page 13
Technical data ..................................................................................................................................... Page 13
Scope of delivery ................................................................................................................................Page 13
General safety instructions .............................................................................................. Page 14
Before installation ...................................................................................................................Page 14
Before use .......................................................................................................................................Page 15
Installation .....................................................................................................................................Page 15
Start-up .............................................................................................................................................Page 15
Adjusting the motion detector.............................................................................................................Page 15
Setting the lighting duration ................................................................................................................Page 15
Adjusting the sensitivity of the sensor ................................................................................................. Page 16
Setting the daylight level ....................................................................................................................Page 16
Aligning the motion detector ..............................................................................................................Page 16
Cleaning and care .................................................................................................................... Page 16
Disposal ............................................................................................................................................Page 16
Warranty ......................................................................................................................................... Page 17
Warranty claim procedure ................................................................................................................. Page 17
Service .................................................................................................................................................Page 17

13 GB/IE
List of pictograms used
Alternating current / voltage ca./approx./
env. 12 m
Motion sensor coverage distance: 12 m
Splashproof LED lifespan
ca./approx./
env. 180°
Motion sensor detection angle: 180°
LED outdoor floodlight
Introduction
We congratulate you on the purchase of your new
product. You have chosen a high quality product.
The instructions for use are part of the product. They
contain important information concerning safety,
use and disposal. Before using the product, please
familiarise yourself with all of the safety information
and instructions for use. Only use the product as
described and for the specified applications. If you
pass the product on to anyone else, please ensure
that you also pass on all the documentation with it.
Intended use
The product is intended for automatic lighting in both
indoor and outdoor areas. This product is solely in-
tended for private use and not for commerical use.
Parts description
1 Spotlight
2 Locking screw
(mounting bracket)
3 Spring washer
4 Tooth lock washer
5 Mounting screw
6 Wall plug
7 Mounting bracket
8 Motion detector
9 Plastic cover
10 Seal ring
11 Terminal cover
12 Cable gland
13 Connection terminal
14 Rotary control LUX
(light sensitivity)
15 Rotary control SENS
(sensitivity)
16 Rotary control TIME
(switched on duration)
Technical data
Operating voltage: 230 V∼ 50 Hz, 24 W
LEDs: 28 x LED
(LEDs are non-replaceable.)
Dimming switch: adjustable from
10 lx–20,000 lx
Light on time: adjustable between
approx. 10 s–7 min
Protection class: I
Protection class: IP44 (Splashproof)
Dimensions
(H x W x D): approx. 192 x 160 x 90 mm
Projected area: max. 170 x 160 mm
Mounting height: approx. 2.5 m
Weight: approx. 510 g
Scope of delivery
1 LED spotlight with motion detector
2 Wall plugs (Ø 6 mm)
2 Screws
1 Terminal cover
1 Cable gland
1 Set of mounting and operating instructions

14 GB/IE
General safety
instructions
Before using the product, please familiarise yourself
with all of the safety information and instructions
for use! When passing this product on to others,
please also include all the documents!
DANGER TO LIFE AND ACCI-
DENT HAZARD FOR TODDLERS
AND SMALL CHILDREN! Never
leave children unattended with the packaging
material. The packaging material represents a
danger of suffocation. Children frequently un-
derestimate the dangers. Please keep children
away from the product at all times.
This product may be used by children age
8 years and up, as well as by persons with re-
duced physical, sensory or mental capacities,
or lacking experience and / or knowledge, so
long as they are supervised or instructed in the
safe use of the product and understand the as-
sociated risks. Children should not be allowed to
play with the product. Cleaning and user main-
tenance should not be performed by children
without supervision.
Risk of electric shock
Always check product for damage before con-
necting it to power. Never use the product if it
shows any signs of damage.
Prior to installation, verify that the mains voltage
on site corresponds with the operating voltage
required for the product (230 V∼ 50 Hz). Other-
wise do not install the product.
CAUTION! DANGER OF BURN INJURIE
S!
To prevent burns, verify the product is switched
off and has cooled down for at least 15 min
before touching it. The product can become
very hot.
0.5 m
FIRE HAZARD! Fit the product so
that it is at least 0.5 m away from the
material to be illuminated. Excessive
heat can result in a fire.
CAUTION! RISK OF INJURY!
Broken lamp glass must be replaced
before any further use is made of
the product.
Only intended for installations out of normal
reach.
This product does not contain any parts that
can be serviced by the user. The LEDs cannot
be replaced by end user.
If the LEDs fail at the end of their lives, they must
be repaired by qualified electrician or the entire
product must be replaced.
The spotlight is only suited for use with the built-in
LED control gear.
The product continues to draw a small amount
of power even if the lamp is off as long as prod-
uct is connected to supply mains. To switch the
product off completely, the mains switch should
be switched off.
If the external flexible cable or cord of this lumi-
naire is damaged, it shall be exclusively replaced
by the manufacturer or his service agent or a si-
milar qualified person in order to avoid a hazard.
Before installation
Important: The electrical connection must be
established by a qualified electrician or a person
trained to perform electrical installations. This person
must be familiar with the properties of the product
and the connection regulations.
Before installation ensure that the circuit, to which
the product will be connected, is not energised.
To do so, remove the fuse or switch off the circuit
breaker in the fuse box (0 position).
Use the voltage tester to verify the de-energised
status.
The included mounting material is suitable for
ordinary solid concrete or masonry construc-
tion. Check which mounting material is suitable
for your chosen mounting surface. If necessary,
seek expert advice.

15 GB/IE
Before use
Note: Remove all packaging materials from the
product.
Remove the plastic cover 9 from the product
(Fig. B).
Installation
Make sure you will not be drilling into electrical,
gas or water lines inside the wall. Use a power
drill to drill the holes into the brick wall. Always
observe all safety instructions for the power drill
in the manual for the power drill. Death or in-
jury due to electric shock may otherwise result.
When selecting the mounting location, pay attention
to the following:
Make sure that the spotlight 1 illuminates the
desired area. You can move the spotlight 1
vertically.
Make sure the motion detector 8 covers the
desired area. The motion detector 8 has a
maximum coverage range of 12 m, with a
coverage angle of about 180 ° (depending
on the mounting height–a height of 2.50 m is
ideal) (Fig. E).
Make sure the motion detector
8
is not illumina
ted
at night by street lighting. This can influence its
functioning.
During mounting, proceed as described below:
Unscrew locking screws 2 by using a screw
driver (cross type) to detach the mounting bracket
7 from the spotlight 1.
Hold the mounting bracket 7 so that it is hori-
zontal (possibly with a spirit level) against the
wall and mark the fastening holes.
Now drill the fastening holes (Ø 6 mm) and push
the wall plugs 6 into the drill holes (Fig. A).
Secure the mounting bracket 7 onto the wall
using the mounting screws 5 provided and
check the tight fit.
Run the connection cable (not include in the
product), type H05RN-F 3G 1.0 mm², through
the cable gland 12 and terminal cover 11 to
the connection terminal 13 . The suitable length
for the connecting wires please refer to Fig. C.
Open the connection terminal 13 by using a
screw driver (cross type) to loosen the screws.
Then connect the connection cable with the
connection terminal 13 . Pay attention to the
markings on the connection terminal 13 (L for
live, N for neutral and for the earth wire)
(Fig. C). The overall length for the connection
cable line should not exceed 2.5 m.
Close the connection terminal 13 again by
fastening the screws. Make sure the seal ring 10
is correctly installed (Fig. B). Then tighten the
terminal cover 11 and cable gland 12 finally
to fix the connection cable.
Now use the screw driver (cross type) to attach
the spotlight 1 to the mounting bracket 7 by
using the previously removed locking screws 2,
spring washers 3, and tooth lock washers 4
(Fig. A).
Align the spotlight 1 into the desired direction.
The motion detector 8 can be rotated approx.
150 ° horizontally and approx. 180 ° vertically.
Reinsert the fuse or switch the circuit breaker back
on. Your product is now ready to use.
Start-up
Adjusting the motion detector
Depending on the pre-adjustments of the motion
detector 8, the spotlight 1 will switch itself on for
a certain period of time as soon as the motion de-
tector 8 detects movement. These pre-adjustments
are made using the three controllers on the underside
of the motion detector 8 (Fig. D).
Setting the lighting duration
Turn the rotary control TIME 16 anti-clockwise
to increase the duration of the illumination. The
lighting duration can be adjusted within a time
window of approx. 10 seconds to 7 minutes.

16 GB/IE
Adjusting the sensitivity
of the sensor
Turn the rotary control SENS 15 anti-clockwise
to increase the sensitivity of the sensor.
Note: The motion detector 8 responds to heat
radiation. When outdoor temperatures are low,
it is more sensitive to body heat than when out-
door temperatures are warm. Be sure to regulate
the sensitivity of the sensor over the course of
the year.
Setting the daylight level
Turn the rotary control LUX 14 anti-clockwise to
increase the daylight level: In the position, the
motion detector only reacts at night (at approx.
10 lx). In t
he position, the motion detector also
responds at daylight levels, as long as about
20,000 lx are not exceeded.
Aligning the motion detector
Note: Perform this adjustment at twilight.
Turn the rotary control LUX 14 to position .
Align the motion detector 8 into the central
region of the desired coverage area.
Move about through the coverage area until you
are satisfied with the response characteristics
of the motion detector 8. To find the proper
orientation, change the position of the rotary
control SENS 15 or the orientation of the mo-
tion detector 8.
Note: Please note that the motion detector 8
primarily detects movements transverse to the
motion detector 8. If you move directly towards
the motion detector 8, it cannot detect this
movement.
When you have aligned the motion detector 8
satisfactorily then turn the rotary control LUX 14
to the desired position. You can determine the
appropriate position of the rotary control LUX
14
during dawn or dusk at which the spotlight 1
should react.
Slowly turn the rotary control LUX 14 anti-clock-
wise until the motion detector 8 reacts to move-
ment within the coverage area.
Cleaning and care
Before cleaning, remove the fuse or switch off
the circuit breaker at the fuse box.
Never immerse the product in water or other liqu
ids.
Otherwise the product can be damaged.
Clean the product with a lint-free, slightly moist
cloth and mild cleaning agent.
Reconnect the fuse or circuit breaker for use
after cleaning.
Disposal
The packaging is made entirely of recyclable mate-
rials, which you may dispose of at local recycling
facilities.
b
a
Observe the marking of the packaging
materials for waste separation, which
are marked with abbreviations (a) and
numbers (b) with following meaning:
1–7: plastics / 20–22: paper and fibre-
board / 80–98: composite materials.
The product and packaging materials
are recyclable, dispose of it separately
for better waste treatment. The Triman
logo is valid in France only.
Contact your local refuse disposal author-
ity for more details of how to dispose of
your worn-out product.
To help protect the environment, please
dispose of the product properly when it
has reached the end of its useful life and
not in the household waste. Information
on collection points and their opening
hours can be obtained from your local
authority.

17 GB/IE
Warranty
The product has been manufactured to strict quality
guidelines and meticulously examined before deliv-
ery. In the event of product defects you have legal
rights against the retailer of this product. Your legal
rights are not limited in any way by our warranty
detailed below.
The warranty for this product is 3 years from the d
ate
of purchase. The warranty period begins on the date
of purchase. Please keep the original sales receipt
in a safe location. This document is required as your
proof of purchase.
Should this product show any fault in materials or
manufacture within 3 years from the date of purchase,
we will repair or replace it – at our choice – free of
charge to you. This warranty becomes void if the
product has been damaged, or used or maintained
improperly.
The warranty applies to defects in material or manu-
facture. This warranty does not cover product parts
subject to normal wear, thus possibly considered con-
sumables (e.g. batteries) or for damage to fragile
parts, e.g. switches, rechargeable batteries or glass
parts.
Warranty claim procedure
To ensure quick processing of your case, please
observe the following instructions:
Please have the till receipt and the item number
(e.g. IAN 123456_7890) available as proof of
purchase.
You will find the item number on the rating plate, an
engraving on the front page of the instructions for u
se
(bottom left), or as a sticker on the rear or bottom
of the product.
If functional or other defects occur, please contact
the service department listed either by telephone or
by e-mail.
You can return a defective product to us free of
charge to the service address that will be provided
t
o you. Ensure that you enclose the proof of purch
ase
(till receipt) and information about what the defect
is and when it occurred.
Service
Service Great Britain
Tel.: 08000569216
E-Mail: [email protected]
Service Ireland
Tel.: 1800 200736
E-Mail: [email protected]

18 FR/BE
Légende des pictogrammes utilisés .......................................................................... Page 19
Introduction ................................................................................................................................... Page 19
Utilisation conforme ............................................................................................................................Page 19
Descriptif des éléments .......................................................................................................................Page 19
Caractéristiques techniques ................................................................................................................Page 19
Contenu de la livraison .......................................................................................................................Page 19
Instructions générales de sécurité .............................................................................Page 20
Avant le montage ....................................................................................................................Page 20
Avant la mise en service .....................................................................................................Page 21
Montage ...........................................................................................................................................Page 21
Mise en service ...........................................................................................................................Page 21
Régler le détecteur de mouvement ....................................................................................................Page 21
Réglage de la durée d‘éclairage .......................................................................................................Page 22
Réglage de la sensibilité du détecteur ...............................................................................................Page 22
Régler le niveau de lumière du jour ...................................................................................................Page 22
Orienter le détecteur de mouvement .................................................................................................Page 22
Nettoyage et entretien ........................................................................................................ Page 22
Mise au rebut ............................................................................................................................... Page 22
Garantie ........................................................................................................................................... Page 23
Faire valoir sa garantie .......................................................................................................................Page 24
Service après-vente .............................................................................................................................Page 24

19 FR/BE
Légende des pictogrammes utilisés
Courant alternatif / Tension alternative ca./approx./
env. 12 m
Distance de détection du détecteur
de mouvement : 12 m
Protégé contre les projections d‘eau Durée de vie des LED
ca./approx./
env. 180°
Angle de détection du détecteur
de mouvement : 180 °
Projecteur extérieur à LED
Introduction
Nous vous félicitons pour l‘achat de votre nouveau
produit. Vous avez opté pour un produit de grande
qualité. Le mode d‘emploi fait partie intégrante de
ce produit. Il contient des indications importantes
pour la sécurité, l’utilisation et la mise au rebut.
Veuillez lire consciencieusement toutes les indications
d‘utilisation et de sécurité du produit. Ce produit doit
uniquement être utilisé conformément aux instructions
et dans les domaines d‘application spécifiés. Lors
d‘une cession à tiers, veuillez également remettre
tous les documents.
Utilisation conforme
Le produit est prévu pour un éclairage automatique
en intérieur et extérieur. Le produit est exclusivement
destiné à un usage privé et non commercial.
Descriptif des éléments
1 Projecteur
2 Vis de serrage
(étrier de montage)
3 Rondelle élastique
4 Disque denté
5 Vis de fixation
6 Cheville
7 Étrier de montage
8 Détecteur de
mouvement
9 Cache en plastique
10 Bague d‘étanchéité
11 Couvercle de borne
12 Presse-étoupe
13 Borne de
raccordement
14 Commutateur rotatif
LUX (photosensibilité)
15 Commutateur rotatif
SENS (sensibilité)
16 Commutateur
rotatif TIME (durée
d‘éclairage)
Caractéristiques techniques
Tension de service : 230 V∼, 50 Hz, 24 W
LED: 28 x LED (les LED ne
sont pas remplaçables.)
Interrupteur crépusculaire : réglable de
10 lx à 20000 lx
Durée d‘éclairage : réglable d‘env.
10 s–7 min
Classe de protection : I
Type de protection : IP44 (protégé contre les
projections d‘eau)
Dimensions (h x l x p) :
env. 192 x 160 x 90 mm
Surface de projection : max. 170 x 160 mm
Hauteur de montage : env. 2,5 m
Poids : env. 510 g
Contenu de la livraison
1 Projecteur d‘extérieur LED avec
détecteur de mouvement
2 Chevilles (Ø 6 mm)
2 Vis
1 Couvercle de borne
1 Presse-étoupe
1 Notice d‘utilisation et de montage

20 FR/BE
Instructions générales
de sécurité
Prenez connaissance de toutes les indications de
maniement et de sécurité avant d‘utiliser l‘appareil
pour la première fois ! Transmettez également tous
les documents en cas de transmission du produit à
une personne tierce !
DANGER DE MORT ET D’ACCI-
DENT POUR LES ENFANTS EN
BAS ÂGE ET LES ENFANTS! Ne
laissez jamais les enfants jouer sans surveillance
avec l’emballage. Ils peuvent s‘étouffer avec les
emballages. Les enfants sous-estiment souvent le
danger. Toujours tenir l‘appareil à l‘écart des
enfants.
Ce produit peut être utilisé par des enfants âgés
de 8 ans et plus ainsi que par des personnes
ayant des capacités physiques, sensorielles ou
mentales réduites ou manquant d‘expérience
ou de connaissances, à la condition qu‘ils soient
surveillés ou s‘ils ont été informés de l‘utilisation
sûre du produit et s‘ils en comprennent les risques
liés à son utilisation. Les enfants ne doivent pas
jouer avec le produit. Le nettoyage et l‘entretien
du produit ne doivent pas être effectués par des
enfants laissés sans surveillance.
Danger de mort par
électrocution
Avant chaque branchement sur secteur, contrôlez
le bon état du produit. Ne jamais utiliser le pro-
duit si vous détectez le moindre endommagement.
Avant le montage, vérifiez que la tension secteur
corresponde à la tension de service requise du
produit (230 V∼ 50 Hz). Si ce n‘est pas le cas,
ne pas monter le produit.
ATTENTION ! RISQUE DE BRÛLURES!
Vérifiez que le produit est éteint et refroidi depuis
au moins 15 min avant de le manipuler. Le pro-
duit peut dégager une forte chaleur.
0,5 m
RISQUE D‘INCENDIE! Le produit
doit être monté à une distance d‘au
moins 0,5m des objets éclairés. Un
dégagement de chaleur excessif peut provoquer
un incendie.
ATTENTION ! RISQUE DE BLES-
SURES ! Un verre de lampe endom-
magé doit être remplacé avant toute
autre utilisation du produit.
Montage exclusivement prévu dans une zone
hors d‘atteinte.
Ce produit ne contient aucune pièce nécessitant
une maintenance de la part de l‘utilisateur.
Les LED ne peuvent pas être remplacées par
l‘utilisateur.
Si les LED arrivent en fin de vie, ils doivent être
réparés par un électricien qualifié. Dans le cas
contraire, l‘ensemble du produit doit être remplacé.
Le projecteur à LED doit être utilisé uniquement
avec le ballast à LED intégré.
Dès lors que le produit est branché sur une prise,
il consomme une faible quantité d‘énergie – même
si la lampe est éteinte. Pour éteindre complètement
le produit, débrancher le cordon d‘alimentation.
Lorsque le câble externe flexible, ou le câble de
cette lampe sont endommagés, il doit être ex-
clusivement remplacé par le fabricant, son ser-
vice après-vente ou une personne possédant une
qualification similaire, afin de prévenir toute mise
en danger.
Avant le montage
Important : Le raccordement électrique doit être
réalisé par un électricien professionnel ou par une
personne formée pour exécuter une installation élec-
trique. Cette personne doit connaître les caractéris-
tiques du produit et des conditions de raccordement.
Avant l‘installation, assurez-vous que le câble sur
lequel le produit doit être branché n‘est pas sous
tension. Retirez à cet effet le fusible ou coupez
le disjoncteur de la boîte à fusible (position 0).
Vérifiez l‘absence de tension à l‘aide d‘un dé-
tecteur de tension.
Le matériel de montage fourni est adapté pour
les ouvrages de maçonnerie usuelle et solide.
Vérifiez que matériel de fixation est bien appro-
prié au support de montage que vous avez choisi.
Le cas échéant, renseignez-vous auprès d‘un
professionnel.
Strona się ładuje...
Strona się ładuje...
Strona się ładuje...
Strona się ładuje...
Strona się ładuje...
Strona się ładuje...
Strona się ładuje...
Strona się ładuje...
Strona się ładuje...
Strona się ładuje...
Strona się ładuje...
Strona się ładuje...
Strona się ładuje...
Strona się ładuje...
Strona się ładuje...
Strona się ładuje...
Strona się ładuje...
Strona się ładuje...
Strona się ładuje...
Strona się ładuje...
Strona się ładuje...
Strona się ładuje...
Strona się ładuje...
Strona się ładuje...
Strona się ładuje...
Strona się ładuje...
Strona się ładuje...
Strona się ładuje...
Strona się ładuje...
-
 1
1
-
 2
2
-
 3
3
-
 4
4
-
 5
5
-
 6
6
-
 7
7
-
 8
8
-
 9
9
-
 10
10
-
 11
11
-
 12
12
-
 13
13
-
 14
14
-
 15
15
-
 16
16
-
 17
17
-
 18
18
-
 19
19
-
 20
20
-
 21
21
-
 22
22
-
 23
23
-
 24
24
-
 25
25
-
 26
26
-
 27
27
-
 28
28
-
 29
29
-
 30
30
-
 31
31
-
 32
32
-
 33
33
-
 34
34
-
 35
35
-
 36
36
-
 37
37
-
 38
38
-
 39
39
-
 40
40
-
 41
41
-
 42
42
-
 43
43
-
 44
44
-
 45
45
-
 46
46
-
 47
47
-
 48
48
-
 49
49


w innych językach
- Deutsch: LIVARNO 345146 Bedienungsanleitung
- slovenčina: LIVARNO 345146 Návod na obsluhu
- français: LIVARNO 345146 Le manuel du propriétaire
- Nederlands: LIVARNO 345146 de handleiding
Powiązane artykuły
-
LIVARNO 437486 Instrukcja obsługi
-
-
-
-
-
-
-
-
-