
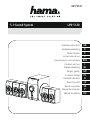
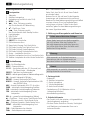
5.1-Sound-System
F
D
GB
E
Operating Instructions
Bedienungsanleitung
Mode d‘emploi
Instrucciones de uso
Руководство по эксплуатации
Istruzioni per l‘uso
Gebruiksaanwijzing
Οδηγίες χρήσης
Instrukcja obsługi
Használati útmutató
Návod kpoužití
Návod na použitie
Manual de instruções
Manual de utilizare
RUS
GR
SK
PL
P
I
H
NL
CZ
RO
LPR-5120
001731 47

ON
OFF
~230 V/50Hz
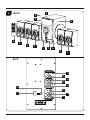
A
3
FRONT
BACK
2
2
2
1 7 6
2
2
12
14
16
18
13
15
17
19
11
10
8
5
4
9

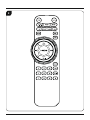
B

2
G Operating instruction
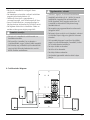
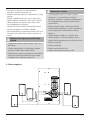
Controls and Displays
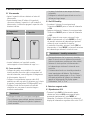
A
Speaker:
1. Subwoofer
2. Satellite speakers
3. Remote control (for details see Fig. B)
4. MODE button
5. ¤¤
|
button, next title,
Turning off/on the LED lighting
6. ¤
||
Play/Pause button
7. |
button, previous title,
Turning off/on the auto standby function
8. Volume control
9. USB/SD-Slot
10. 230 Vmains supply
11. ON/OFF,on/off switch
12. FM antenna connection
13. Stereo audio input RCAright/left
14. DVD audio input front right /front left
15. DVD audio input centre/subwoofer
16. DVD audio input rear right/left
17. Centrespeaker connection
18. Satellite speaker connection front right/left
19. Satellite speaker connection rear right/left
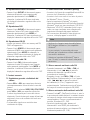
B
Remote control:
STBY –on/standby switch
MUTE –mute switch
2.1/5.1 –Switch between 5.1 (surround) and
2.1 (stereo) audio playback
PRESET –Save radio stations
RESET –Restoresystem to factory settings
FM –Select FM radio as audio source
DVD/BT –Select DVD player as audio source
USB/SD –Select USB storage medium or SD/SDHC card
as audio source
AUX –Select AUX/PC connection as audio source
SURR –Individual volume control for satellites
SUB –Individual volume control for subwoofer
CEN –Individual volume control for centrespeaker
VOL +/- –General volume control (master)
¤
||
–Play/Pause button /auto. radio station search
|
–Previous title /Radio station search
¤¤
|
–Next title /Radio station search
FRONT –Individual volume control for front speaker
TUN- –Radio frequency search backwards
TUN+ –Radio frequency search forwards
0-9 –Track numberselection
Thank you for choosing aHama product.
Take your time and read the following instructions and
information completely.Please keep these instructions
in asafe place for futurereference. If you sell the
device, please pass these operating instructions on to
the new owner.
1. Explanation of Warning Symbols and Notes
Risk of electric shock
This symbol indicates product parts energized with
adangerous voltage of sucient magnitude to
constitute arisk of electric shock.
Warning
This symbol is used to indicate safety instructions or
to draw your attention to specichazards and risks.
Note
This symbol is used to indicate additional information
or important notes.
2. Package Contents
• Subwoofer
• 4satellite speakers
• 1centrespeaker
• 1Y-audio adaptor cable
• 3audio connection cables
• Remote control (2 AAA batteries required, not
included)
• These operating instructions
3. Safety Notes
• The product is intended for private, non-commercial
use only.
• Protect the product from dirt, moistureand
overheating and us it in dry rooms only.
• As with all electrical devices, this device should be
kept out of the reach of children.
• Do not drop the product and do not expose it to any
major shocks.
• Do not operate the product outside the power limits
given in the specications.
• Keep the packaging material out of the reach of
children due to the risk of suffocation.

3
• Dispose of packaging material immediately according
to locally applicable regulations.
• Do not modify the device in any way.Doing so voids
the warranty.
Risk of electric shock
• Do not open the device or continue to operate it if
it becomes damaged.
• Do not use the product if the AC adapter,adapter
cable or power cable is damaged.
• Do not attempt to service or repair the product
yourself.Leave any and allservice work to qualied
experts.
Warning Batteries
• When inserting batteries, note the correct polarity
(+ and -markings) and insert the batteries
accordingly.Failuretodosocould result in the
batteries leaking or exploding.
• Do not allow children to change batteries without
supervision.
• Remove the batteries from products that arenot
being used for an extended period.
• Do not short-circuit batteries.
• Do not charge batteries.
• Do not throw batteries in a re.
• Keep batteries out of the reach of children.
• Do not mix old and new batteries or batteries of a
different type or make.
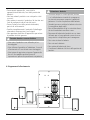
4. Wiring diagram

4
5. Getting Started
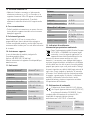
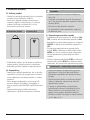
5.1 Remote control
• Open the battery compartment cover.Itislocated on
the rear of the remote control.
• Pull the closing tab back (if present) and lift the cover.
With other models of remote control, it suces to
simply push the casing in the direction indicated.
A: Closing tab B: Sliding cover
Insert the batteries, paying attention to match the
polarities correctly.The correct polarity is indicated
by the plus and minus symbols in the battery
compartment.
5.2 Speaker
• Connect the four satellite speakers as wellasthe
centrespeaker with the corresponding audio outputs
at the rear of the subwoofer,asshown in item 4of
the wiring diagram.
• Then connect the corresponding AUX audio input
with the signal source (computer/DVD/Blueray/MP3
player etc.), with the help of one of the enclosed
audio cables.
• Connect the subwoofer’spower supply cable to an
undamaged electrical socket which has been installed
correctly.
Note
• Only connect the product to asocket that has been
approved for the device. The electrical socket must
always be easily accessible.
• When using amult-socket power strip, make sure
that the sum power draw of allthe connected
devices does not exceed its maximum throughput
rating.
• If you will not be using the product for along
period of time, disconnect it from mains power.
Note –Line interference /reception
problems
• In an environment with radio-frequency
disturbances, the sample may malfunction
and could self-recover when the interference
disappears.
• In an environment with conducted disturbances,
the sample may malfunction and could self-recover
when the interference disappears.
5.3 On/off switch /standby
• Turn the speaker system on by turning the on/off
switch ON/OFF at the rear of the subwoofer to ON.
• Turn the speaker system off completely by turning
the on/off switch ON/OFF on the rear side of the
subwoofer to OFF.
• When the speaker system is turned on press
the STBY button on the remote control or the
MODE button on the subwoofer’sfront display for
approximately 3seconds to switch the speaker system
to standby mode.
• Press the STBY button in standby mode on the
remote control or the MODE button on the front
display of the subwoofer to activate the speaker.
Note –Automatic standby
• Please note that the speaker system switches to
standby mode after 15 minutes of no activity (no
audio playback /noother activity).
• Press any button on the remote control or the
subwoofer to re-activate the speaker system.
• The system is shipped from the factory with an
auto standby function. To deactivate this mode,
press button 5onthe front of the subwoofer
system or on the remote control for about 3
seconds. ‘E off’ or ‘E on’ appears in the display.

5
6. Audio source selection
6.1 AUX playback
• Press the AUX button on the remote control or press
the MODE button on the subwoofer several times to
select the AUX connection as the audio source. The
AUX selection is shown on the subwoofer’sdisplay
and signalled by an “AUX” speech message.
6.2 Playback using
Bluetooth
®
• Press the DVD/BT button on the remote control or
press the MODE button on the subwoofer several
times to select
Bluetooth
®
as the audio source. The
BLUE selection is shown on the subwoofer’sdisplay
and signalled by a“Bluetooth” speech message.
6.3 DVD playback
• Press the DVD/BT button on the remote control
or press the MODE button on the subwoofer
several times to select the DVD connection as the
audio source. The DVD selection is shown on the
subwoofer’sdisplay and signalled by an “DVD”
speech message.
6.4 USB/SD playback
• Insert aUSB memory stick or SD/SDHC cardinto the
device.
• Press the USB/SD button on the remote control or
press the MODE button on the subwoofer several
times to select USB/SD as the audio source. The USB/
SD selection is shown on the subwoofer’sdisplay and
signalled by an “USB” speech message.
6.5 FM radio playback
• Press the FM button on the remote control or press
the MODE button on the subwoofer several times to
select the built-in FM radio as the audio source. The
FM selection is shown on the subwoofer’sdisplay and
signalled by an “FM” speech message.
7. Advanced features
7.1 General and individual volume control
• Press VOL+ or VOL- to increase or decrease the
volume of all speakers together.
• Press the selection buttons SURR, SUB, CEN,
FRONT and nally VOL+ oder VOL- to increase
or decrease the volume individually for aselected
speaker in the system. This can be used to improve
sound quality if thereisunbalanced volume and
problematic spatial conditions.
• The volume of each individual speaker is shown in the
display.
7.2
Bluetooth
®
first connection (pairing)
• Make surethat your
Bluetooth
®
-capable terminal
device is on and
Bluetooth
®
is activated.
• Make surethat the speaker is located within the
Bluetooth
®
range of max. 10 metres.
• Open the
Bluetooth
®
settings on your terminal device
and wait until "LPR-5120" appears in the list of
Bluetooth
®
devices found.
• Select "LPR-5120" and wait until the speaker is listed
as connected in the
Bluetooth
®
settings on your
terminal device.
• If the
Bluetooth
®
has connected successfully BLUE will
be shown on the display.
Note
• Check whether your mobile device (MP3 player,
mobile phone, etc.) is
Bluetooth
®
capable.
• If not, you can only use the speaker for playback
using the included audio cable.
• Note that the maximum range for
Bluetooth
®
is
10 metres without obstacles such as walls, people,
etc.
7.3 Manual FM radio station search
• Youcan search for stations manually by briey
pressing the TUN+ or the TUN- buttons on the
remote control or the
|
¤¤
|
buttons on the
subwoofer’sdisplay.
• If you press and hold the TUN+ / TUN- buttons or the
¤
||
Play/Pause button on the remote control (about 2
seconds), or the press and hold the
|
¤¤
|
/ ¤
||
buttons on the subwoofer’sdisplay the device will
automatically search for the next receivable station
within the regional FM transmission area.

6
7.4 Automatic FM radio station search
• Press and hold the ¤
||
Play/Pause button until the
automatic station search begins. The stations found in
the reception area at that time aresaved as presets. A
max. of 40 presets can be saved (P0 -P40).
• Press the PRESET button on the remote control during
radio playback to display the station preset (P0 -P40)
corresponding to the FM frequency playing at that
time.
7.5 Numeric keypad 0-9
• Select atitle on aCD, an audio le, aUSB or SD
storage medium or asaved radio station (preset) by
using the numeric keypad on the remote control. The
selection is only possible on the audio source active
at that time.
8. Care and Maintenance
•Only clean this product with aslightly damp, lint-free
cloth and do not use aggressive cleaning agents.
9. Warranty Disclaimer
Hama GmbH &CoKGassumes no liability and provides
no warranty for damage resulting from improper
installation/mounting, improper use of the product or
from failuretoobserve the operating instructions and/
or safety notes.
10. Service and Support
Please contact Hama Product Consulting if you have
any questions about this product.
Hotline: +49 9091 502-115 (German/English)
Further support information can be found here:
www.hama.com
11. Technical Data
Bluetooth
®
Technology
Bluetooth
®
v4.0
Frequency 45 Hz –20kHz
Impedance 8 Ω
Distortion factor ≥ 0.5% (1K, 1W)
Power supply
230 VAC/50Hz/
0,4 AMax
Power supply remote control 2AAA batteries
Connections
Cinch, USB
(Host, Type A), SD
Performance
Max. total music
performance
120 W
Subwoofer 1x 30 W
Satellites/Centre5x18W
Size (B xTxH)/Weight
Total ca. 7250 g
Subwoofer
27.3 x16x30.8 cm
ca. 4900 g
Satellites/Centre
10.5 x11x17.2 cm
ca. 470 g
12. Recycling Information
Note on environmental protection:
After the implementation of the European
Directive 2012/19/EU and 2006/66/EU in the
national legal system, the following applies:
Electric and electronic devices as wellas
batteries must not be disposed of with household
waste. Consumers areobliged by law to return electrical
and electronic devices as wel lasbatteries at the end of
their service lives to the public collecting points set up
for this purpose or point of sale. Details to this are
dened by the national law of the respective country.
This symbol on the product, the instruction manual or
the package indicates that aproduct is subject to these
regulations. By recycling, reusing the materials or other
forms of utilising old devices/Batteries, you aremaking
an important contribution to protecting our
environment.
13. Declaration of Conformity
Hereby,Hama GmbH &CoKGdeclares that the
radio equipment type [00173147] is in
compliance with Directive 2014/53/EU.The full
text of the EU declaration of conformity is available at
the following internet address: www.hama.
com->00173147->Downloads.
Frequency band(s)
2400 -2483.5
MHz
Maximum radio-frequency power
transmitted
20 dBm

7
D Bedienungsanleitung
Bedienungselemente und Anzeigen
A
Lautsprecher:
1. Subwoofer
2. Satelliten-Lautsprecher
3. Fernbedienung (ausführlich siehe Pic.B)
4. MODE –Taste
5. ¤¤
|
–Taste, Titelsprung vorwärts,
Aus-/Einschalten der LED Beleuchtung
6. ¤
||
–Play/Pause –Taste
7. |
–Taste, Titelsprung zurück,
Aus-/Einschalten der Auto-Standby Funktion
8. Lautstärkeregler
9. USB/SD-Slot
10. 230 VNetzanschluß
11. ON/OFF,Ein-/Ausschalter
12. FM Antennenanschluss
13. Stereo Audio Eingang Cinch Rechts/Links
14. DVD Audio Eingang Front Rechts/Front Links
15. DVD Audio Eingang Center/Subwoofer
16. DVD Audio Eingang Rückseite Rechts/Links
17. Center –Lautsprecher Anschluss
18. Satelliten Lautsprecher Anschluss Front Rechts/Links
19. Satelliten Lautsprecher Anschluss Hinten Rechts/Links
B
Fernbedienung:
STBY –Ein-/Standbyschalter
MUTE –Stummschaltung
2.1/5.1 –Umschalten zwischen 5.1 (Surround) und
2.1 (Stereo) Audio –Wiedergabe
PRESET –Speichern von Radiosendern
RESET –
setzt das ganze System auf Werkseinstellung zurück
FM –Auswahl Audioquelle FM-Radio
DVD/BT –Auswahl Audioquelle DVD-Player
USB/SD –Auswahl Audioquelle Speichermedium USB
oder SD/SDHC Karte
AUX –Auswahl Audioquelle AUX /PC-Anschluss
SURR –individuelle Lautstärkeregelung Satelliten
SUB –individuelle Lautstärkeregelung Subwoofer
CEN –individuelle Lautstärkeregelung Center
Lautsprecher
VOL +/- –generelle Lautstärkeregelung (Master)
¤
||
–Play/Pause –Taste /autom. Radio-Sender Suche
|
–Titelsprung zurück /Radio-Sender Suche
¤¤
|
–Titelsprung vorwärts /Radio-Sender Suche
FRONT –individuelle Lautstärkeregelung Front
Lautsprecher
TUN- –Radiofrequenzsuche rückwärts
TUN+ –Radiofrequenzsuche vorwärts
0-9 –Titelnummernauswahl
Vielen Dank, dass Sie sich für ein Hama Produkt
entschieden haben!
Nehmen Sie sich Zeit und lesen Sie die folgenden
Anweisungen und Hinweise zunächst ganz durch.
Bewahren Sie diese Bedienungsanleitung anschließend
an einem sicheren Ort auf,umbei Bedarf darin
nachschlagen zu können. Sollten Sie das Gerät
veräußern, geben Sie diese Bedienungsanleitung an
den neuen Eigentümer weiter.
1. Erklärung von Warnsymbolen und Hinweisen
Gefahr eines elektrischen Schlages
Dieses Symbol weist auf eine Berührungsgefahr
mit nicht isolierten Teilen des Produktes hin,
die möglicherweise eine gefährliche Spannung
von solcher Höhe führen, dass die Gefahr eines
elektrischen Schlags besteht.
Warnung
Wirdverwendet, um Sicherheitshinweise zu
kennzeichnen oder um Aufmerksamkeit auf
besondereGefahren und Risiken zu lenken.
Hinweis
Wirdverwendet, um zusätzlich Informationen oder
wichtige Hinweise zu kennzeichnen.
2. Packungsinhalt
• Subwoofer
• 4Satelliten Lautsprecher
• 1Center Lautsprecher
• 1Y-Audio-Adapterkabel
• 3Audio-Anschlusskabel
• Fernbedienung (2 AAA Batterien nicht im
Lieferumfang enthalten)
• diese Bedienungsanleitung
3. Sicherheitshinweise
• Das Produkt ist für den privaten, nicht-gewerblichen
Haushaltsgebrauch vorgesehen.
• Schützen Sie das Produkt vor Schmutz, Feuchtigkeit
und Überhitzung und verwenden Sie es nur in
trockenen Räumen.

8
• Dieses Produkt gehört, wie alle elektrischen Produkte,
nicht in Kinderhände!
• Lassen Sie das Produkt nicht fallen und setzen Sie es
keinen heftigen Erschütterungen aus.
• Betreiben Sie das Produkt nicht außerhalb
seiner in den technischen Daten angegebenen
Leistungsgrenzen.
• Halten Sie Kinder unbedingt von dem
Verpackungsmaterial fern, es besteht
Erstickungsgefahr.
• Entsorgen Sie das Verpackungsmaterial sofort gemäß
den örtlich gültigen Entsorgungsvorschriften.
• Nehmen Sie keine Veränderungen am
Gerät vor.Dadurch verlieren sie jegliche
Gewährleistungsansprüche.
Gefahr eines elektrischen Schlages
• Öffnen Sie das Produkt nicht und betreiben Sie es
bei Beschädigungen nicht weiter.
• Verwenden Sie das Produkt nicht, wenn der
AC-Adapter,das Adapterkabel oder die
Netzleitung beschädigt sind.
• Versuchen Sie nicht, das Produkt selbst zu warten
oder zu reparieren. Überlassen Sie jegliche
Wartungs-arbeit dem zuständigen Fachpersonal.
Warnung -Batterien
• Beachten Sie unbedingt die korrekte Polarität
(Beschriftung +und -) der Batterien und legen
Sie diese entsprechend ein. Bei Nichtbeachtung
besteht die Gefahr des Auslaufens oder einer
Explosion der Batterien.
• Gestatten Sie Kindern nicht ohne Aufsicht das
Wechseln von Batterien.
• Mischen Sie alte und neue Batterien nicht, sowie
Batterien unterschiedlichen Typs oder Herstellers.
• Entfernen Sie Batterien aus Produkten, die längere
Zeit nicht benutzt werden.
• Schließen Sie die Batterien nicht kurz.
• Laden Sie Batterien nicht.
• Werfen Sie Batterien nicht ins Feuer.
• Bewahren Sie Batterien außerhalb der Reichweite
von Kindern auf.
4. Anschlussdiagramm

9
5. Inbetriebnahme
5.1 Fernbedienung
• Öffnen Sie die Batteriefachabdeckung, welche sich
auf der Rückseite der Fernbedienung bendet.
• Ziehen Sie (gegebenenfalls) die Verschlusslasche
zurück und heben Sie den Deckel an. Bei anderen
Modellen der Fernbedienung genügt es die
Abdeckung in die gekennzeichnete Richtung zu
schieben.
A: Verschlusslasche B: Schiebedeckel
• Legen Sie die Batterien polrichtig ein. Die
richtige Polarität wirdimBatteriefach durch die
Kennzeichnung des Plus- und Minuspols dargestellt.
5.2 Lautsprecher
• Verbinden Sie die vier Satelliten-Lautsprecher sowie
den Center-Lautsprecher mit den entsprechenden
Audioausgängen an der Rückseite des Subwoofers,
wie im Anschlussdiagramm Punkt 4dargestellt.
• Verbinden Sie dann den entsprechenden
Audioeingang AUX mit Hilfe eines der beiliegenden
Audiokabel mit der Signalquelle (Computer/DVD/
Blueray/MP3 Player etc).
• Verbinden Sie das Netzanschlusskabel des Subwoofers
mit einer intakten und korrekt installierten Steckdose.
Hinweis
• Betreiben Sie das Produkt an einer dafür
zugelassenen Steckdose.
• Achten Sie bei Mehrfachsteckdosen darauf,dass
die angeschlossenen Verbraucher die zulässige
Gesamtleistungsaufnahme nicht überschreiten.
• Die Netzsteckdose muss jederzeit leicht erreichbar
sein.
• Trennen Sie das Produkt vom Netz, wenn Sie es
längereZeit nicht benutzen.
5.3 Ein-/Ausschalten/Standby
• Schalten Sie das Lautsprechersystem ein, indem Sie
den Ein-/Ausschalter ON/OFF an der Rückseite des
Subwoofers auf ON stellen.
• Schalten Sie das Lautsprechersystem vollständig
aus, indem Sie den Ein-/Ausschalter ON/OFF an der
Rückseite des Subwoofers auf OFF stellen.
• Bei eingeschaltetem Lautsprechersystem betätigen
Sie die Taste STBY auf der Fernbedienung oder
die Taste MODE (ca. 3Sek.) an der Bedienfront
des Subwoofers um das Lautsprechersystem in den
Standby-Modus wechseln zu lassen.
• Betätigen Sie im Standby-Modus die Taste STBY
auf der Fernbedienung oder die Taste MODE
an der Bedienfront des Subwoofers, um das
Lautsprechersystem zu aktivieren.
Hinweis –Automatischer Standby
• Beachten Sie, dass das Lautsprechersystem nach
15 Minuten ohne Aktion (keine Audiowiedergabe/
keine sonstigen Aktivitäten) in den Standby-Modus
wechselt.
• Betätigen Sie eine beliebige Taste auf der
Fernbedienung oder am Subwoofer,umdas
Lautsprechersystem wieder zu aktivieren.
•Werksseitig wirddas System mit einem Auto-
Standby ausgeliefert. Um diesen Modus zu
deaktivieren, drücken Sie für ca. 3Sek. die Taste 5
auf der Vorderseite des Subwoofersystems oder der
Fernbedienung. Im Display erscheint die Anzeige
„E off“ oder „E on“

10
6.Audio-Quellenauswahl
6.1 AUX-Wiedergabe
• Betätigen Sie die Taste AUX auf der Fernbedienung
oder wählen Sie durch mehrmaliges Drücken der
MODE Taste am Subwoofer den AUX-Anschluss als
Audioquelle aus. Die Auswahl AUX wirdauf dem
Display am Subwoofer angezeigt und durch die
Sprachinformation „AUX“ signalisiert.
6.2 Wiedergabe über
Bluetooth
®
• Betätigen Sie die Taste DVD/BT auf der
Fernbedienung oder wählen Sie durch mehrmaliges
Drücken der MODE Taste am Subwoofer
Bluetooth
®
als Audioquelle aus. Die Auswahl BLUE wirdauf
dem Display am Subwoofer angezeigt und durch die
Sprachinformation „Bluetooth“ signalisiert.
6.3 DVD-Wiedergabe
• Betätigen Sie die Taste DVD/BT auf der
Fernbedienung oder wählen Sie durch mehrmaliges
Drücken der MODE Taste am Subwoofer den DVD-
Anschluss als Audioquelle aus. Die Auswahl DVD wird
auf dem Display am Subwoofer angezeigt und durch
die Sprachinformation „DVD“ signalisiert.
6.4 USB/SD-Wiedergabe
• Stecken Sie einen USB Speicher oder SD/SDHC
Speicherkarte in das Gerät.
• Betätigen Sie die Taste USB/SD auf der
Fernbedienung oder wählen Sie durch mehrmaliges
Drücken der MODE Taste am Subwoofer USB/SD
als Audioquelle aus. Die Auswahl USB/SD wirdauf
dem Display am Subwoofer angezeigt und durch die
Sprachinformation „USB“ signalisiert.
6.5 FM Radio Wiedergabe
• Betätigen Sie die Taste FM auf der Fernbedienung
oder wählen Sie durch mehrmaliges Drücken der
MODE Taste am Subwoofer das integrierte FM-Radio
als Audioquelle aus. Die Auswahl FM wirdauf dem
Display am Subwoofer angezeigt und durch die
Sprachinformation „FM“ signalisiert.
7. Erweiterte Funktionen
7.1 Generelle und individuelle
Lautstärkeregelung
• Betätigen Sie VOL+ oder VOL-,umdie Lautstärke
aller Lautsprecher des Systems gemeinsam zu erhöhen
oder zu verringern.
• Betätigen Sie die Auswahltasten SURR, SUB, CEN,
FRONT und anschließend VOL+ oder VOL-,um
die Lautstärke individuell für die ausgewählten
Lautsprecher des Systems zu erhöhen oder zu
verringern. Dies kann bei ungleichmäßiger
Ausstellung und schwierigen Raumverhältnissen zur
Klangverbesserung genutzt werden.
• Die individuelle Lautstärke der einzelnen Lautsprecher
wirdimDisplay angezeigt
7.2
Bluetooth
®
Erstverbindung (Pairing)
• Stellen Sie sicher,dass Ihr
Bluetooth
®
fähiges
Endgerät eingeschaltet ist und dass
Bluetooth
®
aktiviert ist.
• Stellen Sie sicher,dass der Lautsprecher sich innerhalb
der
Bluetooth
®
Reichweite von max. 10 Metern
bendet.
• Öffnen Sie auf Ihrem Endgerät die
Bluetooth
®
Einstellungen und warten Sie, bis in der Liste der
gefundenen
Bluetooth
®
Geräte "LPR-5120" angezeigt
wird.
• Wählen Sie "LPR-5120" aus und warten Sie, bis
der Lautsprecher als verbunden in den
Bluetooth
®
Einstellungen Ihres Endgerätes angezeigt wird.
• Bei erfolgreicher
Bluetooth
®
–Verbindung wirdBLUE
auf dem Display dauerhaft angezeigt.
Hinweis
• Prüfen Sie, ob ihr mobiles Endgerät (MP3-Player,
Mobiltelefon, etc.)
Bluetooth
®
fähig ist.
• Wenn nicht, können Sie den Lautsprecher
nur mittels des beiliegenden Audiokabels zur
Wiedergabe nutzen.
• Beachten Sie, dass die Reichweite von
Bluetooth
®
max. 10 Meter beträgt, ohne Hindernisse wie
Wände, Personen etc.

11
7.3 Manuelle FM-Radio Sendersuche
• Durch kurzes Betätigen der Tasten TUN+ oder TUN-
auf der Fernbedienung oder der Tasten
|
¤¤
|
an der Bedienfront des Subwoofers können Sie einen
Sender manuell suchen.
• Betätigen Sie die Tasten TUN+ / TUN- oder die
¤
||
-Play/Pause –Tasteauf der Fernbedienung länger
(ca. 2Sek.), oder der Tasten
|
¤¤
|
/ ¤
||
an der
Bedienfront des Subwoofers länger (ca. 2Sek.), sucht
das Gerät automatisch den nächsten empfangbaren
Senders innerhalb des regionalen FM (UKW)
Sendebereichs.
7.4 Automatische FM-Radio Sendersuche
• Drücken Sie die ¤
||
–Play/Pause –Taste dauerhaft
bis der die automatische Sendersuche startet. Die
im aktuellen Empfangsbereich gefundenen Sender
werden als Presets abgespeichert. Max. 40 Presets
können gespeichert werden (P0 -P40).
• Drücken Sie während der Radio-Wiedergabe auf der
Fernbedienung die Taste PRESET,umden zu einer
aktuell abgespielten FM-Frequenz den zugehörigen
Speicherplatz (P0 -P40) anzeigen zu lassen.
7.5 Nummernfeld 0-9
• Wählen Sie mit Hilfe des Nummernfeldes
auf Ihrer Fernbedienung einen Titel auf Ihrer
Fernbedienung eine Audiodatei auf einem USB oder
SD Speichermedium, oder einen abgespeicherten
Radiosender (Preset) aus. Die Auswahl ist nur auf der
aktuell aktiven Audioquelle möglich.
8. Wartung und Pflege
• Reinigen Sie dieses Produkt nur mit einem
fusselfreien, leicht feuchten Tuch und verwenden Sie
keine aggressiven Reiniger.
9. Haftungsausschluss
Die Hama GmbH &CoKGübernimmt keinerlei
Haftung oder Gewährleistung für Schäden, die
aus unsachgemäßer Installation, Montage und
unsachgemäßem Gebrauch des Produktes oder einer
Nichtbeachtung der Bedienungsanleitung und/oder der
Sicherheitshinweise resultieren.
10. Service und Support
Bitte wenden Sie sich bei Fragen zum Produkt gerne
an die Hama-Produktberatung.
Hotline: +49 9091 502-115 (Deu/Eng)
WeitereSupportinformationen nden Sie hier:
www.hama.com
11. Technische Daten
Bluetooth
®
Technologie
Bluetooth
®
v4.0
Frequenz 45 Hz –20kHz
Impedanz 8 Ω
Verzerrung /Klirrfaktor ≥ 0.5% (1K, 1W)
Spannungsversorgung
230 VAC/50Hz/
0,4 AMax
Stromversorgung
Fernbedienung
2AAA Batterien
Anschlüsse
Cinch, USB
(Host, Type A), SD
Leistung
Max. Musikgesamtleistung 120 W
Subwoofer 1x 30 W
Satelliten/Center 5x 18 W
Größe (B xTxH)/Gewicht
Gesamt ca. 7250 g
Subwoofer
27,3 x16x30,8 cm
ca. 4900 g
Satelliten /Center
10,5 x11x17,2 cm
ca. 470 g

12
12. Entsorgungshinweise
Hinweis zum Umweltschutz:
Ab dem Zeitpunkt der Umsetzung der
europäischen Richtlinien 2012/19/EU und
2006/66/EG in nationales Recht gilt folgendes:
Elektrische und elektronische Geräte sowie
Batterien dürfen nicht mit dem Hausmüll entsorgt
werden. Der Verbraucher ist gesetzlich verpichtet,
elektrische und elektronische Geräte sowie Batterien am
Ende ihrer Lebensdauer an den dafür eingerichteten,
öffentlichen Sammelstellen oder an die Verkaufsstelle
zurückzugeben. Einzelheiten dazu regelt das jeweilige
Landesrecht. Das Symbol auf dem Produkt, der
Gebrauchsanleitung oder der Verpackung weist auf
diese Bestimmungen hin. Mit der Wiederverwertung,
der stoichen Verwertung oder anderen Formen der
Verwertung von Altgeräten/Batterien leisten Sie einen
wichtigen Beitrag zum Schutz unserer Umwelt.
13. Konformitätserklärung
Hiermit erklärt die Hama GmbH &CoKG, dass
der Funkanlagentyp [00173147] der Richtlinie
2014/53/EU entspricht. Der vollständige Text der
EU-Konformitätserklärung ist unter der folgenden
Internetadresse verfügbar: www.hama.
com->00173147->Downloads.
Frequenzband/Frequenzbänder
2400 -
2483.5 MHz
Abgestrahlte maximale Sendeleistung 20 dBm

13
F Mode d‘emploi
Éléments de commande et d'affichage
A
Haut-parleurs :
1. Caisson de basses
2. Haut-parleurs satellites
3. Télécommande (détails, cf. g. B)
4. Touche MODE
5. Touche ¤¤
|
,Taste, titresuivant,
Mise hors/sous tension de l’éclairage LED
6. Touche ¤
||
,lecture/pause
7. Touche
|
,titreprécédent,
Mise hors/sous tension de la fonction de veille
automatique
8. Réglage du volume
9. Emplacement USB/SD
10. Entrée secteur 230 V
11. Interrupteur de mise sous/hors tension ON/OFF
12. Entrée antenne FM
13. Entrée audio stéréo RCAdroite/gauche
14. Entrée audio DVD avant droite/avant gauche
15. Entrée audio DVD centre/caisson de basses
16. Entrée audio DVD face arrièredroite/gauche
17. Connexion haut-parleur central
18. Connexion haut-parleurs satellites face avant
droite/gauche
19. Connexion haut-parleurs satellites face arrière
droite/gauche
B
Télécommande :
STBY –Commutateur de mise en fonction/veille
MUTE –Commutateur de mise en sourdine
2.1/5.1 –Umschalten entrelectureaudio 5.1
(Surround) et 2.1 (stéréo)
PRESET –mise en mémoiredestations radio
RESET –réinitialisation des réglages d'usine de tout le
système
FM –sélection de la radio FM comme source audio
DVD/BT –sélection du lecteur DVD comme source audio
USB/SD –sélection de la clé USB ou carte SD/SDHC
comme source audio
AUX –sélection de AUX /PCcomme source audio
SURR –réglage individuel du volume des satellites
SUB –réglage individuel du volume du caisson des
basses
CEN –réglage individuel du volume du haut-parleur
central
VOL +/- –réglage général du volume (Master)
¤
||
–Touche, lecture/pause /auto Recherche d’une
station de radio
|
–titreprécédent /recherche d’une station de
radio
¤¤
|
–titresuivant /recherche d’une station de radio
FRONT –réglage individuel du volume des haut-
parleurs avant
TUN- –recherche d’une fréquence radio vers l’arrière
TUN+ –recherche d’une fréquence radio vers l’avant
0-9 –sélection du numérod’un titre
Nous vous remercions d’avoir choisi un produit Hama.
Veuillez prendreletemps de lirel‘ensemble des
remarques et consignes suivantes. Veuillez conserver
ce mode d‘emploi àportée de main andepouvoir le
consulter en cas de besoin. Transmettez-le au nouveau
propriétaireavec l’appareil le cas échéant.
1. Explication des symboles d‘avertissement et
des remarques
Risque d’électrocution
Ce symbole indique un risque de contact avec
des parties non isolées du produit susceptibles de
conduireuncourant électrique capable de provoquer
un risque d‘électrocution.
Avertissement
Ce symbole est utilisé pour indiquer des consignes
de sécurité ou pour attirer votreattention sur des
dangers et risques particuliers.
Remarque
Ce symbole est utilisé pour indiquer des informations
supplémentaires ou des remarques importantes.
2. Contenu de l‘emballage
• Caisson de basses
• 4haut-parleurs satellites
• 1haut-parleur central
• 1câble adaptateur audio en Y
• 3câbles audio
• Télécommande (fonctionne sur 2piles LR03/AAA, non
fournies)
• Mode d'emploi

14
3. Consignes de sécurité
• Ce produit est destiné àune installation domestique
non commerciale.
• Protégez le produit de toute saleté, humidité, surchauffe
et utilisez-le uniquement dans des locaux secs.
• Cet appareil, comme tout appareil électrique, doit être
gardé hors de portée des enfants !
• Protégez le produit des secousses violentes et évitez
tout choc ou toute chute.
• N‘utilisez pas le produit en dehors des limites
de puissance indiquées dans les caractéristiques
techniques.
• Tenez les emballages d‘appareils hors de portée des
enfants, risque d‘étouffement.
• Recyclez les matériaux d’emballage conformément
aux prescriptions locales en vigueur.
• N’apportez aucune modication àl’appareil. Des
modications vous feraient perdrevos droits de
garantie.
Risque d’électrocution
• Ne tentez pas d‘ouvrir le produit en cas de
détérioration et cessez de l’utiliser.
• N‘utilisez pas le produit lorsque l‘adaptateur,le
câble de connexion ou le câble d‘alimentation sont
endommagés.
• Ne tentez pas de réparer l’appareil vous-même ni
d’effectuer des travaux d’entretien. Déléguez tous
travaux d‘entretien àdes techniciens qualiés.
Avertissement -les batteries
• Respectez impérativement la polarité des batteries
(indications +et-)lors de leur insertion dans le
boîtier.Risques d‘écoulement et d‘explosion des
batteries si tel n‘est pas le cas.
• N‘autorisez pas àdes enfants de remplacer les
piles d‘un appareil sans surveillance.
4. Diagramme de raccordement

15
5. Mise en service
5.1 Télécommande
• Ouvrez le couvercle du compartiment àpiles qui se
trouve sur la face arrièredelatélécommande.
• Tirez(le cas échéant) la languette de fermeture
vers l’arrièreetsoulevez le couvercle. Pour d’autres
modèles de télécommande, il sutdeglisser le
couvercle dans la direction marquée.
A: Languette de
fermeture
B: Couvercle coulissant
• Insérez les piles en respectant la polarité. La polarité
conforme est représentée par les pôles positifs et
négatifs dans le compartiment àpiles.
5.2 Haut-parleurs
• Raccordez les quatrehaut-parleurs satellites et le
haut-parleur central aux sorties audio situées sur la
face arrièreducaisson de basses, comme indiqué au
point 4dudiagramme de raccordement.
• Raccordez ensuite l’entrée audio AUX àvotresource
audio (ordinateur/lecteur DVD/Blue-ray/lecteur MP3,
etc.) àl’aide d’un des câbles audio fournis.
• Branchez le cordon d’alimentation secteur du caisson
de basses àune prise de courant.
Remarque
• Branchez l'appareil uniquement sur une prise de
courant appropriée.
• En cas de prises multiples, veillez àceque les
appareils consommateurs branchés ne dépassent
pas la puissance absorbée totale admissible.
• La prise de courant doit êtrefacilement accessible
àtout moment.
• Débranchez l’appareil si vous ne l’utilisez pas sur
une période prolongée.
5.3 Mise sous/hors tension/en veille
• Mettez le système de haut-parleurs sous tension
en plaçant l’interrupteur ON/OFF,situé sur la face
arrièreducaisson de basses, sur ON.
• Vous pouvez mettrelesystème de haut-parleurs hors
tension en plaçant l’interrupteur ON/OFF,situé sur la
face arrièreducaisson de basses, sur OFF.
• Sur un système de haut-parleurs sous tension, utilisez
la touche STBY de la télécommande ou la touche
MODE située sur le panneau de commande du
caisson de basses (pression d’env.3s)andemettre
le système de haut-parleurs en veille.
• Utilisez la touche STBY de la télécommande ou la
touche MODE située sur le panneau de commande
du caisson de basses anderéactiver le système de
haut-parleurs.
Remarque concernant la veille
automatique
• Veuillez noter que le système de haut-parleurs
se met automatiquement en veille au bout de
15 minutes d'inactivité (aucune lecture/aucune
fonction).
• Appuyez sur n'importe quelle touche de la
télécommande ou du caisson de basses ande
réactiver le système de haut-parleurs.
• Le système est livré par défaut avec une fonction
de veille automatique. Pour désactiver ce mode,
appuyez pendant environ 3secondes sur la touche
5delaface avant du caisson de graves ou de la
télécommande. «Eoff »ou«Eon»apparaît alors
àl’écran.
6.Sélection de la source audio
6.1 Lecture AUX
• Utilisez la touche AUX de la télécommande ou
sélectionnez AUX comme source audio en appuyant
plusieurs fois sur la touche MODE du caisson de
basses. La sélection AUX apparaît àl’écran du caisson
de basses et le message vocal annonce «AUX ».

16
6.2 Lecture via
Bluetooth
®
• Utilisez la touche DVD/BT de la télécommande ou
sélectionnez
Bluetooth
®
comme source audio en
appuyant plusieurs fois sur la touche MODE du
caisson de basses. La sélection BLUE apparaît à
l’écran du caisson de basses et le message vocal
annonce «Bluetooth ».
6.3 Lecture DVD
• Utilisez la touche DVD/BT de la télécommande ou
sélectionnez la connexion DVD comme source audio
en appuyant plusieurs fois sur la touche MODE du
caisson de basses. La sélection DVD apparaît àl’écran
du caisson de basses et le message vocal annonce «
DVD ».
6.4 Lecture USB/SD
• Insérez une clé USB ou une carte SD/SDHC dans
l’appareil.
• Utilisez la touche USB/SD de la télécommande
ou sélectionnez USB/SD comme source audio en
appuyant plusieurs fois sur la touche MODE du
caisson de basses. La sélection USB/SD apparaît à
l’écran du caisson de basses et le message vocal
annonce «USB ».
6.5 Lecture radio FM
• Utilisez la touche FM de la télécommande ou
sélectionnez la radio FM intégrée comme source
audio en appuyant plusieurs fois sur la touche MODE
du caisson de basses. La sélection FM apparaît à
l’écran du caisson de basses et le message vocal
annonce «FM».
7. Fonctions avancées
7.1 Réglage général et individuel du volume
• Utilisez la touche VOL+ ou VOL- and’augmenter
ou baisser le volume de tous les haut-parleurs du
système.
• Utilisez les touches de sélection SURR, SUB, CEN,
FRONT, puis la touche VOL+ ou la touche VOL- an
d’augmenter ou baisser individuellement le volume
de certains haut-parleurs du système. Vous pouvez
utiliser cette commande and’améliorer le son en cas
de positionnement décalé des haut-parleurs ou de
conguration spatiale critique.
• Le réglage individuel du volume des différents haut-
parleurs apparaît àl’écran.
7.2 Première connexion
Bluetooth
®
(couplage)
• Assurez-vous que votreappareil
Bluetooth
®
est bien
sous tension et que sa fonction
Bluetooth
®
est bien
activée.
• Assurez-vous que le haut-parleur se trouve dans un
rayon ne dépassant pas la portée
Bluetooth
®
max. de
10 mètres.
• Ouvrez le menu des paramètres
Bluetooth
®
sur
votreappareil portable et attendez que l’appareil
"LPR-5120" apparaisse dans la liste des appareils
Bluetooth
®
détectés.
• Sélectionnez "LPR-5120" et attendez que le haut-
parleur soit aché avec le statut connecté dans les
paramètres
Bluetooth
®
de votreappareil.
• BLUE apparaît àl’écran en cas de connexion
Bluetooth
®
conforme.
Remarque
• Veuillez contrôler que votreappareil portable
(lecteur MP3, téléphone portable, etc.) est bien
compatible
Bluetooth
®
.
• Si tel n‘est pas le cas, vous pourrez utiliser les
haut-parleurs uniquement àl‘aide du câble audio
fourni.
• Veuillez noter que la portée maximale de la
connexion
Bluetooth
®
est de 10 mètres sans
obstacles tels que parois, personnes, etc.
7.3 Recherche manuelle de stations FM
• Appuyez brièvement sur le touche TUN+ ou la touche
TUN- de la télécommande ou sur les touches
|
¤¤
|
du panneau de commande du caisson de basses
and’effectuer une recherche manuelle de stations.
• Appuyez pendant env.2ssur la touche TUN+
ou TUN- ,sur la touche¤
||
-lecture/pause de la
télécommande ou encoresur les touches
|
¤¤
|
/ ¤
||
du panneau de commande du caisson de
basses (pendant env.2s)pour lancer une recherche
automatique de la prochaine station captable dans la
plage FM régionale (OUC).
7.4 Recherche automatique de stations FM
• Maintenez la touche ¤
||
–lecture/pause enfoncée
jusqu’au démarrage de la recherche automatique
des stations. Les stations captées dans la plage de
réception seront sauvegardées en tant que stations
présélectionnées. Jusqu’à 40 stations présélectionnées
peuvent êtresauvegardées (P0 -P40).

17
• En mode de lectureradio, appuyez sur la touche
PRESET de la télécommande and’acher
l’emplacement mémoire(P0 -P40) de la fréquence
FM en cours de lecture.
7.5 Pavé numérique 0-9
• Sélectionnez le titred’un CD, le chier audio d’une clé
USB ou d’une carte SD ou encoreune station de radio
en mémoire(Preset) àl’aide du pavé numérique de
la télécommande. Ce type de sélection n’est possible
qu’à partir de la source audio activée.
8. Soins et entretien
•Nettoyez la balance uniquement àl’aide d’un chiffon
non breux légèrement humide ;évitez tout détergent
agressif.
9. Exclusion de garantie
La société Hama GmbH &CoKGdécline toute
responsabilité en cas de dommages provoqués par
une installation, un montage ou une utilisation non
conformes du produit ou encoreprovoqués par un non
respect des consignes du mode d‘emploiet/ou des
consignes de sécurité.
10. Service et assistance
En cas de question concernant le produit, veuillez vous
adresser au service de conseil produits de Hama.
Ligne téléphonique directe :+49 9091 502-115
(allemand/anglais)
Vous trouverez ici de plus amples informations
concernant l‘assistance :www.hama.com
11. Caractéristiques techniques
Technologie
Bluetooth
®
Bluetooth
®
v4.0
Fréquence 45 Hz –20kHz
Impédance 8 Ω
Distorsion /taux de distorsion ≥ 0.5% (1K, 1W)
Courant électrique
230 VAC/50Hz/
0,4 AMax
Alimentation électrique de la
télécommande
2piles AAA
Connexions
Cinch, USB
(Host, Type A), SD
Puissance
Max. puissance musicale
totale
120 W
Caisson de basses 1x 30 W
Satellites /central 5x 18 W
Taille (B xTxH)/poids
Total ca. 7250 g
Caisson de basses
27,3 x16x30,8 cm
ca. 4900 g
Satellites /central
10,5 x11x17,2 cm
ca. 470 g
12. Consignes de recyclage
Remarques concernant la protection de
l’environnement:
Conformément àladirective européenne
2012/19/EU et 2006/66/CE, et and‘atteindre
un certain nombred‘objectifs en matièrede
protection de l‘environnement, les règles
suivantes doivent êtreappliquées: Les appareils
électriques et électroniques ainsi que les batteries ne
doivent pas êtreéliminés avec les déchets ménagers. Le
pictogramme “picto” présent sur le produit, son manuel
d‘utilisation ou son emballage indique que le produit
est soumis àcette réglementation. Le consommateur
doit retourner le produit/la batterie usager aux points
de collecte prévus àcet effet. Il peut aussi le remettreà
un revendeur.Enpermettant ennlerecyclagedes
produits ainsi que les batteries, le consommateur
contribueraàlaprotection de notreenvironnement.
C‘est un acte écologique.
13. Déclaration de conformité
Le soussigné, Hama GmbH &CoKG, déclare
que l‘équipement radioélectrique du type
[00173147] est conforme àladirective
2014/53/UE. Le texte complet de la déclaration UE de
conformité est disponible àl‘adresse internet suivante:
www.hama.com -> 00173147 -> Downloads.
Bandes de fréquences
2400 -2483.5
MHz
Puissance de radiofréquence
maximale
20 dBm

18
E Instrucciones de uso
Elementos de manejo eindicadores
A
Altavoces:
1. Subwoofer
2. Altavoces satélite
3. Mando adistancia (paradetalle consulte la g. B)
4. Tecla MODE
5. Tecla ¤¤
|
,salto al título siguiente,
Conectar/desconectar la iluminación LED
6. Tecla ¤
||
Reproducción/Pausa
7. Tecla
|
,salto al título anterior,
Conectar/desconectar la función Auto standby
8. Regulador de volumen
9. RanuraSD/USB
10. Conexión de red230 V
11. Conmutador encendido/apagado ON/OFF
12. Conexión de antena FM
13. Entrada de audio estéreo RCAderecha/izquierda
14. Entrada de audio DVD frontal derecho/frontal
izquierdo
15. Entrada de audio DVD centro/subwoofer
16. Entrada de audio DVD lado posterior derecha/
izquierda
17. Centro–conexión altavoces
18. Conexión altavoces satélite frontal derecho/
izquierdo
19. Conexión altavoces satélite lado posterior derecho/
izquierdo
B
Mando adistancia:
STBY –Interruptor On/Standby
MUTE –Silenciamiento
2.1/5.1 –Conmutación entrereproducción de audio
5.1 (Surround) y2.1 (Stereo)
PRESET –Almacenamiento de emisoras de radio
RESET –restablece el sistema por completo alos
ajustes de fábrica
FM –Selección de la radio FM como fuente de audio
DVD/BT –Selección del reproductor de DVD como
fuente de audio
USB/SD –Selección del medio de memoria USB odela
tarjeta SD/SDHC como fuente de audio
AUX –ASelección de la conexión AUX/PC como fuente
de audio
SURR –
Regulación del volumen individual de los satélites
SUB –Regulación del volumen individual del
subwoofer
CEN –
Regulación del volumen individual altavoces centro
VOL +/- –Regulación de volumen general (maestro)
¤
||
–Tecla Reproducir/pausa /búsqueda autom. de
emisoras de radio
|
–Salto al título anterior/búsqueda de emisoraderadio
¤¤
|
–Salto al título siguiente/búsqueda de emisora
de radio
FRONT –Regulación del volumen individual altavoces
frontales
TUN- –Búsqueda de radiofrecuencia, retroceso
TUN+ –Búsqueda de radiofrecuencia, avance
0-9 –Selección del númerodetítulo
Le agradecemos que se haya decidido por un producto
de Hama.
Tómese tiempo yléase primerolas siguientes
instrucciones eindicaciones. Después, guarde estas
instrucciones de manejo en un lugar seguroparapoder
consultarlas cuando sea necesario. Si vende el aparato,
entregue estas instrucciones de manejo al nuevo
propietario.
1. Explicación de los símbolos de aviso ydelas
indicaciones
Peligrodesufrir una descarga eléctrica
Este símbolo hace referencia al peligrodecontacto
con partes no aisladas del producto que pueden
conducir una tensión peligrosa de una intensidad tal
que puede provocar una descarga eléctrica.
Aviso
Se utiliza paracaracterizar las indicaciones de
seguridad oparallamar la atención sobrepeligros y
riesgos especiales.
Nota
Se utiliza paracaracterizar informaciones adicionales
oindicaciones importantes.
2. Contenido del paquete
• Subwoofer
• 4altavoces satélite
• 1altavoz de centro
• 1cable adaptador de audio Y
• 3cables de conexión de audio
• Mando adistancia (2 pilas AAA no incluidas en el
volumen de suministro)
• Estas instrucciones de manejo
Strona się ładuje...
Strona się ładuje...
Strona się ładuje...
Strona się ładuje...
Strona się ładuje...
Strona się ładuje...
Strona się ładuje...
Strona się ładuje...
Strona się ładuje...
Strona się ładuje...
Strona się ładuje...
Strona się ładuje...
Strona się ładuje...
Strona się ładuje...
Strona się ładuje...
Strona się ładuje...
Strona się ładuje...
Strona się ładuje...
Strona się ładuje...
Strona się ładuje...
Strona się ładuje...
Strona się ładuje...
Strona się ładuje...
Strona się ładuje...
Strona się ładuje...
Strona się ładuje...
Strona się ładuje...
Strona się ładuje...
Strona się ładuje...
Strona się ładuje...
Strona się ładuje...
Strona się ładuje...
Strona się ładuje...
Strona się ładuje...
Strona się ładuje...
Strona się ładuje...
Strona się ładuje...
Strona się ładuje...
Strona się ładuje...
Strona się ładuje...
Strona się ładuje...
Strona się ładuje...
Strona się ładuje...
Strona się ładuje...
Strona się ładuje...
Strona się ładuje...
Strona się ładuje...
Strona się ładuje...
Strona się ładuje...
Strona się ładuje...
Strona się ładuje...
Strona się ładuje...
Strona się ładuje...
Strona się ładuje...
Strona się ładuje...
Strona się ładuje...
Strona się ładuje...
Strona się ładuje...
-
 1
1
-
 2
2
-
 3
3
-
 4
4
-
 5
5
-
 6
6
-
 7
7
-
 8
8
-
 9
9
-
 10
10
-
 11
11
-
 12
12
-
 13
13
-
 14
14
-
 15
15
-
 16
16
-
 17
17
-
 18
18
-
 19
19
-
 20
20
-
 21
21
-
 22
22
-
 23
23
-
 24
24
-
 25
25
-
 26
26
-
 27
27
-
 28
28
-
 29
29
-
 30
30
-
 31
31
-
 32
32
-
 33
33
-
 34
34
-
 35
35
-
 36
36
-
 37
37
-
 38
38
-
 39
39
-
 40
40
-
 41
41
-
 42
42
-
 43
43
-
 44
44
-
 45
45
-
 46
46
-
 47
47
-
 48
48
-
 49
49
-
 50
50
-
 51
51
-
 52
52
-
 53
53
-
 54
54
-
 55
55
-
 56
56
-
 57
57
-
 58
58
-
 59
59
-
 60
60
-
 61
61
-
 62
62
-
 63
63
-
 64
64
-
 65
65
-
 66
66
-
 67
67
-
 68
68
-
 69
69
-
 70
70
-
 71
71
-
 72
72
-
 73
73
-
 74
74
-
 75
75
-
 76
76
-
 77
77
-
 78
78


w innych językach
- español: Hama 00173147 El manual del propietario
- italiano: Hama 00173147 Manuale del proprietario
- slovenčina: Hama 00173147 Návod na obsluhu
- português: Hama 00173147 Manual do proprietário
- français: Hama 00173147 Le manuel du propriétaire
- română: Hama 00173147 Manualul proprietarului
Powiązane artykuły
-
Hama 00173140 Instrukcja obsługi
-
-
-
-
-
-
-
-
-
Inne dokumenty
-
Harman Kardon AVR 171S Instrukcja obsługi
-
Sony DAV-SB100 Instrukcja obsługi
-
Sony DAV-SB200 Instrukcja obsługi
-
Sony STR-DH770 Instrukcja obsługi
-
Sony STR-DH790 Instrukcja obsługi
-
Sony STR-DH590 Instrukcja obsługi
-
Philips SPA2310/00 Skrócona instrukcja obsługi
-
-
Silvercrest SP-2124 User Manual And Service Information