
Body AnAlyser scAle
Operation and Safety Notes
TesTAnAlizáló mérleg
Kezelési és biztonsági utalások
osoBní váhA s měřením Tělesného Tuku
Pokyny pro obsluhu a bezpečnostní pokyny
körperfeTTwAAge
Bedienungs- und Sicherheitshinweise
wAgA osoBowA z miernikiem
zAwArTości Tłuszczu w orgAniźmie
Wskazówki dotyczące obsługi i bezpieczeństwa
TehTnicA Telesne mAščoBe
Navodila za upravljanje in varnostna opozorila
osoBná váhA
Pokyny pre obsluhu a bezpečnostné pokyny
4 Z28414

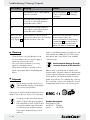
GB Operation and Safety Notes Page 5
PL Wskazówki dotyczące obsługi i bezpieczeństwa Strona 13
HU Kezelési és biztonsági utalások Oldal 22
SI Navodila za upravljanje in varnostna opozorila Stran 31
CZ Pokyny pro obsluhu a bezpečnostní pokyny Strana 39
SK Pokyny pre obsluhu a bezpečnostné pokyny Strana 48
DE / AT / CH Bedienungs- und Sicherheitshinweise Seite 57

A
3
6
SET WT START
2
1
5
3
4
12
15
16
14
13
SET WT START
7
8
9
10
11
Z28414-TX
Z28414-RX

4
B
2628 2730
17 19
20
21
24
25
31
32
33
34
35
36
37
38
22
23
18
29

5 GB
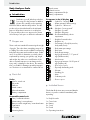
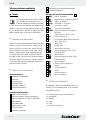
Table of Contents
Introduction
Proper use ...................................................................................................................... Page 6
Parts list ..........................................................................................................................Page 6
Included items ...............................................................................................................Page 6
Technical information ....................................................................................................Page 7
Safety advice .........................................................................................................Page 7
Before getting started
Inserting / replacing the batteries .................................................................................Page 8
Mounting the control unit..............................................................................................Page 8
Preparing for use
Setting the time ..............................................................................................................Page 9
Setting the alarm ...........................................................................................................Page 9
Setting the unit of weight ..............................................................................................Page 9
Entering personal details ..............................................................................................Page 9
How to use
Measuring weight .........................................................................................................Page 10
Measuring weight, calorie requirement, body fat,
body water, bone and muscle percentages ................................................................Page 10
Retrieving last recorded values ....................................................................................Page 11
What the interpreted readings mean ...............................................Page 11
Trouble-shooting .................................................................................................Page 11
Cleaning .....................................................................................................................Page 12
Disposal ......................................................................................................................Page 12

6 GB
Introduction
Body Analyser Scale
Q
Introduction
Familiarise yourself with the product be-
fore using it for the first time. In addition
please refer carefully to the operating
instructions below and the safety advice. Use the
product only as described and for the indicated
purpose. Keep these instructions in a safe place.
If you pass the product on to anyone else, please
ensure that you also pass on all the documentation.
Q
Proper use
These scales are intended for measuring the weight
of people. The scales have a weighing range of up
to 180 kg. The scales are also suitable for measuring
body fat, body water, muscle and bone mass. Further-
more, it is possible to determine your daily calorie
requirement by entering your gender, age, height
and weight. Any other use or modification of the
device constitute improper use and may result in
injury and / or damage to the device. The manufac-
turer is not liable for damage caused by improper
use. The device is not intended for commercial use.
Q
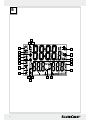
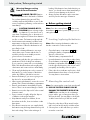
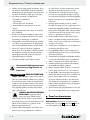
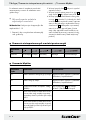
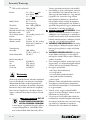
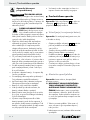
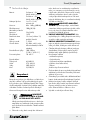
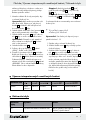
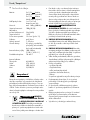
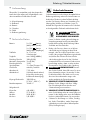
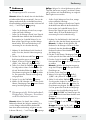
Parts list
Scales
1
Inlet for control unit
2
Electrodes
3
Platform
4
Metal contact
5
Infrared transmitter
6
Battery compartment
Removable control unit
7
Time / confirmation button
8
Alarm setting / count-up button
9
Button to set the weight units / count-down button
10
Start button
11
LC display
12
Mounting device
13
Metal contact
14
Infrared receiver
15
Battery compartment lid clip
16
Battery compartment
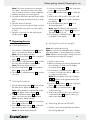
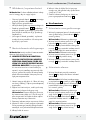
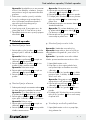
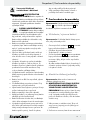
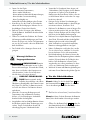
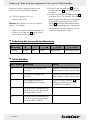
Pictograms in the LC display
11
17
AM – Symbol for “mornings”
18
– Alarm activated / alarm settings
19
PM – Symbol for “afternoons”
20
st:lb – Weight in “stones:pounds”
lb – Weight in “pounds”
21
kg – Weight in kilograms
22
KCAL – Recommended daily calorie
requirement
23
’ “ – Height in feet and inches
24
cm – Height in cm
25
% – Percentages (of body fat, muscles,
body water, bone)
26
– Body water percentage
27
– Bone mass
28
– Body fat percentage
29
– Age group between 7 - 17 years of
age (children mode)
30
– Muscle mass
31
– Age group between 18 - 99 years of
age (adult mode)
32
– Does a lot of sport
33
– Physically demanding work
34
– Woman
35
– Standing job
36
– Man
37
– Sedentary work
38
– Does no sport
Q
Included items
Check that all the items are present and that the
device is in perfect condition immediately after
unpacking.
1 x Body fat scales
1 x Control unit
4 x Battery
2 x Screw
2 x Dowel
1 x Operating instructions

7 GB
Introduction / Safety advice
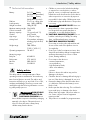
Q
Technical information
Battery: 2 x 1.5 V battery
(AAA) Micro (transmitter)
2 x 1.5 V
battery
(AAA) Micro (receiver)
Platform: 31 x 31 cm, safety glass
Load capacity: max. 180 kg (400 lbs)
Weight increment: 100 g (0.2 lb)
Minimum starting weight: 3 kg (6.6 lb)
Calorie increment: 1 kcal
Memory capacity: 12 + guest (total: 13)
Gender: male / female
Age range: 7 - 99 years of age
Activity level: 5 (recumbent, sedentary,
standing, physical effort,
sports)
Height range: 100 - 250 cm
(3’30 ½“ - 8’02 ½“)
Operating temperature: 10 - 40 °C
Measuring range:
Body fat: 4.0 - 60.0 %
Body water: 27.5 - 66.0 %
Muscles: 20.0 - 56.0 %
Bones: 2.0 - 20.0 %
Safety advice
This safety advice is an important part of these
operating instructions and must be observed every
time electrical devices are used. The advice and
instructions will help you to avoid risk of loss of life,
accidents and damage. Therefore you must read
carefully through the following information concern-
ing safety and proper use.
J
WARNING!
RISK OF LOSS
OF LIFE OR ACCIDENT TO IN-
FANTS AND CHILDREN! Never
leave children unsupervised with the packaging
materials or the device. Otherwise there is a
risk to life from suffocation. Always keep
children away from the device.
J Children or persons who lack the knowledge
or experience to use the device or whose
physical, sensory or intellectual capacities are
limited must never be allowed to use the device
without supervision or instruction by a person
responsible for their safety. Children must never
be allowed to play with the device. The product
is not a toy.
WARNING!
DANGER TO LIFE! Never use
the product if you have a pacemaker. Never
use the product near people that have a
pacemaker or use other medical devices.
m CAUTION! DANGER OF INJURY! Do not
load the scales beyond 180 kg. The safety
glass could break and cause cut injuries
m CAUTION! DANGER OF INJURY!
Do not step on to the scales with wet feet and
do not use the scales if the platform is moist.
You might slip.
J Protect your scales from impact, moisture, dust,
chemicals and sudden changes in temperature
and keep them away from sources of heat
(ovens, heating radiators).
J Do not expose the device to:
- extreme temperatures,
- strong vibrations,
- high mechanical loads,
- direct solar radiation,
- moisture.
Failure to observe this advice may result in
damage to the device.
J Check the device for damage before bringing it
into use. If the device is damaged do not use it.
J Remove the battery if the device breaks down
or is defective. Otherwise the battery is more
likely to leak.
J Never open the device housing. This could result
in personal injury or damage to the device.
Always have any repairs carried out at the ser-
vice centre or by an electrical equipment
repair specialist.
J The product is not suitable for pregnant women.

8 GB
Safety advice / Before getting started
Warning! Dangers arising
from the use of batteries
WARNING!
DANGER TO LIFE! Batteries
are not intended to be in the hands of children.
Do not leave batteries lying around. They
could be swallowed by children or pets. In the
event of swallowing a battery, contact a doctor
immediately!
J
CAUTION! DANGER OF EX-
PLOSION! Never recharge single-
use batteries. Do not short-circuit or
open them. Overheating, fire or destruction of
the batteries might result. Never throw batteries
into fire or water. The batteries might explode.
J Avoid extreme environmental conditions and
temperatures as they may affect batteries e.g.
above radiators. Otherwise the batteries are
more likely to leak.
J Exhausted or damaged batteries can cause
caustic burns upon contact with the skin. To
avoid this, always wear suitable protective
gloves in these circumstances!
J Avoid contact with the skin, eyes and mucous
membranes if fluid is leaking from a battery.
If you come into contact with corrosive battery
fluids, flush the affected area thoroughly with
clean water and contact a doctor immediately.
J Clean any light dirt deposits on the contacts of
the batteries or on the contacts of the device
with a dry, fluff-free cloth before insertion.
J Remove the battery if you are not going to use
the device for an extended period.
J When inserting the batteries, ensure the correct
polarity! This is shown in the battery compartment.
J Remove spent batteries immediately from the
device. There is an increased danger of leaks!
J Batteries must not be disposed of in the normal
domestic waste!
J Every consumer is legally obliged to dispose
of batteries in the proper manner!
J Keep batteries away from children; do not
throw them in the fire, short-circuit them or take
them apart.
J If the above instructions are not complied with,
the batteries may discharge themselves beyond
their end voltage. There is then a danger of
leaking. If the batteries have leaked inside your
device, you should remove them immediately in
order to prevent damage to the device!
J Always replace all batteries at the same time
and only use the same type of batteries.
Q
Before getting started
Note: Press the count-up button
8
or the count-
down-button
9
down to speed up the process of
setting the values.
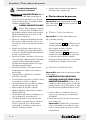
Q
Inserting / replacing the batteries
Note: When inserting the batteries, make sure
that the contacts do not become bent.
j Open the battery compartment
6
,
16
, by
pushing the battery compartment lid in the
direction of the arrows.
j Take the battery compartment lid off.
j Insert the batteries in accordance with polarity.
j Close the battery compartment
6
,
16
by placing
the battery compartment lid back on and pushing
it in the opposite direction to the arrows until it
perceptibly and audibly clicks into place.
j If the scales do not indicate any function, check
that the batteries have been correctly inserted.
You may have to reinsert them.
Q
Mounting the control unit
Note: You can mount the control unit onto the wall.
m RISK OF ELECTRIC SHOCK! RISK OF
DAMAGE TO PROPERTY! RISK OF IN-
JURY! Make sure that you do not damage
power cables, gas or water pipes when you
drill into the wall. You may have to check with
a cable locator before you drill into a wall.
1. Place the scales about 10 cm away from the
wall on a level and (scratch-) resistant surface.
2. Select a place on the wall where you wish to
mount the control unit.

9 GB
Before getting started / Preparing for use
Note: The control unit must not be mounted
more than 1.5 m away from the scales. Other-
wise no infrared connection can be established.
3. Mark the selected position with a pencil.
4. Use a drill to drill a hole in the wall. Please comply
with the operating and safety instructions of the
drill.
5. Place the dowel into the hole.
6. Screw the screw into the dowel. Make sure that
the head of the screw sticks out of the wall by
5 - 7 mm.
7. Hang the control unit onto the wall using the
mounting device
12
.
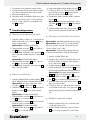
Q
Preparing for use
Q
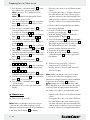
Setting the time
1. Press the time / confirmation button
7
down for
about 3 seconds to be able to set the hours.
Note: The hour display will flash.
2. Press the count-up button
8
or the count-down
button
9
to set the hours.
3. Press the time / confirmation button
7
to confirm
the entry and to be able to set the minutes.
Note: The minute display will flash.
4. Press the count-up button
8
or the count-down
button
9
to set the minutes.
5. Press the time / confirmation button
7
to confirm
your entry.
Q
Setting the alarm
1. Press the alarm-setting button
8
twice to activate
the alarm and to display the alarm time.
Note: When the alarm is activated, the symbol
18
will appear in the LC display
11
.
2. Press the confirmation button
7
down for
about 3 seconds to be able to set the hours.
Note: The hour display will flash.
3. Press the count-up button
8
or the count-down
button
9
to set the hours.
4. Press the confirmation button
7
to confirm the
entry and to be able to set the minutes.
Note: The minute display will flash.
5. Press the count-up button
8
or the count-down
button
9
to set the minutes.
6. Press the confirmation button
7
to confirm the
entry.
7. Wait for about 30 seconds or press the confir-
mation button
7
again in order to get back to
time display.
8. Press the alarm-setting button
8
twice to
deactivate the alarm.
Note: When the alarm is deactivated, the
symbol
18
in the LC display
11
will go out.
The alarm time will go out.
9. Press the time / confirmation button
7
in order
to get back to time display.
Q
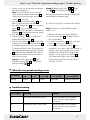
Setting the unit of weight
Note: the legal weight unit is kg.
Note: You can choose to display the units of weight in
either kilogrammes or “stones and pounds” or pound.
Note: When the unit of weight is changed, the unit
of measurement for height also changes.
1. Pick the control unit up.
2. Make sure that the time is being displayed and
press the button to set the units of weight /
count-down button
9
.
3. Press the time / confirmation button
7
down
for about 3 seconds to be able to set the units
of weight you wish to have.
Note: The pictograms of the units of weight
20
,
21
will flash on the right-hand side of the
LC display
11
.
4. Press the count-up button
8
or the count-down
button
9
to set the unit of weight.
5. Press the time / confirmation button
7
to
confirm your entry.
6. Wait for about 30 seconds or press the time /
confirmation button
7
again in order to get
back to time display.
Q
Entering personal details
1. Pick the control unit up and make sure that the
time is being displayed.

10 GB
Preparing for use / How to use
2. Press the time / confirmation button
7
in order
to be able to enter your personal details.
Note: The letters “P - X“ will flash in the LC
display
11
.
Note: “X“ stands for the data profile of a per-
son from the group of users.
3. Press the count-up button
8
or the count-down
button
9
, to select the data profile (1 - 12 or
guest) you wish to have.
4. Press the time / confirmation button
7
, to
confirm the data profile you have selected and
to set the unit of weight
20
,
21
.
5. Press the count-up button
8
or the count-down
button
9
to set the unit of weight
20
,
21
.
6. Press the time / confirmation button
7
to
confirm the entry and to be able to select your
gender
34
,
36
.
7. Press the count-up button
8
or the count-down
button
9
to select either male
36
or female
34
.
8. Press the time / confirmation button
7
to
confirm the entry and to be able to set your age.
9. Press the count-up button
8
or the count-down
button
9
to set your age.
10. Press the time / confirmation button
7
, to
confirm the entry and to set your activity level
32
,
33
,
35
,
37
,
38
.
11. Press the count-up button
8
or the count-down
button
9
to set the appropriate activity level
32
,
33
,
35
,
37
,
38
.
12. Press the time / confirmation button
7
to
confirm the entry and to be able to set your height.
13. Press the count-up button
8
or the count-down
button
9
to set your height.
14. Press the time / confirmation button
7
to
confirm the entry.
15. Wait about 30 seconds to get back to time
display.
Q
How to use
Q
Measuring weight
Note: Make sure that the control unit is at most
1.5 m from the scales when weighing yourself.
Otherwise no infrared connection can be established.
In this event, the LC display
11
will display “- - - -“.
j Place the scales down on a solid, flat horizontal
surface.
j Do not place the scales on a carpet. Otherwise
this could influence the result. If necessary you
can place a board on the carpet and place the
scales upon this. A solid floor covering is required
in order to achieve correct weight measurements.
1. Pick the control unit up and make sure that the
time is being displayed.
2. Press the count-down button
9
to be able to
measure your weight only.
3. Wait until “0,0 kg“, “0,0 lb“ or “0:0o st:lb“ is
displayed in the LC display
11
.
4. Step onto the platform
3
and stand still. Make
sure that you are standing on both electrodes
2
.
The weight measurement process will now start.
The display will blink 3 times. The weight
measured will be displayed and stored.
5. Step down off the platform
3
.
6. Wait for about 30 seconds or press the time /
confirmation button
7
in order to get back to
time display.
Q
Measuring weight, calorie
requirement, body fat,
body water, bone and muscle
percentages
Note: Make sure that the control unit is at most
1.5 m from the scales when weighing yourself.
Otherwise no infrared connection can be established.
In this event, the LC display
11
will display “- - - -“.
Tip: Always try to weigh yourself at the same
time of day (best done in the morning), after going
to the toilet, with an empty stomach and without
any clothes on in order to get comparable results.
j Place the scales down on a solid, flat horizontal
surface.
j Do not place the scales on a carpet. Otherwise
this could influence the result. If necessary you
can place a board on the carpet and place the
scales upon this. A solid floor covering is required
in order to achieve correct weight measurements.

11 GB
How to use / What the interpreted readings mean / Trouble-shooting
1. Pick the control unit up and make sure that the
time is being displayed.
Note: You can leave the control unit in the
scales. Make sure that the metal contact
13
of the control unit lies precisely on the metal
contact
4
of the scales.
2. Press the time / confirmation button
7
to be
able to get the stored personal data.
3. Press the count-up button
8
or the count-down
button
9
to get your profile memory.
Note: When your data profile is displayed, the
LC display
11
will display all your personal settings.
4. Press the start button
10
.
5. Wait until “0,0 kg“, “0,0 lb“ or “0:0o st:lb“ is
displayed in the LC display
11
.
6. Step onto the platform
3
and stand still. Make
sure that you are standing on both electrodes
2
.
The weight measurement process will now start.
The display will blink 3 times. The weight meas-
ured will be displayed and stored. The LC display
11
will then display “00.0 000“. After that, it
will display the measured value three times in
rotation in two groups.
Group 1: Calorie requirement
22
“kcal“,
body fat percentage
28
in % and body
water percentage
26
in %.
Group 2: Weight “kg / lb / st:lb“
20
,
21
, muscle
mass
30
in % and bone mass
27
in %.
After the values have been displayed, the time will
automatically be displayed again.
Q
Retrieving last recorded values
Note: This function is only available for data
profiles 1 - 12.
1. Make sure that the time is being displayed.
2. Press the start button
10
to be able to retrieve
the stored readings.
3. Press the count-up button
8
or the count-down
button
9
to select your data profile.
4. Press the time / confirmation button
7
and
wait about 3 - 4 seconds to allow the last stored
readings of the selected profile memory to be
displayed. The readings will be displayed in
rotation in two groups in the LC display
11
(see “Measuring weight, calorie requirement,
body fat, body water, bone and muscle per-
centages”, Point 6.).
Q
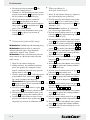
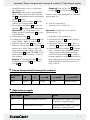
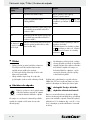
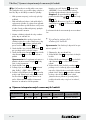
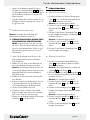
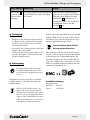
What the interpreted readings mean
LCD display
Meaning too thin thin normal overweight extremely overweight
Q
Trouble-shooting
Error display Meaning Solution
h-Lo The control unit batteries are flat. Change the batteries in line with the
section called “Inserting / replacing
the batteries”.
b-Lo The batteries in the scales are flat. Change the batteries in line with the
section called “Inserting / replacing
the batteries”.

12 GB
Trouble-shooting / Cleaning / Disposal
Q
Cleaning
j Clean the device using a slightly moist cloth.
For more stubborn dirt you can also apply a
weak soap solution to the cloth.
j Do not use chemical cleaners or scouring
agents for cleaning the device.
j Never immerse the device in water or other
liquids. Ignoring this advice may damage the
device.
Q
Disposal
The packaging is made entirely of recy-
clable materials, which you may dispose
of at local recycling facilities.
Contact your local refuse disposal authority for more
details of how to dispose of your worn-out product.
To help protect the environment, please
dispose of the product properly when it
has reached the end of its useful life and
not in the household waste. Information
on collection points and their opening
hours can be obtained from your local
authority.
Faulty or used batteries must be recycled in accord-
ance with Directive 2006 / 66 / EC. Please return
the batteries and / or the device to the available
collection points.
Environmental damage through
incorrect disposal of the batteries!
Batteries may not be disposed of with the usual
domestic waste. They may contain toxic heavy metals
and are subject to hazardous waste treatment rules
and regulations. The chemical symbols for heavy
metals are as follows: Cd = cadmium, Hg = mercury,
Pb = lead. That is why you should dispose of used
rechargeable batteries at a local collection point.
EMC
Product description:
Body Analyser Scale
Model No.: Z28414
Version: 10 / 2010
Error display Meaning Solution
Err The maximum load of 180 kg (400 lb)
has been exceeded.
Step off the platform
3
of the scales
in order to avoid injuries or damage
to property.
ErrL The body fat percentage measured
is too low or is below the minimum
measurable value of 4.0 %.
–
Errh The body fat percentage measured
it too high or is above the maximum
measurable value of 60.0 %.
–
Various error mes-
sages appear in
the LC display
11
.
Radio transmission devices (mobile
phones, microwave ovens, etc.) interfere
with the operation of the scale.
- Remove the radio transmission devices
from proximity of the scale.
- Remove the batteries from the battery
compartment
6
and wait for about
10 seconds, then insert the battery
back to the battery compartment
6
.

13 PL
Spis zawartości
Wstęp
Użytkowanie zgodne z przeznaczeniem .................................................................Strona 14
Opis części .................................................................................................................Strona 14
Zawartość ...................................................................................................................Strona 15
Dane techniczne ........................................................................................................Strona 15
Bezpieczeństwo ................................................................................................Strona 15
Przed uruchomieniem .................................................................................Strona 16
Wkładanie / wymiana baterii ....................................................................................Strona 17
Montaż elementu obsługowego ...............................................................................Strona 17
Uruchomienie
Ustawianie czasu godzinowego ..............................................................................Strona 17
Ustawianie alarmu .....................................................................................................Strona 17
Ustawianie jednostki wagi.........................................................................................Strona 18
Wprowadzanie danych osobistych ..........................................................................Strona 18
Obsługa
Pomiar wagi ciała ......................................................................................................Strona 19
Pomiar masy ciała, zapotrzebowania na kalorie, tkanki
tłuszczowej, wody, tkanki kostnej i tkanki mięśniowej .............................................Strona 19
Wywoływanie ostatnio zapisanych wartości ...........................................................Strona 20
Znaczenie zinterpretowanych wartości pomiarowych
.....Strona 20
Usuwanie błędów ..........................................................................................Strona 20
Czyszczenie ..........................................................................................................Strona 21
Usuwanie ...............................................................................................................Strona 21

14 PL
Wstęp
Waga osobowa z miernikiem
zawartości tłuszczu w organiźmie
Q
Wstęp
Przed uruchomieniem urządzenia po raz
pierwszy zapoznaj się z nim. W tym celu
przeczytaj uważnie poniższą instrukcję
obsługi oraz wskazówki dotyczące bezpieczeństwa.
Użytkuj urządzenie tylko tak, jak to opisano i tylko
w podanych dziedzinach zastosowania. Przechowuj
starannie niniejszą instrukcję. Przy przekazywaniu
urządzenia osobom trzecim, przekaż wraz z nią
również całą przynależną dokumentację.
Q
Użytkowanie zgodne
z przeznaczeniem
Waga ta służy do ustalania masy człowieka. Waga
posiada w tym celu zakres ważenia do 180 kg.
Ponadto możliwe jest określenie dziennego zapotrze-
bowania kalorii przez podanie płci, wieku, wzrostu
i wagi. Inne zastosowanie lub wykonanie zmian w
urządzeniu jest uznawane za niezgodne z przezna-
czeniem i może pociągnąć za sobą niebezpieczeń-
stwa obrażeń ciała i / lub uszkodzenie urządzenia.
Za szkody powstałe wskutek sprzecznego z prze-
znaczeniem użytkowania urządzenia producent
nie ponosi żadnej odpowiedzialności. Urządzenie
nie jest przeznaczone do celów zarobkowych.
Q
Opis części
Waga
1
Wpust dla elementu obsługowego
2
Elektrody
3
Płyta wagi
4
Styk metalowy
5
Nadajnik podczerwieni
6
Gniazdo baterii
Zdejmowany element obsługowy
7
Przycisk czasu potwierdzania godzinowego
8
Przycisk ustawiania alarmu / przycisk zmiany
wartości w górę
9
Przycisk do ustawiania jednostek wagi /
zmiany wartości wstecz
10
Przycisk Start
11
Wyświetlacz LC
12
Przyrząd montażowy
13
Styk metalowy
14
Odbiornik podczerwieni
15
Klips pokrywy gniazda baterii
16
Gniazdo baterii
Piktogramy na wyświetlaczu LC
11
17
AM – Symbol „przedpołudnia“
18
– Alarm aktywowany / Ustawienia alarmu
19
PM – Symbol „popołudnia“
20
st:lb – Jednostka wagi w „kamieniach:funtach“
lb – Jednostka wagi w „funtach“
21
kg – Jednostka wagi w kilogramach
22
KCAL – Zalecane dzienne zapotrzebowanie
kalorii
23
’ “ – Wzrost w stopach i calach
24
cm – Wzrost w cm
25
% – Udział procentowy (tkanki tłuszczowej,
mięśni, wody, kości)
26
– Udział wody
27
– Masa kości
28
– Udział tkanki tłuszczowej
29
– Grupa wiekowa między 7 - 17 lat
(tryb dziecięcy)
30
– Masa mięśniowa
31
– Grupa wiekowa między 18 - 99 lat
(tryb dla dorosłych)
32
– Aktywni sportowo
33
– Forsowna praca fizyczna
34
– Kobieta
35
– Praca stojąca
36
– Mężczyzna
37
– Praca siedząca
38
– Nieaktywny sportowo

15 PL
Wstęp / Bezpieczeństwo
Q
Zawartość
Niezwłocznie po rozpakowaniu sprawdź zawartość
pod kątem kompletności i nienagannego stanu
urządzenia.
1 x Waga do pomiaru tkanki tłuszczowej
1 x Element obsługowy
4 x Bateria
2 x Śruba
2 x Kołek
1 x Instrukcja obsługi
Q
Dane techniczne
Bateria: 2 x 1,5 V Bateria (AAA),
Mikro (nadajnik)
2 x 1,5 V
Bateria (AAA),
Mikro (odbiornik)
Płyta wagi: ok. 31 x 31 cm, szkło
bezpieczne
Udźwig: maks. 180 kg (400 lbs)
Podziałka wagi: 100 g (0,2 lb)
Minimalna
masa startowa: 3 kg (6,6 lb)
Podziałka kalorii: 1 kcal
Ilość użytkowników: 12 + gość (łącznie: 13)
Płeć: mężczyzna / kobieta
Przedział wiekowy: 7 - 99 lat
Poziom aktywności: 5 (nieruchomy, siedzący,
stojący, wysiłek fizyczny,
wysiłek kondycyjny)
Przedział wzrostu: 100 - 250 cm
(3’30 ½“ - 8’02 ½“)
Temperatura robocza: 10 - 40 °C
Zakres ważenia:
Tkanka tłuszczowa: 4,0 - 60,0 %
Woda: 27,5 - 66,0 %
Mięśnie: 20,0 - 56,0 %
Kości: 2,0 - 20,0 %
Bezpieczeństwo
Wskazówki bezpieczeństwa stanowią istotną część
niniejszej instrukcji obsługi i powinny być przestrze-
gane w każdym przypadku podczas eksploatacji
urządzeń elektrycznych. Wskazówki mają pomóc
w unikaniu sytuacji powodujących zagrożenie dla
życia, wypadki i szkody. Dlatego należy zapoznać
się uważnie z poniższymi informacjami w zakresie
bezpieczeństwa i prawidłowej eksploatacji.
J
OSTRZEŻENIE!
NIEBEZ-
PIECZEŃSTWO UTRATY ŻYCIA
I WYPADKU W PRZYPADKU
NIEMOWLĄT I DZIECI! Nigdy nie należy
pozostawiać dzieci bez nadzoru z materiałem
opakowaniowym i urządzeniem. W przeciwnym
razie istnieje niebezpieczeństwo utraty życia
przez uduszenie. Zawsze należy trzymać dzieci
z dala od urządzenia.
J Dzieciom lub osobom, którym brak wiedzy lub
doświadczenia w obchodzeniu się z urządze-
niem, lub które są ograniczone pod względem
ich fizycznych, sensorycznych lub duchownych
zdolności, nie wolno obsługiwać urządzenia bez
nadzoru lub wskazówek osoby odpowiedzialnej
za ich bezpieczeństwo. Dzieci muszą być
nadzorowane, aby nie bawiły się urządzeniem.
Produkt nie jest zabawką.
OSTRZEŻENIE!
NIEBEZPIECZEŃSTWO
DLA ŻYCIA! Osobom z rozrusznikiem serca
nie wolno w żadnym wypadku używać tego
produktu. Produktu nie wolno używać w pobliżu
osób z rozrusznikiem rozrusznik serca lub osób
używających innych urządzeń medycznych.
m UWAGA! NIEBEZPIECZEŃSTWO USZKO-
DZENIA CIAŁA! Nie należy doprowadzać
do przeciążenia wagi powyżej 180 kg. Szkło
bezpieczne może pęknąć, powodując przy
tym uszkodzenie ciała.
m UWAGA! NIEBEZPIECZEŃSTWO USZKO-
DZENIA CIAŁA! Nie należy wchodzić na
wagę mokrymi stopami i nie należy korzystać z
wagi, gdy powierzchnia ważenia jest mokra. W
przeciwnym razie może dojść do poślizgnięcia.

16 PL
Bezpieczeństwo / Przed uruchomieniem
J Należy chronić wagę przed wstrząsami, wilgo-
cią, kurzem, chemikaliami, dużymi wahaniami
temperatury oraz znajdującymi się w bezpośred-
niej bliskości źródłami ciepła (piec, kaloryfer).
J Nie należy wystawiać urządzenia na:
- ekstremalne temperatury,
- silne wibracje,
- silne mechaniczne obciążenia,
- bezpośrednie promieniowanie słoneczne,
- wilgoć.
W przeciwnym razie może dojść do uszkodze-
nia urządzenia.
J Przed uruchomieniem urządzenia należy skon-
trolować je pod kątem uszkodzeń. Nie należy
uruchamiać uszkodzonego urządzenia.
J W przypadku awarii lub niesprawnego urządze-
nia należy wyciągnąć baterię. W przeciwnym
razie istnieje niebezpieczeństwo wycieku baterii.
J Nie wolno otwierać obudowy urządzenia.
Może dojść do uszkodzenia ciała lub urządze-
nia. Naprawy powinny być przeprowadzane
wyłącznie przez punkt serwisowy lub przez
wykwalifikowanego elektryka.
J Produkt nie nadaje się dla kobiet w ciąży.
Ostrzeżenie! Niebezpieczeństwa
związane z posługiwaniem się
bateriami
OSTRZEŻENIE!
NIEBEZPIECZEŃSTWO
UTRATY ŻYCIA! Baterie nie powinny znajdo-
wać się w rękach dziecka. Baterie nie powinny
być przechowywane w łatwo dostępnych miej-
scach. Istnieje niebezpieczeństwo, że zostaną
połknięte przez dzieci lub zwierzęta domowe.
W przypadku połknięcia należy natychmiast
udać się do lekarza.
J
UWAGA! NIEBEZPIECZEŃSTWO
WYBUCHU! Nigdy nie należy
baterii ponownie naładowywać,
zwierać lub otwierać. Może to doprowadzić
do przegrzania, pożaru lub wybuchnięcia. Nie
należy wrzucać baterii do ognia lub wody.
Baterie mogą eksplodować.
J Należy unikać ekstremalnych warunków i tem-
peratur, które mogą oddziaływać na baterie,
np. kaloryferów. W przeciwnym razie istnieje
zwiększone niebezpieczeństwo wycieku.
J Wycieknięte lub uszkodzone baterie mogą
powodować w przypadku kontaktu ze skórą
silne poparzenia; dlatego też w takim przypadku
należy koniecznie nosić odpowiednie rękawice
ochronne!
J Należy unikać kontaktu ze skórą, oczami i
błonami śluzowymi, jeśli ciecz wydostanie się z
baterii. W przypadku kontaktu z cieczą bateryjną
miejsca, które miały taki kontakt, należy przemyć
natychmiast dużą ilością czystej wody i należy
udać się natychmiast do lekarza.
J W przypadku lekkiego zabrudzenia styków
baterii i urządzenia należy przed włożeniem
baterii oczyścić styki suchą, niepozostawiającą
strzępków ściereczką.
J Usuń baterie z urządzenia, o ile nie będą one
używane przez dłuższy czas.
J Przy zakładaniu baterii zwróć uwagę na ich
prawidłową biegunowość! Jest ona pokazana
w kieszeni na baterie.
J Zużyte baterie ze względu na niebezpieczeństwo
ich wycieku natychmiast wyjąć z urządzenia!
J Baterii nie wyrzucać do śmieci domowych!
J Każdy konsument jest prawnie zobowiązany
do prawidłowej utylizacji baterii!
J Baterie trzymać z dala od dzieci, nie wrzucać
ich do ognia, nie zwierać ich i nie rozbierać.
J W przypadku nieprzestrzegania powyższych
wskazówek baterie mogą zostać rozładowane
przez swoje napięcie końcowe. Występuje
wówczas niebezpieczeństwo wycieku baterii.
Jeśli dojdzie do wycieku baterii w urządzeniu,
baterie należy natychmiast wyjąć, aby zapobiec
uszkodzeniu urządzenia!
J Wymieniać zawsze wszystkie baterie równocześ-
nie i stosować tylko baterie tego samego typu.
Q
Przed uruchomieniem
Wskazówka: Przytrzymać wciśnięty przycisk
zmiany wartości w górę
8
lub wstecz
9
. W ten
sposób uzyskamy szybsze ustawianie wartości.

17 PL
Przed uruchomieniem / Uruchomienie
Q
Wkładanie / wymiana baterii
Wskazówka: Podczas wkładania baterii należy
zwrócić uwagę, aby nie zagiąć styków.
j Otworzyć gniazdo baterii
6
,
16
, przesuwając
pokrywę gniazda w kierunku strzałki.
j Zdjąć pokrywę gniazda baterii.
j Włożyć baterie zgodnie z położeniem biegunów.
j Zamknąć gniazdo baterii
6
,
16
, zakładając
pokrywę gniazda i przesuwając ją w kierunku
przeciwnym do strzałki, aż do jej słyszalnego
wzębienia się.
j Jeśli waga nie działa, sprawdzić, czy baterie
zostały włożone prawidłowo. W razie potrze-
by włożyć je ponownie.
Q
Montaż elementu obsługowego
Wskazówka: Istnieje możliwość zamontowania
elementu obsługowego na ścianie.
m NIEBEZPIECZEŃSTWO PORAŻENIA
PRĄDEM ELEKTRYCZNYM! NIEBEZPIE-
CZEŃSTWO POWSTANIA SZKÓD RZE-
CZOWYCH! NIEBEZPIECZEŃSTWO OD-
NIESIENIA OBRAŻEŃ! Przed przystąpieniem
do wiercenia otworów w ścianie należy się
upewnić, czy nie natrafimy na przewody elek-
tryczne, gazowe lub wodne. W razie potrzeby
przed wierceniem zbadać ścianę za pomocą
wykrywacza przewodów.
1. Ustawić wagę w odległości ok. 10 cm od ściany
na równej, stabilnej (i odpornej na zadrapania)
powierzchni.
2. Wybrać na ścianie miejsce, na którym chcemy
zamontować element obsługowy wagi.
Wskazówka: Element obsługowy nie może
być zamontowany dalej niż 1,5 m od wagi. W
przeciwnym razie nie będzie możliwe zapew-
nienie połączenia na podczerwień.
3. Zaznaczyć wybrane miejsce za pomocą ołówka.
4. Wywiercić otwór w ścianie za pomocą wiertarki.
Proszę przestrzegać instrukcji obsługi wiertarki i
zawartych w niej wskazówek bezpieczeństwa.
5. Włożyć kołek do otworu.
6. Wkręcić śrubę do kołka. Zwrócić przy tym
uwagę na to, aby główka śruby wystawała ze
ściany na 5 - 7 mm.
7. Zawiesić element obsługowy na ścianie za
pomocą przyrządu montażowego
12
.
Q
Uruchomienie
Q
Ustawianie czasu godzinowego
1. Wcisnąć i przytrzymać przez 3 sekundy przycisk
czasu godzinowego / potwierdzania
7
, aby
ustawić godzinę.
Wskazówka: Wskazanie godzin miga.
2. Wcisnąć przycisk zmiany wartości w górę
8
lub wstecz
9
, aby ustawić godzinę.
3. Wcisnąć przycisk potwierdzania czasu godzi-
nowego
7
, aby potwierdzić zadaną wartość
i aby móc przystąpić do ustawiania minut.
Wskazówka: Wskazanie minut miga.
4. Wcisnąć przycisk zmiany wartości w górę
8
lub wstecz
9
, aby ustawić minuty.
5. Wcisnąć przycisk potwierdzania czasu godzi-
nowego
7
, aby potwierdzić zadaną wartość.
Q
Ustawianie alarmu
1. Wcisnąć dwukrotnie przycisk ustawiania
alarmu
8
, aby aktywować alarm i wskazać
czas alarmu.
Wskazówka: Jeśli alarm jest aktywowany,
na wyświetlaczu
11
pojawia się symbol
18
.
2. Wcisnąć i przytrzymać przez 3 sekundy przycisk
potwierdzania czasu godzinowego
7
, aby
móc ustawić godziny.
Wskazówka: Wskazanie godzin miga.
3. Wcisnąć przycisk zmiany wartości w górę
8
wzgl. wstecz
9
, aby ustawić godziny.
4. Wcisnąć przycisk potwierdzania
7
, aby
potwierdzić zadaną wartość i aby móc przy-
stąpić do ustawiania minut.
Wskazówka: Wskazanie minut miga.
5. Wcisnąć przycisk zmiany wartości w górę
8
wzgl. wstecz
9
, aby ustawić minuty.

18 PL
Uruchomienie
6. Wcisnąć przycisk potwierdzania
7
, aby
potwierdzić zadaną wartość.
7. Odczekać ok. 30 sekund lub ponownie wcisnąć
przycisk potwierdzania
7
, aby przejść z powro-
tem do wskazania czasu godzinowego.
8. Wcisnąć dwukrotnie przycisk ustawiania
alarmu
8
, aby dezaktywować alarm.
Wskazówka: Jeśli alarm zostanie dezaktywo-
wany, symbol
18
na wyświetlaczu LC
11
gaśnie. Czas alarmu gaśnie.
9. Wcisnąć przycisk potwierdzania czasu godzi-
nowego
7
, aby przejść z powrotem do
wskazania czasu.
Q
Ustawianie jednostki wagi
Wskazówka: Standardową jednostką wagi jest kg.
Wskazówka: Mamy możliwość ustawienia
wskazań jednostek masy w kilogramach lub
„kamieniach i funtach“ wzg. „funtach“.
Wskazówka: Wraz z przestawieniem jednostki
masy, zmienia się odpowiednio także jednostka
miary wzrostu.
1. Wziąć do ręki element obsługowy.
2. Należy zapewnić, aby wskazany został naj-
pierw czas godzinowy i następnie wcisnąć
przycisk ustawiania jednostek masy / przycisk
zmiany wartości wstecz
9
.
3. Wcisnąć i przytrzymać przez 3 sekundy przycisk
potwierdzania czasu godzinowego
7
, aby
móc ustawić żądaną jednostkę masy.
Wskazówka: Piktogramy jednostek wagi
20
,
21
migają po prawej stronie wyświetlacza
ciekłokrystalicznego
11
.
4. Wcisnąć przycisk zmiany wartości w górę
8
wzgl. wstecz
9
, aby ustawić jednostkę masy.
5. Wcisnąć przycisk potwierdzania czasu godzi-
nowego
7
, aby potwierdzić zadaną wartość.
6. Odczekać 30 sekund lub ponownie wcisnąć
przycisk potwierdzania czasu godzinowego
7
,
aby przejść z powrotem do wskazania czasu.
Q
Wprowadzanie
danych osobistych
1. Wziąć do ręki element obsługowy i zapewnić,
aby wyświetlany był czas godzinowy.
2. Wcisnąć przycisk potwierdzania czasu godzi-
nowego
7
, aby móc ustawić dane osobiste.
Wskazówka: Na wyświetlaczu LC
11
miga
wskazanie „P - X“.
Wskazówka: Symbolem „X“ oznaczona
jest osoba z kręgu użytkowników.
3. Wcisnąć przycisk zmiany wartości w górę
8
lub wstecz
9
, aby wybrać żądanego użyt-
kownika (1 - 12 lub gość).
4. Wcisnąć przycisk potwierdzania czasu godzino-
wego
7
,aby potwierdzić wybranego użytkow-
nika i aby móc ustawić jednostkę masy
20
,
21
.
5. Wcisnąć przycisk zmiany wartości w górę
8
lub
wstecz
9
, aby ustawić jednostkę masy
20
,
21
.
6. Wcisnąć przycisk potwierdzania czasu godzino-
wego
7
, aby potwierdzić zadaną jednostkę i
aby móc ustawić płeć
34
,
36
.
7. Wcisnąć przycisk zmiany wartości w górę
8
lub wstecz
9
, aby wybrać płeć męską
36
lub
żeńską
34
.
8. Wcisnąć przycisk potwierdzania czasu godzino-
wego
7
, aby potwierdzić zadany parametr i
aby móc ustawić wiek.
9. Wcisnąć przycisk zmiany wartości w górę
8
lub wstecz
9
, aby ustawić wiek.
10. Wcisnąć przycisk potwierdzania czasu godzino-
wego
7
, aby potwierdzić zadany parametr i
aby ustawić poziom aktywności
32
,
33
,
35
,
37
,
38
.
11. Wcisnąć przycisk zmiany wartości w górę
8
lub wstecz
9
, aby ustawić odpowiedni poziom
aktywności
32
,
33
,
35
,
37
,
38
.
12. Wcisnąć przycisk potwierdzania czasu godzino-
wego
7
, aby potwierdzić zadany parametr i
aby móc ustawić wzrost.
13. Wcisnąć przycisk zmiany wartości w górę
8
lub wstecz
9
, aby ustawić odpowiedni wzrost.
14. Wcisnąć przycisk potwierdzania czasu godzino-
wego
7
, aby potwierdzić zadany parametr.
15. Odczekać około 30 sekund, aby powrócić do
wskazania czasu.

19 PL
Obsługa
Q
Obsługa
Q
Pomiar wagi ciała
Wskazówka: Zwrócić uwagę na to, aby element
obsługowy podczas ważenia znajdował się w odle-
głości maksymalnie 1,5 m od wagi. W przeciwnym
razie nie będzie można uzyskać połączenia na
podczerwień. W takim przypadku na wyświetlaczu
LC
11
wyświetlany będzie symbol „- - - -“.
j Ustawić wagę na stabilnym, poziomym i równym
podłożu.
j Nie ustawiać wagi na dywanie, gdyż może to
wpływać na rezultat pomiaru. W wyjątkowym
przypadku możemy położyć na dywanie deskę
i na niej ustawić wagę. Twarda powierzchnia
podłogi jest warunkiem prawidłowego pomiaru.
1. Wziąć do ręki element obsługowy i zapewnić,
aby na wyświetlaczu wskazywany był czas
godzinowy.
2. Wcisnąć przycisk zmiany wartości wstecz
9
,
aby móc zmierzyć tylko wagę naszego ciała.
3. Odczekać aż na wyświetlaczu
11
pojawi się
„0,0 kg“, „0,0 lb“ lub „0:0o st:lb“.
4. Stanąć na płycie wagi
3
i pozostać na niej
nieruchomo. Zawrócić przy tym uwagę, aby stać
na obydwu elektrodach
2
. Rozpoczyna się
pomiar wagi. Wskazanie miga 3 x. Zmierzony
ciężar zostaje wyświetlony i zapisany w pamięci.
5. Zejść z płyty wagi
3
.
6. Odczekać 30 sekund lub wcisnąć przycisk
potwierdzania czasu godzinowego
7
, aby
powrócić do wskazania czasu.
Q
Pomiar masy ciała, zapotrze-
bowania na kalorie, tkanki
tłuszczowej, wody, tkanki
kostnej i tkanki mięśniowej
Wskazówka: Zwrócić uwagę, aby podczas
ważenia element obsługowy znajdował się w odle-
głości maksymalnie 1,5 m od wagi. W przeciwnym
razie nie będzie można zapewnić połączenia na
podczerwień. W takim przypadku na wyświetla-
czu
11
wskazany zostanie symbol „- - - -“.
Rada: Dla uzyskania porównywalnych wyników
należy w miarę możliwości ważyć się o tej samej
porze dnia (najlepiej rano), po wizycie w toalecie,
na czczo i bez ubrania.
j Ustawić wagę na stabilnym, poziomym i równym
podłożu.
j Nie ustawiać wagi na dywanie, gdyż może to
wpływać na rezultat pomiaru. W wyjątkowym
przypadku możemy położyć na dywanie deskę
i na niej ustawić wagę. Twarda powierzchnia
podłogi jest warunkiem prawidłowego pomiaru.
1. Wziąć element obsługowy do ręki i zapewnić,
aby wyświetlony był czas godzinowy.
Wskazówka: Możliwe jest pozostawienie
elementu obsługowego w wadze. Zwrócić
uwagę na to, aby styk metalowy
13
części
obsługowej przylegał dokładnie do styku
metalowego
4
wagi.
2. Wcisnąć przycisk czasu godzinowego / potwier-
dzania
7
, aby móc wywołać nasze osobiste
dane.
3. Wcisnąć przycisk zmiany wartości w górę
8
lub wstecz
9
, aby wybrać użytkownika.
Wskazówka: Podczas wyświetlania naszego
profilu wyświetlacz LC
11
wyświetla wszystkie
nasze osobiste ustawienia.
4. Wcisnąć przycisk Start
10
.
5. Odczekać, aż na wyświetlaczu LC
11
pojawi
się „0,0 kg“, „0,0 lb“ lub „0:0o st:lb“.
6. Stanąć na płycie wagi
3
i pozostać na niej
nieruchomo. Zwrócić uwagę na to, aby stanąć
przy tym na obydwie elektrody
2
. Rozpoczyna
się pomiar wagi. Wskazanie miga 3 x. Zmierzona
waga zostaje wyświetlona i zapisana w pamięci.
Następnie wyświetlacz LC
11
wskazuje
„00.0000“. Po tym wskazuje trzy razy na
przemian zmierzone wartości w dwóch grupach.
Grupa 1: zapotrzebowanie na kalorie
22
„kcal“, zawartość tkanki tłuszczowej
28
w %
i zawartość wody
26
w %.
Grupa 2: c iężar „kg / lb / st:lb“
20
,
21
, masa
mięśniowa
30
w % i masa kostna
27
w %.

20 PL
Obsługa / Znaczenie zinterpretowanych wartości ... / Usuwanie błędów
Po wskazaniu wartości urządzenie przechodzi
automatycznie ponownie do wskazania czasu
godzinowego.
Q
Wywoływanie ostatnio
zapisanych wartości
Wskazówka: Funkcja ta jest dostępna tylko dla
użytkowników 1 - 12.
1. Zapewnić, aby na wyświetlaczu wskazany był
czas godzinowy.
2. Wcisnąć przycisk Start
10
, aby móc wywołać
zapisane wartości.
3. Wcisnąć przycisk zmiany wartości w górę
8
wzgl. wstecz
9
, aby wybrać nasz profil.
4. Wcisnąć przycisk potwierdzania czasu godzi-
nowego
7
i odczekać 3 - 4 sekundy, do chwili
aż można będzie wyświetlić ostatnio zapisane
wartości dla wybranego użytkownika. Na wy-
świetlaczu LC
11
wskazywane są na zmianę
wartości w dwóch grupach (patrz „Pomiar
wagi ciała, zapotrzebowania na kalorie, za-
wartości tkanki tłuszczowej, zawartości wody,
zawartości tkanki kostnej i tkanki mięśniowej“
punkt 6.).
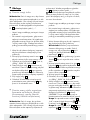
Q
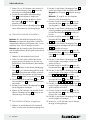
Znaczenie zinterpretowanych wartości pomiarowych
Wskazanie
LCD
Znaczenie Za szczupły Szczupły Normalny Nadwaga Wysoka nadwaga
Q
Usuwanie błędów
Komunikat
błędu
Znaczenie Rozwiązanie
h-Lo Baterie elementu obsługowego są zużyte. Wymienić baterie zgodnie z rozdziałem:
„Wkładanie / wymiana baterii“.
b-Lo Baterie wagi są zużyte. Wymienić baterie zgodnie z rozdziałem:
„Wkładanie / wymiana baterii“.
Err Przekroczono maks. obciążenie 180 kg
(400 lb).
Zejść z płyty wagi
3
, aby uniknąć
obrażeń i / lub szkód rzeczowych.
ErrL Zmierzona zawartość tkanki tłuszczowej
jest za niska, wzgl. znajduje się poniżej
minimalnej wartości pomiaru wynoszącej
4,0 %.
–
Errh Zmierzona zawartość tkanki tłuszczowej
jest za wysoka, wzgl. znajduje się powy-
żej maksymalnej wartości pomiaru wyno-
szącej 60,0 %.
–
Strona się ładuje...
Strona się ładuje...
Strona się ładuje...
Strona się ładuje...
Strona się ładuje...
Strona się ładuje...
Strona się ładuje...
Strona się ładuje...
Strona się ładuje...
Strona się ładuje...
Strona się ładuje...
Strona się ładuje...
Strona się ładuje...
Strona się ładuje...
Strona się ładuje...
Strona się ładuje...
Strona się ładuje...
Strona się ładuje...
Strona się ładuje...
Strona się ładuje...
Strona się ładuje...
Strona się ładuje...
Strona się ładuje...
Strona się ładuje...
Strona się ładuje...
Strona się ładuje...
Strona się ładuje...
Strona się ładuje...
Strona się ładuje...
Strona się ładuje...
Strona się ładuje...
Strona się ładuje...
Strona się ładuje...
Strona się ładuje...
Strona się ładuje...
Strona się ładuje...
Strona się ładuje...
Strona się ładuje...
Strona się ładuje...
Strona się ładuje...
Strona się ładuje...
Strona się ładuje...
Strona się ładuje...
Strona się ładuje...
Strona się ładuje...
Strona się ładuje...
-
 1
1
-
 2
2
-
 3
3
-
 4
4
-
 5
5
-
 6
6
-
 7
7
-
 8
8
-
 9
9
-
 10
10
-
 11
11
-
 12
12
-
 13
13
-
 14
14
-
 15
15
-
 16
16
-
 17
17
-
 18
18
-
 19
19
-
 20
20
-
 21
21
-
 22
22
-
 23
23
-
 24
24
-
 25
25
-
 26
26
-
 27
27
-
 28
28
-
 29
29
-
 30
30
-
 31
31
-
 32
32
-
 33
33
-
 34
34
-
 35
35
-
 36
36
-
 37
37
-
 38
38
-
 39
39
-
 40
40
-
 41
41
-
 42
42
-
 43
43
-
 44
44
-
 45
45
-
 46
46
-
 47
47
-
 48
48
-
 49
49
-
 50
50
-
 51
51
-
 52
52
-
 53
53
-
 54
54
-
 55
55
-
 56
56
-
 57
57
-
 58
58
-
 59
59
-
 60
60
-
 61
61
-
 62
62
-
 63
63
-
 64
64
-
 65
65
-
 66
66


w innych językach
- slovenčina: Silvercrest Z28414 Návod na používanie
Powiązane artykuły
Inne dokumenty
-
ECG OV 124 Instrukcja obsługi
-
Korona 75501 Instrukcja obsługi
-
Bosch PPW7170/01 Instrukcja obsługi
-
-
AEG PW 5644 FA Instrukcja obsługi
-
ProfiCare PC-PW 3007 FA 8 in 1 schwarz Instrukcja obsługi
-
-
 Profi Care PC-PW 3008 BT Instrukcja obsługi
-
LIVARNO 91748 Instrukcja obsługi
-
Menuett 820-195 User Instructions
