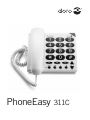
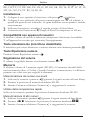
Doro PhoneEasy® 311c Instrukcja obsługi
- Kategoria
- Telefony
- Typ
- Instrukcja obsługi

PhoneEasy 311C

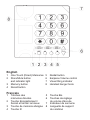
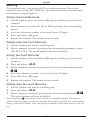
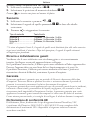
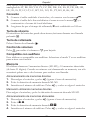
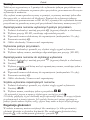
1 Touches des
mémoires directes
2 Touche Enregistrement /
Secret et témoin lumineux
3 Touche de mémoire abrégée
4 Touche R
5 Touche Bis
6 Touches de réglage
du volume d’écoute
7 Indicateur de sonnerie
8 Languette de support
du combiné
Français
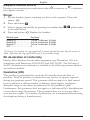
1 One Touch (Direct) Memories
2 Store/Mute button
and indicator light
3 Memory button
4 Recall button
5 Redial button
6 Earpiece Volume control
7 Visual Ring indicator
8 Handset hanger hook
English

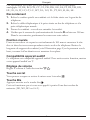
1 Composizione a un tasto
2 Tasto Memorizzazione/
Silenziamento e LED
3 Tasto memoria
4 Tasto Recall (R)
5 Tasto Ripetizione numero
6 Regolazione volume
7 Indicatore di squillo
8 Supporto di aggancio
per la cornetta
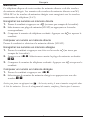
1 Memorias directas
2 Tecla e indicador de
Almacenamiento/Silencio
3 Tecla de Memoria
4 Tecla R
5 Tecla de Rellamada
6 Control de volumen
7 Indicador de Timbre
8 Para montaje mural
Español
Italiano
1 Κουμπιάταχείας
κλήσηςM1-M3
2 Κουμπίαποθήκευσης
/Σίγαση
3 Κουμπίμνήμης
4 Flash
5 Λειτουργίαεπανάκλησης
6 Ρυθμιστήςέντασης
ήχουακουστικού
7 Ένδειξηήχουκλήσης
8 Οπήανάρτησηςακουστικού
Ελληνικά
1 Pamięciszybkiegowybierania
2 Przyciskzapisuiwyciszania/
kontrolkawyciszania
3 Przycisk skróconego
wybierania
4 Przycisk Recall (R)
5 Przyciskponownego
wybierania
6 Regulacjagłośności
7 Wskaźniksygnałudzwonka
8 Wieszaknasłuchawkę
Polski
1 Direktwahltasten
2 Speichern/Stummtaste
mit kontrollleuchte
3 Kurzwahltaste
4 R-Signaltaste
5 Wahlwiederholungstaste
6 Lautstärke für Hörer
7 Optische Rufanzeige
8 Hörerhalterung bei
Wandmontage
Deutsch

1
English
This device is intended for the analogue telephone network lines in AT, BE,
BG, CH, CY, CZ, DE, DK, EE, ES, FI, FR, GB, GR, HU, IE, IS, IT, LV, LT,
LU, MT, NL, NO, PL, PT, RO, SI, SK, SE.
Connection
1. Connect the handset curly cord to the handset and the socket on the left-
hand side of the telephone
q
.
2. Connect the telephone line cord to the socket at the rear of the telephone
T
, and to a telephone network wall socket.
3. You will hear a click when the modular plug is correctly in place.
4. Lift the handset and listen for the dial tone. Your telephone is now
operational.
5. Ensure that the recall button timing switch (R) on the telephone is
correctly set (100 ms UK/AUS or 300 ms France/Portugal or 600 ms NZ).
Wall mounting
The telephone can be wall mounted using two screws positioned vertically at
a distance of 100 mm, the screws should t into the ‘keyholes’ on the back of
the telephone. Remove the hanger hook (please refer to diagram on page 2) by
pushing it upwards, then rotate it 180 degrees and replace it
Hearing Aid compatible
This telephone is hearing aid compatible. Select the T mode on your hearing
aid to enable this feature.
Mute button
Press and release
z
to mute the handset microphone during a call, the light
next to the button will ash while the microphone is muted. Press and release
z
again to continue with your telephone conversation.
Redial button
If the number dialled is engaged or you wish to dial the last number called
lift the handset and press and release
r
. Redial will not work if the number
dialled was from memory (i.e. M1, M2, M3 or 0-9).
Recall
Access to additional network services can be gained by using the recall button
R
,
*
and
#
keys. Contact your network operator for more information.
Press the recall button
R
followed by the extension number to when connected
to a PBX (TBR only).

2
English
Memory
The telephone has 3 one-touch and 10 two-touch memories. One-touch
memories are stored in M1, M2 & M3, two touch memories are stored using
the telephone keypad digits 0-9.
StoringOne-touchMemories
1. Lift the handset, press and release
P
(ignore anything you hear in the
earpiece).
2. Select a memory location M1, M2 or M3 by pressing the corresponding
button.
3. Enter the telephone number to be stored (up to 21 digits).
4. Press and release
P
again.
5. Replace the handset. The number is now stored.
DiallingusingOne-touchMemories
1. Lift the handset and wait for a dialling tone.
2. Select a memory location by pressing the corresponding memory button
(M1, M2 or M3). The stored number will now be dialled.
StoringTwo-touchMemories
1. Lift the handset, press and release
P
(ignore anything you hear in the
earpiece).
2. Press and release
m
.
3. Select a memory location by pressing one of the keypad number buttons
0
-
9
.
4. Enter the telephone number to be stored (up to 21 digits).
5. Press and release
P
again.
6. Replace the handset. The number is now stored.
DiallingusingTwo-touchMemories
1. Lift the handset and wait for a dialling tone.
2. Press and release
m
.
3. Select a memory location by pressing the relevant keypad number
0
-
9
.
The stored number will now be dialled.
Press and release
r
if you need to insert a pause in a telephone number. The name or
number stored in memory can then be entered on the memo list if wished. If a stored number
changes, follow the procedures above entering the new number in the same location as the old
one.

3
English
Earpiece Volume control
During a conversation press and release either
v
to increase or
V
to decrease
the earpiece volume.
Ringer
1. Lift the handset (ignore anything you hear in the earpiece). Press and
release
P
.
2. Press and release
#
.
3. Select a ringer and melody by pressing the number keys
0
-
9
(please refer
to the table below).
4. Press and release
P
. Replace the handset.
Melody type Key/level
Melody A ........................ 1=Low,2=Normal,3=High
Melody B ........................ 4=Low,5=Normal,6=High
Melody C ........................ 7=Low,8=Normal,9=High
Off* ................................. 0
* If the key 0 is selected, the ring signal will be turned off until the next time the receiver is
lifted. After that, the ring signal will revert to the previous setting.
EU declaration of conformity
Hereby, Doro declares that the radio equipment type PhoneEasy 311c is in
compliance with Directives: 2014/53/EU and 2011/65/EU. The full text of
the EU declaration of conformity is available at the following internet address:
www.doro.com/dofc
Guarantee (UK)
This product is guaranteed for a period of 24 months from the date of
purchase. Proof of purchase is required for any service or support required
during the guarantee period. This guarantee shall not apply to a fault caused
by an accident or a similar incident or damage, liquid ingress, negligence,
abnormal usage or any other circumstances on the purchaser’s part.
Furthermore, this guarantee shall not apply to a fault caused by a thunderstorm
or any other voltage uctuations. This guarantee does not in any way affect
your statutory rights. (As a matter of precaution, we recommend disconnecting
the telephone during a thunderstorm.)

Français
4
Cet équipement est conçu pour être utilisé sur le réseau téléphonique
analogique AT, BE, BG, CH, CY, CZ, DE, DK, EE, ES, FI, FR, GB, GR,
HU, IE, IS, IT, LV, LT, LU, MT, NL, NO, PL, PT, RO, SI, SK, SE.
Raccordement
1. Reliez le cordon spiralé au combiné et à la che située sur la gauche du
téléphone.
2. Reliez le câble téléphonique à la prise située au dos du téléphone et à la
prise téléphonique murale.
3. Prenez le combiné : vous devez entendre la tonalité.
4. Vériez que le curseur de synchronisation de la touche R est bien sur 300 ms.
Dans le cas contraire, positionnez le curseur sur cette valeur.
Position murale
Fixez au mur deux vis espacées verticalement de 100 mm et encastrez la tête
des vis dans les trous correspondants situés au dos du téléphone. Retirez la
languette de support du combiné (voir l’illustration page 2) en la poussant vers le
haut ; tournez-la d’un demi-tour et remettez-la en place.
Compatibilité appareil auditif
Ce téléphone est compatible appareil auditif. Pour activer cette fonction, mettez
votre appareil auditif sur T.
Réglage du volume
Réglez le volume à l’aide des touches
V
/
v
.
Touche secret
Vous pouvez couper ou activer le micro avec la touche M.
Touche Bis
Appuyez ensuite sur la touche bis
r
.
Ceci ne fonctionne pas si vous avez appelé à partir d’une des touches de
mémoire (M1, M2, M3 ou 0 à 9).

Français
5
Mémoires
Ce téléphone dispose de trois touches de mémoire directe et de dix touches
de mémoire abrégée. Les numéros des touches de mémoire directe sont M1,
M2 & M3 et les touches de mémoire abrégée sont enregistrés sur les touches
numérotées du téléphone (0 à 9).
Enregistrer les numéros en mémoire directe
1. Prenez le combiné et appuyez sur p (ne tenez pas compte de la tonalité).
2. Sélectionnez une plage de mémoire(M1-M3) en appuyant sur la touche
correspondante.
3. Composez le numéro de téléphone souhaité. Appuyez sur p et reposez le
combiné.
Composer un numéro en mémoire directe
Prenez le combiné et choisissez la mémoire désirée (M1-M3).
Enregistrer les numéros en mémoire abrégée
1. Prenez le combiné et appuyez une fois sur la touche
P
(ne tenez pas
compte de la tonalité).
2. Appuyez sur
M
. Sélectionnez ensuite la plage de mémoire souhaitée
0
-
9
.
3. Composez le numéro de téléphone souhaité. Appuyez sur
P
et reposez le
combiné.
Composer un numéro en mémoire abrégée
1. Prenez le combiné et appuyez sur
M
.
2. Sélectionnez le numéro de mémoire abrégée en appuyant sur une des
touches
0
-
9
.
Insérez une pause en appuyant sur
r
. Au besoin, mettez le nom et numéro enregistrés dans
la liste des mémoires. En cas de changement de numéro, remplacez l’ancien par le nouveau.

Français
6
Choix de sonnerie
1. Prenez le combiné (ne tenez pas compte de la tonalité) et appuyez p et
sur
#
.
2. Sélectionnez une des sonneries en appuyant sur une des touches
numérotées
0
-
9
qui correspondent au tableau suivant.
Appuyez sur p et reposez le combiné.
Mélodie Touche/Niveau sonore
Mélodie A ....................... 1=Faible,2=Normal,3=Fort
Mélodie B ....................... 4=Faible,5=Normal,6=Fort
Mélodie C ....................... 7=Faible,8=Normal,9=Fort
Coupée* ......................... 0
* Si vous sélectionnez la touche 0, la sonnerie reste coupée jusqu’à ce que vous repreniez le
combiné. Après utilisation du combiné, le réglage antérieur de la sonnerie est rétabli.
Declaration UE de conformite
Le soussigné, Doro, déclare que l’équipement radioélectrique du type
PhoneEasy 311C est conforme aux directives : 2014/53/UE et 2011/65/UE.
Le texte complet de la déclaration UE de conformité est disponible à l’adresse
internet suivante : www.doro.com/dofc
Garantie et S.A.V.
Pour la France
Cet appareil est garanti deux ans partir de sa date d’achat, la facture ou le ticket
de caisse faisant foi. La réparation dans le cadre de cette garantie sera effectuée
gratuitement.
La garantie est valable pour un usage normal de l’appareil tel qu’il est déni
dans la notice d’utilisation. Les fournitures utilisées avec l’appareil ne sont pas
couvertes par la garantie. Sont exclues de cette garantie les détériorations dues
à une cause étrangère à l’appareil. Les dommages dus à des manipulations ou
à un emploi non conformes, à un montage ou entreposage dans de mauvaises
conditions, à un branchement ou une installation non-conformes ne sont
pas pris en charge par la garantie. Par ailleurs, la garantie ne s’appliquera
pas si l’appareil a été endommagé à la suite d’un choc ou d’une chute,
d’une fausse manœuvre, d’un branchement non-conforme aux instructions
mentionnées dans la notice, de l’effet de la foudre, de surtensions électriques
ou électrostatiques, d’une protection insufsante contre l’humidité, la chaleur
ou le gel. En tout état de cause, la garantie légale pour vices cachés s’appliquera
conformément aux articles 1641 et suivants du Code Civil.
Il est recommandé de débrancher le téléphone en cas d’orage.

7
Italiano
Questa apparecchiatura è studiata per l’uso sulla rete telefonica analogica AT, BE,
BG, CH, CY, CZ, DE, DK, EE, ES, FI, FR, GB, GR, HU, IE, IS, IT, LV, LT, LU,
MT, NL, NO, PL, PT, RO, SI, SK, SE.
Installazione
1. Collegare il cavo spiralato al ricevitore e alla presa
q
sul telefono.
2. Collegare il cavo telefonico alla presa contrassegnata con
T
sul telefono, e
quindi alla presa di rete telefonica. La spina modulare scatta quando è inserita
correttamente.
3. Sollevare il ricevitore e attendere il segnale acustico di linea libera.
4. Assicurarsi che l’interruttore R/Tempo di Recall sia impostato su 100 ms.
Compatibilità con apparecchi acustici
Il telefono è dotato di circuito a induzione incorporato. Selezionare la modalità
T sull’apparecchio acustico per consentire l’accoppiamento.
Tasto silenziamento (microfono disabilitato)
Il microfono può essere disattivato o attivato durante una chiamata premendo
z
.
Tasto Ripetizione numero
Premere il tasto Ripetizione numero
r
.
Regolazione del volume
Il volume è regolabile durante una chiamata tramite
{
/
}
.
Memoria
Il telefono è dotato di 3 memorie rapide (M1-M3) e 10 memorie attivabili dalla
tastiera numerica (no a 21 cifre). Quando il numero è memorizzato, è sufciente
premere uno o due tasti per eseguire la chiamata.
Memorizzazionedeinumerione-touch
1. Sollevare la cornetta e premere p(ignorare il segnale acustico di linea libera).
2. Premere la posizione di memoria desiderata M1-M3.
3. Inserire il numero telefonico. Premere p e riagganciare la cornetta.
Utilizzo della composizione rapide
Sollevare la cornetta e premere la posizione di memoria desiderata M1-M3.
Memorizzazione di altri numeri
1. Sollevare la cornetta e premere p(ignorare il segnale acustico di linea libera).
2. Premere
M
. Selezionare la posizione di memoria desiderata
0
-
9
.
3. Inserire il numero telefonico. Premere p e riagganciare la cornetta.

8
Italiano
Utilizzo della composizione dei numeri in memoria
1. Sollevare la cornetta e premere
M
.
2. Selezionare la posizione di memoria desiderata
0
-
9
.
Premere
r
per inserire una pausa nel numero telefonico.
Suoneria
1. Sollevare la cornetta e premere
p
e
#
.
2. Selezionare il segnale di squillo premendo
0
-
9
in base alla tabella
sottostante.
3. Premere p e riagganciare la cornetta.
Tipo di melodia Tasto/livello
Melodia A ....................... 1=Basso,2=Normale,3=Alto
Melodia B ....................... 4=Basso,5=Normale,6=Alto
Melodia C ....................... 7=Basso,8=Normale,9=Alto
Off * ................................ 0
* Se viene selezionato il tasto 0, il segnale di squillo verrà disattivato no alla volta successiva
in cui verrà risollevato il ricevitore. Dopo tale operazione, il segnale di squillo ritornerà
all’impostazione precedente.
Ricerca e individuazione guasti
Vericare che il cavo telefonico non sia danneggiato e sia correttamente
inserito. Scollegare eventuali apparecchiature collegate.
Se il problema viene risolto, il difetto può essere attribuito all’altro apparecchio.
Provare l’apparecchio con una linea del cui funzionamento si è certi. Se
il prodotto funziona, il difetto può essere attribuito alla linea. Qualora si
riscontrino ulteriori difcoltà, contattare il punto d’acquisto.
Garanzia
Il presente prodotto è garantito per un periodo di 24 mesi a decorrere dalla data
di acquisto. Per avere diritto a qualsiasi servizio o assistenza durante il periodo di
garanzia è necessario presentare il relativo documento di acquisto.
La presente garanzia non verrà applicata nel caso di eventuali guasti dovuti a incidenti,
infortuni o danni simili, penetrazione di liquidi, negligenza, uso anomalo o altre
circostanze simil impuitabili all’acquirente. Inoltre, la presente garanzia non verrà
applicata ad eventuali guasti causati da temporali o altre cause di sbalzi di tensione.
Come misura precauzionale, si consiglia di scollegare il telefono durante i temporali.
Dichiarazione di conformità UE
Il fabbricante, Doro, dichiara che il tipo di apparecchiatura PhoneEasy 311C
è conforme alle Direttive: 2014/53/EU e 2011/65/EU. Il testo completo della
dichiarazione di conformità UE è disponibile al seguente indirizzo Internet:
www.doro.com/dofc

9
Deutsch
Dieses Gerät ist für den Betrieb an einem analogen Telefonanschluss oder
an einer analogen Nebenstelle einer Telefonanlage in den folgenden Ländern
geeignet, AT, BE, BG, CH, CY, CZ, DE, DK, EE, ES, FI, FR, GB, GR, HU,
IE, IS, IT, LV, LT, LU, MT, NL, NO, PL, PT, RO, SI, SK, SE.
Anschließen
1. Schließen Sie das Spiralkabel an den Hörer und an den Anschluss, der mit
q
markiert ist, an der Unterseite des Telefons an.
2. Schließen Sie das Telefonkabel an den Anschluss
T
an der Unterseite des
Telefons und an die Telefonsteckdose an.
3. Sie hören ein Klicken, wenn der Stecker richtig eingerastet ist.
4. Heben Sie den Hörer ab und warten Sie auf das Freizeichen. Ihr Telefon ist
jetzt betriebsbereit.
Hörgerät
Der Hörer hat eine eingebaute Hörhilfe, wenn Sie ein Hörgerät während des
Gesprächs benutzen wollen. Schliessen Sie die Telefonspule an den Hörer an,
indem Sie das Hörgerät auf die T-Stellung schalten.
Stummschaltungstaste
Das Mikrofon des Hörers kann während eines Gesprächs mit der Taste
z
ausgeschaltet werden. Nochmaliges Drücken der Taste schaltet das Mikrofon
wieder ein. Die LED neben der Taste blinkt, wenn das Mikrofon ausgeschaltet
ist.
Wahlwiederholung
Wenn die angerufene Nummer besetzt war, oder wenn Sie die zuletzt gewählte
Nummer noch einmal wählen möchten, heben Sie den Hörer ab und drücken
Sie die Wahlwiederholungs-Taste
r
.
Lautstärkeregelung
Die Lautstärke im Hörer, kann während des Gesprächs mit Hilfe der
Lautstärketasten. Benutzen Sie die Taste
v
, um die Lautstärke zu erhöhen und
die Taste
V
um diese zu senken.

10
Deutsch
Speicher
Im Telefon können drei Schnellwahltasten und 10 Kurzwahlnummern
gespeichert werden. Wenn eine Nummer auf einer dieser Tasten gespeichert ist,
kann diese mit weniger Tasten gewählt werden. Die Schnellwahltasten haben
die Bezeichnung M1-M3. Die Kurzwahlnummern werden mit 0-9 nummeriert.
Schnellwahlspeichern
1. Heben Sie den Hörer ab (ignorieren Sie das Freizeichen) und drücken Sie
die Taste
P
.
2. Wählen Sie den Speicherplatz (M1-M3) indem Sie die jeweilige Taste drücken.
3. Geben Sie die Telefonnummer mit den Zifferntasten ein (max. 21 Zeichen).
4. Drücken Sie
P
nochmals.
5. Legen Sie den Hörer auf. Die Nummer ist gespeichert.
WählenmitSchnellwahl
1. Heben Sie den Hörer ab und warten Sie auf das Freizeichen.
2. Wählen Sie den Speicherplatz (M1-M3) indem Sie die jeweilige Taste drücken.
Kurzwahlnummerspeichern
1. Heben Sie den Hörer ab und drücken Sie die Taste
P
.
2. Drücken Sie die Taste
m
.
3. Wählen Sie den gewünschten Speicherplatz mit den Tasten
0
-
9
.
4. Geben Sie die Telefonnummer mit den Zifferntasten ein (max. 21
Zeichen).
5. Drücken Sie die Taste
P
und legen Sie den Hörer auf. Die Nummer ist
gespeichert.
AnrufmitKurzwahl
1. Heben Sie den Hörer ab und warten Sie auf das Freizeichen.
2. Drücken Sie die Taste
m
.
3. Wählen Sie die gewünschte Kurzwahlnummer mit den Tasten
0
-
9
.
Wenn Sie eine Pause während der Anwahl möchten, drücken Sie die Taste
r
.
Schreiben Sie die Nummern auf die Nummernkarte. Wenn eine Nummer geändert werden
soll, speichern Sie die neue Nummer über der alten Nummer.

11
Deutsch
Klingel
1. Heben Sie den Hörer ab (ignorieren Sie das Freizeichen) und drücken Sie
die Speichertaste
P
und
#
.
2. Wählen Sie den Klingelton, indem Sie die Zifferntaste
0
-
9
nach der
untenstehenden Tabelle drücken.
3. Drücken Sie die Speichertaste
P
und legen Sie den Hörer wieder auf. Der
Klingelton ist jetzt eingestellt.
Melodie Taste/Lautstärke
Melodie A ....................... 1=Leise,2=Normal,3=Laut
Melodie B ....................... 4=Leise,5=Normal,6=Laut
Melodie C ....................... 7=Leise,8=Normal,9=Laut
Aus *. .............................. 0
* Wenn Sie die Taste 0 drücken, ist das Rufsignal ausgeschaltet, bis der Hörer das nächste
Mal abgenommen wird. Danach wird das Rufsignal wieder auf den vorherigen Zustand
zurückgesetzt.
EU-Konformitätserklärung
Hiermit erklärt Doro, dass der Funkanlagentyp PhoneEasy 311C der folgenden
Richtlinien entspricht: 2014/53/EU und 2011/65/EU. Der vollständige
Text der EU-Konformitätserklärung ist unter der folgenden Internetadresse
verfügbar: www.doro.com/dofc
Wenn das Telefon nicht funktioniert
Vergewissern Sie sich, dass das Telefonkabel unbeschädigt und korrekt
eingesteckt ist. Entfernen Sie eventuelle Zusatzausrüstung, Verlängerungskabel
und andere Telefone. Wenn das Gerät jetzt funktioniert, liegt der Fehler
woanders. Versuchen Sie, das Telefon z.B. bei einem Nachbarn anzuschließen.
Wenn das Gerät dort funktioniert, ist Ihr Telefonanschluss vielleicht gestört.
Rufen Sie die Störungsstelle an. Wenn der Fehler dadurch nicht beseitigt wird,
fragen Sie Ihren Händler.
Garantie
Für dieses Gerät gilt eine Herstellergarantie von 2 Jahren. Bei eventuellen
Reklamationen wenden Sie sich bitte an Ihren Händler. Der Garantieservice wird nur
mit gültiger Kaufquittung bzw. Rechnungskopie ausgeführt. Die Garantie gilt nicht,
wenn der Fehler aufgrund eines Unglücks oder ähnlichem entstanden ist. Weiterhin
gilt die Garantie nicht bei Gewaltanwendung, eingedrungenen Flüssigkeiten, schlechter
Wartung, Missbrauch oder anderer Fehler des Käufers. Die Garantie verfällt auch,
wenn die Seriennummer des Telefons unkenntlich gemacht wurde sowie bei Schäden
die durch Gewitter oder andere Überspannungseinüsse entstanden sind.
Bitte beachten Sie, dass diese Herstellergarantie nicht die Ihnen nach der
jeweils einschlägigen Rechtsordnung zustehenden gesetzlichen Rechte bezogen
auf den Verkauf von Verbrauchsgütern beeinusst.

12
Español
Este equipo está diseñado para uso únicamente en las redes telefónicas
analógicas de AT, BE, BG, CH, CY, CZ, DE, DK, EE, ES, FI, FR, GB, GR,
HU, IE, IS, IT, LV, LT, LU, MT, NL, NO, PL, PT, RO, SI, SK, SE.
Conexión
1. Conecte el cable ondulado al auricular y al conector con la marca
q
.
2. Conecte el cable de la línea telefónica al conector con la marca
T
y a
continuación a la toma de la red telefónica.
3. Asegúrese de que el tiempo de rellamada/R esté establecido en 100 ms.
Tecla de silencio
El micrófono del auricular puede desactivarse/activarse durante una llamada
pulsando
z
.
Tecla de rellamada
Pulse el botón de rellamada
r
.
Control de volumen
Pulse
v
para subir el volumen o
V
para bajarlo.
Compatible con audífono
Este teléfono es compatible con audífono. Seleccione el modo T en su audífono
para activar esta función.
Memoria
El teléfono almacena 3 memorias directas (M1-M3) y 10 memorias abreviadas
(de hasta 21 dígitos). Cuando un número esté almacenado en memoria, tan sólo
necesitará pulsar uno o dos botones para realizar una llamada.
Almacenamiento de memorias directas
1. Descuelgue el auricular y pulse p (ignore el tono de marcación).
2. Pulse la ubicación de memoria deseada M1-M3.
3. Introduzca el número de teléfono. Pulse p y vuelva a colgar el auricular.
Marcación utilizando memorias directas
Descuelgue el auricular y pulse la ubicación de memoria deseada M1-M3.
Almacenamiento de memorias abreviadas
1. Descuelgue el auricular y pulse p (ignore el tono de marcación).
2. Pulse
M
.
3. Pulse la ubicación de memoria deseada
0
-
9
.
4. Introduzca el número de teléfono. Pulse p y vuelva a colgar el auricular.

13
Español
Marcación utilizando memorias abreviadas
1. Descuelgue el auricular y pulse
M
.
2. Pulse la ubicación de memoria deseada
0
-
9
.
Pulse
r
si desea una pausa en el número de teléfono.
Timbre
1. Descuelgue el auricular (ignore el tono de marcación) y pulse p y
#
.
2. Seleccione la señal de llamada pulsando
0
-
9
de acuerdo con la siguiente
tabla.
3. Pulse p y vuelva a colgar el auricular.
Tipo de melodía Tecla/nivel
Melodía A ....................... 1=Bajo,2=Normal,3=Alto
Melodía B ....................... 4=Bajo,5=Normal,6=Alto
Melodía C ....................... 7=Bajo,8=Normal,9=Alto
Desactivada* .................. 0
* Si se selecciona la tecla 0, la señal de llamada quedará desactivada hasta la siguiente vez
que se descuelgue el auricular. A continuación, la señal de llamada volverá a su valor anterior.
Solución de problemas
Verique que el cable de teléfono está en perfectas condiciones y conectado
correctamente.
Desconecte cualquier equipo adicional que pueda estar conectado.
Si el problema se soluciona, el fallo estará en el otro equipo.
Compruebe el equipo en una línea de cuyo funcionamiento esté seguro. Si
el producto funciona, el fallo estará en la línea. Si sigue teniendo problemas,
póngase en contacto con el establecimiento en el que adquirió el teléfono.
Garantía
Este producto está cubierto por una garantía de 24 meses a partir de la fecha de
compra.
Para cualquier servicio o asistencia durante el período de validez de la garantía será
necesaria una prueba de compra.
Esta garantía no será aplicable en caso de fallos causados por accidentes o trato
brusco, daños, introducción de líquidos, negligencia, uso anormal o cualquier otra
circunstancia por parte del comprador. Esta garantía tampoco será aplicable en caso
de fallos causados por tormentas eléctricas o uctuaciones de tensión. A modo de
precaución, se recomienda desconectar el teléfono durante las tormentas eléctricas.
Declaración UE de conformidad
Por la presente, Doro declara que el tipo de equipo radioeléctrico PhoneEasy 311C es
conforme con las siguientes directivas: 2014/53/UE y 2011/65/UE. El texto completo
de la declaración UE de conformidad está disponible en la dirección Internet
siguiente: www.doro.com/dofc

14
Ελληνικά
Ο παρών εξοπλισμός έχει σχεδιαστεί για χρήση μόνο στο αναλογικό τηλεφωνικό
δίκτυο της AT, BE, BG, CH, CY, CZ, DE, DK, EE, ES, FI, FR, GB, GR, HU,
IE, IS, IT, LV, LT, LU, MT, NL, NO, PL, PT, RO, SI, SK, SE.
Σύνδεση
1. Συνδέστε το καλώδιο του τηλεφώνου στην πρίζα του τηλεφωνικού δικτύου.
2. Βεβαιωθείτε ότι ο διακόπτης επανάκλησης/χρόνου (R) αναλαμπής έχει
ρυθμιστεί στα 100 ms.
Κουμπί σίγασης
Μπορείτε να απενεργοποιήσετε ή να ενεργοποιήσετε το μικρόφωνο του
ακουστικού/των ακουστικών κατά τη διάρκεια μιας κλήσης, πατώντας το κουμπί
z
.
Κουμπί επανάκλησης
Πατήστε το κουμπί επανάκλησης
r
.
Ρύθμιση έντασης ήχου
Η ένταση του ήχου μπορεί να ρυθμιστεί κατά τη διάρκεια της κλήσης πατώντας
τα πλήκτρα
{/}
.
Μνήμη
Το τηλέφωνο μπορεί να αποθηκεύσει 3 μνήμες ανάκλησης με ένα πάτημα (M1-M3) και
10 μνήμες ανάκλησης με δύο πατήματα (μέχρι και 21 ψηφία). Όταν ένας αριθμός έχει
αποθηκευτεί, χρειάζεται να πατήσετε μόνον ένα ή δύο κουμπιά για να πραγματοποιήσετε
μια κλήση.
Αποθήκευσημνημώνανάκλησηςμεέναπάτημα
1. Σηκώστε το ακουστικό και πατήστε το κουμπί p (αγνοήστε οτιδήποτε
ακουστεί από το ακουστικό).
2. Πατήστε την επιθυμητή θέση M1-M3.
3. Πληκτρολογήστε τον αριθμό τηλεφώνου. Πατήστε το κουμπί p και
τοποθετήστε το ακουστικό στη θέση του.
Πραγματοποίησηκλήσηςχρησιμοποιώνταςμνήμεςανάκλησηςμεένα
πάτημα
Σηκώστε το ακουστικό και πατήστε την επιθυμητή θέση M1-M3.
Αποθήκευσημνημώνανάκλησηςμεδύοπατήματα
1. Σηκώστε το ακουστικό και πατήστε το κουμπί p (αγνοήστε οτιδήποτε ακουστεί
από το ακουστικό).
2. Πατήστε το M.
3. Πατήστε την επιθυμητή θέση
0
-
9
.
4. Πληκτρολογήστε τον αριθμό τηλεφώνου. Πατήστε το κουμπί p και
τοποθετήστε το ακουστικό στη θέση του.

15
Ελληνικά
Πραγματοποίησηκλήσηςχρησιμοποιώνταςμνήμεςανάκλησηςμεδύο
πατήματα
1. Σηκώστε το ακουστικό και πατήστε το
M
.
2. Πατήστε την επιθυμητή θέση
0-9
.
Πατήστε το
r
εάν θέλετε να εισαγάγετε μια παύση μέσα στον αριθμό.
Ήχος κλήσης
1. Σηκώστε το ακουστικό (αγνοήστε τον ήχο κλήσης) και πατήστε p και
#
.
2. Επιλέξτε το σήμα κλήσης πατώντας
0
-
9
, σύμφωνα με τον παρακάτω
πίνακα.
3. Πατήστε το κουμπί p και τοποθετήστε το ακουστικό στη θέση του.
Τύπος μελωδίας Πλήκτρο/επίπεδο
ΜελωδίαA ...................... 1=Χαμηλό,2=Κανονικό,3=Υψηλό
ΜελωδίαB ...................... 4=Χαμηλό,5=Κανονικό,6=Υψηλό
ΜελωδίαC ..................... 7=Χαμηλό,8=Κανονικό,9=Υψηλό
Off* ................................. 0
* Εάν επιλεγεί το πλήκτρο 0, ο ήχος κλήσης θα απενεργοποιηθεί μέχρι να σηκώσετε ξανά
το ακουστικό. Μετά από αυτό, ο ήχος κλήσης θα επανέλθει στην προηγούμενη ρύθμιση.
Απλουστευμενη δηλωση συμμορφωσης ΕΕ
Με την παρούσα ο/η Doro, δηλώνει ότι ο ραδιοεξοπλισμός PhoneEasy 311C πληροί
με τις οδηγίες: 1999/05/ΕΚ ή 2014/53/ΕΕ και 2011/65/ΕΕ. Το πλήρες κείμενο της
δήλωσης συμμόρφωσης ΕΕ διατίθεται στην ακόλουθη ιστοσελίδα στο διαδίκτυο:
www.doro.com/dofc
Αντιμετώπιση προβλημάτων
Βεβαιωθείτε ότι το καλώδιο της τηλεφωνικής γραμμής δεν έχει υποστεί φθορά και είναι
συνδεδεμένο σωστά.
Αποσυνδέστε τυχόν άλλες συνδεδεμένες συσκευές.
Εάν το πρόβλημα λυθεί, τότε η βλάβη βρίσκεται στον άλλο εξοπλισμό.
Δοκιμάστε τον εξοπλισμό σε μια γραμμή που είναι γνωστό ότι λειτουργεί. Εάν το
προϊόν λειτουργήσει, τότε η βλάβη βρίσκεται στη γραμμή. Εάν συνεχίζετε να έχετε
δυσκολίες, επικοινωνήστε με το κατάστημα από το οποίο αγοράσατε το τηλέφωνο.
Εγγύηση
Το προϊόν αυτό καλύπτεται από εγγύηση 24 μηνών από την ημερομηνία αγοράς.
Η απόδειξη αγοράς είναι απαραίτητη για οποιαδήποτε επισκευή ή τεχνική υποστήριξη
εντός της περιόδου εγγύησης.
Η εγγύηση αυτή δεν ισχύει για βλάβες που προκλήθηκαν από ατύχημα ή παρόμοιο
περιστατικό ή ζημιά, εισροή υγρών, αμέλεια, αντικανονική χρήση ή οποιεσδήποτε άλλες
συνθήκες από την πλευρά του αγοραστή. Επίσης, η εγγύηση αυτή δεν ισχύει για βλάβες
που προκλήθηκαν από κεραυνούς ή οποιαδήποτε άλλη αυξομείωση τάσης. Ως μέσο
προφύλαξης, σας προτείνουμε να αποσυνδέετε το τηλέφωνο κατά τη διάρκεια καταιγίδας
με κεραυνούς.

1
Polski
To urządzenie jest przeznaczone do użytku w analogowej sieci telefonicznej w
AT, BE, BG, CH, CY, CZ, DE, DK, EE, ES, FI, FR, GB, GR, HU, IE, IS, IT,
LV, LT, LU, MT, NL, NO, PL, PT, RO, SI, SK, SE.
Podłączanie
1. Podłącz przewód telefoniczny do gniazda telefonicznego oraz do gniazda
znajdującego się na tylnej ściance telefonu.
2. Podłącz skrętny przewód do gniazda słuchawki znajdującego się na lewej
bocznej ściance aparatu oraz do słuchawki.
3. Po poprawnym włożeniu wtyczki modularnej do gniazdka powinno być
słyszalne kliknięcie.
4. Podnieś słuchawkę i sprawdź, czy słychać ciągły sygnał wybierania.
StałaczasowaprzyciskuRecall
Do wyboru dostępne są trzy różne stałe czasowe przycisku Recall: 100/300/600 ms.
Używać 100.
Montaż na ścianie
Telefon można zamontować na ścianie po uprzednim demontażu podstawki.
Użyj dwu wkrętów usytuowanych w pionie w odległości 100 milimetrów.
Wkręty powinny wtedy trać w dwa otwory w kształcie dziurki od klucza,
znajdujące się z tyłu telefonu. Wyjmij wieszak (obok miejsca na słuchawkę),
pchając go ku górze. Obróć wieszak o 180 stopni, po czym ponownie go załóż.
Zgodność z aparatami słuchowymi
Telefon ten jest zgodny z aparatami słuchowymi. Aby uaktywnić sprzężenie z
aparatem słuchowym, należy przełączyć aparat słuchowy w tryb T.
Przycisk wyciszania
Podczas rozmowy można odłączyć mikrofon, naciskając przycisk wyciszania
z
. Ponowne naciśnięcie tego przycisku aktywuje mikrofon. Gdy mikrofon jest
odłączony, kontrolka obok przycisku pulsuje.
Przycisk ponownego wybierania
Jeśli wybrany numer jest zajęty, lub jeśli zachodzi potrzeba ponownego
wybrania tego samego numeru, podnieś słuchawkę i naciśnij przycisk
ponownego wybierania
r
.
Dodatkowe usługi sieciowe
Aby przenieść połączenie, gdy telefon jest podłączony do centrali abonenckiej,
naciśnij przycisk
R
, a następnie wybierz numer wewnętrzny.
Za pomocą przycisków
R
,
*
,
#
można uzyskać dostęp do dodatkowych
usług sieci telefonicznej. Więcej informacji na ten temat można uzyskać u
operatora sieci.

2
Polski
Pamięć
Telefon jest wyposażony w 3 pamięci do wybierania jednym przyciskiem oraz
10 pamięci do wybierania za pomocą dwu przycisków, przeznaczone dla często
wybieranych numerów.
Aby wybrać numer przechowywany w pamięci, wystarczy nacisnąć jeden albo
dwa przyciski, w zależności od lokalizacji. Pamięci do wybierania jednym
przyciskiem są ponumerowane od M1 do M3, a pamięci do wybierania dwoma
przyciskami są przechowywane pod przyciskami klawiatury numerycznej 0-9.
Zapamiętywanienumerówwybieranychjednymprzyciskiem
1. Podnieś słuchawkę i naciśnij przycisk
P
(zignoruj dźwięki w słuchawce).
2. Wybierz pozycję M1-M3, naciskając odpowiedni przycisk.
3. Wprowadź numer telefoniczny do zapamiętania (maksymalnie 21 cyfry).
4. Ponownie naciśnij
P
.
5. Odłóż słuchawkę. Numer został zapamiętany.
Wybieranie jednym przyciskiem
1. Podnieś słuchawkę i sprawdź, czy słychać ciągły sygnał wybierania.
2. Wybierz żądany numer, naciskając odpowiadającą mu pozycję (M1-M3).
Zapamiętywanienumerówdoszybkiegowybierania
1. Podnieś słuchawkę i naciśnij przycisk
P
(zignoruj dźwięki w słuchawce).
2. Naciśnij
m
.
3. Wybierz pozycję, pod którą ma być zapamiętany numer, naciskając jeden z
przycisków
0
-
9
.
4. Wprowadź numer telefoniczny do zapamiętania (maksymalnie 21 cyfry).
5. Ponownie naciśnij
P
.
6. Odłóż słuchawkę. Numer został zapamiętany.
Szybkiewybieraniezapamiętanychnumerów
1. Podnieś słuchawkę i sprawdź, czy słychać ciągły sygnał wybierania.
2. Naciśnij
m
.
3. Wybierz numer, naciskając jeden z przycisków
0
-
9
.
Aby wprowadzić przerwę w numerze telefonicznym, naciśnij prz ycisk
r
.
Na kartkę znajdującą się pod słuchawką można wprowadzić numery lub nazwy telefonów
przechowywanych w pamięci aparatu. Jeśli zachodzi konieczność zmiany zapisanego w
pamięci aparatu numeru telefonu, należ y zapisać nowy numer w miejsce dotychczasowego.
Regulacja głośności
W trakcie rozmowy można zwiększyć lub zmniejszyć (o kilka poziomów)
głośność dźwięku w głośniku słuchawki. Do zwiększania głośności służy
przycisk
v
, a do zmniejszania głośności - przycisk
V
.
Strona się ładuje...
Strona się ładuje...
Strona się ładuje...
Strona się ładuje...
-
 1
1
-
 2
2
-
 3
3
-
 4
4
-
 5
5
-
 6
6
-
 7
7
-
 8
8
-
 9
9
-
 10
10
-
 11
11
-
 12
12
-
 13
13
-
 14
14
-
 15
15
-
 16
16
-
 17
17
-
 18
18
-
 19
19
-
 20
20
-
 21
21
-
 22
22
-
 23
23
-
 24
24


Doro PhoneEasy® 311c Instrukcja obsługi
- Kategoria
- Telefony
- Typ
- Instrukcja obsługi