Kensington 72281 Instrukcja obsługi
- Kategoria
- Myszy
- Typ
- Instrukcja obsługi
Niniejsza instrukcja jest również odpowiednia dla

SlimBlade
™
Trackball Mouse
Wa
rr
anty
S
i
8
60m
B
lu
et
o
ot
h
®
M
ob
i
le
Tr
a
ck
b
al
l
Instruction Guide
Guide d’instructions
Bedienungsanleitung
Handleiding
Manuale di istruzioni
Manual de instrucciones
Használati útmutató
Příručka s pokyny
Instrukcja obsługi
Руководство пользователя
Manual de instruções

English ......................................................................................................................2
Français ................................................................................................................. 17
Deutsch ................................................................................................................. 33
Nederlands ........................................................................................................... 49
Italiano .................................................................................................................. 65
Español ................................................................................................................. 81
Magyar ................................................................................................................ 97
Čeština .............................................................................................................. 113
Polski ................................................................................................................. 129
Русский ............................................................................................................... 145
Português ........................................................................................................... 161
SlimBlade
™
Trackball Mouse

2
English
A B
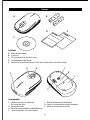
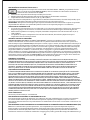
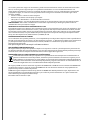
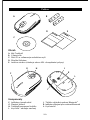
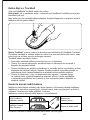
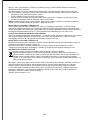
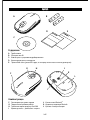
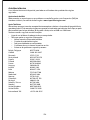
Contents
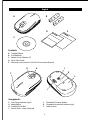
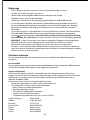
A. Trackball Mouse
B. 2 AA Batteries
C. Mouse Driver Software CD
D. Quick Start Guide
E. Warranty Insert (contains URL for full Instruction Manual)
Components
F. Fuel Gauge Indicator Lights J. Bluetooth® Discover Button
G. Mode Switch K. Bluetooth Connection Indicator Light
H. Trackball/Scroll Ball L. Battery Cover
I. Sensor Cover – Keep It Opened
F
H
I
K
J
L
D E
G
C

3
3
sec
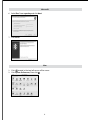
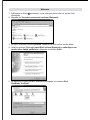
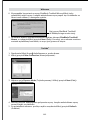
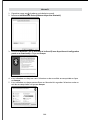
4. Connect Your Mouse to Your Bluetooth Enabled Computer
Your next step is to connect your mouse to your Bluetooth enabled computer.
The steps are different for different Bluetooth versions:
• If you have a Mac® computer with OS 10.4 or later, you have the Mac Bluetooth version.
• If you have a Windows® computer and the appears in the system tray, you probably have
the Widcomm or Microsoft® Bluetooth version.
• If you have a Windows computer and the appears in the system tray, you probably have
Toshiba Bluetooth version.
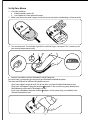
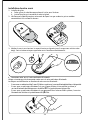
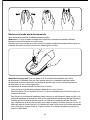
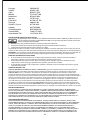
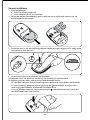
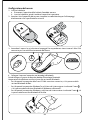
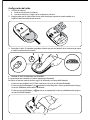
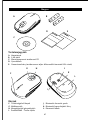
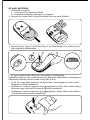
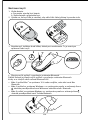
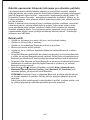
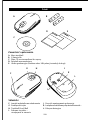
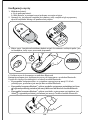
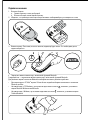
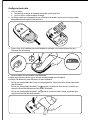
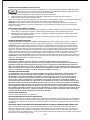
Set Up Your Mouse
1. Insert the batteries.
a. Slide the battery cover off.
b. Insert batteries, then replace the cover.
2. Make sure the sensor cover is open so that the sensor can access the desktop surface correctly.
3. Turn on the mouse. The indicator light blinks until the finger is removed. This is necessary for
your mouse to operate correctly.

4
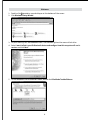
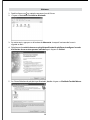
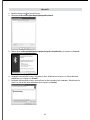
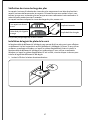
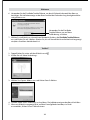
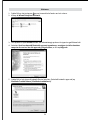
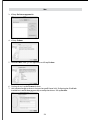
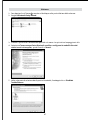
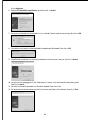
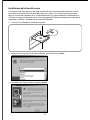
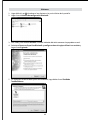
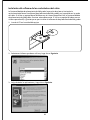
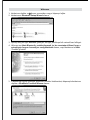
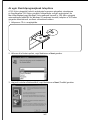
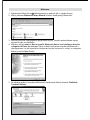
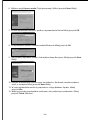
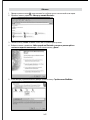
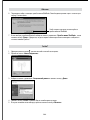
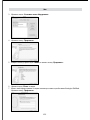
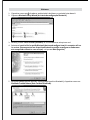
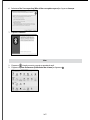
Widcomm
1. Double-click
located on your desktop or at the bottom of the screen.
2. Click Bluetooth Setup Wizard.
3. On your mouse, press the Discover button. The indicator light on the mouse blinks blue.
4. Select I want to find a specific Bluetooth device and configure how this computer will use its
services and click Next.
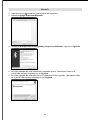
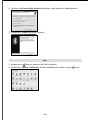
5. On the Bluetooth Device Selection screen, double-click SlimBlade Trackball Mouse.

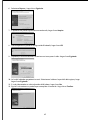
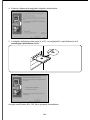
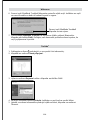
5
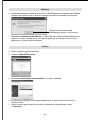
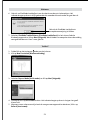
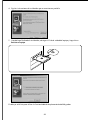
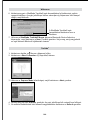
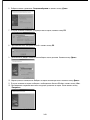
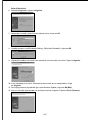
6. Using your SlimBlade Trackball Mouse, click to confirm selection of the mouse. The indicator
light on the mouse stays solid blue for three seconds and then goes off.
7. Select the SlimBlade Trackball Mouse on the Bluetooth Device Selection screen and click Next.
Wait for your computer screen to display a message that the mouse is ready for use.
Use the SlimBlade Trackball Mouse
to click on this prompt here.
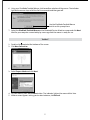
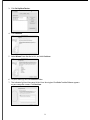
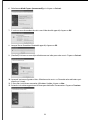
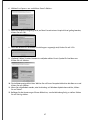
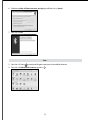
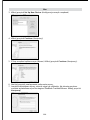
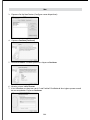
Toshiba®
1. Double-click
located at the bottom of the screen.
2. Click New Connection.
3. Select Express Mode and click Next.
4. On your mouse, press the Discover button. The indicator light on the mouse blinks blue.
5. When a screen appears asking you to select a device, click Refresh.

6
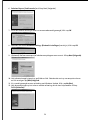
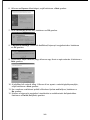
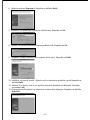
Toshiba
6. Select
Express and click Next.
7. If a screen appears asking for a passkey, click OK.
8. When the Bluetooth Settings screen appears, click OK.
9. (Optional) Enter a name and/or select an icon for your mouse. Click Next.
10. The indicator light blinks blue. Select the mouse on your computer screen, and then click Next.
11. If prompted to connect to Windows Update, click No.
12. Follow the onscreen instructions to finish connecting. Click Finish.

7
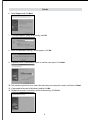
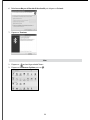
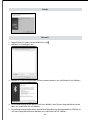
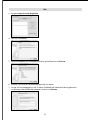
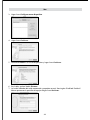
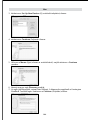
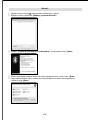
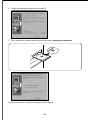
1. Double-click located at the bottom of the screen.
2. Select Add Bluetooth Device.
3. Select My device is set up and ready to be found and click Next.
4. The indicator light on the mouse blinks blue. Select the mouse on your computer screen, and
then click Next.
5. The indicator light on the mouse stays solid blue for three seconds. Select the mouse on your
computer screen, and then click Next.
Microsoft

8
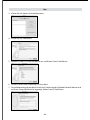
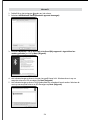
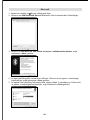
6. Select Don’t use a passkey and click Next.
7. Click Finish.
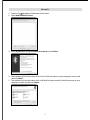
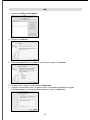
1. Click located in the top-left corner of the screen.
2. Click System Preferences, then click .
Mac
Microsoft

9
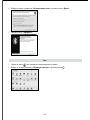
3. Click Set Up New Devices.
4. Click Continue.
5. Select Mouse from the device list, and click Continue.
6. On your mouse, press the Discover button.
7. The indicator light on the mouse blinks blue. Kensington SlimBlade Trackball Mouse appears
on your computer screen. Click Continue.

10
8. On the Conclusion screen, click Quit.
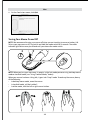
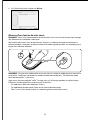
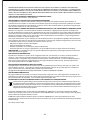
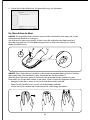
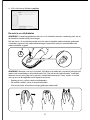
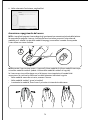
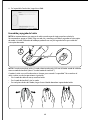
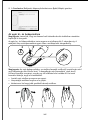
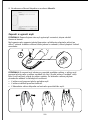
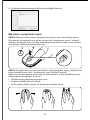
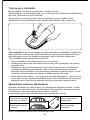
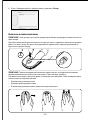
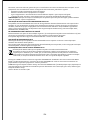
Turning Your Mouse On and Off
NOTE: We recommend turning your mouse off when you are traveling to conserve battery life.
To turn your mouse on or off, single click and hold the mode switch for 3 seconds. The mode
indicator light flashes once per second until you release the mode switch.
NOTE: When you turn your mouse on, it remains in the last mode you were using: desktop mouse
mode or trackball mode (see “Using Trackball Mode,” below).
When your mouse has been sitting idle, it goes into “sleep” mode. To wake up the mouse, do any
of the following:
• In desktop mouse mode, move the mouse.
• In trackball mode, roll the trackball.
• In either mode, click the left or right mouse button.
3
sec
Mac

11
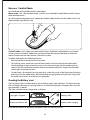
Mouse vs. Trackball Mode
Your SlimBlade Trackball Mouse offers two modes:
Mouse mode. This is the standard mode, in which your SlimBlade Trackball Mouse works like any
other desktop mouse.
To switch between desktop mouse mode and trackball mode, double-click the mode switch. The
mode indicator light flashes once.
Trackball mode. In this mode, only the trackball of your SlimBlade Trackball Mouse is activated.
You can switch to trackball mode when you have limited room on your desktop, or when the
mouse functions do not work well on a particular surface.
Trackball mode offers the following features:
• Roll the trackball to move the cursor onscreen.
• To scroll the screen, move the cursor to the onscreen scroll bar and click the mode switch.
• To click and drag an item, place the cursor on the item and single click the mode switch to
select it. Roll the trackball to move the item to the location you want. Single click the mode
switch again to release the item.
• To select text—for example, to cut or copy text—place the cursor at the beginning of the text
and single click the mode switch. Roll the trackball to highlight the text you want. Single click
the mode switch when all of the text is highlighted.
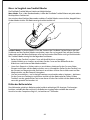
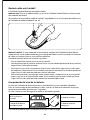
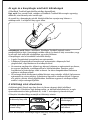
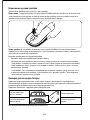
Checking the Battery Level
The fuel gauge lights include a battery icon and three square light indicators. The lights come on
after turning on the mouse, inserting batteries, or reconnecting to your computer and stay lit for
approximately 5 seconds.
The lights indicate battery charge level, as follows:
If any light is lit green
Battery is fine
Battery icon flashes red Battery needs charging
If the battery reaches an extremely low power state, the mouse turns off.

12
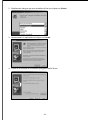
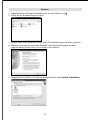
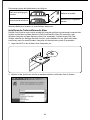
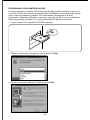
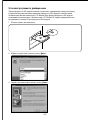
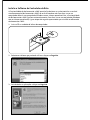
Install the Mouse Driver Software
The 360-degree scrolling functionality enables you to scroll horizontally and vertically
simultaneously (360-degree scrolling) onscreen using your mouse. If you are using a Mac
computer or a Windows computer running the Vista operating system, the 360-degree scrolling
functionality works automatically. If you are using a Windows computer running the XP operating
system, follow these steps to install the 360-degree scrolling software.
1. Insert the CD into your computer’s drive.
2. Select the language you want to use. and click
Next.
3. Exit all applications and click Next.

13
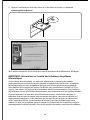
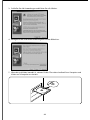
4. Follow the onscreen installation instructions.
5. When installation is complete, remove the CD from your computer’s drive and click Re-start
your computer.
Your mouse is now ready to use with the 360-degree scrolling functionality.

14
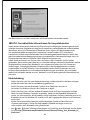
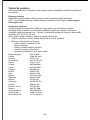
IMPORTANT: Computer User Health Information
In recent years, medical attention on occupational injuries has identified normal, seemingly
harmless activities as a potential cause of a wide range of problems collectively known as Repetitive
Stress Injuries (RSI) or Cumulative Trauma Disorders (CTD). It is now recognized that any repetitive
motion may contribute to these health problems. As a computer user, you might also be at risk.
By paying attention to the way you perform your work, use your computer and phone, play
sports, and work around the house, you can identify the behaviors that may be putting you at
risk. If you experience pain, swelling, numbness, or weakness in your wrists or hands (especially
during sleep), see your physician immediately. These symptoms could mean that you are
developing a repetitive stress injury that requires prompt medical attention. For more detailed
information, consult your doctor.
Troubleshooting
• Make sure to use fresh batteries and to insert them correctly into the mouse.
• Make sure that the sensor cover is open.
• Make sure that your computer’s Bluetooth technology is turned on.
• Try moving the mouse closer to the computer.
• Make sure that there are no other Bluetooth devices in discover mode.
• On a Windows computer, refer to the Bluetooth software help guide to ensure that Bluetooth
is working properly. The computer must be running a version of Bluetooth for Windows XP
that supports input devices (mice and keyboards).
• On a Mac computer, click the Bluetooth icon on the System Preferences screen. Refer to the
Apple Bluetooth help file to ensure Bluetooth is working properly.
• No or icon? Go to http://bluetooth.com/Bluetooth/Connect/Devices/Finding_Your_
Bluetooth_PC_Stack.html for instructions on finding your Bluetooth version.
NOTE: If you are using your mouse with a Bluetooth adapter, wait a few seconds after
inserting the adapter into your computer. Your mouse should work normally with the adapter
after they have been connected.
Also, if your computer is just turned on or waking up, after a few seconds your mouse should
work normally with the computer after they have been connected.
Technical Support
Technical support is available to all registered users of Kensington products. There is no charge for
technical support except the cost of the phone call, and long distance charges where applicable.
Technical Support Contact information can be found on the back page of this manual.
Web Support
You may find the answer to your problem in the Frequently Asked Questions (FAQ) section of the
Support area on the Kensington Website:
www.support.kensington.com
Telephone Support
There is no charge for technical support except long-distance charges where applicable. Please
visit www.kensington.com for telephone support hours. In Europe, technical support is available
by telephone Monday to Friday 0900 to 2100.
Please note the following when calling support:
• Call from a phone where you have access to your mouse.
• Be prepared to provide the following information:
– Name, address, and telephone number
– Name of the Kensington product

15
– Make and model of your computer
– System software and version
– Symptoms of the problem and what led to them
België / Belgique 02 275 0684
Canada 1 800 268 3447
Denmark 35 25 87 62
Deutschland 0211 6579 1159
España 91 66 2 3833
Finland 09 2290 6004
France 01 70 20 00 41
Hungary 20 9430 612
Ireland 01 601 1163
Italia 02 4827 1154
México 55 15 00 57 00
Nederland 053 482 9868
Norway 22 70 82 01
Österreich 01 790 855 701
Portugal 800 831 438
Schweiz / Suisse 01 730 3830
Sweden 08 5792 9009
United Kingdom 0207 949 0119
United States 1 800 535 4242
International Toll +31 53 484 9135
CLASS 1 LASER SAFETY STATEMENT:
This laser device complies with international standard IEC 60825-1: 2001-08, class 1 laser product and
also Comply with 21 CFR 1040.10 and 1040.11 except for deviation pursuant to Laser Notice No. 50 dated
7/2001:
1. Emission of a parallel beam of infrared user-invisible light
2. Maximum power of 716 microwatts CW, wavelength range 832-865 nanometers
3. Operating temperate between 0 ° C (32° F) to 40° C (104° F).
While the Class 1 laser in this product is safe under normal use, the laser beam (which is invisible to the human eye, but
emitted from the bottom of the mouse) should not be pointed at anyone’s eyes.)
CAUTION: This device has no serviceable parts. Use of controls or adjustments or performance of procedures other than
those specified herein may result in hazardous radiation exposure.
SAFETY AND USAGE GUIDELINES
1. In the absence of proper operation and if customer-initiated troubleshooting is unsuccessful, switch off the device
and call Kensington technical support.
2. Do not disassemble this product or expose it to liquid, humidity, moisture, or temperatures outside the specified
operating ranges of 0 deg C (32 deg F) to 40 deg C (104 deg F).
3. If your product is exposed to out-of-range temperatures, switch it off and allow temperature to return to the normal
operating range.
FIVE-YEAR LIMITED WARRANTY
KENSINGTON COMPUTER PRODUCTS GROUP ("KENSINGTON") warrants this product against defects in material
and workmanship under normal use and service for five years from the original date of purchase. KENSINGTON, at
its option, shall repair or replace the defective unit covered by this warranty. Please retain the dated sales receipt as
evidence of the date of purchase. You will need it for any warranty service. In order to keep this limited warranty in
effect, the product must have been handled and used as prescribed in the instructions accompanying this warranty.
This limited warranty does not cover any damage due to accident, misuse, abuse or negligence. This limited warranty is
valid only if the product is used with the equipment specified on the product box. Please check product box for details
or call KENSINGTON technical support. This warranty does not affect any other legal rights you may have by operation
of law. Contact KENSINGTON at www.support.kensington.com or at one of the technical support numbers listed below
for warranty service procedures.
DISCLAIMER OF WARRANTY
EXCEPT FOR THE LIMITED WARRANTY PROVIDED HEREIN, TO THE EXTENT PERMITTED BY LAW, KENSINGTON DISCLAIMS
ALL WARRANTIES, EXPRESS OR IMPLIED, INCLUDING ALL WARRANTIES OF MERCHANTABILITY AND/OR FITNESS FOR A
PARTICULAR PURPOSE. TO THE EXTENT THAT ANY IMPLIED WARRANTIES MAY NONETHELESS EXIST BY OPERATION OF

16
LAW, ANY SUCH WARRANTIES ARE LIMITED TO FOUR YEARS. SOME STATES/PROVINCES DO NOT ALLOW LIMITATIONS
ON HOW LONG AN IMPLIED WARRANTY LASTS, SO THE ABOVE LIMITATIONS MAY NOT APPLY TO YOU.
LIMITATION OF LIABILITY
REPAIR OR REPLACEMENT OF THIS PRODUCT, AS PROVIDED HEREIN, IS YOUR EXCLUSIVE REMEDY. KENSINGTON SHALL
NOT BE LIABLE FOR ANY SPECIAL, INCIDENTAL OR CONSEQUENTIAL DAMAGES, INCLUDING, BUT NOT LIMITED TO,
LOST REVENUES, LOST PROFITS, LOSS OF USE OF SOFTWARE, LOSS OR RECOVERY OF DATA, RENTAL OF REPLACEMENT
EQUIPMENT, DOWNTIME, DAMAGE TO PROPERTY, AND THIRD-PARTY CLAIMS, ARISING OUT OF ANY THEORY OF
RECOVERY, INCLUDING WARRANTY, CONTRACT, STATUTORY OR TORT. NOTWITHSTANDING THE TERM OF ANY
LIMITED WARRANTY OR ANY WARRANTY IMPLIED BY LAW, OR IN THE EVENT THAT ANY LIMITED WARRANTY FAILS
OF ITS ESSENTIAL PURPOSE, IN NO EVENT WILL KENSINGTON’S ENTIRE LIABILITY EXCEED THE PURCHASE PRICE
OF THIS PRODUCT. SOME STATES/COUNTIES DO NOT ALLOW THE EXCLUSION OR LIMITATION OF INCIDENTAL OR
CONSEQUENTIAL DAMAGES, SO THE ABOVE LIMITATION OR EXCLUSION MAY NOT APPLY TO YOU. THIS WARRANTY
GIVES YOU SPECIFIC LEGAL RIGHTS AND YOU MAY ALSO HAVE OTHER RIGHTS THAT VARY FROM STATE TO STATE AND
PROVINCE TO PROVINCE.
RF TECHNICAL SPECIFICATIONS
RF Frequency 2.4-2.4835 GHz
FCC RADIATION EXPOSURE STATEMENT
This equipment complies with FCC radiation exposure limits set forth for an uncontrolled environment. End users must
follow the specific operating instructions for satisfying RF exposure compliance. This transmitter must not be co-located
or operating in conjunction with any other antenna or transmitter.
FEDERAL COMMUNICATION COMMISSION INTERFERENCE STATEMENT
Note: This equipment has been tested and found to comply with the limits for a Class B digital device, Pursuant to
Part 15 of the FCC Rules. These limits are designed to provide reasonable protection against harmful interference in a
residential installation. This equipment generates, uses and can radiate radio frequency energy and, if not installed and
used in accordance with the instructions, may cause harmful interference to radio communications. However, there is no
guarantee that interference will not occur in a particular installation. If this equipment does cause harmful interference to
radio or television reception, which can be determined by turning the equipment off and on, the user is encouraged to try
to correct the interference by one or more of the following measures:
• Reorient or relocate the receiving antenna
• Increase the separation between the equipment and receiver
• Connect the equipment into an outlet on a circuit different from that to which the receiver is connected
• Consult the dealer or an experienced radio/TV technician for help
MODIFICATIONS: Any changes or modifications not expressly approved by Kensington could void the user’s authority to
operate the equipment.
FCC DECLARATION OF CONFORMITY STATEMENT
This product complies with Part 15 of the FCC rules. Operation is subject to the following two conditions:
(1) This device may not cause harmful interference, and (2) This device must accept any interference received, including
interference that may cause undesired operation. As defined in Section 2.909 of the FCC Rules, the responsible party for
this device is Kensington Computer Product Group, 333 Twin Dolphin Drive, Redwood Shores, CA 94065,USA.
INDUSTRY CANADA CONFORMITY
This device has been tested and found to comply with the limits specified in RSS-210. Operation is subject to the following
two conditions: (1) This device may not cause interference, and (2) This device must accept any interference, including
interference that may cause undesired operation of the device.
This Class [B] digital apparatus complies with Canadian ICES-003.
CE DECLARATION OF CONFORMITY
Kensington declares that this product is in compliance with the essential requirements and other relevant provisions of
applicable EC directives.
For Europe, a copy of the Declaration of Conformity for this product may be obtained by clicking on the ‘Compliance
Documentation’ link at www.support.kensington.com
INFORMATION FOR EU MEMBER-STATES ONLY
The use of the symbol indicates that this product may not be treated as household waste. By ensuring this product
is disposed of correctly, you will help prevent potential negative consequences for the environment and human
health, which could otherwise be caused by inappropriate waste handling of this product. For more detailed
information about recycling of this product, please contact your local city office, your household waste disposal
service, or the shop where you purchased the product.
Kensington and ACCO are registered trademarks of ACCO Brands. SlimBlade is a trademark of ACCO Brands. The
Kensington Promise is a service mark of ACCO Brands. All other trademarks are the property of their respective owners.
Patents pending.
© 2007 Kensington Computer Products Group, a division of ACCO Brands. Any unauthorized copying, duplicating, or other
reproduction of the contents hereof is prohibited without written consent from Kensington Computer Products Group.
All rights reserved. 4/07

17
Français
A B
Contenu
A. Boule de commande
B. 2 piles AA
C. CD du logiciel du pilote de la souris
D. Guide de démarrage rapide
E. Document de garantie (contient l’URL pour le Manuel d’instructions entier)
Composants
F. Voyants lumineux d’indication J. Bouton de découverte Bluetooth®
du niveau des piles K. Voyant lumineux de connexion Bluetooth
G. Bouton de mode L. Volet du compartiment à piles
H. Boule de commande/Boule de défilement
I. Volet du capteur – Laissez-le ouvert
F
H
I
K
J
L
D E
G
C

18
4. Connectez votre souris à votre ordinateur Bluetooth
L’étape suivante consiste à connecter votre souris à votre ordinateur Bluetooth.
Les étapes sont différentes en fonction de votre version Bluetooth :
• Si vous avez un ordinateur Mac® avec OS 10.4 ou supérieure, la version Bluetooth de Mac est disponible.
• Si vous avez un ordinateur Windows® et que apparaît dans la barre d’état système, la
version Bluetooth de Widcomm ou de Microsoft® est probablement disponible.
• Si vous avez un ordinateur Windows et que apparaît dans la barre d’état système, la version
Bluetooth de Toshiba est probablement disponible.
Installation de votre souris
1. Installez les piles.
a. Faites glisser le volet du compartiment à piles pour l’enlever.
b. Insérez les piles puis remettez le volet en place.
2. Vérifiez que le volet du capteur est ouvert de façon à ce que ce dernier puisse accéder
correctement à la surface du bureau.
3. Mettez la souris sous tension. Le voyant lumineux clignote jusqu’à ce que vous retiriez votre
doigt. Ceci est nécessaire pour que votre souris fonctionne correctement.
3
sec

19
Widcomm
1. Double-cliquez sur
sur votre bureau ou en bas de l’écran.
2. Cliquez sur Assistant d’installation Bluetooth.
3. Sur votre souris, appuyez sur le bouton de découverte. Le voyant lumineux de la souris
clignote en bleu.
4. Sélectionnez Je souhaite trouver un périphérique Bluetooth spécifique et configurer le mode
d’utilisation de ses services par mon ordinateur puis cliquez sur Suivant.
5. Sur l’écran Sélection de périphérique Bluetooth, double-cliquez sur SlimBlade Trackball Mouse.
Strona się ładuje...
Strona się ładuje...
Strona się ładuje...
Strona się ładuje...
Strona się ładuje...
Strona się ładuje...
Strona się ładuje...
Strona się ładuje...
Strona się ładuje...
Strona się ładuje...
Strona się ładuje...
Strona się ładuje...
Strona się ładuje...
Strona się ładuje...
Strona się ładuje...
Strona się ładuje...
Strona się ładuje...
Strona się ładuje...
Strona się ładuje...
Strona się ładuje...
Strona się ładuje...
Strona się ładuje...
Strona się ładuje...
Strona się ładuje...
Strona się ładuje...
Strona się ładuje...
Strona się ładuje...
Strona się ładuje...
Strona się ładuje...
Strona się ładuje...
Strona się ładuje...
Strona się ładuje...
Strona się ładuje...
Strona się ładuje...
Strona się ładuje...
Strona się ładuje...
Strona się ładuje...
Strona się ładuje...
Strona się ładuje...
Strona się ładuje...
Strona się ładuje...
Strona się ładuje...
Strona się ładuje...
Strona się ładuje...
Strona się ładuje...
Strona się ładuje...
Strona się ładuje...
Strona się ładuje...
Strona się ładuje...
Strona się ładuje...
Strona się ładuje...
Strona się ładuje...
Strona się ładuje...
Strona się ładuje...
Strona się ładuje...
Strona się ładuje...
Strona się ładuje...
Strona się ładuje...
Strona się ładuje...
Strona się ładuje...
Strona się ładuje...
Strona się ładuje...
Strona się ładuje...
Strona się ładuje...
Strona się ładuje...
Strona się ładuje...
Strona się ładuje...
Strona się ładuje...
Strona się ładuje...
Strona się ładuje...
Strona się ładuje...
Strona się ładuje...
Strona się ładuje...
Strona się ładuje...
Strona się ładuje...
Strona się ładuje...
Strona się ładuje...
Strona się ładuje...
Strona się ładuje...
Strona się ładuje...
Strona się ładuje...
Strona się ładuje...
Strona się ładuje...
Strona się ładuje...
Strona się ładuje...
Strona się ładuje...
Strona się ładuje...
Strona się ładuje...
Strona się ładuje...
Strona się ładuje...
Strona się ładuje...
Strona się ładuje...
Strona się ładuje...
Strona się ładuje...
Strona się ładuje...
Strona się ładuje...
Strona się ładuje...
Strona się ładuje...
Strona się ładuje...
Strona się ładuje...
Strona się ładuje...
Strona się ładuje...
Strona się ładuje...
Strona się ładuje...
Strona się ładuje...
Strona się ładuje...
Strona się ładuje...
Strona się ładuje...
Strona się ładuje...
Strona się ładuje...
Strona się ładuje...
Strona się ładuje...
Strona się ładuje...
Strona się ładuje...
Strona się ładuje...
Strona się ładuje...
Strona się ładuje...
Strona się ładuje...
Strona się ładuje...
Strona się ładuje...
Strona się ładuje...
Strona się ładuje...
Strona się ładuje...
Strona się ładuje...
Strona się ładuje...
Strona się ładuje...
Strona się ładuje...
Strona się ładuje...
Strona się ładuje...
Strona się ładuje...
Strona się ładuje...
Strona się ładuje...
Strona się ładuje...
Strona się ładuje...
Strona się ładuje...
Strona się ładuje...
Strona się ładuje...
Strona się ładuje...
Strona się ładuje...
Strona się ładuje...
Strona się ładuje...
Strona się ładuje...
Strona się ładuje...
Strona się ładuje...
Strona się ładuje...
Strona się ładuje...
Strona się ładuje...
Strona się ładuje...
Strona się ładuje...
Strona się ładuje...
Strona się ładuje...
Strona się ładuje...
Strona się ładuje...
Strona się ładuje...
Strona się ładuje...
Strona się ładuje...
Strona się ładuje...
Strona się ładuje...
-
 1
1
-
 2
2
-
 3
3
-
 4
4
-
 5
5
-
 6
6
-
 7
7
-
 8
8
-
 9
9
-
 10
10
-
 11
11
-
 12
12
-
 13
13
-
 14
14
-
 15
15
-
 16
16
-
 17
17
-
 18
18
-
 19
19
-
 20
20
-
 21
21
-
 22
22
-
 23
23
-
 24
24
-
 25
25
-
 26
26
-
 27
27
-
 28
28
-
 29
29
-
 30
30
-
 31
31
-
 32
32
-
 33
33
-
 34
34
-
 35
35
-
 36
36
-
 37
37
-
 38
38
-
 39
39
-
 40
40
-
 41
41
-
 42
42
-
 43
43
-
 44
44
-
 45
45
-
 46
46
-
 47
47
-
 48
48
-
 49
49
-
 50
50
-
 51
51
-
 52
52
-
 53
53
-
 54
54
-
 55
55
-
 56
56
-
 57
57
-
 58
58
-
 59
59
-
 60
60
-
 61
61
-
 62
62
-
 63
63
-
 64
64
-
 65
65
-
 66
66
-
 67
67
-
 68
68
-
 69
69
-
 70
70
-
 71
71
-
 72
72
-
 73
73
-
 74
74
-
 75
75
-
 76
76
-
 77
77
-
 78
78
-
 79
79
-
 80
80
-
 81
81
-
 82
82
-
 83
83
-
 84
84
-
 85
85
-
 86
86
-
 87
87
-
 88
88
-
 89
89
-
 90
90
-
 91
91
-
 92
92
-
 93
93
-
 94
94
-
 95
95
-
 96
96
-
 97
97
-
 98
98
-
 99
99
-
 100
100
-
 101
101
-
 102
102
-
 103
103
-
 104
104
-
 105
105
-
 106
106
-
 107
107
-
 108
108
-
 109
109
-
 110
110
-
 111
111
-
 112
112
-
 113
113
-
 114
114
-
 115
115
-
 116
116
-
 117
117
-
 118
118
-
 119
119
-
 120
120
-
 121
121
-
 122
122
-
 123
123
-
 124
124
-
 125
125
-
 126
126
-
 127
127
-
 128
128
-
 129
129
-
 130
130
-
 131
131
-
 132
132
-
 133
133
-
 134
134
-
 135
135
-
 136
136
-
 137
137
-
 138
138
-
 139
139
-
 140
140
-
 141
141
-
 142
142
-
 143
143
-
 144
144
-
 145
145
-
 146
146
-
 147
147
-
 148
148
-
 149
149
-
 150
150
-
 151
151
-
 152
152
-
 153
153
-
 154
154
-
 155
155
-
 156
156
-
 157
157
-
 158
158
-
 159
159
-
 160
160
-
 161
161
-
 162
162
-
 163
163
-
 164
164
-
 165
165
-
 166
166
-
 167
167
-
 168
168
-
 169
169
-
 170
170
-
 171
171
-
 172
172
-
 173
173
-
 174
174
-
 175
175
-
 176
176
-
 177
177
-
 178
178


Kensington 72281 Instrukcja obsługi
- Kategoria
- Myszy
- Typ
- Instrukcja obsługi
- Niniejsza instrukcja jest również odpowiednia dla
w innych językach
- español: Kensington 72281 Manual de usuario
- italiano: Kensington 72281 Manuale utente
- Deutsch: Kensington 72281 Benutzerhandbuch
- slovenčina: Kensington 72281 Používateľská príručka
- português: Kensington 72281 Manual do usuário
- français: Kensington 72281 Manuel utilisateur
- Nederlands: Kensington 72281 Handleiding
Powiązane artykuły
-
Kensington 72283US Instrukcja obsługi
-
-
Kensington SlimBlade Media Mouse Karta katalogowa
-
Kensington K72330US Specyfikacja
-
Kensington 33902EU Instrukcja obsługi
-
Kensington Kensington Orbit Fusion K72363WW Skrócona instrukcja obsługi
-
Kensington 72280 Karta katalogowa
-
Kensington Expert Mouse Instrukcja obsługi
-
Kensington K72337US Instrukcja obsługi
-