Dicota BLUESTAR Instrukcja obsługi
- Kategoria
- Myszy
- Typ
- Instrukcja obsługi

1
BlueStar
Rechargeable Bluetooth Laser Mouse
www.dicota.com
english
User’s Guide
Rechargeable Bluetooth Laser Mouse
deutsch
Bedienungsanleitung
Wiederaufladbare Bluetooth Laser-Maus
français
Guide d’utilisation
Souris laser Bluetooth rechargeable
español
Manual de instrucciones
Ratón Bluetooth laser recargable
italiano
Manuale d’uso
Mouse laser Bluetooth ricaricabile
czech
Manuál
Napájecí laserová myš na Bluetooth
russian
Инструкция
Лазерная мышь блютуз с зарядным устройством
hungarian
Használati utasítás
Bluetooth ύjratölthető optikai egér
polish
Przewodnik użytkownika
Akumulatorowa mysz laserowa Bluetooth
slovakian
User’s Guide
Nabíjateľná laserová myš s Bluetooth

2
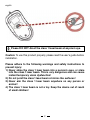
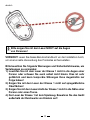
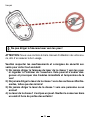
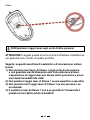
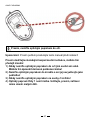
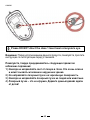
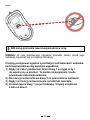
Please DO NOT direct the class 1 laser beam at anyone’s eye.
Caution: To use this product properly, please read the user’s guide before
installation.
Please adhere to the following warnings and safety instructions to
prevent injury:
1.) Never shine the class 1 laser beam into a person’s eyes, or stare
into the class 1 laser beam. This is very dangerous and can cause
instant temporary vision dysfunction!
2.) Do not point the class 1 laser beam at mirror-like surfaces!
3.) Never aim the class 1 laser beam anywhere on any person or
animal !
4.) The class 1 laser beam is not a toy. Keep the device out of reach
of small children!
english

3
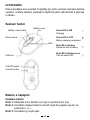
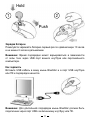
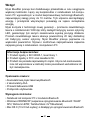
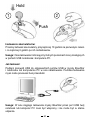
Welcome !
Your BlueStar mouse works without a receiver for the ultimate hassle-free
mobility. It instantly connects to a Notebook or PC enabled with Bluetooth
wireless technology, providing up to 10 meters (30 feet) of cordless range.
Power-saving sleep modes and an ON/OFF switch let you manage working
power wisely.
Your BlueStar mouse uses a new generation technology – invisible 1600
dpi laser sensor that replaces and accurately scans the surface 20 times
more sensitive than the traditional LED optical sensor. You can work with
your BlueStar mouse in most surfaces smoothly.
The stylish & comfortable design provides you with the best way to work
with your Notebook or PC.
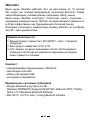
Safety notice:
1. This product complies with IEC 60825-1, class 1 laser product.
2. This product complies with FCC and CE rules.
3. This product has no serviceable parts. Use of controls or adjust-
ments of procedures other than the user guide mentiones may
result in malfunction.
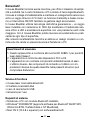
Package contents
• Bluetooth rechargeable laser mouse
• 2 x AAA rechargeable batteries
• USB charging cable
• User’s guide
Minimum system requirements
• Bluetooth module enabled Notebook or PC
• Windows 2000/ME/XP (supports WinXP SP2, Widcomm BTW,
Toshiba Stack or IVT BlueSoleil Bluetooth software)
• Mac OS X (10.2.8 or later) running Bluetooth software

4
CAUTION:
Change or modifications not expressly approved by the manufacturer
responsible for compliance could void the user’s authority to operate the
equipment.
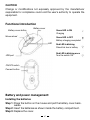
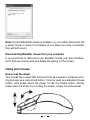
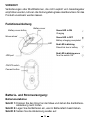
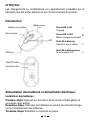
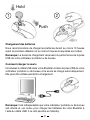
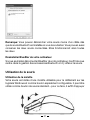
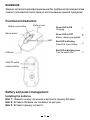
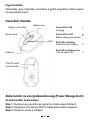
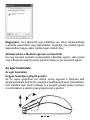
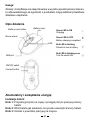
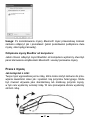
Functional introduction
Battery and power management:
Installing the batteries
Step 1: Press the button on the mouse and pull the battery cover back-
wards.
Step 2: Insert the batteries as shown inside the battery compartment.
Step 3: Replace the cover.
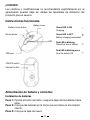
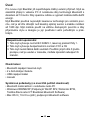
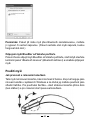
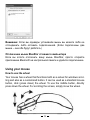
Battery cover
Battery cover button
Mouse wheel
USB port
ON/OFF switch
Connect button
LED
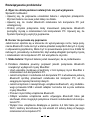
Green LED is ON
Charging
Green LED is OFF
Battery charging completed
Red LED is blinking
Paired link low in battery
Red LED is blinking once
Turn the switch ON

5
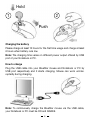
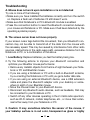
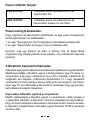
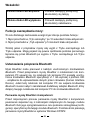
Charging the battery
Please charge at least 10 hours for the first time usage and charge at least
6 hours when battery runs low.
Note: The charging time varies on different power output offered by USB
port of your Notebook or PC.
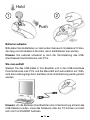
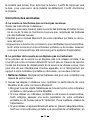
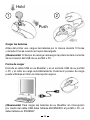
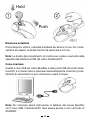
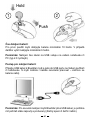
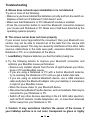
How to charge
Plug the USB cable into your BlueStar mouse and Notebook or PC by
USB port respectively and it starts charging. Mouse can work uninter-
ruptedly during charging.
Note: To continuously charge the BlueStar mouse via the USB cable,
your Notebook or PC must be ON and AWAKE.
1 2
Hold
Push

6
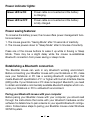
Power indicator lights:
Green LED is ON Power cable is connected and the battery
is charging.
Green LED is OFF Power cable is connected and the battery
is fully charged.
Power saving features:
To conserve the battery power, the mouse offers power management func-
tions as below:
1. The mouse goes into “Saving Mode” after 10 seconds of inactivity.
2. The mouse powers down to “Sleep Mode” after 5 minutes of inactivity.
Press one of the mouse buttons to wake it up while in Saving or Sleep
Mode. There may be a slight delay while the mouse re-establishes
Bluetooth connection from power saving or sleep mode.
Establishing a Bluetooth connection
The BlueStar mouse can work in any Bluetooth working environment.
Before connecting your BlueStar mouse with your Notebook or PC, make
sure your Notebook or PC has a working Bluetooth configuration that
meets Bluetooth specification V1.1 or higher with Human Interface Device
(HID) profile. If your Notebook or PC does not support Bluetooth, you need
to obtain and install a commercially available Bluetooth adapter which con-
verts your Notebook or PC to a Bluetooth environment.
Paring your Bluetooth mouse with your computer
Before paring your BlueStar mouse with your computer, you should read
through the instructions that came with your Bluetooth hardware and/or
software for details how to pair a device to your specific Bluetooth configu-
ration. Follow below steps to paring your BlueStar mouse under Windows
XP/SP2 system.

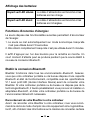
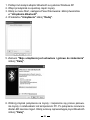
7
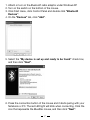
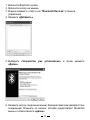
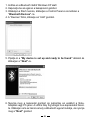
1. Attach or turn on the Bluetooth radio adaptor under Windows XP
2. Turn on the switch on the bottom of the mouse.
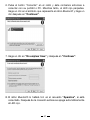
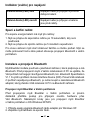
3. Click Start menu, click Control Panel and double click “Bluetooth
Devices”.
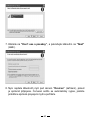
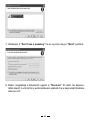
4. On the “Devices” tab, click “Add”.
5. Select the “My device is set up and ready to be found” check box,
and then click “Next”.
6. Press the connection button of the mouse and it starts paring with your
Notebook or PC. The red LED light will blink when connecting. Click the
icon that represents the BlueStar mouse, and then click “Next”.

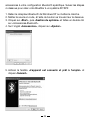
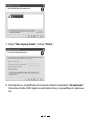
8
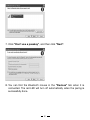
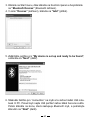
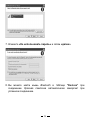
7. Click “Don’t use a passkey”, and then click “Next”.
8. You can find the Bluetooth mouse in the “Devices” tab when it is
connected. The red LED will turn off automatically when the paring is
successfully done.

9
Note: Once the BlueStar mouse is installed, you can either disconnect the
a wired mouse or leave it connected. (If you leave two mice connected,
they will both work.)
Disconnecting BlueStar mouse from your computer
If you would like to disconnect your BlueStar mouse, just open the Blue-
tooth devices control panel and delete the pairing for the mouse.
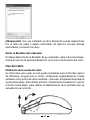
Using your mouse
How to use the wheel
Your mouse has a wheel that functions both as a wheel for windows scrol-
ling and also as a customized button. It can be used as a standard mouse
button, click (press down) the wheel. To use the middle button, directly
press down the wheel. For scrolling the screen, simply move the wheel.

10
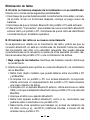
Troubleshooting
A. Mouse does not work upon installation or is not detected
Try one or more of the following:
• Make sure you have installed the batteries correctly and turn the switch
on. Replace a fresh set of batteries if it still doesn’t work.
• Make sure that Notebook’s or PC’s Bluetooth module is enabled.
• Press the connection button to reset the Bluetooth connection between
your mouse and Notebook or PC. Make sure it had been detected by the
operating systems properly.
B. The screen cursor does not move properly
If your screen cursor lags behind the movement, then your Bluetooth con-
nection may not be able to transmit all of the data from the mouse with
the necessary speed. This may be caused by interference from other radio
sources, obstructions in the radio wave path, excessive distance from the
Notebook or PC, or a combination of the above.
1. Low Battery: Replace batteries you feel the battery being low.
2. Try the following actions to improve your Bluetooth connection and
optimize your BlueStar mouse performance:
• Remove any metallic objects from the line of sight between your Note-
book or PC and BlueStar mouse.
• If you are using a Notebook or PC with a built-in Bluetooth antenna,
try re-orienting the Notebook or PC until you get a better data rate.
• If you are using an external Bluetooth device, use a USB extension
cable and place the Bluetooth adapter onto your desktop or some-
where in sight of your BlueStar mouse.
• Move the mouse closer to your Bluetooth device.
• Disconnect any Bluetooth audio devices, such as headsets, that may
be connected to your Notebook or PC.
• Switch off any other devices operating in the 2.4 GHz radio spectrum,
such as Wi-Fi network, mobile telephones, etc., or move their anten-
nas further away from your Notebook or PC.
3. Caution: It may sometimes interfere the sensor of the mouse, if
your tabletop surface is in red color, transparent as glass or highly

11
reflective like a mirror. Try to use a mouse pad or use your mouse on
a different tabletop surface.
Disclaimer:
Information in this document is subject to change without notice. The
manufacturer does not make any representations or warranties (implied
or otherwise) regarding the accuracy and completeness of this document
and shall in no event be liable for any loss of profit or any commercial
damage, including but not limited to special, incidental, consequential, or
other damage. No part of this document may be reproduced or transmitted
in any form by any means, electronic or mechanical, including photocopy-
ing, recording or information recording and retrieval systems without the
express written permission of the manufacturer.
Customer service:
If you encounter any problem with your BlueStar mouse, please contact our
local subsidiary, partner or dealer, or send us your inquiry to info@dicota.
com.
2 years warranty. Please find the complete text in our guarantee on the
internet: www.dicota.com.
All the products and software mentioned above are registered trademarks
of their respective owners. Errors and omissions excepted.
The Bluetooth word mark and logos are owned by the Bluetooth SIG, Inc.
and any use of such marks by DICOTA is under license. Other trademarks
and trade names are those of their respective owners.

12
N1879
This symbol (crossed out bin wheelie symbol according to
WEEE Annex IV) indicates separate collection of waste elec-
trical and electronic equipment in the EU countries. Please do
not throw the equipment into the domestic refuse. Please use
the return and collection systems available in your country for
the disposal of this product.

13
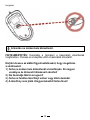
Bitte zeigen Sie mit dem Laser NICHT auf die Augen
von Personen!
VORSICHT: Lesen Sie dieses Benutzerhandbuch vor der Installation durch,
um eine korrekte Verwendung des Produktes sicherzustellen.
Bitte beachten Sie folgende Warnungen und Sicherheitshinweise, um
Verletzungen zu vermeiden:
1.) Leuchten Sie mit dem Laser der Klasse 1 nicht in die Augen einer
Person oder schauen Sie auch selbst nicht hinein. Dies ist sehr
gefährlich und kann temporäre Störungen Ihres Augenlichts zur
Folge haben!
2.) Zeigen Sie mit dem Laser der Klasse 1 nicht auf spiegelähnliche
Oberflächen!
3.) Zeigen Sie mit dem Laserstrahl der Klasse 1 nicht in die Nähe einer
Person oder eines Tieres.
4.) Der Laser der Klasse 1 ist kein Spielzeug. Bewahren Sie das Gerät
außerhalb der Reichweite von Kindern auf !
deutsch

14
Willkommen!
Ihre BlueStar funktioniert ohne einen Empfänger, um die ultimative, ein-
fache Mobilität zu bieten. BlueStar stellt sofort eine Verbindung zu einem
Notebook oder PC her, wenn dieser mit Bluetooth-Technologie ausgestat-
tet ist und bietet eine kabellose Verbindung innerhalb eines Radius von 10
Metern. Der stromsparende Standby wie auch der Ein-/Aus-Knopf helfen
Ihnen dabei, die Akkuleistung geschickt zu verwalten.
Ihre BlueStar nutzt eine Technologie der neuesten Generation – ein unsicht-
barer Laser mit 1600 dpi ersetzt den traditionellen optischen LED-Sensor
und tastet die Oberfläche zwanzigmal genauer ab. Ihre BlueStar arbeitet
auf fast allen Oberflächen einwandfrei.
Das moderne und komfortable Design stattet Sie mit der besten Möglich-
keit aus, an Ihrem Notebook oder PC zu arbeiten.
Sicherheitshinweis:
1. Dieses Gerät stimmt überein mit IEC 60825-1 für Produkte der
Laserklasse 1
2. Ihr Gerät stimmt mit FCC und CE Bestimmungen überein.
3. Dieses Gerät hat keine nutzbaren Teile. Anderweitige Nutzung der
Bedienungselemente oder andere Einstellungen als in diesem
Benutzerhandbuch angeführt, können zu Fehlfunktionen führen.
Lieferumfang
• Bluetooth aufladbare Lasermaus
• 2 x AAA aufladbare Batterien
• USB-Ladekabel
• Benutzerhandbuch
Systemanforderungen
• Notebook oder PC mit Bluetooth-Modul
• Windows 2000/ME/XP (unterstützt WinXP SP2, Widcomm BTW, Toshiba
Stack oder IVT BlueSoleil Bluetooth-Software)
• Mac OS X (10.2.8 oder höher) mit Bluetooth-Software

15
VORSICHT:
Veränderungen oder Modifikationen, die nicht explizit vom Garantiegeber
empfohlen werden, können die Nutzungsbefugnisse des Benutzers für das
Produkt unwirksam werden lassen.
Funktionseinleitung
Batterie- und Stromversorgung:
Batterieinstallation
Schritt 1:
Drücken Sie den Knopf an der Maus und ziehen Sie die Batterie-
abdeckung nach hinten.
Schritt 2: Legen Sie die Batterien ein, wie im Batteriefach beschrieben.
Schritt 3: Setzen Sie die Abdeckung wieder auf.
Battery cover
Battery cover button
Mouse wheel
USB port
ON/OFF switch
Connect button
LED
Green LED is ON
Charging
Green LED is OFF
Battery charging completed
Red LED is blinking
Paired link low in battery
Red LED is blinking once
Turn the switch ON

16
Batterien aufladen
Bitte laden Sie die Batterien vor dem ersten Gebrauch mindestens 10 Stun-
den lang und mindestens 6 Stunden, wenn die Batterien leer werden.
Hinweis: Die Ladezeit schwankt je nach der Stromleistung des USB-
Anschlusses Ihres Notebooks oder PC’s.
Wie man auflädt
Stecken Sie das USB-Kabel in Ihre BlueStar und in den USB-Anschluss
Ihres Notebooks oder PC’s und die Maus lädt sich automatisch auf. Wäh-
rend des Ladevorgangs kann die Maus ohne Unterbrechung weiter genutzt
werden.
Hinweis: Um die Batterien Ihrer BlueStar ohne Unterbrechung anhand des
USB-Kabels zu laden, muss das Notebook oder der PC AN sein und darf
sich nicht im STANDBY befinden.
1 2
Hold
Push

17
Batterieanzeigen:
Grüne LED ist AN Stromkabel ist verbunden und die Batterien
werden aufgeladen
Grüne LED ist AUS Stromkabel ist verbunden und die Batterien
sind vollständig aufgeladen.
Stromsparende Funktionen:
Um Batterieenergie zu sparen, bietet die Maus folgende Stromsparfunk-
tionen:
1.
Nach 10 Sekunden ohne Nutzung geht die Maus in den Stromsparmodus.
2. Nach 5 Minuten ohne Nutzung schaltet sich die Maus aus.
Drücken Sie einen der Knöpfe, um die Maus aus einem dieser Modi zu
reaktivieren. Es kann zu einer kurzen Verzögerung kommen, während die
Maus die Bluetooth-Verbindung nach einem dieser Modi erneut aufbaut.
Bluetooth-Verbindung herstellen
BlueStar funktioniert in jeder Bluetooth-Umgebung. Bevor Sie Ihre BlueStar
mit Ihrem Notebook oder PC verbinden, stellen Sie bitte sicher, dass Ihr
Notebook oder PC über eine funktionierende Bluetooth-Konfiguration ver-
fügt, die mit der Bluetooth-Spezifikation V1.1 mit einem HID-Profil (Human
Interface Device) kompatibel ist. Falls Ihr Notebook oder PC Bluetooth
nicht unterstützt, müssen Sie zuerst einen im Handel erhältlichen Blue-
tooth-Adapter erwerben und installieren, welches Ihr Notebook oder Ihren
PC mit einer Bluetooth-Umgebung ausstattet.
BlueStar mit Ihrem Computer verbinden
Bevor Sie Ihre BlueStar mit Ihrem Computer verbinden, sollten Sie die Ge-
brauchsanweisung durchlesen, die mit Ihrer
Bluetooth
-Hardware und/oder
-Software mitgeliefert wurde, um Details zum Verbinden bestimmter Geräte
mit Ihrer spezifischen
Bluetooth
-Konfiguration zu erfahren. Um Ihre BlueStar
mit einem XP/SP2-System zu verbinden, folgen Sie folgenden Schritten:

18
1. Verbinden Sie den Windows XP Bluetooth-Empfänger oder schalten Sie
diesen ein.
2. Schalten Sie die Maus mit dem Knopf an der Unterseite der Maus an.
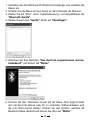
3. Klicken Sie auf “Start”, dann “Systemsteuerung” und doppelklicken Sie
“Bluetooth-Geräte”.
4. Klicken Sie auf dem “Geräte”-Reiter auf “Hinzufügen”.
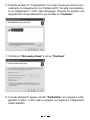
5. Aktivieren Sie das Kästchen “Das Gerät ist angeschlossen und be-
triebsbereit” und klicken Sie “Weiter”.
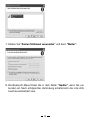
6. Drücken Sie den “Verbinden”-Knopf auf der Maus, dann beginnt diese
sich mit Ihrem Notebook oder PC zu verbinden. Währenddessen wird
die rote LED-Leuchte blinken. Klicken Sie das Symbol, welches die
Bluetooth-Maus darstellt und klicken Sie dann auf “Weiter”.

19
7. Klicken Sie “Keinen Schlüssel verwenden” und dann “Weiter”.
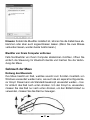
8. Die Bluetooth-Maus finden Sie in dem Reiter “Geräte”, wenn Sie ver-
bunden ist. Nach erfolgreicher Verbindung schaltet sich die rote LED-
Leuchte automatisch aus.

20
Hinweis: Sobald die BlueStar installiert ist, können Sie die Kabelmaus ab-
klemmen oder aber auch angeschlossen lassen. (Wenn Sie zwei Mäuse
verbunden lassen, werden beide funktionieren.)
BlueStar von Ihrem Computer entfernen
Falls Sie BlueStar von Ihrem Computer abklemmen möchten, öffnen Sie
einfach die Steuerung für Bluetooth-Geräte und löschen Sie die Verbin-
dung der Maus.
Gebrauch der Maus
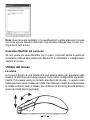
Nutzung des Mausrads
Ihre Maus besitzt ein Rad, welches sowohl zum Scrollen innerhalb von
Windows verwendet werden kann, wie auch als ein separat konfigurierba-
rer Knopf. Dieser kann als Standardmausknopf verwendet werden – hier-
für einfach das Rad nach unten drücken. Um den Knopf zu verwenden,
müssen Sie das Rad nur nach unten drücken, um den Bildschirmlauf zu
verwenden, müssen Sie das Rad nur bewegen.
Strona jest ładowana ...
Strona jest ładowana ...
Strona jest ładowana ...
Strona jest ładowana ...
Strona jest ładowana ...
Strona jest ładowana ...
Strona jest ładowana ...
Strona jest ładowana ...
Strona jest ładowana ...
Strona jest ładowana ...
Strona jest ładowana ...
Strona jest ładowana ...
Strona jest ładowana ...
Strona jest ładowana ...
Strona jest ładowana ...
Strona jest ładowana ...
Strona jest ładowana ...
Strona jest ładowana ...
Strona jest ładowana ...
Strona jest ładowana ...
Strona jest ładowana ...
Strona jest ładowana ...
Strona jest ładowana ...
Strona jest ładowana ...
Strona jest ładowana ...
Strona jest ładowana ...
Strona jest ładowana ...
Strona jest ładowana ...
Strona jest ładowana ...
Strona jest ładowana ...
Strona jest ładowana ...
Strona jest ładowana ...
Strona jest ładowana ...
Strona jest ładowana ...
Strona jest ładowana ...
Strona jest ładowana ...
Strona jest ładowana ...
Strona jest ładowana ...
Strona jest ładowana ...
Strona jest ładowana ...
Strona jest ładowana ...
Strona jest ładowana ...
Strona jest ładowana ...
Strona jest ładowana ...
Strona jest ładowana ...
Strona jest ładowana ...
Strona jest ładowana ...
Strona jest ładowana ...
Strona jest ładowana ...
Strona jest ładowana ...
Strona jest ładowana ...
Strona jest ładowana ...
Strona jest ładowana ...
Strona jest ładowana ...
Strona jest ładowana ...
Strona jest ładowana ...
Strona jest ładowana ...
Strona jest ładowana ...
Strona jest ładowana ...
Strona jest ładowana ...
Strona jest ładowana ...
Strona jest ładowana ...
Strona jest ładowana ...
Strona jest ładowana ...
Strona jest ładowana ...
Strona jest ładowana ...
Strona jest ładowana ...
Strona jest ładowana ...
Strona jest ładowana ...
Strona jest ładowana ...
Strona jest ładowana ...
Strona jest ładowana ...
Strona jest ładowana ...
Strona jest ładowana ...
Strona jest ładowana ...
Strona jest ładowana ...
Strona jest ładowana ...
Strona jest ładowana ...
Strona jest ładowana ...
Strona jest ładowana ...
-
 1
1
-
 2
2
-
 3
3
-
 4
4
-
 5
5
-
 6
6
-
 7
7
-
 8
8
-
 9
9
-
 10
10
-
 11
11
-
 12
12
-
 13
13
-
 14
14
-
 15
15
-
 16
16
-
 17
17
-
 18
18
-
 19
19
-
 20
20
-
 21
21
-
 22
22
-
 23
23
-
 24
24
-
 25
25
-
 26
26
-
 27
27
-
 28
28
-
 29
29
-
 30
30
-
 31
31
-
 32
32
-
 33
33
-
 34
34
-
 35
35
-
 36
36
-
 37
37
-
 38
38
-
 39
39
-
 40
40
-
 41
41
-
 42
42
-
 43
43
-
 44
44
-
 45
45
-
 46
46
-
 47
47
-
 48
48
-
 49
49
-
 50
50
-
 51
51
-
 52
52
-
 53
53
-
 54
54
-
 55
55
-
 56
56
-
 57
57
-
 58
58
-
 59
59
-
 60
60
-
 61
61
-
 62
62
-
 63
63
-
 64
64
-
 65
65
-
 66
66
-
 67
67
-
 68
68
-
 69
69
-
 70
70
-
 71
71
-
 72
72
-
 73
73
-
 74
74
-
 75
75
-
 76
76
-
 77
77
-
 78
78
-
 79
79
-
 80
80
-
 81
81
-
 82
82
-
 83
83
-
 84
84
-
 85
85
-
 86
86
-
 87
87
-
 88
88
-
 89
89
-
 90
90
-
 91
91
-
 92
92
-
 93
93
-
 94
94
-
 95
95
-
 96
96
-
 97
97
-
 98
98
-
 99
99
-
 100
100


Dicota BLUESTAR Instrukcja obsługi
- Kategoria
- Myszy
- Typ
- Instrukcja obsługi
w innych językach
- español: Dicota BLUESTAR El manual del propietario
- italiano: Dicota BLUESTAR Manuale del proprietario
- slovenčina: Dicota BLUESTAR Návod na obsluhu
- français: Dicota BLUESTAR Le manuel du propriétaire
Powiązane dokumenty
-
Dicota Vent Instrukcja obsługi
-
-
-
-
-
Dicota Stream Instrukcja obsługi
-
-
-
Dicota D30119 Instrukcja obsługi
-
Inne dokumenty
-
 Wow iq 400 Translation Of The Original Operating Instructions
-
Toshiba SATELLITE P200 (PSPB6) Instrukcja obsługi
-
Toshiba SATELLITE PRO A210 Instrukcja obsługi
-
-
-
Targus Bluetooth Comfort Laser Mouse Instrukcja obsługi
-
Kensington K72330US Specyfikacja
-
Kensington K72281US Karta katalogowa
-
Cherry 64410150-00 GENTIX BT Bluetooth Mouse instrukcja
-
Asus BX701 Instrukcja obsługi
