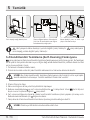
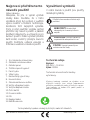
Beko CEG 5311 X Instrukcja obsługi
- Kategoria
- Ekspresy do kawy
- Typ
- Instrukcja obsługi
Niniejsza instrukcja jest również odpowiednia dla

CEG5311X
Fully Automatc
Espresso Machne
User Manual
01M-8813573200-2718-01
EN DE FR TR ES CS
IT PL RO SL AR

CONTENTS
ENGLISH 5-19
DEUTSCH 20-38
FRANÇAIS 39-55
TÜRKÇE 56-72
ESPAÑOL 73-91
ČESKY 92-108
ITALIANO 109-126
POLSKI 127-147
SLOVAK 148-166
ROMÂNĂ 167-183

All declared values on the product and on the prnted leaflets are pcked up after laboratory
measurements performed accordng to related standarts. These values may dffer upon usage and
ambent condtons.
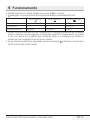
Technical data
Power supply:
220-240 V~, 50-60 Hz
Power:
1350 W
Technical and design modifications
reserved.
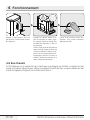
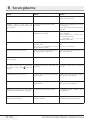
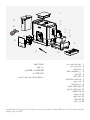
1. Coffee Beans Container Cover
2. Coffee Bean Container
3. Control Panel
4. On/Off button
5. Steam Nozzle
6. Nozzle cover
7. Adjustable coffee spout
8. Metal tube
9. Coffee Grounds Container
10. Internal Drip Tray
11. External Drip Tray
12. Cleanness brush
13. Service Door
14. Brewer
15. Power cord
16. Water Tank
1
2
3
4
5
6
8
7
9
10
11
12
13
14
15
16

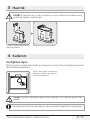
Please read ths user ma-
nual frst!
Dear Customers,
Thank you for selectng an Beko product.
We hope that you get the best results
from your product whch has been
manufactured wth hgh qualty and
state-of-the-art technology. Therefore,
please read ths entre user manual and all
other accompanyng documents carefully
before usng the product and keep t as a
reference for future use. If you handover
the product to someone else, gve the
user manual as well. Follow all warnngs
and nformaton n the user manual.
Meanngs of the symbols
Followng symbols are used n the varous
secton of ths manual:
Important nformaton or useful hnts
about usage.
DANGER:
Warnng for hazardous s-
tuatons wth regard to lfe and property.
WARNING:
Warnng ndcates a
potentally dangerous stuaton.
CAUTION:
Warnng ndcates poten-
tal materal damage.
Ths product has been produced n envronmentally-frendly, state-of-the-art facltes.
Comples wth the WEEE Drectve.
It does not contan PCB.

5 / EN
Fully Automatic Coffee Machine / User Manual
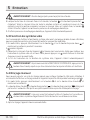
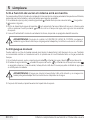
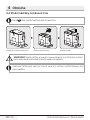
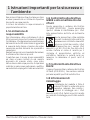
1 Important instructions for safety and
environment
This section includes the safety
instructions that will help providing
protection against personal injury
and material loss risks. Failure to
follow these instructions invalidates
the granted warranty.
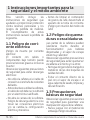
1.1 Danger of electrc
current
Danger to life by electric current!
Contact with live wires or
components could lead to serious
injury or even death!
Observe the following safety
precautions to avoid electric shocks:
• Do not use the coffee machine
if the connecting cable or mains
plug are damaged.
• Before reusing the coffee
machine, the mains cable must be
renewed by a qualified electrician.
• Do not open the housing of
the coffee machine. Danger of
electric shock if live connections
are touched and/or the electrical
and mechanical configuration is
changed.
• Before cleaning the bean
container, pull the mains plug of
the appliance out of the socket.
Danger from rotating coffee mill!
1.2 Danger of
burnng or scaldng
Parts of the coffee machine can
become very hot during operation!
Dispensed drinks and escaping
steam are very hot!
Observe the following safety
precautions to avoid burning/
scalding yourself and/or others:
• Do not touch either of the metal
sleeves on both coffee spouts.
• Avoid direct contact of the skin
with escaping steam or hot
rinsing, cleaning and descaling
water.
1.3 Fundamental
safety precautons
Observe the following safety
precautions to ensure safe handling
of the coffee machine:
• Never play with packaging
material. Risk of suffocation.
• Inspect the coffee machine for
visible signs of damage before
use. Do not use a damaged coffee
machine.

6 / EN
Fully Automatic Coffee Machine / User Manual
1 Important instructions for safety and
environment
•
If the connecting cable is damaged,
it should only be replaced by a
service agent recommended by the
manufacturer in order to prevent
any danger! Please contact the
manufacturer or his customer
service.
•
Repairs to the coffee machine must
only be carried out by an authorised
specialist or by the works customer
service. Unqualified repairs can lead
to considerable danger for the user.
They will also void the warranty.
•
Repairs to the coffee machine
during the warranty period may
only be carried out by service
centres authorised by the
manufacturer, otherwise the
warranty will become void in the
event of subsequent damage.
•
Defective parts may only be
replaced with original spare parts.
Only original spare parts guarantee
that the safety requirements are
met.
•
This appliance can be used by
children from the age of 8 up as
well as by persons with reduced
physical, sensory or mental abilities
or with lacking experience and/or
knowledge, if these persons are
supervised or have been instructed
how to use the appliance in a safe
way and have understood the
hazards which could arise from
using it. Children must not play with
the appliance. Cleaning and user
maintenance shall not be made by
children unless they are older than
8 and supervised.
• This appliance is intended to be
used in household and similar
applications such as:
- staff kitchen areas in shops,
offices and other working
environments,
- farm houses,
- by clients in hotels, motels
and other residential type
environments,
- bed and breakfast type
environments.
• Protect the coffee machine
against the effects of weather
such as rain, frost and direct
sunlight. Do not use the coffee
machine outdoors.

7 / EN
Fully Automatic Coffee Machine / User Manual
1 Important instructions for safety and
environment
• Never immerse the coffee
machine itself, the mains cable or
the mains plug into water or other
liquids.
• Do not clean the coffee machine
or accessories in a dish washer.
• Do not pour any other liquids apart
from water or place foodstuffs
into the water tank.
• Do not fill the water tank beyond
the maximum mark (lower edge of
the filling hole) (1.5 litres).
• Only operate the machine when
the waste container, drip tray and
the cup grate are fitted.
• Do not pull the cable to remove
the plug from the mains socket or
touch with wet hands.
• Do not hold the coffee machine
with the mains cable.
• Keep the appliance and its cord
out of reach of children aged less
than 8 years.
• Do not operate the hot water
function continuously for more
than one tank of water.
1.4 Intended use
The fully automatic coffee machine Beko is
intended for use in homes and similar applications,
for instance in staff kitchens, shops, offices and
similar areas or by customers in bed & breakfast,
hotels, motels and other living accommodation.
This coffee machine is not intended for commercial
use. The machine is only intended for preparing
coffee and heating milk and water. Any other
use other than previously stated is considered as
improper use.
Danger resultng from mproper
use!
If not used for its intended purpose or used in any
other way, the coffee machine may be or become
a source of danger.
A
WARNING:
Therefore, the coffee
machine may only be used for its
intended purpose.
A
WARNING:
Observe the
procedures described in this user
manual.
No claims of any kind will be accepted for damage or
injury resulting from use of the coffee machine for
other than its intended purpose.
The risk has to be borne solely by the machine
owner.

8 / EN
Fully Automatic Coffee Machine / User Manual
1 Important instructions for safety and
environment
1.5 Limitation of liability
All technical information, data and instructions
on installation, operation and maintenance of
the coffee machine contained in these operating
instructions represent the current status at the
time of printing and are based on the best possible
knowledge gained by experience and knowhow.
No claims can be derived from the information,
illustrations and descriptions in this user manual.
The manufacturer assumes no liability for damage
or injury resulting from failure to observe the user
manual, use for other than the intended purpose,
unprofessional repairs, unauthorised modifications
or use of non-approved spare parts.
1.6 Compliance with the WEEE
Directive and Disposing of the
Waste Product:
This product complies with EU WEEE Directive
(2012/19/EU). This product bears a classification
symbol for waste electrical and electronic
equipment (WEEE).
This product has been manufactured
with high quality parts and materials
which can be reused and are suitable
for recycling. Do not dispose of the
waste product with normal domestic
and other wastes at the end of its service life. Take
it to the collection center for the recycling of
electrical and electronic equipment. Please
consult your local authorities to learn about these
collection centers.
1.7 Compliance with RoHS
Directive
The product you have purchased complies with EU
RoHS Directive (2011/65/EU). It does not contain
harmful and prohibited materials specified in the
Directive.
1.8 Package information
Packaging materials of the product are
manufactured from recyclable materials
in accordance with our National
Environment Regulations. Do not
dispose of the packaging materials together with
the domestic or other wastes. Take them to the
packaging material collection points designated
by the local authorities.

9 / EN
Fully Automatic Coffee Machine / User Manual
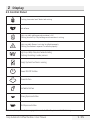
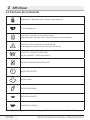
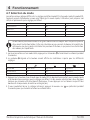
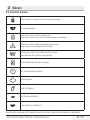
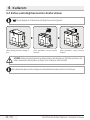
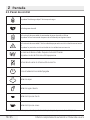
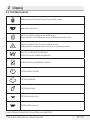
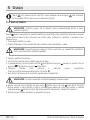
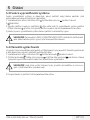
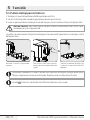
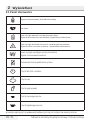
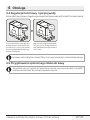
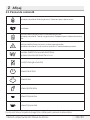
2 Dsplay
2.1 Control Panel
Flashng: Low water level/ Water tank mssng
Lack of bean
Lghts up stably: coffee grounds contaner s full
Flashng: Internal Drp Tray/coffee grounds contaner s mssng
Lghts up stably: Brewer s mssng/ nstalled mproperly
Flashng: Servce door s opened / nstalled mproperly
Lights up stably: Requires to do descaling
Flashing: Descaling is under process
Empty System Function is running
Power ON/OFF Button
Steam Button
Hot Water Button
Strong Espresso Button
Mild Espresso Button
In the box, three packs of cleaning agents are included for the process of self-cleaning.

10 / EN
Fully Automatic Coffee Machine / User Manual
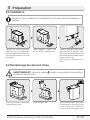
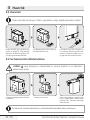
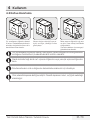
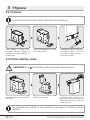
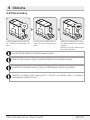
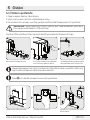
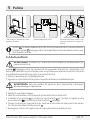
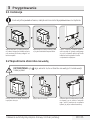
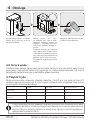
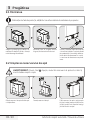
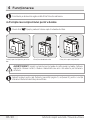
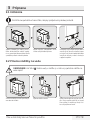
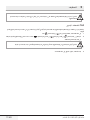
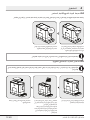
3 Preparaton
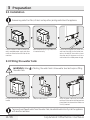
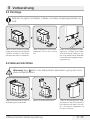
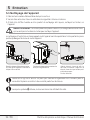
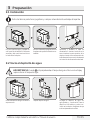
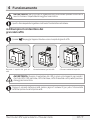
3.1 Installation
Remove any protective films, stickers and any other packing material on the appliance.
150mm
150mm
150mm
150mm
150mm
.
Choose a safe and stable surface wth an
easly reachable power supply and allow
mnmum dstance from the sdes of the
machnes.
Insert the external drp tray. Make sure t
s nserted correctly.
Unwnd and straghten the power cord
and nsert the plug nto the socket loca-
ted on the back of the machne. Insert
the other end of the power cord nto a
wall socket wth sutable power voltage.
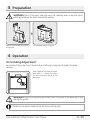
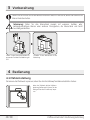
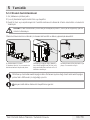
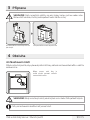
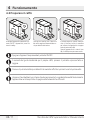
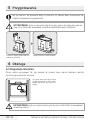
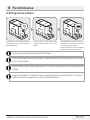
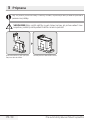
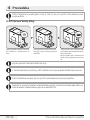
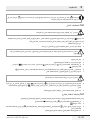
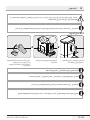
3.3 Filling the water tank
WARNING:
When is flashing, the water tank is in low water level and requires filling
the water tank.
Lft the water tank by usng the ld as the
handle.
Take the water tank out. Rnse the water tank wth fresh water
and then fll the tank to the Max level and
place t back nto the machne. Make sure
t s fully nserted.
To prevent overflow of water from the water tank, do not add water directly into the appliance
with another container.

11 / EN
Fully Automatic Coffee Machine / User Manual
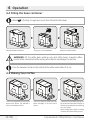
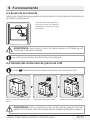
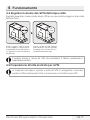
WARNING:
Never fill the water tank with warm, hot, sparkling water or any other liquid
which might damage the water tank and the machine.
.
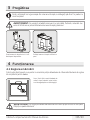
Place the water tank back by usng the ld
as the handle.
Close the water tank by usng the ld.
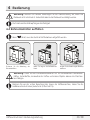
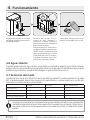
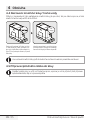
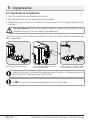
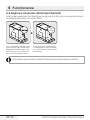
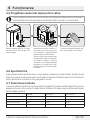
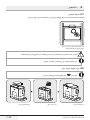
4.1 Grinding Adjustment
You can adjust the grinder to suit the roast of your coffee by turning adjuster knob in the bean
container:
WARNING:
Never do the grinding adjustment when the grinder is not operating. It may
damage the grinder.
The dots on the adjuster knob indicate the fineness of the grind.
3 Preparaton
4 Operaton
When the grnder s grndng the coffee
bean when t s makng the coffee,
you can turn the adjust knob to do the
adjustment.

12 / EN
Fully Automatic Coffee Machine / User Manual
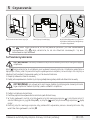
4 Operaton
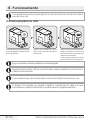
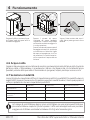
4.2 Filling the bean container
When is flashing, the appliance needs to be filled with coffee bean.
Remove the bean contaner ld. Slowly pour n the coffee beans. Place the contaner ld back.
WARNING:
Fill the coffee bean container only with coffee beans. Grounded coffee,
instant coffee, caramelized coffee and any other objects may damage the machine.
Press the hot water button to clean inside of the coffee maker before first use.
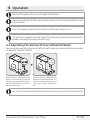
4.3 Making Your Coffee
Swtch on the applance by pressng the
power on/off button. The applance s
then n the standby condton.
Place a cup under the coffee spout and
adjust the heght of the spout the ft
the cup.
The espresso button beng pressed wll
lght on and the llumnaton wll lghts up
ndcates that the applance s preparng
the cup of coffee.
When the applance s back to standby
condton, the coffee s ready to serve.

13 / EN
Fully Automatic Coffee Machine / User Manual
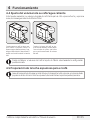
Switch off the appliance by pressing the power on/off button.
Depending on the taste of coffee you would like to have, press strong espresso button or mild
espresso button .
Press the hot water button to clean inside of the coffee maker before first use.
The Appliance is equipped with auto-shut off. Depending on the mode you have selected the
appliance will have different auto-shut off timing.
4.4 Adjustiing The Volume Of Your Coffee/Hot Water
You can memorze your desred volume of coffee for both strong espresso and mld espresso and also
the hot water from 25ml to 250ml.
2x
bipp!
When makng your coffee (ether strong
espresso or mld espresso) or dspensng
hot water, press and hold the button you
selected. The applance wll contnue to
make the cup of coffee.
When the volume of coffee meets your
desred volume, release the button. Two
beep sounds wll be heard ndcates that
the volume of coffee s beng memor-
zed.
You can reset the volume of coffee back to the factory setting by selecting the default setting.
4
Operaton

14 / EN
Fully Automatic Coffee Machine / User Manual
4
Operaton
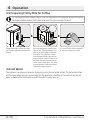
4.5 Preparing Frothy Milk for Coffee
As the temperature of steam is higher than the temperature of espresso, so espresso should
be prepared before making frothy milk; otherwise the espresso might be burnt.
Prepare the espresso coffee wth larger
cup. Turn the steam nozzle toward to the
Drp tray.
Press the steam button. Steam ndcator
lght wll flash. Then the applance s he-
atng up and dranng the resdual water
nto the Drp Tray or another contaner.
After the steam ndcator lght stop flas-
hng and stay on, place a contaner wth
mlk under the steam nozzle and mmer-
se the steam nozzle about 5cm deep
nto the contaner. Swvel the contaner
whle the hot steam comes out.
Pour the hot frothy mlk nto the espres-
so. Now you can enjoy your coffee.
4.6 Hot Water
The appliance can dispense hot water by simply pressing the hot water button. The hot water button
and the illumination will lights up indicates that the appliance is heating up the water. When the hot
water button and the illumination turn off, the water is ready to serve.

15 / EN
Fully Automatic Coffee Machine / User Manual
4
Operaton
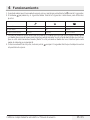
4.7 Mode Selection
The machne has two dfferent settng: default settng, ECO mode and speed mode. In ECO mode, the
applance helps to save more energy. In speed mode, the user can make ther coffee faster than n
default settng.
ECO Mode Speed Mode Default Settng
Illumnaton Lght No Yes Yes
Pre-brewng* Yes No Yes
Auto shut off tme 10mns 30mns 20mns
Cup Volume memory Yes Yes Yes
The pre-brewing function moistens the grounded beans in the brewer with a small amount of
water before full extraction. This expands the coffee grounds to build up a greater pressure in
the brewer which help extraction of all the oils and full flavor from the grounded beans.
1. When the machine is in standby condition, press and holds the for 5 seconds.
2. The will then be flashing and the following button will have the following indications for different
settings:
Hot water button
Strong espresso button Mld espresso button
In ECO Mode Lghts ON Flashng Flashng
In Speed Mode Yes No Flashng
In Default Settng Flashng Flashng Lghts On
3. Press the hot water button for ECO mode, strong espresso button for speed mode and mild espresso
button for default setting. Two Beep sound will be heard indicates that the mode is being selected.
(Note: If you are pressing the relative lights on button for each mode, the machine will not response).
4. If you would like to remain the setting unchanged, press again or wait for 5 seconds for the
machine to return to the standby condition

16 / EN
Fully Automatic Coffee Machine / User Manual
5
Cleanng
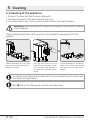
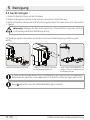
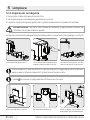
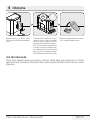
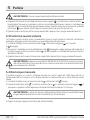
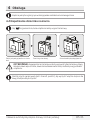
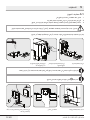
5.1 Cleaning of the appliance
1. Dsconnect the power cord from the mans supply outlet.
2. Pour away all the water in the internal and external drip tray
3. Use a damped cloth or non-scratching cleaner to clean the water stains on the applance.
WARNING:
Never use any abrasive, vinegar or descaling agents not included in the box to
clean the appliance.
Tmely cleanng and mantenance of the applance s very mportant n prolongng the lfe of the
applance.
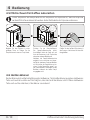
1
2
2
1
Remove the external drp tray. Sldes
open the nternal drp tray and the cof-
fee grounds contaner.
Unlock the nozzle cover by turnng t
to left. Then pull t downward to remo-
ve Pull the metal tube downward to
ds-assembly the nozzle cover and me-
tal tube.
Empty the coffee grounds contaner, ex-
ternal drp tray, nozzle cover and metal
tube wash t wth fresh water. Dry t af-
terwards.
Assembly the metal tube back to the nozzle cover. Then push upward to place the nozzle cover
back. And turn it to right to lock it.
When lights up, the coffee grounds container needs to be empty.

17 / EN
Fully Automatic Coffee Machine / User Manual
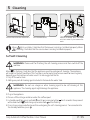
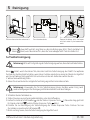
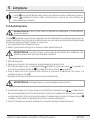
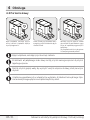
2
1
Pull down the servce door and remove t. Press the release knob. Remove the brewer. Wash the brewer
wth fresh water. Dry the brewer after-
wards.
When lights up stably, it indicates that the brewer is missing / installed improperly. When
is flashing, it indicates that the service door is missing/installed improperly.
5.2 Self-Cleaning
WARNING:
Please wat for fnshng the self cleanng process and then swtch off the
machne.
When s flashng, t ndcates that the applance needs to undergo self-cleanng. The applance
wll reman n the best condton f ths functon s performed at least once a month or more regularly
dependng on the hardness of water used. It s also suggested that to
1. Fully fll the water tank.
2. Addng one pack of cleanng agent ncluded n the box to the water tank.
WARNING:
Do not use vnegar or other cleanng agent to do self-cleanng of ths
applance. The cleanng agent mght damage the applance.
3. Plug n the applance.
4. Place a suffcent large contaner under the coffee spout.
5. In standby condton, press and hold and strong espresso button for 5 seconds. A beep sound
wll be heard wth and strong espresso button wll be flashng.
6. Press strong espresso button to confrm undergong the self-cleanng process. To resume back to
the standby condton, press .
5
Cleanng

18 / EN
Fully Automatic Coffee Machine / User Manual
7. Wll be flashng ndcates that the applance s undergong the self-cleanng process.
WARNING:
Keep skn/body away from the hot water.
8. When all the water n the water tank s beng dspensed out, and strong espresso button wll
be flashng. Remove all the remanng soluton n the water tank and fll the tank wth normal tap
water untl the max poston. When water s flled nto the water tank, wll goes off. Then the
applance wll contnue the self-cleanng process.
9. When the self-cleanng process s completed, the applance wll swtch off automatcally.
5.3 Empty System Function
The empty system functon s recommended to be used before long perod of non-use, frost protecton
and before talkng to repar agent.
1. In standby condton, press and hold the and mld espresso button together for 5 seconds.
2. wll then be flashng.
3. Remove the water tank from the applance. wll lght up stably ndcates that the empty system
s under process. You can press before removng the water tank to resume back to the standby
condton.
4. When the empty system functon s completed, the applance wll swtch off automatcally.
WARNING:
After perform EMPTY SYSYEM FUNCTION; press the hot water button untl
water can come out from spout when the coffee maker s reused agan.
5.4 Manual Rinsing
You can perform a manual rnsng cycle to clean the coffee nozzle after use. It s also suggested to
perform a manual rnsng f the applance has not been used for a long perod of tme.
1. In standby condton, press and hold the and hot water button together.
2. The hot water button , strong espresso button and mld espresso button wll then goes
off. The coffee nozzle will then dispense a small amount of water which is used for the rinising.
WARNING:
Water comes out of the coffee nozzle is hot and is collected in the drip tray
underneath. Avoid contact with splashes of water.
3. After rnsng, the applance wll return to the standby condton.
5
Cleanng

19 / EN
Fully Automatic Coffee Machine / User Manual
6 Troubleshootng
Problem Cause Solution
The applance does not work. The applance s not connected to the mans. Plug n and press the swtch. Check the cable
and the Plug
No or delayed response n several trals of
pressng on functon key on the panel
Applance s under an electromagnetc
nterference
Drt over the panel
Unplug the applance. Restart after few
mnutes Clean the panel wth the cloth
provded
The coffee s not hot enough. The cups have not been preheated.
The brewng unt s too cold.
Rnse the applance at least 3 tmes before
makng the coffee.
The coffee cannot come out from spout.
Empty system functon maybe used before. Press the hot water button untl water can
come out from spout.
The frst cup of coffee s poor qualty. The frst run of grnder does not pour
suffcent quantty coffee power nto the
brewng unt.
Throw the coffee away. The other coffees
wll always be of good qualty.
The touch buttons are not senstve Excessve scale has bult up. Descale the applance.
The water tank s removed / the water level
s very low n the water tank but have no
alert.
The area near the water
tank connector s wet.
Wpe the water around the water tank
connector
Internal drp tray s flled wth a lot of water. Coffee powder too fne whch block the water
to come out.
Adjust the coffee fneness to bgger dot
durng grnder operaton.
Coffee s delvered too slowly or a drop at a
tme.
Coffee powder too fne whch block the water
to come out.
Adjust the coffee fneness to bgger dot
durng grnder operaton.
Lack of bean ndcator flashes but there s stll
a lot of coffee bean nsde the contaner.
Internal coffee powder outlet s blocked. To follow the steps of secton E (V. Cleanng
coffee powder outlet).
The brewer or the coffee ground tray s
mpossble to remove.
The applance dd not fnsh the self-cleanng
process and was swtched off .
Please swtch on the machne agan and let t
fnsh ts auto cleanng process.

Btte lesen Se zunächst
dese Anletung!
Sehr geehrte Kundn, sehr geehrter
Kunde,
Danke, dass Se sch für en Produkt der
Marke Beko entscheden haben. Wr
hoffen, dass Se mt desem Produkt, das
mt den höchsten Qualtätsanforderungen
und der modernsten Technologe
hergestellt wurde, beste Ergebnsse
erzelen. Btte lesen Se de gesamte
Bedenungsanletung und alle anderen
Begletdokumente aufmerksam, bevor
Se das Produkt verwenden; bewahren
Se se zum künftgen Nachschlagen
scher auf. Wenn Se das Produkt an enen
Drtten wetergeben, händgen Se btte
auch dese Anletung aus. Befolgen Se
alle Warnhnwese und Informatonen n
deser Anletung.
Erklärung der Symbole
In deser Anletung werden de folgenden
Symbole verwendet:
Wchtge Informatonen oder nützlche
Tpps zur Verwendung.
GEFAHR:
Warnung vor Stuatonen,
de Körper- und Sachschäden zur Folge
haben können.
Warnung:
Warnung zegt ene
potenzell gefährlche Stuaton.
Achtung:
Warnung zegt potenzelle
Materalschäden.
Deses Produkt wurde n umweltfreundlchen, modernen Enrchtungen hergestellt
Das Gerät erfüllt de Vorgaben der
WEEE-Rchtlne.
Es enthält ken PCB.
Technische Daten
Spannungsversorgung:
220-240 V Wechselspannung,
50 bis 60 Hz
Leistung: 1350 W
Technische und optische Änderungen
vorbehalten.
Alle angegebenen Werte am Produkte und m
Dokument wurden unter Laborbedngungen
entsprechend den zutreffenden Standards
ermttelt. Dese Werte können je nach Nutzung
und Umgebungsbedngungen vareren.
1. Abdeckung des Kaffeebohnenbehälters
2. Kaffeebohnenbehälter
3. Bedienfeld
4. En-/Austaste
5. Dampfdüse
6. Düsenabdeckung
7. Anpassbare Kaffeedüse
8. Metallrohr
9. Kaffeesatzbehälter
10. Interne Tropfschale
11. Externe Tropfschale
12. Reinigungspinsel
13. Serviceklappe
14. Brühgruppe
15. Netzkabel
16. Wassertank
Strona się ładuje...
Strona się ładuje...
Strona się ładuje...
Strona się ładuje...
Strona się ładuje...
Strona się ładuje...
Strona się ładuje...
Strona się ładuje...
Strona się ładuje...
Strona się ładuje...
Strona się ładuje...
Strona się ładuje...
Strona się ładuje...
Strona się ładuje...
Strona się ładuje...
Strona się ładuje...
Strona się ładuje...
Strona się ładuje...
Strona się ładuje...
Strona się ładuje...
Strona się ładuje...
Strona się ładuje...
Strona się ładuje...
Strona się ładuje...
Strona się ładuje...
Strona się ładuje...
Strona się ładuje...
Strona się ładuje...
Strona się ładuje...
Strona się ładuje...
Strona się ładuje...
Strona się ładuje...
Strona się ładuje...
Strona się ładuje...
Strona się ładuje...
Strona się ładuje...
Strona się ładuje...
Strona się ładuje...
Strona się ładuje...
Strona się ładuje...
Strona się ładuje...
Strona się ładuje...
Strona się ładuje...
Strona się ładuje...
Strona się ładuje...
Strona się ładuje...
Strona się ładuje...
Strona się ładuje...
Strona się ładuje...
Strona się ładuje...
Strona się ładuje...
Strona się ładuje...
Strona się ładuje...
Strona się ładuje...
Strona się ładuje...
Strona się ładuje...
Strona się ładuje...
Strona się ładuje...
Strona się ładuje...
Strona się ładuje...
Strona się ładuje...
Strona się ładuje...
Strona się ładuje...
Strona się ładuje...
Strona się ładuje...
Strona się ładuje...
Strona się ładuje...
Strona się ładuje...
Strona się ładuje...
Strona się ładuje...
Strona się ładuje...
Strona się ładuje...
Strona się ładuje...
Strona się ładuje...
Strona się ładuje...
Strona się ładuje...
Strona się ładuje...
Strona się ładuje...
Strona się ładuje...
Strona się ładuje...
Strona się ładuje...
Strona się ładuje...
Strona się ładuje...
Strona się ładuje...
Strona się ładuje...
Strona się ładuje...
Strona się ładuje...
Strona się ładuje...
Strona się ładuje...
Strona się ładuje...
Strona się ładuje...
Strona się ładuje...
Strona się ładuje...
Strona się ładuje...
Strona się ładuje...
Strona się ładuje...
Strona się ładuje...
Strona się ładuje...
Strona się ładuje...
Strona się ładuje...
Strona się ładuje...
Strona się ładuje...
Strona się ładuje...
Strona się ładuje...
Strona się ładuje...
Strona się ładuje...
Strona się ładuje...
Strona się ładuje...
Strona się ładuje...
Strona się ładuje...
Strona się ładuje...
Strona się ładuje...
Strona się ładuje...
Strona się ładuje...
Strona się ładuje...
Strona się ładuje...
Strona się ładuje...
Strona się ładuje...
Strona się ładuje...
Strona się ładuje...
Strona się ładuje...
Strona się ładuje...
Strona się ładuje...
Strona się ładuje...
Strona się ładuje...
Strona się ładuje...
Strona się ładuje...
Strona się ładuje...
Strona się ładuje...
Strona się ładuje...
Strona się ładuje...
Strona się ładuje...
Strona się ładuje...
Strona się ładuje...
Strona się ładuje...
Strona się ładuje...
Strona się ładuje...
Strona się ładuje...
Strona się ładuje...
Strona się ładuje...
Strona się ładuje...
Strona się ładuje...
Strona się ładuje...
Strona się ładuje...
Strona się ładuje...
Strona się ładuje...
Strona się ładuje...
Strona się ładuje...
Strona się ładuje...
Strona się ładuje...
Strona się ładuje...
Strona się ładuje...
Strona się ładuje...
Strona się ładuje...
Strona się ładuje...
Strona się ładuje...
Strona się ładuje...
Strona się ładuje...
Strona się ładuje...
Strona się ładuje...
Strona się ładuje...
Strona się ładuje...
Strona się ładuje...
Strona się ładuje...
Strona się ładuje...
Strona się ładuje...
Strona się ładuje...
Strona się ładuje...
Strona się ładuje...
Strona się ładuje...
Strona się ładuje...
Strona się ładuje...
Strona się ładuje...
Strona się ładuje...
Strona się ładuje...
Strona się ładuje...
Strona się ładuje...
Strona się ładuje...
Strona się ładuje...
Strona się ładuje...
Strona się ładuje...
-
 1
1
-
 2
2
-
 3
3
-
 4
4
-
 5
5
-
 6
6
-
 7
7
-
 8
8
-
 9
9
-
 10
10
-
 11
11
-
 12
12
-
 13
13
-
 14
14
-
 15
15
-
 16
16
-
 17
17
-
 18
18
-
 19
19
-
 20
20
-
 21
21
-
 22
22
-
 23
23
-
 24
24
-
 25
25
-
 26
26
-
 27
27
-
 28
28
-
 29
29
-
 30
30
-
 31
31
-
 32
32
-
 33
33
-
 34
34
-
 35
35
-
 36
36
-
 37
37
-
 38
38
-
 39
39
-
 40
40
-
 41
41
-
 42
42
-
 43
43
-
 44
44
-
 45
45
-
 46
46
-
 47
47
-
 48
48
-
 49
49
-
 50
50
-
 51
51
-
 52
52
-
 53
53
-
 54
54
-
 55
55
-
 56
56
-
 57
57
-
 58
58
-
 59
59
-
 60
60
-
 61
61
-
 62
62
-
 63
63
-
 64
64
-
 65
65
-
 66
66
-
 67
67
-
 68
68
-
 69
69
-
 70
70
-
 71
71
-
 72
72
-
 73
73
-
 74
74
-
 75
75
-
 76
76
-
 77
77
-
 78
78
-
 79
79
-
 80
80
-
 81
81
-
 82
82
-
 83
83
-
 84
84
-
 85
85
-
 86
86
-
 87
87
-
 88
88
-
 89
89
-
 90
90
-
 91
91
-
 92
92
-
 93
93
-
 94
94
-
 95
95
-
 96
96
-
 97
97
-
 98
98
-
 99
99
-
 100
100
-
 101
101
-
 102
102
-
 103
103
-
 104
104
-
 105
105
-
 106
106
-
 107
107
-
 108
108
-
 109
109
-
 110
110
-
 111
111
-
 112
112
-
 113
113
-
 114
114
-
 115
115
-
 116
116
-
 117
117
-
 118
118
-
 119
119
-
 120
120
-
 121
121
-
 122
122
-
 123
123
-
 124
124
-
 125
125
-
 126
126
-
 127
127
-
 128
128
-
 129
129
-
 130
130
-
 131
131
-
 132
132
-
 133
133
-
 134
134
-
 135
135
-
 136
136
-
 137
137
-
 138
138
-
 139
139
-
 140
140
-
 141
141
-
 142
142
-
 143
143
-
 144
144
-
 145
145
-
 146
146
-
 147
147
-
 148
148
-
 149
149
-
 150
150
-
 151
151
-
 152
152
-
 153
153
-
 154
154
-
 155
155
-
 156
156
-
 157
157
-
 158
158
-
 159
159
-
 160
160
-
 161
161
-
 162
162
-
 163
163
-
 164
164
-
 165
165
-
 166
166
-
 167
167
-
 168
168
-
 169
169
-
 170
170
-
 171
171
-
 172
172
-
 173
173
-
 174
174
-
 175
175
-
 176
176
-
 177
177
-
 178
178
-
 179
179
-
 180
180
-
 181
181
-
 182
182
-
 183
183
-
 184
184
-
 185
185
-
 186
186
-
 187
187
-
 188
188
-
 189
189
-
 190
190
-
 191
191
-
 192
192
-
 193
193
-
 194
194
-
 195
195
-
 196
196
-
 197
197
-
 198
198
-
 199
199
-
 200
200
-
 201
201


Beko CEG 5311 X Instrukcja obsługi
- Kategoria
- Ekspresy do kawy
- Typ
- Instrukcja obsługi
- Niniejsza instrukcja jest również odpowiednia dla
w innych językach
- español: Beko CEG 5311 X El manual del propietario
- italiano: Beko CEG 5311 X Manuale del proprietario
- Deutsch: Beko CEG 5311 X Bedienungsanleitung
- slovenčina: Beko CEG 5311 X Návod na obsluhu
- français: Beko CEG 5311 X Le manuel du propriétaire
- Türkçe: Beko CEG 5311 X El kitabı
- română: Beko CEG 5311 X Manualul proprietarului
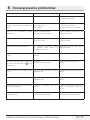
Powiązane artykuły
Inne dokumenty
-
Philips HD8827/09 Instrukcja obsługi
-
Philips HD8829/09 Instrukcja obsługi
-
Zelmer ZCM4821B (CM4821) Instrukcja obsługi
-
eta Nero 5180 90000 černý Instrukcja obsługi
-
Rowenta FULLY AUTOMATIC Instrukcja obsługi
-
Gaggia MAGENTA PLUS Instrukcja obsługi
-
-
Saeco Xsmall Instrukcja obsługi
-
Solac CA4815 Instrukcja obsługi
-
Solac CA4805 Instrukcja obsługi