
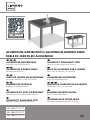
ALUMINIUM-GARTENTISCH / ALUMINIUM GARDEN TABLE
TABLE DE JARDIN EN ALUMINIUM
IAN 384027_2107
IAN 384029_2107
IAN 384031_2107
ALUMINIUM-GARTENTISCH
Bedienungs- und Sicherheitshinweise
ALUMINIUM GARDEN TABLE
Operation and safety notes
TABLE DE JARDIN EN ALUMINIUM
Instructions d‘utilisation et consignes de sécurité
ALUMINIUM TUINTAFEL
Bedienings- en veiligheidsinstructies
ALUMINIOWY STÓŁ OGRODOWY
Wskazówki dotyczące obsługi i bezpieczeństwa
HLINÍKOVÝ ZAHRADNÍ STŮL
Pokyny pro obsluhu a bezpečnostní pokyny
HLINÍKOVÝ ZÁHRADNÝ STÔL
Pokyny pre obsluhu a bezpečnostné pokyny
MESA DE ALUMINIO PARA JARDÍN
Instrucciones de utilización y de seguridad
ALUMINIUMS-HAVEBORD
Brugs- og sikkerhedsanvisninger
TAVOLO DA GIARDINO IN ALLUMINIO
Indicazioni per l’uso e per la sicurezza
ALUMÍNIUM KERTI ASZTAL
Kezelési és biztonsági utalások
ALUMINIJASTA VRTNA MIZA
Navodila za upravljanje in varnostna opozorila

DE/AT/CH Bedienungs- und Sicherheitshinweise Seite 6
GB/IE Operation and safety notes Page 13
FR/BE Instructions d‘utilisation et consignes de sécurité Page 19
NL/BE Bedienings- en veiligheidsinstructies Pagina 27
PL Wskazówki dotyczące obsługi i bezpieczeństwa Strona 34
CZ Pokyny pro obsluhu a bezpečnostní pokyny Strana 41
SK Pokyny pre obsluhu a bezpečnostné pokyny Strana 47
ES Instrucciones de utilización y de seguridad Página 54
DK Brugs- og sikkerhedsanvisninger Side 61
IT/CH/MT Indicazioni per l’uso e per la sicurezza Pagina 67
HU Kezelési és biztonsági utalások Oldal 74
SI Navodila za upravljanje in varnostna opozorila Stran 81

WICHTIG, FÜR SPÄTERE
BEZUGNAHME AUFBEWAHREN:
SORGFÄLTIG LESEN!
IMPORTANT, RETAIN FOR FUTURE
REFERENCE: READ CAREFULLY!
IMPORTANT, À CONSERVER POUR
CONSULTATION ULTÉRIEURE :
À LIRE ATTENTIVEMENT !
BELANGRIJK, BEWAREN
VOOR LATERE RAADPLEGING:
ZORGVULDIG LEZEN!
WAŻNE, ZACHOWAĆ DO
PÓŹNIEJSZEGO UŻYTKU: UWAŻNIE
PRZECZYTAĆ!
DŮLEŽITÉ, UCHOVEJTE PRO
POZDĚJŠÍ POUŽITÍ: PEČLIVĚ SI
PŘEČTĚTE!
DÔLEŽITÉ, USCHOVAJTE PRE
PRÍPAD POUŽITIA V BUDÚCNOSTI:
DÔKLADNE SI PREČÍTAJTE POKYNY!

IMPORTANTE: CONSERVAR PARA
CONSULTAS POSTERIORES: LEER
ATENTAMENTE.
VIGTIGT, SKAL OPBEVARES TIL
SENERE
BRUG: SKAL LÆSES
OMHYGGELIGT!
IMPORTANTE: CONSERVARE PER
EVENTUALI NECESSITÀ FUTURE:
LEGGERE CON ATTENZIONE!
F
ONTOS, KÉSŐBBI HIVATKOZÁSOK
C
É LJÁBÓL ŐRIZZE MEG: OLVASSA EL
F
IGYELMESEN!
POMEMBNO, SHRANITE ZA KASNEJŠO
UPORABO: NATANČNO PREBERITE!

A
D
F
E
G
B
C
H
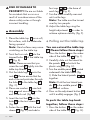
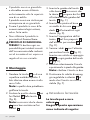
1a
3
3
2
3
2a
1
1
1 x 2
4 x
3
4 x
10
1 x
9
1 x
8
1 x
7
3 x
6
4 x
5
4 x
4
4 x 9a
10 7
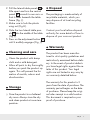
1b
9
6
5
4
3
8
2
I
J
1e
1e
1c
1c
1d
1d
1c
1c
1b
1b
1e
1e
2
WICHTIG, FÜR SPÄTERE BEZUGNAHME
AUFBEWAHREN: SORGFÄLTIG LESEN!
IMPORTANT, RETAIN FOR FUTURE
REFERENCE: READ CAREFULLY!
00_384027_384029_384031_Cover.indd 5-800_384027_384029_384031_Cover.indd 5-8 20/7/2021 11:36 PM20/7/2021 11:36 PM

D
F
E
G
10 7
1b
9
6
5
4
3
8
2
H

I
J
1e
1e
1c
1c
1d
1d
1c
1c
1b
1b
1e
1e

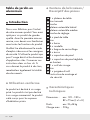
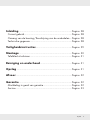
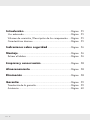
6 DE/AT/CH
Einleitung .....................................................................................Seite 7
Bestimmungsgemäßer Gebrauch ................................................. Seite 7
Lieferumfang / Teilebeschreibung .................................................Seite 7
Technische Daten .......................................................................... Seite 7
Sicherheitshinweise ............................................................... Seite 8
Montage ......................................................................................Seite 9
Tischplatte ausziehen .................................................................... Seite 10
Reinigung und Pflege ...........................................................Seite 10
Lagerung ..................................................................................... Seite 10
Entsorgung ................................................................................. Seite 11
Garantie .......................................................................................Seite 11
Abwicklung im Garantiefall .......................................................... Seite 11
Service ...........................................................................................Seite 12

7 DE/AT/CH
Aluminium-Gartentisch
Einleitung
Wir beglückwünschen Sie zum Kauf
Ihres neuen Produkts. Sie haben sich
damit für ein hochwertiges Produkt
entschieden. Machen Sie sich vor
der ersten Inbetriebnahme mit dem
Produkt vertraut. Lesen Sie hierzu
aufmerksam die nachfolgende Be-
dienungsanleitung und die Sicher-
heitshinweise. Benutzen Sie das
Produkt nur wie beschrieben und für
die angegebenen Einsatzbereiche.
Bewahren Sie diese Anleitung an
einem sicheren Ort auf. Händigen
Sie alle Unterlagen bei Weitergabe
des Produktes an Dritte mit aus.
Bestimmungsgemäßer
Gebrauch
Das Produkt ist für den privaten Be-
reich geeignet. Das Produkt ist nicht
für den gewerblichen Gebrauch vor-
gesehen. Das Produkt wurde für den
privaten Wohnbereich hergestellt.
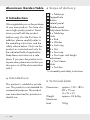
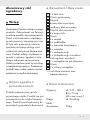
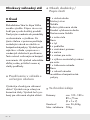
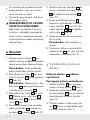
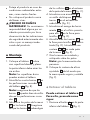
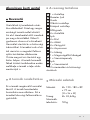
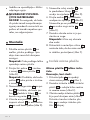
Lieferumfang /
Teilebeschreibung
1 1 x Tischplatte
1a Gewindebohrung
1b Taste
1c seitliche Ausziehplatte
1d mittlere Ausziehplatte
1e Einstelltaste
2 4 x Tischbein
2a Loch
3 4 x Stange
4 4 x Unterlegscheibe
5 4 x Verschlussring
6 4 x Mutter
7 3 x Fußkappe
8 1 x höhenverstellbare Fußkappe
9 1 x Schraubwerkzeug
9a Loch
10 1 x Werkzeuggriff
1 x Montage- und Sicherheitshinweise
Technische Daten
Maße: ca. 120‒180 x
89 x 75 cm
(L x B x H)
Gewicht: ca. 26,44 kg
Max. Belastung: 50 kg

8 DE/AT/CH
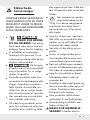
Sicherheitshinweise
BEWAHREN SIE DIESE ANLEI-
TUNG GUT AUF! HÄNDIGEN SIE
ALLE UNTERLAGEN BEI WEITER-
GABE DES PRODUKTS AN DRITTE
EBENFALLS MIT AUS.
LEBENS- UND
UNFALLGEFAHR FÜR
KLEINKINDER UND KINDER!
Lassen Sie Kinder niemals
unbeaufsichtigt mit dem Verpa-
ckungsmaterial. Es besteht
Erstickungsgefahr.
Wir empfehlen die Montage
mit zwei Personen vorzunehmen,
um Verletzungen oder Beschädi-
gungen am Produkt zu vermeiden.
Gehen Sie
beim Auseinander- und Zusam-
menklappen des Produkts vor-
sichtig vor, um Verletzungen /
Einklemmen zu vermeiden.
Überprüfen Sie das Produkt vor
jeder Verwendung
auf Beschädi-
gung oder Verschleiß. Verwen-
den Sie das Produkt nur in
einem einwandfreien Zustand.
Verwenden Sie das Produkt
nicht, wenn Schäden sichtbar
sind oder vermutet werden.
Achten Sie vor der Benutzung
des Produkts auf die richtige
Stabilität.
Stellen Sie das Produkt vor dem
Gebrauch auf einem ebenen,
festen Untergrund auf, andern-
falls könnte das Produkt instabil
werden und zur Seite fallen oder
kippen. Dies kann zu Verletzungen
oder Sachbeschädigung führen.
50 kg Beachten Sie die maxi-
male Belastbarkeit von
50 kg. Wenn diese Gewichts-
grenze überschritten wird, kann
dies zu Verletzungen und / oder
Sachbeschädigung führen.
Achten Sie darauf, dass sich
Personen, insbesondere Kinder,
nicht auf das Produkt stellen
oder an diesem hochziehen.
Das Produkt könnte umkippen.
Setzen oder stellen Sie sich nie-
mals auf das Produkt.
Achten Sie darauf, dass Ihre
Hände nicht in die Klappvorrich-
tung geraten, um Verletzungen
zu vermeiden.
Achten Sie beim Auseinander-
klappen darauf, dass der Klapp-
mechanismus ordnungsgemäß
einrastet, bevor Sie das Produkt
verwenden.

9 DE/AT/CH
Achten Sie darauf, dass das Pro-
dukt vollständig geöffnet wurde,
bevor Sie es verwenden.
Das Produkt ist kein Spielzeug und
sollte nur unter Aufsicht von Er-
wachsenen verwendet werden.
Das Produkt ist kein Klettergerüst
oder Spielzeug.
Sichern Sie das Produkt bei
extremen Wetterbedingungen,
z. B. bei starkem Wind.
Verwenden Sie das Produkt
nicht in der Nähe von offenem
Feuer.
GEFAHR DER SACHBE-
SCHÄDIGUNG! Wir haften
nicht für Unfälle, die infolge der
Nichtbeachtung der oben ge-
nannten Sicherheitshinweise oder
durch falsche Handhabung auf-
treten.
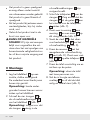
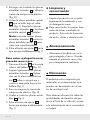
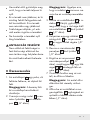
Montage
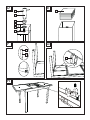
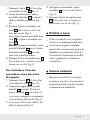
1. Legen Sie die Tischplatte 1 auf
einen weichen, flachen Unter-
grund. Die Unterseite muss dabei
nach oben weisen.
Hinweis: Harte Untergründe
können die Tischplatte zerkratzen.
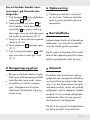
2. Schrauben Sie die vier Stangen
3 in die Gewindebohrungen
1a der Tischplatte 1 (Abb. B).
Hinweis: Achten Sie darauf,
dass die Stangen 3 fest in die
Gewindebohrungen 1a einge-
schraubt sind.
3. Stecken Sie die Tischbeine 2
auf die Stangen 3. Achten Sie
darauf, dass die Stangen 3 aus
den Löchern 2a am Ende der
Tischbeine 2 herausschauen
(Abb. C).
4. Stecken Sie eine Unterlegscheibe
4, einen Verschlussring 5 und
eine Mutter 6 auf jedes Stangen-
ende (Abb. D).
5. Stecken Sie den Werkzeuggriff
10 in das dafür vorgesehene
Loch
9a
am Schraubwerkzeug
9
(Abb. D)
.
6. Schrauben Sie die Muttern 6
mit dem mitgelieferten Schraub-
werkzeug 9 fest (Abb. D). Ste-
cken Sie eine Fußkappe 7, 8
auf jedes Tischbein 2 (Abb. E).
7. Drehen Sie den Tisch vorsichtig um
und stellen Sie ihn auf die Beine.
Hinweis: Drehen Sie den Tisch
zu zweit um.
8. Stellen Sie die höhenverstellbare
Fußkappe 8 so ein, dass der
Tisch sicher und stabil steht
(Abb. F).

10 DE/AT/CH
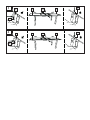
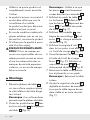
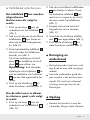
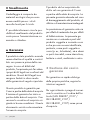
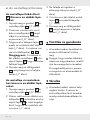
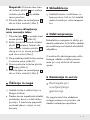
Tischplatte ausziehen
Sie können die Tischplatte 1
ausziehen.
Gehen Sie hierzu wie folgt vor:
1. Drücken Sie die Taste 1b auf der
Unterseite der Tischplatte 1
(Abb. I).
2. Ziehen Sie vorsichtig die seitli-
chen Ausziehplatten 1c heraus
und lösen Sie die Kunststoff-Flü-
gelmutter (Abb. H).
3. Drehen Sie die mittlere Auszieh-
platte 1d , die sich unterhalb des
Tischrahmens befindet, um (Abb. I).
Schieben Sie die seitliche Aus-
ziehplatte 1c und mittlere Aus-
ziehplatte 1d zusammen.
Hinweis: Drücken Sie die bei-
den seitlichen Ausziehplatten 1c
an die mittlere Ausziehplatte 1d ,
um eine ebene Oberfläche zu er-
halten.
4. Drücken Sie die Einstelltaste 1e ,
bis diese hörbar einrastet (Abb. I).
Um den Tisch wieder zusam-
men zu schieben, gehen Sie
wie folgt vor:
1. Drücken Sie die Taste 1b auf der
Unterseite der Tischplatte 1
(Abb. G).
2. Ziehen Sie die seitlichen Auszieh-
platten 1c leicht auseinander.
Drehen Sie die mittlere Auszieh -
platte 1d einmal um die eigene
Achse und schieben Sie sie wieder
unter den Tischrahmen (Abb. J).
3. Achten Sie darauf, die Kunststoff-
Flügelmutter zu sichern (Abb. H).
4. Schieben Sie die Ausziehplatten
1c wieder zusammen (Abb. J).
5. Drücken Sie die Einstelltaste 1e ,
bis diese hörbar einrastet (Abb. J).
Reinigung und Pflege
Reinigen Sie das Produkt mit
einem feuchten Tuch und einem
milden Reinigungsmittel.
Lassen Sie alle Teile gut trocknen,
bevor Sie das Produkt wieder
verpacken. Dies verhindert die
Bildung von Schimmel, Gerüchen
und Verfärbungen.
Lagerung
Lagern Sie das Produkt in einem
geschützten, trockenen Raum.
Lagern Sie das trockene und
saubere Produkt immer bei
Raumtemperatur.

11 DE/AT/CH
Entsorgung
Die Verpackung besteht aus um-
weltfreundlichen Materialien, die
Sie über die örtlichen Recyclingstellen
entsorgen können.
Möglichkeiten zur Entsorgung des
ausgedienten Produkts erfahren Sie
bei Ihrer Gemeinde- oder Stadtver-
waltung.
Garantie
Das Produkt wurde nach strengen
Qualitätsrichtlinien sorgfältig produ-
ziert und vor Anlieferung gewissen-
haft geprüft. Im Falle von Mängeln
dieses Produkts stehen Ihnen gegen
den Verkäufer des Produkts gesetzli-
che Rechte zu. Diese gesetzlichen
Rechte werden durch unsere im Fol-
genden dargestellte Garantie nicht
eingeschränkt.
Sie erhalten auf dieses Produkt 3 Jahre
Garantie ab Kaufdatum. Die Garantie-
frist beginnt mit dem Kaufdatum.
Bitte bewahren Sie den Original-
Kassenbon gut auf. Diese Unterlage
wird als Nachweis für den Kauf be-
nötigt.
Tritt innerhalb von 3 Jahren ab dem
Kaufdatum dieses Produkts ein Ma-
terial- oder Fabrikationsfehler auf,
wird das Produkt von uns – nach
unserer Wahl – für Sie kostenlos re-
pariert oder ersetzt. Diese Garantie
verfällt, wenn das Produkt beschä-
digt, nicht sachgemäß benutzt oder
gewartet wurde.
Die Garantieleistung gilt für Mate-
rial- oder Fabrikationsfehler. Diese
Garantie erstreckt sich nicht auf
Produktteile, die normaler Abnut-
zung ausgesetzt sind (z. B. Batte-
rien) und daher als Verschleißteile
angesehen werden können oder
Beschädigungen an zerbrechlichen
Teilen, z. B. Schalter, Akkus oder
die aus Glas gefertigt sind.
Abwicklung im
Garantiefall
Um eine schnelle Bearbeitung Ihres
Anliegens zu gewährleisten, folgen
Sie bitte den folgenden Hinweisen:

12 DE/AT/CH
Bitte halten Sie für alle Anfragen den
Kassenbon und die Artikelnummer
(IAN 384027_2107 /
IAN 384029_2107 /
IAN 384031_2107) als Nach-
weis für den Kauf bereit.
Die Artikelnummer entnehmen Sie
bitte dem Typenschild, einer Gra-
vur, auf dem Titelblatt Ihrer Bedie-
nungsanleitung (unten links) oder
als Aufkleber auf der Rück- oder
Unterseite des Produkts.
Sollten Funktionsfehler oder sons-
tige Mängel auftreten, kontaktieren
Sie zunächst die nachfolgend be-
nannte Serviceabteilung telefonisch
oder per E-Mail.
Ein als defekt erfasstes Produkt kön-
nen Sie dann unter Beifügung des
Kaufbelegs (Kassenbon) und der
Angabe, worin der Mangel besteht
und wann er aufgetreten ist, für Sie
portofrei an die Ihnen mitgeteilte
Service-Anschrift übersenden.
Service
Service Deutschland
Tel.: 0800 5435 111
E-Mail: [email protected]
Service Österreich
Tel.: 0800 292726
E-Mail: [email protected]
Service Schweiz
Tel.: 0800562153
E-Mail: [email protected]

13 GB/IE
Introduction .............................................................................. Page 14
Intended use ................................................................................. Page 14
Scope of delivery ......................................................................... Page 14
Technical data .............................................................................. Page 14
Safety notices .......................................................................... Page 15
Assembly ....................................................................................Page 16
Pulling out the table top ............................................................... Page 16
Cleaning and care ................................................................. Page 17
Storage ........................................................................................Page 17
Disposal....................................................................................... Page 17
Warranty .................................................................................... Page 17
Warranty claim procedure ..........................................................Page 18
Service .......................................................................................... Page 18

14 GB/IE
Aluminium Garden Table
Introduction
We congratulate you on the purchase
of your new product. You have cho-
sen a high quality product. Famil-
iarise yourself with the product
before using it for the first time. In
addition, please carefully refer to
the operating instructions and the
safety advice below. Only use the
product as instructed and only for
the indicated field of application.
Keep these instructions in a safe
place. If you pass the product on to
anyone else, please ensure that you
also pass on all the documentation
with it.
Intended use
This product is suitable for private
use. This product is not intended for
commercial purposes. This product
was manufactured for private resi-
dential use.
Scope of delivery
1 1 x Table top
1a Tapped hole
1b Button
1c Lateral panel
1d Middle panel
1e Adjustment button
2 4 x Table leg
2a Hole
3 4 x Rod
4 4 x Washer
5 4 x Lock ring
6 4 x Nut
7 3 x Foot cap
8 1 x Foot caps with height
adjustment
9 1 x Tool sleeve
9a Hole
10 1 x Tool bar
1 x Assembly and safety instructions
Technical data
Dimensions: approx. 120‒180 x
89 x 75 cm
(L x W x H)
Weight: approx. 26.44 kg
Maximum
load: 50 kg

15 GB/IE
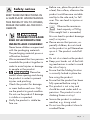
Safety notices
KEEP THESE INSTRUCTIONS IN
A SAFE PLACE! WHEN PASSING
THIS PRODUCT ON TO OTHERS;
PLEASE INCLUDE ALL THE DOC-
UMENTS.
DANGER TO LIFE AND
RISK OF ACCIDENTS FOR
INFANTS AND CHILDREN!
Never leave children unsupervised
with the packaging materials.
The packaging material poses a
suffocation hazard.
We recommend that two persons
assemble the product together in
order to avoid injuries or damage
to people or the product.
Please be
careful when opening and closing
the product in order to prevent
injuries and pinching.
Check the product for damage
or wear before
each use. Only
use the product in good condition.
Do not use the product if damage
is visible or suspected.
Verify the product is stable be-
fore use.
Before use, place the product on
a level, firm surface, otherwise the
product could become unstable
and tip to the side and / or fall
over. This can lead to injuries or
damage.
50 kg Observe the maximum
load capacity of 50 kg.
If the weight limit is exceeded,
this can lead to product damage
and / or injuries.
Please ensure that persons, es-
pecially children, do not stand
on the product or pull themselves
up on it. The product could fall
over.
Do not sit or stand on the product.
Keep your hands out of the fold-
ing mechanism in order to avoid
the risk of injury.
Ensure that the folding function
is correctly locked in place be-
fore using the product.
Ensure that the product has been
fully opened before using it.
This product is not a toy and
should be used under adult su-
pervision. The product is not a
climbing frame or a toy!
Secure the product in extreme
weather, e.g. strong wind.
Do not use the product close to
a naked flame.

16 GB/IE
RISK OF DAMAGE TO
PROPERTY! We are not liable
for accidents that occur as a
result of non-observance of the
above safety notes or through
incorrect handling.
Assembly
1. Place the table top 1 on a soft,
flat surface, with the underside
facing upward.
Note: Hard surfaces may cause
scratching on the table top.
2. Twist the four rods 3 into the
tapped holes 1a of the table top
1 (Fig. B).
Note: Please ensure that you
screw the rods
3
tightly into the
table top thread 1a .
3. Slot the table legs 2 onto the
rods 3. Please ensure that the
end of the rod protrudes through
the hole 2a in the table leg 2
(Fig. C).
4. Place one washer 4, one lock
ring 5, and one nut 6 on the
end of each rod (Fig. D).
5. Insert the tool bar 10 into the
hole 9a in the tool sleeve 9
(Fig. D).
6. Fasten the nut 6 with the tool
sleeve 9 (Fig. D) and add a
foot cap 7, 8 to the base of
each leg 2 (Fig. E).
7.
Turn the table carefully over and
set it on the legs.
Note: The table must be turned
over by two people.
8. Adjust the table leg using the
height adjustment 8 in order to
achieve optimum stability (Fig. F).
Pulling out the table top
You can extend the table top
1. Please follow these steps:
1. Press the button 1b on the under-
side of the table top 1 (Fig. I).
2. Carefully slide out the lateral ta-
ble panels 1c and unlock the
plastic wing nut (Fig. H).
3. Turn the middle panel 1d located
underneath the table frame (Fig.
I).
Slide the lateral panels 1c , 1d
together.
Note: Push the two lateral pan-
els 1c to the middle panel 1d to
get a level surface.
4. Press on the adjustment button 1e
until it audibly engages (Fig. I).
To push the table top back
together, follow these steps:
1. Press the button 1b on the under-
side of the table top 1 (Fig. G).

17 GB/IE
2. Pull the lateral table panels 1c a
little apart and turn the central
panel 1d around its own axis so
that it slides beneath the table
frame (Fig. J).
3. Make sure to lock the plastic
wing nut (Fig H).
4. Slide the two lateral table pan-
els 1c into the middle of the table
(Fig. J).
5. Press on the adjustment button 1e
until it audibly engages (Fig. J).
Cleaning and care
Clean the product with damp
cloth and a mild detergent.
Allow all parts to dry thoroughly
before you pack the product up
again. This will prevent the for-
mation of moulds, odours and
discolouration.
Storage
Store the product in a sheltered
dry room. Always store the dry
and clean product at room tem-
perature.
Disposal
The packaging is made entirely of
recyclable materials, which you
may dispose of at local recycling
facilities.
Contact your local refuse disposal
authority for more details of how to
dispose of your worn-out product.
Warranty
The product has been manufac-
tured to strict quality guidelines and
meticulously examined before deliv-
ery. In the event of product defects
you have legal rights against the re-
tailer of this product. Your legal
rights are not limited in any way by
our warranty detailed below.
The warranty for this product is 3
years from the d
ate of purchase. The
warranty period begins on the date
of purchase. Please keep the origi-
nal sales receipt in a safe location.
This document is required as your
proof of purchase.

18 GB/IE
Should this product show any fault
in materials or manufacture within 3
years from the date of purchase, we
will repair or replace it – at our
choice – free of charge to you. This
warranty becomes void if the prod-
uct has been damaged, or used or
maintained improperly.
The warranty applies to defects in
material or manufacture. This war-
ranty does not cover product parts
subject to normal wear, thus possi-
bly considered consumables (e.g.
batteries) or for damage to fragile
parts, e.g. switches, rechargeable
batteries or glass parts.
Warranty claim
procedure
To ensure quick processing of your
case, please observe the following
instructions:
Please have the till receipt and the
item number
(IAN 384027_2107 /
IAN 384029_2107 /
IAN 384031_2107) available as
proof of purchase.
You will find the item number on
the rating plate, an engraving on
the front page of the instructions for
use (bottom left), or as a sticker on
the rear or bottom of the product.
If functional or other defects occur,
please contact the service depart-
ment listed either by telephone or
by e-mail.
You can return a defective product
to us free of charge to the service
address that will be provided to
you. Ensure that you enclose the
proof of purchase (till receipt) and
information about what the defect
is and when it occurred.
Service
Service Great Britain
Tel.: 08000569216
E-Mail: o[email protected]
Service Ireland
Tel.: 1800 200736
E-Mail: o[email protected]
Strona się ładuje...
Strona się ładuje...
Strona się ładuje...
Strona się ładuje...
Strona się ładuje...
Strona się ładuje...
Strona się ładuje...
Strona się ładuje...
Strona się ładuje...
Strona się ładuje...
Strona się ładuje...
Strona się ładuje...
Strona się ładuje...
Strona się ładuje...
Strona się ładuje...
Strona się ładuje...
Strona się ładuje...
Strona się ładuje...
Strona się ładuje...
Strona się ładuje...
Strona się ładuje...
Strona się ładuje...
Strona się ładuje...
Strona się ładuje...
Strona się ładuje...
Strona się ładuje...
Strona się ładuje...
Strona się ładuje...
Strona się ładuje...
Strona się ładuje...
Strona się ładuje...
Strona się ładuje...
Strona się ładuje...
Strona się ładuje...
Strona się ładuje...
Strona się ładuje...
Strona się ładuje...
Strona się ładuje...
Strona się ładuje...
Strona się ładuje...
Strona się ładuje...
Strona się ładuje...
Strona się ładuje...
Strona się ładuje...
Strona się ładuje...
Strona się ładuje...
Strona się ładuje...
Strona się ładuje...
Strona się ładuje...
Strona się ładuje...
Strona się ładuje...
Strona się ładuje...
Strona się ładuje...
Strona się ładuje...
Strona się ładuje...
Strona się ładuje...
Strona się ładuje...
Strona się ładuje...
Strona się ładuje...
Strona się ładuje...
Strona się ładuje...
Strona się ładuje...
Strona się ładuje...
Strona się ładuje...
Strona się ładuje...
Strona się ładuje...
Strona się ładuje...
Strona się ładuje...
Strona się ładuje...
Strona się ładuje...
Strona się ładuje...
-
 1
1
-
 2
2
-
 3
3
-
 4
4
-
 5
5
-
 6
6
-
 7
7
-
 8
8
-
 9
9
-
 10
10
-
 11
11
-
 12
12
-
 13
13
-
 14
14
-
 15
15
-
 16
16
-
 17
17
-
 18
18
-
 19
19
-
 20
20
-
 21
21
-
 22
22
-
 23
23
-
 24
24
-
 25
25
-
 26
26
-
 27
27
-
 28
28
-
 29
29
-
 30
30
-
 31
31
-
 32
32
-
 33
33
-
 34
34
-
 35
35
-
 36
36
-
 37
37
-
 38
38
-
 39
39
-
 40
40
-
 41
41
-
 42
42
-
 43
43
-
 44
44
-
 45
45
-
 46
46
-
 47
47
-
 48
48
-
 49
49
-
 50
50
-
 51
51
-
 52
52
-
 53
53
-
 54
54
-
 55
55
-
 56
56
-
 57
57
-
 58
58
-
 59
59
-
 60
60
-
 61
61
-
 62
62
-
 63
63
-
 64
64
-
 65
65
-
 66
66
-
 67
67
-
 68
68
-
 69
69
-
 70
70
-
 71
71
-
 72
72
-
 73
73
-
 74
74
-
 75
75
-
 76
76
-
 77
77
-
 78
78
-
 79
79
-
 80
80
-
 81
81
-
 82
82
-
 83
83
-
 84
84
-
 85
85
-
 86
86
-
 87
87
-
 88
88
-
 89
89
-
 90
90
-
 91
91


LIVARNO 384027 Instrukcja obsługi
- Typ
- Instrukcja obsługi
w innych językach
- italiano: LIVARNO 384027 Manuale del proprietario
- Deutsch: LIVARNO 384027 Bedienungsanleitung
- slovenčina: LIVARNO 384027 Návod na obsluhu
- français: LIVARNO 384027 Le manuel du propriétaire
- dansk: LIVARNO 384027 Brugervejledning
- Nederlands: LIVARNO 384027 de handleiding
Powiązane artykuły
-
LIVARNO 384033 Instrukcja obsługi
-
-
-
-
-
-
-
-
-