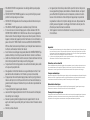
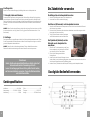
bluMill GLA-1006A Instrukcja obsługi
- Kategoria
- Frytownice
- Typ
- Instrukcja obsługi

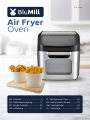
Air Fryer
Oven
EN - Manual ...................................... 2
NL - Gebruiksaanwijzing ..............17
FR - Mode d’emploi ......................32
DE - Anleitung ...............................47
IT - Istruzioni per l’uso .................62
ES - Instrucciones de uso ............77
SW - Instruktioner ........................92
PL - Instrukcje ..............................107
GLA-1006A

2 3
4.
MAKE SURE the appliance is plugged into a dedicated wall socket. Always
make sure that the plug is inserted into the wall socket properly and without
any other appliances on the same outlet.
5.
To prevent food contact with the interior upper screen and heat element. DO
NOT OVERFILL the Round Basket.
6.
DO NOT COVER the Air Intake Vent or Air Outlet Vent while the 12L air fryer is
operating. Doing so will prevent even cooking and may damage the Unit or
cause it to overheat.
7.
NEVER POUR oil into the round Basket.Fire and personal injury could result.
8.
While cooking, the internal temperature of the Unit reaches several hundred
degrees Celsius. TO AVOID PERSONAL INJURY, never place hands inside the
Unit unless it is thoroughly cooled.
9.
This appliance is NOT INTENDED FOR USE by persons with reduced physi-
cal, sensory or mental capabilities or a lack of experience and knowledge
unless they are UNDER THE SUPERVISION of a responsible person or have
been given proper instruction in using the appliance. This appliance is NOT
INTENDED FOR USE by children.
10.
When cooking, DO NOT PLACE the appliance against a wall or against other
appliances Leave at least 12cm free space on the back and sides and above
the appliance. Do not place anything on top of the appliance.
11.
DO NOT USE this Unit if the plug, the power cord, or the appliance itself is
damaged in any way.
12.
Do NOT PLACE The Unit on stove top surfaces.
13.
If the power cord is damaged, YOU MUST HAVE IT REPLACED by the ma-
nufacturer, its service agent, or a similarly qualied person in order to avoid
hazard.
14.
Keep the appliance and its power cord OUT OF THE REACH of children when
it is in operation or in the cooling process.
15.
KEEP THE POWER CORD AWAY from hot surfaces.DO NOT PLUG in the po-
wer cord or operate the Unit controls with wet hands.
16.
NEVER CONNECT this appliance to an external timer switch or separate
remote-control system.
17.
NEVER USE this appliance with an extension cord of any kind.
IMPORTANT SAFEGUARDS
When using electrical appliances, basic safety precautions should always be
followed including:
1.
NEVER IMMERSE the Main Unit Housing, which contains electrical compo-
nents and heating elements in water. Do not rinse under the tap.
2.
TO AVOID ELECTRICAL SHOCK, DO NOT put liquid of any kind into the Main
Unit Housing containing the electrical components.
3.
This appliance has a VDE plug. To REDUCE THE RISK OF ELECTRIC SHOCK,
if the plug does not t fully into the outlet, reverse the plug. If it still does not
t, contact a qualied electrician. Do NOT ATTEMPT to modify the plug in any
way.
EN EN
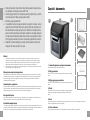
Save these instructions—For household use only
When using electrical appliances, basic safety precautions should
always be followed. Do not use the appliance until you have read
this manual thoroughly.
IMPORTANT :
BEFORE COOKING FOOD FOR THE FIRST TIME PREHEAT AT
200ºC/400ºC FOR 10 MINUTES TO ALLOW THE PROTECTIVE
COATING OF OIL TO BURN OFF. IT IS NORMAL FOR SOME SMOKE
TO APPEAR.

4 5
EN EN
18.
DO NOT OPERATE the appliance on or near combustible materials, such as
tablecloths and curtains.
19.
Do NOT USE the 12L air fryer for any purpose other than described in this
manual.
20.
NEVER OPERATE the appliance unattended.
21.
When in operation, air is released through the Air Outlet Vent. KEEP YOUR
HANDS AND FACE at a safe distance from the Air Outlet Vent. Also avoid the
air while removing the Round Basket from the appliance.
22.
The Unit’s outer surfaces may become hot during use. The Round Basket
WILL BE HOT. WEAR air fryer MITTS or use the Fetch Tool when handling hot
components. Wear air fryer mitts when handling hot surfaces.
23.
Should the Unit emit black smoke, UNPLUG IMMEDIATELY and wait for smo-
king to stop before removing air fryer contents.
24.
When time has run out, cooking will stop but the fan WILL CONTINUE RUN-
NING for 20 secs. to cool down the Unit.
25.
Always operate the appliance on a horizontal surface that is level, stable, and
noncombustible.
26.
This appliance is intended for normal household use only. It is not intended
for use in commercial or retail environments.
27.
If the 12L air fryer is used improperly or for professional or semiprofessional
purposes or if it is not used according to the instructions in the user manual,
the warranty becomes invalid and the manufacturer will not be held liable for
damages.
28.
Always unplug the appliance after use.
29.
Let the appliance cool down for approximately 30mins. Before handling,
cleaning, or storing.
30.
Make sure the ingredients prepared in this Unit come out cooked to a gol-
den-yellow color rather than dark or brown. Remove burnt remnants.
31.
30.Caution, hot surface
32.
This appliance can be used by children aged from 8 years and above and
persons with reduced physical, sensory or mental capabilities or lack of
experience and knowledge if they have been given supervision or instruction
concerning use of the appliance in a safe way and understand the hazards
involved. Children shall not play with the appliance. cleaning and user mainte-
nance shall not be made by children without supervision.
33.
The product and the power cord must be kept out of reach of children below 8
years of age.
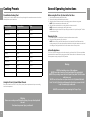
Important
1. Before initial use and after subsequent use,hand wash the Round Basket and other cooking
accessories. Then, wipe the outside and inside of the Unit with a warm moist cloth and mild
detergent. Finally, preheat the Unit for a few minutes to burn off any residue.
2. The cook-top may smoke the rst time it is used. It is not defective and the smoke will burn off
within a few minutes.
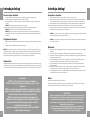
Overheating Protection
Should the inner temperature control system fail,the overheating protection system will be activated
and the Unit will not function. Should this happen, unplug the power cord. Allow time for the Unit to
cool completely before repair or storing.
Automatic Shut-Off
The appliance has a built in shut-off device,that will automatically shut down the Unit when the Timer
LED reaches zero. You can manually switch off the appliance by selecting the Power Button. The fan
will continue running for about 30 secs. To cool down the unit.
Be careful not to touch the blades or sharp parts during use and cleaning.
IMPORTANT! Allow to dry fully after cleaning before using again. Do not use the appliance if damp.
After washing and drying, immediately place attachment into the protective sleeve for storage.
Electric Power
If the electrical circuit is overloaded with other appliances, your new Unit may not operate properly. It
should be operated on a dedicated electrical circuit.
Electromagnetic Fields
This appliance complies with all standards regarding electromagnetic elds. If handled properly
and according to the instructions in this user manual, the appliance is safe to use based on scientic
evidence available today.

6 7
EN EN
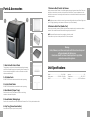
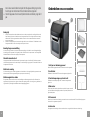
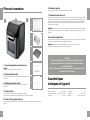
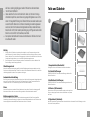
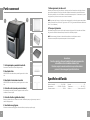
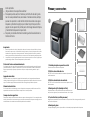
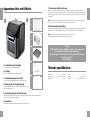
1. Main Unit with Control Panel
This appliance complies with all standards regarding electromag-
netic elds. If handled properly and according to the instructions in
this user manual, the appliance is safe to use based on scientic
evidence available today.
2. Air Intake Vents
DO NOT COVER the Air Intake Vents while the unit is operating.
3. Hot Air Outlet Vents
DO NOT COVER the Air Outlet Vents while the unit is operating.
4. Mesh Basket (Crisper Trays)
Can be used not only for dehydration but also to cook crispy
snacks or reheat items like pizza.
5. Round Basket (Baking Cage)
Great for fries, roasted nuts, and other snacks.Use Rotisserie Fetch Tool to place basket into Unit.
6. Drip Tray (*placed inner botton)
Cook with the Drip Pan in place for easy clean-up.
Parts & Accessories
457 68
123
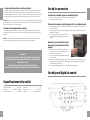
7. Rotisserie Shaft, Forks & Set Screws
Use for roasts and whole chicken. Force Shaft lengthwise through meat and center. Slide Forks onto
shaft from either end into meat, then lock in place with Set Screws. There are indentations on the
shaft for the set screws. You can adjust the screws closer to the middle if needed but never outward
towards the ends.
NOTE: Make sure roast or chicken is not too large to rotate freely within the oven.Chicken: 2kgs roast:
up to 2.5-3kgs (depending on the diameter of the meat. Up to 15cm diameter).
8. Rotisserie Fetch Tool (Handle Tool)
Use to remove cooked roasts and chicken that have been prepared using the rotisserie or skewer
methods. Place under Rotisserie Shaft and lift then gently extract the food.
NOTE: Unpack all listed contents from packaging. Varies by model.
Please remove any clear or blue protective lm on the components.
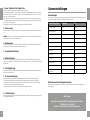
Model: ...................................................GLA-1006A
Supply power: ..................... 220-240V~ 50/60Hz
Rated: ............................................................1800W
capacity: .............................................................12L
Temperature: ........................................80~200 °C
Display: .....................................LED Touch Screen
Warning
Forks, Skewers, and other metal parts with this unit are sharp and
will get extremely hot during use.
Great care should be taken to avoid personal injury.Wear
protective oven mitts or gloves.
Unit Specications

8 9
EN EN
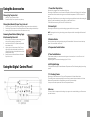
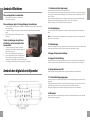
Placing Drip Tray into Unit
1. Insert Drip Tray into bottom of Unit
2. Cook with the Drip Pan in place for easy clean-up.
Placing Mesh Basket (Crisper Trays) into unit
1. Place Crisper Trays into Unit by sliding through the side grooves and onto the back lip.
2. Place Crisper Trays closer to the top heating element for faster cooking and added crisp.
3. Inserting Crisper Trays (always use oven mitts when oven is hot).
Removing Round Basket (Baking Cage)
& Rotisserie Spit from Unit
1. Open the door of the Unit to pause cooking cycle or
turn unit off by pressing the power button.
2. Insert Rotisserie Fetch Tool (handle tool) beneath
the rotisserie shaft.
3. Lift the right side of the rotisserie Fetch Tool at a
slight angle to clear the bracket, then shift to the
right until the left side of the shaft slides out of the
rotisserie shaft socket.
4. Carefully remove the Round Basket or Rotisserie
Spit from the Unit.
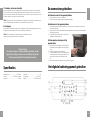
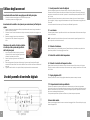
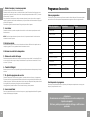
1. Power/Start-Stop Button
Once the Unit is plugged in,the Power Button will light up.
Selecting the Power Button once will cause the full panel to be illuminated. Selecting the Power Button
a second time will activate the cooking process at the default temperature of 185ºC and time of 15
mins..
Selecting the Power Button at any time during the cooking process will shut down the Unit, causing the
display to go dark immediately the running light to go dark within 30 secs.
The fan will continue running for 30 secs.to cool down the Unit.
2. Internal Light
Selecting this button will help you check cooking progress while Unit is in operation.
NOTE: Opening the door during the cooking process will pause the Unit. Internal light will illuminate if
doors open.
3. Rotation Button
Select this button when cooking anything using the Rotisserie Mode. Function can be used with any
preset. The icon will blink while in use.
4. Temperature Control Buttons
5. Time Control Buttons
These buttons enable you to select exact cooking time to the minute, from 1 min.to 90 mins. in all
modes except below:
Dehydrating time 30-min.intervals and ranging from 2-24 hrs.
6. LED Digital Display
The Digital Numeric Display will switch between Temperature and Time Remaining during the cooking
process.
7-18. Cooking Presets
Selecting any Preset Button sets the Time and Temperature to the Preset’s default value.
The cooking process starts automatically ve secs. after the preset has been selected, or the Power
Button can be pressed after the Preset Button to start the Oven immediately.
You may override these presets with Time and Temperature Buttons.
8.Fan icon
This icon will blink in sequence while cooking is in progress and continue blinking up to 30 secs.once
you shut Unit down.
Using the Accessories
Using the Digital Control Panel

10 11
EN EN
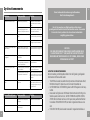
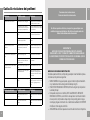
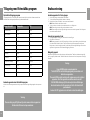
Preset Button Cooking Chart
* Cooking time for whole roasted chicken will vary with weight. Use meat thermometer to check inter-
nal temperature as per chart below.
Before using the 12L air fry Oven for the rst time
1. Read all material,warning stickers and labels.
2. Remove all packing materials,labels,and stickers.
3. Wash all parts and accessories used in the cooking process with warm soapy water.
NOTE: Only the accessories are dishwasher safe.
4. Wipe the inside and outside of the cooking Unit with a clean,moist cloth.
NOTE: Never wash or submerge the cooking Unit in water.
NOTE: When using this Unit,never ll any cooking vessel with oil or liquid of any kind. This Unit
cooks with hot air only.
Preparing for Use
1. Place the appliance on a stable,level,horizontal, and heat-resistant surface.
4. Select the cooking accessory for your recipe.
NOTE: Before initial use and after subsequent use, hand wash the Round Basket and other
cooking accessories.Then, wipe the outside and inside of the Unit with a warm moist cloth and
mild detergent.Finally,preheat the Unit for a few minutes to burn off any residue.
A Versatile Appliance
The 12L air fry Oven is designed to cook a wide variety of your favorite foods. The charts and tables
provided within this manual will help you get great results. Please refer to this information for proper
time/temperature settings and proper food quantities.
Using the 12L air fry Oven Without Presets
Once you are familiar with the 12L air fry Oven, you may want to experiment with your own cooking
times and temperatures.
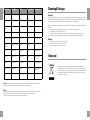
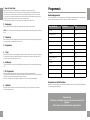
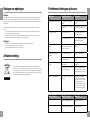
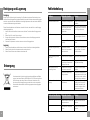
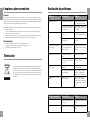
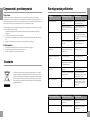
Cooking Presets General Operating Instructions
Preset Button Temperature Time
7.French Fry 200ºC 15 mins
8.Steaks/Chops 175ºC 25 mins
9.Fish 165ºC 15 mins
10.Shrimp 160ºC 12 mins
11.Pizza 180ºC 15 mins
12.Chicken 185ºC 40 mins
13.Baking 160ºC 30 mins
14.Rotisserie 190ºC 30 mins
15.Dehydrator 30ºC 2 Hours
16.keep warm 115ºC 12 mins
17.PREHEAT 80ºC 5 mins
18.Frozen food cooking 200ºC 20 mins
Warning
Never use a cooking vessel lled with cooking oil or any other liquid with
this unit!
Fire hazard or personal injury could result.
Warning
NEVER put anything on top of the appliance.
NEVER cover the air vents on the top and back of the cooking Unit.
NEVER ll any cooking vessel with oil or liquid of any kind. This Unit cooks
with hot air only.
NEVER use the Oven Door as a place to rest a hot Fry Basket lled with
food. The Hot Fry Basket could damage the Oven Door or cause the Unit
to tip. Personal injury could result.
ALWAYS use oven mitts when removing hot Crisper Trays.

12 13
EN EN
Cooking with the 12L air fry Oven
1. Place the ingredients on an Crisper Tray, on one of the Rotisserie accessories, or in the Round
Basket.
2. Put the Crisper Tray,Round Basket,or Rotisserie Spit into the unit and shut the oven door. Plug the
power cord into a 220-240V dedicated outlet.
3. When Round Basket or Rotisserie and food is in place, press the Power Button once.
4. Select a preset function or manually set the Temperature and then the Time. The Unit will auto-
matically start the cooking cycle a few seconds after a preset function is selected. Alternatively,
you can press the Power Button to begin the cooking cycle immediately once the desired cooking
time and temperature have been selected manually.
NOTE: You may open the oven door to view the rotisserie at any time during the process to check
the progress.
NOTE: Consult the Charts in this manual to determine the correct settings.
Tips
• Foods that are smaller in size usually require a slightly shorter cooking time than larger ones.
• Large quantities of food only require a slightly longer cooking time than smaller quantities.
• Flipping or turning smaller sized foods halfway through the cooking process ensures that all the
pieces are evenly fried.
• Misting a bit of vegetable oil on fresh potatoes is suggested for a crispier result.When adding a
little oil,do so just before cooking.
• Snacks normally cooked in an oven can also be cooked in the 12L air fry Oven.
• Use pre-made dough to prepare lled snacks quickly and easily. Pre-made dough also requires a
shorter cooking time than homemade dough..
• Place a baking tin or oven dish in the 12L air fry Oven when baking a cake or quiche. A tin or dish
is also suggested when cooking fragile or lled foods.
Important
Removing Cooked or Hot Food
When removing cooked or hot food, use the Rotisserie Fetch Tool or oven mitts.The Fetch Tool can
also be used with Rotisserie Spit.
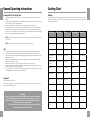
Settings
The table on next page will help you select the correct temperature and time for best results. As you
become more familiar with the 12L air fry Oven cooking process, you may adjust these settings to suit
your own personal tastes.
General Operating Instructions Cooking Chart
Warning
During the cooking process,the Round Basket and other accessories will become
very hot.When you remove it to check on the progress,make sure you have a
trivet or a heat-resistant surface nearby to set it down on.NEVER place the Round
Basket directly on a counter top or table.
Cooking accessories will get hot during the air frying process.Wear oven
mitts and handle with care to AVOID INJURY.
Food Item Min-Max Time Temperature Comments
Thin Frozen Fries 160-400 Grams 15-16 mins 200ºC
Thick Frozen
Fries
160-400 Grams 15-20 mins 200ºC
Homemade Fries 160-420 Grams 10-16 mins 200ºC Add 1/2 tbsp .oil
Homemade Pota-
to Wedges
160-420 Grams 18-22 mins
185ºC
Add 1/2 tbsp .oil
Homemade Pota-
to Cubes
160-400 Grams 12-18 mins
185ºC
Add 1/2 tbsp .oil
Hash Browns 130 Grams 15-18 mins 185ºC
Potato Gratin 250 Grams 15-18 mins 200ºC
Steak 120–500 Grams 8-12 mins 185ºC
Pork Chops 120–500 Grams 10-14 mins 185ºC
Hamburger 120–500 Grams 7-14 mins 185ºC
Sausage Roll 120–500 Grams 13-15 mins 200ºC
Chicken Drum-
sticks
120–500 Grams 18-22 mins 185ºC

14 15
EN EN
Food Item Min-Max Time Temperature Comments
Chicken Breast 120–500 Grams 10-15 mins 185ºC
Spring Rolls 120–350 Grams 15-20 mins 200ºC Use oven-ready
Frozen Chicken
Nuggets
120–500 Grams 10-15 mins 200ºC Use oven-ready
Frozen Fish
Sticks
120–500 Grams 6-10 mins 200ºC Use oven-ready
Mozzarella Sticks 120–500 Grams 8-10 mins 185ºC Use oven-ready
Stuffed
Vegetables
120–500 Grams 10 mins 160ºC
Cake 160 Grams 20-25 mins 160ºC Use baking tin
Quiche 200 Grams 20-22 mins 185ºC Use baking tin/
oven dish
Muns 160 Grams 15-18 mins 200ºC Using baking tin
Sweet Snacks 200 Grams 20 mins 160ºC Use baking tin/
oven dish
Frozen Onion
Rings
450 Grams 15 mins 200ºC
NOTE: Keep in mind that these settings are indications.Since ingredients differ in origin,size,sha-
pe,and brand,we cannot guarantee the best settings for your ingredients.
Tips
Set the Timer to half the time needed for the recipe and the Timer bell will alert you when it’s time to
ip your food. When you hear the timer bell, the preset preparation time has elapsed.
Add 3 mins.to cooking time when starting with a cold appliance.
Cleaning
Clean the 12L air fry Oven after each use.The Round Basket and other accessories are made of dura-
ble stainless steel and are dishwasher safe. Never use abrasive cleaning materials or utensils on these
surfaces. Caked-on food should be soaked for easy removal in warm, soapy water.
Remove the power cord from the wall socket and be certain the appliance is thoroughly cooled before
cleaning.
1. Wipe the outside of the appliance with a warm, moist cloth and mild detergent.
2. To clean glass, open the door of the Unit.
3. Clean the inside of the appliance with hot water, a mild detergent,and a nonabrasive sponge.
4. If necessary,remove unwanted food residue from the upper screen with a cleaning brush.
Storage
1. Unplug the appliance and let it cool thoroughly.
2. Make sure all components are clean and dry.
3. Place the appliance in the clean, dry place.
Cleaning&Storage
Disposal
The adjacent symbol of a crossed out dustbin on wheels indicates this
device is subject to Directive 2012/19/EU. This directive states at the end of
the life this device must not be disposed of through regular household refuse
but must be returned to special collection sites, recycling depots or waste
management companies.

16 17
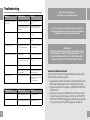
EN Troubleshooting
Problem Possible Cause Solution
The power Air Fryer Oven Elite
does not work
The appliance is not plugged in. Plug power cord into wall
socket.
You have not turned tho Unit on
by setting the preparation time
temperature.
Set the temperature and time
check that door is closed.
Food not cooked The Round Basket ls overloa-
ded.
Use smaller batches for more
even frying.
The temperature ls set too low. Raise temperature and continue
cooking.
Food is not fried evenly Some foods need to be turned
during the cooking process.
See General operations in this
manual on page 12.
White smoke coming from Unit Oil is being used. Wipe down to remove excess
oil.
Accessories have excess
grease residue from previous
cooking.
Clean the Round Basket after
each use.
French fries are not fried evenly Wrong type of potato being
used.
Use fresh.rm potatoes
Potatoes not blanched properly
during preparation
Use cut sticks and pat dry to
remove excess starch.
Fries are not crispy Raw fries have too much water. Dry potato sticks properly befo-
re misting oil. Cut sticks smaller.
Add a bit more oil.
Blanch cut potatoes.
Display shown Possible cause Solution
E1 Broken circuit of the thermal
sensor
Call Customer Service
E2 Short circuit the thermal sensor Call customer service
BELANGRIJKE WAARSCHUWINGEN
Houd u bij het gebruik van elektrische apparatuur altijd aan de standaard veilig-
heidsvoorschriften, waaronder de volgende:
1.
Dit apparaat bevat elektrische onderdelen en verwarmingselementen en mag
NOOIT worden ondergedompeld in water. Niet afspoelen onder de kraan.
2.
Giet geen enkele vloeistof in het apparaat, ter VOORKOMING VAN EEN ELEK-
TRISCHE SCHOK.
3.
Dit apparaat is voorzien van een VDE-stekker. Draai de stekker om als deze
niet goed in het stopcontact lijkt te passen, om het risico van EEN ELEKTRI-
SCHE SCHOK TE BEPERKEN. Raadpleeg een erkend elektricien als de stekker
dan nog steeds niet past. Breng NOOIT wijzigingen aan de stekker aan.
Bewaar deze handleiding goed
Uitsluitend voor huishoudelijk gebruik
Houd u bij het gebruik van elektrische apparatuur altijd aan
de standaard veiligheidsvoorschriften. Lees deze handleiding
zorgvuldig door voordat u het apparaat gebruikt.
BELANGRIJK:
VOORDAT U HET APPARAAT DE EERSTE KEER GEBRUIKT, MOET
U HET GEDURENDE 10 MINUTEN VOORVERWARMEN OP 200°C
OM DE BESCHERMENDE OLIELAAG TE VERWIJDEREN. HET IS
NORMAAL DAT ER BIJ DIT PROCES WAT ROOK VRIJKOMT.
NL

18 19
4.
Steek de stekker van het apparaat in een eigen stopcontact. De stekker moet
stevig in het stopcontact zitten. Sluit geen andere apparaten aan op hetzelfde
stopcontact.
5.
Doe de frituurmand NIET TE VOL, zodat het eten niet in aanraking komt met
het rooster en het verwarmingselement aan de binnenkant van het apparaat.
6.
Blokkeer geen van de ventilatieopeningen wanneer het apparaat aanstaat.
Anders kan het eten ongelijkmatig worden verwarmd, wat schade of overver-
hitting tot gevolg kan hebben.
7.
Giet NOOIT olie in de frituurmand. Dit kan brand en lichamelijk letsel tot gevolg
hebben.
8.
Tijdens de bereiding kan de temperatuur in het apparaat oplopen tot enkele
honderden graden Celsius. Steek NOOIT uw handen in het apparaat voordat
het volledig is afgekoeld, TER VOORKOMING VAN PERSOONLIJK LETSEL.
9.
Dit apparaat mag NIET worden gebruikt door personen met lichamelijke,
zintuiglijke of geestelijke beperkingen of met gebrek aan ervaring en kennis,
tenzij zij worden begeleid of geïnstrueerd over het gebruik van het apparaat
door iemand die verantwoordelijk is voor hun veiligheid. Dit apparaat is NIET
BEDOELD voor gebruik door kinderen jonger dan 8 jaar.
10.
Zet het apparaat tijdens het bereiden van voedsel niet tegen een muur of een
ander apparaat. Laat aan alle kanten rondom het apparaat ten minste 12
centimeter ruimte vrij. Zet geen voorwerpen op het apparaat.
11.
Gebruik het apparaat NIET als het snoer, de stekker of het apparaat is bescha-
digd.
12.
Zet het apparaat NIET op een fornuis.
13.
Als het snoer beschadigd is, moet het worden VERVANGEN door de fabrikant
of een erkend onderhoudsbedrijf om gevaarlijke situaties te voorkomen.
14.
Houd tijdens het gebruik het apparaat en het snoer altijd BUITEN BEREIK van
kinderen.
15.
Houd het NETSNOER UIT DE BUURT van hete oppervlakken. Gebruik het ap-
paraat NIET en steek de stekker niet met natte handen in het stopcontact.
16.
Sluit het apparaat NIET aan op een timerschakelaar of een aan-uitschakelaar
met afstandsbediening.
17.
Gebruik NOOIT een verlengsnoer of stekkerblok.
18.
Plaats het apparaat NIET op of in de buurt van brandbare materialen, zoals
een tafelkleed of gordijnen.
19.
Gebruik dit apparaat UITSLUITEND zoals beschreven in deze handleiding.
20.
Laat het apparaat NOOIT onbeheerd achter wanneer het in gebruik is.
21.
Tijdens het gebruik komt er lucht uit de ventilatieroosters. HOUD UW HANDEN
EN GEZICHT op een veilige afstand van de ventilatieroosters. Vermijd ook de
warme lucht die vrijkomt wanneer u de frituurmand uit het apparaat haalt.
22.
De buitenkant van het apparaat kan heet worden tijdens het gebruik. De
frituurmand wordt ERG HEET. Draag OVENHANDSCHOENEN of gebruik de
handgreep bij het hanteren van hete onderdelen.
23.
Als er zwarte rook uit het apparaat komt, moet u ONMIDDELLIJK de stekker
uit het stopcontact halen. Wacht tot het apparaat stopt met roken voordat u
het eten uit de airfryer haalt.
24.
Wanneer de timer is afgelopen, stopt het apparaat, maar blijft de ventilator
nog ongeveer 30 seconden werken om het apparaat af te koelen.
25.
Zet het apparaat altijd op een vlakke, stabiele en niet-brandbare ondergrond.
26.
Dit apparaat is uitsluitend bedoeld voor huishoudelijk gebruik. Dit apparaat is
niet bedoeld voor gebruik in commerciële omgevingen of winkels.
27.
Als het apparaat niet op de juiste manier wordt gebruikt, wordt gebruikt voor
(semi)professionele doeleinden of op een manier die niet overeenkomt met de
instructies in de handleiding, komt de garantie te vervallen en is de fabrikant
niet aansprakelijk voor schade.
28.
Haal na gebruik altijd de stekker uit het stopcontact.
29.
Laat het apparaat ongeveer een half uur afkoelen voordat u het schoonmaakt
of opbergt.
30.
De ingrediënten die u bereidt met dit apparaat moeten een goudbruine kleur
hebben en mogen niet te donker of zwart zijn. Verwijder aangebrande resten.
31.
Wees voorzichtig, het oppervlak wordt erg warm.
32.
Dit apparaat mag ook worden gebruikt door kinderen van 8 jaar en ouder en
door personen met lichamelijke, zintuiglijke of geestelijke beperkingen of met
gebrek aan ervaring en kennis, op voorwaarde dat zij worden begeleid of geïn-
strueerd over het veilige gebruik van het apparaat en op de hoogte zijn van de
NL NL

20 21
risico’s ervan. Laat kinderen niet spelen met dit apparaat. Reiniging en onder-
houd mogen niet zonder toezicht door kinderen worden uitgevoerd.
33.
Houd het apparaat en het snoer altijd buiten bereik van kinderen jonger dan 8
jaar.
Belangrijk
1. Was de frituurmand en andere bakaccessoires voor het eerste gebruik en na elk gebruik met de
hand. Neem de binnen- en buitenkant van het apparaat af met een vochtige doek en een beetje
afwasmiddel. Zet het apparaat daarna enkele minuten in de voorverwarmstand om eventuele
resten te verwijderen.
2. Wanneer u het apparaat voor de eerste keer gebruikt, kan er rook uitkomen. Dit betekent niet dat
het apparaat defect is. De rook verdwijnt na een paar minuten.
Beveiligd tegen oververhitting
Als er een storing optreedt in de interne temperatuurregeling, verhindert de oververhittingsbeveiliging
de werking van het apparaat. Als dit gebeurt, haalt u de stekker uit het stopcontact. Laat het apparaat
helemaal afkoelen voordat u het opbergt of laat repareren.
Schakelt automatisch uit
Het apparaat schakelt zichzelf automatisch uit wanneer de timer de nul bereikt. U kunt het apparaat
ook handmatig uitzetten met de aan-uitknop. De ventilator blijft nog ongeveer 30 seconden werken om
het apparaat af te koelen.
Elektrische voeding
Als de stroomkring door andere apparaten wordt overbelast, is het mogelijk dat dit apparaat niet naar
behoren werkt. Sluit het apparaat altijd aan op een aparte stroomkring.
Elektromagnetische velden
Dit apparaat voldoet aan alle normen met betrekking tot elektromagnetische velden. Wanneer het
apparaat op de juiste manier en volgens de instructies wordt gebruikt, is het veilig om te gebruiken; dit
is gebaseerd op de huidige beschikbare wetenschappelijke gegevens.
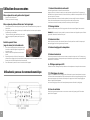
1. Airfryer met bedieningspaneel
Met het bedieningspaneel bedient u de functies van het apparaat.
2. Luchtinlaat
Blokkeer de luchtinlaat NIET wanneer het apparaat in gebruik is.
3. Ventilatieopeningen voor hete lucht
Blokkeer de ventilatieopeningen NIET wanneer het apparaat in
gebruik is.
4. Bakrooster
Dit kan niet alleen worden gebruikt om voedsel te drogen, maar ook
voor het bakken van knapperige snacks of opnieuw opwarmen van
bijvoorbeeld pizza.
5. Frituurmand
Ideaal voor het bereiden van frietjes, geroosterde noten en andere snacks. Gebruik de handgreep om
de mand in het apparaat te plaatsen.
6. Lekrooster
Het apparaat is eenvoudiger schoon te maken als u voor gebruik het lekrooster onderin legt.
Onderdelen en accessoires
457 68
123
NL NL

22 23
7. Draaispies, vorken en schroefjes
Deze kunt u gebruiken voor een braadstuk of een hele kip. Steek de draaispies in de lengte midden
door het vlees. Schuif de vorken op beide uiteinden van de draaispies en in het vlees, en zet ze vast
met de schroeven. De draaispies heeft inkepingen voor de schroeven. U kunt de schroeven meer naar
het midden plaatsen, maar niet te ver naar de uiteinden.
LET OP: Zorg dat het vlees vrij kan ronddraaien in het apparaat. Kip: maximaal 2kg, braadstuk: maxi-
maal 2,5-3kg (afhankelijk van de diameter van het braadstuk, maximaal 15cm).
8. Handgreep
Hiermee kunt u een braadstuk of kip die aan de draaispies is bereid uit het apparaat halen. Plaats de
handgreep onder de draaispies en til het eten voorzichtig uit het apparaat.
LET OP: Pak alle onderdelen uit. Het uiterlijk van de onderdelen kan variëren.
Verwijder doorzichtig of blauw folie van de onderdelen.
Modelnummer .....................................GLA-1006A
Voeding ................................ 220-240V~ 50/60Hz
Nominaal ..................................................... 1800W
Capaciteit ...........................................................12L
Temperatuur: ........................................ 80~200 °C
Display: .....................................LED Touch Screen
Waarschuwing
De vorken, draaispies en andere metalen onderdelen van het
apparaat zijn scherp en worden zeer heet tijdens het gebruik.
Voorkom persoonlijk letsel. Draag altijd ovenwanten.
Specicaties
Het lekrooster onder in het apparaat plaatsen
1. Plaats het lekrooster onder in het apparaat.
2. Hierdoor kunt u het apparaat na gebruik gemakkelijk reinigen.
Het bakrooster in het apparaat plaatsen
1. Plaats het bakrooster in het apparaat door het door de groeven in de zijkant op de rand aan de
achterkant te schuiven.
2. Plaats het rooster dichter bij het bovenste verwarmingselement voor een kortere bereidingstijd en
een knapperig resultaat.
3. Draag altijd ovenwanten wanneer u het bakrooster
beetpakt en het apparaat heet is.
De frituurmand en draaispies uit het
apparaat halen
1. Open de deur van het apparaat om de bereiding te
onderbreken of zet het apparaat uit met de aan-uit-
knop.
2. Steek de handgreep onder de draaispies.
3. Til de rechterkant iets omhoog om de draaispies uit
de inkeping te halen en beweeg naar rechts om de
spies uit de opening aan de linkerkant te schui-
ven.
4. Haal de frituurmand of de draaispies voorzichtig uit het apparaat.
De accessoires gebruiken
Het digitale bedieningspaneel gebruiken
NL NL

24 25
1. Aan-uit-/start-stop
Deze knop licht op wanneer u de stekker van het apparaat in het stopcontact steekt.
Druk eenmaal op deze knop om de verlichting van het bedieningspaneel in te schakelen. Druk nog-
maals op de knop om het bereiden te starten met de standaardinstellingen: 185°C en 15 minuten.
Als u op enig moment tijdens het bakken op de aan-uitknop drukt, gaat het apparaat uit, gaat het dis-
play uit en gaat het lampje in de aan-uitknop na 30 seconden ook uit.
De ventilator blijft nog ongeveer 30 seconden werken om het apparaat af te koelen.
2. Ovenlampje
Druk op deze knop om het lampje in het apparaat aan te doen wanneer het aanstaat.
LET OP: Als u de deur opent tijdens het bakken, wordt de bereiding onderbroken en gaat het ovenlamp-
je aan.
3. Draaiknop
Druk op deze knop om de draaispies te laten draaien. Deze functie kunt u gebruiken bij elk programma.
Het lampje knippert wanneer deze functie actief is.
4. Temperatuur
5. Timer
Met deze knoppen kunt u de bereidingstijd per minuut instellen, variërend van 1 minuut tot 90 minuten.
U kunt deze knop gebruiken in alle standen behalve de droogstand; die werkt met intervallen van 30
minuten en een programmeertijd van 2-24 uur.
6. Leddisplay
Tijdens de bereiding wordt op het display afwisselend de temperatuur en de resterende tijd weergege-
ven.
7-18. Programma’s
Met deze programmaknoppen kunt u een vooraf ingestelde tijd en temperatuur kiezen.
Een programma start automatisch vijf seconden nadat u op de knop drukt. U kunt ook op de startknop
drukken om het geselecteerde programma meteen te starten.
U kunt de instellingen van een programma wijzigen met de timer- en temperatuurknoppen.
8. Ventilator
Dit lampje knippert wanneer het apparaat aanstaat en blijft nog ongeveer 30 seconden knipperen
nadat u het apparaat uitzet.
Standaardprogramma’s
* De bereidingstijd voor een hele gebraden kip is afhankelijk van het gewicht. Met een vleesthermome-
ter kunt u de kerntemperatuur controleren, aan de hand van de volgende tabel.
Temperatuur en tijd zelf instellen
Wanneer u vertrouwd bent met de werking van het apparaat, kunt u zelf verschillende bereidingstijden
en -temperaturen gaan uitproberen.
Programma’s
Programmaknop Temperatuur Timer
7. Frietjes 200ºC 15 min
8. Steak/karbonade 175ºC 25 min
9. Vis 165ºC 15 min
10. Garnalen 160ºC 12 min
11. Pizza 180ºC 15 min
12. Kip 185ºC 40 min
13. Bakken 160ºC 30 min
14. Braadstuk/kip aan
draaispies
190ºC 30 min
15. Drogen 30ºC 2 uur
16. Warmhouden 115ºC 12 min
17. Voorverwarmen 80ºC 5 min
18. Bevroren voedsel 200ºC 20 min
Waarschuwing
Plaats nooit een bakplaat met olie of een andere vloeistof in het
apparaat!
Dit kan brand en lichamelijk letsel tot gevolg hebben.
NL NL

26 27
Eerste gebruik
1. Lees de handleiding en alle waarschuwingsstickers.
2. Verwijder alle verpakkingsmaterialen en eventuele stickers.
3. Was, voordat u eten gaat bereiden, alle onderdelen en accessoires met warm water en zeep.
LET OP: Alleen de accessoires zijn geschikt voor de vaatwasser.
4. Veeg de binnen- en buitenkant van het apparaat schoon met een vochtige doek.
LET OP: Dompel het apparaat nooit onder in water.
LET OP: Plaats nooit een bakplaat met olie of een andere vloeistof in het apparaat. Dit apparaat
werkt uitsluitend met hete lucht.
Klaarmaken voor gebruik
1. Zet het apparaat op een stevige, horizontale en hittebestendige ondergrond.
2. Selecteer de juiste accessoire voor uw recept.
LET OP: Was de frituurmand en andere bakaccessoires vóór het eerste gebruik en na elk gebruik
met de hand. Neem de binnen- en buitenkant van het apparaat af met een vochtige doek en een
beetje afwasmiddel. Zet het apparaat daarna enkele minuten in de voorverwarmstand om eventu-
ele resten te verwijderen.
Geniet van de vele mogelijkheden
Met dit apparaat kunt u vele soorten voedsel bereiden. Raadpleeg de tabellen in deze handleiding voor
de aanbevolen tijd, temperatuur en hoeveelheden.
Gebruiksaanwijzing
Waarschuwing
Zet NOOIT voorwerpen op het apparaat.
Blokkeer NOOIT de ventilatieopeningen aan de boven- en
achterkant van het apparaat.
Plaats NOOIT een bakplaat met olie of een andere vloeistof in het
apparaat. Dit apparaat werkt uitsluitend met hete lucht.
Zet NOOIT een volle frituurmand op de deur van het apparaat, om
te voorkomen dat de deur beschadigt of het apparaat kantelt, wat
lichamelijk letsel tot gevolg kan hebben.
Draag ALTIJD ovenwanten wanneer u het bakrooster beetpakt en
het apparaat heet is.
De airfryer gebruiken
1. Plaats de ingrediënten op het bakrooster, aan de draaispies of in de frituurmand.
2. Plaats het rooster, de draaispies of de frituurmand in het apparaat en sluit de deur. Steek de
stekker in het stopcontact.
3. Druk eenmaal op de aan-uitknop.
4. Selecteer een programma of stel zelf een tijd en temperatuur in.
5. Wanneer u op een van de programmaknoppen drukt, wordt het programma automatisch na een
paar seconden gestart. U kunt ook zelf een tijd en temperatuur instellen en vervolgens op de
aan-uitknop drukken om het apparaat aan te zetten.
LET OP: U kunt op ieder moment de deur openen om de voortgang van de bereiding te controle-
ren.
LET OP: Raadpleeg de tabellen in deze handleiding voor de juiste instellingen.
Tips
• Kleinere etenswaren hoeven meestal minder lang te worden bereid dan grotere.
• De bereidingstijd voor grotere hoeveelheden is slechts iets langer dan die voor kleinere hoeveel-
heden.
• Draai kleinere etenswaren halverwege de bereidingstijd om voor gelijkmatige verhitting.
• Spray een beetje plantaardige olie op verse aardappelen voor een knapperig resultaat. Doe dit vlak
voordat u het apparaat aanzet.
• Snacks die u normaal gesproken in de oven bereidt, kunnen ook worden klaargemaakt in de
airfryer.
• Met kant-en-klaar deeg kunt u snel gevulde snacks maken. Kant-en-klaar deeg is bovendien
eerder gaar dan zelfgemaakt deeg.
• Plaats een bakplaat of ovenschaal in het apparaat voor het bereiden van een cake of quiche, of
voor het bereiden van kwetsbare of gevulde etenswaren.
Belangrijk
Klaargemaakt of heet eten uit het apparaat halen
Gebruik de handgreep en ovenwanten om heet eten uit het apparaat te halen. De handgreep is ook
bedoeld voor het vastpakken van de draaispies.
Gebruiksaanwijzing
Waarschuwing
Tijdens het bereiden van eten worden de frituurmand en andere accessoires erg
heet. Als u de frituurmand uit het apparaat haalt om te controleren of het eten
klaar is, zet het dan op een onderzetter of een ander hittebestendig oppervlak. Zet
de frituurmand NOOIT zonder onderzetter op een aanrecht of tafel.
De accessoires worden erg heet tijdens het gebruik. Draag ovenwanten en wees
voorzichtig om LETSEL TE VOORKOMEN.
NL NL

28 29
Instellingen
Raadpleeg de volgende tabel om de juiste temperatuur en tijd te selecteren voor de beste resultaten.
Naarmate u meer vertrouwd raakt met het apparaat, kunt u de instellingen aanpassen aan uw per-
soonlijke voorkeur.
Instellingen voor het bereiden van eten
Voedsel Min-Max Timer Temperatuur Opmerking
Franse frietjes 160-400g 15-16 min 200ºC
Vlaamse frieten 160-400g 15-20 min 200ºC
Zelfgemaakte
frieten
160-420g 10-16 min 200ºC Voeg een halve
eetlepel olie toe
Zelfgemaakte
aardappelpartjes
160-420g 18-22 min
185ºC
Voeg een halve
eetlepel olie toe
Zelfgemaakte
aardappelblokjes
160-400g 12-18 min
185ºC
Voeg een halve
eetlepel olie toe
Aardappelkoekjes 130g 15-18 min 185ºC
Gegratineerde
aardappel
250g 15-18 min 200ºC
Biefstuk 120–500g 8-12 min 185ºC
Karbonade 120–500g 10-14 min 185ºC
Hamburger 120–500g 7-14 min 185ºC
Worstenbroodjes 120–500g 13-15 min 200ºC
Kipdrumsticks 120–500g 18-22 min 185ºC
Voedsel Min-Max Timer Temperatuur Opmerking
Kiplet 120–500g 10-15 min 185ºC
Loempia's 120–350g 15-20 min 200ºC Gebruik product
dat geschikt is
voor ovenberei-
ding
Kipnuggets (diep-
vries)
120–500g 10-15 min 200ºC Gebruik product
dat geschikt is
voor ovenberei-
ding
Vissticks (diep-
vries)
120–500g 6-10 min 200ºC Gebruik product
dat geschikt is
voor ovenberei-
ding
Mozzarellasticks 120–500g 8-10 min 185ºC Gebruik product
dat geschikt is
voor ovenberei-
ding
Gevulde groente 120–500g 10 min 160ºC
Cake 160g 20-25 min 160ºC Gebruik een
bakplaat
Quiche 200g 20-22 min 185ºC Gebruik een
bakplaat of oven-
schaal
Muns 160g 15-18 min 200ºC Gebruik een
bakplaat
Zoete snacks 200g 20 min 160ºC Gebruik een
bakplaat of oven-
schaal
Uienringen (diep-
vries)
450g 15 min 200ºC
LET OP: Deze instellingen zijn een indicatie. Omdat oorsprong, grootte, vorm en merk van de ingredi-
enten invloed hebben op de bereiding, kunnen de optimale instellingen variëren.
Tips
Stel de timer in op de helft van de totale bereidingstijd. Het belletje attendeert u erop dat het tijd is om
het eten om te draaien. Wanneer u het belletje hoort, is de ingestelde tijd verstreken.
Als u het apparaat niet voorverwarmt, telt u 3 minuten bij de bereidingstijd op.
NL NL

30 31
Reinigen
Maak het apparaat schoon na elk gebruik. De frituurmand en andere accessoires zijn gemaakt van
duurzaam roestvrij staal en zijn geschikt voor de vaatwasser. Gebruik nooit een schuurmiddel of
schuurspons om ze schoon te maken. Vastzittende etensresten kunt u losweken in warm water met
afwasmiddel.
Haal de stekker uit het stopcontact en laat het apparaat helemaal afkoelen voordat u het schoon-
maakt.
1. Neem de buitenkant van het apparaat af met een vochtige doek en een beetje afwasmiddel.
2. Open de deur om het glas te reinigen.
3. Reinig de binnenkant van het apparaat met warm water, afwasmiddel en een zacht sponsje.
4. Verwijder etensresten van het bovenste rooster met een borstel.
Opbergen
1. Haal de stekker uit het stopcontact en laat het apparaat helemaal afkoelen.
2. Zorg dat alle onderdelen schoon en droog zijn.
3. Bewaar het apparaat op een koele, droge plaats.
Reinigen en opbergen
Afvalverwerking
Het symbool van een doorgekruiste afvalbak geeft aan dat de Europese
Richtlijn 2012/19/EU van toepassing is op dit apparaat. Die schrijft voor dat
dit apparaat aan het einde van zijn levensduur niet mag worden weggegooid
bij het huishoudelijke afval, maar moet worden ingeleverd bij een inzamello-
catie, recyclingpunt of afvalverwijderingsbedrijf.
Problemen/storingen oplossen
Probleem Mogelijke oorzaak Oplossing
Het apparaat functioneert niet. De stekker zit niet in het stop-
contact.
Steek de stekker in het stop-
contact.
U hebt geen tijd en temperatuur
ingesteld.
Stel temperatuur en tijd in. Con-
troleer of de deur gesloten is.
Het eten is niet gaar. De frituurmand is te vol. Bereid kleinere porties voor
gelijkmatige verhitting.
De temperatuur is te laag. Stel een hogere temperatuur en
langere bereidingstijd in.
Het eten is niet gelijkmatig
gegaard.
Sommige etenswaren moeten
halverwege de bereidingstijd
worden omgedraaid.
Raadpleeg de instructies op
pagina 12.
Er komt witte rook uit het
apparaat.
Er is te veel olie gebruikt. Verwijder overtollige olie.
De accessoires zijn nog vet van
eerdere bereidingen.
Reinig de frituurmand na elk
gebruik.
Franse frietjes zijn niet gelijkma-
tig gaar.
U hebt niet de juiste aardappel-
soort gebruikt.
Gebruik verse, vastkokende
aardappelen.
De aardappelen zijn niet op de
juiste wijze voorbereid.
Snijd de aardappels in frieten,
blancheer ze en dep ze droog
om zetmeelresten te verwijde-
ren.
Frieten zijn niet knapperig. Ongekookte frieten bevatten te
veel water.
1.Droog de frieten goed af
voordat u ze met olie besproeit.
Snijd kleinere frieten. Gebruik
een klein beetje meer olie.
2.Snijd de aardappels in frieten,
blancheer ze en dep ze droog
om zetmeelresten te verwijde-
ren.
Code op display Mogelijke oorzaak Oplossing
E1 Storing in temperatuursensor. Bel de klantenservice.
E2 Kortsluiting in temperatuursen-
sor.
Bel de klantenservice.
NL NL

32 33
veiller à ce que la che soit correctement insérée dans la prise murale. Ne
jamais brancher d’autres appareils sur la même prise.
5.
Pour éviter que les aliments n’entrent en contact avec l’intérieur du haut de
l’appareil et le bloc chauffant, NE PAS TROP REMPLIR le panier à friture.
6.
NE PAS RECOUVRIR les orices d’admission ou d’évacuation d’air lorsque l’ap-
pareil fonctionne. Cela empêcherait une cuisson uniforme et pourrait endom-
mager l’appareil ou entraîner une surchauffe.
7.
Ne JAMAIS verser d’huile dans le panier à friture. Cela pourrait entraîner un
incendie et des blessures corporelles.
8.
Pendant la cuisson, la température interne de l’appareil atteint plusieurs cen-
taines de degrés Celsius. POUR ÉVITER DE SE BLESSER, ne jamais mettre les
mains à l’intérieur de l’appareil avant qu’il ne soit complètement refroidi.
9.
Cet appareil NE DOIT PAS ÊTRE UTILISÉ par les personnes aux capacités
physiques, sensorielles ou mentales réduites, ou n’ayant pas susamment
d’expérience ou de connaissances, à moins qu’elles soient surveillées ou aient
été instruites du mode d’emploi de l’appareil par une personne responsable de
leur sécurité. Cet appareil NE DOIT PAS ÊTRE UTILISÉ par les enfants.
10.
En cours de cuisson, NE PAS PLACER l’appareil contre un mur ou d’autres
appareils. Ménager au moins 12 cmd’espace libre à l’arrière, sur les côtés et
au-dessus de l’appareil. Ne rien placer sur le dessus de l’appareil.
11.
NE PAS UTILISER l’appareil si la che, le cordon d’alimentation ou l’appareil
lui-même est endommagé d’une quelconque façon.
12.
Ne PAS PLACER l’appareil sur le dessus d’une cuisinière.
13.
Si le cordon d’alimentation est endommagé, LE FAIRE REMPLACER par le
fabricant, son responsable SAV ou une personne possédant des qualications
identiques an d’éviter tout danger.
14.
Tenir l’appareil et son cordon d’alimentation HORS DE PORTÉE des enfants
lorsqu’il fonctionne ou est encore chaud.
15.
LE CORDON D’ALIMENTATION NE DOIT JAMAIS ÊTRE EN CONTACT avec des
surfaces chaudes. TOUJOURS avoir les mains bien sèches lors du branche-
ment du cordon d’alimentation ou de l’activation des commandes.
16.
NE JAMAIS BRANCHER cet appareil sur une prise avec timer ou télécom-
mandée par un système à part.
PRÉCAUTIONS IMPORTANTES
Toujours observer les précautions de sécurité de base lors de l’utilisation d’ap-
pareils électriques, notamment les suivantes:
1.
NE JAMAIS IMMERGER l’appareil car il renferme des composants électriques
et des éléments chauffants. Ne pas le rincer sous le robinet.
2.
POUR ÉVITER LES CHOCS ÉLECTRIQUES, NE PAS verser de liquide dans
l’unité principale.
3.
Cet appareil est équipé d’une prise de terre de type VDE. Pour RÉDUIRE LE
RISQUE DE CHOC ÉLECTRIQUE, si la che ne s’insère pas correctement dans
la prise, inversez la che. Si elle ne rentre toujours pas, contactez un électri-
cien qualié. NE JAMAIS ESSAYER de modier la che de quelque façon que
ce soit.
4.
S’ASSURER que l’appareil est branché sur une prise murale dédiée. Toujours
FR FR
Conservez ces instructions – Réservé à un usage domestique
Toujours observer les précautions de sécurité de base lors de
l’utilisation d’appareils électriques. Ne pas utiliser l’appareil avant
d’avoir lu attentivement ce manuel.
IMPORTANT:
AVANT D’UTILISER CET APPAREIL POUR LA PREMIÈRE FOIS,
PRÉCHAUFFEZ-LE À 200°C PENDANT 10 MINUTES POUR BRÛLER
LE FILM GRAS PROTECTEUR. IL EST NORMAL QU’UN PEU DE
FUMÉE APPARAISSE.

34 35
FR FR
17.
NE JAMAIS UTILISER cet appareil avec une rallonge électrique de quelque
type que ce soit.
18.
NE PAS FAIRE FONCTIONNER l’appareil sur ou à proximité d’objets pouvant
prendre feu tels que nappes ou rideaux.
19.
NE PAS UTILISER l’appareil à des ns autres que celles décrites dans le pré-
sent manuel.
20.
NE JAMAIS LAISSER l’appareil sans surveillance lorsqu’il fonctionne.
21.
En cours de cuisson, de l’air s’échappe par les orices d’aération. NE PAS
APPROCHER LES MAINS NI LE VISAGE de ces orices. Se tenir également à
distance de l’air chaud s’échappant lorsque vous retirez le panier à friture de
l’appareil. L’extérieur de l’appareil peut être très chaud en cours d’utilisation. Le
panier à friture EST TRÈS CHAUD. Porter des GANTS DE CUISINE ISOTHER-
MES ou utiliser l’accessoire de préhension pour manipuler les accessoires ou
toucher les surfaces étant encore très chauds.
22.
Si une fumée noire s’échappe de l’appareil, débrancher IMMÉDIATEMENT l’ap-
pareil et attendre qu’il ne fume plus avant de retirer le contenu de la friteuse.
23.
L’arrêt de la minuterie entraîne l’arrêt de la cuisson mais le ventilateur continue
de fonctionner pendant 30 secondes pour refroidir l’appareil.
24.
Toujours faire fonctionner l’appareil sur une surface horizontale, plane, stable
et ne pouvant pas prendre feu.
25.
Cet appareil est strictement réservé à un usage domestique normal. Il n’est
pas destiné à être utilisé dans un commerce ou pour la vente au détail.
26.
Si l’appareil est utilisé de manière inappropriée, à des ns (semi-)profession-
nelles ou de façon non conforme aux instructions du manuel d’utilisation, la
garantie devient caduque et le fabricant ne pourra être tenu responsable des
dommages.
27.
Toujours débrancher l’appareil après utilisation.
28.
Laisser refroidir l’appareil pendant environ 30 minutes avant de le manipuler,
de le nettoyer ou de le ranger.
29.
S’assurer que les ingrédients préparés dans cet appareil sortent cuits en
ayant une coloration jaune doré plutôt que foncée ou brune. Enlevez les restes
calcinés.
30.
Attention, surface chaude!
31.
Cet appareil peut être utilisé par des enfants à partir de 8 ans et des person-
nes aux capacités physiques, sensorielles ou mentales réduites, ou n’ayant
pas susamment d’expérience ou de connaissances, si elles sont surveil-
lées ou ont été instruites du mode d’emploi de l’appareil par une personne
responsable et si elles ont compris les dangers encourus. Ne pas laisser les
enfants jouer avec l’appareil. Le nettoyage et l’entretien ne doivent pas être
effectués par des enfants sans surveillance.
32.
Tenir l’appareil et le cordon d’alimentation hors de portée des enfants de
moins de 8ans.
Important
1. Avant la première utilisation et après chaque utilisation, laver à la main le panier à friture et les au-
tres accessoires de cuisson. Essuyer ensuite l’intérieur et l’extérieur de l’appareil avec un chiffon
légèrement imbibé d’eau chaude ajoutée d’un détergent doux. Pour nir, mettre l’appareil pendant
quelques minutes en préchauffage an de brûler tout résidu.
2. Le couvercle de l’appareil peut fumer lors de la première utilisation. Cela ne signie pas qu’il est
défectueux. La fumée se dissipe en quelques minutes.
Protection anti-surchauffe
En cas de défaillance du système de réglage de la température interne, le système de protection cont-
re la surchauffe est activé et empêche l’appareil de fonctionner. En pareil cas, débrancher le cordon
d’alimentation. Laisser l’appareil refroidir complètement avant de le faire réparer ou de le ranger.
Coupure automatique
L’appareil est équipé d’un dispositif de coupure intégré qui arrête automatiquement l’appareil dès que la
minuterie est à zéro. L’appareil peut aussi être coupé manuellement en activant le bouton de marche.
Le ventilateur continue de fonctionner pendant 30 secondes pour refroidir l’appareil.
Alimentation électrique
S’il est branché sur un circuit électrique sursollicité par d’autres appareils, l’appareil pourrait ne pas
fonctionner correctement. Il doit être branché à un circuit électrique dédié.
Champs électromagnétiques
Cet appareil est conforme à toutes les normes relatives aux champs électromagnétiques. Moyennant
manipulation correcte et conforme aux instructions du présent manuel d’utilisation, l’utilisation de
l’appareil est sûre eu égard aux connaissances scientiques actuellement disponibles.

36 37
FR FR
1. Corps de l’appareil avec panneau de com-
mande
Permet de contrôler les fonctions de l’appareil.
2. Orices d’admission d’air
NE PAS RECOUVRIR les orices d’admission d’air lorsque l’appareil
fonctionne.
3. Orices de sortie d’air chaud
NE PAS RECOUVRIR les orices de sortie d’air lorsque l’appareil
fonctionne.
4. Plateau à friture
Peut être utilisé non seulement pour la dessiccation, mais aussi
pour cuire des en-cas croustillants ou réchauffer des aliments comme la pizza.
5. Panier à friture (cage de cuisson)
Idéal pour frites, noix grillées et autres snacks. Utiliser l’accessoire de préhension pour le placer dans
l’appareil.
Pièces et accessoires
457 68
123
6. Plateau anti-gouttes
Se place au fond du corps de l’appareil pour faciliter le nettoyage.
7. Tournebroche, fourches et vis
S’utilise pour cuire un rôti ou un poulet entier. Piquer le tournebroche au milieu de la pièce de viande à
cuire, sur toute la longueur. Enler les fourches sur le tournebroche et les piquer dans les deux extré-
mités de la pièce de viande, puis les verrouiller en place à l’aide des vis. Le tournebroche est pourvu
de crénelures pour les vis. Ajuster l’emplacement des fourches en les rapprochant plutôt qu’en les
écartant vers les extrémités.
REMARQUE: Veiller à ne pas choisir un rôti ou un poulet trop gros, an qu’il puisse tourner sans gêne
dans le four. Poulet: max. 2kg, rôti: max. 2,5-3kg (selon le diamètre de la viande: jusqu’à 15cm de
diamètre).
8. Accessoire de préhension
Sert à retirer les rôtis et les poulets cuits préparés en mode rôtissoire. Le placer sous le tournebroche
et soulever avec précaution pour sortir les aliments de l’appareil.
REMARQUE: Déballer le contenu de l’emballage. Il peut varier en fonction du modèle.
Retirer tout lm protecteur transparent ou bleu encore présent.
Numéro de modèle: ............................GLA-1006A
Alimentation électrique .... 220-240V~ 50/60Hz
Puissance ....................................................1800W
Contenance........................................................12L
Température ......................................... 80~200 °C
Achage .................................Écran tactile à LED
Attention
Les fourches, brochettes et autres pièces métalliques de cet
appareil peuvent blesser et deviennent extrêmement chaudes
pendant l’utilisation.
Faire très attention en les manipulant. Portez des gants de cuisine
isothermes ou des maniques.
Caractéristiques
techniques de l’appareil

38 39
FR FR
Mise en place du bac anti-gouttes dans l’appareil
1. Se place au fond de l’appareil.
2. S’utilise pour faciliter le nettoyage.
Mise en place du plateau à friture dans l’unité principale
1. Placer le plateau à friture dans l’appareil en la glissant dans les rainures latérales et jusque sur la
butée arrière.
2. En la glissant plus haut, et plus près du corps de chauffe supérieur, la cuisson est plus rapide et
les aliments plus croustillants.
3. Toujours utiliser des gants isothermes ou des mani-
ques pour manipuler le plateau quand l’appareil est
chaud.
Retrait du panier à friture
(cage de cuisson) et du tournebroche
1. Ouvrir la porte de l’appareil pour interrompre le cycle
de cuisson ou éteindre l’appareil en appuyant sur le
bouton de marche.
2. Insérer l’accessoire de préhension sous le tourne-
broche.
3. Relever légèrement le côté droit de l’accessoire de
préhension pour dégager le crochet, puis relever la droite jusqu’à ce que le côté gauche du tourne-
broche sorte de la douille d’entraînement du tournebroche.
4. Sortir délicatement le panier à friture ou le tournebroche de l’appareil.
1. Bouton d’alimentation/marche-arrêt
Une fois l’appareil branché, le bouton de marche s’allume.
Appuyer une fois sur le bouton de marche pour que le panneau complet s’allume. En appuyant une
deuxième fois sur le bouton de marche, la cuisson s’amorce par défaut à une température de 185°C et
pour une durée de 15 minutes.
Une nouvelle activation du bouton de marche pendant la cuisson entraîne l’extinction de l’appareil:
l’écran s’éteint immédiatement et le témoin lumineux s’éteint dans les 30 secondes.
Le ventilateur continue à fonctionner pendant 30 secondes pour refroidir l’appareil.
2. Éclairage intérieur
Appuyer sur cette touche pour vérier la progression de la cuisson quand l’appareil est en marche.
REMARQUE: L’ouverture de la porte pendant le processus de cuisson met l’appareil en pause. L’éclaira-
ge intérieur s’allume dès l’ouverture de la porte.
3. Bouton de rotation
Utiliser ce bouton en cas de choix du mode rôtissoire. Ce mode peut être combiné à n’importe quel
autre préréglage. Une icône clignote lorsqu’il est activé.
4. Boutons de réglage de la température
5. Boutons de minuterie
Ces boutons permettent de sélectionner en minutes un temps de cuisson entre 1 et 90 minutes pour
tous les modes de cuisson, à l’exception du temps de dessiccation qui fonctionne par intervalles de 30
minutes entre 2 et 24 heures.
6. Achage numérique à LED
Pendant la cuisson, l’achage numérique alterne entre la température et le temps de cuisson restant.
7-18. Préréglages de cuisson
Appuyer sur l’une des touches de préréglage pour sélectionner le temps et la température de cuisson.
La cuisson démarre automatiquement cinq secondes après la sélection du programme préréglé. Vous
pouvez aussi appuyer sur le bouton de marche après avoir appuyé sur le bouton de préréglage pour
démarrer l’appareil immédiatement.
Les boutons de réglage de l’heure et de la température permettent d’annuler les préréglages.
8. Icône de ventilateur
Cette icône clignote lorsque la cuisson est en cours et continue de clignoter jusqu’à 30 secondes
après l’arrêt de l’appareil.
Utilisation des accessoires
Utilisation du panneau de commande numérique
Strona jest ładowana ...
Strona jest ładowana ...
Strona jest ładowana ...
Strona jest ładowana ...
Strona jest ładowana ...
Strona jest ładowana ...
Strona jest ładowana ...
Strona jest ładowana ...
Strona jest ładowana ...
Strona jest ładowana ...
Strona jest ładowana ...
Strona jest ładowana ...
Strona jest ładowana ...
Strona jest ładowana ...
Strona jest ładowana ...
Strona jest ładowana ...
Strona jest ładowana ...
Strona jest ładowana ...
Strona jest ładowana ...
Strona jest ładowana ...
Strona jest ładowana ...
Strona jest ładowana ...
Strona jest ładowana ...
Strona jest ładowana ...
Strona jest ładowana ...
Strona jest ładowana ...
Strona jest ładowana ...
Strona jest ładowana ...
Strona jest ładowana ...
Strona jest ładowana ...
Strona jest ładowana ...
Strona jest ładowana ...
Strona jest ładowana ...
Strona jest ładowana ...
Strona jest ładowana ...
Strona jest ładowana ...
Strona jest ładowana ...
Strona jest ładowana ...
Strona jest ładowana ...
Strona jest ładowana ...
Strona jest ładowana ...
Strona jest ładowana ...
Strona jest ładowana ...
-
 1
1
-
 2
2
-
 3
3
-
 4
4
-
 5
5
-
 6
6
-
 7
7
-
 8
8
-
 9
9
-
 10
10
-
 11
11
-
 12
12
-
 13
13
-
 14
14
-
 15
15
-
 16
16
-
 17
17
-
 18
18
-
 19
19
-
 20
20
-
 21
21
-
 22
22
-
 23
23
-
 24
24
-
 25
25
-
 26
26
-
 27
27
-
 28
28
-
 29
29
-
 30
30
-
 31
31
-
 32
32
-
 33
33
-
 34
34
-
 35
35
-
 36
36
-
 37
37
-
 38
38
-
 39
39
-
 40
40
-
 41
41
-
 42
42
-
 43
43
-
 44
44
-
 45
45
-
 46
46
-
 47
47
-
 48
48
-
 49
49
-
 50
50
-
 51
51
-
 52
52
-
 53
53
-
 54
54
-
 55
55
-
 56
56
-
 57
57
-
 58
58
-
 59
59
-
 60
60
-
 61
61
-
 62
62
-
 63
63


bluMill GLA-1006A Instrukcja obsługi
- Kategoria
- Frytownice
- Typ
- Instrukcja obsługi
w innych językach
- español: bluMill GLA-1006A Manual de usuario
- italiano: bluMill GLA-1006A Manuale utente
- Deutsch: bluMill GLA-1006A Benutzerhandbuch
- svenska: bluMill GLA-1006A Användarmanual
- français: bluMill GLA-1006A Manuel utilisateur
- Nederlands: bluMill GLA-1006A Handleiding
Inne dokumenty
-
Emerio AF-128121 Instrukcja obsługi
-
BLACK DECKER BXAFO1200E Instrukcja obsługi
-
Beko FRL 5388 B Instrukcja obsługi
-
Silvercrest SHFD 1400 B2 Digital Air Fryer Instrukcja obsługi
-
Zelmer ZAF3550 Instrukcja obsługi
-
Zelmer ZAF3551W Instrukcja obsługi
-
Zelmer ZAF5500B Instrukcja obsługi
-
Emerio AF-123544 Instrukcja obsługi
-
-
Emerio AF-127778 Instrukcja obsługi