
ZAF3550
INSTRUKCJE UŻYTKOWANIA
Frytkownica beztłuszczowa
ИНСТРУКЦИЯ ПО ПРИМЕНЕНИЮ
Фритюрница
NÁVOD K POUŽITÍ
Horkovzdušná fritéza
ИНСТРУКЦИИ ЗА УПОТРЕБА
Въздушен фритюрник
NAVODILA ZA UPORABO
Teplovzdušná fritéza
ІНСТРУКЦІЯ ПО ЗАСТОСУВАННЮ
повітрянa фритюрниця
USER MANUAL
Air fryer
BENUTZERHANDBUCH
Heißluftfritteuse
HASZNÁLATI UTASÍTÁS
Air Fryer
INSTRUCȚIUNI DE UTILIZARE
Friteuza cu aer cald
PL
EN
DE
CZ
SK
HU
RO
RU
UA
BG
ZAF3550

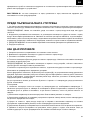
2
1
2
3
4
5
6
2
3
9 7 4
8
10

3
PL
PL
DZIĘKUJEMY ZA WYBÓR MARKI ZELMER. ŻYCZYMY SATYSFAKCJI Z UŻYTKOWANIA URZĄDZENIA.
OSTRZEŻENIE
PRZED UŻYCIEM PRODUKTU NALEŻY UWAŻNIE PRZECZYTAĆ INSTRUKCJĘ UŻYTKOWANIA.
PRZECHOWUJ JĄ W BEZPIECZNYM MIEJSCU DO WYKORZYSTANIA W PRZYSZŁOŚCI.
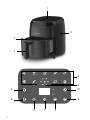
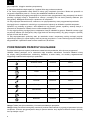
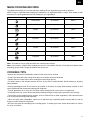
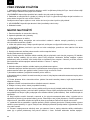
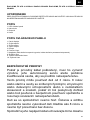
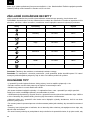
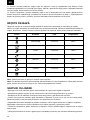
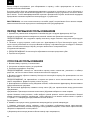
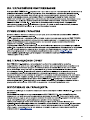
OPIS
1. Panel sterowania LED
2. Korpus główny
3. Uchwyt
4. Kosz
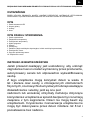
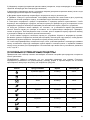
OPIS PANELU STEROWANIA
1. Panel wyświetlacza
2. Zwiększanie temperatury
3. Zmniejszanie temperatury
4. Wybór programu
5. Przepis
6. Ikona pracy
7. Zasilanie (długie naciśnięcie włącz/wyłącz, krótkie naciśnięcie pauza/start)
8. Zmniejszenie czasu
9. Przycisk opóźnionego startu
10. Zwiększenie czasu
INSTRUKCJE BEZPIECZEŃSTWA
Jeżeli przewód zasilający jest uszkodzony, aby uniknąć
zagrożenia musi on zostać wymieniony przez producenta,
autoryzowany serwis lub odpowiednio wykwalikowaną
osobę.
Z tego urządzenia mogą korzystać dzieci w wieku 8
lat i starsze oraz osoby o zmniejszonych zdolnościach
zycznych, czuciowych lub umysłowych lub nieposiadające
doświadczenia i wiedzy, jeśli są one pod
nadzorem lub wcześniej otrzymały instrukcje dotyczące
korzystania z urządzenia w sposób bezpieczny i rozumieją
związane z tym zagrożenia. Dzieci nie mogą bawić się
urządzeniem. Czyszczenie i konserwacja urządzenia nie
mogą być dokonywane przez dzieci młodsze niż 8 lat i
pozostawione bez nadzoru.

4
PL
PL
Urządzenie i kabel zasilający trzymaj poza zasięgiem
dzieci w wieku poniżej 8 lat.
Urządzenie nie jest przeznaczone do pracy z użyciem
zewnętrznych wyłączników czasowych lub oddzielnego
układu zdalnej regulacji.
Odłączaj urządzenie od zasilania, jeżeli nie jest ono
używane, a także przed jego czyszczeniem. Przed
założeniem lub zdjęciem części oraz czyszczeniem
urządzenia należy pozostawić je do ostygnięcia. Nie
należy zanurzać urządzenia w wodzie ani w żadnym
innym płynie.
Urządzenie jest przeznaczone do użytku na maksymalnej
wysokości 2000m n.p.m.
WAŻNE OSTRZEŻENIA
To urządzenie jest przeznaczone wyłącznie do użytku domowego i w żadnym wypadku nie powinno być
wykorzystywane do użytku komercyjnego lub przemysłowego.
Nieprawidłowe użycie lub niewłaściwe obchodzenie się z urządzeniem spowoduje unieważnienie gwarancji.
Przed podłączeniem urządzenia do sieci sprawdź, czy napięcie zasilania jest takie samo, jak wskazane na
tabliczce znamionowej urządzenia.
Umieść urządzenie na płaskiej i równej powierzchni.
W trakcie korzystania z urządzenia przewód zasilający nie może być zaplątany ani owinięty wokół
urządzenia.
Nie używaj, nie podłączaj ani nie odłączaj urządzenia od sieci, mając mokre dłonie i/lub stopy. Nie ciągnij za
przewód zasilający w celu odłączenia urządzenia. Nie używaj przewodu jako uchwytu.
WAŻNE Podczas korzystania urządzenia należy zachować co najmniej dziesięć centymetrów wolnej
przestrzeni po wszystkich jego stronach, aby umożliwić odpowiednią cyrkulację powietrza.
NIE umieszczaj urządzenia pod szafkami, za żaluzjami lub zasłonami. Ryzyko przegrzania / pożaru.
Nie przykrywaj żadnej części urządzenia szmatką lub podobnym materiałem, ponieważ spowoduje to
przegrzanie. Ryzyko pożaru.
To jest FRYTKOWNICA BEZTŁUSZCZOWA AIR FRYER. Do przygotowania produktów wymaga niewielkiej
ilość oleju. Nie napełniaj pojemnika olejem lub tłuszczem, ponieważ może to spowodować zagrożenie
pożarowe.
Nie używaj z urządzeniem akcesoriów innych niż zalecane przez producenta.
Zawsze zakładaj ochronne, izolowane rękawice kuchenne podczas wkładania lub wyjmowania rzeczy z
frytkownicy.
Z urządzenia korzystaj na płaskiej, stabilnej i odpornej na ciepło powierzchni. Przy pierwszym użyciu
frytkownicy Air Fryer może się pojawić delikatny nieprzyjemny zapach lub niewielka ilość dymu. Jest to
normalne w przypadku nowych urządzeń po procesie produkcji.
Zawsze umieszczaj składniki przeznaczone do smażenia w koszyku, aby zapobiec ich kontaktowi z
elementami grzejnymi.

5
PL
PL
W przypadku jakiejkolwiek awarii lub uszkodzenia natychmiast odłącz urządzenie od sieci i skontaktuj się
z autoryzowanym działem wsparcia technicznego. Nie otwieraj obudowy urządzenia, ponieważ grozi to
niebezpieczeństwem. Jedynie wykwalikowany personel z ocjalnego działu wsparcia technicznego marki
może przeprowadzać naprawy lub procedury na urządzeniu.
Firma Eurogama Sp. z o.o. nie ponosi odpowiedzialności za jakiekolwiek szkody, które mogą wystąpić na
osobach, zwierzętach lub przedmiotach z powodu nieprzestrzegania tych ostrzeżeń.
PRZED PIERWSZYM UŻYCIEM
1. Usuń wszystkie materiały opakowaniowe i naklejki wewnątrz i na zewnątrz urządzenia Air Fryer.
Delikatnie wytrzyj powierzchnię zewnętrzną wilgotną szmatką lub ręcznikiem papierowym.
OSTRZEŻENIE: Nie zanurzaj urządzenia ani wtyczki przewodu zasilającego w wodzie ani w żadnym innym
płynie.
2. Pociągnij za uchwyt kosza, aby wyjąć go z urządzenia Air Fryer. Aby wyjąć tackę użyj uchwytu
znajdującego się w jej środkowej części Umyj kosz i tackę wewnątrz i na zewnątrz używając gąbki i ciepłej
wody z mydłem. Kosz i tackę można myć na górnej półce
zmywarki.
3. OSTRZEŻENIE: Nie używaj szorstkich środków do czyszczenia ani ściereczek do szorowania.
4. Dokładnie osusz.
SPOSÓB UŻYCIA
1. Podłącz wtyczkę do uziemionego gniazdka ściennego.
2. Ostrożnie wyciągnij kosz z urządzenia.
3. Włóż składniki do koszyka.
OSTRZEŻENIE: Nigdy nie napełniaj kosza powyżej ilości podanej w tabeli receptur, ponieważ może to
mieć wpływ na jakość produktów końcowych.
4. Wsuń kosz z powrotem do urządzenia. Nigdy nie używaj kosza bez umieszczonej na nim tacy na
żywność.
OSTRZEŻENIE: Nie dotykaj kosza w trakcie i po zakończeniu użytkowania, ponieważ bardzo się nagrzewa.
Kosz łap tylko za uchwyt.
5. Naciśnij i przytrzymaj przycisk zasilania, aby włączyć urządzenie.
Korzystanie z programów wstępnie ustawionych:
Przy włączonej frytownicy, naciśnij przycisk menu (M), aby przełączać się pomiędzy różnymi programami.
Po każdym naciśnięciu przycisku menu (M), tryb jest wybierany od lewej do prawej strony. Naciśnij przycisk
zasilania, aby wybrać żądany tryb i rozpocząć gotowanie. Każdy tryb ma przypisany czas i temperaturę.
Aby je zmienić, można nacisnąć przyciski +/- czas i +/- temperatura przed naciśnięciem przycisku zasilania.
6. Nacisnąć przycisk regulacji temperatury do uzyskania żądanej temperatury..
7. Nacisnąć przycisk dotykowy timera, aby ustawić wymagany czas przygotowania, nacisnąć krótko
przycisk dotykowy power
aby rozpocząć gotowanie, logo robocze zaświeci się i obróci.
1) Lampka kontrolna wentylatora (zewnętrzna biała lampka) świeci się i obraca;
2) Lampka kontrolna ciepła (środkowa czerwona lampka) świeci się, do czasu ustawionej temperatury lub
gdy temperatura spadła;
3) Frytownica przestaje się nagrzewać, a lampka wskaźnika ciepła (środkowa czerwona lampka) gaśnie

6
PL
PL
gdy urządzenie osiągnie ustawioną temperaturę.
4) Lampka wskaźnika ciepła zapali się i zgaśnie kilka razy podczas smażenia.
8. Do czasu przygotowania należy dodać 3 minuty, gdy urządzenie jest zimne. Można też pozwolić na
rozgrzanie urządzenia przez ok. 4 minuty bez wkładania składników do środka.
9. Niektóre składniki wymagają potrząśnięcia w połowie czasu przygotowania. Aby potrząsnąć lub obrócić
produkty, wyciągnij koszyk z urządzenia za uchwyt i potrząśnij nim lub obróć produkty widelcem (lub
szczypcami). Następnie włóż koszyk z powrotem do urządzenia.
10. Gdy usłyszysz dzwonek timera, oznacza to, że upłynął ustawiony czas przygotowania produktów.
Wyciągnij kosz z urządzenia i umieścić go na powierzchni odpornej na działanie wysokich temperatur.
Sprawdź, czy produkty są gotowe. Jeśli składniki nie są jeszcze gotowe, wystarczy wsunąć koszyk z
powrotem do urządzenia i ustawić timer na kilka dodatkowych minut.
11. Aby wyjąć produkty, wyciągnij kosz z urządzenia. Koszyk i składniki są gorące. Składniki możesz wyjąć
za pomocą widelca (lub szczypców). Aby wyjąć duże lub kruche produkty, użyj pary szczypiec. Opróżnij
koszyk do miski lub na talerz.
12. Aby zaprogramować opóźniony start, po ustawieniu czasu i temperatury, należy nacisnąć przycisk
opóźnionego startu (9) i wybrać żądany czas za pomocą przycisków +/- czas. Nacisnąć przycisk zasilania,
aby potwierdzić. Opóźnienie startu można ustawić od 0,5h do 24h.
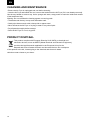
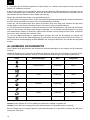
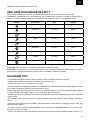
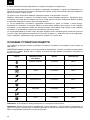
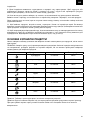
PODSTAWOWE PRZEPISY KULINARNE
Poniższa tabela pomoże wybrać podstawowe ustawienia dla produktów, które chcesz przygotować.
UWAGA: Należy pamiętać, że te ustawienia mają charakter wskazówek. Ponieważ składniki różnią
się między sobą pochodzeniem, wielkością, kształtem, a także marką, nie możemy zagwarantować
najlepszego ustawienia dla wybranych produktów.
Ikony Program Czas Temperatura
Suszone owoce 15 minut 200ºC
Frytki 18 minut 200ºC
Chleb 25 minut 160ºC
Ryba 18 minut 160ºC
Kurczak 20 minut 200ºC
Brokuły 18 minut 200ºC
Marchewka 35 minut 200ºC
Stek 13 minut 180ºC
Babeczki 12 minut 180ºC
Uwaga: Tabela jest tylko wskazówką i nie zawiera dokładnych przepisów.
Uwaga: Należy zachować szczególną ostrożność podczas obchodzenia się z gorącymi potrawami w koszu
urządzenia. Podczas przygotowywania tłustych potraw nadmiar oleju będzie ściekał do kosza. Opróżnij
kosz po każdym użyciu.

7
PL
PL
WSKAZÓWKI KULINARNE
• Prawie każda potrawa, która jest tradycyjnie gotowana w piekarniku, może zostać przygotowana w
urządzeniu.
• Potrawy przygotowują się najlepiej i najbardziej równomiernie, gdy są podobnej wielkości i grubości.
• Mniejsze kawałki potraw wymagają krótszego czasu gotowania niż kawałki większe.
• Aby uzyskać najlepsze rezultaty w najkrótszym czasie, przygotowuj jedzenie w urządzeniu w małych
porcjach. Jeśli to możliwe unikaj układania produktów na sobie lub w warstwach.
• Większość pakowanej żywności nie musi być wrzucana do oleju przed przygotowaniem w urządzeniu.
Większość już zawiera olej i inne składniki, które zwiększają rumienienie i chrupkość.
• W urządzeniu bardzo dobrze przygotowują się mrożone przystawki. Aby uzyskać najlepsze rezultaty, ułóż
je na tacy w jednej warstwie.
• Przy ułożeniu produktów w warstwy należy potrząsnąć koszem w połowie procesu (lub odwrócić produkty),
aby ułatwić równomierne przygotowanie.
• Potrawy, które przygotowujesz od podstaw, takie jak frytki lub warzywa, potraktuj niewielką ilości oleju, aby
je przyrumienić i nadać im chrupkości.
• Podczas przygotowywania świeżych warzyw, przed dodaniem oleju i włożeniem ich do urządzenia upewnij
się, że są one całkowicie suche, tak aby zapewnić maksymalną chrupkość.
• Frytkownice świetnie nadają się do odgrzewania potraw, w tym pizzy. Aby ponownie podgrzać jedzenie,
ustaw temperaturę na 150°C na maksymalnie 10 minut.
CZYSZCZENIE I KONSERWACJA
• Przed czyszczeniem upewnij się, że urządzenie jest chłodne i odłączone od zasilania.
• Gdy urządzenie i kosz są chłodne, wyjmij kosz z urządzenia (jeśli jeszcze tego nie zrobiłeś). Użyj uchwytu
tacki, aby wyjąć tackę. Użyj gąbki i ciepłej wody z mydłem aby umyć tackę i kosz wewnątrz i na zewnątrz.
Ostrzeżenie: Nie używaj szorstkich środków do czyszczenia ani ściereczek do szorowania.
• Kosz i tackę można myć na górnej półce zmywarki.
• Delikatnie wytrzyj powierzchnię zewnętrzną wilgotną szmatką lub ręcznikiem papierowym.
• Nie zanurzaj urządzenia ani wtyczki przewodu zasilającego w wodzie ani w żadnym innym płynie.
• Przed schowaniem urządzenia dokładnie wysusz wszystkie części.
• Urządzenie przechowuj w chłodnym i suchym miejscu.
UTYLIZACJA PRODUKTU
To urządzenie jest oznaczone zgodnie z Dyrektywą Europejską 2012/19/UE oraz polską Ustawą
z dnia 11 września 2015r. „o zużytym sprzęcie elektrycznym i elektronicznym” (Dz.U. z dn.
23.10.2015 poz.1688) symbolem przekreślonego kontenera na odpady.
Takie oznakowanie informuje, że sprzęt ten, po okresie jego użytkowania nie może być
umieszczany łącznie z innymi odpadami pochodzącymi z gospodarstwa domowego.
Użytkownik jest zobowiązany do oddania go prowadzącym zbieranie zużytego sprzętu elektrycznego i
elektronicznego/. Prowadzący zbieranie, w tym lokalne punkty zbiórki, sklepy oraz gminne jednostki, tworzą
odpowiedni system umożliwiający oddanie tego sprzętu.
Właściwe postępowanie ze zużytym sprzętem elektrycznym i elektronicznym przyczynia się do uniknięcia
szkodliwych dla zdrowia ludzi i środowiska naturalnego konsekwencji, wynikających z obecności składników
niebezpiecznych oraz niewłaściwego składowania i przetwarzania takiego sprzętu.
Mamy nadzieję, że produkt przyniesie Państwu wiele satysfakcji.

8
PL
EN
WE WOULD LIKE TO THANKS YOUR FOR CHOOSING ZELMER, WE WISH THE PRODUCT
PERFORMS TO YOUR SATISFACTION AND PLEASURE
WARNING
PLEASE READ THE INSTRUCTIONS FOR USE CAREFULLY PRIOR TO USING THE PRODUCT.
STORE THESE IN A SAFE PLACE FOR FUTURE REFERENCE.
DESCRIPTION
1. LED Control panel
2. Main body
3. Handle
4. Basket
CONTROL PANEL DESCRIPTION
1. Display panel
2. Increase temperature
3. Decrease temperature
4. Recipe selection
5. Recipe
6. Working logo
7. Power (long press on/off, short press pause/start)
8. Time decrease
9. Delayed start button
10. Time increase
SAFETY INSTRUCTIONS
If the supply cord is damaged it must be replaced by
the manufacturer, its service agent or similarly qualied
persons in order to avoid a hazard.
This appliance can be used by children aged from 8
years and above and persons with reduced physical,
sensory or mental capabilities or lack of experience
and knowledge if they have been given supervision or
instruction concerning use of the appliance in a safe way
and understand the hazards involved. Children shall not
play with the appliance. Cleaning and user maintenance
shall not be made by children unless they are older than
8 and supervised.
Keep the appliance and its cord out of reach of children

9
PL EN
less than 8 years.
Appliances are not intended to be operated by means of
an external timer or separate remote-control system.
Disconnect the appliance when it is not in use and
before cleaning it. Let it cool before putting on, taking
off parts and cleaning it.
Do not submerge the appliance in water or any other
liquid.
This appliance is intended for use at a maximum altitude
of 2000m above sea level.
IMPORTANT WARNINGS
This appliance is designed exclusively for domestic use, in no case should be a commercial or industrial
use.
Any incorrect use or improper handling of the product shall render the warranty null and void.
Prior to plugging in the product, check that your mains voltage is the same as the one indicated on the
product label.
Place the appliance on a at even surface The mains connection cable must not be tangled or wrapped
around the product during use.
Do not use the device, or connect and disconnect to the supply mains with the hands and/or feet wet. Do
not pull on the connection cord in order to unplug it or use it as a handle.
IMPORTANT. When operating this Air Fryer, keep at least ten centimeters of free space on all sides of the
oven to allow for adequate air circulation.
DO NOT place your Air Fryer under cupboards, blinds or curtains. Risk of overheating / re.
Do not cover any part of the Fryer with a cloth or similar, it will cause overheating. Risk of re.
This is an AIR FRYER. It requires very little oil to cook. Do not ll the pot with oil or fat as this may cause
a re hazard.
Do not use any accessories other than manufacturer recommended accessories in this Air Fryer.
Always wear protective, insulated oven gloves when inserting or removing items from the hot Air Fryer.
The appliance must be used on a level, stable heat-resistant surface. The rst time you use your Air
Fryer there may be a slight odor or a small amount of smoke given off. This is normal and is just the
manufacturing residues burning off.
Always place the ingredients to be fried in the basket to prevent it from coming into contact with the heating
elements.
Unplug the product immediately from the mains in the event of any breakdown or damage and contact
an ofcial technical support service. In order to prevent any risk of danger, do not open the device. Only
qualied technical personnel from the brand´s Ofcial technical support service may carry out repairs or
procedures on the device.
B&B TRENDS SL. disclaims all liability for damages that may occur to people, animals or objects, for the
non-observance of these warnings.

10
PL
EN
BEFORE ITS FIRST USE
1. Remove all packing materials and stickers from the inside and outside of the Air Fryer.
Gently wipe down exterior with a damp cloth or paper towel.
WARNING: Never immerse the Air Fryer or its plug in water or any other liquids.
2. Pull the basket handle to remove the basket from the Air Fryer. Use the tray handle, in the center of the
tray, to remove the tray. Use a sponge and warm, soapy water to wash the inside and outside of the basket
and tray. The basket and the tray are top-rack dishwasher safe.
3. WARNING: Do not use abrasive cleaning agents or scouring pads.
4. Dry thoroughly.
HOW TO USE
1. Connect the mains plug to an earthed wall socket.
2. Carefully pull the basket out of the Airfryer
3. Put the ingredients into the basket.
4. Slide the basket back to the Airfryer. Never use the basket without the food tray on it.
WARNING: Do not touch the basket during and sometime after use as it gets very hot. Only hold the basket
by the handle.
5. Press shortly the power standby button to turn on the air fryer.
Using the pre-set programmes:
With the air fryer switched on, press the menu button (M) to switch between the different programmes. Each
time you press the menu button (M), the mode is selected from left to right. Press the power button to select
the desired mode and start cooking. Each mode has an assigned time and temperature. To change these
you can press the +/- time and +/- temperature buttons before pressing the power button.
Manual Mode:
6. Press the temperature control touch button to the required temperature.
7. Press the timer touch button to the required preparation time, press shortly the power standby touch
button to start cooking, the working logo lights and rotates.
1) The fan indicator light (outside white lamp) lights and rotates;
2) The heat indicator light (center red lamp) lights when the temperature didn’t reach the setting temperature
or the temperature come down;
3) The air fryer stops heating and the heat indicator light (centre red lamp) goes off when the temperature
reached the setting temperature.
4) The heat indicator light will go on and go off several times during frying.
8. Add 3 minutes to the preparation time when the appliance is cold, or you can also let the appliance
preheat without any ingredients inside approx. 4 minutes.
9. Some ingredients require shaking halfway through the preparation time. To shake or turn over the
ingredients, pull the basket out of the appliance by the handle and shake it or turn over the ingredients by
fork (or tongs). Then put the basket back into the Airfryer.
10. When you hear the timer bell, the set preparation time has elapsed. Pull the basket out of the appliance
and place it on a heat-resistant surface. Check if the ingredients are ready. If the ingredients are not ready
yet, simply slide the basket back into the appliance and set the timer to a few extra minutes.
11. To remove the ingredients, pull the basket out of the Airfryer. The basket and the ingredients are hot.
You can use a fork (or tongs) to take out the ingredients. To remove large or fragile ingredients, use a pair
of tongs to lift the ingredients out of the tank. Empty the basket into a bowl or onto a plate.
12. To program a delayed start, once the time and temperature have been set, press the delayed start
button (9) and select the desired time with the +/- time buttons. Press the power button to conrm. Delayed
start can be set from 0.5h to 24h.

11
PL EN
MAIN COOKING RECIPES
This table below helps you to select the basic settings for the ingredients you want to prepare.
NOTE: Keep in mind that these settings are indications. As ingredients differ in origin, size, shape as well
as brand, we cannot guarantee the best setting for your ingredients.
Icons Presets Time Temperature
Dried fruits 15 minutes 200ºC
French fries 18 minutes 200ºC
Bread 25 minutes 160ºC
Fish 18 minutes 160ºC
Chicken 20 minutes 200ºC
Broccoli 18 minutes 200ºC
Carrot 35 minutes 200ºC
Steak 13 minutes 180ºC
Cupcake 12 minutes 180ºC
Note: This table is only a guide and does not contain exact recipes.
Note: Use extreme caution while handling hot food in fryer basket. Excess oil will drip into basket when
preparing greasy foods. Empty the basket after every use.
COOKING TIPS
• Almost any food that is traditionally cooked in the oven can be air fried.
• Foods cook best and most evenly when they are of similar size and thickness.
• Smaller pieces of food require less cooking time than larger pieces.
• For best results in the shortest amount of time, air fry food in small batches. Avoid stacking or layering
when possible.
• Most prepackaged foods do not need to be tossed in oil before air frying. Most already contain oil and
other ingredients that enhance browning and crispiness
• Frozen appetizers air fry very well. For best results, arrange them on the tray in a single layer.
• If layering foods, be sure to shake the basket halfway through (or ip food) to promote even cooking.
• Toss foods you are preparing from scratch, such as French fries or other vegetables, with a small amount
of oil to promote browning and crispiness.
• When air frying fresh vegetables, make sure to pat them dry completely before tossing with oil and air
frying to ensure maximum crispiness.
• Air fryers are great for reheating food, including pizza. To reheat your food, set the temperature to 150oC
for up to 10 minutes.

12
PL
EN
CLEANING AND MAINTENANCE
• Ensure the Air Fryer is unplugged and cool before cleaning.
• Once the Air Fryer and basket are cool, remove the basket from the Air Fryer (if it is not already removed).
Use the tray handle to remove tray. Use a sponge and warm, soapy water to wash the inside and outside
of the basket and tray.
Warning: Do not use abrasive cleaning agents or scouring pads.
• The basket and the tray are top-rack dishwasher safe.
• Gently wipe down exterior with a damp cloth or paper towel.
• Never immerse the Air Fryer or its plug in water or any other liquid.
• Dry all parts thoroughly before storage.
• Store the Air Fryer in a cool, dry place.
PRODUCT DISPOSAL
This product complies with European Directive 2012/19/EU on electrical and
electronic devices, known as WEEE (Waste Electrical and Electronic Equipment),
provides the legal framework applicable in the European Union for the
disposal and reuse of waste electronic and electrical devices. Do not dispose
of this product in the bin, instead going to the electrical and electronic waste
collection center closest to your home.

13
PL
DE
WIR DANKEN IHNEN, DASS SIE SICH FUR ZELMER ENTSCHIEDEN HABEN UND WUNSCHEN
IHNEN VIEL FREUDE UND ZUFRIEDENHEIT MIT IHREM GERAT.
WARNUNG
BITTE LESEN SIE DIE GEBRAUCHSANWEISUNG VOR DER VERWENDUNG DES GERATS
SORGFALTIG DURCH. BEWAHREN SIE DIESE AN EINEM SICHEREN ORT ZUR SPATEREN
VERWENDUNG AUF.
BESCHREIBUNG
1. LED-Bedienfeld
2. Hauptteil
3. Handhabung
4. Korb
BESCHREIBUNG DES BEDIENFELDES
1. Anzeige
2. Temperatur erhohen
3. Temperatur senken
4. Rezeptauswahl
5. Rezept
6. Arbeitslogo
7. Strom (langes Drucken ON/OFF, kurzes Drucken Pause/Start)
8. Zeit verkurzen
9. Taste fur verzogerten Start
10. Zeit verlangern
SICHERHEITSHINWEISE
Wenn das Netzkabel beschadigt wird, muss es durch den
Hersteller, seinen Kundendienst oder ahnlich qualizierte
Personen ersetzt werden, um eine Gefahrdung zu
vermeiden.
Dieses Gerat darf von Kindern ab 8 Jahren sowie von
Personen mit verringerten physischen, sensorischen
oder mentalen Fahigkeiten oder Mangel an Erfahrung
und Wissen nur benutzt werden, wenn sie beaufsichtigt
oder bezuglich des sicheren Gebrauchs des Gerats
unterwiesen wurden und die daraus resultierenden
Gefahren verstehen. Kinder durfen nicht mit dem Gerat
spielen. Reinigung und Wartung durfen nicht von Kindern
vorgenommen werden - es sei denn, sie sind alter als 8

14
PL
DE
Jahre und werden beaufsichtigt.
Halten Sie das Gerat und sein Kabel auserhalb der
Reichweite von Kindern unter 8 Jahren.
Dieses Gerat ist nicht fur den Betrieb uber eine externe
Zeitschaltuhr oder ein separates Fernsteuersystem
vorgesehen.
Trennen Sie das Gerat von der Stromversorgung, wenn
es nicht in Gebrauch ist und bevor Sie es reinigen.
Lassen Sie es abkuhlen, bevor Sie Teile anbringen,
abnehmen oder reinigen.
Tauchen Sie das Gerat niemals in Wasser oder andere
Flussigkeiten ein.
Dieses Gerat ist fur den Einsatz in einer maximalen Hohe
von 2.000 m uber dem Meeresspiegel vorgesehen.
WICHTIGE WARNHINWEISE
Dieses Gerat ist ausschlieslich fur den hauslichen Gebrauch bestimmt, keinesfalls fur einen gewerblichen
oder industriellen Einsatz.
Bei unsachgemasem Gebrauch oder falscher Handhabung des Gerats erlischt die Garantie.
Prufen Sie vor dem Einstecken des Produkts, ob Ihre Netzspannung mit der auf dem Produktetikett
angegebenen Spannung ubereinstimmt.
Stellen Sie das Gerat immer auf eine ache, ebene Oberache.
Das Stromkabel darf wahrend des Betriebs nicht verwickelt oder um das Produkt gewickelt werden.
Benutzen oder stecken Sie das Gerat nicht mit nassen Handen und/oder Fusen ein oder aus. Ziehen
Sie nicht am Anschlusskabel, um es auszustecken oder es als Griff zu verwenden WICHTIG. Stellen Sie
beim Betrieb dieser Heisluftfritteuse an allen Seiten mindestens zehn Zentimeter Freiraum sicher, um eine
ausreichende Luftzirkulation zu ermoglichen.
Stellen Sie Ihre Heisluftfritteuse NICHT unter Schranke, Jalousien oder Vorhange. Uberhitzungs- und
Brandgefahr.
Bedecken Sie keinen Teil der Fritteuse mit einem Tuch oder Ahnlichem, da dies zu Uberhitzung fuhrt.
Feuergefahr.
Dieses Gerat ist eine HEISSLUFTFRITTEUSE. Es benotigt sehr wenig Ol zum Kochen. Befullen Sie den
Topf nicht mit Ol oder Fett, da dies eine Brandgefahr birgt.
Verwenden Sie fur diese Heisluftfritteuse nur das vom Hersteller empfohlene Zubehor.
Tragen Sie immer schutzende, isolierte Ofenhandschuhe, wenn Sie etwas in die heise Heisluftfritteuse
einlegen oder aus ihr entnehmen.
Verwenden Sie das Gerat auf einer ebenen, stabilen und hitzebestandigen Oberache.
Wenn Sie die Fritteuse zum ersten Mal benutzen, kann etwas Geruch oder eine gewisse Rauchentwicklung
auftreten. Dies ist normal und nur auf das Verbrennen von Herstellungsruckstanden zuruckzufuhren.

15
PL
DE
Legen Sie die zu frittierenden Speisen immer in den Korb, damit sie nicht mit den Heizelementen in
Beruhrung kommen.
Ziehen Sie im Falle einer Storung oder Beschadigung sofort den Netzstecker und wenden Sie sich an einen
ofziellen technischen Kundendienst. Um eine Gefahrdung zu vermeiden, darf das Gerat nicht geoffnet
werden. Nur qualiziertes technisches Personal des ofziellen technischen Kundendienstes der Marke darf
Reparaturen oder Eingriffe am Gerat vornehmen.
B&B TRENDS SL. ubernimmt keine Haftung fur Schaden an Personen, Tieren oder Gegenstanden, die
durch die Nichtbeachtung dieser Warnhinweise entstehen.
VOR DEM ERSTEN EINSATZ
1. Entfernen Sie alle Verpackungsmaterialien und Aufkleber von der Innen- und Ausenseite der
Heisluftfritteuse. Wischen Sie die Ausenseite vorsichtig mit einem feuchten Stoffoder Papiertuch ab.
WARNUNG: Tauchen Sie die Heisluftfritteuse oder ihren Stecker niemals in Wasser oder andere
Flussigkeiten.
2. Ziehen Sie den Korb an seinem Griff aus der Heisluftfritteuse heraus. Nehmen Sie die Schale am
Griff in ihrer Mitte heraus. Reinigen Sie die Innen- und Ausenseite des Korbs und der Schale mit einem
Schwamm und warmem Seifenwasser. Korb und Schale konnen oben im oberen Fach des Geschirrspulers
gewaschen werden.
3. WARNUNG: Verwenden Sie keine scheuernden Reinigungsmittel oder Schwamme.
4. Trocknen Sie alles grundlich ab.
BEDIENUNG
1. Verbinden Sie den Netzstecker mit einer geerdeten Steckdose.
2. Nehmen Sie den Korb vorsichtig aus der Heisluftfritteuse heraus
3. Geben Sie die Zutaten in den Korb.
4. Schieben Sie den Korb zuruck in die Heisluftfritteuse. Verwenden Sie den Korb niemals ohne die
Essensschale darauf.
ACHTUNG: Beruhren Sie den Korb wahrend und unmittelbar nach dem Gebrauch nicht, da er sehr heis
wird. Halten Sie den Korb nur am Griff.
5. Drucken Sie die Standby-Taste kurz, um den Airfryer einzuschalten.
Verwendung der voreingestellten Programme:
Drucken Sie bei eingeschalteter Fritteuse die Menutaste (M), um zwischen den verschiedenen
Programmen zu wechseln. Jedes Mal, wenn Sie die Menutaste (M) drucken, wird der Modus von links
nach rechts ausgewahlt. Drucken Sie die Einschalttaste, um den gewunschten Modus auszuwahlen und
den Garvorgang zu starten. Jedem Modus sind eine Zeit und eine Temperatur zugeordnet. Um diese zu
andern, konnen Sie die Tasten +/- Zeit und +/- Temperatur drucken, bevor Sie die Einschalttaste drucken.
Manueller Modus:
6. Stellen Sie die gewunschte Temperatur durch Drucken der Temperaturtaste ein.
7. Drucken Sie die Timer-Taste, um die gewunschte Zubereitungszeit einzustellen, drucken Sie kurz die
Standby-Taste, um den Garvorgang zu starten. Das Symbol fur den Betrieb leuchtet auf und dreht sich.
1) Die Geblasekontrollleuchte (ausere weise Lampe) leuchtet auf und dreht sich;
2) Die Hitzekontrollleuchte (rote Lampe in der Mitte) leuchtet, wenn die Temperatur nicht die eingestellte
Temperatur erreicht hat oder die Temperatur gesunken ist;
3) Der Airfryer hort auf zu heizen und die Heizungsanzeige (rote Lampe in der Mitte)
erlischt, wenn die Temperatur die eingestellte Temperatur erreicht hat.
4) Die Hitzekontrollleuchte leuchtet wahrend des Frittierens mehrmals auf und erlischtwieder.

16
PL
DE
8. Verlangern Sie die Zubereitungszeit bei kaltem Gerat um 3 Minuten oder lassen Sie das Gerat ohne
Zutaten ca. 4 Minuten vorheizen.
9. Bei einigen Speisen ist es erforderlich, diese nach der Halfte der Zubereitungszeit zu schutteln. Um die
Zutaten zu schutteln oder umzudrehen, ziehen Sie den Korb am Griff aus dem Gerat und schutteln Sie ihn
oder wenden Sie die Zutaten mit einer Gabel (oder Zange).
Setzen Sie den Korb dann wieder in die Heisluftfritteuse ein.
10. Wenn Sie die Timerglocke horen, ist die eingestellte Zubereitungszeit abgelaufen. Ziehen Sie den Korb
aus dem Gerat und stellen Sie diesen auf eine hitzebestandige Unterlage.
Prufen Sie, ob die Zutaten fertig sind. Wenn die Zutaten noch nicht fertig sind, schieben Sie den Korb
einfach wieder in das Gerat und stellen Sie den Timer auf ein paar zusatzliche Minuten.
11. Um die Zutaten zu entnehmen, ziehen Sie den Korb aus der Heizluftfritteuse. Der Korb und die Zutaten
sind heis. Sie konnen eine Gabel (oder Zange) verwenden, um die Zutaten herauszunehmen. Um grose
oder zerbrechliche Zutaten zu entfernen, heben Sie die Zutaten mit einer Zange aus dem Tank. Leeren Sie
den Korb in eine Schussel oder auf einen Teller.
12. Um eine Startverzogerung zu programmieren, drucken Sie nach der Einstellung von Uhrzeit und
Temperatur die Taste fur die Startverzogerung (9) und wahlen Sie die gewunschte Zeit mit den Tasten +/-
Zeit. Drucken Sie zur Bestatigung die Einschalttaste. Der verzogerte Start kann von 0,5h bis 24h eingestellt
werden.
ALLGEMEINE KOCHREZEPTE
Diese Tabelle unten hilft Ihnen bei der Auswahl der Grundeinstellungen fur die Zutaten, die Sie zubereiten
mochten.
HINWEIS: Beachten Sie, dass diese Einstellungen Hinweise sind. Da sich die Zutaten in Herkunft, Grose,
Form sowie Marke unterscheiden, konnen wir nicht die beste Einstellung fur Ihre Zutaten garantieren.
Icons Voreinstellungen Zeit Temperatur
Getrocknete Früchte 15 Minuten 200ºC
Pommes frites 18 Minuten 200ºC
Brot 25 Minuten 160ºC
Fisch 18 Minuten 160ºC
Huhn 20 Minuten 200ºC
Brokkoli 18 Minuten 200ºC
Karotte 35 Minuten 200ºC
Steak 13 Minuten 180ºC
Cupcake 12 Minuten 180ºC
Hinweis: Diese Tabelle ist nur ein Leitfaden und stellt keine exakten Vorgaben dar.
Hinweis: Seien Sie beim Umgang mit heisen Lebensmitteln im Frittierkorb auserst vorsichtig.
Bei der Zubereitung von fettigen Speisen tropft uberschussiges Ol in den Korb. Entleeren Sie den Korb
nach jedem Gebrauch.

17
PL
DE
ZUBEREITUNGSTIPPS
• Fast alle traditionell im Backofen zubereiteten Speisen konnen auch mit heiser Luft frittiert werden
• Lebensmittel garen am besten und gleichmasigsten, wenn sie ahnlich gros und dick sind
• Kleinere Lebensmittelstucke benotigen weniger Garzeit als grosere
• Fur beste Ergebnisse in kurzester Zeit frittieren Sie Ihre Lebensmittel in kleinen Mengen. Vermeiden Sie
nach Moglichkeit, sie zu stapeln oder zu schichten
• Die meisten vorverpackten Lebensmittel mussen vor dem Heisluftfrittieren nicht in Ol geschwenkt werden.
Die meisten enthalten bereits Ol und andere Zutaten, die eine gute Braunung und Knusprigkeit ermoglichen
• Tiefgekuhlte Happchen und Vorspeisen lassen sich sehr gut mit Heisluft frittieren. Die besten Ergebnisse
erzielen Sie, wenn Sie sie in einer einzigen Schicht auf der Schale anordnen
• Wenn Sie Speisen schichten, schutteln Sie den Korb oder wenden Sie seinen Inhalt nach halber Zeit, um
ein gleichmasiges Frittieren zu fordern
• Schwenken Sie Lebensmittel, die Sie frisch zubereiten, wie z. B. Pommes frites oder anderes Gemuse,
mit einer kleinen Menge Ol, damit sie knusprig braun werden
• Tupfen Sie frisches Gemuse vollstandig trocken, bevor Sie es in Ol schwenken und mit Luft frittieren, um
maximale Knusprigkeit zu erzielen
• Heisluftfritteusen eignen sich hervorragend zum Aufwarmen, auch von Pizza. Stellen Sie zum Aufwarmen
Ihrer Speisen die Temperatur auf 150 °C und die Zeit auf 10 Minuten ein
REINIGUNG UND WARTUNG
• Stellen Sie sicher, dass die Heisluftfritteuse vor der Reinigung ausgesteckt und abgekuhlt ist
• Sobald Gerat und Korb abgekuhlt sind, nehmen Sie den Korb heraus (falls er nicht bereits entfernt wurde).
Ziehen Sie den Korb am Griff heraus. Reinigen Sie die Innen- und Ausenseite des Korbs und der Schale mit
einem Schwamm und warmem Seifenwasser.
Warnung: Verwenden Sie keine scheuernden Reinigungsmittel oder Schwamme.
• Korb und Schale konnen oben im oberen Fach des Geschirrspulers gewaschen werden.
• Wischen Sie die Ausenseite vorsichtig mit einem feuchten Stoff- oder Papiertuch ab.
• Tauchen Sie die Fritteuse niemals in Wasser oder andere Flussigkeiten ein
• Trocknen Sie alle Teile grundlich ab, bevor Sie sie wegstellen.
• Lagern Sie die Heisluftfritteuse an einem kuhlen, trockenen Ort
GERÄTEENTSORGUNG
Dieses Gerat entspricht der europaischen Richtlinie 2012/19/EU uber elektrische und elektronische
Gerate, bekannt als WEEE (Waste Electrical and Electronic Equipment), die den in der
Europaischen Union geltenden Rechtsrahmen fur die Entsorgung und Wiederverwendung von
Elektro- und Elektronik-Altgeraten bildet. Werfen Sie dieses Produkt nicht in die Mulltonne, sondern
geben Sie es bei der nachstgelegenen Sammelstelle fur Elektro- und Elektronikschrott ab.

18
PL
CZ
DĚKUJEME, ŽE JSTE SI VYBRALI ZNAČKU ZELMER. PŘEJEME VÁM, ABYSTE BYLI S NAŠÍM
VÝROBKEM SPOKOJENI.
UPOZORNĚNÍ
PŘED POUŽITÍM ZAŘÍZENÍ SI NEJPRVE PŘEČTĚTE NÁVOD K OBSLUZE A ULOŽTE JEJ NA
BEZPEČNÉM MÍSTĚ PRO BUDOUCÍ POUŽITÍ.
POPIS
1. Ovládací panel LED
2. hlavní tělo
3. rukojeť
4. koš
POPIS OVLÁDACÍHO PANELU
1. panel displeje
2. zvyšující se teplota
Snížení teploty
4. výběr programu
5. recept
6. pracovní logo
7. napájení (dlouhé stisknutí zapnout/vypnout, krátké stisknutí pauza/spuštění)
8) Zkrácení času
9. tlačítko odloženého startu
10. prodloužení času
BEZPEČNOSTNÍ PŘEDPISY
Pokud je přívodní kabel poškozený, musí jej vyměnit
výrobce, jeho autorizovaný servis nebo podobně
kvalikovaná osoba, aby se předešlo nebezpečí.
Tento přístroj mohou používat děti od 3 let.
8 let nebo starší a osoby se sníženými fyzickými, smyslovými
nebo duševními schopnostmi nebo s nedostatkem
zkušeností a znalostí, pokud jim byl poskytnut dohled
nebo byly poučeny o bezpečném používání spotřebiče a
rozumí souvisejícím nebezpečím. Děti si se spotřebičem
nesmí hrát. Čištění a údržbu spotřebiče nesmí provádět
děti mladší 8 let a nesmí být ponechán bez dozoru.
Spotřebič a jeho napájecí kabel uchovávejte mimo dosah
dětí mladších 8 let.

19
PL
CZ
Spotřebič není určen pro provoz s externími časovači
nebo se samostatným systémem dálkového ovládání.
Pokud spotřebič nepoužíváte a před čištěním jej odpojte
od elektrické sítě. Před nasazením nebo sejmutím dílů
nebo před čištěním jednotky nechte díly vychladnout.
Přístroj neponořujte do vody ani do jiné kapaliny.
Zařízení je určeno pro použití v maximální nadmořské
výšce 2000 metrů nad mořem.
DŮLEŽITÁ UPOZORNĚNÍ
Tento spotřebič je určen pouze pro domácí použití a v žádném případě se nesmí používat pro komerční
nebo průmyslové účely.
Nesprávné použití nebo nesprávné zacházení vede ke ztrátě záruky.
Před připojením spotřebiče k elektrické síti zkontrolujte, zda napětí v síti odpovídá napětí na štítku.
před připojením jednotky k elektrické síti zkontrolujte, zda napájecí napětí odpovídá napětí uvedenému na
typovém štítku jednotky.
Spotřebič postavte na rovný a rovný povrch.
Při používání přístroje se nesmí napájecí kabel zamotat nebo omotat kolem přístroje.
Nepoužívejte, nezapojujte ani neodpojujte přístroj s mokrýma rukama a/nebo nohama. Při odpojování
přístroje netahejte za napájecí kabel. Nepoužívejte šňůru jako rukojeť.
DŮLEŽITÉ Při používání spotřebiče ponechte po všech stranách prostor alespoň deset centimetrů, aby
byla zajištěna dostatečná cirkulace vzduchu.
NEUMÍSŤUJTE stroj pod skříně, za žaluzie nebo závěsy. Riziko přehřátí/požáru.
Žádnou část spotřebiče nezakrývejte látkou nebo podobným materiálem, protože by mohlo dojít k přehřátí.
Riziko požáru.
Toto je FRITÉZA BEZ TUKU AIR FRYER. K přípravě pokrmů je zapotřebí malé množství oleje. Nádobu
nenaplňujte olejem nebo tukem, protože by mohlo dojít k požáru. Ke spotřebiči nepoužívejte jiné
příslušenství, než které doporučuje výrobce.
Při vkládání a vyjímání potravin z fritézy vždy používejte ochranné tepelné štíty. Spotřebič používejte na
rovném, stabilním a žáruvzdorném povrchu. Při prvním použití fritézy můžete cítit mírný nepříjemný zápach
nebo malé množství kouře. To je normální u nových spotřebičů po ukončení výrobního procesu.
Pražené suroviny vždy vkládejte do koše, aby se nedostaly do kontaktu s topnými tělesy.
V případě jakékoli závady nebo poškození spotřebič okamžitě odpojte od sítě a obraťte se na autorizovanou
technickou podporu. Neotevírejte kryt spotřebiče, protože by to mohlo být nebezpečné. Opravy a postupy
na spotřebiči může provádět pouze kvalikovaný personál autorizovaného střediska technické podpory
značky.
B&B TRENDS SL. neodpovídá za žádné škody na osobách, zvířatech nebo majetku, které mohou
vzniknout v důsledku nedodržení těchto upozornění.

20
PL
CZ
PŘED PRVNÍM POUŽITÍM
1. Odstraňte veškerý obalový materiál a nálepky z vnitřní i vnější strany fritézy Air Fryer. Jemně otřete vnější
stranu vlhkým hadříkem nebo papírovou utěrkou.
UPOZORNĚNÍ: Neponořujte spotřebič ani zástrčku do vody nebo jiné kapaliny.
2. Zatáhněte za rukojeť koše a vyjměte jej z fritézy Air Fryer. K vyjmutí tácu použijte rukojeť umístěnou ve
svém středu Umyjte koš a tác zevnitř i zvenku.
Použijte houbu a teplou mýdlovou vodu. Koš a tác lze mýt na horní polici myčky nádobí.
3. UPOZORNĚNÍ: Nepoužívejte abrazivní čisticí prostředky nebo houby.
4. Důkladně osušte.
NÁVOD NA POUŽITÍ
1. Zasuňte zástrčku do uzemněné zásuvky.
2. Opatrně vytáhněte koš z jednotky.
3. Vložte ingredience do košíku.
UPOZORNĚNÍ: Nikdy nenaplňujte tác nad množství uvedené v tabulce receptů, protože by to mohlo
ovlivnit kvalitu konečného výrobku.
4. Vložte koš zpět do stroje. Nikdy nepoužívejte koš, aniž byste na něj položili misku na potraviny.
UPOZORNĚNÍ: Během používání a po něm se koše nedotýkejte, protože se velmi zahřívá. Koš držte
pouze za rukojeť.
5. Krátkým stisknutím tlačítka pohotovostního režimu zapněte fritézu.
Použití přednastavených programů:
Když je fritéza zapnutá, stiskněte tlačítko nabídky (M) pro přepínání mezi různými programy. Při každém
stisknutí tlačítka nabídky (M) se režim vybere zleva doprava. Stisknutím tlačítka napájení vyberte
požadovaný režim a začněte vařit. Každý režim má přiřazený čas a teplotu. Chcete-li je změnit, můžete
před stisknutím tlačítka napájení stisknout tlačítka +/- času a +/- teploty.
Manuální režim:
6. Stiskněte dotykové tlačítko ovládání teploty na požadovanou teplotu.
7. Stiskněte dotykové tlačítko časovače na požadovanou dobu přípravy, krátce stiskněte dotykové tlačítko
pohotovostního režimu pro spuštění vaření, pracovní logo se rozsvítí a otočí.
1) Kontrolka ventilátoru (vnější bílá kontrolka) svítí a otáčí se;
2) Kontrolka ohřevu (střední červená kontrolka) se rozsvítí, když teplota nedosáhla nastavené teploty nebo
teplota klesla;
3) Fritéza přestane hřát a kontrolka ohřevu (střední červená kontrolka) zhasne, když teplota dosáhne
nastavené teploty.
4) Během smažení se kontrolka ohřevu několikrát rozsvítí a zhasne.
8. Přidejte 3 minuty vaření, dokud je spotřebič studený.
Spotřebič můžete také nechat asi 4 minuty zahřát, aniž byste do něj vkládali jakékoli přísady.
9. Některé přísady je třeba v polovině vaření protřepat. Chcete-li jídlo protřepat nebo obrátit, vytáhněte koš
ze spotřebiče za rukojeť a jídlo protřepejte nebo obraťte vidličkou (nebo kleštěmi). Poté vložte koš zpět do
spotřebiče.
10. Když uslyšíte zvonění časovače, znamená to, že uplynula nastavená doba vaření. Vyjměte koš ze
spotřebiče a položte jej na tepelně odolný povrch. Zkontrolujte, zda je jídlo připraveno. Pokud ingredience
nejsou hotové, jednoduše zasuňte koš zpět do přístroje a nastavte časovač na několik minut navíc.
11. Vytáhněte koš ze spotřebiče a vyjměte potraviny. Košík a přísady jsou horké. Přísady můžete vyjmout
vidličkou (nebo kleštěmi). K vyjmutí velkých nebo křehkých předmětů použijte kleště. Vyprázdněte koš do
mísy nebo na talíř.
12. Chcete-li naprogramovat odložený start, po nastavení času a teploty stiskněte tlačítko odloženého
startu (9) a vyberte požadovaný čas pomocí tlačítek +/- času. Potvrďte stisknutím tlačítka napájení.
Strona się ładuje...
Strona się ładuje...
Strona się ładuje...
Strona się ładuje...
Strona się ładuje...
Strona się ładuje...
Strona się ładuje...
Strona się ładuje...
Strona się ładuje...
Strona się ładuje...
Strona się ładuje...
Strona się ładuje...
Strona się ładuje...
Strona się ładuje...
Strona się ładuje...
Strona się ładuje...
Strona się ładuje...
Strona się ładuje...
Strona się ładuje...
Strona się ładuje...
Strona się ładuje...
Strona się ładuje...
Strona się ładuje...
Strona się ładuje...
Strona się ładuje...
Strona się ładuje...
Strona się ładuje...
Strona się ładuje...
Strona się ładuje...
Strona się ładuje...
Strona się ładuje...
Strona się ładuje...
Strona się ładuje...
Strona się ładuje...
Strona się ładuje...
Strona się ładuje...
Strona się ładuje...
Strona się ładuje...
Strona się ładuje...
Strona się ładuje...
Strona się ładuje...
Strona się ładuje...
Strona się ładuje...
Strona się ładuje...
-
 1
1
-
 2
2
-
 3
3
-
 4
4
-
 5
5
-
 6
6
-
 7
7
-
 8
8
-
 9
9
-
 10
10
-
 11
11
-
 12
12
-
 13
13
-
 14
14
-
 15
15
-
 16
16
-
 17
17
-
 18
18
-
 19
19
-
 20
20
-
 21
21
-
 22
22
-
 23
23
-
 24
24
-
 25
25
-
 26
26
-
 27
27
-
 28
28
-
 29
29
-
 30
30
-
 31
31
-
 32
32
-
 33
33
-
 34
34
-
 35
35
-
 36
36
-
 37
37
-
 38
38
-
 39
39
-
 40
40
-
 41
41
-
 42
42
-
 43
43
-
 44
44
-
 45
45
-
 46
46
-
 47
47
-
 48
48
-
 49
49
-
 50
50
-
 51
51
-
 52
52
-
 53
53
-
 54
54
-
 55
55
-
 56
56
-
 57
57
-
 58
58
-
 59
59
-
 60
60
-
 61
61
-
 62
62
-
 63
63
-
 64
64


w innych językach
- slovenčina: Zelmer ZAF3550 Používateľská príručka
- română: Zelmer ZAF3550 Manual de utilizare