GOCLEVER R105BK Instrukcja obsługi
- Kategoria
- Tabletki
- Typ
- Instrukcja obsługi
Ten podręcznik jest również odpowiedni dla

Tablet R105BK
OWNER’S MANUAL
Tablet R105BK
INSTRUKCJA OBSŁUGI
WWW.GOCLEVER.COM
TO SEE MORE PRODUCTS TAB, NAVIO, DVR, DVB
Przed skorzystaniem z
oraz zachowaj ją ść
Tablet R105BK
OWNER’S MANUAL
Tablet R105BK
INSTRUKCJA OBSŁUGI
VISIT OUR WEBSITE
WWW.GOCLEVER.COM
TO SEE MORE PRODUCTS TAB, NAVIO, DVR, DVB
Przed skorzystaniem z
urządzenia zapoznaj się z niniejszą instrukcją
oraz zachowaj ją na przyszłość
Tablet R105BK
Tablet R105BK
WWW.GOCLEVER.COM
TO SEE MORE PRODUCTS TAB, NAVIO, DVR, DVB
-T
ą ę ą instrukcją obsługi

Contents /
Spis treś
English
Polski
Warunki gwarancji
Spis treści
2
3
16
29

1. Before using the tablet PC,
this product correctly. Please make sure that you have read this manual carefully before
using this product.
2. Our company reserves the copyright of this manual, any random duplication or
in
terpretation of the full or partial manual is forbidden in commercial activities.
3. The information covered in this manual is all based on the latest information when
compiling the manual, and products are subject to change without notice for further
impr
ovement. We are not committed to any mistakes or incidences caused by the manual.
For additional product information, visit the
4. When using this product, please make backup for the data by yourself and this company
will just be
responsible for the product's hardware itself, and will not undertake any
responsibility for any loss or damage of personal data and information due to wrong
operations of hardware.
Precautions
This manual includes important information on safety
product. To prevent any accident, please make sure that you have read this manual carefully
before using this product. Do not keep this product in a place with a high temperature,
humidity or too much dust. Especially d
closed in summer, and keep out direct sunlight.
•
Avoid dropping or shocking this product h
violently, otherwise, the IPS
•
Please choose a suitable volume. Avoid excessively high volume when using a
headset. If you feel any ear noise, please decrease the volume or stop using.
•
Do not break the connection suddenly when this product is conducting formatting,
uploading or do
wnloading operations, otherwise there may be program errors.
•
This company will not undertake any responsibility for any memory loss due to
product damage, repairing or other reasons.
•
Do not dissemble this product by yourself and do not clean the surface o
with alcohol, thinner or benzene.
•
Do not use this product in a place where the using of electronic device is prohibited,
such as on a plane.
Important Declaration
please read all information provided by us,
so that you can use
this product correctly. Please make sure that you have read this manual carefully before
2. Our company reserves the copyright of this manual, any random duplication or
terpretation of the full or partial manual is forbidden in commercial activities.
3. The information covered in this manual is all based on the latest information when
compiling the manual, and products are subject to change without notice for further
ovement. We are not committed to any mistakes or incidences caused by the manual.
For additional product information, visit the
website: www.goclever.com.
4. When using this product, please make backup for the data by yourself and this company
responsible for the product's hardware itself, and will not undertake any
responsibility for any loss or damage of personal data and information due to wrong
This manual includes important information on safety
precautions and proper usage of this
product. To prevent any accident, please make sure that you have read this manual carefully
before using this product. Do not keep this product in a place with a high temperature,
humidity or too much dust. Especially d
o not place this product in a car with all windows
closed in summer, and keep out direct sunlight.
Avoid dropping or shocking this product h
eavily and avoid shaking the IPS
violently, otherwise, the IPS
display may be damaged or cannot play correct
Please choose a suitable volume. Avoid excessively high volume when using a
headset. If you feel any ear noise, please decrease the volume or stop using.
Do not break the connection suddenly when this product is conducting formatting,
wnloading operations, otherwise there may be program errors.
This company will not undertake any responsibility for any memory loss due to
product damage, repairing or other reasons.
Do not dissemble this product by yourself and do not clean the surface o
with alcohol, thinner or benzene.
Do not use this product in a place where the using of electronic device is prohibited,
Important Declaration
3
so that you can use
this product correctly. Please make sure that you have read this manual carefully before
2. Our company reserves the copyright of this manual, any random duplication or
terpretation of the full or partial manual is forbidden in commercial activities.
3. The information covered in this manual is all based on the latest information when
compiling the manual, and products are subject to change without notice for further
ovement. We are not committed to any mistakes or incidences caused by the manual.
4. When using this product, please make backup for the data by yourself and this company
responsible for the product's hardware itself, and will not undertake any
responsibility for any loss or damage of personal data and information due to wrong
precautions and proper usage of this
product. To prevent any accident, please make sure that you have read this manual carefully
before using this product. Do not keep this product in a place with a high temperature,
o not place this product in a car with all windows
eavily and avoid shaking the IPS
display
display may be damaged or cannot play correct
ly.
Please choose a suitable volume. Avoid excessively high volume when using a
headset. If you feel any ear noise, please decrease the volume or stop using.
Do not break the connection suddenly when this product is conducting formatting,
wnloading operations, otherwise there may be program errors.
This company will not undertake any responsibility for any memory loss due to
Do not dissemble this product by yourself and do not clean the surface o
f this product
Do not use this product in a place where the using of electronic device is prohibited,

•
Do not use this product while driving a car or walking on the street, otherwise traffic
accident may occur.
•
Our company reserves the right to make any improvement on this product. No further
notice will be provided on any variation on the specification and design of this
product!
•
This device is not waterproof.
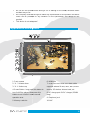
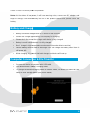
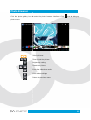
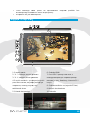
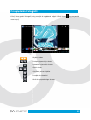
Appearance and Buttons
1. Front camera
2. “V -”: Volume down
3. “V +”: Volume up
4. Power Button -
long press this button to
turn On/Off the player, short press this
button to lock screen in order to a
operation error
5. Memory card slot
Do not use this product while driving a car or walking on the street, otherwise traffic
Our company reserves the right to make any improvement on this product. No further
notice will be provided on any variation on the specification and design of this
This device is not waterproof.
Appearance and Buttons
long press this button to
turn On/Off the player, short press this
button to lock screen in order to a
void
6. HDMI slot
7.
USB Port: Micro USB 5 Pin
supports external U-
disc, MP3, MP4, wired
mouse, 3G wireless Internet card, etc.
8. DC charge port:
9V DC charger
plug)
9. Earphone Jack
10. MIC
4
Do not use this product while driving a car or walking on the street, otherwise traffic
Our company reserves the right to make any improvement on this product. No further
notice will be provided on any variation on the specification and design of this
USB Port: Micro USB 5 Pin
data cable
disc, MP3, MP4, wired
mouse, 3G wireless Internet card, etc.
9V DC charger
(2.5MM

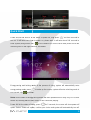
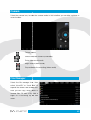
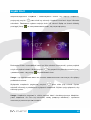
Quick Start
Power On/Off and unlock: at the status of power off, long press
turn on. It will take some time to power on, please wait. It will take about 100 seconds to
enter system, drag unlock icon “
unlocking icon on the right to unlock, see below:
Energy-
saving and locking mode: at the process of using, system will automatically enter
energy-saving mode, press “
one second, slip “
” to unlock.
Notes:
At the status of energy saving mode, the
will be off, showing black screen. Music or film continues playing.
Power Off: At the status of using, press “
option. Select “Power off” option, confirm your choic
Power On/Off and unlock: at the status of power off, long press
“ ”
for
turn on. It will take some time to power on, please wait. It will take about 100 seconds to
enter system, drag unlock icon “
” to the camera icon on the left to take photo and to the
unlocking icon on the right to unlock, see below:
saving and locking mode: at the process of using, system will automatically enter
” to wake up the screen, system will enter unlocking mode in
” to unlock.
At the status of energy saving mode, the
main operation won’t stop, only LCD screen
will be off, showing black screen. Music or film continues playing.
Power Off: At the status of using, press “
” for
5 seconds, the screen will show power off
option. Select “Power off” option, confirm your choic
e and system will automatically
5
for
three seconds to
turn on. It will take some time to power on, please wait. It will take about 100 seconds to
” to the camera icon on the left to take photo and to the
saving and locking mode: at the process of using, system will automatically enter
” to wake up the screen, system will enter unlocking mode in
main operation won’t stop, only LCD screen
5 seconds, the screen will show power off
e and system will automatically
turn off.

Select “Cancel” to cancel power off operation.
Notes: At the status of low-
power
begin to charge, it will automatically
battery.
Battery and Charge
•
Battery should be charged for 8 to 12 hours for the first time
•
Please use charger appro
•
Please don’t disconnect the charger
• Battery icon will sh
ow whether it is fully charged
•
Don’t charge in high temperature environment (like under direct sunshine)
•
Lithium battery doesn’t need to discharge. User can charge the battery
still power left
•
While charging, it is normal that both charger and device will heat up
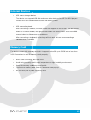
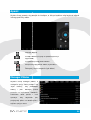
Computer Connection & File Transfer
•
Connect the device to computer with USB cable
•
The default mode is battery charging mode
•
To change the default charging mode to transfer mode,
switch to USB storage status (see picture below)
Select “Cancel” to cancel power off operation.
power
, it will have warning voice;
connect the
begin to charge, it will automatically
turn
off. If the product cannot boot, please check the
Battery and Charge
Battery should be charged for 8 to 12 hours for the first time
Please use charger appro
ved by our company for charging
Please don’t disconnect the charger
until device is fully charged
ow whether it is fully charged
Don’t charge in high temperature environment (like under direct sunshine)
Lithium battery doesn’t need to discharge. User can charge the battery
While charging, it is normal that both charger and device will heat up
Computer Connection & File Transfer
Connect the device to computer with USB cable
The default mode is battery charging mode
To change the default charging mode to transfer mode,
roll down the status bar and
switch to USB storage status (see picture below)
6
connect the
DC adapter and
off. If the product cannot boot, please check the
Don’t charge in high temperature environment (like under direct sunshine)
Lithium battery doesn’t need to discharge. User can charge the battery
when there is
While charging, it is normal that both charger and device will heat up
roll down the status bar and

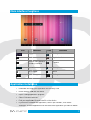
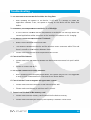
Main Interface Functions
Icon
Google search
Back
Back to main interface
from any interface
System current time
Wi-Fi
Mass storage status
Application Installation
•
Download and copy your application into memory card
•
Insert memory card into the device
•
Open “Setting/application program”
•
Select “Unknown sources”
•
Find your application file and install it on the device
•
If you want to uninstall the application, select “Apk installer”, then select
“Manager” to enter applications list and select the application you want to delete
Main Interface Functions
Definition
Icon
Definition
Google search
Setting
Application list
Back to main interface
from any interface
Camera
System current time
Battery
signal
Menu
Mass storage status
Setting menu
Application Installation
Download and copy your application into memory card
Insert memory card into the device
Open “Setting/application program”
Select “Unknown sources”
Find your application file and install it on the device
If you want to uninstall the application, select “Apk installer”, then select
“Manager” to enter applications list and select the application you want to delete
7
Definition
If you want to uninstall the application, select “Apk installer”, then select
“Manager” to enter applications list and select the application you want to delete

• Click t
o go back to previous interface
Internet
• Wi-Fi connection.
Click the main interface shortcut, select “Internet connec
settings”, enter Wi-Fi
setting interface
• The device
will automatically scan for wireless networks
• Select your network
•
Enter the password when prompted and connect to the network to get access to the
Internet
o go back to previous interface
Click the main interface shortcut, select “Internet connec
tion
manager”, click “W
setting interface
and turn on the Wi-
Fi switch (see picture below)
will automatically scan for wireless networks
Enter the password when prompted and connect to the network to get access to the
8
manager”, click “W
i-Fi
Fi switch (see picture below)
Enter the password when prompted and connect to the network to get access to the

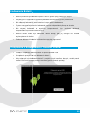
Music Player
Click the music icon to enter the music player interface.
Play the previous music, long press to fast reverse
Pause
Play the next song, long press to
Display the present playing list
Select the random playing mode
Select the repeat playing mode
Play
Click the music icon to enter the music player interface.
Select your music
Play the previous music, long press to fast reverse
Pause
Play the next song, long press to
fast forward
Display the present playing list
Select the random playing mode
Select the repeat playing mode
Play
9
Select your music
file.
Play the previous music, long press to fast reverse

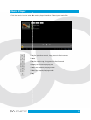
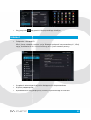
Video Player
Click the video
icon to enter the
Play the previous
Pause
Play the next
Screen adjustment
Click to set up
Enter video settings
Play
icon to enter the
video player interface. Select your video
file.
Play the previous
video
, long press to fast reverse
Pause
Play the next
video, long press to fast forward
Screen adjustment
Click to set up
brightness
Enter video settings
Play
10
file.
, long press to fast reverse

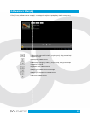
Photo Browser
Click the photo gallery
icon to enter the
photo menu.
icon to enter the
photo browser interface. Click
Select pictures
Zoom in/out the picture
Brightness setting
Rotate the picture
Enter the slideshow mode
Enter video settings
Return to previous menu
11
icon to bring up

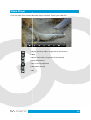
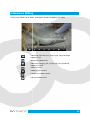
Camera
Select the camera icon, to enter the camera mode.
record a video.
Take
a picture
Switch front/rear camera (if available)
Enter video record mode
Begin record (video mode)
Stop and save the recording (video mode)
File Manager
Select the file ma
nager icon, then
select “microSD
” or “Local Disk” to
expand the
folders and related files.
Here you can copy, move, paste or
rename files. To edit a file, hold a
finger on it and bring up the edit
menu.
Select the camera icon, to enter the camera mode.
In this interface you can take a picture or
a picture
Switch front/rear camera (if available)
Enter video record mode
Begin record (video mode)
Stop and save the recording (video mode)
nager icon, then
” or “Local Disk” to
folders and related files.
Here you can copy, move, paste or
rename files. To edit a file, hold a
finger on it and bring up the edit
12
In this interface you can take a picture or

External Devices
•
USB mass storage devices
The device can support USB disk and some other devices like MP3 or
Please don’t use external devices with low battery power.
• USB mouse/keyboard
After connecting a mouse, a mouse pointer will appear on the screen. The left mouse
button is a confirm button, the right mouse button is a return button. Use the mi
mouse button to slide menus up and down.
After connecting a keyboard, some keys will not work. We are recommending a
standard USB keyboard.
Memory Card
The device comes with memory card slot. It supports
1GB. Re
member to use all memory cards properly:
•
When card is working, don’t pull it out
•
Avoid using memory card in high temperature or high humidity environment
•
Keep the memory card away from liquids
•
To pull out a memory card, push it a little and it will pop up
•
Do not force pull or push a memory card
USB mass storage devices
The device can support USB disk and some other devices like MP3 or
Please don’t use external devices with low battery power.
After connecting a mouse, a mouse pointer will appear on the screen. The left mouse
button is a confirm button, the right mouse button is a return button. Use the mi
mouse button to slide menus up and down.
After connecting a keyboard, some keys will not work. We are recommending a
standard USB keyboard.
The device comes with memory card slot. It supports
microSD up to 32
GB but no less than
member to use all memory cards properly:
When card is working, don’t pull it out
Avoid using memory card in high temperature or high humidity environment
Keep the memory card away from liquids
To pull out a memory card, push it a little and it will pop up
Do not force pull or push a memory card
13
The device can support USB disk and some other devices like MP3 or
MP4 players.
After connecting a mouse, a mouse pointer will appear on the screen. The left mouse
button is a confirm button, the right mouse button is a return button. Use the mi
ddle
After connecting a keyboard, some keys will not work. We are recommending a
GB but no less than
Avoid using memory card in high temperature or high humidity environment

Troubleshooting
1.
The first time to turn on the
•
After updating the system of the
application software. Then, the speed of turning on the
before.
2.
Sometimes, the temperature of the
•
It is the common situation that the temperature of the
several applications at the same time or the backlight is maximum or it is charging.
3. The device cannot connect to the Wi
•
Make sure the wireless router works well.
•
The distance between the
there is no wall or other barriers between them.
•
Please make sure the user and the password are correct.
4. Cannot surf the Internet.
•
Please make sure the distance between the
50m.
• Please re-
connect the Wi
5. The system cannot run in some situation.
•
When installing some third party applications, the system may not run. It is suggested
to long click the Power button for 6 seconds to turn off the
6. Cannot set the E-
mail or register the application system
•
Please make sure the connection of the
•
Please make sure the way to set the
7. Cannot read the data of
the memory
•
Please make sure the
•
Please make sure that your memory card capacity is between 1 and 16GB
The first time to turn on the
device takes too long time.
After updating the system of the
device, it will take 2-
3 minutes to install the
application software. Then, the speed of turning on the
device
Sometimes, the temperature of the
device is a little high.
It is the common situation that the temperature of the
device
is a little high when use
several applications at the same time or the backlight is maximum or it is charging.
3. The device cannot connect to the Wi
-Fi network.
Make sure the wireless router works well.
The distance between the
device and the wireles
s router should be wi
there is no wall or other barriers between them.
Please make sure the user and the password are correct.
Please make sure the distance between the
device
and the wireless
connect the Wi
-Fi.
5. The system cannot run in some situation.
When installing some third party applications, the system may not run. It is suggested
to long click the Power button for 6 seconds to turn off the
device.
mail or register the application system
Please make sure the connection of the
Internet works well.
Please make sure the way to set the
e-mail is correct.
the memory
card
Please make sure the
memory card inserted into the device
correctly.
Please make sure that your memory card capacity is between 1 and 16GB
14
3 minutes to install the
will be faster than
is a little high when use
several applications at the same time or the backlight is maximum or it is charging.
s router should be wi
thin 50m and
and the wireless
hot spot is within
When installing some third party applications, the system may not run. It is suggested
correctly.
Please make sure that your memory card capacity is between 1 and 16GB

8. Sometimes, the device
runs slowly.
•
This is the common situation. But you can
management interface, or un
system resources.
9. Bluetooth connect
1. Keyboard set switch to ON and press Connect button
2. Tablet Settings-
>Bluetooth set ON
3. When tablet find on list Goclever
4.Using keyboard
keys input 4
5. Now you can you
keyboard
runs slowly.
This is the common situation. But you can
close some applications in the l
management interface, or un
install
some third party application to release more
1. Keyboard set switch to ON and press Connect button
>Bluetooth set ON
3. When tablet find on list Goclever
Keyboard tap on it.
keys input 4
code PIN and press Enter
keyboard
with tablet after success Pair
15
close some applications in the l
ast
some third party application to release more

Tablet R105BK
INSTRUKCJA OBSŁUGI
WWW.GOCLEVER.COM
TO SEE MORE PRODUCTS TAB, NAVIO, DVR, DVB
Przed
skorzystaniem z urzą ę ą ą
oraz zachowaj ją ść
Tablet R105BK
INSTRUKCJA OBSŁUGI
VISIT OUR WEBSITE
WWW.GOCLEVER.COM
TO SEE MORE PRODUCTS TAB, NAVIO, DVR, DVB
skorzystaniem z urządzenia zapoznaj się z niniejszą instrukcją
oraz zachowaj ją na przyszłość
16
WWW.GOCLEVER.COM
TO SEE MORE PRODUCTS TAB, NAVIO, DVR, DVB
-T
ą ę ą instrukcją obsługi

1. Przed skorzystaniem z urzą ę ę
że przeczytane instrukcje są dla Ciebie
2. Nasza firma posiada wszelkie prawa autorskie niniejszej instrukcji obsługi. Zabrania się
powielania zarówno w części jak i w całoś
3. Informacje zawarte w niniejszej instrukcji obsługi opierają ę ę
danych,
jednak firma zastrzega sobie prawo do ich zmiany bez wcześ
Firma nie ponosi odpowiedzialnoś ę ż
instrukcji obsługi. Dodatkowe informacje dostę ą
4. Pod
czas korzystania z urzą ę ń
przechowywanych na nim danych. Firma nie ponosi odpowiedzialnoś
utracenie danych wynikłe z niewłaś ą
Ostrzeżenia
Niniejsza
instrukcja obsługi zawiera waż ą
poprawnego korzystania z urzą ż
uszkodzeniu urządzenia lub skaleczeniu ciała. Nie przechowuj urzą
pomieszczeniach, w których panuj
Nie zostawiaj urządzenia w samochodzie, w miejscu, w którym bę ż
bezpośrednie działanie promieni słonecznych.
•
Staraj się nie narażać urzą ą ą ć
•
Wybieraj odpowiedni poziom głoś ś ź ę
słuchawkowego. Zaprzestań ż ż
•
Nie przerywaj połączenia sieciowego, jeż ą
danych. Nie wyjmuj
karty pamię
•
Firma nie ponosi odpowiedzialnoś
•
Nie demontuj urządzenia. Nie czyść ą ż ś ą
alkohol, rozpuszczalnik lub benzynę
•
Nie używaj urządzeni
elektronicznych jest zabronione (np. w samolocie)
•
Nie używaj urządzenia podczas prowadzenia pojazdu lub podczas przechodzenia
przez jezdnię samochodową
Ważne Informacje
1. Przed skorzystaniem z urządzenia, przeczytaj wszystkie dostępne informacje. Upewnij się
ż ą dla Ciebie
zrozumiałe.
2. Nasza firma posiada wszelkie prawa autorskie niniejszej instrukcji obsługi. Zabrania się
ęści jak i w całości.
3. Informacje zawarte w niniejszej instrukcji obsługi opierają się na najnowszych dostę
jednak firma zastrzega sobie prawo do ich zmiany bez wcześniejszego uprzedzenia.
Firma nie ponosi odpowiedzialności za jakiekolwiek błędy wynikłe z uż
instrukcji obsługi. Dodatkowe informacje dostępne są na stronie www.goclever.com.
czas korzystania z urządzenia, pamiętaj o wykonaniu kopii bezpieczeń
przechowywanych na nim danych. Firma nie ponosi odpowiedzialności za uszkodzenie lub
utracenie danych wynikłe z niewłaściwego korzystania z urządzenia.
instrukcja obsługi zawiera ważne informacje dotyczące bezpiecznego i
poprawnego korzystania z urządzenia. Przeczytaj poniższe wskazówki, aby zapobiec
ądzenia lub skaleczeniu ciała. Nie przechowuj urzą
pomieszczeniach, w których panuj
e wysoka temperatura lub wysoka wilgotność
ądzenia w samochodzie, w miejscu, w którym będzie ono naraż
średnie działanie promieni słonecznych.
ę ż ć urządzenia na wstrząsy, które mogą uszkodzić
Wybieraj odpowiedni poziom głośności dźwięku podczas korzystania z zestawu
słuchawkowego. Zaprzestań używania słuchawek, jeżeli słyszysz szum w uszach.
ączenia sieciowego, jeżeli urządzenie jest w trakcie pobierania
karty pamięci podczas zapisu lub odczytu danych.
Firma nie ponosi odpowiedzialności za szkody wynikłe z utraty danych.
ądzenia. Nie czyść urządzenia przy użyciu środków zawierają
alkohol, rozpuszczalnik lub benzynę.
ż ądzeni
a w miejscach, w których korzystanie z urzą ń
elektronicznych jest zabronione (np. w samolocie)
ż ądzenia podczas prowadzenia pojazdu lub podczas przechodzenia
ę samochodową.
17
ą ępne informacje. Upewnij się,
2. Nasza firma posiada wszelkie prawa autorskie niniejszej instrukcji obsługi. Zabrania się jej
ą ę na najnowszych dostępnych
śniejszego uprzedzenia.
ś ędy wynikłe z używania niniejszej
ę ą na stronie www.goclever.com.
ą ętaj o wykonaniu kopii bezpieczeństwa
ści za uszkodzenie lub
ż ące bezpiecznego i
ą ższe wskazówki, aby zapobiec
ądzenia lub skaleczeniu ciała. Nie przechowuj urządzenia w
e wysoka temperatura lub wysoka wilgotność powierza.
ą ędzie ono narażone na
ę ż ć ą ą ą uszkodzić ekran
IPS.
ś ś ź ęku podczas korzystania z zestawu
ń ż żeli słyszysz szum w uszach.
ą ż ądzenie jest w trakcie pobierania
ęci podczas zapisu lub odczytu danych.
ści za szkody wynikłe z utraty danych.
ą ść ą ż środków zawierających
a w miejscach, w których korzystanie z urządzeń
ż ądzenia podczas prowadzenia pojazdu lub podczas przechodzenia

•
Firma zastrzega sobie prawo do wprowadzania ulepszeń
wcześniejszego ostrzeż
•
Urządzenie nie jest wodoodporne.
Wygląd i Przyciski
1. Przedni aparat
2. “V -”:
Zmniejsz poziom głoś ś
3. “V +”:
Zwiększ poziom głoś ś
4. Przycisk zasilania –
przytrzymaj
przez kilka sekund, aby włą ć ą ć
urządzenie, naciśnij przycisk, aby
zablokować ekran.
5. Gniazdo kart pamięci
Firma zastrzega sobie prawo do wprowadzania ulepszeń
śniejszego ostrzeżenia i zmian w specyfikacji.
ądzenie nie jest wodoodporne.
Zmniejsz poziom głośności
ększ poziom głośności
przytrzymaj
przycisk
przez kilka sekund, aby włączyć/wyłączyć
ą śnij przycisk, aby
6. Gniazdo HDMI
7. Port USB: 5-
pinowy kabel USB z
obsługą zewnętrznych urzą ń ę
masowej, myszy, klawiatury, Internetu 3G
innych
8. Gniazdo zasilania:
9V
9. Wejście słuchawkowe
10. Mikrofon
18
Firma zastrzega sobie prawo do wprowadzania ulepszeń p
roduktu bez
pinowy kabel USB z
ą ętrznych urządzeń pamięci
masowej, myszy, klawiatury, Internetu 3G
i
9V
(wtyczka 2.5mm)

Szybki Start
Włączanie/wyłączanie urządzenia i odblokowywanie ekranu: aby włą ć ą
przytrzymaj przycisk “
” przez około trzy sekundy. Urzą
sekundach. Załadowanie systemu zajmuje około 100 sekund. Bę ą
przeciągnij ikonę “
” na ikonę ąć ę
Blokowanie ekranu i oszczędzanie baterii: po kilku minutach
w tryb oszczędzania baterii. Wciś
i podświetlić ekran. Użyj ikony “
Uwaga:
Tryb oszczędzania baterii nie przerwie odtwarzania filmu oraz muzyki
podświetlenie ekranu.
Wyłączanie urządzenia: przytrzymaj przycisk “
wyświetli informację o potwierdzeniu wyłą ą ę ą
zamknąć system.
Uwaga:
Urządzenie przypomni o
Jeżeli urządzenie nie chce się ć ż ą ć ę ć
uruchomić je ponownie po kilku minutach.
ą ą ądzenia i odblokowywanie ekranu: aby włą ć ą
” przez około trzy sekundy. Urządzenie
uruchomi się
sekundach. Załadowanie systemu zajmuje około 100 sekund. Będąc na ekranie blokady,
” na ikonę odblokowanej kłódki, aby rozpocząć pracę
ędzanie baterii: po kilku minutach
bezczynności, system przejdzie
ędzania baterii. Wciśnij przycisk “
” aby przywrócić system do normalnej pracy
ś ć żyj ikony “
” aby odblokować ekran.
ędzania baterii nie przerwie odtwarzania filmu oraz muzyki
ą ądzenia: przytrzymaj przycisk “
”
przez około pięć
ś ę o potwierdzeniu wyłączenia urządzenia. Wybierz opcję ą
ądzenie przypomni o
niskim poziome baterii charakterystycznym dź ę
ż ądzenie nie chce się uruchomić, należ y podłączyć ładowarkę ć
ć je ponownie po kilku minutach.
19
ą ą ądzenia i odblokowywanie ekranu: aby włączyć urządzenie,
uruchomi się po kilkunastu
ę ąc na ekranie blokady,
ę ąć pracę:
ści, system przejdzie
ć system do normalnej pracy
ędzania baterii nie przerwie odtwarzania filmu oraz muzyki
, ale wyłączy
przez około pięć sekund. System
ś ę ą ądzenia. Wybierz opcję wyłączenia, aby
niskim poziome baterii charakterystycznym dźwiękiem.
ż ą ę ć ż ą ć ładowarkę i spróbować

Ładowanie Baterii
•
Bateria powinna być ładowana przez 8 do 12 godzin przy pier
•
Używaj tylko i wyłącznie oryginalnej ładowarki dostarczonej przez producenta
•
Nie odłączaj ładowarki, jeż ą
•
System zasygnalizuje koniec ładowania poprzez odpowiednią ę
•
Nie używaj ładowarki w
bezpośrednich promieni słonecznych)
•
Bateria litowa może być
wykorzystana do końca
•
Podczas ładowania bateria i ładowarka mogą ę ć
Połączenie z Komput
•
Podłącz urządzenie do komputera za pomocą
•
Urządzenie przejdzie w tryb ładowania baterii
•
Aby wyłączyć tryb ładowania baterii i przejść ń
zadań i uruchom funkcję ę
ć ładowana przez 8 do 12 godzin przy pier
wszym uż
ż ącznie oryginalnej ładowarki dostarczonej przez producenta
ączaj ładowarki, jeżeli baterie nie są w pełni naładowane
System zasygnalizuje koniec ładowania poprzez odpowiednią ikonę
żywaj ładowarki w
wysokich temperaturach (np. podczas działania
średnich promieni słonecznych)
że być ładowana nawet wtedy, gdy jej energia nie została
ńca
Podczas ładowania bateria i ładowarka mogą się nagrzewać
ączenie z Komput
erem i Transfer Plików
ą ądzenie do komputera za pomocą kabla USB
ądzenie przejdzie w tryb ładowania baterii
ą ć tryb ładowania baterii i przejść w tryb transferu danych, rozwiń
ń i uruchom funkcję pamięci masowej (patrz ob
razek poniżej)
20
wszym użyciu
ż ącznie oryginalnej ładowarki dostarczonej przez producenta
ą ikonę na ekranie
wysokich temperaturach (np. podczas działania
ż ć ładowana nawet wtedy, gdy jej energia nie została
ą ć ść w tryb transferu danych, rozwiń pasek
Strona jest ładowana ...
Strona jest ładowana ...
Strona jest ładowana ...
Strona jest ładowana ...
Strona jest ładowana ...
Strona jest ładowana ...
Strona jest ładowana ...
Strona jest ładowana ...
Strona jest ładowana ...
Strona jest ładowana ...
Strona jest ładowana ...
-
 1
1
-
 2
2
-
 3
3
-
 4
4
-
 5
5
-
 6
6
-
 7
7
-
 8
8
-
 9
9
-
 10
10
-
 11
11
-
 12
12
-
 13
13
-
 14
14
-
 15
15
-
 16
16
-
 17
17
-
 18
18
-
 19
19
-
 20
20
-
 21
21
-
 22
22
-
 23
23
-
 24
24
-
 25
25
-
 26
26
-
 27
27
-
 28
28
-
 29
29
-
 30
30
-
 31
31


GOCLEVER R105BK Instrukcja obsługi
- Kategoria
- Tabletki
- Typ
- Instrukcja obsługi
- Ten podręcznik jest również odpowiedni dla