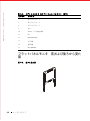
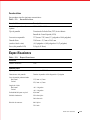
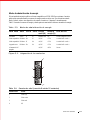
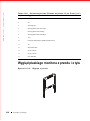
Dell 17FP Instrukcja obsługi
- Kategoria
- Telewizory
- Typ
- Instrukcja obsługi
Niniejsza instrukcja jest również odpowiednia dla

www.dell.com | support.dell.com
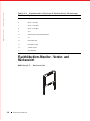
Dell™ PowerEdge™ Rack Console 17FP
Flat-Panel Monitor
User’s Guide
Guide Utilisateur du Moniteur à Ecran Plat
Flachbildschirm-Monitor - Bedienungsanleitung
フラットパネルモニタ ユーザーズガイド
Guía del usuario del monitor de pantalla plana
平板顯示器用戶指南
平面顯示器使用手冊
LCD 모니터 사용 설명서
Instrukcja Obsługi Monitora Płaskoekranowego
Руководство
пользователя монитора с плоским экраном
17FPugfc_00.fm Page 1 Wednesday, August 29, 2007 5:18 PM

17FPugfc_00.fm Page 2 Wednesday, August 29, 2007 5:18 PM

www.dell.com | support.dell.com
Dell™ PowerEdge™ Rack Console 17FP
Flat-Panel Monitor
User’s Guide

Notes, Cautions, and Warnings
NOTE: A NOTE indicates important information that helps you make better use of your computer.
CAUTION: A CAUTION indicates potential damage to hardware or loss of data if instructions are
not followed.
WARNING: A WARNING indicates a potential for property damage, personal injury, or death.
____________________
Information in this document is subject to change without notice.
© 2009 Dell Inc. All rights reserved.
Reproduction of these materials in any manner whatsoever without the written permission of Dell Inc. is strictly forbidden.
Trademarks used in this text: Dell and the DELL logo are trademarks of Dell Inc.; Microsoft and Windows are either
trademarks or registered trademarks of Microsoft Corporation in the United States and/or other countries.
Other trademarks and trade names may be used in this document to refer to either the entities claiming the marks and
names or their products. Dell Inc. disclaims any proprietary interest in trademarks and trade names other than its own.
Model 17FP
December 2009 P/N MNPG9 Rev. A00

Contents 3
Contents
CAUTION: Safety Instructions . . . . . . . . . . . . . . . . . . 1-1
Rack Mounting of Systems. . . . . . . . . . . . . . . . 1-1
Instruction . . . . . . . . . . . . . . . . . . . . . . . . . . . . 1-2
Overview. . . . . . . . . . . . . . . . . . . . . . . 1-2
Features . . . . . . . . . . . . . . . . . . . . . . . 1-2
Specifications . . . . . . . . . . . . . . . . . . . . . . . . . . . 1-3
Power Management Modes . . . . . . . . . . . . . . . 1-7
Flat-Panel Monitor Front and Back View . . . . . . . . . . . . . 1-8
Setting Up the Flat-Panel Monitor. . . . . . . . . . . . . 1-9
Power Management System . . . . . . . . . . . . . . . 1-9
Maintenance . . . . . . . . . . . . . . . . . . . . . . . . . . 1-10
Adjusting the Monitor Display . . . . . . . . . . . . . . . . . 1-10
Troubleshooting . . . . . . . . . . . . . . . . . . . . . . . . . 1-15
Issue: Display is unclear or unstable.. . . . . . . . . . . 1-15
Issue: There is no display on the flat-panel monitor. . . . . . 1-15
Issue: "Input Signal Out of Range" message in the OSD. . . . 1-15
Issue: "No Signal" message in the OSD. . . . . . . . . . 1-15

4 Contents

User’s Guide 1-1
CAUTION: Safety Instructions
Use the following safety guidelines to help ensure your own personal safety and to help
protect your system from potential damage. For complete safety information, see the safety
documentation that came with your system.
IMPORTANT NOTICE FOR USE IN HEALTHCARE ENVIRONMENTS:
Dell products are not medical devices and are not listed under UL or IEC 60601 (or
equivalent). As a result, they must not be used within 6 feet of a patient or in a manner that
directly or indirectly contacts a patient.
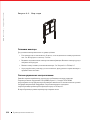
Rack Mounting of Systems
Observe the following precautions for rack stability and safety. Also refer to the rack
installation documentation accompanying the system and the rack for specific warning and/or
caution statements and procedures.
Systems are considered to be components in a rack. Thus, "component" refers to any system
as well as to various peripherals or supporting hardware.
CAUTION: Installing systems in a rack without the front and side stabilizers
installed could cause the rack to tip over, potentially resulting in bodily injury
under certain circumstances. Therefore, always install the stabilizers before
installing components in the rack.
After installing system/components in a rack, never pull more than one
component out of the rack on its mounting rails at one time. The weight of more
than one extended component could cause the rack to tip over and may result in
serious injury.
NOTE:
Your system is safety-certified as a component for use in a rack cabinet using the
customer rack kit when both the rack cabinet and rack kit were designed for your
system. The installation of your system and rack kit in any other rack cabinet has not
been approved by any safety agencies. It is your responsibility to have the final
combination of system and rack kit in a cabinet evaluated for suitability by a certified
safety agency. The manufacturer disclaims all warranties and liability in connection with
such combinations.
• System rack kits are intended to be installed in a rack by trained service technicians. If
you install the kit in any other rack, be sure that the rack meets the specifications.
CAUTION: Do not move racks by yourself. Due to the height and weight of the
rack, a minimum of two people should accomplish this task.

www.dell.com | support.dell.com
1-2 User’s Guide
Instruction
Overview
This product outlines the specifications for the 17-inch, high-resolution color flat-panel
monitor. This flat-panel monitor is designed from the latest flat-panel monitor technology and
provides a performance oriented product with no radiation. This product uses a D-Sub 15-pin
VGA connector and can support 28 VESA modes, VESA DPMS power management, and plug
and play function. It is also a space saving design which conserves rack space compared to a
traditional CRT monitor. In addition, the flat-panel monitor consumes less power.
Features
This product has the following features:
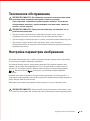
• Before working on the rack, make sure that the stabilizers are secured to the rack,
extended to the floor, and that the full weight of the rack rests on the floor. Install front
and side stabilizers on a single rack or front stabilizers for joined multiple racks before
working on the rack.
• Always load the rack from the bottom up, and load the heaviest item in the rack first.
• Make sure that the rack is level and stable before extending a component from the rack.
• Do not overload the AC supply branch circuit that provides power to the rack. The total
rack load should not exceed 80 percent of the branch circuit rating.Check the voltage
rating before you connect the equipment to the power source to ensure that the required
voltage and frequency match the available power source.
• Do not use equipment power cables if the power cable is damaged. Use only with 40W
of power supply (Liteon PA-1041 series)
• Ensure that proper airflow is provided to components in the rack.
• Do not step on or stand on any component when servicing other components in a rack.
• For PLUGGABLE EQUIPMENT, the socket-outlet shall be installed near the
equipment and shall be easily accessible.
Table 1-1. Features
Feature Description
Optimal resolution and refresh 1280 x 1024 at 60 Hz
CAUTION: Safety Instructions
(continued)

User’s Guide 1-3
Specifications
Table 1-2. Specifications
Screen type Active Matrix Thin Film Transistor (TFT)
Liquid Crystal Display (LCD)
Display active area 337.9 mm x 270.3 mm (13.3 inches x 10.64 inches)
Physical size
(width x depth x height)
358.5 mm x 17.5 mm x 296.5 mm
(14.1 inches x 0.689 inches x 11.67 inches )
Weight (LCD Panel only) 2.0 kg (4.41 lbs)
General
Model number 17FP
Flat Panel
Screen type Active matrix-TFT LCD
Screen dimensions 17-inch diagonal viewable image size
Preset display area:
Horizontal
Ver ti ca l
337.9 mm ± 0.5 mm
270.3 mm ± 0.5 mm
Viewing angle:
Horizontal
Ver ti ca l
+80 / –80 degree
+80 / –80 degrees
Pixel dot pitch 0.264 mm
Luminance output 250 cd/m
2
typical
200 cd/m
2
min
Contrast ratio 800:1 typical
550:1 min
Faceplate coating Anti-glare
Backlight CCFL <2> edge light system
Table 1-1. Features
(continued)
Feature Description

www.dell.com | support.dell.com
1-4 User’s Guide
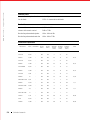
Resolution
Horizontal scan range 30 KHz to 80 KHz
Vertical scan range 56 Hz to 75 Hz
Optimal preset resolution 1280 x 1024 at 60 Hz
Highest preset resolution 1280 x 1024 at 75 Hz
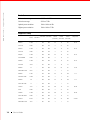
Supported Timing
TIMING NAME FH(KHz)
FV(Hz)
SYNC
POLARITY
TOTAL
(DOT/LINE)
ACTIVE
(DOT/LINE)
SYNC
WIDTH
(DOT/LINE)
FRONT
PORCH
(DOT/LINE)
BACK
PORCH
(DOT/LINE)
PIXEL
FREQ (MHz)
640x350 31.469 + 800 640 96 16 48 25.175
VGA-350 70.087 - 449 350 2 37 60
640x350 31.469 + 800 640 96 16 48 25.175
VGA-350 70.087 - 449 350 2 37 60
640x400 31.469 - 800 640 96 16 48 25.175
VGA-GRAPH 70.087 + 449 400 2 12 35
640x480 31.469 - 800 640 96 16 48 25.175
VGA-480 59.94 - 525 480 2 10 33
640x480 35 - 864 640 64 64 96 30.24
APPLE MAC-480 66.67 - 525 480 3 3 39
640x480 37.861 - 832 640 40 16 120 31.5
VESA-480-72Hz 72.809 - 520 480 3 1 20
640x480 37.5 - 840 640 64 16 120 31.5
VESA-480-75Hz 75 - 500 480 3 1 16
720x350 31.47 + 900 720 108 18 54 28.322
70Hz 70.087 - 449 400 2 37 60
720x400 31.469 - 900 720 108 18 54 28.322
VESA-400-TEXT 70.087 + 449 400 2 12 35
832x624 49.725 - 1152 832 64 32 224 57.2832
APPLE MAC-800 74.55 - 667 624 3 1 39

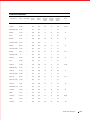
User’s Guide 1-5
800x600 35.156 + 1024 800 72 24 128 36
SVGA 56.25 + 625 600 2 1 22
800x600 37.879 + 1056 800 128 40 88 40
VESA-600-60Hz 60.317 + 628 600 4 1 23
800x600 48.077 + 1040 800 120 56 64 50
VESA-600-72Hz 72.188 + 666 600 6 37 23
800x600 46.875 + 1056 800 80 16 160 49.5
VESA-600-75Hz 75 + 625 600 3 1 21
1024x768 48.363 - 1344 1024 136 24 160 65
XGA 60.004 - 806 768 6 3 29
1024x768 53.964 + 1328 1024 176 16 112 71.664
COMPAQ-XGA 66.132 + 816 768 4 8 36
1024x768 56.476 - 1328 1024 136 24 144 75
VESA-768-70Hz 70.069 - 806 768 6 3 29
1024x768 60.023 + 1312 1024 96 16 176 78.75
VESA-768-75Hz 75.029 + 800 768 3 1 28
1024x768 60.24 - 1328 1024 96 32 176 80
APPLE MAC-768 75.02 - 803 768 3 3 29
1152x864 54.054 + 1480 1152 96 40 192 80
(60Hz) 59.27 + 912 864 3 13 32
1152x864 63.851 + 1480 1152 96 32 200 94.499
(70Hz) 70.012 + 912 864 3 1 44
1152x864 67.5 + 1600 1152 128 64 256 108
(75Hz) 75. + 900 864 2 2 32
1152x870 68.68 - 1456 1152 128 32 144 100
(75Hz) 75.06 - 915 870 3 3 39
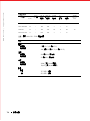
Supported Timing
TIMING NAME FH(KHz)
FV(Hz)
SYNC
POLARITY
TOTAL
(DOT/LINE)
ACTIVE
(DOT/LINE)
SYNC
WIDTH
(DOT/LINE)
FRONT
PORCH
(DOT/LINE)
BACK
PORCH
(DOT/LINE)
PIXEL
FREQ (MHz)

www.dell.com | support.dell.com
1-6 User’s Guide
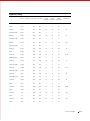
1280x960 60 + 1800 1280 112 96 312 108
(60Hz) 60 + 1000 960 3 1 36
1280x960 70 + 1800 1280 112 96 312 126
(70Hz) 70 + 1000 960 3 1 36
1280x960 75 + 1800 1280 112 96 312 135
(75Hz) 75 + 1000 960 3 1 36
1280x1024 64 + 1688 1280 112 48 248 108
VESA-1024-60Hz 60
+
1066 1024 3 1 38
1280x1024 80 + 1688 1280 144 16 248 135
VESA-1024-75Hz 75 + 1066 1024 3 1 38
NOTE: Mode 640 x 350, 70 Hz is not full screen.
Environmental
Temperature:
Operating
Nonoperating
5° to 35° C (50° to 95° F)
–20° to 60° C (–4° to 113° F) for 240 hours
Humidity:
Operating
Nonoperating
20% to 80% (noncondensing)
5% to 80% (noncondensing)
Altitude:
Operating
Nonoperating
3,000 m (10,000 ft)
12,192 m (40,000 ft)
Thermal dissipation:
Maximum
Typical
71.7 BTU/hour
51.2 BTU/hour
Supported Timing
TIMING NAME FH(KHz)
FV(Hz)
SYNC
POLARITY
TOTAL
(DOT/LINE)
ACTIVE
(DOT/LINE)
SYNC
WIDTH
(DOT/LINE)
FRONT
PORCH
(DOT/LINE)
BACK
PORCH
(DOT/LINE)
PIXEL
FREQ (MHz)

User’s Guide 1-7
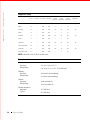
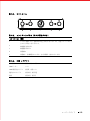
Power Management Modes
If you have a VESA DPMS compliant display card or software installed in your system, the monitor can
automatically reduce its power consumption when not in use. If input from the keyboard, mouse, or other
input devices is detected, the monitor will automatically "wake up." Table 1-3 shows the power
consumption and signals for this automatic power saving feature.
Figure 1-1. Pin Assignment
Table 1-3. Power Management Modes
VESA Mode Video H-sync V-sync Power Used
(W)
Power Saving
(%)
LED Color
On Active Yes Yes Maximum 20W 0% Full bright < blue >
Sleep mode Blanked No Yes <0.5 W >75% Half bright < blue >
Sleep mode Blanked Yes No <0.5 W >75% Half bright < blue >
Active-off Blanked No No <0.5 W >75% Half bright < blue >
DC power off <0.5 W >85% Dark
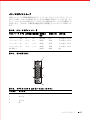
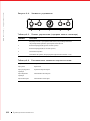
Table 1-4. Signal Connector (15 pin D-sub Connector)
Pin No Signal
1Red Video
2Green Video
3Blue Video
4NC
5 Logic Ground
1
5
6
10
11
15

www.dell.com | support.dell.com
1-8 User’s Guide
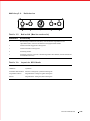
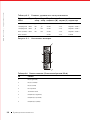
Flat-Panel Monitor Front and Back View
Figure 1-2. Front View
6 Red Video Ground
7 Green Video Ground
8 Blue Video Ground
9VCC
10 Identify VGA Cable Connection
11 NC
12 SDA (DDC1/2B)
13 Horizontal Sync
14 Vertical Sync
15 SCL (DDC2B)
Table 1-4. Signal Connector (15 pin D-sub Connector)
(continued)
Pin No Signal

User’s Guide 1-9
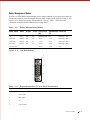
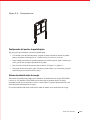
Figure 1-3. Back View
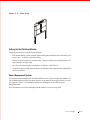
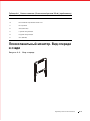
Setting Up the Flat-Panel Monitor
Follow the steps below to set up the flat-panel monitor.
• If the monitor has not yet been operated, ensure the flat-panel monitor has been connected to an AC
power source. See the Rack Installation Guide.
• Pull the flat-panel monitor tray out until it locks. Grasp the monitor by its handle and rotate it to
approximately a 90 degree angle.
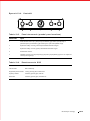
• Press the power button to turn on the monitor. See Figure 1-4 and Table 1-5.
• To adjust the monitor height, grasp the monitor at both sides and use equal pressure on both sides to
move it up and down.
Power Management System
This flat-panel monitor complies with the VESA DPMS (version 11) power management standard. The
VESA DPMS proposal provides four phases of power saving modes by detecting horizontal or vertical
sync signal. See Table 1-3 for information about power consumption for each different power
management mode.
The LED indicator color will be half-bright when the monitor is in power saving mode.

www.dell.com | support.dell.com
1-10 User’s Guide
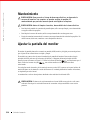
Maintenance
CAUTION: To avoid risk of electric shock, do not disassemble the monitor
cabinet. Users cannot service the monitor. User maintenance is restricted to
cleaning.
CAUTION: Before cleaning the monitor, unplug it from the electrical outlet.
• To clean your flat-panel monitor screen, use a soft, clean cloth lightly dampened with water or
isopropyl alcohol.
• To clean the monitor cabinet, use a cloth lightly dampened with a mild detergent.
• Wipe off stubborn stains from the cabinet with a cloth lightly dampened in isopropyl alcohol. Do
not use benzene, thinner, ammonia, or abrasive cleaners.
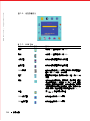
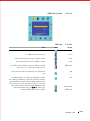
Adjusting the Monitor Display
The flat-panel monitor features an intuitive, menu-driven, On-Screen Display (OSD) that makes the
display characteristics adjustment quick and simple.
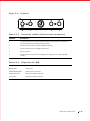
This model has four control keys located below the monitor screen. To access the OSD main menu, press
the function buttons and the OSD main menu diagram will appear as shown in Figure 1-5. Use the
function buttons to scroll through the menu. Use the adjustment buttons to make
changes to the selected menu items.
Current input resolution and vertical scanning frequency (FV) are displayed at the bottom of the OSD
menu along with firmware version number. Continuing to press the function buttons will scroll through
the entire menu.
Detailed descriptions of each function in the OSD menu is provided below.
CAUTION: The version number shown on the OSD menu in this guide is for illustration purposes
only. The firmware version for your monitor may have been updated to a later one.

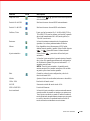
User’s Guide 1-11
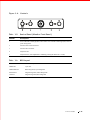
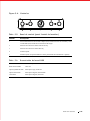
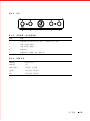
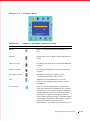
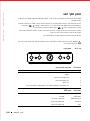
Figure 1-4. Controls
Table 1-5. Control Panel (Monitor Front Panel)
Control Description
1 Power LED will be full bright (blue) when monitor is on and will be half bright (blue) when in
power saving mode.
2 Function select counter-clockwise.
3 Function select clockwise.
4 Adjust increase.
5 Adjust decrease. (Auto Adjustment is enabled by pressing this button for 1 second.)
Table 1-6. OSD Layout
OSD format 20 characters by 9 rows
OSD border Cyan color
OSD tunable item Black foreground, Cyan background
Selected item Magenta foreground, Yellow background
Comment Magenta foreground, Blue background

www.dell.com | support.dell.com
1-12 User’s Guide
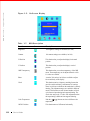
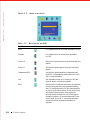
Figure 1-5. On Screen Display
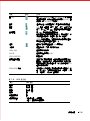
Table 1-7. OSD Description
Function Icon Description
Brightness 101 brightness settings are available (0 to 100).
Contrast 101 contrast settings are available (0 to 100).
H. Position This function lets you adjust the display's horizontal
position
V. Position This function lets you adjust the display's vertical
position.
OSD Transparency This function lets you set the transparency of the OSD
menu. The transparency can be adjusted from 0 to 100.
11 scales are available.
Phase A total of 101 scales (0 to 100) are available to adjust
focus and clarity of the display.
Clock This function carries a frequency-tracking feature that
provide a stable and clarity environment. 101 settings
(from 0 to 100) are available on the mode that is currently
running. The adjustment ranges are variable in different
modes. This function records deviated number of clock
cycle between input timing and supported timing. The
clock value may not be "0" after Auto Adjustment when
the input timing is different from supported timing.
Color Temperature Push the ( ) buttons to select a different color
temperature.
OSD H. Position This function moves OSD menu horizontally.

User’s Guide 1-13
OSD V. Position This function moves OSD menu vertically.
Graph / Text Because the H and V-Frequencies of both 640 x 400@70
Hz and 720 x 400@70 Hz are the same, this function
allows you to manually select either 640 x 400 (graphics
mode) or 720 x 400 (text mode).
Recall The recall function will reset all adjusted parameters to
factory preset values.
Language Five OSD languages are available: English, German,
French, Spanish, and Japanese. Press ( ) or ( )
adjustment button to select the desired language.
Auto Adjustment Press ( ) button to activate the Auto Adjustment
function.
The Auto Adjustment function allows you to adjust the
display size, clock, and phase to obtain a optimize viewing
setting. This process will take 3 ~ 5 seconds to activate.
NOTE: After Auto Adjustment, the display might display
the wrong position or size if it has received a pattern
which has no screen border.
Exit Saves the values of this setting and exits the OSD menu
function.
Sharpness
Adjust the scale-up effect (smoother or sharper).
1280 x 1024 Current mode resolution.
60.2 HZ Current mode vertical frequency ±1 Hz.
VER 0.02MTGK0 Firmware version.
Intellectual-Auto The Auto Adjustment function starts automatically when a
display mode is input for the first time. After adjustment,
this mode is saved. The monitor switches to the optimized
condition automatically whenever this mode is
encountered again. A total of 21 recently used modes are
recorded into this system.
VESA DPMS
Functionality
When signaled by the host system, the monitor displays a
black screen for about 3 seconds. After 3 seconds, if the
monitor receives no further signal, it will display "No
Signal" and then enter the power saving mode.
Function Icon Description

www.dell.com | support.dell.com
1-14 User’s Guide
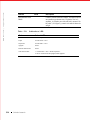
Table 1-8. LED Indicators
Mode LED color
On Full bright < blue >
Stand-by Half bright < blue >
Suspend Half bright < blue >
Off Dark
Button power off Dark
Cable disconnection 1. Half bright < blue > <Sleep mode>
2. Dark <DC power off; Off mode>
Strona się ładuje...
Strona się ładuje...
Strona się ładuje...
Strona się ładuje...
Strona się ładuje...
Strona się ładuje...
Strona się ładuje...
Strona się ładuje...
Strona się ładuje...
Strona się ładuje...
Strona się ładuje...
Strona się ładuje...
Strona się ładuje...
Strona się ładuje...
Strona się ładuje...
Strona się ładuje...
Strona się ładuje...
Strona się ładuje...
Strona się ładuje...
Strona się ładuje...
Strona się ładuje...
Strona się ładuje...
Strona się ładuje...
Strona się ładuje...
Strona się ładuje...
Strona się ładuje...
Strona się ładuje...
Strona się ładuje...
Strona się ładuje...
Strona się ładuje...
Strona się ładuje...
Strona się ładuje...
Strona się ładuje...
Strona się ładuje...
Strona się ładuje...
Strona się ładuje...
Strona się ładuje...
Strona się ładuje...
Strona się ładuje...
Strona się ładuje...
Strona się ładuje...
Strona się ładuje...
Strona się ładuje...
Strona się ładuje...
Strona się ładuje...
Strona się ładuje...
Strona się ładuje...
Strona się ładuje...
Strona się ładuje...
Strona się ładuje...
Strona się ładuje...
Strona się ładuje...
Strona się ładuje...
Strona się ładuje...
Strona się ładuje...
Strona się ładuje...
Strona się ładuje...
Strona się ładuje...
Strona się ładuje...
Strona się ładuje...
Strona się ładuje...
Strona się ładuje...
Strona się ładuje...
Strona się ładuje...
Strona się ładuje...
Strona się ładuje...
Strona się ładuje...
Strona się ładuje...
Strona się ładuje...
Strona się ładuje...
Strona się ładuje...
Strona się ładuje...
Strona się ładuje...
Strona się ładuje...
Strona się ładuje...
Strona się ładuje...
Strona się ładuje...
Strona się ładuje...
Strona się ładuje...
Strona się ładuje...
Strona się ładuje...
Strona się ładuje...
Strona się ładuje...
Strona się ładuje...
Strona się ładuje...
Strona się ładuje...
Strona się ładuje...
Strona się ładuje...
Strona się ładuje...
Strona się ładuje...
Strona się ładuje...
Strona się ładuje...
Strona się ładuje...
Strona się ładuje...
Strona się ładuje...
Strona się ładuje...
Strona się ładuje...
Strona się ładuje...
Strona się ładuje...
Strona się ładuje...
Strona się ładuje...
Strona się ładuje...
Strona się ładuje...
Strona się ładuje...
Strona się ładuje...
Strona się ładuje...
Strona się ładuje...
Strona się ładuje...
Strona się ładuje...
Strona się ładuje...
Strona się ładuje...
Strona się ładuje...
Strona się ładuje...
Strona się ładuje...
Strona się ładuje...
Strona się ładuje...
Strona się ładuje...
Strona się ładuje...
Strona się ładuje...
Strona się ładuje...
Strona się ładuje...
Strona się ładuje...
Strona się ładuje...
Strona się ładuje...
Strona się ładuje...
Strona się ładuje...
Strona się ładuje...
Strona się ładuje...
Strona się ładuje...
Strona się ładuje...
Strona się ładuje...
Strona się ładuje...
Strona się ładuje...
Strona się ładuje...
Strona się ładuje...
Strona się ładuje...
Strona się ładuje...
Strona się ładuje...
Strona się ładuje...
Strona się ładuje...
Strona się ładuje...
Strona się ładuje...
Strona się ładuje...
Strona się ładuje...
Strona się ładuje...
Strona się ładuje...
Strona się ładuje...
Strona się ładuje...
Strona się ładuje...
Strona się ładuje...
Strona się ładuje...
Strona się ładuje...
Strona się ładuje...
Strona się ładuje...
Strona się ładuje...
Strona się ładuje...
Strona się ładuje...
Strona się ładuje...
Strona się ładuje...
Strona się ładuje...
Strona się ładuje...
Strona się ładuje...
Strona się ładuje...
Strona się ładuje...
Strona się ładuje...
Strona się ładuje...
Strona się ładuje...
Strona się ładuje...
Strona się ładuje...
Strona się ładuje...
Strona się ładuje...
Strona się ładuje...
Strona się ładuje...
Strona się ładuje...
Strona się ładuje...
Strona się ładuje...
Strona się ładuje...
Strona się ładuje...
Strona się ładuje...
Strona się ładuje...
Strona się ładuje...
Strona się ładuje...
Strona się ładuje...
Strona się ładuje...
Strona się ładuje...
Strona się ładuje...
Strona się ładuje...
Strona się ładuje...
Strona się ładuje...
Strona się ładuje...
Strona się ładuje...
Strona się ładuje...
Strona się ładuje...
Strona się ładuje...
Strona się ładuje...
Strona się ładuje...
Strona się ładuje...
Strona się ładuje...
-
 1
1
-
 2
2
-
 3
3
-
 4
4
-
 5
5
-
 6
6
-
 7
7
-
 8
8
-
 9
9
-
 10
10
-
 11
11
-
 12
12
-
 13
13
-
 14
14
-
 15
15
-
 16
16
-
 17
17
-
 18
18
-
 19
19
-
 20
20
-
 21
21
-
 22
22
-
 23
23
-
 24
24
-
 25
25
-
 26
26
-
 27
27
-
 28
28
-
 29
29
-
 30
30
-
 31
31
-
 32
32
-
 33
33
-
 34
34
-
 35
35
-
 36
36
-
 37
37
-
 38
38
-
 39
39
-
 40
40
-
 41
41
-
 42
42
-
 43
43
-
 44
44
-
 45
45
-
 46
46
-
 47
47
-
 48
48
-
 49
49
-
 50
50
-
 51
51
-
 52
52
-
 53
53
-
 54
54
-
 55
55
-
 56
56
-
 57
57
-
 58
58
-
 59
59
-
 60
60
-
 61
61
-
 62
62
-
 63
63
-
 64
64
-
 65
65
-
 66
66
-
 67
67
-
 68
68
-
 69
69
-
 70
70
-
 71
71
-
 72
72
-
 73
73
-
 74
74
-
 75
75
-
 76
76
-
 77
77
-
 78
78
-
 79
79
-
 80
80
-
 81
81
-
 82
82
-
 83
83
-
 84
84
-
 85
85
-
 86
86
-
 87
87
-
 88
88
-
 89
89
-
 90
90
-
 91
91
-
 92
92
-
 93
93
-
 94
94
-
 95
95
-
 96
96
-
 97
97
-
 98
98
-
 99
99
-
 100
100
-
 101
101
-
 102
102
-
 103
103
-
 104
104
-
 105
105
-
 106
106
-
 107
107
-
 108
108
-
 109
109
-
 110
110
-
 111
111
-
 112
112
-
 113
113
-
 114
114
-
 115
115
-
 116
116
-
 117
117
-
 118
118
-
 119
119
-
 120
120
-
 121
121
-
 122
122
-
 123
123
-
 124
124
-
 125
125
-
 126
126
-
 127
127
-
 128
128
-
 129
129
-
 130
130
-
 131
131
-
 132
132
-
 133
133
-
 134
134
-
 135
135
-
 136
136
-
 137
137
-
 138
138
-
 139
139
-
 140
140
-
 141
141
-
 142
142
-
 143
143
-
 144
144
-
 145
145
-
 146
146
-
 147
147
-
 148
148
-
 149
149
-
 150
150
-
 151
151
-
 152
152
-
 153
153
-
 154
154
-
 155
155
-
 156
156
-
 157
157
-
 158
158
-
 159
159
-
 160
160
-
 161
161
-
 162
162
-
 163
163
-
 164
164
-
 165
165
-
 166
166
-
 167
167
-
 168
168
-
 169
169
-
 170
170
-
 171
171
-
 172
172
-
 173
173
-
 174
174
-
 175
175
-
 176
176
-
 177
177
-
 178
178
-
 179
179
-
 180
180
-
 181
181
-
 182
182
-
 183
183
-
 184
184
-
 185
185
-
 186
186
-
 187
187
-
 188
188
-
 189
189
-
 190
190
-
 191
191
-
 192
192
-
 193
193
-
 194
194
-
 195
195
-
 196
196
-
 197
197
-
 198
198
-
 199
199
-
 200
200
-
 201
201
-
 202
202
-
 203
203
-
 204
204
-
 205
205
-
 206
206
-
 207
207
-
 208
208
-
 209
209
-
 210
210
-
 211
211
-
 212
212
-
 213
213
-
 214
214
-
 215
215
-
 216
216
-
 217
217
-
 218
218


Dell 17FP Instrukcja obsługi
- Kategoria
- Telewizory
- Typ
- Instrukcja obsługi
- Niniejsza instrukcja jest również odpowiednia dla
w innych językach
- 日本語: Dell 17FP ユーザーマニュアル
Powiązane artykuły
Inne dokumenty
-
 Miro Displays P17F86i Instrukcja obsługi
-
 Miro Displays P17F98 Instrukcja obsługi
-
 Miro Displays P19F98 Instrukcja obsługi
-
 Miro Displays TD570 Instrukcja obsługi
-
Acer AL 506 Instrukcja obsługi
-
Samsung 510N Instrukcja obsługi
-
Samsung 910T Instrukcja obsługi
-
 Tyco Electronics 1928L Instrukcja obsługi
-
Hitachi NCD 2085 Instrukcja obsługi


