Philips GC7640/80 Instrukcja obsługi
- Kategoria
- Okowy
- Typ
- Instrukcja obsługi
Niniejsza instrukcja jest również odpowiednia dla

Always here to help you
Register your product and get support at
www.philips.com/welcome
GC7600 series


4

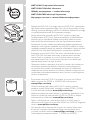
- ANTI-CALC: Important information:
- ANTI-CALC: Důležité informace:
- Wkłady antywapienne — ważne informacje
- ANTI-CALCAR: informaţii importante:
- Картридж очистки от накипи. Важная информация.
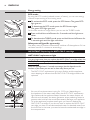
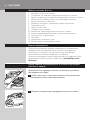
- Replace the ANTI-CALC cartridge when the ANTI-CALC replacement
light ashes and the appliance beeps. If you do not, the product will stop
working to prevent damaging itself. You could either replace the cartridge
or use demineralised water with exhausted cartridge.
- Jakmile začne blikat kontrolka ANTI-CALC a přístroj bude pípat,
vyměňte kazetu ANTI-CALC. Pokud tak neučiníte, výrobek přestane
pracovat, aby se nepoškodil. Můžete buď vyměnit kazetu za novou
nebo použít demineralizovanou vodu pro vypotřebovanou kazetu.
- Konieczność wymiany wkładu antywapiennego będzie sygnalizowana
dźwiękiem oraz miganiem wskaźnika wymiany. Jeśli wymiana nie nastąpi,
urządzenie przestanie działać, aby zapobiec uszkodzeniu. Można wymienić
wkład lub użyć wody demineralizowanej z wyczerpanym wkładem.
- Înlocuieşte cartuşul ANTI-CALCAR atunci când ledul de înlocuire
ANTI-CALCAR luminează intermitent şi aparatul emite semnale
sonore. Dacă nu, produsul nu va mai funcţiona pentru a preveni
auto-deteriorarea. Poţi e să înlocuieşti cartuşul, e să utilizezi apă
demineralizată pentru cartuşul terminat.
- Проводите замену картриджа очистки от накипи при появлении
мигающего индикатора замены и звукового предупреждения
на приборе. Если замена произведена не будет, во избежание
повреждения прибор выключится. Можно заменить картридж или
использовать деминерализованную воду (в этом случае картридж
можно не вынимать).
- To purchase more ANTI-CALC cartridges, go to your local Philips
dealer or search for GC002 or GC004 in the online shop at
www.philips.com/shop.
- Chcete-li zakoupit další kazety ANTI-CALC, navštivte místního
prodejce výrobků Philips nebo vyhledejte výrobek GC002 či GC004
v online obchodě na adrese www.philips.com/shop.
- Wkłady antywapienne można zakupić u sprzedawcy produktów rmy
Philips lub wyszukując kod produktu GC002 lub GC004 w sklepie
internetowym pod adresem www.philips.com/shop.
- Pentru a achiziţiona mai multe cartuşe ANTI-CALCAR, mergi la
distribuitorul tău Philips local sau caută GC002 sau GC004 în magazinul
online la www.philips.com/shop.
- Для приобретения картриджей очистки от накипи обратитесь
в местную торговую организацию Philips или воспользуйтесь
услугами интернет-магазина www.philips.com/shop (в строке
поиска введите название модели — GC002 или GC004).


6
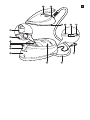
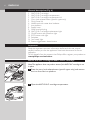
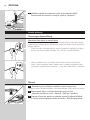
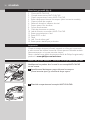
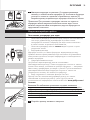
General description (Fig. 4)
1 ANTI-CALC cartridge
2 ANTI-CALC cartridge compartment
3 ANTI-CALC cartridge compartment lid
4 Carry lock release button (specic types only)
5 Filling funnel lid
6 Water tank with water level indicator
7 Iron platform
8 Supply hose
9 Mains cord with plug
10 ANTI-CALC cartridge replacement light
11 On/off button with power-on light
12 ECO button with light
13 Soleplate
14 ’Iron ready’ light
15 Steam trigger/steam boost button
Important
Read the separate important information leaet and the user manual
carefully before you use the appliance. Save both documents for future
reference.
To fully benet from the support that Philips offers, register your product at
www.philips.com/welcome.
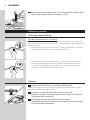
Before rst use - Placing the ANTI-CALC cartridge
Note: The appliance does not produce steam if the ANT-CALC cartridge is not
in place.
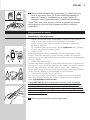
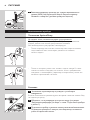
1 Pressthecarrylockreleasebutton(specictypesonly)andremove
the iron from the iron platform.
2 Open the ANTI-CALC cartridge compartment.
ENGLISH

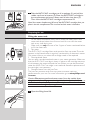
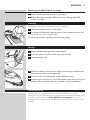
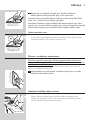
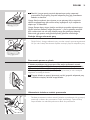
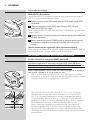
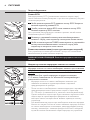
3 TaketheANTI-CALCcartridgeoutofitspackage(1)andpullthe
rubbercapfromitsbottom(2).PlacetheANTI-CALCcartridgein
thecompartmentandpressitdownuntilitlocksintoplace(3).
Then close the ANTI-CALC cartridge compartment lid.
Note: Some water droplets may fall out of the ANTI-CALC cartridge when you
place it into the compartment. This is normal and the water is harmless.
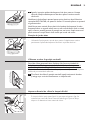
Preparing for use
Filling the water tank
- Fill the water tank before every use or when the water level in the
water tank drops below the minimum level. You can rell the water
tank at any time during use.
- Make sure you only use one of the 3 types of water mentioned below
to ll the water tank:
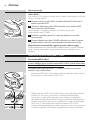
1 Tap water
The ANTI-CALC cartridge lters scale particles from tap water. The scale
content in the ltered water is regularly monitored by an electronic sensor.
This sensor informs you when the cartridge needs to be replaced.
2 Demineralised water
You can safely use demineralised water in your steam generator. Make sure
that the ANTI-CALC cartridge is always in place, as the cartridge serves as
a link between the water tank and the iron. When you use demineralised
water, the ANTI-CALC cartridge is not used and therefore replacement of
the cartridge is not necessary.
3 Descaled water from the IronCare
The IronCare removes scale from tap water to ensure optimum
performance for your iron. For more information, go to www.philips.com/
ironcare.
Caution: Do not use perfumed water, water from the tumble dryer,
vinegar,starch,descalingagents,ironingaids,chemicallydescaledwateror
other chemicals as they may cause water to splutter from the soleplate,
brown stains or damage to your appliance.
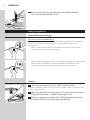
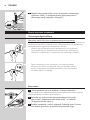
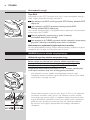
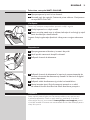
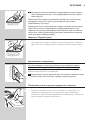
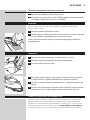
1 Openthellingfunnellid.
ENGLISH 7

2 Fill the water tank with tap water up to the MAX indication.
Thenclosellingfunnellid(‘click’).
Using the appliance
OptimalTemp technology
Do not iron non-ironable fabrics.
This appliance is equipped with OptimalTemp technology, which enables
you to iron all types of ironable fabrics without adjusting the iron
temperature.
- Fabrics with these symbols are ironable, for example linen, cotton,
polyester, silk, wool, viscose and rayon.
- Fabrics with this symbol are not ironable. These fabrics include synthetic
fabrics such as Spandex or elastane, Spandex-mixed fabrics and
polyolens (e.g. polypropylene), but also prints on garments.
Ironing
1 Placethesteamgeneratoronastableandevensurface.
In order to ensure a safe ironing we recommend to always place the base
on the ironing board.
2 Make sure that there is enough water in the water tank (see section
‘Fillingthewatertank’inchapter‘Preparingforuse’).
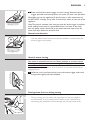
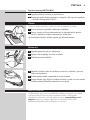
3 Plug in the appliance and press the on/off button. Wait for approx.
2minutesuntilthe‘ironready’lightstopsashing.
ENGLISH8

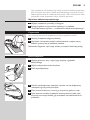
4 Press and hold the steam trigger to start ironing. Keep the steam
triggerpressedcontinuouslywhenyoumovetheironoverthefabric.
Note: When you use the appliance for the rst time or after replacement of
the ANTI-CALC cartridge, it may take 10 seconds for steam to come out of the
appliance.
Note: The pump is activated each time you press the steam trigger. It produces
subtle rattling sound, which is normal. When there is no water in the water
tank, the pump sound is louder. Fill up the water tank with water when the
water level drops below the minimum level.
Steam boost function
- Use the steam boost function to remove stubborn creases. Press the
steam trigger twice quickly.
Vertical steam ironing
Hotsteamisemittedfromtheiron.Neverattempttoremovecreases
from a garment that someone is wearing. Do not apply steam near your
orsomeoneelse’shand.
You can use the steam iron in vertical position to remove wrinkles from
hanging fabrics.
1 Holdtheironinverticalposition,pressthesteamtriggerandtouch
the garment lightly with the soleplate.
Putting down the iron during ironing
- During ironing, you can place the iron either on the iron platform
or horizontally on the ironing board. Thanks to the OptimalTemp
technology, the soleplate will not damage the ironing board cover.
ENGLISH 9

Energy saving
ECO mode
By using the ECO mode (reduced amount of steam), you can save energy
without compromising on the ironing result.
1 ToactivatetheECOmode,presstheECObutton.ThegreenECO
light goes on.
2 TodeactivatetheECOmode,presstheECObuttonagain.
ThegreenECOlightgoesout.
For the best results on tough fabrics, you can use the TURBO mode.
1 Press and hold the on/off button for 2 seconds until the light turns
white.
2 TodeactivatetheTURBOmode,pressandholdtheon/offbuttonfor
2 seconds again until the light turns blue.
Safety auto-off (specic types only)
The safety auto-off function automatically switches off the appliance if it has
not been used for 5 minutes, to save energy.
IMPORTANT: Replacing the ANTI-CALC cartridge
ANTI-CALC replacement light
ItisveryimportantthatyoureplacetheANTI-CALCcartridgewhenthe
ANTI-CALCcartridgereplacementlightstartsashingandtheappliance
starts beeping.
Note: The cartridge lasts 1-3 months on average, but this depends on the
hardness of the water you use and on how many hours you iron.
- The ANTI-CALC replacement light starts ashing and the appliance
starts beeping to indicate that the ANTI-CALC cartridge needs to be
replaced.
- You can still continue steam ironing for 15-30 min. (depending on
the hardness of the water used) when the ANTI-CALC replacement
light ashes and the appliance beeps. However, the steam output will
diminish and ultimately the steam generator stops producing steam to
prevent scale build-up that would permanently damage your appliance.
- To let the appliance produce steam again, you have to replace the
ANTI-CALC cartridge. If you do not want to replace the ANTI-CALC
cartridge, you have to use demineralised water or descaled water from
the IronCare. In that case, you need to leave the exhausted cartridge in
the compartment.
ENGLISH10

Replacing the ANTI-CALC cartridge
1 Switch off the appliance and let it cool down.
2 Followthestepsinchapter‘Beforerstuse-PlacingtheANTI-
CALCcartridge’.
Cleaning
To properly maintain your appliance, clean it regularly.
1 Clean the appliance with a moist cloth.
2 Toeasilyandeffectivelyremovestains,letthesoleplateheatupand
movetheironoveramoistcloth.
Tip: Clean the soleplate regularly to ensure smooth gliding.
Storage
1 Switch off the steam generator and unplug it.
2 Pour the water out of the water tank into the sink.
3 Fold the supply hose.
4 Wind the supply hose inside the supply hose storage compartment
and secure it inside the storage hook.
5 Fold the mains cord and fasten it with the Velcro strip.
6 Specictypesonly:Youcancarrytheappliancewithonehandbythe
handle of the iron when the iron is locked on the iron platform.
Troubleshooting
This chapter summarises the most common problems you could
encounter with the appliance. If you are unable to solve the problem with
the information below, visit www.philips.com/support for a list of
frequently asked questions or contact the Consumer Care Centre in your
country.
ENGLISH 11

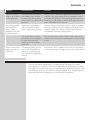
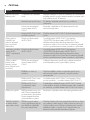
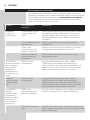
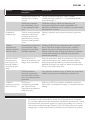
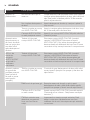
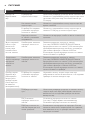
Problem Possible cause Solution
The appliance
does not produce
any steam.
There is not enough water
in the water tank.
Fill the water tank beyond the MIN indication. Press
and hold the steam trigger until steam comes out. It
may take up to 30 seconds until steam comes out.
You have not pressed the
steam trigger.
Press the steam trigger and keep it pressed when
you iron.
You have just installed a
new ANTI-CALC cartridge.
Press and hold the steam trigger for 10 seconds until
steam comes out.
The ANTI-CALC cartridge
is not placed properly.
Press down the ANTI-CALC cartridge until it locks
into position.
The appliance
beeps and less or
no steam comes
out of the iron
when I press the
steam trigger.
You have to replace the
ANTI-CALC cartridge.
Replace the ANTI-CALC cartridge (see chapter
‘IMPORTANT: Replacing the ANTI-CALC cartridge’).
You can also use demineralised water or descaled
water from the IronCare. In that case, you need to
leave the exhausted cartridge in the compartment.
The ‘ANTI-
CALC cartridge
replacement’ light
keeps ashing.
You have to replace the
ANTI-CALC cartridge.
Replace the ANTI-CALC cartridge (see chapter
‘IMPORTANT: Replacing the ANTI-CALC cartridge’).
You can also use demineralised water or descaled
water from the IronCare. In that case, you need to
leave the exhausted cartridge in the compartment.
The appliance
produces a loud
pumping sound
(subtle pumping
sound is normal).
You have just installed a
new ANTI-CALC cartridge.
Continue to press the steam trigger until the
pumping sound stops and steam comes out of the
soleplate.
The water tank is empty. Rell the water tank with water and press the steam
trigger until the pumping sound stops and steam
comes out of the soleplate.
The ANTI-CALC cartridge
is not in place.
Place the ANTI-CALC cartridge (see chapter ‘Before
rst use - Placing the ANTI-CALC cartridge’).
The ANTI-CALC cartridge
is damaged or shows cracks
or hairline cracks.
Inspect the ANTI-CALC cartridge thoroughly. If you
see any sign of damage or cracks, no matter how
small, replace the ANTI-CALC cartridge with a new
one.
The appliance has
switched off.
The safety auto-off function
is activated automatically
when the steam generator
has not been used for
more than 5 minutes.
Press the on/off button to reactivate the steam
generator.
ENGLISH12

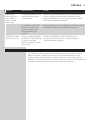
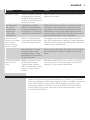
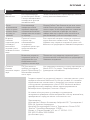
Problem Possible cause Solution
The iron leaves a
shine or an imprint
on the garment.
The surface to be ironed
was uneven, for instance
because you were ironing
over a seam or a fold in the
garment.
Perfect Care is safe on all garments. The shine or
imprint is not permanent and will disappear when
you wash the garment. Avoid ironing over seams or
folds or you can place a cotton cloth over the area
to be ironed to avoid imprints.
The ironing board
cover becomes
wet or water
droplets come out
of the soleplate.
Steam has condensed on
the ironing board cover
after a long ironing session.
Replace the ironing board cover if the foam material
has worn out. You can also add an extra layer of felt
material under the ironing board cover to prevent
condensation on the ironing board.
You may have an ironing
board that is not designed
to cope with the high
steam rate of the steam
generator.
Put an extra layer of felt material under the ironing
board cover to prevent condensation on the ironing
board.
There is too much
steam coming out
of the iron.
The default setting of the
iron is the OptimalTemp
setting. In this setting the
iron provides a high steam
output.
Activate the ECO mode to iron with a lower steam
output. See section ‘Energy saving’ in this user manual.
This iron has been approved by The Woolmark Company Pty Ltd for
the ironing of wool only products provided that the garments are ironed
according to the instructions on the garment label and those issued by the
manufacturer of this iron. R1303. In United Kingdom, Eire, HongKong and
India, the Woolmark trademark is a Certication trademark.
ENGLISH 13

14
Všeobecný popis (Obr. 4)
1 Kazeta ANTI-CALC
2 Přihrádka pro kazetu ANTI-CALC
3 Kryt přihrádky pro kazetu ANTI-CALC
4 Tlačítko uvolnění zámku pro přenášení (pouze některé typy)
5 Víko plnicího trychtýře
6 Nádržka na vodu s kontrolkou hladiny vody
7 Žehlicí plocha
8 Přívodní hadice
9 Napájecí kabel se zástrčkou
10 Kontrolka výměny kazety ANTI-CALC
11 Vypínač s kontrolkou zapnutí
12 Tlačítko ECO s kontrolkou
13 Žehlicí plocha
14 Kontrolka „Žehlička připravena“
15 Spoušť páry / tlačítko parního rázu
Důležité
Před použitím si pečlivě přečtěte uživatelskou příručku a samostatný
letáček s důležitými informacemi. Uložte si oba dokumenty pro budoucí
použití.
Chcete-li využívat všech výhod podpory nabízené společností Philips,
zaregistrujte svůj výrobek na adrese www.philips.com/welcome.
Před prvním použitím – Umístění kazety ANTI-CALC
Poznámka: Přístroj nevytváří páru, pokud není na místě kazeta ANT-CALC.
1 Stisknětetlačítkouvolněnízámkupropřenášenížehličky
(pouzeněkterétypy)asundejtežehličkuzestojánku.
2 OtevřetepřihrádkuprokazetuANTI-CALC.
ČEŠTINA

15
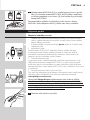
3 VybaltekazetuANTI-CALC(1)asejmětegumovýkrytzespodní
části(2).UmístětekazetuANTI-CALCdopřihrádkyazatlačtena
ni,dokudnezapadnenasvémísto(3).Potézavřetekrytpřihrádky
kazetyANTI-CALC.
Poznámka: Během vkládání do přihrádky se může stát, že z kazety
ANTI-CALC bude odkapávat voda. To je běžné, tato voda je neškodná.
Příprava k použití
Naplnění nádržky na vodu
- Nádržku na vodu plňte před každým použitím nebo pokud hladina
vody v nádržce klesne pod minimální úroveň. Doplnit vodu můžete
kdykoli během používání.
- K plnění nádržky na vodu používejte pouze jeden ze 3 druhů vody
uvedených níže:
1 Kohoutková voda
Filtrační kazety ANTI-CALC odstraňují částice vodního kamene
z kohoutkové vody. Obsah vodního kamene ve ltrované vodě je
pravidelně monitorován elektronickým senzorem. Tento senzor vás
upozorní, jakmile je potřeba vyměnit kazetu.
2 Demineralizovaná voda
V generátoru páry můžete bezpečně použít demineralizovanou vodu.
Vždy zkontrolujte, zda je kazeta ANTI-CALC na svém místě, protože
slouží jako spojení mezi nádržkou na vodu a žehličkou. Když používáte
demineralizovanou vodu, kazeta ANTI-CALC není využívána a není nutné
ji vyměňovat.
3 Demineralizovaná voda z ltru IronCare
Filtr IronCare odstraňuje vodní kámen z kohoutkové vody a zajišťuje tak
optimální výkon vaší žehličky. Více informací naleznete na adrese
www.philips.com/ironcare.
Upozornění:Nepoužívejteparfémovanouvodu,voduzesušičky,
ocet,škrob,odvápňovacíprostředky,přípravkyprousnadněnížehlení,
voduschemickyodstraněnýmvodnímkamenemnebojinéchemikálie,
protožebymohlodojítkvystřikovánívodynažehlicíplošežehličky,
vznikuhnědýchskvrnnebopoškozenízařízení.
1 Otevřetevíkoplnicíhotrychtýře.
ČEŠTINA 15

16
2 NádržkunaplňtekohoutkovouvodouažpooznačeníMAX.
Potézavřetevíkoplnicíhotrychtýře(ozvese„klapnutí“).
Použití přístroje
Technologie OptimalTemp
Nežehletelátky,kterésenemajížehlit.
Tento přístroj využívá technologii OptimalTemp. Pomocí této technologie
můžete žehlit veškeré druhy žehlitelných látek, aniž byste museli upravovat
teplotu žehlení.
- Žehlit lze látky označené těmito symboly; jedná se například o lněnou
tkaninu, bavlnu, polyester, hedvábí, vlnu, viskózu a umělé hedvábí.
- Látky označené tímto symbolem žehlit nelze. Kromě syntetických
látek – jako je spandex nebo elastan, látky s podílem spandexu nebo
polyoleny (například polypropylen) – sem patří také oděvy s potiskem.
Žehlení
1 Generátorpáryumístětenastabilníavodorovnýpovrch.
Chcete-li zajistit bezpečné žehlení, umístěte základnu vždy na žehlicí prkno.
2 Zkontrolujte,zdajevnádržcedostatekvody(vizčást
„Naplněnínádržkynavodu“vkapitole„Přípravakpoužití“).
3 Zapojtepřístrojdozásuvkyastisknětevypínač.Počkejtepřibližně
2minuty,dokudnepřestaneblikatkontrolka„Žehličkapřipravena“.
ČEŠTINA16

17
4 Stisknutímapodrženímspouštěpáryzačnětesžehlením.
Běhemžehleníudržujtespoušťpárytrvalestisknutou.
Poznámka: Při prvním použití přístroje nebo po výměně kazety ANTI-CALC
může trvat 10 sekund, než z přístroje vyjde pára.
Poznámka: Čerpadlo se zapne pokaždé, když stisknete spoušť páry. Lehce
zadrnčí, což je normální. Pokud v nádržce není voda, zvuk čerpadla je hlasitější.
Když úroveň vody klesne pod minimální hladinu, naplňte nádržku vodou.
Funkce parního rázu
- K odstranění nepoddajných záhybů se používá funkce parního rázu.
Stiskněte dvakrát rychle tlačítko uvolnění páry.
Žehlení s vertikálním napařováním
Žehličkavypouštíhorkoupáru.Nikdysenepokoušejteodstraňovat
záhybyzoděvu,kterýmáněkdonasobě.Párunepoužívejteblízkosvých
rukouanirukouněkohojiného.
Parní žehličku můžete použít ve svislé poloze, abyste mohli odstranit
záhyby na zavěšených tkaninách.
1 Držtežehličkuvesvislépoloze,stisknětespoušťpáryanaoděv
zlehkapřiložtežehlicíplochu.
Odkládání žehličky během žehlení
- Během žehlení můžete položit žehličku buď na stojánek, nebo
vodorovně na žehlicí plochu. Díky technologii OptimalTemp žehlicí
plocha nepoškodí potah žehlicího prkna.
ČEŠTINA 17

18
Úspora energie
režim ECO
Díky režimu ECO (snížené množství páry) můžete ušetřit energii, aniž byste
ovlivnili výsledek žehlení.
1 Chcete-liaktivovatrežimECO,stisknětetlačítkoECO.Rozsvítíse
zelenákontrolkaECO.
2 Chcete-lideaktivovatrežimECO,stiskněteznovutlačítkoECO.
ZelenákontrolkaECOzhasne.
Abyste dosáhli co nejlepšího výsledku při žehlení silných látek,
můžete použít režim TURBO.
1 Stiskněteapodržtevypínačna2sekundy,dokudsekontrolka
nerozsvítíbíle.
2 Chcete-lideaktivovatrežimTURBO,stiskněteapodobu2sekund
podržtetlačítkovypínače,dokudnebudekontrolkasvítitmodře.
Bezpečnostní automatické vypnutí (pouze některé typy)
Funkce bezpečnostního automatického bezpečnostního vypnutí z důvodu
úspory energie automaticky vypne přístroj, pokud se nebude 5 minut
používat.
DŮLEŽITÉ: Výměna kazety ANTI-CALC
Kontrolka ANTI-CALC
Jevelmidůležité,abystevyměnilikazetuANTI-CALC,pokudzačneblikat
kontrolkaANTI-CALCazařízenízačnepípat.
Poznámka: Kazeta vydrží průměrně 1–3 měsíce, ale záleží to na tvrdosti
používané vody a délce žehlení.
- Kontrolka ANTI-CALC začne blikat a přístroj začne pípat, čímž indikuje,
že je potřeba vyměnit kazetu ANTI-CALC.
- Pokud kontrolka ANTI-CALC bliká a přístroj pípá, můžete pokračovat
v žehlení 15–30 minut (v závislosti na tvrdosti používané vody).
Výstup páry se však sníží a generátor páry přestane vytvářet páru,
aby zabránil tvorbě vodního kamene, který by nenávratně poškodil přístroj.
- Chcete-li, aby přístroj začal znovu vytvářet páru, musíte vyměnit kazetu
ANTI-CALC. Pokud nechcete vyměňovat kazetu ANTI-CALC,
musíte použít demineralizovanou nebo upravenou vodu z ltru IronCare.
V takovém případě musíte nechat vypotřebovanou kazetu v přihrádce.
ČEŠTINA18

19
Výměna kazety ANTI-CALC
1 Vypnětepřístrojanechtejejvychladnout.
2 Postupujtepodlekrokůuvedenýchvkapitole„Předprvnímpoužitím
–UmístěníkazetyANTI-CALC“.
Čištění
Chcete-li udržovat přístroj v dobrém stavu, pravidelně jej čistěte.
1 Povrchpřístrojevyčistětenavlhčenýmhadříkem.
2 Skvrnysnadnoaúčinněodstranítetak,ženechátežehlicíplochu
zahřátažehličkoubudetepohybovatpovlhkélátce.
Tip: Pravidelným čištěním žehličky zajistíte její dokonalé klouzání.
Skladování
1 Vypnětegenerátorpáryaodpojtejej.
2 Vylijtevoduznádržkynavodudodřezu.
3 Přeložtepřívodníhadičku.
4 Naviňtepřívodníhadicidoúložnéhoprostoruazajistětejipomocí
háčkunaskladování.
5 Sviňtenapájecíkabelaupevnětejejsuchýmzipem.
6 Pouzeněkterétypy:Přístrojmůžetepřenášetvjednérucezarukojeť
žehličky,pokudježehličkauzamčenanastojánku.
Řešení problémů
V této kapitole jsou shrnuty nejběžnější problémy, se kterými se můžete
u přístroje setkat. Pokud se vám nepodaří problém vyřešit podle
následujících informací, navštivte webové stránky www.philips.com/
support, kde jsou uvedeny odpovědi na nejčastější dotazy, nebo
kontaktujte Středisko péče o zákazníky ve své zemi.
ČEŠTINA 19

20
Problém Možnápříčina Řešení
Žehlička nevytváří
žádnou páru.
V nádržce není dostatek
vody.
Naplňte nádržku na vodu za ukazatel MIN. Stiskněte a
podržte spoušť na páru, dokud nezačne vycházet pára,
což může trvat až 30 sekund.
Nestiskli jste spoušť páry. Při žehlení stiskněte spoušť páry a podržte ji
stisknutou.
Právě jste nainstalovali
novou kazetu ANTI-
CALC.
Stiskněte a podržte na 10 sekund spoušť páry,
dokud nevyjde pára.
Kazeta ANTI-CALC není
umístěna správně.
Zatlačte kazetu ANTI-CALC, dokud nezapadne na
místo.
Přístroj pípá a
z žehličky při
stisknutí spouště
páry nevychází
žádná pára.
Musíte vyměnit kazetu
ANTI-CALC.
Vyměňte kazetu ANTI-CALC (viz kapitola
„DŮLEŽITÉ: Výměna kazety ANTI-CALC“).
Můžete také používat demineralizovanou nebo
upravenou vodu z ltru IronCare. V takovém případě
musíte vypotřebovanou kazetu ponechat v přihrádce.
Kontrolka „výměna
kazety ANTI-
CALC“ nepřestává
blikat.
Musíte vyměnit kazetu
ANTI-CALC.
Vyměňte kazetu ANTI-CALC (viz kapitola
„DŮLEŽITÉ: Výměna kazety ANTI-CALC“).
Můžete také používat demineralizovanou nebo
upravenou vodu z ltru IronCare. V takovém případě
musíte vypotřebovanou kazetu ponechat v přihrádce.
Přístroj vydává
hlasité zvuky
čerpání (jemné
zvuky čerpání jsou
normální).
Právě jste nainstalovali
novou kazetu ANTI-
CALC.
Udržujte stisknutou spoušť páry, dokud neutichne
zvuk čerpadla a pára vyjde z žehlicí plochy.
Nádržka na vodu je
prázdná.
Doplňte nádržku vodou a stiskněte spoušť páry,
dokud zvuk čerpání neskončí a z žehlicí plochy
nevyjde pára.
Kazeta ANTI-CALC není
správně umístěna.
Umístěte kazetu ANTI-CALC (viz kapitola „Před
prvním použitím – Umístění kazety ANTI-CALC“).
Kazeta ANTI-CALC
je poškozená nebo
popraskaná.
Prohlédněte důkladně kazetu ANTI-CALC. Pokud
vidíte jakékoli známky poškození nebo trhlin (nezáleží
na velikosti), vyměňte kazetu ANTI-CALC za novou.
Přístroj se vypnul. Když generátor páry více
než 5 minut nepoužíváte,
je automaticky aktivována
funkce bezpečnostního
automatického vypnutí.
Stisknutím vypínače znovu aktivujete generátor páry.
Žehlička nechává
na oděvu lesklé
stopy nebo otisky.
Žehlený povrch nebyl
rovný, například proto, že
jste žehličkou přejížděli
šev nebo záhyb látky.
Žehličku Perfect Care lze bezpečně používat se všemi
typy oděvů. Lesklé stopy či otisky nejsou trvalé a po
vyprání oděvu zmizí. Chcete-li zabránit jejich tvorbě,
nežehlete oděv v místech švů či záhybů nebo na
žehlenou látku položte bavlněnou tkaninu.
ČEŠTINA20
Strona się ładuje...
Strona się ładuje...
Strona się ładuje...
Strona się ładuje...
Strona się ładuje...
Strona się ładuje...
Strona się ładuje...
Strona się ładuje...
Strona się ładuje...
Strona się ładuje...
Strona się ładuje...
Strona się ładuje...
Strona się ładuje...
Strona się ładuje...
Strona się ładuje...
Strona się ładuje...
Strona się ładuje...
Strona się ładuje...
Strona się ładuje...
Strona się ładuje...
Strona się ładuje...
Strona się ładuje...
Strona się ładuje...
Strona się ładuje...
Strona się ładuje...
Strona się ładuje...
-
 1
1
-
 2
2
-
 3
3
-
 4
4
-
 5
5
-
 6
6
-
 7
7
-
 8
8
-
 9
9
-
 10
10
-
 11
11
-
 12
12
-
 13
13
-
 14
14
-
 15
15
-
 16
16
-
 17
17
-
 18
18
-
 19
19
-
 20
20
-
 21
21
-
 22
22
-
 23
23
-
 24
24
-
 25
25
-
 26
26
-
 27
27
-
 28
28
-
 29
29
-
 30
30
-
 31
31
-
 32
32
-
 33
33
-
 34
34
-
 35
35
-
 36
36
-
 37
37
-
 38
38
-
 39
39
-
 40
40
-
 41
41
-
 42
42
-
 43
43
-
 44
44
-
 45
45
-
 46
46


Philips GC7640/80 Instrukcja obsługi
- Kategoria
- Okowy
- Typ
- Instrukcja obsługi
- Niniejsza instrukcja jest również odpowiednia dla
w innych językach
- slovenčina: Philips GC7640/80 Používateľská príručka
- русский: Philips GC7640/80 Руководство пользователя
- română: Philips GC7640/80 Manual de utilizare
Powiązane artykuły
-
Philips GC4526/87 Instrukcja obsługi
-
Philips GC4512/20 Instrukcja obsługi
-
Philips GC4881/20 Instrukcja obsługi
-
Philips GC4595/40 Instrukcja obsługi
-
Philips GC4880/20 Instrukcja obsługi
-
Philips GC8080/08 Instrukcja obsługi
-
Philips GC024/00 Instrukcja obsługi
-
Philips GC7640/80 Skrócona instrukcja obsługi
-
Philips GC4914/27 Instrukcja obsługi
-
Philips GC8644/30 Instrukcja obsługi
