
ZIS5400 Aqua Steam
INSTRUKCJE UŻYTKOWANIA
Generator pary
ИНСТРУКЦИЯ ПО ПРИМЕНЕНИЮ
Паровая станция
NÁVOD K POUŽITÍ
Parní stanice
ИНСТРУКЦИИ ЗА УПОТРЕБА
парна станция
NAVODILA ZA UPORABO
Parná stanica
ІНСТРУКЦІЯ ПО ЗАСТОСУВАННЮ
Парова станція
USER MANUAL
Steam station
BENUTZERHANDBUCH
Dampfstation
HASZNÁLATI UTASÍTÁS
Gozállomás
INSTRUCȚIUNI DE UTILIZARE
Statie de calcat cu aburi
PL
EN
DE
CZ
SK
HU
RO
RU
UA
BG
ZIS5400 AQUA STEAM

2
7
10
8
9
2
1
6
4
11
11
35

3
PL
PL
DZIĘKUJEMY ZA WYBÓR MARKI ZELMER. ŻYCZYMY SATYSFAKCJI Z UŻYTKOWANIA URZĄDZENIA
OSTRZEŻENIE
PRZED UŻYCIEM PRODUKTU NALEŻY UWAŻNIE PRZECZYTAĆ INSTRUKCJĘ UŻYTKOWANIA.
PRZECHOWUJ JĄ W BEZPIECZNYM MIEJSCU DO WYKORZYSTANIA W PRZYSZŁOŚCI.
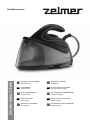
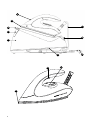
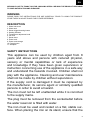
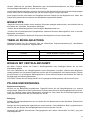
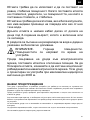
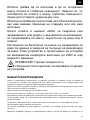
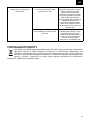
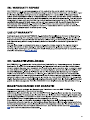
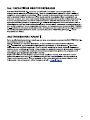
OPIS
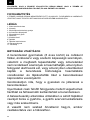
1. Osłona wlotu wody
2. Zbiornik na wodę
3. Przycisk włączania pary/czyszczenia
4. Wskaźnik gotowości do pracy
5. Pokrętło regulacji pary
6. Blokada żelazka
7. Wąż doprowadzający parę
8. Przewód zasilający
9. Schowek przewodu zasilającego
10. Przycisk zasilania
11. Stopa żelazka
INSTRUKCJE BEZPIECZEŃSTWA
Urządzenie może być obsługiwane przez dzieci w
wieku od 8. roku życia oraz przez osoby o ograniczonej
sprawności zycznej, sensorycznej lub psychicznej i
osoby nieposiadające wystarczającego doświadczenia
oraz wiedzy pod warunkiem, że będą one nadzorowane
lub zostaną poinstruowane w zakresie bezpiecznej obsługi
urządzenia i będą rozumiały zagrożenia związane z taką
obsługą. Nie należy dopuszczać, aby dzieci bawiły się
urządzeniem. Dzieci nie mogą przeprowadzać czynności
czyszczenia ani konserwacji urządzenia bez nadzoru.
Jeżeli przewód zasilania jest uszkodzony, dla
bezpieczeństwa musi zostać wymieniony przez
producenta, autoryzowany serwis lub odpowiednio
wykwalikowaną osobę.
Żelazka nie można zostawiać bez nadzoru, jeżeli jest
podłączone do zasilania.
Wtyczkę należy wyjąć z gniazda przed napełnieniem
zbiornika wodą.

4
PL
PL
Żelazko musi być używane i przechowywane na stabilnej
i płaskiej powierzchni.
Podczas umieszczania żelazka na podstawie dopilnować,
aby powierzchnia, na której leży podstawa, była stabilna.
Żelazko nie może być używane, jeżeli zostało upuszczone,
przecieka lub nosi widoczne ślady uszkodzeń.
Trzymaj żelazko i przewód poza zasięgiem dzieci poniżej
8. roku życia, jeżeli jest zasilane lub odstawione do
ochłodzenia.
Instrukcje bezpiecznego napełniania zbiornika wody
znajdują się w sekcji dotyczącej napełniania zbiornika
wody.
UWAGA. Gorące powierzchnie. Powierzchnie
mogą być gorące podczas używania żelazka.
Urządzenie jest przeznaczone do użytku na maksymalnej
wysokości do 2000 m n.p.m.
WAŻNE OSTRZEŻENIA
Urządzenie przeznaczone jest wyłącznie do użytku domowego i w żadnym wypadku nie może być
używane do zastosowań komercyjnych lub przemysłowych. Nieprawidłowe używanie lub niewłaściwa
obsługa produktu powoduje unieważnienie gwarancji.
Przed podłączeniem urządzenia do sieci sprawdzić, czy napięcie zasilania jest takie samo, jak wskazane
na tabliczce znamionowej urządzenia.
Urządzenie należy podłączać do gniazda z uziemieniem. W przypadku używania adaptera upewnić się, że
może osiągnąć natężenie 16 A i ma wtyczkę z uziemieniem.
W trakcie korzystania z urządzenia przewód zasilający nie może być zaplątany ani owinięty wokół
urządzenia.
Nie używać, nie podłączać ani nie odłączać urządzenia od sieci, mając mokre dłonie lub stopy.
Nie ciągnąć za przewód zasilający w celu odłączenia urządzenia. Nie używać przewodu do wieszania
urządzenia.
Nie kierować strumienia pary bezpośrednio w stronę ludzi ani zwierząt.
Nie podstawiaj urządzenia pod kran w celu napełnienia zbiornika. Nie zanurzaj urządzenia w wodzie ani
innych płynach.
W przypadku jakiejkolwiek awarii lub uszkodzenia natychmiast odłącz urządzenie od sieci i skontaktuj się z
ocjalnym działem wsparcia technicznego. Aby zapobiec niebezpieczeństwu, nie należy otwierać obudowy
urządzenia. Naprawy lub procedury dotyczące urządzenia może wykonywać tylko wykwalikowany
personel ocjalnego działu wsparcia technicznego marki.

5
PL
PL
Nie wolno wystawiać urządzenia na działanie wody ani warunków atmosferycznych.
Urządzenie osiąga wysokie temperatury i wytwarza parę podczas działania, co w razie nieprawidłowego
użytkowania grozi poparzeniami lub przypaleniem.
Nie wolno dopuszczać do zetknięcia się kabla zasilającego z gorącą stopą żelazka.
Urządzenie należy czyścić według wskazówek znajdujących się w sekcji dotyczącej konserwacji i
czyszczenia.
EUROGAMA SP. Z O. O. nie ponosi odpowiedzialności za szkody poniesione przez ludzi, zwierzęta lub
przedmioty z powodu niestosowania się do ostrzeżeń.
PRZED PIERWSZYM UŻYCIEM
Przed użyciem generatora pary przeczytaj instrukcję obsługi i upewnij się, że budowa generatora i jego
funkcje są zrozumiałe. Usuń wszelkie materiały opakowaniowe i etykiety przed użyciem urządzenia po raz
pierwszy.
Przy pierwszym użyciu z urządzenia mogą uwalniać się zapachy lub opary. Nie rozpylaj pary podczas
pierwszego użycia bezpośrednio na ubraniach, ponieważ na stopie mogą znajdować się zabrudzenia.
UŻYWANA WODA
Urządzenie jest przewidziane do użytkowania z wodą z kranu. Jeżeli woda w miejscu używania urządzenia
jest twarda lub półtwarda, używaj mieszanki wody z kranu z wodą destylowaną lub demineralizowaną
zakupioną w sklepie w proporcji, odpowiednio, 2:1 i 1:1 (woda destylowana: woda z kranu). Skontaktuj się
z dostawcą wody w celu ustalenia rodzaju wody w miejscu używania urządzenia.
Nie używaj wyłącznie destylowanej lub demineralizowanej wody, wody deszczowej, wody zmiękczanej,
wody zapachowej, wody z innych urządzeń, np. z chłodziarek, klimatyzatorów, suszarek, lub innych
rodzajów wody przygotowanej w domu.
NAPEŁNIANIE ZBIORNIKA NA WODY
Napełnij zbiornik na wodę (2) przez osłonę wlotu wody (1). NIE napełniaj ponad wskaźnik poziomu MAX.
Upewnij się, że po umieszczaniu z powrotem na stacji, urządzenie jest prawidłowo dopasowane.
OBSŁUGA
Uwaga: Jeśli po raz pierwszy prasujesz z użyciem pary lub jeśli produkt nie był używany przez jakiś czas,
ustaw pokrętło regulacji pary (5) w pozycji MAX i naciskaj przycisk włączania pary (3) w sposób ciągły, aż
pojawi się para. Proces ten może potrwać kilka minut.
Umieść generator pary na stabilnym, równym stole, ławie lub desce do prasowania. Podłącz urządzenie do
gniazdka elektrycznego i włącz za pomocą przycisku zasilania (10).
Ustaw pokrętło regulacji pary (5) stosownie do rodzaju tkanin, które chcesz wyprasować. Uwaga: Jeśli
chcesz skorzystać z prasowania parowego, proponujemy ustawić pokrętło regulacji pary (5) na MAX. Gdy
zgaśnie wskaźnik gotowości do pracy (4), urządzenie będzie gotowe do pracy.
Uwaga: Cały czas w trakcie pracy wskaźnik gotowości do pracy (4) będzie się zapalał i gasł w nieregularnych
odstępach czasu. Jest to normalne.
Aby wypuścić strumień pary, naciśnij przycisk włączania pary (3), a jeśli chcesz zatrzymać parę zwolnij ten
sam przycisk. W ciągu kilku sekund para przestanie się wydobywać.
Po naciśnięciu i przytrzymaniu przycisk włączania pary (3), para może wydobywać się ze stopy żelazka
(11). Parę można wyłączyć w każdej chwili, zwalniając przycisk włączania pary (3).

6
PL
PL
WSKAZÓWKI DOTYCZĄCE PRASOWANIA
• Zacznij od tkanin, które mają być prasowane w niskiej temperaturze, a skończ na tych, które wymagają
wyższej temperatury.
• W przypadku tkanin z włókien mieszanych, ustaw temperaturę prasowania na niższym poziomie.
• W przypadku ubrań wełnianych, naciśnij kilkakrotnie przycisk włączania pary (3) nad ubraniem bez
dotykania go żelazkiem.
• W przypadku grubszych tkanin, podnieś temperaturę żelazka do pozycji MAX.
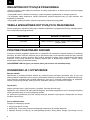
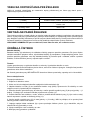
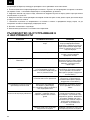
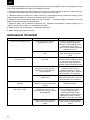
TABELA WSKAZÓWEK DOTYCZĄCYCH PRASOWANIA
Poniżej znajdują się wskazówki dotyczące ustawień temperatury wymaganej dla różnych rodzajów tkanin,
wraz z zalecaną metodą prasowania.
OZNAKOWANIE MATERIAŁ, NA PRZYKŁAD
• (1 kropka) Włókno octanowe, elastan, poliamid, polipropylen
• • (2 kropki) Włókno miedziowe, poliester, jedwab, włókno triacetatowe,
wiskoza, wełna
••• (3 kropki) / MAX Bawełna / len
PIONOWE PRASOWANIE PAROWE
Funkcja ta pozwala wygładzić zagniecenia na ubraniach lub zasłonach w sposób podobny do działania
parownicy do ubrań. Wysokie ciśnienie pary w generatorze pary może zapewnić uderzenia pary podczas
trzymania żelazka w pozycji pionowej. Aby uzyskać najlepsze rezultaty, stosuj na delikatnych lub lekkich
tkaninach. Parę należy kierować na wiszące ubrania tylko w bezpiecznym miejscu i zawsze należy
przestrzegać zaleceń producenta odzieży.
OSTRZEŻENIE: NIE kieruj pary na ubranie, które jest noszone, ani na żadną osobę.
KONSERWACJA I CZYSZCZENIE
Blokada żelazka
Wbudowana w podstawę blokada żelazka (6) umożliwia prosty transport generatora pary. W tym celu
należy podnieść urządzenie ruchem do góry, aż blokada żelazka (6) zatrzaśnie się w odpowiedniej pozycji.
Przed użyciem generatora pary blokada żelazka (6) musi być z powrotem zablokowana na podstawie;
naciśnij i przytrzymaj blokadę, zwolnij przycisk i delikatnie opuść go z powrotem na miejsce.
Czyszczenie
Wyłącz generator pary i wyjmij wtyczkę z gniazdka. Opróżnij zbiornik wody.
Regularnie czyść ceramiczną stopę żelazka wilgotną, niemetaliczną gąbką do mycia. Wytrzyj zewnętrzną
część generatora pary za pomocą wilgotnej szmatki.
Do czyszczenia generatora pary NIE używaj ściernych środków czyszczących, detergentów ani innych
środków chemicznych.
Proces odkamieniania
Postępuj w następujący sposób:
1. Przygotuj pojemnik z wodą.
2. Upewnij się, że wtyczka przewodu zasilającego urządzenia (8) została odłączona.
3. Napełnij zbiornik na wodę (2) do maksymalnego poziomu wody (MAX). Uwaga: Nie wlewaj octu ani

7
PL
PL
innych środków odkamieniających do zbiornika wody.
4. Włóż wtyczkę generatora pary do gniazda, a pokrętło regulacji pary (5) ustaw na pierwszej pozycji: • (1
kropka). Poczekaj aż zgaśnie wskaźnik gotowości do pracy (4).
5. Trzymając żelazko nad pojemnikiem z wodą, naciśnij i przytrzymaj przycisk włączania pary (3), aż ze
stopy żelazka (11) przestanie wypływać woda z kamieniem.
6. Obróć pokrętło regulacji pary (5) do trzeciej pozycji ••• (3 kropki) / MAX i poczekaj aż ze spodu żelazka
przestanie wypływać woda ani para.
7. Odłącz wtyczkę przewodu zasilającego urządzenia (8) i delikatnie przesuwaj stopę żelazka (1) po
ściereczce, aby usunąć plamy pozostałe od wody.
8. Wylej pozostałą wodę ze zbiornika na wodę.
9. Pozostaw generator pary do ostygnięcia.
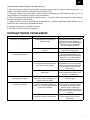
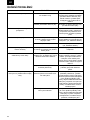
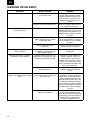
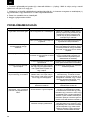
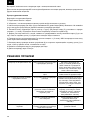
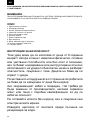
ROZWIĄZYWANIE PROBLEMÓW
PROBLEM MOŻLIWA PRZYCZYNA ROZWIĄZANIE
Generator nie wytwarza pary Niewystarczająca ilość wody w
zbiorniku wody Napełnij zbiornik wody do znaku
poziomu wody MAX. Naciśnij i pr-
zytrzymaj przycisk włączania pary,
aż pojawi się para. Rozpylenie
pary może zająć 30 sekund.
Nie nacisnąłeś przycisku włącza-
nia pary. Dotknij przycisku włączania pary,
aby włączyć funkcję pary.
Z urządzenia wydobywa się głośny
dźwięk pompowania Brak wody w zbiorniku wody Napełnij zbiornik wodą i naciśnij
przycisku włączania pary, aż
dźwięk pompowania wody stanie
się cichszy, a ze stopy żelazka
będzie wydobywać się para.
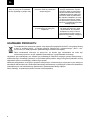
Ze stopy żelazka kapie woda Po zakończeniu procesu odka-
mieniania pozostała woda może
wyciekać ze stopy żelazka
Wytrzyj podstawę na żelazko oraz
stopę żelazka do sucha szmatką.
Proszę przeprowadź proces odka-
mieniania (patrz „Konserwacja i
czyszczenie”)
Proces odkamieniania nie został
zakończony Proszę ponownie przeprowadzić
proces odkamieniania (patrz „Kon-
serwacja i czyszczenie”)
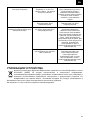
Brudna woda i zanieczyszczenia
wydostają się ze stopy Zanieczyszczenia lub substancje
chemiczne z wody osadzają się na
wylocie pary i/lub stopie
Regularnie przeprowadzaj proces
odkamieniania.
Żelazko pozostawia jasne plamy
lub odcisk na odzieży Powierzchnia prasowania jest
nierówna, na przykład dlatego, że
prasujesz w miejscu, gdzie ubrania
są zszyte lub złożone
Jasne plamy lub odciski nie będą
się utrzymywać; znikną po wypra-
niu odzieży. Unikaj prasowania
szwów i zagięć, możesz też
położyć bawełnianą ściereczkę na
prasowanym miejscu, aby uniknąć
odcisków.
Niewystarczająca ilość lcu/gąbki
w pokrowcu deski do prasowania. Dodaj warstwę podkładki lcowej/
gąbki pod pokrowiec deski do
prasowania.

8
PL
PL
Pokrowiec deski do prasowania
staje się mokry lub na podłodze/
ubraniu pojawiają się krople wody.
Po dłuższym prasowaniu na
pokrowcu deski do prasowania
skrapla się para
Jeśli gąbka lub lcowa podkła-
dka jest uszkodzona, wymień
pokrowiec deski do prasowania.
Można również dodać warstwę
podkładki lcowej lub gąbki pod
pokrowiec deski do prasowania,
aby zapobiec skraplaniu się wody
na desce. Dla lepszych rezulta-
tów prasowania, polecamy także
pokrowce z metalizowaną powłoką
odbijającą parę
Deska do prasowania nie jest
przystosowana do silnej pary
urządzenia.
Dodaj warstwę podkładki lcowej
lub gąbki pod pokrowiec deski
do prasowania, aby zapobiec
skraplaniu się wody na desce.
Ewentualnie korzystaj z deski z
metalizowaną powłoką, odbijającą
parę.
USUWANIE PRODUKTU
To urządzenie jest oznaczone zgodnie z Dyrektywą Europejską 2012/19/UE oraz polską Ustawą
z dnia 11 września 2015r. „o zużytym sprzęcie elektrycznym i elektronicznym” (Dz.U. z dn.
23.10.2015 poz.1688) symbolem przekreślonego kontenera na odpady.
Takie oznakowanie informuje, że sprzęt ten, po okresie jego użytkowania nie może być
umieszczany łącznie z innymi odpadami pochodzącymi z gospodarstwa domowego.
Użytkownik jest zobowiązany do oddania go prowadzącym zbieranie zużytego sprzętu elektrycznego i
elektronicznego/. Prowadzący zbieranie, w tym lokalne punkty zbiórki, sklepy oraz gminne jednostki, tworzą
odpowiedni system umożliwiający oddanie tego sprzętu.
Właściwe postępowanie ze zużytym sprzętem elektrycznym i elektronicznym przyczynia się do uniknięcia
szkodliwych dla zdrowia ludzi i środowiska naturalnego konsekwencji, wynikających z obecności składników
niebezpiecznych oraz niewłaściwego składowania i przetwarzania takiego sprzętu.
Mamy nadzieję, że produkt przyniesie Państwu wiele satysfakcji.

9
PL EN
WE WOULD LIKE TO THANK YOU FOR CHOOSING UFESA. WE WISH THE PRODUCT PERFORMS
TO YOUR SATISFACTION AND PLEASURE
WARNING
PLEASE READ THE INSTRUCTIONS FOR USE CAREFULLY PRIOR TO USING THE PRODUCT.
STORE THESE IN A SAFE PLACE FOR FUTURE REFERENCE.
DESCRIPTION
1. Water inlet cover
2. Water tank
3. Steam trigger/cleaning button
4. Heating indicator
5. Temperature adjustment knob
6. Iron lock
7. Steam hose
8. Power cord
9. Power cord storage
10. Power button
11. Soleplate
SAFETY INSTRUCTIONS
This appliance can be used by children aged from 8
years and above and persons with reduced physical,
sensory or mental capabilities or lack of experience
and knowledge if they have been given supervision or
instruction concerning use of the appliance in a safe way
and understand the hazards involved. Children shall not
play with the appliance. Cleaning and user maintenance
shall not be made by children without supervision.
If the supply cord is damaged it must be replaced by
the manufacturer, its service agent or similarly qualied
persons in order to avoid a hazard.
The iron must not be left unattended while it is conncted
to the supply mains.
The plug must be removed from the socketoutlet before
the water reservoir is lled with water.
The iron must be used and rested on a at, stable sur-
face. When placing the iron on its stand, ensure that the

10
PL
EN
surface on which the stand is placed is stable.
The iron is not to be used if it has been dropped, if there
are visible signs of damage or if it is leaking.
Keep the iron and its cord out of reach of children less
than 8 years of age when it is energized or coo- ling down.
Instruction for the safe relling of the water reser- voir are
given in lling the water tank section.
CAUTION. Hot surfaces. Surfaces are liable to get
hot during use.
Before connecting the appliance to the mains, put the
iron in the unlocked position. To block the iron, wait until
the appliance has cooled down completely and has been
unplugged from the mains.
This device is designed for use at a maximum altitude up
to 2000m above sea level.
IMPORTANT WARNINGS
This appliance is designed for home use and should never be used for commercial or industrial use under
any circumstances. Any incorrect use or improper handling of the product shall render the warranty null
and void.
Prior to plugging in the product, check that your mains voltage is the same as the one indicated on the
product label.
If you use one adaptor make sure it can reach 16 A and is provided with earth socket.
The mains connection cable must not be tangled or wrapped around the product during use. Do not use the
device, or connect and disconnect to supply mains with the hands and / or feet wet.
Do not pull on the connection cord in order to unplug it or use it as a handle Do not direct steam at people
and animals.
Do not place the appliance under the tap to ll the water tank, or immerse it in water or other liquids.
Unplug the product immediately from the mains in the event of any breakdown or damage and contact
an Ofcial Technical support service. In order to prevent any risk of danger, do not open the device. Only
qualied technical personnel from the brand´s Ofcial Technical support service may carry out repairs or
procedures on the device.
Proceed according to the conservation and cleaning section of this manual for cleaning.
B&B Trends, S.L. disclaims all liability for damages that may occur to people, animals or objects, for the
non-observance of these warnings.

11
PL EN
BEFORE THE FIRST USE
Before using the Steam Station, please ensure you read the user manual and understand all parts and
features of the Steam Station. Be sure to remove any packaging material and labels before using for the
rst time.
In the rst use they can break off odors or fumes that sent quickly. Do not spray for the rst time on clothes
and there may be traces of dirt on the soleplate.
WATER TO BE USED
The device is designed for use with tap water. If the water in your area is hard or semi-hard use mix tap
water with distilled or demineralized water purchased in stores, in the ratio 2:1 and 1:1 respectively (distilled
water: tap water). Check with your water supplier to determine the type of water in your area.
Never use 100% distilled or demineralized, rain water, softened water, scented water, water from other
appliances such as refrigerators, air conditioners, dryers or other types of home water preparation water.
FILLING THE WATER TANK
Fill it through the water inlet cover. Do NOT ll over the MAX level indicator. Make sure when placing it back
to the station that it ts correctly.
OPERATING INSTRUCTIONS
NB: If it is the rst time you have steam-ironed or if the product has not been used for some time, turn the
temperature control to Max position and press the steam button continuously until steam comes out. This
process can take a few minutes.
Place the Steam Station on a rm level table, bench or ironing board. Plug the unit into a power outlet and
switch on at the power point.
Adjust the temperature dial in terms of choose the kind of fabrics that you want to iron. Note: If you want to
use the steam ironing, we suggest you to adjust the temperature dial on MAX. When the iron operating light
indicator goes out the device will be ready for use.
Note: During the whole operating time, the iron operating light indicator will go on and off in erratic intervals,
this is normal.
To make the steam jet come out, press the steam trigger, and if you want to stop the steam release the
steam trigger, in a few seconds steam will stop.
Pressing and holding the steam button, the steam can jet out from the iron soleplate. The steam can be
switched off at any time by releasing the steam button.
IRONING TIPS
• Start with the fabrics to be ironed at a low temperature and nish with those that need higher temperatures.
• For mixed bre fabric, set the ironing temperature to a lower setting.
• For woollen garments, press the steam trigger repeatedly over the garment without physically touching it
with the iron.
• For thicker fabrics, raise the iron temperature at MAX position.
IRONING GUIDE CHART
Below is a guide on the temperature setting required for different types of fabric, along with the recommended
iron method.

12
PL
EN
MARKING MATERIAL, FOR EXAMPLE
• (1 dot) Acetate, elastane, polyamide, polypropylene
• • (2 dots) Cupro, polyester, silk, triacetate, viscose, wool
••• (3 dots) / MAX Cotton / Linen
VERTICAL STEAM IRONING
This feature allows you to smooth out creases in garments or drapery in a similar manner to a garment
steamer. The high steam pressure of the Steam Station can provide bursts of steam while holding the iron
vertically. For best results, utilise on delicate or light fabrics. Only direct steam at hanging garments in a safe
area and ensure you always refer to gar- ment manufacturer recommendations.
WARNING: Do NOT direct the steam onto a garment that is being worn or at any person.
MAINTENANCE AND CLEANING
Iron lock
The easy carry locker attached to the base unit can be used to transport the steam Station with ease. To
do so, lift it in an upward motion until it clicks into position. Before using the Steam Station, the easy carry
handle must be locked back into position against the base unit; press and hold the handle release button
and carefully lower it back to place.
Cleaning
Turn off the Steam Station and unplug at the power outlet. Empty the water tank.
Regularly clean the ceramic soleplate with a damp, non-metallic washing pad. Wipe the exterior of the
Steam Station with a soft cloth.
Do NOT use abrasive cleaners, detergent or other chemicals to clean the Steam Station.
Descaling process
Proceed as follows:
1. Please prepare a water container.
2. Make sure that the plug of the product has been unplugged.
3. Fill the water tank to the maximum water level (MAX). Note: Do not pour vinegar or other descaling
agents into the water tank.
4. Insert the pump steam station plug into the socket, and the steam control knob has been adjusted to the
rst point, wait for the heating indicator light to go out.
5. Hold the iron on top of the water container, press and hold the steam button until no scale is ushed out
from the bottom of the iron.
6. Turn the steam control knob back to the third point, until there is no water and steam rus- hing out from
the bottom of the iron.
7. Unplug the power plug of the iron, and move the iron gently on a cloth to remove the resi- dual water
stains on the soleplate.
8. Pour out the remaining water in the water tank.
9. Let the iron cool down and store it.

13
PL EN
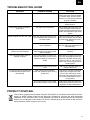
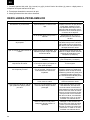
TROUBLESHOOTING GUIDE
PROBLEM POSSIBLE REASON SOLUTION
The iron has no steam Insufcient water in the water tank Fill the water tank to the MAX
water level mark. Press and hold
the steam switch until the steam
comes out. It may take 30 seconds
to spray out steam
You didn’t press the steam switch Tap the steam switch to turn on the
steam function.
The product makes a loud pum-
ping sound No water in the water tank Fill the water tank with water and
press the steam switch until the
sound of pumping water becomes
smaller and the bottom plate emits
steam
Water droplets from the sole- plate After the descaling process is over,
the remaining water can drip from
the bottom plate
Wipe the bottom plate dry with a
cloth. Please perform the descaling
process (see “Maintenance and
Cleaning”)
The descaling process has not
been completed You must perform the descaling
process again (see “Maintenance
and Cleaning”)
Dirty water and impurities will
emerge from the soleplate Impurities or chemicals in the
water deposit on the steam outlet
and/or soleplate
Perform the descaling process
regularly
The iron leaves bright spots on
clothing or imprint The ironing surface is uneven, for
example, because you are ironing
where the clothes are stitched or
folded
Bright spots or imprints will not per-
sist; they will disappear after the
clothes are washed. Avoid ironing
seams or folds, or you can put a
cotton cloth on the ironing area to
avoid imprints
Insufcient felt in the ironing board
cover Add a layer of felt pad under the
ironing board cover
The ironing board cover gets wet
or water droplets appear on the
oor/clothing
After a long ironing operation,
steam will condense on the ironing
board cover
If the foam or felt pad is damaged,
replace the ironing board cover.
You can also add a layer of felt
pad under the ironing board cover
to prevent condensation on the
ironing board
The ironing board is not sui- table
for the strong steam of the product Add a layer of felt pad under the
ironing board cover to prevent con-
densation on the ironing board
PRODUCT DISPOSAL
This product complies with European Directive 2012/19/EU on electrical and electronic devices,
known as WEEE (Waste Electrical and Electronic Equipment), provides the legal framework
applicable in the European Union for the disposal and reuse of waste electronic and electrical
devices. Do not dispose of this product in the bin, instead going to the electrical and electronic
waste collection center closest to your home.

14
PL
DE
VIELEN DANK, DASS SIE SICH FÜR UFESA ENTSCHIEDEN HABEN. WIR WÜNSCHEN IHNEN VIEL
FREUDE UND ZUFRIEDENHEIT MIT IHREM GERÄT
ACHTUNG
BITTE LESEN SIE DIE GEBRAUCHSANWEISUNG VOR DER ERSTEN VERWENDUNG DES GERÄTS
SORGFÄLTIG DURCH. BEWAHREN SIE DIESE FÜR SPÄTERES NACHSCHLAGEN AN EI- NEM
SICHEREN ORT AUF.
BESCHREIBUNG
1. Deckel für Wassereinlass
2. Wassertank
3. Dampfauslöser/Reinigungstaste
4. Heizanzeige
5. Temperaturdrehknopf
6. Bügeleisenverriegelung
7. Dampeitung
8. Stromkabel
9. Stromkabelaufbewahrung
10. Einschaltknopf
11. Bügelsohle
SICHERHEITSHINWEISE
Dieses Gerät darf von Kindern ab 8 Jahren und von
Personen mit eingeschränkten körperlichen, senso-
rischen oder geistigen Fähigkeiten oder mangeln- der
Erfahrung und Kenntnissen verwendet werden, wenn
sie beaufsichtigt werden oder bezüglich des sicheren
Gebrauchs des Gerätes unterwiesen wur- den und die
daraus resultierenden Gefahren vers- tanden haben.
Kinder dürfen nicht mit dem Gerät spielen. Reinigung und
Wartung darf von Kindern nur unter Aufsicht durchgeführt
werden.
Wenn das Netzkabel beschädigt ist, muss es vom
Hersteller, seinem Servicevertreter oder ähnlich
qualizierten Personen ersetzt werden, um eine
Gefährdung zu vermeiden.
Das Bügeleisen darf nicht unbeaufsichtigt bleiben, so-
lange es an der Stromversorgung angeschlossen ist.

15
PL
DE
Der Netzstecker muss aus der Steckdose gezogen wer-
den, bevor der Wasserbehälter mit Wasser gefüllt wird.
Das Bügeleisen muss auf einer ebenen, stabi- len
Oberäche verwendet und abgestellt werden. Wenn Sie
das Bügeleisen auf seinen Ständer ste- llen, achten Sie
darauf, dass die Oberäche, auf die der Ständer gestellt
wird, stabil ist.
Das Bügeleisen darf nicht verwendet werden, wenn es
heruntergefallen ist, sichtbare Beschädigungen aufweist
oder undicht ist.
Solange das Bügeleisen und dessen Kabel unter Strom
steht oder abkühlt, halten Sie es von Kindern unter 8
Jahren fern.
Hinweise zum sicheren Nachfüllen des Wassertanks
nden Sie im Abschnitt zum Füllen des Wassertanks.
VORSICHT! Heiße Oberächen. Die Oberächen
können während des Gebrauchs heiß werden.
Bevor Sie das Gerät an die Stromversorgung ans-
chließen, stellen Sie das Bügeleisen in die entrie- gelte
Position. Um das Bügeleisen zu verriegeln, warten Sie,
bis das Gerät vollständig abgekühlt ist und vom Stromnetz
getrennt wurde.
Dieses Gerät ist für den Einsatz in einer maximalen Höhe
von 2.000 m über dem Meeresspiegel ausgelegt.
WICHTIGE WARNHINWEISE
Dieses Gerät ist für den Hausgebrauch konzipiert und sollte unter keinen Umständen für den kommerziellen
oder industriellen Gebrauch verwendet werden. Jede unsachgemäße Verwen- dung oder unsachgemäße
Handhabung des Produkts führt zum Erlöschen der Garantie.
Prüfen Sie vor dem Einstecken des Produkts, ob Ihre Netzspannung mit der auf dem Pro- duktetikett
angegebenen Spannung übereinstimmt.
Wenn Sie einen Adapter verwenden, achten Sie darauf, dass dieser 16 A liefern kann und mit einer
Schutzkontaktsteckdose versehen ist.
Das Netzanschlusskabel darf während des Gebrauchs nicht verworren sein oder um das Gerät gewickelt

16
PL
DE
werden.
Benutzen oder stecken Sie das Gerät nicht mit nassen Händen und/oder Füßen ein- oder aus. Ziehen Sie
den Netzstecker nicht am Kabel heraus und tragen Sie das Gerät nicht am Kabel Richten Sie keinen Dampf
auf Menschen oder Tiere.
Stellen Sie das Gerät nicht unter den Wasserhahn, um den Wassertank zu füllen, und tau- chen Sie es nicht
in Wasser oder andere Flüssigkeiten.
Ziehen Sie im Falle einer Störung oder Beschädigung sofort den Netzstecker und wenden Sie sich an einen
ofziellen technischen Kundendienst. Um Gefahren zu vermeiden, darf das Gerät nicht geöffnet werden.
Nur qualiziertes technisches Personal des ofziellen technischen Kundendienstes der Marke darf
Reparaturen oder Eingriffe an dem Gerät vornehmen. Zur Reinigung gehen Sie gemäß dem Abschnitt
Wartung und Reinigung in dieser Anleitung vor.
B&B TRENDS, S.L. lehnt jede Haftung für Schäden ab, die an Menschen, Tieren oder Ge- genständen
durch die Nichtbeachtung dieser Warnhinweise entstehen können.
VOR DEM ERSTEN GEBRAUCH
Bevor Sie das Dampfbügeleisen benutzen, sollten Sie unbedingt das Benutzerhandbuch le- sen und alle
seine Zubehörteile und Funktionen verstehen. Achten Sie darauf, Verpackungs- material und Klebestreifen
vor dem ersten Gebrauch zu entfernen.
Beim ersten Erhitzen des Geräts können Gerüche oder Dämpfe austreten, die aber sch- nell verschwinden.
Beim ersten Verwenden der Sprühfunktion nicht auf Kleidungsstücke sprühen, weil dann eventuell
Schmutzreste austreten könnten.
ZU VERWENDENDES WASSER
Das Gerät ist für die Verwendung mit Leitungswasser ausgelegt. Wenn das Wasser in Ihrer Gegend hart
oder halbhart ist, mischen Sie Leitungswasser mit im Handel erhältlichem destillierten oder demineralisierten
Wasser im Verhältnis 2:1 bzw. 1:1 (destilliertes Was- ser: Leitungswasser). Wenden Sie sich an Ihren
Wasserversorger, um die Wasserhärte in Ihrem Gebiet herauszunden.
Verwenden Sie niemals 100% destilliertes oder demineralisiertes, Regenwasser, enthär-
tetes Wasser, parfümiertes Wasser, Wasser aus anderen Geräten wie Kühlschränken, Kli- maanlagen,
Trocknern oder andere Arten häuslicher Wasseraufbereitung.
FÜLLEN DES WASSERTANKS
Füllen Sie ihn durch den Deckel für den Wassereinlass. Füllen Sie NICHT über die MAX-Fülls- tandsanzeige
hinaus.
Vergewissern Sie sich, dass er beim Wiedereinsetzen richtig sitzt.
BEDIENUNGSANWEISUNGEN
NB: Wenn Sie zum ersten Mal mit Dampf bügeln oder das Gerät längere Zeit nicht benutzt haben, stellen
Sie den Temperaturregler auf die „Max“-Position und drücken Sie die Dampftaste so lange, bis Dampf
austritt. Dies kann einige Minuten dauern.
Stellen Sie das Dampfbügeleisen auf einen festen, ebenen Tisch, eine Bank oder ein Bü- gelbrett.
Schließen Sie das Gerät an eine Steckdose an und schalten Sie es ein.
Stellen Sie den Temperaturregler entsprechend der Art der zu bügelnden Stoffe ein. Hinweis: Wenn Sie mit
Dampf bügeln möchten, empfehlen wir Ihnen, den Temperaturre- gler auf MAX einzustellen.
Wenn die Kontrollleuchte des Bügeleisens erlischt, ist das Gerät einsatzbereit.

17
PL
DE
Hinweis: Während der gesamten Betriebszeit geht die Betriebskontrollleuchte des Büge- leisens in
unregelmäßigen Abständen an und aus, dies ist normal.
Um den Dampfstrahl entweichen zu lassen, drücken Sie den Dampfauslöser. Wenn Sie den Dampf stoppen
wollen, lassen Sie den Dampfauslöser los und der Dampf stoppt in einigen Sekunden.
Durch langes Drücken und Halten der Dampftaste kann der Dampf aus der Bügelsohle aus- treten. Der
Dampf kann jederzeit durch Loslassen der Dampftaste ausgeschaltet werden.
BÜGELTIPPS
• Beginnen Sie mit den Stoffen, die bei niedriger Temperatur gebügelt werden sollen, und schließen Sie mit
den Stoffen ab, die höhere Temperaturen benötigen.
• Stellen Sie bei Mischfasergeweben eine niedrigere Bügeltemperatur ein.
• Drücken Sie bei Wolltextilien den Dampfauslöser wiederholt über dem Kleidungsstück, ohne es mit dem
Bügeleisen zu berühren.
• Erhöhen Sie bei dickeren Stoffen die Temperatur des Bügeleisens bis zur Position MAX.
TABELLE BÜGELANLEITUNG
Nachfolgend nden Sie eine Übersicht über die erforderliche Temperatureinstellung für verschiedene
Stoffarten sowie die empfohlene, Bügelmethode.
KENNZEICHNUNG BEISPIEL FÜR MATERIAL
• (1 Punkt) Acetat, Elasthan, Polyamid, Polypropylen
• • (2 Punkte) Cupro, Polyester, Seide, Triacetat, Viskose, Wolle
••• (3 Punkte) / Max. Baumwolle/Leinen
BÜGELN MIT VERTIKALEM DAMPF
Mit dieser Funktion können Sie Falten in Kleidungsstücken oder Vorhängen ähnlich wie mit einer
Dampfbürste glätten.
Der hohe Dampfdruck des Dampfbügeleisens kann Dampfstöße erzeugen, während das Bügeleisen
vertikal gehalten wird. Die besten Ergebnisse erzielen Sie bei empndlichen oder leichten Stoffen. Richten
Sie den Dampf nur auf hängende Kleidungsstücke in einem sicheren Bereich und beachten Sie stets die
Empfehlungen des Kleidungsherstellers.
ACHTUNG: Richten Sie den Dampf NICHT auf ein getragenes Kleidungsstück oder auf eine Person.
PFLEGE UND REINIGUNG
Bügeleisenverriegelung
Mit dem an der Basiseinheit angebrachten Tragegriff können Sie das Dampfbügeleisen pro- blemlos
transportieren. Ziehen Sie es dazu nach oben an, bis es einrastet. Bevor Sie das Dampfbügeleisen benutzen,
muss der Tragegriff wieder an der Basiseinheit verriegelt wer- den; halten Sie die Entriegelungstaste des
Griffs gedrückt und senken Sie ihn vorsichtig wie- der ab.
Reinigung
Schalten Sie das Dampfbügeleisen aus und ziehen Sie den Netzstecker aus der Steckdose. Entleeren Sie
den Wassertank.
Reinigen Sie die Keramiksohle regelmäßig mit einem feuchten, nicht-metallischen Reini- gungsschwamm.
Wischen Sie das Äußere des Dampfbügeleisens mit einem weichen Tuch ab.
Verwenden Sie KEINE Scheuermittel, Reinigungsmittel oder andere Chemikalien zur Reini- gung des
Dampfbügeleisens.

18
PL
DE
Entkalken
Es wird empfohlen, das Gerät etwa alle zwei Wochen zu entkalken. Gehen Sie dabei wie folgt vor:
1. Stellen Sie ein Wasserbehältnis bereit.
2. Stellen Sie sicher, dass der Netzstecker des Geräts gezogen ist.
3. Füllen Sie den Wassertank bis zur „MAX“-Füllmarke auf. Hinweis: Füllen Sie keinen Essig oder andere
Entkalkungsmittel in den Wassertank.
4. Stecken Sie den Netzstecker der Dampfbügelstation in die Steckdose und stellen sie Den Dampfregelknopf
auf den ersten Punkt. Warten Sie, bis die Heizanzeige erlischt.
5. Halten Sie das Bügeleisen über das Wasserbehältnis und halten Sie so lange die Dampf- taste gedrückt,
bis keine Kalkreste mehr aus der Unterseite des Bügeleisens austreten.
6. Drehen Sie den Dampfregelknopf zurück auf den dritten Punkt, bis kein Wasser und Dampf mehr aus der
Unterseite des Bügeleisens austritt.
7. Trennen Sie den Netzstecker vom Stromnetz und fahren Sie mit dem Bügeleisen vorsichtig über ein
Tuch, um die Wasserreste von der Bügelsohle zu entfernen.
8. Schütten Sie das restliche Wasser aus dem Wassertank.
9. Lassen Sie das Bügeleisen abkühlen und verstauen Sie es.
ANLEITUNG ZUR FEHLERBEHEBUNG
PROBLEM MÖGLICHE URSACHEN LÖSUNG
Bügeleisen erzeu- gt keinen Dampf Unzureichend Wasser im Was-
sertank Füllen Sie den Wassertank bis zur
„MAX“-Fü- llmarke auf. Drücken
und halten Sie die Dam- pftaste,
bis Dampf austritt. Es kann bis zu
30 Sekunden dauern, bis Dampf
austritt
Sie haben die Dampftaste nicht
betätigt Betätigen Sie die Dampftaste, um
die Damp- ffunktion einzuschalten
Das Gerät erzeugt laute Pump-
geräusche Kein Wasser im Wassertank Füllen Sie den Wassertank auf und
betätigen Sie die Dampftaste, bis
das Pumpgeräusch leiser wird und
Dampf aus der Bügelsohle austritt
Wasser tropft aus der Bügelsohle Nach dem Entkalkungsvor- gang
kann Restwasser aus der Bügelso-
hle austreten
Wischen Sie die Bügelsohle mit ei-
nem Tuch trocken. Bitte führen Sie
einen Entkalkungs- vorgang durch
(siehe „Pege und Reinigung“)
Der Entkalkungsvorgang ist noch
nicht abgeschlossen Sie müssen den Entkalkungsvor-
gang erneut durchführen (siehe
„Pege und Reinigung“)
Schmutzwasser und Verunreini-
gungen treten aus der Bügelsohle
aus
Verunreinigungen oder Che- mi-
kalien im Wassertank, dem Damp-
fauslass und/oder der Bügelsohle
Bitte führen Sie regelmäßige
Entkalkungsvor- gänge durch
Das Bügeleisen hinterlässt Ab-
drücke oder helle Flecken auf der
Kleidung
Die Bügelunterlage ist uneben,
etwa, weil Sie zu- sammenge-
faltete Kleidung oder auf Nähten
bügeln
Die hellen Flecken sind nicht
dauerhaft und verschwinden nach
einer Wäsche. Vermeiden Sie das
Bügeln von Nähten oder Falten
oder legen Sie ein Baumwolltuch
auf die betreffende Stelle, um
Abdrücke zu vermeiden
Zu wenig Filz im Bezug des
Bügelbretts Legen Sie eine Filzunterlage unter
den Bezug des Bügelbretts

19
PL
DE
Der Bezug des Bügelbretts wird
nass oder Wassertropfen tauchen
auf der Kleidung / dem Boden auf
Nach längeren Bügelvor- gängen
kondensiert der Dampf auf dem
Bezug des Bügelbretts
Wenn die Schaumstoff- oder
Filzunterlage bes- chädigt ist,
ersetzen Sie den Bügelbrettbezug.
Sie können auch eine Filzunterlage
unter den Bezug des Bügelbretts
legen, um Kondensation auf dem
Bügelbrett zu vermeiden
Das Bügelbrett ist nicht für
den starken Dampf des Geräts
geeignet
Legen Sie Filzunterlage unter
den Bezug des Bügelbretts, um
Kondensation auf dem Bügel- brett
zu vermeiden
GERÄTEENTSORGUNG
Dieses Gerät entspricht der Europäischen Richtlinie 2012/19/EU über elektris- che und
elektronische Geräte, bekannt als WEEE (Waste Electrical and Elec- tronic Equipment), die den
in der Europäischen Union geltenden gesetzlichen Rahmen für die Entsorgung und
Wiederverwendung von elektronischen und elektrischen Altgeräten darstellt. Werfen Sie dieses
Produkt nicht in die Müll- tonne, sondern geben Sie es bei der nächstgelegenen Sammelstelle für
Elektro- und Elektronikschrott ab.

20
PL
CZ
RÁDI BYCHOM VÁM PODĚKOVALI, ŽE JSTE SI VYBRALI SPOLEČNOST ZELMER. DOUFÁME, ŽE
VÁM BUDE PRODUKT DOBŘE SLOUŽIT.
VAROVÁNÍ
PŘED POUŽITÍM PRODUKTU SI POZORNĚ PŘEČTĚTE NÁVOD K POUŽITÍ. ULOŽTE JEJ NA
BEZPEČNÉM MÍSTĚ PRO BUDOUCÍ POUŽITÍ.
POPIS
1. Kryt přívodu vody
2. Nádrž na vodu
3. Tlačítko aktivace páry/čištění
4. Indikátor připravenosti k práci
5. Knoík pro regulaci páry
6. Blokáda žehličky
7. Hadice pro přívod páry
8. Napájecí kabel
9. Úložný prostor pro napájecí kabel
10. Tlačítko napájení
11. Žehlicí plocha
BEZPEČNOSTNÍ POKYNY
Spotřebič mohou používat děti od 8 let věku a osoby
s omezenými fyzickými, smyslovými a mentálními
schopnostmi nebo nedostatečnými zkušenostmi a
znalostmi, pokud jsou pod dohledem nebo byly poučeny
ohledně bezpečného použití spotřebiče a rozumí možným
rizikům. Děti si se spotřebičem nesmějí hrát. Čištění a
údržbu nesmějí provádět děti bez dohledu.
Pokud dojde k poškození přívodního kabelu, musí být
vyměněn výrobcem nebo zástupcem servisu či
podobně kvalikovanou osobou, aby se eliminovalo
nebezpečí.
Nikdy nenechávejte žehličku bez dozoru, pokud je
připojena do elektrické sítě.
Před naplněním nádrže vodou, nesmí být zástrčka
zapojena do elektrické sítě.
Žehličku používejte na rovném a stabilním povrchu.
Při pokládání žehličky na stojan se ujistěte, že povrch, na
Strona jest ładowana ...
Strona jest ładowana ...
Strona jest ładowana ...
Strona jest ładowana ...
Strona jest ładowana ...
Strona jest ładowana ...
Strona jest ładowana ...
Strona jest ładowana ...
Strona jest ładowana ...
Strona jest ładowana ...
Strona jest ładowana ...
Strona jest ładowana ...
Strona jest ładowana ...
Strona jest ładowana ...
Strona jest ładowana ...
Strona jest ładowana ...
Strona jest ładowana ...
Strona jest ładowana ...
Strona jest ładowana ...
Strona jest ładowana ...
Strona jest ładowana ...
Strona jest ładowana ...
Strona jest ładowana ...
Strona jest ładowana ...
Strona jest ładowana ...
Strona jest ładowana ...
Strona jest ładowana ...
Strona jest ładowana ...
Strona jest ładowana ...
Strona jest ładowana ...
Strona jest ładowana ...
Strona jest ładowana ...
Strona jest ładowana ...
Strona jest ładowana ...
Strona jest ładowana ...
Strona jest ładowana ...
Strona jest ładowana ...
Strona jest ładowana ...
Strona jest ładowana ...
Strona jest ładowana ...
Strona jest ładowana ...
Strona jest ładowana ...
Strona jest ładowana ...
Strona jest ładowana ...
Strona jest ładowana ...
Strona jest ładowana ...
Strona jest ładowana ...
Strona jest ładowana ...
Strona jest ładowana ...
Strona jest ładowana ...
Strona jest ładowana ...
Strona jest ładowana ...
-
 1
1
-
 2
2
-
 3
3
-
 4
4
-
 5
5
-
 6
6
-
 7
7
-
 8
8
-
 9
9
-
 10
10
-
 11
11
-
 12
12
-
 13
13
-
 14
14
-
 15
15
-
 16
16
-
 17
17
-
 18
18
-
 19
19
-
 20
20
-
 21
21
-
 22
22
-
 23
23
-
 24
24
-
 25
25
-
 26
26
-
 27
27
-
 28
28
-
 29
29
-
 30
30
-
 31
31
-
 32
32
-
 33
33
-
 34
34
-
 35
35
-
 36
36
-
 37
37
-
 38
38
-
 39
39
-
 40
40
-
 41
41
-
 42
42
-
 43
43
-
 44
44
-
 45
45
-
 46
46
-
 47
47
-
 48
48
-
 49
49
-
 50
50
-
 51
51
-
 52
52
-
 53
53
-
 54
54
-
 55
55
-
 56
56
-
 57
57
-
 58
58
-
 59
59
-
 60
60
-
 61
61
-
 62
62
-
 63
63
-
 64
64
-
 65
65
-
 66
66
-
 67
67
-
 68
68
-
 69
69
-
 70
70
-
 71
71
-
 72
72


w innych językach
- slovenčina: Zelmer ZIS5400 Používateľská príručka
- română: Zelmer ZIS5400 Manual de utilizare
Powiązane dokumenty
Inne dokumenty
-
Philips GC8721/30 Instrukcja obsługi
-
Philips GC9545 Instrukcja obsługi
-
-
Philips GC9222/02 Instrukcja obsługi
-
Philips GC7640/80 Instrukcja obsługi
-
-
Menuett Strykejern Instrukcja obsługi
-
Bosch Serie|6 ProHygienic TDS6080 Instrukcja obsługi