

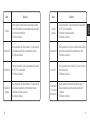
Welcome
Notice
Compatibility
About
Package List
Features
How To Use
Warranty
Important Safety Warnings
Technical Specication
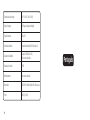
Español
Deutsch
日本語
Français
Português
Italian
Polskie
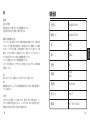
3
3
3
4
4
4
6
18
19
23
25
48
72
95
119
142
165

3
EN
English
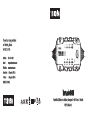
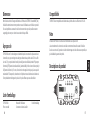
Welcome
Thank you for purchasing TOPDON Lead-acid Battery Charger Tornado4000 (T4A). Please
carefully read and understand this User Manual before operating this product. If any issues
arise from the operation of this product, you are welcome to contact [email protected] for
ofcial technical support.
Notice
Before charging, read the instructions.For indoor use, or do not expose to rain (unless the
battery charger is at least IPX4).Disconnect the supply before making or breaking the connec-
tions to the battery.
WARNING: Explosive gases. Prevent flames and sparks. Provide adequate ventilation during
charging.
This Product Manual is subject to change without written notice.
Read the instructions carefully and use the unit properly before operating. Failure to do so may
cause damage and/or personal injury, which will void the product warranty.
Compatibility
TOPDON T4A is compatible with 6V & 12V lead-acid and lithium-ion batteries.

4 5
EN
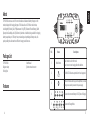
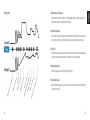
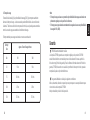
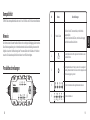
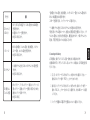
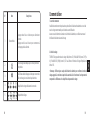
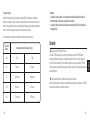
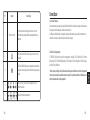
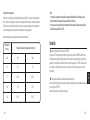
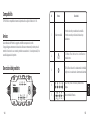
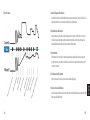
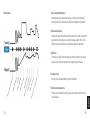
Features
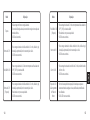
NO. Name Descriptions
2
3
4
5
Solid Blue LED indicates the charger is in Standby Mode, it indicates
the charger is successfully connected to the power supply.
Indicates the connected battery’s SOC (State of Charge).
Indicates the Charge Mode.
1
Solid Red LED indicates a potential error has happened.
Press it twice to select the mode.
Press it once to start charging after the selection.
Mode Button
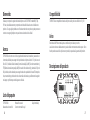
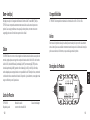
About
TOPDON T4A serves as one of the most innovative and advanced battery chargers on the
market, designed for charging all types of 12V lead-acid and 12V lithium-ion batteries,
including Wet (Flooded), Gel, MF (Maintenance-Free),EFB (Enhanced Flooded Battery), AGM
(Absorption Glass Mat), and LIB (Lithium Ion) batteries. In addition, being suitable for charging
battery capacities up to 150 Amp-Hours, maintaining and optimizing all battery sizes, it is
quite possibly the safest and most efcient charger you will ever use.
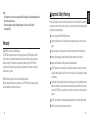
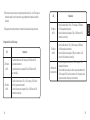
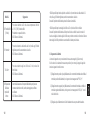
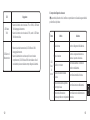
Package List
TOPDON T4A User Manual
Alligator clamp Eyelet terminal connector
Packing Box

6 7
EN
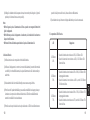
How To Use
1. Before Getting Started
2. Charging Modes
Please read the battery manufacturer’s specific precautions carefully and have the recom-
mended rates of charge for the battery before using.
Make sure to determine the voltage and chemistry of the battery, found by referring to the
battery’s user manual before charging.
TOPDON T4A offers 8 charging modes: Standby, 12V Norm, 12V Cold/AGM, 12V Norm (Small),
12V Cold/AGM (Small), 6V Norm, 12V Lithium, and 12V Repair & Engine Pulse Charging.
*Note: Always check with the battery manufacturer to confirm the right charging mode for
your specific battery before operating. It is important to understand the differences and
purpose of each charging mode:
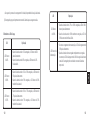
Mode Explanation
• For charging 12-volt batteries in cold temperatures below
14ºF (-10ºC) or AGM batteries.
• White LED will illuminate.
• For charging 12-volt Wet Cell, Gel Cell, Enhanced Flooded,
Maintenance-Free batteries.
• For batteries with small capacity,which is less than 50Ah.
• White LED will illuminate.
• For charging 12-volt Wet Cell, Gel Cell, Enhanced Flooded,
Maintenance-Free batteries.
• White LED will illuminate.
• Not charging or providing any power to the battery.
• Energy Save is activated, drawing microscopic power from the
electrical outlet.
• Blue LED will illuminate.
Standby
12V Norm
12V Cold/AGM
12V Norm
(Small)

8 9
EN
Mode Explanation
• For charging 12-volt lithium-ion batteries, including lithium
iron phosphate.
• White LED will illuminate.
• An advanced battery recovery mode for repairing and storing,
old, idle, damaged, stratied, or sulfated batteries.
• White LED will illuminate.
• For charging 6-volt Wet Cell, Gel Cell, Enhanced Flooded,
Maintenance-Free.
• White LED will illuminate.
• For charging 12-volt batteries in cold temperatures below
14ºF (-10ºC) or AGM batteries.
• For batteries with small capacity,which is less than 50Ah.
• White LED will illuminate.
12V Cold/AGM
(Small)
6V Norm*
12V Lithium**
12V Repair &
Engine Pulse
Charging
*ONLY available for 6-volt lead-acid batteries, as Wet Cell, Gel Cell, Enhanced Flooded, Mainte-
nance-Free.
Consult the battery manufacturer before using this mode.
**ONLY available for 12-volt lithium-ion batteries, including lithium iron phosphate.
Consult the lithium battery manufacturer before charging and ask for recommended charging
rates and voltages. Lithium-ion batteries are made and constructed in different ways. Some
lithium-ion batteries may be unstable and unsuitable for charging.
3. Connecting to the Battery
The below instructions are for a negative ground system (most common).
If your vehicle is a positive ground system (uncommon), follow the below instructions in re-
verse order:
1) Connect the positive (red) battery clamp or eyelet terminal connector with the positive
battery terminal, which is typically marked by “POS, P, +”.
2) Connect the negative (black) battery clamp or eyelet terminal connector with the negative
battery terminal, which is typically marked by “NEG, N, -”, or with the vehicle chassis.
3) Connect the battery charger’s AC power plug into a suitable electrical outlet.
4) Disconnect the battery charger in the reverse sequence, removing the negative rst (or

10 11
EN
positive rst for positive ground systems).
*Note:
• DO NOT connect the AC power plug until all other connections are made.
• DO NOT make any connections to the carburetor, fuel lines, or thin, sheet metal parts.
• DO NOT face the battery when contacting the AC power plug into the electrical outlet.
4. Begin Charging
5. Understanding Charge LEDs
1) Verify the voltage and chemistry of the battery.
2) Conrm if the proper connection has been made between the battery clamps (eyelet
terminal connectors) with battery terminals, and the AC power plug is plugged into the
electrical outlet.
3) The charger will begin in Standby mode, with no power provided, indicated by a Blue LED.
4) Press the Mode button twice to toggle to the appropriate charge mode for the voltage and
chemistry of the battery. The mode LED will illuminate the selected charge mode.
5) Press it once to start charging after the selection. The charge LEDs will illuminate when
the charging process is started, depending on the health of the battery.
6) The charger can now remain connected to the battery for the needed charge.
LED Explanation
• When the battery is >50%, and <75% charged, the 75% White
LED will slowly flash.
• When the battery is 75% charged, the 75% White LED will
become solid too.
• When the battery is >75%, and <100% charged, the 100%
White LED will slowly flash.
• When the battery is 100% fully charged, the 100% White LED
will become solid too.
• When the battery is >25%, and <50% charged, the 50% White
LED will slowly flash.
• When the battery is 50% charged, the 50% White LED will
become solid too.
• When the battery is <25% charged, the 25% White LED will
slowly flash.
• When the battery is 25% charged, the 25% White LED will
become solid.
25% White LED
50% White LED
75% White LED
100% White LED

12 13
EN
Mode Descriptions
• During maintenance charging, the 100% Charge LED will slowly flash.
• When the battery is topped off and fully charged again, the 100%
Charge LED will turn solid White. The charger can be left connected to
the battery at all times.
Maintenance
White LED
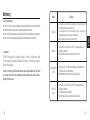
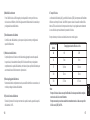
6. Understanding Advanced Diagnostics
The will illuminate, indicating a potential error has occurred. See the following chart to
identify the issue:
Error Reason Solution
Wrong charging mode selection
battery voltage is too low for charger
to detect
Check the charging mode.
Check the battery voltage
The domestic power supply’s
voltage might not match
Check your voltage of domestic
power supply
Possible short circuit Check the battery, or contact battery
manufacturer.
Reverse polarity
Solid
Error
LED
Cannot hold a charge
Reverse the battery connections.
Check the battery connections, or
contact battery manufacturer.

14 15
EN
7. Charging Steps 1) Battery Analysis & Diagnosis
2) Battery Desulphation
3) Soft Start
4) Battery Initialization
5) Battery Bulk Charge
Check the battery’s initial condition, including voltage, state-of-charge, and health, to
determine if the battery is stable before charging.
Use voltage or high-frequency pulses to break down the sulfates that have built up over
time in your aging battery, to extend battery life, and optimize battery performance.
Minimize the large startup currents from flowing when the input power is rst applied, to
avoid stressing the components by the sudden current or voltage surges.
Start the charging process with a gentle (soft) charge.
Begin the Bulk charging process based on the condition of the battery, and return 80% of
the battery’s capacity.

16 17
EN
6) Absorption Mode
7) Battery Recondition
8) Battery Optimization
9) Battery Float Charge
10) Battery Restart Charge
Bring the charge level to 90% by delivering small amounts of current to provide a safe,
efcient charge. This limits battery gassing and is essential to prolonging battery life.
Check the battery status, and then recover the small current to improve the
battery capacity.
Finalize the charging process, and bring the battery to maximum capacity.
In this step, the charger utilizes multi-layered charging proles to fully recapture battery
capacity, and optimize the specic gravity of the battery for increased run time and per-
formance.
Maintain the battery fully charged, without boiling out electrolyte or overcharging, so as
to elongate the battery life.
Restart the charging process to maintain the maximum capacity, once the battery capac-
ity is <85%.
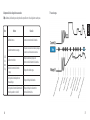
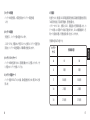
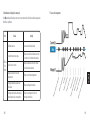
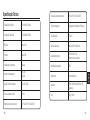
8. Charging Times
The size of the battery (Ah), the depth of discharge (DOD), and the environment temperature
will affect the charging time. Actual data may differ due to battery conditions. T4A has a ther-
mal compensation function, which can automatically adjust the charging curve to maximize
the charging performance.
The estimated time to charge a battery is shown below:
Battery Size
Ah 6V 12V
Approx. Time to Charge In Hours
25 hrs
37.5 hrs
25 hrs
37.5 hrs
18.8 hrs 18.8 hrs
20
75
100
150
5 hrs 5 hrs

18 19
EN
*Note:
• The charge time is based on an average depth of discharge to a fully charged battery and is
for reference purposes only.
• The time to charge a normally discharged battery is based on a 50% Depth of
Discharge (DOD).
Warranty
TOPDON Three Year Limited Warranty
The TOPDON Company warrants to its original purchaser that TOPDON products will be
free from defects in material and workmanship for 36 months from the date of purchase
(Warranty Period). For the defects reported during the Warranty Period, TOPDON will,
according to the technical support analysis and conrmation, either repair or replace the
defective part or product.
Misused, disassembled, altered, or repaired by a non-TOPDON technical repair specialist.
Careless handling and violation of operation.
This limited warranty is void under the following conditions:
Important Safety Warnings
Please read all safety instructions before using the product. Failure to follow these safety in-
structions may result in electric shock, explosion, or re, which may result in serious personal
injury, death, or property damage.
Do not charge NON-RECHARGEABLE batteries.
Someone should be around, or be within your sound range, to help you in case of an emer-
gency.
Have clean water and soap at hand in case there is contamination from the battery acid.
Wear protective goggles and appropriate clothing when working near the battery.
Always wash hands after handling batteries and related materials.
DO NOT handle or wear any metal objects, including tools, watches or jewelry, etc. while op-
erating the battery charger. Sparks or short circuits may occur if a metal object is dropped
on the battery.
Adults need to offer detailed instructions and warnings to minors who handle this product
before use. Otherwise, the adult shall bear full responsibility and shall NOT claim compen-
sation from TOPDON for any accidents caused by the use or abuse from minors using this
product.
DO NOT use the product if it is damaged under the severe impact, or the shell / cable is broken.
DO NOT use the product if the power outlet is loose.

20 21
EN
fan blades, belts and pulleys), or result in the risk of human injury or death.
DO NOT use the product in an enclosed area or an area with limited ventilation.
Please operate the product at an ambient temperature of -4°F to 104°F (-20°C to 40°C), and
store the product at a temperature of -4°F to 130°F (-20°C to 54°C).
DO NOT charge a frozen battery. Discontinue the use of the product immediately if the bat-
tery becomes excessively warm.
DO NOT use or store the product in an area with high dust concentration.
Please store the charger in a flat place to avoid falling.
The charger is only compatible with lead-acid and lithium-ion batteries.
DO NOT use the product to charge any other type of battery. The product is ONLY compati-
ble with lead-acid and lithium-ion batteries. Charging other battery chemistries may result
in injury, death, or property damage.
Please turn off the power before any maintenance or cleaning proceeds. If the product
contacts with liquid or any type of contaminants, clean the product immediately. Use a soft
lint-free cloth (microber) to keep the ports from moisture.
DO NOT operate the product in areas where there is a potential explosion hazard, including are-
as that are fueled or contain chemicals or particles (such as grain, dust, or metal powder).
The design, testing, and manufacturing of the product are in compliance with regulations
regarding radiofrequency emissions. Such radiation emitted by the product may have a
negative impact on the operation of other electronic devices, causing them to malfunction.
DO NOT use the product near the water. Store and operate the product in a dry place.
DO NOT use the product if it is socked with water to avoid the potential damage to the
product due to the humidity and liquid. If the product is already wet and working, discon-
nect it from the power outlet, and stop using it immediately.
DO NOT disconnect the product from the power outlet by pulling the AC cable.
DO NOT attempt to change, modify or repair any part of the product, which may result in
personal injury, death, or property damage.
Any changes to the product will invalidate your warranty. Please contact TOPDON if the
product is damaged.
TOPDON shall not bear any responsibility for product damage and personal safety prob-
lems caused by the use of accessories that are not approved by TOPDON.
Using an improper extension cable may cause re and electric shock, which may result in
personal injury, death, or equipment and property damage. Please ensure: (1) the number,
size, and shape of the pins on the extension cable plug are the same as the number, size
and shape of the AC power cable of the product; (2) the extension cable is in good condi-
tion, and is correctly connected while using the extension cable.
DO NOT place the product directly above the battery, otherwise, the gas in the battery will
cause corrosion and damage.
DO NOT place the battery directly above the product, otherwise, it may cause the accidental
damage by moving car parts (including the hood and doors), moving engine parts (including

22 23
EN
Technical Specication
Input Voltage AC
Working Voltage AC
Efciency
Power
Charging Voltage
Charging Current
Low-Voltage Detection
Back Current Drain
Working Temp.
100-240VAC, 50-60Hz
100-240VAC, 50-60Hz
85% Approx.
65W Max
Various
4A (12V)
4A (6V)
2V(12V), 2V(6V)
< 5mA
-4°F to 104°F (-20°C to 40°C)
WARNING
For indoor use only
CAUTION: Risk of Fire
Refer to the Instruction Manual for the size, type, and number of batteries to be charged.
CAUTION: Risk of Electric Shock Dry location use only
WARNING RISK OF EXPLOSIVE GAS MIXTURE
Connect and disconnect battery leads only when supply cord is disconnected.
For a battery installed in a vehicle, rst connect charger output lead to ungrounded battery post - not
connected to automobile chassis - in accordance with polarity identication and then opposite polarity lead
to chassis away from battery; do not connect to carburetor or fuel lines. Disconnect chassis lead rst. For
battery not installed in vehicle, refer to Instruction Manual.
Do not overcharge battery - See Instruction Manual.
Do not smoke, strike a match, or cause a spark in vicinity of battery.
Use in well-ventilated area.
CAUTION
Do not expose to rain. Replace defective cords or wires immediately.
CAUTION
Risk of Electric Shock. No user serviceable parts. Return to manufacturer for servicing.
FCC WARNINGS
This device complies with part 15 of the FCC Rules. Operation is subject to the following two conditions: (1)
This device may not cause harmful interference, and (2) this device must accept any interference received,
including interference that may cause undesired operation.

24
Storage Temp.
Charger Type
Type of Batteries
Battery Chemistries
Battery Capacity
Enclosure Rating
Cooling
Dimensions
Weight
-4°F to 130°F (-20°C to 54°C)
10 Step, Smart Charger
6V & 12V
Wet, Gel, MF, EFB, AGM & LIB
Up to 150Ah (6V & 12V)
Maintains All Sizes
IP65
Natural Convection
205.4*74.1*46.5 mm (8.09*2.92*1.83 inches)
545 g (1.20 lb)
Español

26 27
ESDE
Bienvenido
Gracias por comprar el cargador de batería de plomo-ácido TOPDON Tornado4000 (T4A).
Por favor, lea cuidadosamente y comprenda este Manual del Usuario antes de utilizar este
producto. Si surge algún problema con el funcionamiento de este producto, puede ponerse en
contacto con [email protected] para obtener asistencia técnica ocial.
Acerca
TOPDON T4A sirve como uno de los cargadores de batería más innovadores y avanzados en
el mercado, diseñado para cargar todo tipo de baterías de plomo-ácido de 12 V y de iones de
litio de 12 V, incluidas Celdas húmedas (Normal inundada), Gel, MF (Libre de mantenimiento),
EFB (Batería inundada mejorada), AGM (Esteras de vidrio de absorción) y baterías LIB (Ion de
litio). Además, siendo adecuado para cargar baterías de capacidades de hasta 150 amperios-
hora, manteniendo y optimizando todos los tamaños de batería, es posiblemente el cargador
más seguro y eciente que usted alguna vez utilizará.
Lista del paquete
TOPDON T4A Manual de usuario Caja de embalaje
Abrazadera de cocodrilo Conector terminal de ojal
Descripciones del producto
Compatibilidad
Aviso
TOPDON T4A es compatible con baterías de plomo-ácido y de iones de litio de 6V y 12V
Este Manual del Producto está sujeto a cambios sin previo aviso por escrito.
Lea las instrucciones cuidadosamente y use la unidad correctamente antes de operar. De no
hacerlo puede causar daños y lesiones corporales, lo que anulará la garantía del producto.

28 29
ESDE
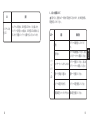
Número Nombre Descripciones
2
3
4
5
El LED azul jo indica que el cargador está en modo de
espera: no está cargando ni proporcionando ninguna
energía a la batería.
Indica el SOC (estado de carga) de la batería conectada.
Indica el modo de carga.
1
El LED rojo jo indica que se ha producido un posible
error.
• Presiónelo dos veces para seleccionar el modo.
• Presiónelo una vez para comenzar a cargar después
de la selección.
Botón de modo
Cómo utilizar
1. Antes de comenzar
2. Modos de carga
Por favor, lea cuidadosamente las precauciones especícas del fabricante de la batería y ten-
ga los valores de carga recomendadas para la batería antes de usarla.
Asegúrese de determinar el voltaje y la química de la batería, que se encuentra consultando el
manual del usuario de la batería antes de cargarla.
TOPDON T4A ofrece 8 modos de carga: en espera, estándar de 12 V, frío / AGM de 12 V, están-
dar de 12 V (pequeña), frío / AGM de 12 V (pequeña), estándar de 6 V, litio de 12 V, reparación
de 12V y carga de pulso del motor.
* Nota: Siempre verique con el fabricante de la batería para conrmar el modo de carga cor-
recto para su batería especíca antes de operar. Es importante comprender las diferencias y
el propósito de cada modo de carga:

30 31
ESDE
Modo Explicación
• Para cargar baterías de 12 voltios en temperaturas frías por debajo
de 14ºF (-10ºC) o baterías AGM.
• El LED blanco se iluminará.
• Para cargar baterías de: celdas húmedas de 12 voltios, celdas de
gel, inundadas mejoradas, libre de mantenimiento y de calcio.
• Para baterías con pequeña capacidad.
• El LED blanco se iluminará.
• Para cargar baterías de: celdas húmedas de 12 voltios, celdas de
gel, inundadas mejoradas, libre de mantenimiento y de calcio.
• El LED blanco se iluminará.
• No está cargando ni proporcionando ninguna energía a la batería.
• El Ahorro de Energía está activado, extrayendo energía microscópica
de la toma de corriente eléctrica.
• El LED azul se iluminará.
En espera
Estándar de 12V
Frío/AGM de 12V
Estándar de 12V
(pequeña)
• Para cargar baterías de iones de litio de 12 voltios, incluido el
fosfato de hierro y litio .
• El LED blanco se iluminará.
• Un modo avanzado de recuperación de batería para reparar y
almacenar baterías viejas, inactivas, dañadas, estraticadas
o sulfatadas.
• El LED blanco se iluminará.
• Para cargar baterías de 6 voltios de: celdas húmedas, celdas de
gel, inundadas mejoradas, libre de mantenimiento y de calcio.
• El LED blanco se iluminará.
• Para cargar baterías de 12 voltios en temperaturas frías por debajo
de 14ºF (-10ºC) o baterías AGM.
• Para baterías con pequeña capacidad.
• El LED blanco se iluminará.
Frío/AGM
(pequeña)
Estándar de 6V*
Litio de 12V**
Reparación de
12V y carga de
pulso del motor
Modo Explicación

32 33
ESDE
* SOLO disponible para baterías de plomo-ácido de 6 voltios, como baterías de celda húmeda,
celda de gel, inundadas mejoradas, libre de mantenimiento y de calcio.
Consulte al fabricante de la batería antes de usar este modo.
** SOLO disponible para baterías de iones de litio de 12 voltios, incluido el fosfato de hierro y litio.
Consulte al fabricante de la batería de litio antes de cargar y solicite los valores y voltajes de
carga recomendados. Las baterías de iones de litio son fabricadas y construidas de diferentes
maneras. Algunas baterías de iones de litio pueden ser inestables e inadecuadas para cargar.
3. Conectando a la batería
Las siguientes instrucciones son para un sistema de tierra negativo (el más común).
Si su vehículo es un sistema de tierra positivo (poco común), siga las siguientes instrucciones
en orden inverso:
1) Conecte la pinza positiva (roja) de la batería o el conector de terminal de ojal con el ter
minal positivo de la batería, que normalmente está marcado con "POS, P, +".
2) Conecte la pinza negativa (negra) de la batería o el conector de terminal de ojal con el
terminal negativo de la batería, que normalmente está marcado con “NEG, N, -” o con el
chasis del vehículo.
3) Conecte el enchufe de alimentación de CA (corriente alterna)del cargador de batería a
una toma de corriente eléctrica adecuada.
4) Desconecte el cargador de batería en la secuencia inversa, quitando el negativo primero (o
positivo primero para los sistemas de tierra positivos).
*Nota:
• NO conecte el enchufe de alimentación de CA (corriente alterna) hasta que se hayan real
izado todas las demás conexiones.
• NO realice ninguna conexión al carburador, a las líneas de combustible ni a las partes de
láminas de metal delgadas.
• NO este al frente de la batería cuando haga contacto con el enchufe de alimentación de CA
(corriente alterna) y la toma de corriente eléctrica.
4. Comienzar a cargar
1) Verique el voltaje y la química de la batería.
2) Conrme si ha realizado la conexión adecuada entre las pinzas de la batería (conectores
de terminal de ojal) con los terminales de la batería, y si el enchufe de alimentación de CA
está enchufado a la toma de corriente eléctrica.
3) El cargador comenzará en modo de espera, sin suministro de energía, indicado por un
LED azul.
4) Presione el botón Modo dos veces para alternar al modo de carga apropiado para el vol
taje y la química de la batería. El LED de modo iluminará el modo de carga seleccionado.

34 35
ESDE
5. Comprensión de los LED de carga
LED Explanation
• Cuando la batería tiene> 25% y <50% de carga, el LED blanco
de 50% parpadeará lentamente.
• Cuando la batería está cargada al 50%, el LED blanco de 50%
también se volverá jo.
• Cuando la batería tiene <25% de carga, el LED blanco de 25%
parpadeará lentamente.
• Cuando la batería está cargada al 25%, el LED blanco de 25%
se volverá jo.
LED blanco
de 25%
LED blanco
de 50%
5) Presione una vez para comenzar a cargar después de la selección. Los LED de carga se
iluminarán cuando se inicie el proceso de carga, dependiendo del estado de salud de
la batería.
6) El cargador ahora puede permanecer conectado a la batería para la carga necesaria.
LED Explanation
• Cuando la batería tiene> 50% y <75% de carga, el LED blanco
de 75% parpadeará lentamente.
• Cuando la batería está cargada al 75%, el LED blanco de 75%
también se volverá jo.
• Cuando la batería tiene> 75% y <100% de carga, el LED blanco
de 100% parpadeará lentamente.
• Cuando la batería está cargada al 100% por completo, el LED
blanco de 100% también se volverá jo.
LED blanco
de 75%
LED blanco
de 100%
• Durante la carga de mantenimiento, el LED de carga de 100%
parpadeará lentamente.
• Cuando la batería se acaba y se vuelve a cargar completamente, el
LED de carga de 100% se volverá un blanco jo. El cargador puede
dejarse conectado a la batería en todo momento.
LED blanco de
mantenimiento

36 37
ESDE
Error Motivo Solución
Selección incorrecta del modo
de carga
El voltaje de la batería puede ser
demasiado bajo.
Verique el modo de carga.
Verique el voltaje de la batería
El voltaje de la fuente de alimentación
doméstica puede no coincidir
Verique el voltaje de su fuente de
alimentación doméstica
Posible cortocircuito Verique la batería o póngase en
contacto con el fabricante de la batería.
Polaridad inversa
LED
de
error
jo
No puede mantener una carga
Invierta las conexiones de la batería.
Verique las conexiones de la batería o póngase
en contacto con el fabricante de la batería.
6. Comprensión de los diagnósticos avanzados
El se iluminará, indicando que se ha producido un posible error. Vea el siguiente cuadro para
7. Pasos de carga
Strona się ładuje...
Strona się ładuje...
Strona się ładuje...
Strona się ładuje...
Strona się ładuje...
Strona się ładuje...
Strona się ładuje...
Strona się ładuje...
Strona się ładuje...
Strona się ładuje...
Strona się ładuje...
Strona się ładuje...
Strona się ładuje...
Strona się ładuje...
Strona się ładuje...
Strona się ładuje...
Strona się ładuje...
Strona się ładuje...
Strona się ładuje...
Strona się ładuje...
Strona się ładuje...
Strona się ładuje...
Strona się ładuje...
Strona się ładuje...
Strona się ładuje...
Strona się ładuje...
Strona się ładuje...
Strona się ładuje...
Strona się ładuje...
Strona się ładuje...
Strona się ładuje...
Strona się ładuje...
Strona się ładuje...
Strona się ładuje...
Strona się ładuje...
Strona się ładuje...
Strona się ładuje...
Strona się ładuje...
Strona się ładuje...
Strona się ładuje...
Strona się ładuje...
Strona się ładuje...
Strona się ładuje...
Strona się ładuje...
Strona się ładuje...
Strona się ładuje...
Strona się ładuje...
Strona się ładuje...
Strona się ładuje...
Strona się ładuje...
Strona się ładuje...
Strona się ładuje...
Strona się ładuje...
Strona się ładuje...
Strona się ładuje...
Strona się ładuje...
Strona się ładuje...
Strona się ładuje...
Strona się ładuje...
Strona się ładuje...
Strona się ładuje...
Strona się ładuje...
Strona się ładuje...
Strona się ładuje...
Strona się ładuje...
Strona się ładuje...
Strona się ładuje...
Strona się ładuje...
Strona się ładuje...
Strona się ładuje...
Strona się ładuje...
Strona się ładuje...
Strona się ładuje...
Strona się ładuje...
Strona się ładuje...
Strona się ładuje...
-
 1
1
-
 2
2
-
 3
3
-
 4
4
-
 5
5
-
 6
6
-
 7
7
-
 8
8
-
 9
9
-
 10
10
-
 11
11
-
 12
12
-
 13
13
-
 14
14
-
 15
15
-
 16
16
-
 17
17
-
 18
18
-
 19
19
-
 20
20
-
 21
21
-
 22
22
-
 23
23
-
 24
24
-
 25
25
-
 26
26
-
 27
27
-
 28
28
-
 29
29
-
 30
30
-
 31
31
-
 32
32
-
 33
33
-
 34
34
-
 35
35
-
 36
36
-
 37
37
-
 38
38
-
 39
39
-
 40
40
-
 41
41
-
 42
42
-
 43
43
-
 44
44
-
 45
45
-
 46
46
-
 47
47
-
 48
48
-
 49
49
-
 50
50
-
 51
51
-
 52
52
-
 53
53
-
 54
54
-
 55
55
-
 56
56
-
 57
57
-
 58
58
-
 59
59
-
 60
60
-
 61
61
-
 62
62
-
 63
63
-
 64
64
-
 65
65
-
 66
66
-
 67
67
-
 68
68
-
 69
69
-
 70
70
-
 71
71
-
 72
72
-
 73
73
-
 74
74
-
 75
75
-
 76
76
-
 77
77
-
 78
78
-
 79
79
-
 80
80
-
 81
81
-
 82
82
-
 83
83
-
 84
84
-
 85
85
-
 86
86
-
 87
87
-
 88
88
-
 89
89
-
 90
90
-
 91
91
-
 92
92
-
 93
93
-
 94
94
-
 95
95
-
 96
96


w innych językach
- español: Topdon Tornado4000 Manual de usuario
- italiano: Topdon Tornado4000 Manuale utente
- Deutsch: Topdon Tornado4000 Benutzerhandbuch
- português: Topdon Tornado4000 Manual do usuário
- français: Topdon Tornado4000 Manuel utilisateur
- 日本語: Topdon Tornado4000 ユーザーマニュアル
Inne dokumenty
-
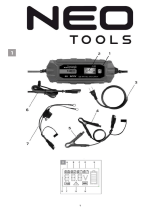 NEO TOOLS 11-892 Instrukcja obsługi
-
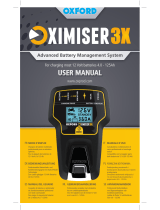 Oxford Oximiser 3X Instrukcja obsługi
-
Beta 1498/16A Instrukcja obsługi
-
Bahco BBCE12-F100 Instrukcja obsługi
-
Schumacher Sealey SPI15S.V2 with Power Supply Instrukcja obsługi
-
-
-
PNI C130 Instrukcja obsługi
-
-

