LAXIHUB B1 Instrukcja obsługi

Typ
Instrukcja obsługi
powered by
B1
Kompatibilní s Amazon Alexa
RYCHLÝ NÁVOD
CS Chytrý bezdrátový video zvonek
EN Smart Wi-Fi Video Doorbell
FR Sonnette vidéo Wi-Fi intelligente
DE Intelligente Wi-Fi Video Türklingel
IT Campanello video Wi-Fi intelligente
ES Timbre de video con Wi-Fi inteligente
© Sunnysoft s.r.o., distributor
www.sunnysoft.cz
12
B1 Baterie USB kabel
x
x
x
8
8
2
Šrouby set Rychlý návod
Klíč
AC adaptér
Oboustranná páska
Reset 1
Mini USB
Reset 2
12
CS CS
Nejprve stáhněte a nainstalujte aplikaci Laxihub. Poté
připojte zařízení a jednoduše ho ovládejte
prostřednictvím aplikace.
1. Obsah balení
2. Popis
Mikfon
Tlačítko zvonku
LED
Reproduktor
Slot SD karty
Externí nabíjecí port
Baterie
LED nabíjení
B1 Hlavní část
Zadní část
Zámek
© Sunnysoft s.r.o., distributor
www.sunnysoft.cz
34
CS CS
Stažení aplikace
Stáhněte aplikaci Arenti z obchodu Google Play (Android)
nebo z Apple Store (iSO) a nainstalujte ji.
Zde můžete naskenovat aplikaci Arenti.
Vytvoření účtu
Klikněte na tlačítkoAllow” a povolte získávat oznámení.
Otevřete aplikaci Arenti. Pokud jste nový uživatel, vytvořte
si nový účet a dokončete registraci podle pokynů
uvedených v aplikaci.
Poznámka: prosím odsouhlaste dohodu o ochraně
osobních údajů
© Sunnysoft s.r.o., distributor
www.sunnysoft.cz
56
CS CS
Párování zařízení Párování zařízení
Stiskněte a přidejte nové zařízení, vyberte “Doorbell”. Zapněte zvonek, poté uslyšíte uvítací tón. Pokud bude
LED problikávat červeně (jednou za 1 s), znamená to,
že je zvonek úspěšně zapnut a je připraven na párování.
© Sunnysoft s.r.o., distributor
www.sunnysoft.cz
78
Scan
QR
Code
on screen
CS CS
Párování zařízení Párování zařízení
Zadejte heslo pro WiFi a stiskněte Next”. V případě
potřeby lze stisknout Change a změnit na požadovanou
jinou WiFi síť.
Stiskněte “Next” a naskenujte QR kód pomocí zvonku.
Udržujte ho 5-8" od obrazovky telefonu.
Poté co uslyšíte ze zvnoku tón, stiskněte “Next”.
Aplikace se začne automaticky spojovat ke zvonku.
Úspěšné spojení - LED bude svítit modře.
© Sunnysoft s.r.o., distributor
www.sunnysoft.cz
910
EN EN
Párování zařízení Párování zařízení
OJakmile proces spárování bude úspěšný, zobrazí se
Device Found!" (zařízení nalezeno).
Před tím než se rozhodnete pokračovat
(stiskněte
Done),
lze změnit název přidaného zařízení.
OPoté lze zobrazit video v aplikaci (aby přehrávání videa
fungovalo, je nutné se připojit na
Wi-Fi).
Pokud se spárovnání nezdařilo, překontrolujte následující
body:
1) Wi-Fi síť je 2,4 GHz.
2) Zadené heslo Wi-Fi je správné a mobilní telefon je
připojen na stejné Wi-Fi síti.
3) Zařízení Arenti je nastaveno v režimu párování.
4) Překontrolujte, zda WiFi opravdu funguje.
© Sunnysoft s.r.o., distributor
www.sunnysoft.cz
11 12
Historie oznámení
HD/SD přepínání Uložište Cloud
Plné zobrazení displeje
Síla WiFi signálu
Datový tok


CS CS
Živý přenos Historie
Zpět
Nastavení menu
Stav baterie
Hlasitost zapnout/
vypnout
Klepnutím zaznamenáte
fotografii/video v živém
náhledu nebo v přehrávání.
Poznámka: fotografie/videa jsou uloženy
do vnitřní paměti telefonu .
Klepnutím - povolení mluvení
Klepnutím - povolení detekce pohybu
SVyberte data, která chcete zkontrolovat při
přehrávání z SD karty
Klepnutím - vyhledaní videa podle data
© Sunnysoft s.r.o., distributor
www.sunnysoft.cz
13 14
Režim baterie
12~24V AC
EN EN
Instalace Instalace
Před výběrem upřednostňovaného umístění, zkontrolujte
pokrytí WiFi a ujistěte se, že je zvonek funkční.
Krok 1 Vyjměte podpěru z
B1.Krok 3 Vložte baterii do zvonku..
Podpěra
Krok 2 Upevněte podpěru
pomocí šroubů na zeď a poté
instalujte zvonek.
Pohled z
boku
Režim AC nabíjení
Krok 1 Vyjměte podpěru z
B1.
Podpěra
Krok 2 Připojte AC napájení.
Krok 3 Upevněte podpěru
pomocí šroubů na zeď a poté
instalujte zvonek.
Pohled z
boku
© Sunnysoft s.r.o., distributor
www.sunnysoft.cz
Čeká na WiFi spojení
15 16
Režim oboustranné pásky
CS CS
Instalace
Krok 1 Oboustrannou pásku připevněte na obě strany
podpěry.
páska
Krok 2 Přitiskněte zvonek na čisté a suché místo..
Řešení potíží
LED
Svítí
Bliká
Svítí
Aktuálně čeká na spojení
(rychle problikává)
Kamera/síť nafunguje jak má
Kamera běží správně
Bliká
Aktuálně se připojuje
Co dělat, když
párování selže
1. Překontrolujte, zda je mobilní telefon
připojen k WiFi 2,4 GHz.
2. Překontrolujte heslo WiFi a zda je telefon
připojen na stejnou WiFi síť.
3. Překontrolujte, zda je zvonek v režimu
spárování (LED musí pomalu červeně
problikávat 1/s).
Podporuje
zařízení
Laxihub
5 GHz?
Ne - Zařízení Laxihub aktuálně nepodporuje
5 GHz sítě.
© Sunnysoft s.r.o., distributor
www.sunnysoft.cz
17
CS
Řešení potíží
Jak změnit
síť?
Nejprve zařízení resetujte nebo jej odeberte z
aplikace a znovu proveďte spárování.
Proč
zařízení
nenašlo
SD
kartu?
Po výpadnku napájení, připojte kartu
znovu. Zkontrolujte zda má formát FAT32.
Kartu také nelze identifikovat, pokud není
dobré WiFi spojení.
Distributor
Sunnysoft s.r.o.
Kovanecká 2390/1a
190 00 Praha 9
Česká republika
www.sunnysoft.cz
© Sunnysoft s.r.o., distributor
www.sunnysoft.cz
12
Thank you for purchasing Laxihub smart home product.
Get started using your new devices by downloading
Laxihub, one convenient app that manages everything
straight from your phone or tablet. Easily connect to
your home WiFi and control multiple devices from the
touch of your fingertips.
1. Contents
B1 Battery box USB cable
x
x
x
8
8
2
Screws package Quick Guide
Pin
AC adaptor
Double sided tape
Doorbell button
Microphone
Status light
Speaker
SD card slot
Reset 1
2. Description
External
power port
Back of doorbell
Charging
indicator
Mini USB
Reset 2
Bayonet
lock
B1 main body
Battery box
12
EN EN
© Sunnysoft s.r.o., distributor
www.sunnysoft.cz
34
3. Download the App 4. Register an account
Open the Arenti App. If you are a new user, tap create new
account and follow the prompts to complete registration.
Note: Please agree with the Privacy Agreement.
In order to receive notification in time, please click “Allow”.
Scan and download Arenti App for free
Download the Arenti from App Store or Google Play.
EN EN
© Sunnysoft s.r.o., distributor
www.sunnysoft.cz
56
5. Pair your device Pair your device
Power on your doorbell, you will hear a welcome sound.
If the status light is red and blinking (once per second).
The doorbell is successfully powered on and ready for
pairing.
Click to add a new device, and select “Doorbell”.
EN EN
© Sunnysoft s.r.o., distributor
www.sunnysoft.cz
78
Pair your device Pair your device
Press “Next” after hearing a sound from your doorbell.
The Arenti App will start to connect to the doorbell
automatically as indicated by the status light blinking
rapidly and then staying solid blue.
Enter the Wi-Fi password and tap Next to proceed.
If needed, you can tap Change WiFi to switch to
another suitable WiFi network for your doorbell.
Scan
QR
Code
on screen
Press “Next” to scan QR code using your doorbell.
Keep 5~8inches away from your mobile screen.
EN EN
© Sunnysoft s.r.o., distributor
www.sunnysoft.cz
Pair your device Pair your device
910
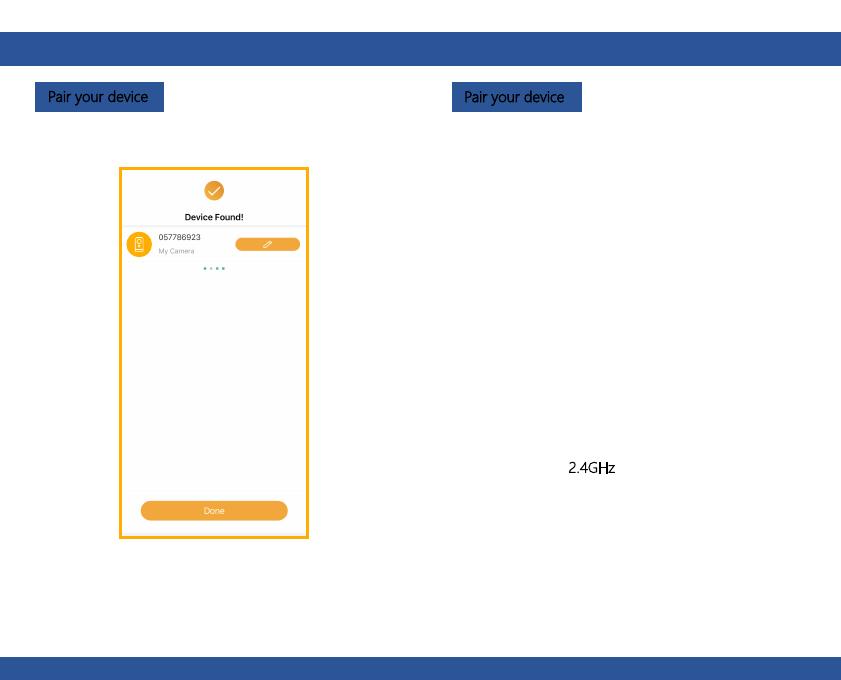
Once the pairing process is complete, a page showing
Device Found!” will appear.
You may choose to edit the device name or assign the
device to a dedicated room before tapping Done to
finish the pairing process.
Once your camera is paired, your camera can be viewed
at anytime from your smartphone as long as there is
Internet access.
If no device is found and the pairing process failed, please
check below instructions:
1) WiFi network is 2.4GHz.
2) WiFi password entered is correct and the same WiFi
network is used for the mobile device.
3) Arenti device is in pairing mode.
4) Check your WiFi for network activity.
EN EN
© Sunnysoft s.r.o., distributor
www.sunnysoft.cz
11 12
6. Live viewing 7. History
Tap to enable talking
Tap to enable motion detection
Select a data to review your playback
from SD card
Tap to search video clips by date
Tap to capture a photo/video
during live view or playback
Note: the photo and video
are saved to the internal
memory of your smartphone
Return
Setting menu
Volume on/off Notification history
Battery status
HD/SD switch Cloud storage service
Full screen display
WiFi signal strength
Stream bit rate


EN EN
© Sunnysoft s.r.o., distributor
www.sunnysoft.cz
13 14
8. Installation
Before choosing your preferred location, check the WiFi
strength/coverage to ensure the doorbell is fully functional.
Step 1 Remove the bracket from
B1.
Bracket
Step 1 Remove the bracket from
B1.
Bracket
Battery powered mode
Step 2 Fix the bracket on the wall
with screws and insert the
doorbell into the bracket.
Step 3 Insert the battery box into
the doorbell.
Side
view
AC powered mode
Step 2 Connect AC power with
your wires.
12~24V AC
Step 3 Fix the bracket on the wall
with screws and insert the
doorbell into the bracket.
Side
view
Installation
EN EN
© Sunnysoft s.r.o., distributor
www.sunnysoft.cz
Status Light
Solid on: Camera running correctly
Blink: Currently connecting
Solid on: The camera or network is
abnormal
Blink: Awaiting WiFi connection and
Currently connecting (faster
blinking)
What can I
do if I fail to
pair my
Laxihub
device?
1. Check your mobile device is connected to
a 2.4GHz WiFi network.
Does our
current
Laxihub
device
support 5GHz
wireless?
No - Laxihub device currently does not support
5GHz wireless connection.
15 16
3. Check Laxihub device is in pairing mode,the
status light blinks red slowly. (1 time/s)
2. Check WiFi password entered is correct and
the same WiFi network is used both for mobile
and pairing.
Double sided tape mode
Installation
9. Trouble shooting
tape
Step 1 Attach the double sided tape to both sides of the
bracket
Step 2 Stick the doorbell to a clean flat tightly.
EN EN
© Sunnysoft s.r.o., distributor
www.sunnysoft.cz
17
Trouble shooting
How to
change the
camera
network to
another
router?
First reset the device or remove it on the
Arenti App, then configure the device again
by the App.
Why doesn’t
the device
identify the
SD card?
It’s recommended to plug SD card after
power cut. Confirm whether the SD card is
normally available and the format is FAT32.
And the SD card can’t be identified when
the Internet environment is not good.
Please visit our official website for further assistance.
www.laxihub.com
EN
© Sunnysoft s.r.o., distributor
www.sunnysoft.cz
12
18 19
Merci d'avoir acheté un produit pour maison intelligente
Laxihub. Commencez à utiliser vos nouveaux appareils en
téléchargeant Laxihub, une application pratique qui gère
tout directement depuis votre téléphone ou votre tablette.
Connectez-vous facilement à votre Wi-Fi domestique et
contrôlez plusieurs appareils depuis toucher du bout des
doigts.
1. Contenu
B1 Boîtier de batterie cable USB
x
x
x
8
8
2
Paquet de vis Guide rapideÉpingle
adaptateur secteur
Ruban adhésif double face
Bouton de
sonnette
Microfono
Voyant d'état
Orateur
Emplacement
pour carte SD
Réinitialiser 1
2. Description
Port
d'alimentation externe
Arrière de la sonnette
Indicateur
de charge
Mini USB
Réinitialiser 2
Serrure à
baïonnette
B1 corps principal
Boîtier de batterie
FR FR
© Sunnysoft s.r.o., distributor
www.sunnysoft.cz
  • Page 1 1
  • Page 2 2
  • Page 3 3
  • Page 4 4
  • Page 5 5
  • Page 6 6
  • Page 7 7
  • Page 8 8
  • Page 9 9
  • Page 10 10
  • Page 11 11
  • Page 12 12
  • Page 13 13
  • Page 14 14
  • Page 15 15
  • Page 16 16
  • Page 17 17
  • Page 18 18
  • Page 19 19
  • Page 20 20
  • Page 21 21
  • Page 22 22
  • Page 23 23
  • Page 24 24
  • Page 25 25
  • Page 26 26
  • Page 27 27
  • Page 28 28
  • Page 29 29
  • Page 30 30
  • Page 31 31
  • Page 32 32
  • Page 33 33
  • Page 34 34
  • Page 35 35
  • Page 36 36
  • Page 37 37
  • Page 38 38
  • Page 39 39
  • Page 40 40
  • Page 41 41
  • Page 42 42
  • Page 43 43
  • Page 44 44
  • Page 45 45
  • Page 46 46
  • Page 47 47
  • Page 48 48
  • Page 49 49
  • Page 50 50
  • Page 51 51
  • Page 52 52
  • Page 53 53
  • Page 54 54
  • Page 55 55
  • Page 56 56

LAXIHUB B1 Instrukcja obsługi

Typ
Instrukcja obsługi