
FDW 2004-E
FDW 201201-E

2
FDW 2004-E
English .............................................................................................................................................................................. 3
Čeština ............................................................................................................................................................................ 25
Slovenčina ..................................................................................................................................................................... 47
Magyarul ....................................................................................................................................................................... 69
Polski ............................................................................................................................................................................... 91
Slovenščina ................................................................................................................................................................. 113
Hrvatski ........................................................................................................................................................................ 135
Русский ......................................................................................................................................................................... 157
FDW 20120 1- E

EN
HIGH-PRESSURE WASHER OPERATING INSTRUCTIONS
3
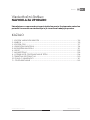
Contents
High-pressure washer
OPERATING INSTRUCTIONS
Thank you for buying this high-pressure washer. Before using it, please read
carefully this operating manual and retain it for further use.
CONTENTS
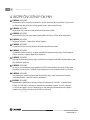
1. GENERAL SAFETY INSTRUCTIONS ............................................................................................... 4
2. SYMBOLS .............................................................................................................................................. 5
3. GENERAL DESCRIPTION ................................................................................................................ 7
4. SAFETY INSTRUCTIONS ................................................................................................................... 8
5. ASSEMBLY INSTRUCTIONS .......................................................................................................... 11
6. STARTING ........................................................................................................................................... 12
7. STORAGE ............................................................................................................................................ 15
8. TROUBLESHOOTING GUIDE ........................................................................................................ 16
9. TECHNICAL SPECIFICATION ....................................................................................................... 20
10. DECLARATION OF CONFORMITY .......................................................................................... 21
11. DISPOSAL ..........................................................................................................................................22

EN
4General safety instructions
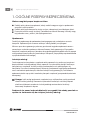
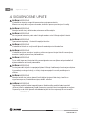
1. GENERAL SAFETY INSTRUCTIONS
Important safety warnings
Unpack the product carefully and be sure not to throw away any part of the package before
having found all components of the product.
Keep the product in a dry place out of reach of children.
Read all cautions and instructions. The failure to adhere to warning cautions and instructions
may result in an accident, fi e and/or a serious injury.
Packaging
The product is placed in a package preventing damage during transport. This package is a raw
material therefore it can be handed-over for recycling.
We recommend keeping of the original package including the internal packaging material,
purchase receipt as well as the warranty card during the warranty period as minimum. Should
the product be transported, pack the device back to the original packaging materials provided
by the manufacturer; in such a way, you can secure the maximum product protection during
potential transport (e. g. relocation or shipping to the service centre).
Instructions for use
Before beginning to work with the machine, read the following safety rules and instructions for
use. Familiarize with operating elements and the proper use of the device. Keep the manual in a
safe place for future reference. We recommend keeping the original package including the inner
packaging materials, cash voucher and guarantee card for a period of warranty at minimum.
For a case of transportation, pack the machine into the original box from the manufacturer,
thus ensuring a maximum protection of the product during a possible transport (e.g. moving or
sending into a service station).
Note: If you hand the machine over to next persons, hand it over together with the manual.
Adherence to the attached instructions for use is a precondition for the proper use of the
machine. The operation manual includes also instructions for operation, maintenance and
repairs.
The manufacturer does not take any responsibility for accidents or damages
resulting from the failure to adhere to this manual.
FDW 20120 1- E
FDW 2004-E

EN
HIGH-PRESSURE WASHER OPERATING INSTRUCTIONS
5
Symbols
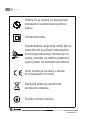
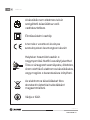
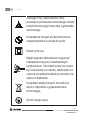
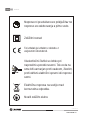
2. SYMBOLS
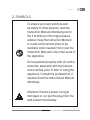
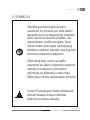
To ensure your own safety as well
as safety of other persons, read the
Instruction Manual attentively prior to
the fi st startup of the high-pressure
washer. Keep the Instruction Manual
in a safe and practical place to be
available when needed. Hand over the
Instruction Manual to any other users of
the appliance.
Get acquainted properly with all control
elements, especially with the features
and activities, prior to start of using the
appliance. Consult the professional, if
needed. Read the Instructional Manual
attentively.
Attention! Should a power cord get
damaged or cut, pull the plug from the
wall socket immediately.

The appliance is not intended for
connection to the potable water feeding
system
Class of protection
High-pressure washers can be
dangerous if handled inappropriately.
Never direct the high-pressure jet to
other persons, pets, live electrical
equipment or to the washer itself.
Electrical appliances shall not be
disposed in the household waste.
Use ears protection.
This product is made in compliance
with approved standards.
EN 6
FDW 2004-E
Symbols
FDW 20120 1- E

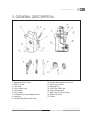
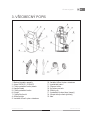
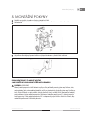
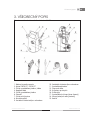
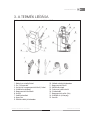
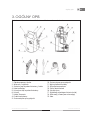
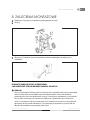
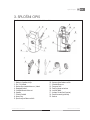
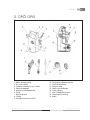
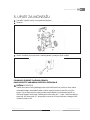
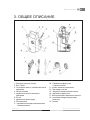
3. GENERAL DESCRIPTION
The final p oduct can differ from the depicted device.
Photographs and line drawings used in this manual are for reference only and
do not represent a specific model
Compare the illustrations with your unit to familiarize yourself with the location of various controls
and adjustments. Save this manual for future reference.
EN
HIGH-PRESSURE WASHER OPERATING INSTRUCTIONS
7
General description
1 - Motor and Pump in Case
2 - ON/OFF switch
3 - Cord Wrap
4 - Power Supply Cord
5 - Hose Holster
6 - Carry Handle
7 - On-Board Accessory Storage Holsters
8 - Spray Gun
9 - Variable Spray Nozzle with Lance
10 - Variable Spray Nozzle with Lance
11 - High-Pressure Hose
13 - Shipping Plug
15 - Wheel Axis Hole Cover
16 - Lance Storage Cover
17 - High Pressure Outlet (metal)
18 - Water inlet plastic
19 - Wheels

EN 8
FDW 2004-E
Safety instructions
ATTENTION! WARNING
Inappropriate extension cables can be dangerous. Should an extension cable be used, both
the socket and the plug shall be of a waterproof design and the coupled parts shall be kept
dry and with no connection with earth. We recommend using of an extension cable drum
keeping the socket 60 mm above the ground as minimum.
WARNING
When leaving the device unattended, always turn the power off.
Carefully remove the tool and any accessories from the box. Do not discard any of the
packing materials until all parts are accounted for.
This appliance is not intended for use by persons (including children) with reduced physical,
sensory or mental capabilities, or lack of experience and knowledge, unless they have been
given supervision or instruction concerning use of the appliance by a person responsible for
their safety.
Never use any accessories unless delivered together with the product or intended particularly
for the appliance.
Never repair the appliance yourself; do not modify the appliance - a risk of electrocution
is imminent! All repairs and adjustments of the appliance shall be done by the professional
company/service. Tampering with the product during the warranty period may void the
warranty.
Never use the product with wet hands or feet.
Operate and keep the product away from flammable and olatile substances.
Operate and keep the product away from extreme temperatures, direct sunlight, excessive
moisture and do not place it to the excessive dusty environment.
Do not place the product in close vicinity of heaters, naked flame and ther appliances or
equipment generating heat.
Never use the product for other than intended purposes.
Before inserting the power cord into the socket, check whether the voltage you intend to use
complies with that of the machine.
Never lay the power cord in the vicinity of hot surfaces or over the sharp objects. Do not place
heavy objects on the power cord. Position the cord so that it will not be stepped on or tripped
over. Make sure the power cord is not in contact with hot surface.
Should the power cord of the product be damaged, have it repaired by an authorized service
technician to prevent causing a dangerous situation. It is forbidden to use a product with a
damaged power cord or plug.
Do not disconnect the power cord from the wall socket by pulling the cord.
Do not spray the product with water or any other liquid. Do not power water or any other
liquids into the product. Do not submerge the product in water or any other liquid.
Never use the product near a bathtub, wash basin or any other container filled with ater.
If you are not using the product or if you know that you will not be using it soon, turn it off and
disconnect the power cord from the wall socket. Proceed in the same way prior to cleaning.
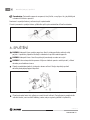
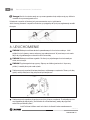
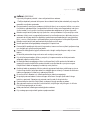
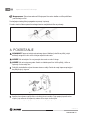
A
B
C
D
E
F
G
H
Spray Gun
Variable Spray Nozzle with Lance
Carry Handle
Hose/Cord Wrap
High-Pressure Hose
Safety Lock
Motor and Pump in Case
Power Supply Cord
I
J
K
L
M
N
O
ON/OFF switch
Bottle
High Pressure Outlet (metal)
Shipping Plug
Water inlet plastic
On-Board Accessory Storage Holsters
Water Inlet Filter Screen [factory
installed inside water inlet [M)]
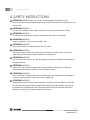
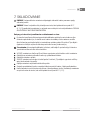
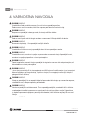
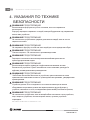
4. SAFETY INSTRUCTIONS
ATTENTION! WARNING High-pressure jets can be dangerous if subject to misuse.
Never direct a water stream towards people or any live electrical device including the pressure
washer itself.
ATTENTION! WARNING
Do not use the appliance within range of persons unless they wear protective clothing.
ATTENTION! WARNING
Do not direct the jet at yourself or others to attempt to clean clothes or footwear.
ATTENTION! WARNING
Danger of explosion - Do not use flammable li uids.
ATTENTION! WARNING
Never allow children or untrained persons to use the tool.
ATTENTION! WARNING
High-pressure hoses, valves and couplings are crucial for the product safety. Use only the
hoses, valves and couplings recommended by the manufacturer.
ATTENTION! WARNING
To secure safety of the device, use only the original spare parts delivered by the manufacturer
or approved by him.
ATTENTION! WARNING
Switch off the tool and pull the plug out of the socket before carrying out any cleaning or
maintenance work or converting the machine to another feature.
ATTENTION! WARNING
Never use the tool if a supply cord or other important parts of the appliance are damaged or
missing, e.g. safety devices, high-pressure hoses, trigger gun.
FDW 20120 1- E

EN
HIGH-PRESSURE WASHER OPERATING INSTRUCTIONS
9
Safety instructions
WARNING
Inappropriate extension cables can be dangerous. Should an extension cable be used, both
the socket and the plug shall be of a waterproof design and the coupled parts shall be kept
dry and with no connection with earth. We recommend using of an extension cable drum
keeping the socket 60 mm above the ground as minimum.
ATTENTION! WARNING
When leaving the device unattended, always turn the power off.
Carefully remove the tool and any accessories from the box. Do not discard any of the
packing materials until all parts are accounted for.
This appliance is not intended for use by persons (including children) with reduced physical,
sensory or mental capabilities, or lack of experience and knowledge, unless they have been
given supervision or instruction concerning use of the appliance by a person responsible for
their safety.
Never use any accessories unless delivered together with the product or intended particularly
for the appliance.
Never repair the appliance yourself; do not modify the appliance - a risk of electrocution
is imminent! All repairs and adjustments of the appliance shall be done by the professional
company/service. Tampering with the product during the warranty period may void the
warranty.
Never use the product with wet hands or feet.
Operate and keep the product away from flammable and olatile substances.
Operate and keep the product away from extreme temperatures, direct sunlight, excessive
moisture and do not place it to the excessive dusty environment.
Do not place the product in close vicinity of heaters, naked flame and ther appliances or
equipment generating heat.
Never use the product for other than intended purposes.
Before inserting the power cord into the socket, check whether the voltage you intend to use
complies with that of the machine.
Never lay the power cord in the vicinity of hot surfaces or over the sharp objects. Do not place
heavy objects on the power cord. Position the cord so that it will not be stepped on or tripped
over. Make sure the power cord is not in contact with hot surface.
Should the power cord of the product be damaged, have it repaired by an authorized service
technician to prevent causing a dangerous situation. It is forbidden to use a product with a
damaged power cord or plug.
Do not disconnect the power cord from the wall socket by pulling the cord.
Do not spray the product with water or any other liquid. Do not power water or any other
liquids into the product. Do not submerge the product in water or any other liquid.
Never use the product near a bathtub, wash basin or any other container filled with ater.
If you are not using the product or if you know that you will not be using it soon, turn it off and
disconnect the power cord from the wall socket. Proceed in the same way prior to cleaning.

EN 10
FDW 2004-E
Safety instructions
Never leave the running product unattended.
Allow the product to cool down properly before storing.
Pay special attention if the product is used near children. Always keep the product away from
children. Supervise the children to be sure they will not use the product as a toy.
To increase safety, the electrical installations shall be connected by a qualified electrica
engineer. We recommend installing a residual current circuit-breaker (RCCB) with a response
time of 30mA/30 ms or a device monitoring the earth circuit (talk to your electrical engineer
about the options).
Pulling the power cord from the wall socket by force may cause damage.
To avoid damage of the hose, do not step on it or bend it by force. Do not use the product with
a bent or damaged hose.
Do not run over the power cord with the product.
The product is equipped with a thermal fuse - if the motor or the pump get overheated, the
thermal fuse will turn the appliance off. As soon as the motor or pump cool down, they can
be turned on again. Warning!!! To avoid a risk of a sudden recovery of the thermal fuse,
the appliance shall not be powered via an external device such as a timer or shall not be
connected to a circuit which is periodically turned on and off.
High-pressure jet can be dangerous if handled inappropriately. It is forbidden to direct the jet
at other people, oneself, pets, electrical appliances or the high-pressure washer itself.
Never place the pistol or extension to your ears or eyes.
Should you use an extension cable to the power supply network, it shall be of the waterproof
design.
The manufacturer shall not be liable for damages caused by inappropriate use of the
appliance and accessories (injuries, burns, scalding, fi e, food spoilage, etc.).
FDW 20120 1- E

EN
HIGH-PRESSURE WASHER OPERATING INSTRUCTIONS
11
Assembly instructions
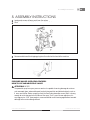
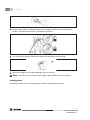
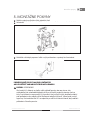
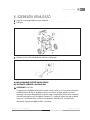
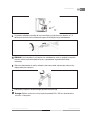
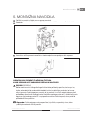
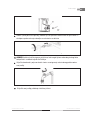
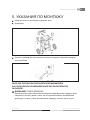
5. ASSEMBLY INSTRUCTIONS
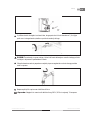
Locate and remove all loose parts from the carton.
Click the storage hook into the back part and fix it with t o screws.
Remove and discard the shipping plug from the outlet on the front of the machine.
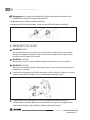
PRESSURE WASHER OPERATING FEATURES
HOW TO USE VARIABLE SPRAY LANCE
ATTENTION! NOTICE:
The powerful spray from your pressure washer Is capable of causing damage to surfaces
such aa wood, glass, automobile paint, auto striping and trim and delicate objects such as
fl wers and shrubs. Before spraying, check the item to be cleaned to assure that it is strong
enough to resist damage from the force of the spray. The 0° pencil stream adjustment is
very aggressive. A 20° spray angle is recommended for most cleaning applications to avoid
damage to the surface being cleaned.

EN 12
FDW 2004-E
Note: The pressure of the spray on the surface you are cleaning increases as you move the
wand closer to the surface.
The high pressure setting is for cleaning and rinsing,
For high pressure operation, pull back the name of the variable spray lance.
NOTICE:
Use only approved pressure washer cleaners. Do not use bleach, chlorine, or any cleaners
containing acids.
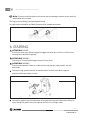
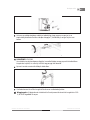
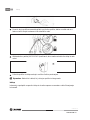
Remove the lance
Remove the soap nozzle from the detergent bottle assembly and ensure the suction lube Is
property connected.
Fill the detergent bottle with suitable cleaning solution and replace the soap nozzle..
Assembly instructions | Starting
CAUTION:
Damage may occur to painted surface if soap is allowed to dry on the surface. Wash and
rinse a small section at a time.
.Apply the solution to a DRY work surface.
WETTING THE SURFACE FIRST IS NOT RECOMMENDED, AS IT DILUTES THE
DETERGENT AND REDUCES ITS CLEANING ABILITY.
Allow detergent to remain on the surface for a short time before rinsing.
Rinse with clean water under high pressure. On a vertical surface, fi st rinse from the bottom
up, then rinse from the top down. Hold nozzle 6 – 8 in in (15-20 cm) from the work surface at
a 45° angle using the flat pray as a peeling tool rather than a scrub brush.
Ensure that the detergent injection system is completely clean prior to switching from
one detergent to another
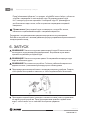
6. STARTING
ATTENTION! DANGER:
Risk of injury from spray. Always engage the trigger lock when gun is not in use. Failure to do
so could cause accidental spraying.
ATTENTION! WARNING
Risk of Injury. Do not direct discharge stream at self or others.
ATTENTION! WARNING
Risk of unsafe operation. Stand on a stable surface and grip gun/ spray wand fi mly with
both hands.
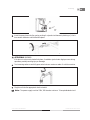
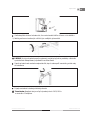
Connect the high pressure hose to the machine outlet. Ensure the threads are aligned
properly and the connection is secure.
Connect the garden hose to the connector on the back of the machine. Before connecting, run
water through the garden hose {not supplied) to flush cut a y foreign matter.
CAUTION:
Damage may occur to painted surface if soap is allowed to dry on the surface. Wash and
rinse a small section at a time.
.Apply the solution to a DRY work surface.
WETTING THE SURFACE FIRST IS NOT RECOMMENDED, AS IT DILUTES THE
DETERGENT AND REDUCES ITS CLEANING ABILITY.
Allow detergent to remain on the surface for a short time before rinsing.
Rinse with clean water under high pressure. On a vertical surface, fi st rinse from the bottom
up, then rinse from the top down. Hold nozzle 6 – 8 in in (15-20 cm) from the work surface at
a 45° angle using the flat pray as a peeling tool rather than a scrub brush.
Ensure that the detergent injection system is completely clean prior to switching from
one detergent to another
DANGER:
Risk of injury from spray. Always engage the trigger lock when gun is not in use. Failure to do
so could cause accidental spraying.
WARNING
Risk of Injury. Do not direct discharge stream at self or others.
WARNING
Risk of unsafe operation. Stand on a stable surface and grip gun/ spray wand fi mly with
both hands.
Connect the high pressure hose to the machine outlet. Ensure the threads are aligned
properly and the connection is secure.
Connect the garden hose to the connector on the back of the machine. Before connecting, run
water through the garden hose {not supplied) to flush cut a y foreign matter.
FDW 20120 1- E

EN
HIGH-PRESSURE WASHER OPERATING INSTRUCTIONS
13
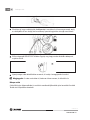
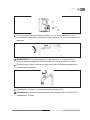
If your water source is a well, the garden hose length can only be 9m as
maximum.
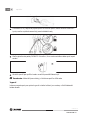
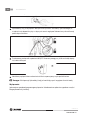
Insert the spray lance into the gun by pushing fi mly and simultaneously twisting a 1/4 of a
turn counter clockwise until locked into place.
ATTENTION! WARNING
If the lance is not securely locked into place, it could be ejected under high pressure during
operation, possibly causing injury or damage.
Turn incoming water on and fully open valve to insure maximum water fl w to the machine.
Plug the unit into the appropriate electrical outlet.
Note: The power supply must be 230V, 50 Hz and a minimum 15 amp dedicated circuit.
Starting

EN 14
FDW 2004-E
Starting
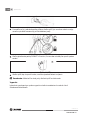
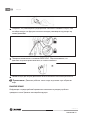
Ensure the gun safety is unlocked and squeeze the trigger until the air has escaped and a
steady fl w of low pressure water Is coming from the nozzle.
Turn switch to ON position. Note that the motor will momentarily start then stop.
Squeeze the trigger to start motor and begin pressure washing.
Note: The motor only runs when the gun trigger is depressed and warier Is spraying.
Shutting down
ISee Storage section in this manual for proper shutdown and storage procedures.
FDW 20120 1- E

EN
HIGH-PRESSURE WASHER OPERATING INSTRUCTIONS
15
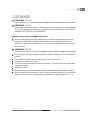
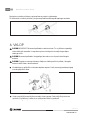
7. STORAGE
ATTENTION! CAUTION:
Prior to moving the unit, always disconnect the garden hose via the garden hose connector.
ATTENTION! CAUTION:
Always store your pressure washer in a location where the temperature will not fall below 40
°F (4 °C). The pump in this machine is susceptible to permanent damage if frozen. FREEZE
DAMAGE IS NOT COVERED BY THE WARRANTY.
End of use and winter storage instructions
When finished applying d tergent, thoroughly rinse suction lube and detergent nozzle by
placing the suction lube in a container of clear water and running detergent nozzle at
maximum fl w setting for 30 seconds. This will flush an d tergent residue from the suction
lube and nozzle.
ATTENTION! CAUTION:
Failure to clean properly will cause the detergent nozzle to become clogged and inoperable.
Turn the machine OFF and squeeze the trigger to release the trapped pressure inside of the
machine.
Remove both the garden nose and high-pressure hose from the unit.
Disconnect the lance from the gun.
Turn ON the machine and allow it to run for 5 seconds. (This will clear out most of the water
trapped in the pump.)
Unplug the machine.
Wrap the high-pressure hose and power supply cord onto the hose/cord wrap as shown.
Store the machine and accessories in a dry, climate controlled environment. Do not store the
machine or accessories in a place where the temperature could drop below 40 °F (4 °C).
Storage

EN 16
FDW 2004-E
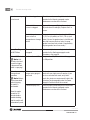
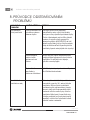
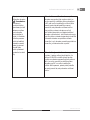
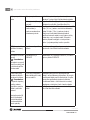
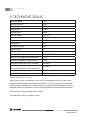
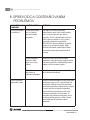
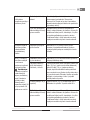
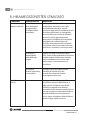
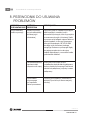
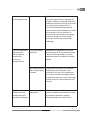
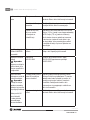
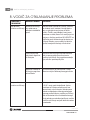
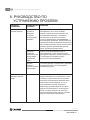
8. TROUBLEShOOTING GUIDE
OPERATIONAL
ISSUE
POSSIBLE CAUSE SOLUTION
Detergent is not
dispensing
Detergent is not
pressure washer
approved
Use only detergents, degreasers, waxes and
other cleaning solutions that are designed
specifically or pressure washers. Cleaners in
this category will clearly state on the label that
they are meant for use in pressure washers. Do
NOT use any other type of cleaning solution in
your high-pressure washer. Never use bleach,
ammonia, any type of acid or hot water in your
appliance!
The suction tube
has become
disconnected,
clogged or kinked
Ensure the suction tube is not damaged and
is properly connected to the detergent nozzle.
Reconnect, clean or replace the tube as
needed.
Detergent nozzle is
clogged with debris
Clean the nozzle according to the instructions
provided in the Nozzle paragraph under the
Maintenance section of this manual.
Detergent to water
ratio
The pressure washer draws detergent at a
maximum 10:1 water to detergent ratio. Most
pressure washer detergents are concentrated
within this range so minimal adjustment of the
detergent nozzle metering valve is required. If
you feel you are using more detergent than is
required for the application, you can dilute the
detergent with regular tap water.
Troubleshooting Guide
FDW 20120 1- E

EN
HIGH-PRESSURE WASHER OPERATING INSTRUCTIONS
17
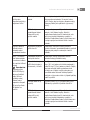
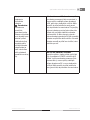
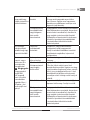
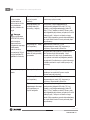
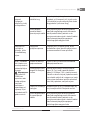
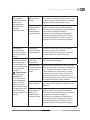
Circuit breaker trips
or fuse blown in
fuse box
Circuit overload Verify that the circuit is rated at 15 amps or
greater. Ensure no other appliance is drawing
power from the same circuit [dedicated
circuit).
Extensor Cord too
long or wire gauge too
small
Nozzle partially
blocked
We do not recommend using of extension
cords with your high-pressure washer. If
you must use an extension cord, verify that
it meets the minimum requirements listed
in the Extension Cord paragraph under the
Power Supply & Electrical info in this manual.
Clean the nozzle according to the instructions
provided in the Nozzle paragraph under the
Maintenance section of this manual.
Spray gun, lance or
high
pressure hose
leaking water
Improperly
connected accessory
Verify all components (gun, lance, high
pressure hose) are properly connected
according to Instructions provided in this
manual.
Low / surging
pressure or motor
does not stop when
spray gun trigger is
released
Note:
The Pressure
washer is NOT
receiving
full volume of
incoming water
The machine
requires
pressurized water
source capable
of sustaining a
minimum of 20 psi
at 5 gpm.
Faucet is not fully
open
Verify incoming water supply faucet is open at
the maximum setting.
Garden hose is too
long or it is kinked /
restricted
Use a maximum garden hose length of 50 ft.
(15,2 m) (city water) or 25 ft. (7,5 m) (well
water). Ensure the garden hose is laid out flat
and does not have any kinks or leaks. Unwrap
garden hose from reel or hook (if applicable).
Replace garden hose if necessary.
Water inlet fil er
screen is clogged
Remove the fil er screen (O) from the water
inlet (M) and clean it thoroughly. Replace the
fil er screen.
Extension cord is too
long or wire gauge Is
too small
We do not recommend using of extension
cords with your high-pressure washer. If you
must use an extension cord, verify that it
meets the minimum requirements listed in the
Extension Cord paragraph under the Power
Supply & Electrical info in this manual.
Troubleshooting Guide

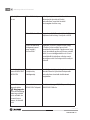
EN 18
FDW 2004-E
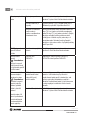
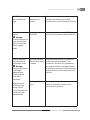
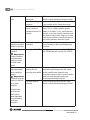
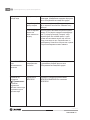
No water coming
out of nozzle
Nozzle is clogged Clean the nozzle according to the instructions
provided in the Nozzle paragraph under
Maintenance section of this manual.
Water inlet fil er
screen is clogged
Remove fil er screen (O) from the water inlet
(M) and clean it thoroughly. Replace the fil er
screen.
Kink in the garden
hose or hose is
wrapped on a storage
wheel
Use a maximum garden hose length of 50
ft. {15,2 m (city water) or 25 ft. (7.6 m) (well
water). Ensure the garden hose is laid flat and
does not have any kinks or leaks. Unwrap
garden hose from reel or hook (if applicable).
Replace garden hose if necessary.
Spray Gun Trigger
will NOT Move
Gun safety lock is
engaged
Release safety lock according to instructions
provided in the Starting paragraph under
Operation in this manual.
Unit will NOT start
Note: Unit
will only start and
run when trigger
is depressed and
water is spraying!
Unit is not turned ON Verify that the ON/OFF switch is full ingaged in
the ON position.
Motor stops working
during normal
operation
Note: Motors
thermal overload
switch tripping
the motor is
overheated
Allow the motor
to cool for 20
minutes before
troubleshooting
and the switch will
automatically reset
Extension cord is too
long or wire- gauge is
too small
We do not recommend using of extension
cords with your high-pressure washer. If you
must use an extension cord, verify that it
meets the minimum requirements listed in the
Extension Cord paragraph under the Power
Supply & Electrical info in this manual.
Defective Spray Gun Clean the nozzle according to the instructions
provided in the Nozzle paragraph under
Maintenance section of this manual.
Troubleshooting Guide
FDW 20120 1- E

EN
HIGH-PRESSURE WASHER OPERATING INSTRUCTIONS
19
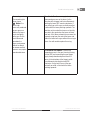
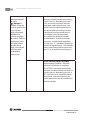
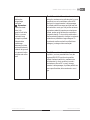
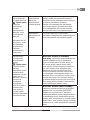
Connecting and
Disconnecting the
Spray Lance
Note: Due
to the high
pressures produced
by your pressure
washer, the lance
must seal lightly
to the gun. As the
result of normal
operation the
lance can become
difficult o attach
or remove and this
process may require
considerable force.
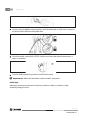
To attach the Lance - apply steady
downward pressure on the lance (in the
direction of the trigger) while simultaneously
twisting the lance 90° counter clockwise. It
may help if you set the gun vertically on a flat
surface with the lance pointing upwards. The
two tabs on the end of the lance must be fully
inserted in the gun before the lance will twist
and lock. If this does not work then remove the
bayonet o-ring from the end of the lance and
attach the lance to the gun without the o-ring in
place. You will need to replace the o-ring.
To remove the Lance - release any
trapped pressure in the gun f hose by turning
the unit OFF and squeezing the gun trigger.
Apply steady downward pressure on the
lance (in the direction of the trigger) while
simultaneously twisting the lance 90°
clockwise. It may help if you set the gun
vertically on a flat su face with the lance
pointing upwards.
Troubleshooting Guide

EN 20
FDW 2004-E
Technical Specifications
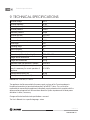
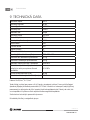
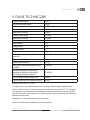
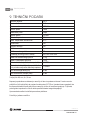
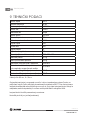
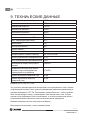
9. TEChNICAL SPECIFICATIONS
Nominal voltage 230 V
Nominal frequency 50 Hz
Nominal power input 1200 W
Nominal pressure 6 MPa
Maximum pressure 9 Mpa
Nominal ow rate 5.5L/ min.
Maximum ow rate 6.5L/ min.
Maximum feed water temperature 40°C
Hose length 3 m
Operating range 8 m
Internal protectio II.
Power cord length 5M
Dimensions (width x depth x height) 265 x 260 x 430 mm
Weight without accessories 5,7 kg
Weight with accessories 6,5 kg
Maximum water inlet pressure in pascals 0.69 MPa
Minimum water inlet pressure in pascals in
case it is necessary for correct operation of
appliance
0.14 MPa
Sound pressure level (Lpa) 85 dB
Sound power level, measured (Lwa 97 dB
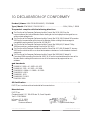
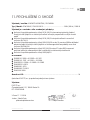
The appliance shall be connected to the power supply systems of the Z max impedance in
the place of connection (a household connection) up to 0.0277 ohms. The user shall be
responsible for connecting the appliance to the power supply networks which complies with the
above mentioned requirement. You can inform about the system impedance at the local power
distributor´s office, if necessa y.
Vibration: Ah = 0.5 ms2, K=1.5 ms2
The User’s Manual is in a specific language ersion.
Changes of the text and technical specifications reserved.
FDW 20120 1- E
Strona się ładuje...
Strona się ładuje...
Strona się ładuje...
Strona się ładuje...
Strona się ładuje...
Strona się ładuje...
Strona się ładuje...
Strona się ładuje...
Strona się ładuje...
Strona się ładuje...
Strona się ładuje...
Strona się ładuje...
Strona się ładuje...
Strona się ładuje...
Strona się ładuje...
Strona się ładuje...
Strona się ładuje...
Strona się ładuje...
Strona się ładuje...
Strona się ładuje...
Strona się ładuje...
Strona się ładuje...
Strona się ładuje...
Strona się ładuje...
Strona się ładuje...
Strona się ładuje...
Strona się ładuje...
Strona się ładuje...
Strona się ładuje...
Strona się ładuje...
Strona się ładuje...
Strona się ładuje...
Strona się ładuje...
Strona się ładuje...
Strona się ładuje...
Strona się ładuje...
Strona się ładuje...
Strona się ładuje...
Strona się ładuje...
Strona się ładuje...
Strona się ładuje...
Strona się ładuje...
Strona się ładuje...
Strona się ładuje...
Strona się ładuje...
Strona się ładuje...
Strona się ładuje...
Strona się ładuje...
Strona się ładuje...
Strona się ładuje...
Strona się ładuje...
Strona się ładuje...
Strona się ładuje...
Strona się ładuje...
Strona się ładuje...
Strona się ładuje...
Strona się ładuje...
Strona się ładuje...
Strona się ładuje...
Strona się ładuje...
Strona się ładuje...
Strona się ładuje...
Strona się ładuje...
Strona się ładuje...
Strona się ładuje...
Strona się ładuje...
Strona się ładuje...
Strona się ładuje...
Strona się ładuje...
Strona się ładuje...
Strona się ładuje...
Strona się ładuje...
Strona się ładuje...
Strona się ładuje...
Strona się ładuje...
Strona się ładuje...
Strona się ładuje...
Strona się ładuje...
Strona się ładuje...
Strona się ładuje...
Strona się ładuje...
Strona się ładuje...
Strona się ładuje...
Strona się ładuje...
Strona się ładuje...
Strona się ładuje...
Strona się ładuje...
Strona się ładuje...
Strona się ładuje...
Strona się ładuje...
Strona się ładuje...
Strona się ładuje...
Strona się ładuje...
Strona się ładuje...
Strona się ładuje...
Strona się ładuje...
Strona się ładuje...
Strona się ładuje...
Strona się ładuje...
Strona się ładuje...
Strona się ładuje...
Strona się ładuje...
Strona się ładuje...
Strona się ładuje...
Strona się ładuje...
Strona się ładuje...
Strona się ładuje...
Strona się ładuje...
Strona się ładuje...
Strona się ładuje...
Strona się ładuje...
Strona się ładuje...
Strona się ładuje...
Strona się ładuje...
Strona się ładuje...
Strona się ładuje...
Strona się ładuje...
Strona się ładuje...
Strona się ładuje...
Strona się ładuje...
Strona się ładuje...
Strona się ładuje...
Strona się ładuje...
Strona się ładuje...
Strona się ładuje...
Strona się ładuje...
Strona się ładuje...
Strona się ładuje...
Strona się ładuje...
Strona się ładuje...
Strona się ładuje...
Strona się ładuje...
Strona się ładuje...
Strona się ładuje...
Strona się ładuje...
Strona się ładuje...
Strona się ładuje...
Strona się ładuje...
Strona się ładuje...
Strona się ładuje...
Strona się ładuje...
Strona się ładuje...
Strona się ładuje...
Strona się ładuje...
Strona się ładuje...
Strona się ładuje...
Strona się ładuje...
Strona się ładuje...
Strona się ładuje...
Strona się ładuje...
Strona się ładuje...
Strona się ładuje...
Strona się ładuje...
Strona się ładuje...
Strona się ładuje...
Strona się ładuje...
Strona się ładuje...
Strona się ładuje...
Strona się ładuje...
Strona się ładuje...
Strona się ładuje...
Strona się ładuje...
Strona się ładuje...
Strona się ładuje...
Strona się ładuje...
Strona się ładuje...
Strona się ładuje...
Strona się ładuje...
Strona się ładuje...
Strona się ładuje...
Strona się ładuje...
Strona się ładuje...
Strona się ładuje...
Strona się ładuje...
Strona się ładuje...
Strona się ładuje...
Strona się ładuje...
Strona się ładuje...
-
 1
1
-
 2
2
-
 3
3
-
 4
4
-
 5
5
-
 6
6
-
 7
7
-
 8
8
-
 9
9
-
 10
10
-
 11
11
-
 12
12
-
 13
13
-
 14
14
-
 15
15
-
 16
16
-
 17
17
-
 18
18
-
 19
19
-
 20
20
-
 21
21
-
 22
22
-
 23
23
-
 24
24
-
 25
25
-
 26
26
-
 27
27
-
 28
28
-
 29
29
-
 30
30
-
 31
31
-
 32
32
-
 33
33
-
 34
34
-
 35
35
-
 36
36
-
 37
37
-
 38
38
-
 39
39
-
 40
40
-
 41
41
-
 42
42
-
 43
43
-
 44
44
-
 45
45
-
 46
46
-
 47
47
-
 48
48
-
 49
49
-
 50
50
-
 51
51
-
 52
52
-
 53
53
-
 54
54
-
 55
55
-
 56
56
-
 57
57
-
 58
58
-
 59
59
-
 60
60
-
 61
61
-
 62
62
-
 63
63
-
 64
64
-
 65
65
-
 66
66
-
 67
67
-
 68
68
-
 69
69
-
 70
70
-
 71
71
-
 72
72
-
 73
73
-
 74
74
-
 75
75
-
 76
76
-
 77
77
-
 78
78
-
 79
79
-
 80
80
-
 81
81
-
 82
82
-
 83
83
-
 84
84
-
 85
85
-
 86
86
-
 87
87
-
 88
88
-
 89
89
-
 90
90
-
 91
91
-
 92
92
-
 93
93
-
 94
94
-
 95
95
-
 96
96
-
 97
97
-
 98
98
-
 99
99
-
 100
100
-
 101
101
-
 102
102
-
 103
103
-
 104
104
-
 105
105
-
 106
106
-
 107
107
-
 108
108
-
 109
109
-
 110
110
-
 111
111
-
 112
112
-
 113
113
-
 114
114
-
 115
115
-
 116
116
-
 117
117
-
 118
118
-
 119
119
-
 120
120
-
 121
121
-
 122
122
-
 123
123
-
 124
124
-
 125
125
-
 126
126
-
 127
127
-
 128
128
-
 129
129
-
 130
130
-
 131
131
-
 132
132
-
 133
133
-
 134
134
-
 135
135
-
 136
136
-
 137
137
-
 138
138
-
 139
139
-
 140
140
-
 141
141
-
 142
142
-
 143
143
-
 144
144
-
 145
145
-
 146
146
-
 147
147
-
 148
148
-
 149
149
-
 150
150
-
 151
151
-
 152
152
-
 153
153
-
 154
154
-
 155
155
-
 156
156
-
 157
157
-
 158
158
-
 159
159
-
 160
160
-
 161
161
-
 162
162
-
 163
163
-
 164
164
-
 165
165
-
 166
166
-
 167
167
-
 168
168
-
 169
169
-
 170
170
-
 171
171
-
 172
172
-
 173
173
-
 174
174
-
 175
175
-
 176
176
-
 177
177
-
 178
178
-
 179
179
-
 180
180
-
 181
181
-
 182
182
-
 183
183
-
 184
184
-
 185
185
-
 186
186
-
 187
187
-
 188
188
-
 189
189
-
 190
190
-
 191
191
-
 192
192
-
 193
193
-
 194
194
-
 195
195
-
 196
196
-
 197
197
-
 198
198


w innych językach
- slovenčina: Fieldmann FDW 2004-E Používateľská príručka
Inne dokumenty
-
Nilfisk-ALTO Excellent 125/135 X-TRA Instrukcja obsługi
-
Nilfisk-ALTO POSEIDON 2-28 Instrukcja obsługi
-
Ferm GRM1031 Instrukcja obsługi
-
Dolmar HP401 Instrukcja obsługi
-
 MALTEC Myjka Ciśnieniowa M2.1400 Pianownica Turbo Lanca Instrukcja obsługi
-
Lavor THERMIC 11-13H Instrukcja obsługi
-
Hozelock 7920 3840 Instrukcja obsługi
-
Parkside PHD 100 C2 Translation Of Original Operation Manual
-
Vonroc V14C-1 Pressure Washer Instrukcja obsługi
-
Comet K 250 STATIC Instrukcja obsługi
