

HEAD OFFICE:
Ness Security Products Pty Ltd
ACN 069 984 372
4 / 167 Prospect Hwy
Seven Hills NSW 2147 Australia
Ph +61 2 8825 9222
Fax +61 2 9674 2520
SYDNEY
02 8825 9222
MELBOURNE
03 9878 1022
BRISBANE
07 3343 7744
PERTH
08 9328 2511
“Australia’s largest
designer and
manufacturer of
high quality security
products”
WWW.NESS.COM.AU
Ness Security Products Pty Ltd
Quality
Endorsed
Company
ISO9001
LIC.No. QEC2074
NSW Head Office only
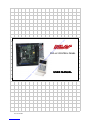
PRO-LX USER MANUAL
REV2 Oct 1993
Electronic version, June 2002
Document Part Number: 890–034
For product:
PRO-LX dialler control panel
© 2002 Ness Security Products Pty Ltd ABN 28 069 984 372
Specifications may change without notice.
NESS SECURITY PRODUCTS
TELECOMMUNICATIONS COMPLIANCE
Australian Communications Authority
Provided for Download by www.bendigosecurity.com.au

CONTENTS
Glossary ......................................................................................................................... 1
INTRODUCTION
Getting Started ............................................................................................................... 3
Your Security System ............................................................................................. 3
Output Devices ....................................................................................................... 3
Input Devices .......................................................................................................... 3
The Control Panel .......................................................................................................... 4
Keypad .................................................................................................................... 5
Audible indications (sounds) ......................................................................................... 6
Visual Indications .......................................................................................................... 7
Zone and status Indicators ...................................................................................... 7
Operating the Panel ........................................................................................................ 9
Area Operation ............................................................................................................. 10
DETECTING INTRUDERS
Zones ............................................................................................................................ 11
Arming ......................................................................................................................... 11
Disarming ..................................................................................................................... 13
Alarms ..........................................................................................................................14
Monitor Mode .............................................................................................................. 15
Warnings Given While Armed ..................................................................................... 17
REPORTING EMERGENCIES
Emergency Alarms ....................................................................................................... 18
OPERATION .............................................................................................................................. 18
View Alarms................................................................................................................. 22
View Power .................................................................................................................. 23
View Memory .............................................................................................................. 24
Exclude ........................................................................................................................ 26
Include .......................................................................................................................... 27
Automatic Zone Test .................................................................................................... 28
Test Mode..................................................................................................................... 28
AREA OPERATION
Area codes and Administrator codes ........................................................................... 30
Area awareness ............................................................................................................ 30
Extra instructions for administrators ........................................................................... 31
Overlapping areas ........................................................................................................ 32
PROGRAMMING
Who may program? ...................................................................................................... 33
Program mode 1 entry .................................................................................................. 33
Programming codes ..................................................................................................... 34
Programming procedure ....................................................................................... 34
Programming codes ........................................................................................ 35, 36
Viewing and Changing Codes .............................................................................. 37
Viewcode .............................................................................................................. 37
Changingcode ....................................................................................................... 37
Entry delay time ........................................................................................................... 39
Exit delay time ............................................................................................................. 39
DIALLER OPERATION
Dialler activity ............................................................................................................. 40
Call Duration ................................................................................................................ 41
Telephone Equipment .................................................................................................. 41
Telephone Line Fault ................................................................................................... 41
Client program record ...................................................................................................... backpage
Provided for Download by www.bendigosecurity.com.au

Glossary
Access Code
-
A 3 to 6 digit number needed to disarm the Panel or silence the
siren when an alarm is occurring. It may be used to arm the Panel or exclude
zones as well. In a system split into areas, the access code may operate only one
area.
Arm
-
Set the Panel to detect an intruder. This operation must be performed
before you leave the premises.
Auto-Exclude
-
A zone may be excluded of it is unsecure at the end of exit time.
In this case it is reported by a sounding of a short burst on the siren instead of
giving the normal alarm for a zone. The state of this zone is also reported to the
Central Station.
Central Station
-
A remote monitoring centre which receives reports by
telephone from the Panel.
Disarm
-
Restore an armed Panel to normal operation or act on an alarm to
silence the siren.
Entry Delay-When
the Panel is armed, and you enter the premises in the normal
manner, the Panel does not report the intrusion immediately. This entry delay
gives you time to disarm the Panel and prevent an alarm occurring.
Exclusion
-
To disable a zone so that a faulty detector does not generate an alarm.
Inclusion of a zone enables it to alarm again. Other inputs may also be excluded.
Exit Time
-
When the Panel is armed, there is a delay before the premises are
made fully secure to allow normal locking up and departure to occur. This delay
is called the exit time.
Lockout
-
A zone or other input which has caused the siren to sound will
normally be prevented from re-starting the siren until the Panel is attended.
Medical Alarm Delay
-
The time allowed to lapse between Medical Button
presses before an alarm is generated.
Ifthe
delay is set to zero, then pressing the
Medical Button creates an alarm immediately.
Monitor Mode
-
The Panel is set to detect intruders in an unoccupied area within
the premises.
Plug Pack
-
A small power unit which plugs directly into a power point. It
converts mains supply to a safe low voltage supply.
Satellite
-
A box with a siren, battery and other alarm output devices which is
more secure than a siren alone.
Siren Reset Time
-
The maximum time the siren sounds continuously before
being switched off.
View
-
Examine the state of the Panel, zones and other inputs or the memory
which records the most recent Panel events.
Zone
-
An input which is connected to one or more detection devices to protect
an area such as the front door, corridor, windows etc. Detectors such as fire
detectors and panic buttons must be able to generate an alarm at all times and
are assigned to
24
hour zones.
PRO-U
User Manual
1
Provided for Download by www.bendigosecurity.com.au

INTRODUCTION
INTRODUCTION
2
NESS Security Products
INTRODUCTION
Congratulations on selecting the PRO-LX Control Panel which combines
advanced security features with ease of operation. This manual is
in tended to help you operate the PRO-LX and become familiar with its
significant security features. You may also find it a handy reference to
remember little-used features or understand incidental warnings or alarms.
This manual introduces you to the PRO-LX, describing its parts and the
features which are useful to people who operate it. The early chapters
contain “essential reading” for everyone.
The chapter, GETTING STARTED introduces you to the PRO-LX. It
explains what the system consists of and the controls you will use to
operate it, with a focus on the keypad.
There are then two chapters on what the PRO-LX does best, Detecting
INTRUDERS and REPORTINGEMERGENCIES. Finally, FEATURES
completes the “essential reading” section in which you will discover some
useful operations to assist in day-to-day running of the PRO-LX.
The next 3 chapters cover features that may not be relevant to all readers.
If your system is divided into separate security areas then AREA
OPERATION is appropriate. If you are responsible for who has access to
the premises then PROGRAMMING will be relevant. Finally, the chapter
DIALLER OPERATION is important if you are taking advantage of the
PRO-LX Dialler features.
The last chapter, CONFIGURATION, contains information about how
your PRO-LX has been set up and it is needed by service people
responsible for maintaining your system. Therefore it may be a good idea
to keep this manual in a safe place for future reference. You may also refer
to this part of the manual to find out what options describe in this manual
have been selected for your system.
Provided for Download by www.bendigosecurity.com.au

INTRODUCTION
Getting Started
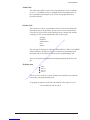
Your Security System
At the hub of your security system is a gray box with lots of wires running
into it. This is the PRO-LX Control Panel and it uses computer technology
to constantly monitor your property and provide advanced security fea-
tures. Only service personnel will need to touch the Panel.
What you will see and use is the PRO-LX
Keypad which is set up for you to control
the Control Panel and view indicators to
find out what is happening. In addition to
the keypad may be a key switch or other
controls such as push buttons. Your in-
staller will explain the function of all
such controls and you will also find them
mentioned in the next two chapters.
Various electrical devices are connected
to the Control Panel in order for it to
function. What these are and how they
are arranged is different for every instal-
lation. They will either input information
about intruders and emergencies or out-
put reports by making distinctive sounds
and visual warnings.
Output Devices
It is almost certain that a box with siren and strobe (flashing light) is placed
in some highly visible outside position. By being there it advertises that your
property is protected by a security system and it provides audible and visible
reports of important
alarms.
Sometimes large sites have one or more
satellite
sirens installed. These are self-contained units with their own security
features.
Input Devices
Various sensors are located at strategic locations around your property to
perform security monitoring, which may include detection of
movement
opening of windows and doors
shattering of glass
excess heat or smoke
and so on. These will be unobtrusive if not out of sight.
As well, your property will be divided into zones with each zone having
sensors installed in such a way that the area may be sealed (that is made totally
secure).
PRO-LX User Manual 3
Provided for Download by www.bendigosecurity.com.au

INTRODUCTION
The Control Panel
The Control Panel is normally powered from the mains using a plug pack,
(transformer which plugs directly into a power point). Inside the box is a
battery which is on stand-by in case of mains power failure. This arrange-
ment allows the Panel to operate continually and give warnings of mains
supply loss. You are also warned about the battery losing its charge.
The telephone
dialler,
if this option is used, is also placed inside the Panel.
By arrangement, it reports alarms to an organization you have chosen to
render assistance or investigate intrusion incidents. These reports go to a
communications
centre
which, in this manual, is called the Central
Station. More information may be found in the DIALLER chapter.
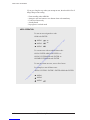
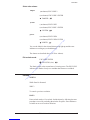
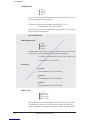
Keyp ad
The keypad provides an easy means to control
your security system and find out its state. The
keypad keys and indicators are shown here so
you will recognize them where they occur in
the manual.
The 3 most import ant questions about operating the PRO-LX
Control Panel are:
How do I arm the Panel?
How do I disarm the Panel?
What do I do when the siren sounds?
You may operate the Panel once you know the answer to these 3 questions.
But to get the best out of your security system you need to view alarms
and view memory. Other features such as exclusion and programming are
intended to be used occasionally but may be important in solving certain
problems such as dealing with a faulty sensor or remembering a forgotten
access code.
Provided for Download by www.bendigosecurity.com.au

INTRODUCTION
Keys
There are a total of
18
keys. Each key has basically one function which
is identified by a single label:
Digits1234567890
Enter access codes
select view, area, zone
etc
change program setting
Complete digit entry or
cancel current operation
Put system in high security mode prior to departure
Put only part of system in security mode
Exclude alarm (temporarilydisable it)
commence exclude selection
Change the way system is set up
Commencearea selection
Commence view selection
progress to next memory event
Emergency
PRO-LX User Manual
5
ENTER
ARM
AREA
VIEW
PANIC
MONITOR
EXCLUDE
PROGRAM
Provided for Download by www.bendigosecurity.com.au

INTRODUCTION
Audible indications (sounds)
Every
key press gets an audible response which helps to keep you
informed on your progress:
1
short
bip -
key press acknowledged
3
short bips - entry accepted
1
long bee-eep - entry invalid, try again
You may also hear warnings:
1
bip
every half second
entry onto property when Panel is armed
intrusion into Monitor area
low level alarm
1
bip
everysecond
Medical Alarm warning tone
Continuous
Bips
Power Problems
eg.
mains fail, low battery
6
NESS Security Products
Provided for Download by www.bendigosecurity.com.au

INTRODUCTION
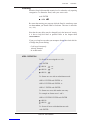
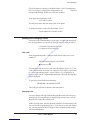
Visual Indications
There are 3 types of visual indicators:
zone
-
digit + green light
label
-
word back-illuminated by red light
status
-
red light + key
These allow quick recognition of alarms and Panel status indications.
Zone Indicators
1
TAMPER
These indicate the state of a group or alarms (zone, tamper, system,
power) . The lights show one of 3 states:
OFF no alarm
ON alarm warning (no report)
FLASHING -alarm reported
Label and Status Indicators
These are used to show what operations are in progress, the state of the
Panel and, in association with the zone indicators, the status of the inputs.
Summarized below are the various indications that are a unique feature
of the PRO-LX. You find them explained in greater detail in the following
chapters.
Generally, there are degrees of urgency conveyed by these indicators
depending on if and how they are illuminated:
OFF
-
nothing happening
ON -routine operation or warning
SLOW -important reminder of past event
FAST -alarm
These are the label indicators:
ZONE
Individual Zones being displayed
ZONE (fast)
Zone group alarm
TAMPER
Individual Tamper alarms being displayed
TAMPER (fast)
Tamper group alarm
PRO-LX User Manual
7
ARM
Provided for Download by www.bendigosecurity.com.au

INTRODUCTION
SYSTEM
Individual System alarms being displayed
SYSTEM (fast)
System group alarm
POWER
Individual Power alarms being displayed
POWER (fast)
Power group alarm
FIRE
Fire warning
FIRE (fast)
Fire alarm
MEMORY
View selection when VIEW key pressed
Memory mode indication while viewing memory
MEMORY (fast)
New alarm in memory
TEST
Automatic test procedure (option only)
AREA1
Area 1 armed
AREA1 (slow)
Area 1 monitor
AREA2
Area 2 armed
AREA2 (slow)
Area 2 monitor
AREA3
Area 3 armed
AREA3
ARM
ARM
(slow)
Area 3 monitor
The following status indicators turn on when the operation identified by
the adjacent key is active:
Panel disarmed
Panel armed
8
NESS Security Products
Provided for Download by www.bendigosecurity.com.au

INTRODUCTION
MONITOR (slow)
Panel in Monitor mode
EXCLUDE
Panel in Exclude mode
EXCLUDE (slow)
Zone or other alarm excluded
PROGRAM
Panel in Program Mode 1
PROGRAM (fast)
Panel in Program Mode 2 (Installation mode)
Operating the Panel
The most often-used features of the PRO-LX are provided with a variety
of ways to operate them to suit different situations. The possible altema-
tives are:
> one button
> two button
> code
> key switch
In most cases there are just 2 alternatives provided and you will only use
one as directed by the person who installed your system.
One Button
If you have a one button system, then most features are available to you
at a single key press.
Keys affected:
MONITOR
ARM
EXCLUDE
PANIC
VIEW
Press one key to make any selection. eg ARM to arm,
MONITOR to monitor, EXCLUDE to exclude, etc.
(This is the default system setting.)
Two button
A two button system requires you to press ENTER to make a selection.
eg ARM ENTER to arm, MONITOR ENTER to monitor, EXCLUDE
ENTER to exclude. The same keys are affected as in one button operation.
PRO-LX User Manual
9
Provided for Download by www.bendigosecurity.com.au

INTRODUCTION
Code
A code is a secret number which identifies who is trying to operate the
Panel. A code is entered as a 3 to 6 digit number followed by ENTER.
eg. 5463
ENTER
An access code is needed to disarm the Panel. You may select to arm the
PRO-LX with this codes as well. You may also select to enter exclude
mode by code only.
Keyswitch
If your system is not split into areas, you may elect to arm and disarm the
Panel by keyswitch. This is in addition to any other alternative.
Area Operation
You will notice boxes with the words
AREA OPERATION
above them.
You may safely disregard them if your system is
not
split into areas or
you are reading this manual for the first time. Area operation involves
slight variations to what is required to work a single system, so it is best
to use these boxes as a quick reference after reading the rest of the manual.
10
NESS Security Products
Provided for Download by www.bendigosecurity.com.au

DETECTING INTRUDERS
Zones
Intruders are sensed by a variety of special devices. These are checked
repeatedly by the Panel and are identified by which part of the property
they secure. We call this a
zone.
Not everyone detected in a zone is an intruder! It depends on whether that
zone is meant to be
unoccupied
at the time. Therefore, we need some
way to inform the Panel that we want zones to be secure.
In fact there are 3
levels of security
normally required of zones:
> Premises vacant, total security required. We
arm
the Panel to get
this level of security.
> Premises fully occupied, only emergency reporting required. We
disarm
the Panel in this case.
> Premises partially occupied, warnings of intrusions into certain
areas required. We put the Panel into
monitor mode
to provide
this level of security which is in between armed and disarmed.
The following sections explain how to arm, disarm, and monitor. They
describe what happens when there is a security breach.
Arming
When leaving the property, ensure all zones are sealed and then arm the
Panel as follows:
(one button)
(two button) ARM
ARM
ENTER
(code)
ARM code ENTER
(keyswitch) Insert key, turn and release
You now have a fixed time in which to leave. This is called the
exit delay.
If you are still within the area secured by the Panel at the end of this time,
then you will be treated as an intruder! If you discover that all zones are
not sealed or you have to go back to get something, then it is best to disarm
the Panel, attend to the problem, and then arm again.
Note that the exit delay may be changed. Refer to the chapter titled
PROGRAMMING.
PRO-LX User Manual
11
ARM
Provided for Download by www.bendigosecurity.com.au

DETECTING INTRUDERS
If you get a long bee-eep when you attempt to arm, then check this list of
things that prevent arming:
- Siren sounding when ARM hit
- Attempt to arm one button or two button when code mandatory
- Code keyed incorrectly
- Already armed
- In program or exclude mode
AREA OPERATION
To arm an area assigned to a code:
ARM code ENTER
To arm one area with an administrator code:
AREA1 ENTER ARM code ENTER -or-
-or-
-or-
AREA2 ENTER ARM code ENTER -or-
AREA3 ENTER ARM code ENTER
To arm more than one area., enter a list of areas.
For example, to arm all three areas:
AREA1 ENTER 2 ENTER 2 ENTER ARM code ENTER
12
NESS Security Products
AREA1
AREA1
AREA2
AREA2
AREA3
AREA3
3
Provided for Download by www.bendigosecurity.com.au

-or-
-or-
AREA1
AREA2
AREA2
AREA3
AREA3
DETECTING INTRUDERS
Disarming
When the Panel is disarmed the security level is reduced to only reporting
emergencies. To disarm the Panel, enter your access code:
code ENTER
Be aware that entering your property while the Panel is armed may cause
an alarm unless you disarm within a fixed time. This time is called the
entry delay.
Note that the entry delay may be changed, but in the interest of security
it is best to keep this short as practical. Refer to the chapter titled
PROGRAMMING.
If you get a long bee-eep when you attempt to disarm, then check this list
of things that prevent arming:
-
Code keyed incorrectly
-
Already disarmed
-
In exclude mode
AREA OPERATION
To disarm an area assigned to a code:
code ENTER
To disarm one area with an administrator code:
AREA 1 ENTER code ENTER
-or-
AREA 2 ENTER code ENTER
-or-
AREA 3 ENTER code ENTER
To disarm two areas, add another area entry.
For example to disarm areas 1 and 2:
AREA 1 ENTER 2 ENTER code ENTER
To disarm all areas with administrator code:
code ENTER
PRO-LX User Manual
13
ARM
Provided for Download by www.bendigosecurity.com.au

DETECTING INTRUDERS
Alarms
A zone that alarms while the Panel is armed may sound the siren, flash
the strobe light and report to the Central Station through the
dialler.
(These
details depend on how your system is equipped and set up, but some sort
of
urgent
report should be given.)
Any alarm should be reset as soon as possible. To reset an alarm, enter a
valid code:
code ENTER
At the same time, siren and strobe turn off and flashing zone indicators
change to off or steady.
Notice that to reset an alarm while Panel is armed also disarms the Panel
as explained in the previous section. Indeed, it is likely that you will not
know that an alarm has happened until you are about to disarm.
To quickly determine where the security breach has occurred during an
alarm, look for flashing indicators on the keypad. These stop flashing
upon reset, but don’t worry, you will get a better idea of what happened
by viewing memory. The
MEMORY
indicator flashes after reset as a
reminder. See
FEATURES
chapter for more details.
Note that the siren will sound for no longer than a set time (the
Siren Reset
Time
which is shown in the
CONFIGURATION
chapter).
14
NESS Security Products
MEMORY (fast)
Provided for Download by www.bendigosecurity.com.au

DETECTING INTRUDERS
Monitor Mode
Use Monitor Mode to guard an unattended part of the property while
occupying the rest. Your system may be programmed so that have the
choice of arming two different monitor areas (dual monitor mode),
otherwise there is only one monitor area (single
monitor mode).
Single Monitor Mode:
Ensure all zones in the monitor area are sealed and then partially arm the
Panel as follows:
(one button) MONITOR
(two button) MONITOR ENTER
(code) MONITOR code ENTER
Dual Monitor Mode:
Ensure all zones in the monitor area are sealed and then partially arm the
Panel as follows:
(one button)
MONITOR 2
MONITOR 1
-or-
(two button) MONITOR 1 ENTER
-or-
-or-
MONITOR 2 ENTER
There is now a fixed time for anyone in the monitor area to leave. This is
the same exit delay as occurs upon full arming.
If, when you attempt to arm, you get a long bee-eep, then check this list
of things that prevent arming:
-
Siren sounding when MONITOR hit
-
Attempt to arm one button or two button when code mandatory
-
Code keyed incorrectly
-
Already armed
-
In program or exclude mode
A zone that alarms while the Panel is in monitor mode may sound the
keypad(s) with a beep every half second. This will continue for a time
equal to the entry delay. If the alarm is not reset within this time, then the
siren will sound for a 2 second burst. (These details depend on how your
PRO-LX User Manual
15
MONITOR (slow)
AREA1 (slow)
AREA2 (slow)
Provided for Download by www.bendigosecurity.com.au

DETECTING INTRUDERS
system is equipped and set up, but some
sort
of
non-urgent
report should
be given.)
Note that pressing any keypad key will silence the beeping, but only
successfully resetting the alarm will prevent the siren burst.
AREA OPERATION
To put an area assigned to a code into monitor mode:
MONITOR code ENTER
To put one area into monitor mode with an administrator code:
AREA 1 ENTER MONITOR code ENTER
-or-
AREA 2 ENTER MONITOR code ENTER -or-
AREA 3 ENTER MONITOR code ENTER
To put more than one area into monitor mode, enter a
list of areas.
For example, to put all three areas into monitor mode:
AREA 1 ENTER 2 ENTER 3 ENTER
MONITOR code ENTER
16
NESS Security
Products
AREA1
AREA1
AREA2
AREA2
AREA3
AREA3
(slow)
(slow)
(slow)
(slow)
(slow)
(slow)
-or-
-or-
Provided for Download by www.bendigosecurity.com.au

DETECTING INTRUDERS
Warnings Given While Armed
1. Entry Beeps (optional)
2.
Zones
Unsealed Warning (optional)
Your system may be programmed to give a reminder upon entry to your
property that the Panel is armed. This consists of a beep every half second
until a key is pressed.
Another option determines how any unsecured zones are treated upon
arming the Panel. At end of exit delay these zones will either
-
a. alarm
b. give a warning and
auto exclude
(refer glossary)
For full arming, the warning a is a
2-second
siren burst, while for monitor
mode, the keypad(s) beep for 2 seconds.
3. Battery Low
The battery in the Panel is tested when ARM key pressed. This may, if
the battery is low, result in POWER indicator lighting up. See
FEATURES
chapter on how to view this alarm.
PRO-LX User Manual
17
Provided for Download by www.bendigosecurity.com.au
Strona się ładuje...
Strona się ładuje...
Strona się ładuje...
Strona się ładuje...
Strona się ładuje...
Strona się ładuje...
Strona się ładuje...
Strona się ładuje...
Strona się ładuje...
Strona się ładuje...
Strona się ładuje...
Strona się ładuje...
Strona się ładuje...
Strona się ładuje...
Strona się ładuje...
Strona się ładuje...
Strona się ładuje...
Strona się ładuje...
Strona się ładuje...
Strona się ładuje...
Strona się ładuje...
Strona się ładuje...
Strona się ładuje...
Strona się ładuje...
Strona się ładuje...
-
 1
1
-
 2
2
-
 3
3
-
 4
4
-
 5
5
-
 6
6
-
 7
7
-
 8
8
-
 9
9
-
 10
10
-
 11
11
-
 12
12
-
 13
13
-
 14
14
-
 15
15
-
 16
16
-
 17
17
-
 18
18
-
 19
19
-
 20
20
-
 21
21
-
 22
22
-
 23
23
-
 24
24
-
 25
25
-
 26
26
-
 27
27
-
 28
28
-
 29
29
-
 30
30
-
 31
31
-
 32
32
-
 33
33
-
 34
34
-
 35
35
-
 36
36
-
 37
37
-
 38
38
-
 39
39
-
 40
40
-
 41
41
-
 42
42
-
 43
43
-
 44
44
-
 45
45


w innych językach
- English: Ness pro-lx User manual
Inne dokumenty
-
Audiovox Prestige APS-15KB Instrukcja obsługi
-
-
PNI HS650 Instrukcja obsługi
-
-
-
Eldes EPIR Instrukcja obsługi
-
Risco lightsys RP432KPP Instrukcja obsługi
-
-
-
Costway HW50956 Instrukcja obsługi