
SQT0818
Operating Instructions
Bedienungsanleitung
Mode d’emploi/Istruzioni per l’uso
Instrucciones de funcionamiento
Gebruiksaanwijzing/Bruksanvisning
Betjeningsvejledning
Návod k obsluze/Instrukcja obsługi
Kezelési útmutató/Návod na obsluhu
Инструкция по эксплуатации
使⽤说明书
使用說明書
사용 설명서
Digital Wireless Stereo Headphones
Digitale drahtlose Stereo-Kopfhörer
Casque d’écoute stéréo sans fil numérique
Cuffie stereo senza fili digitali
Cascos auriculares estéreo inalámbricos digitales
Digitale draadloze stereo-hoofdtelefoon
Digitala trådlösa stereohörlurar
Digital trådløse stereo hovedtelefoner
Digitální bezdrátová stereofonní sluchátka
Bezprzewodowe cyfrowe słuchawki nagłowne stereo
Digitális vezeték nélküli sztereó fejhallgató
Digitálne bezdrôtové stereo slúchadlá
Цифровые беспроводные стереонаушники
数码⽆线⽴体声头戴式⽿机
數碼無線立體聲頭戴式耳機
무선 스테레오 헤드폰
Model No. RP-BTD5
E
ENGLISH
DEUTSCH
FRANÇAIS
ITALIANO
ESPAÑOL
NEDERLANDS
SVENSKA
DANSK
ČESKY
POLSKI
MAGYAR
SLOVENSKY
РУССКИЙ ЯЗЫК
中⽂(简体)
中文(繁體)
EU
Manufactured by:
Panasonic Corporation
Kadoma, Osaka, Japan
Importer for Europe:
Panasonic Marketing Europe GmbH
Panasonic Testing Centre
Winsbergring 15, 22525 Hamburg, Germany
한국어

SQT0818
2
2
6 7 8
9
10
11 12
2
1
3
4
5
Please check and identify the supplied
accessories.
1 USB charging cord
For the United Kingdom and Ireland
customers
Sales and Support Information
Customer Communications Centre
• For customers within the U.K.:
0844 844 3899
• For customers within Ireland:
01289 8333
• Monday - Friday 9:00am - 5:00pm
(Excluding public holidays).
• For further support on your product,
please visit our website:
www.panasonic.co.uk
Direct Sales at Panasonic U.K.
• Order accessory and consumable
items for your product with ease and
confidence by phoning our Customer
Communications Centre -
Monday - Friday 9:00am - 5:00pm
(Excluding public holidays).
• Or go on line through our Internet
Accessory ordering application at
www.pas-europe.com
• Most major credit and debit cards
accepted.
• All enquiries transactions and
distribution facilities are provided
directly by Panasonic U.K.
• It couldn’t be simpler!
• Also available through our Internet is
direct shopping for a wide range of
finished products. Take a browse on
our website for further details.
Table of
contents
Part names
Before use
Accessories ........................................ 2
Part names ......................................... 2
Preparation
Charging ............................................. 3
Turning the power on/off ..................... 3
Connecting a Bluetooth
®
device ......... 3
One-Touch Connection
(Connecting by NFC) ..................... 4
Operation
Listening to music ............................... 4
Making a phone call............................ 5
Useful functions .................................. 5
Other
Restoring to the factory settings ......... 5
Safety precautions .............................. 6
Maintenance ....................................... 6
About Bluetooth
®
................................ 7
Specifications ..................................... 7
Troubleshooting guide ........................ 8
Copyright, etc. .................................... 9
To remove the battery when
disposing of this unit ....................... 9
Limited Warranty
(ONLY FOR AUSTRALIA)
... Back cover
Dear customer
Thank you for purchasing this product.
Please read these instructions carefully
before using this product, and save this
manual for future use.
Accessories
The product illustrations may differ from
the actual product.
1
LED indicator light*
• The number of blinks or colour
notifies the status of the unit.
(* hereafter referred to as
“LED”)
2
Power / Pairing button
3
Charging terminal (DC IN)
• Connect the USB charging
cord (supplied) to this terminal
when charging. (→ P. 3)
4
Microphone
5
NFC touch area
6
Previous
7
Volume +
8
Next
9
Volume –
10
Play/Pause/Call
11
Left speaker
12
Right speaker
■
Note
• Do not use any other USB
charging cords except the
supplied one.
• When using the unit, do not cover
the right speaker with the palm
of your hand. The Bluetooth
®
connection may be blocked.
Left Right
Bottom

SQT0818
3
3
ENGLISH
The rechargeable battery (installed in the unit) is not charged initially. Charge
the battery before using the unit.
1
Connect this unit to a computer
using the USB charging cord
• Within approximately 3 seconds after
the connection is established, the LED
on the right speaker will light in red.
• The LED lights in red when charging
is in progress. When charging is
completed, the LED will go out.
• Charging will take approximately
3.5 hours from empty state to fully
charged.
Right
Computer
LED
USB charging cord (supplied)
■
Note
• The Bluetooth
®
feature cannot be used when this unit is connected to a computer
using the USB charging cord.
• Charge in a room temperature between 10 °C and 35 °C. Outside of this range
of temperatures, charging may stop.
• The power cannot be turned on while charging.
• Do not use any other USB charging cords except the supplied one.
Caution: Use only the supplied USB charging cord when connecting to a
computer.
Charging
To establish a wireless connection, register the unit with Bluetooth
®
compatible
devices.
Preparation on the Bluetooth
®
device
• Turn on the power, and enable the Bluetooth
®
feature.
• Place the device within 1 m from the unit.
• Check the device operation in its operation instructions, as required.
Power on for the first time
1
Turn on the unit
• The unit will start searching for
the Bluetooth
®
device to connect
to, and the LED on the right
speaker will blink in blue and red
alternately. (Only one operation
after purchase)
2
When the unit (“RP-BTD5”)
is detected by the Bluetooth
®
device, select it
• If prompted for a passkey, input
“0000 (four zeros)”.
• If the Bluetooth
®
profile selection
screen appears, select the
“A2DP” profile. If “A2DP” is not
supported or if you want to just
use phone calls, select the “HSP”
or “HFP” profile. (For details on
profiles, see “Listening to music”
(→ P. 4) and “Making a phone
call” (→ P. 5))
3
Check the connection with
the Bluetooth
®
device on the
unit
• First the LED on the right
speaker lights in blue and
repeats on and off. When the
connection is established,
blinking pattern will change.
Connection after the second
time
<Connect the same Bluetooth
®
device>
When the unit is turned on, it will
search for the previously setup
Bluetooth
®
device and automatically
start connecting to it. First the LED
on the right speaker lights in blue
and repeats on and off. When the
connection is established, blinking
pattern will change.
<Connect a different Bluetooth
®
device>
Disable the Bluetooth
®
feature on
the previously connected device.
Check that the unit is turned off. Press
and hold the pairing
button for
approximately 5 seconds. A beep will
sound. The unit will start searching for
other Bluetooth
®
device. The LED on
the right speaker will blink in blue and
red alternately.
Continue steps 2 and 3.
Connecting a Bluetooth
®
device
■
Note
• If connection to a device is not
established within approximately
5 minutes, the unit will be turned off.
Start from step 1 again.
• 2 or more Bluetooth
®
devices cannot
be connected to the unit at the same
time.
• You can pair up to 8 devices with
this unit. If a 9th device is paired, the
device with the oldest connection will
be replaced. To use it, pair it again.
1
Press and hold the power button for
approximately 3 seconds
• A beep will sound and the LED on the right speaker
will blink.
Power button
LED
To turn the power off
• Press and hold the power
button for approximately 3 seconds. A beep will
sound and the power will be turned off.
■
Note
• When the unit is not operated for approximately 5 minutes, the power will
automatically turn off. (See “Auto power off” (→ P. 5))
Turning the power on/off

SQT0818
4
4
For NFC-compatible devices only
The NFC (Near Field Communication) feature allows this unit to connect easily to
an NFC-compatible Bluetooth
®
device. Just touch this unit with your Bluetooth
®
device to automatically turn on this unit, pair the Bluetooth
®
device, and establish a
connection.
Preparation
Turn on the NFC feature of the Bluetooth
®
device.
1
Start the application to play music/video on the Bluetooth
®
device
• Follow on-screen instructions on your device.
2
Touch and hold your device on the NFC touch area of this
unit (until a pop-up window on your device indicates that the
connection is established)
• The unit is turned on. First the LED on the right speaker lights in blue and
repeats on and off. When the connection is established, blinking pattern will
change.
• If the connection is not established, change the position to touch.
3
Start playing music/video on your Bluetooth
®
device
■
Connecting to another device
Touch this unit with another device to establish a new Bluetooth
®
connection.
The previously connected device will be automatically disconnected.
Listening to music
If the Bluetooth
®
compatible device supports the “A2DP” and “AVRCP” Bluetooth
®
profiles, music can be played back with remote control operations on the unit.
• A2DP (Advanced Audio Distribution Profile): Transmits audio to the unit.
• AVRCP (Audio/Video Remote Control Profile):
Allows remote control of the device using the unit.
1
Connect the Bluetooth
®
device and the unit (→ P. 3)
2
Select and play the music on the Bluetooth
®
device
• The selected music is output to the speakers of the unit.
One-Touch Connection (Connecting by NFC)
Operating time of battery
Battery type Operating time
Rechargeable battery (installed in the unit) Approx. 40 hours
Operating time may be less depending on the operating conditions.
■
Attention
• The unit might leak sound depending on the volume level.
• When the volume is increased to near maximum level, music may sound
distorted. Decrease the volume until the distortion is cleared.
Remote controlling
You can control the Bluetooth
®
device using the unit.
• Depending on Bluetooth
®
devices, some functions below do not work, or work
differently via operation of the unit.
(Operation example)
Play/Pause/Call
Press Play/Pause/Call
Previous/Next
Press during
playback
Return to the
start of current
track
Press and hold Rewind
Press during
playback
Forward to the
start of next track
Press and hold Fast forward
Volume
+
Press
Increase the
volume
Press and hold
Increase
the volume
continuously
−
Press
Decrease the
volume
Press and hold
Decrease
the volume
continuously
Volume +
Volume –
Previous
Next
Play/Pause/Call
Right
■
Note
• The volume can be adjusted in
15 levels.
When the maximum or minimum
volume is reached, a beep will
sound.

SQT0818
5
5
ENGLISH
With Bluetooth
®
enabled phones (cell phones or smartphones) that support the
“HSP” or “HFP” Bluetooth
®
profile, you can use the unit for phone calls.
• HSP (Headset Profile):
This profile can be used to receive monaural sounds and establish two-way
communication using the microphone on the unit.
• HFP (Hands-Free Profile):
In addition to the HSP functions, this profile has the incoming and outgoing calls
function.
1
Connect the Bluetooth
®
enabled phone and unit (→ P. 3)
2
When answering an incoming call
Press Call on the unit
and answer the call
• During an incoming call,
ringtone will sound from the
speaker and the LED will blink.
•(HFP only) To reject the
incoming call, press and hold
Call
until the ringtone stops.
Right
Call
When making an outgoing call
Make an outgoing call on
the Bluetooth
®
enabled
phone
• Also refer to the operating
manual for the Bluetooth
®
enabled phone.
(Checking and operation steps on the
unit are explained below)
• During an outgoing call, ringtone
will sound from the speaker and
the LED will blink.
• To cancel the outgoing call,
press Call
.
A beep will sound.
•(HFP only) When the phone is
idle, press and hold Call
for
approximately 5 seconds. An
outgoing call will be made to the
last dialed number. One short
click will sound from the speaker
and the LED will blink.
3
Start talking
• The LED will repeatedly blink 2 times during a call.
• The volume can be adjusted during a phone call. For setting instructions, see
page 4.
4
Press Call to end the phone call
• A beep will sound.
Making a phone call
■
Note
• There may be instances when hands free setting needs to be done on the
Bluetooth
®
enabled phone.
• Depending on the Bluetooth
®
enabled phone, you may hear incoming and
outgoing call ringtones of the phone from the unit.
•(HFP only) Press and hold the Call
on the unit for approximately 5 seconds.
The calling device will be switched between the Bluetooth
®
enabled phone and
the unit.
Useful functions
Resetting the unit
This unit can be reset when all operations are rejected. To reset the unit, connect
the unit to a computer using the USB charging cord. All the previous operations will
be cancelled. (The pairing device information will not be deleted.)
Auto power off
If the unit is silent for approximately 5 minutes and operations for Bluetooth
®
devices are idle during that period, a beep will sound and the power will be
automatically turned off.
LED indicator light
When the battery level is low during use of the unit, the blue blinking LED on the
right speaker will change to red*. A beep will sound every 1 minute. When the
battery runs out, the power will turn off.
* If you press and hold the pairing
button when the battery level is low, the LED
will blink only in red.
Restoring to the factory settings
When you want to delete all pairing device information, etc., you can restore the
unit to the factory settings (original settings upon purchase). Charge the battery
before restoring the unit.
1 Turn off the unit
2 Press and hold the power
button and Previous for 5 seconds or
more simultaneously
• The LED first blinks in blue, then lights in red. The unit will restore to the
factory settings.

SQT0818
6
6
Safety precautions
■
Unit
• Avoid using or placing this unit near sources of heat.
• Do not listen with this unit at high volume in places where you need to hear
sounds from the surrounding environment for safety, such as at railroad
crossings, and construction sites.
• Wide band characteristic voltage equal or larger than 75 mV.
WARNING:
To reduce the risk of fire, electric shock or product damage,
• Do not expose this unit to rain, moisture, dripping or splashing.
• Do not place objects filled with liquids, such as vases, on this unit.
• Use only the recommended accessories.
• Do not remove covers.
• Do not repair this unit by yourself. Refer servicing to qualified service
personnel.
■
Allergies
• Discontinue use if you experience discomfort with the speakers or any other
parts that directly contact your skin.
• Continued use may cause rashes or other allergic reactions.
■
Precautions for listening with the Headphones
• Do not use your headphones at a high volume. Hearing experts advise against
continuous extended play.
• If you experience a ringing in your ears, reduce volume or discontinue use.
• Do not use while operating a motorised vehicle. It may create a traffic hazard
and is illegal in many areas.
• You should use extreme caution or temporarily discontinue use in potentially
hazardous situations.
This unit may receive radio interference caused by mobile telephones during use.
If such interference occurs, please increase separation between this unit and the
mobile telephone.
Maintenance
Clean this unit with a dry and soft cloth.
• Do not use solvents including benzine, thinner, alcohol, kitchen detergent, a
chemical wiper, etc. This might cause the exterior case to be deformed or the
coating to come off.
Declaration of Conformity (DoC)
Hereby, “Panasonic Corporation” declares that this product is in compliance with
the essential requirements and other relevant provisions of Directive 1999/5/EC.
Customers can download a copy of the original DoC to our R&TTE products from
our DoC server:
http://www.doc.panasonic.de
Contact to Authorised Representative: Panasonic Marketing Europe GmbH,
Panasonic Testing Centre, Winsbergring 15, 22525 Hamburg, Germany
This product is intended to be used in the following countries.
The UK, FRANCE, GERMANY, ITALY, SWITZERLAND, AUSTRIA,
NETHERLANDS, BELGIUM, SPAIN, SWEDEN, NORWAY, DENMARK, FINLAND,
HUNGARY, CZECH REPUBLIC, SLOVAKIA, SLOVENIA, BULGARIA, POLAND,
GREECE, PORTUGAL, ROMANIA
This product is intended for general consumer. (Category 3)
Complies with
IDA Standards
DB01017

SQT0818
7
7
ENGLISH
Panasonic bears no responsibility for data and/or information that is
compromised during a wireless transmission.
■
Frequency band used
This unit uses the 2.4 GHz frequency band.
■
Certification of this unit
• This unit conforms to frequency restrictions and has received certification
based on frequency laws. Thus, a wireless permit is not necessary.
• The actions below are punishable by law in some countries:
– Taking apart/modifying the unit.
– Removing specification indications.
■
Restrictions of use
• Wireless transmission and/or usage with all Bluetooth
®
equipped devices is
not guaranteed.
• All devices must conform to standards set by Bluetooth SIG, Inc.
• Depending on the specifications and settings of a device, it can fail to connect
or some operations can be different.
• This system supports Bluetooth
®
security features. But depending on the
operating environment and/or settings, this security may not be sufficient.
Transmit data wirelessly to this system with caution.
• This system cannot transmit data to a Bluetooth
®
device.
■
Range of use
Use this unit at a maximum range of 10 m.
The range can decrease depending on the environment, obstacles or
interference.
■
Interference from other devices
• This unit may not function properly and troubles such as noise and sound
jumps may arise due to radio wave interference if this unit is located too close
to other Bluetooth
®
devices or the devices that use the 2.4 GHz band.
• This unit may not function properly if radio waves from a nearby broadcasting
station, etc. is too strong.
■
Intended usage
• This unit is for normal, general use only.
• Do not use this system near an equipment or in an environment that is
sensitive to radio frequency interference (example: airports, hospitals,
laboratories, etc).
About Bluetooth
®
■
General
Power supply
DC 5 V, 500 mA
(Internal battery : 3.6 V (Li-ion 690 mAh))
Operating time*
1
(SBC mode) Approx. 40 hours
Charging time*
2
(25 ºC) Approx. 3.5 hours
Charging temperature range 10 ºC to 35 ºC
Operating temperature range 0 ºC to 40 ºC
Operating humidity range 35%RH to 80%RH (no condensation)
Mass Approx. 155 g
*
1
It may be shorter depending on the operating conditions.
*
2
Time taken to recharge from empty to full.
■
Bluetooth
®
section
Bluetooth
®
system specification Ver. 3.0
Wireless equipment classification Class 2 (2.5 mW)
Frequency band 2.4 GHz band FH-SS
Supported profiles A2DP, AVRCP, HSP, HFP
Supported codec SBC
Operating distance Up to 10 m
■
Speaker section
Driver units Φ 40 mm
Impedance 32 Ω
■
Terminal section
DC IN DC 5 V, 500 mA
■
Microphone section
Type Mono
■
Accessory section
USB charging cord 0.6 m
●
Specifications are subject to change without notice.
Specifications

SQT0818
8
8
Before requesting service, make the following checks. If you are in doubt about
some of the check points, or if the remedies indicated do not solve the problem,
consult your dealer for instructions.
General
The unit does not respond
• Connect the unit to a computer using the USB charging cord. The unit will be
reset. (→ P. 5)
Power supply and charging
Cannot charge the unit
• Make sure the computer is turned on and is not on standby or sleep mode.
• Is the USB port you are currently using working properly? If your computer has
other USB ports, unplug the connector from its current port and plug it into one of
the other ports.
• If the measures mentioned above are not applicable, unplug the USB charging
cord and plug it in again.
• If the charge time and operating time become shortened, the battery may have
run down. (Number of charging times of the installed battery: Approximately
500.)
LED does not light during charging / Charging takes longer
• Is the USB charging cord (supplied) connected firmly to the USB terminal of the
computer? (→ P. 3)
• Make sure to charge in a room temperature between 10 °C and 35 °C.
The power does not turn on
• Is the unit being charged? The power cannot be turned ON during charging.
(→ P. 3)
Troubleshooting guide
Bluetooth
®
device connection
The device cannot be connected
• Delete the pairing information for this unit from the Bluetooth
®
device, then pair
them again. (→ P. 3)
Sound and audio volume
No sound
•
Make sure that the unit and the Bluetooth
®
device are connected correctly. (→ P. 3)
• Check if music is playing on the Bluetooth
®
device.
• Make sure that the unit is turned on and the volume is not set too low.
• Pair and connect the Bluetooth
®
device and the unit again. (→ P. 3)
Low volume
• Increase the volume of the unit. (→ P. 4)
• Increase the volume on the Bluetooth
®
device.
Sound from the device is cut off / Sound quality is bad
• Sound may be disrupted if signals are blocked. Do not fully cover this unit with
the palm of your hand, etc.
• The device may be out of the 10 m communication range. Move the device
closer to this unit.
• Remove any obstacle between this unit and the device.
• Switch off any wireless LAN device when not in use.
• A communication problem may arise if the battery is not fully charged. Charge
the unit. (→ P. 3)
Phone Calls
You cannot hear the other person
• Make sure that the unit and the Bluetooth
®
enabled phone are turned on.
• Check if the unit and the Bluetooth
®
enabled phone are connected. (→ P. 3)
• Check the audio settings of the Bluetooth
®
enabled phone. Switch the calling
device to the unit if it is set to the Bluetooth
®
enabled phone. (→ P. 3)
• If the volume of the other person’s voice is too low, increase the volume of both
the unit and the Bluetooth
®
enabled phone.

SQT0818
9
9
ENGLISH
●
The Bluetooth
®
word mark and logos are
registered trademarks owned by Bluetooth
SIG, Inc. and any use of such marks by
Panasonic Corporation is under license.
Other trademarks and trade names are those
of their respective owners.
●
Other system names and product names
appearing in this document are in general the
registered trademarks or trademarks of the
respective developer companies.
Note that the ™ mark and ® mark do not
appear in this document.
Copyright, etc.
To remove the battery when disposing of this unit
The following instructions are not intended for
repairing purposes but for the disposal of this unit.
This unit is not restorable once disassembled.
When disposing of this unit, take out the battery installed
in this unit and recycle it.
• Disassemble after the battery runs out.
• Keep disassembled parts out of reach of children.
1
Turn the earpads
A
upward, and place the unit
on a flat surface
2
Hold the bottom of the right speaker (R), and
put a cross-slot screwdriver (commercially
available) under the upper cover
B
• Make sure to keep fingers away from the tip of the
screwdriver.
• Select a screwdriver to be large enough for a space under
the upper cover.
3
Use the screwdriver for leverage, and push the
upper cover
B
upward
4
Remove the upper cover
B
5
Remove the 4 screws, and remove the lower
cover
C
6
Hold the battery
D
, and remove it
Regarding the handling of used batteries
• Insulate the terminals with adhesive tape or similar material.
• Do not disassemble.
■
Batteries
• Do not heat or expose to flame.
• Do not leave the battery(ies) in a car exposed to direct
sunlight for a long period of time with doors and windows
closed.
• Battery mishandling can cause electrolyte leakage which
can damage items the leaked fluid comes into contact
with. If electrolyte leaks from the battery, consult your
dealer. Wash thoroughly with water if electrolyte comes in
contact with any part of your body.
• When disposing of the batteries, please contact your local
authorities or dealer and ask for the correct method of
disposal.
Disposal of Old Equipment and Batteries
Only for European Union and countries
with recycling systems
These symbols on the products,
packaging, and/or accompanying
documents mean that used
electrical and electronic products
and batteries must not be mixed
with general household waste.
For proper treatment, recovery and
recycling of old products and used
batteries, please take them to applicable
collection points in accordance with your
national legislation.
By disposing of them correctly, you will
help to save valuable resources and
prevent any potential negative effects
on human health and the environment.
For more information about
collection and recycling, please
contact your local municipality.
Penalties may be applicable for
incorrect disposal of this waste, in
accordance with national legislation.
Note for the battery symbol
(bottom symbol):
This symbol might be used in
combination with a chemical
symbol. In this case it complies
with the requirement set by the
Directive for the chemical involved.
1
3
R
A
B
B
L
2
4
6
B
C
D
5

SQT0818
10
2
6 7 8
9
10
11 12
2
1
3
4
5
Bitte überprüfen Sie das gelieferte
Zubehör auf Vollständigkeit.
1 USB-Ladekabel
Inhaltsverzeichnis
Teilebezeichnungen
Vor der Benutzung
Zubehör .............................................. 2
Copyright usw. .................................... 2
Teilebezeichnungen ............................ 2
Vorbereitung
Aufladen ............................................. 3
Ein- und ausschalten .......................... 3
Ein Bluetooth
®
-Gerät verbinden .......... 3
One-Touch-Verbindung
(Verbindung per NFC) .................... 4
Betrieb
Musik hören ........................................ 4
Telefonieren ........................................ 5
Praktische Funktionen ........................ 5
Andere
Wiederherstellen der
Werkseinstellungen ........................ 5
Sicherheitshinweise ............................ 6
Wartung .............................................. 6
Über Bluetooth
®
.................................. 7
Technische Daten ............................... 7
Anleitung zur Fehlersuche .................. 8
Zur Entsorgung des Geräts sollte
der Akku entfernt werden ............... 9
Sehr geehrter Kunde
Wir danken Ihnen, dass Sie sich
für dieses Produkt unseres Hauses
entschieden haben.
Bitte lesen Sie diese Anleitung vor
der Inbetriebnahme dieses Produkts
aufmerksam durch, und bewahren
Sie dieses Handbuch für spätere
Bezugnahme griffbereit auf.
Zubehör
Die Abbildungen können vom realen
Aussehen des Produkts abweichen.
Links Rechts
Unterseite
1
LED-Anzeige*
•
Der Status des Kopfhörers wird
signalisiert durch die Farbe der
LED und die Anzahl ihres Blinkens.
(* nachfolgend als „LED“ bezeichnet)
2
Ein/Aus / Koppeln -Taste
3
Lade-Anschluss (DC IN)
• Zum Aufladen das
USB-Ladekabel (gelieferte)
hier anschließen. (→ S. 3)
4
Mikrofon
5
NFC-Touch-Bereich
6
Zurück
7
Lautstärke +
8
Weiter
9
Lautstärke –
10
Wiedergabe/Pause/Anruf
11
Linker Kopflautsprecher
12
Rechter Kopflautsprecher
■
Hinweis
• Zum Aufladen ausschließlich das
zum Lieferumfang gehörende
USB-Ladekabel verwenden.
• Bei Benutzung des Kopfhörers
darauf achten, dass der rechte
Kopflautsprecher nicht durch Ihre
Handfläche abgedeckt wird. Die
Bluetooth
®
-Verbindung könnte
blockiert werden.
●
Die Bluetooth
®
-Wortmarke
und -Logos sind eingetragene
Markenzeichen von Bluetooth
SIG, Inc. und jede Verwendung
dieser Marken durch Panasonic
Corporation erfolgt unter Lizenz.
Andere Warenzeichen und
Handelsnamen sind Eigentum der
jeweiligen Inhaber.
●
Bei allen anderen in diesem
Dokument erwähnten System- und
Produktbezeichnungen handelt
es sich generell um eingetragene
Marken bzw. Marken der
betreffenden Unternehmen.
Die Symbole ™ und
®
werden in
diesem Dokument nicht verwendet.
Copyright
usw.

SQT0818
11
3
DEUTSCH
Zu Anfang ist der (im Kopfhörer installierte) Akku nicht aufgeladen. Laden
Sie erst den Akku auf, bevor Sie das Gerät in Betrieb nehmen.
1
Schließen Sie diesen Kopfhörer
mit dem USB-Ladekabel an einen
Computer an
•
Innerhalb von etwa 3 Sekunden nach dem
Herstellen der Verbindung leuchtet die
LED am rechten Kopflautsprecher in Rot.
• Während des Aufladens leuchtet die
LED in Rot. Sobald der Akku aufgeladen
ist, erlischt die LED.
•
Es dauert ungefähr 3,5 Stunden, um
einen leeren Akku vollständig aufzuladen.
Rechts
Computer
LED
USB-Ladekabel (gelieferte)
■
Hinweis
• Solange dieses Gerät mit dem USB-Ladekabel an einem Computer
angeschlossen ist, kann die Bluetooth
®
-Funktion nicht benutzt werden.
• Das Aufladen sollte bei einer Raumtemperatur zwischen 10 °C und 35 °C
erfolgen. Außerhalb dieses Temperaturbereiches wird das Aufladen
möglicherweise angehalten.
• Während des Aufladens kann das Gerät nicht eingeschaltet werden.
• Zum Aufladen ausschließlich das zum Lieferumfang gehörende USB-Ladekabel
verwenden.
Vorsicht: Zum Anschließen an einen Computer nur das zum Lieferumfang
gehörende USB-Ladekabel verwenden.
Aufladen
Um eine drahtlose Verbindung herzustellen, müssen Sie den Kopfhörer beim
entsprechenden Bluetooth
®
-kompatiblen Gerät registrieren.
Vorbereitung beim Bluetooth
®
-Gerät
• Das Gerät einschalten und die Bluetooth
®
-Funktion aktivieren.
• Das Gerät so platzieren, dass es maximal 1 m Abstand vom Kopfhörer hat.
•
Bei Bedarf den Betrieb des Geräts anhand von dessen Betriebsanleitung überprüfen.
Erstmalige Inbetriebnahme
1
Den Kopfhörer einschalten
•
Der Kopfhörer beginnt, nach dem
Bluetooth
®
-Gerät zu suchen, zu
dem die Verbindung hergestellt
werden soll. Dabei blinkt die LED
auf dem rechten Kopflautsprecher
abwechselnd in Blau und Rot. (Nach
dem Kauf nur ein Mal durchzuführen)
2
Wenn das Bluetooth
®
-Gerät
den Kopfhörer („RP-BTD5“)
erkennt, diesen auswählen
• Wenn Sie aufgefordert werden,
einen Hauptschlüssel (Passkey)
einzugeben, geben Sie „0000
(vier Nullen)“ ein.
•
Wenn das Fenster zur Auswahl
des Bluetooth
®
-Profils angezeigt
wird, wählen Sie das Profil „A2DP“.
Falls „A2DP“ nicht unterstützt wird,
oder falls Sie den Kopfhörer nur
für Telefongespräche benutzen
wollen, wählen Sie das Profil
„HSP“ oder „HFP“. (Für weitere
Informationen über Profile siehe
„Musik hören“ (→ S. 4) und
„Telefonieren“ (→ S. 5))
3
Beim Kopfhörer die
Verbindung zum Bluetooth
®
-
Gerät überprüfen
•
Zuerst leuchtet die LED auf dem
rechten Kopflautsprecher in Blau
und schaltet sich wiederholt ein und
aus. Ist die Verbindung hergestellt,
wechselt das Blinkmuster.
Verbindung ab dem zweiten Mal
<Mit demselben Bluetooth
®
-Gerät verbinden>
Nach Einschalten des Kopfhörers sucht
dieser nach dem zuvor eingerichteten
Bluetooth
®
-Gerät und stellt dann
automatisch die Verbindung zu ihm her.
Zuerst leuchtet die LED auf dem rechten
Kopflautsprecher in Blau und schaltet sich
wiederholt ein und aus. Ist die Verbindung
hergestellt, wechselt das Blinkmuster.
<Mit einem anderen Bluetooth
®
-Gerät verbinden>
Die Bluetooth
®
-Funktion bei dem Gerät
deaktivieren, zu dem zuvor die Verbindung
hergestellt worden ist. Überprüfen, dass
dieses Gerät ausgeschaltet ist. Dann für
ungefähr 5 Sekunden die Koppeln
-Taste
gedrückt halten. Ein akustisches Signal
wird ausgegeben. Der Kopfhörer beginnt,
nach einem anderen Bluetooth
®
-Gerät zu
suchen. Dabei blinkt die LED auf dem rechten
Kopflautsprecher abwechselnd in Blau und Rot.
Fahren Sie fort mit Schritt 2 und 3.
Ein Bluetooth
®
-Gerät verbinden
■
Hinweis
•
Wird innerhalb ungefähr 5 Minuten keine
Verbindung zu einem Gerät hergestellt,
schaltet sich der Kopfhörer aus.
Beginnen Sie erneut ab Schritt 1.
•
Es kann nur ein einziges Bluetooth
®
-Gerät
verbunden werden, nicht mehrere gleichzeitig.
•
Sie können den Kopfhörer mit bis zu
8 Geräten koppeln. Wird ein 9. Gerät
angekoppelt, werden die
Kopplungsinformationen zu dem Gerät,
zu dem eine Verbindungsherstellung am
längsten zurückliegt, ersetzt. Um es dennoch
zu benutzen, müssen Sie es erneut koppeln.
1
Ungefähr 3 Sekunden lang die
Ein/Aus -Taste gedrückt halten
• Es wird ein Signalton ausgegeben, und die LED auf
dem rechten Kopflautsprecher blinkt.
Ein/Aus -Taste
LED
Ausschalten
• Ungefähr 3 Sekunden lang die Ein/Aus
-Taste gedrückt halten. Es wird ein
Signalton ausgegeben, und das Gerät wird ausgeschaltet.
■
Hinweis
• Wird das Gerät ungefähr 5 Minuten lang nicht bedient oder betrieben, schaltet es
sich automatisch aus. (Siehe „Automatisches Ausschalten“ (→ S. 5))
Ein- und ausschalten

SQT0818
12
4
Nur bei NFC-kompatiblen Geräten
Über die NFC-Funktion (NFC - Near Field Communication) ist es möglich, den Kopfhörer
auf einfache Weise mit einem NFC-kompatiblen Bluetooth
®
-Gerät zu verbinden. Einfach
den Kopfhörer mit dem Bluetooth
®
-Gerät berühren, dann wird der Kopfhörer eingeschaltet,
mit dem Bluetooth
®
-Gerät gekoppelt und es wird die Verbindung hergestellt.
Vorbereitung
Schalten Sie beim Bluetooth
®
-Gerät die NFC-Funktion ein.
1
Beim Bluetooth
®
-Gerät die entsprechende Anwendung starten,
so dass es Musik/Video wiedergibt
• Folgen Sie den Anweisungen auf dem Bildschirm des Geräts.
2
Den Kopfhörer mit dem NFC-Touch-Bereich so halten, dass er
das andere Gerät berührt (und so lange halten, bis beim Gerät
durch ein Popup-Fenster angezeigt wird, dass die Verbindung
hergestellt ist)
• Der Kopfhörer wird eingeschaltet. Zuerst leuchtet die LED auf dem rechten
Kopflautsprecher in Blau und schaltet sich wiederholt ein und aus. Ist die
Verbindung hergestellt, wechselt das Blinkmuster.
• Falls keine Verbindung aufgebaut wird, wählen Sie eine andere Stelle zum
Berühren.
3
Beim Bluetooth
®
-Gerät die Musik / das Video abspielen
■
Mit einem anderen Gerät verbinden
Berühren Sie mit dem Kopfhörer das andere Gerät, um eine Bluetooth
®
-Verbindung
zu ihm herzustellen.
Das zuvor verbundene Gerät wird automatisch getrennt.
Musik hören
Wenn das Bluetooth
®
-kompatible Gerät die Bluetooth
®
-Profile „A2DP“ und
„AVRCP“ unterstützt, können Sie das Gerät mit dem Kopfhörer bei der Wiedergabe
fernbedienen.
• A2DP (Advanced Audio Distribution Profile):
Überträgt Audiosignale zum Kopfhörer.
• AVRCP (Audio/Video Remote Control Profile):
Ermöglicht, das Gerät per Kopfhörer fernzubedienen.
1
Das Bluetooth
®
-Gerät und den Kopfhörer verbinden (→ S. 3)
2
Beim Bluetooth
®
-Gerät die gewünschte Musik auswählen und
wiedergeben
• Die ausgewählte Musik wird über den Kopfhörer wiedergegeben.
One-Touch-Verbindung
(Verbindung per NFC)
Akku-Betriebsdauer
Batterie-Typ Betriebsdauer
Akku (wiederaufladbare Batterie) (im Gerät installiert) Ungefähr 40 Stunden
Je nach Betriebsbedingungen kann die Betriebsdauer kürzer sein.
■
Vorsicht
• Je nach Lautstärke kann das Gerät Töne nach außen abstrahlen.
• Wird die Lautstärke sehr hoch oder auf Maximum gestellt, ist es möglich,
dass der Ton verzerrt klingt. Stellen Sie dann die Lautstärke leiser, bis keine
Verzerrungen mehr zu hören sind.
Fernbedienung
Sie können das Bluetooth
®
-Gerät mit dem Kopfhörer fernbedienen.
• Je nach Bluetooth
®
-Gerät ist es möglich, dass bei Bedienschritten am Kopfhörer
einige der unten angegebenen Funktionen nicht arbeiten oder anders reagieren.
(Fernbedienungs-Beispiel)
Wiedergabe/Pause/Anruf
Drücken
Wiedergabe/
Pause/Anruf
Zurück/Weiter
Während der
Wiedergabe
drücken
Kehrt zu Beginn
des derzeitigen
Titels zurück
Gedrückt halten
Schneller
Rücklauf
Während der
Wiedergabe
drücken
Springt zum
Beginn des
nächsten Titels
Gedrückt halten Schneller Vorlauf
Lautstärke
+
Drücken Lauter
Gedrückt halten
Zunehmend
lauter stellen
−
Drücken Leiser
Gedrückt halten
Zunehmend
leiser stellen
Lautstärke +
Lautstärke –
Zurück
Weiter
Wiedergabe/
Pause/Anruf
Rechts
■
Hinweis
• Zur Einstellung der Lautstärke
gibt es 15 Stufen.
Wird das Maximum oder
das Minimum der Lautstärke
erreicht, wird ein Signalton
ausgegeben.

SQT0818
13
5
DEUTSCH
Zusammen mit einem Bluetooth
®
-fähigen Telefon (Mobiltelefon oder Smartphone),
das das Bluetooth
®
-Profil „HSP“ oder „HFP“ unterstützt, können Sie den Kopfhörer
zum Telefonieren benutzen.
• HSP (Headset Profile):
Dieses Profil kann zum einohrigen Hören und zum Einrichten einer Zweiweg-
Kommunikation mithilfe des im Gerät integrierten Mikrofons benutzt werden.
• HFP (Hands-Free Profile):
Zusätzlich zur HSP-Funktion verfügt dieses Profil über die Funktion für
eingehende und ausgehende Anrufe.
1
Das Bluetooth
®
-fähige Telefon und den Kopfhörer verbinden (→ S. 3)
2
Einen eingehenden Anruf annehmen
Auf dem Kopfhörer auf
Anruf
drücken und den
Anruf annehmen
• Bei der Signalisierung eines
eingehenden Anrufs wird
über die Kopflautsprecher
das Klingeln ausgegeben und
zusätzlich blinkt die LED.
•
(Nur bei HFP) Wollen Sie einen
eingehenden Anruf zurückweisen,
die Taste Anruf
gedrückt
halten, bis das Klingeln verstummt.
Rechts
Anruf
Einen ausgehenden Anruf durchführen
Mit dem Bluetooth
®
-fähigen
Telefon eine Gegenstelle
anrufen
• Informationen dazu finden Sie
in der Betriebsanleitung zum
Bluetooth
®
-fähigen Telefon.
(Wie ein Gespräch beendet wird und weitere
Bedienschritte werden unten erläutert)
•
Während der ausgehende Anruf
signalisiert wird, wird über die
Kopflautsprecher der Rufton
ausgegeben und zusätzlich blinkt
die LED.
•
Wollen Sie den ausgehende Anruf
beenden, auf Anruf
drücken.
Ein akustisches Signal wird
ausgegeben.
•
(Nur bei HFP) Wenn das Telefon
nicht belegt ist, die Taste Anruf
ungefähr 5 Sekunden lang gedrückt
halten. Die zuletzt angewählte
Rufnummer wird erneut angerufen.
Über die Kopflautsprecher wird ein
kurzes Klickgeräusch ausgegeben,
und zusätzlich blinkt die LED.
3
Sprechen Sie
• Während eines Telefonats blinkt die LED wiederholt 2 Mal.
• Während eines Telefonats kann die Lautstärke geändert werden.
Informationen zur Durchführung von Einstellungen siehe Seite 4.
4
Um das Telefonat zu beenden, auf Anruf drücken
• Ein akustisches Signal wird ausgegeben.
Telefonieren
■
Hinweis
• Gegebenenfalls muss beim benutzten Bluetooth
®
-fähigen Telefon
Freisprechbetrieb eingeschaltet werden.
• Je nach Bluetooth
®
-fähigen Telefon kann es sein, dass die akustische
Signalisierung eines eingehenden oder ausgehenden Anrufs beim Telefon über
den Kopfhörer ausgegeben wird.
• (Nur bei HFP) Auf dem Gerät ungefähr 5 Sekunden lang auf Anruf
drücken.
Das zum Telefonieren benutzte Gerät wechselt zwischen Bluetooth
®
-fähigen
Telefon und dem Gerät.
Praktische Funktionen
Kopfhörer zurücksetzen
Falls der Kopfhörer auf Bedienschritte nicht mehr reagiert, kann er zurückgesetzt
werden. Um das Gerät zurückzusetzen, schließen Sie es mit dem USB-
Ladekabel an einen Computer an. Alle zuvor ausgeführten Bedienschritte werden
aufgehoben. (Die Daten zum Koppeln von Geräten werden nicht gelöscht.)
Automatisches Ausschalten
Wenn der Kopfhörer ungefähr 5 Minuten keinen Ton überträgt und wenn während
dieser Zeit beim Bluetooth
®
-Gerät keine Bedienschritte ausgeführt werden, schaltet
sich der Kopfhörer nach Ausgabe eines Signaltons automatisch aus.
LED-Anzeige
Wenn während des Betriebs des Kopfhörers die Ladung des Akkus zur Neige geht,
wechselt die blau blinkende LED auf dem rechten Kopflautsprecher die Farbe und
wird rot*. Nach jeweils 1 Minute wird ein akustisches Signal ausgegeben. Wenn
der Akku vollständig leer ist, schaltet sich das Gerät aus.
* Wenn Sie bei niedrigem Akkuladestand die Kopplungstaste
gedrückt halten,
blinkt die LED nur in Rot.
Wiederherstellen der Werkseinstellungen
Wollen Sie alle Daten zu gekoppelten Geräten usw. löschen, können Sie den
Kopfhörer auf die Werkseinstellungen zurücksetzen (die Einstellungen, wie sie
vor dem Kauf bestanden haben). Laden Sie den Akku auf, bevor Sie das Gerät
zurücksetzen.
1 Den Kopfhörer einschalten
2 Mindestens 5 Sekunden lang die Ein/Aus
-Taste und die Zurück -Taste
zusammen gedrückt halten
• Die LED blinkt zunächst in Blau und leuchtet dann in Rot. Der Kopfhörer wird
auf die Werkseinstellungen zurückgesetzt.

SQT0818
14
6
Sicherheitshinweise
■
Kopfhörer
• Das Gerät nicht in der Nähe von Heiz- oder Wärmequellen ablegen.
• Die Lautstärke des Geräts nicht zu hoch stellen, wenn Sie aus
Sicherheitsgründen Geräusche und Töne aus der äußeren Umgebung hören
sollten, z. B. bei Eisenbahnübergängen und auf Baustellen.
• Breitband-Spannungseigenschaften gleich oder höher als 75 mV.
WARNUNG:
Um Brand- oder Stromschlaggefahr und Beschädigungen am Produkt zu
vermeiden, sollten folgende Regeln beachtet werden:
• Das Gerät nicht Regen oder Feuchtigkeit aussetzen, auch nicht in tropfender
oder spritzend Form.
• Kein mit Flüssigkeit gefülltes Gefäß wie z. B. eine Vase auf das Gerät setzen.
• Verwenden Sie nur empfohlenes Zubehör.
• Abdeckungen und Gehäuseteile nicht entfernen.
• Das Gerät nicht selber reparieren. Reparatur-und Instandsetzungsarbeiten
dürfen nur von dazu qualifiziertem und befugtem Personal durchgeführt
werden.
■
Allergien
• Falls Sie bemerken, dass der direkte Hautkontakt durch die Kopflautsprecher
oder durch andere Teile Ihnen nicht gut tut, dann sollten Sie das Gerät nicht
länger benutzen.
• Bei Weiterbenutzung drohen sonst Hautausschlag oder andere allergische
Reaktionen.
■
Sicherheitshinweise zur Benutzung von Kopfhörern
• Kopfhörer nur mit gemäßigter Lautstärke verwenden. Experten warnen vor zu
langem und ununterbrochenem Hören per Kopfhörer.
• Wenn Sie ein Klingeln im Ohr vernehmen, die Lautstärke reduzieren oder den
Gebrauch einstellen.
• Nicht in einem Kraftfahrzeug verwenden, wenn Sie am Steuer sitzen. Das
könnte eine Gefahr im Straßenverkehr sein und ist in vielen Gebieten
gesetzlich verboten.
• In möglicherweise gefährlichen Situationen sollten Sie äußerst vorsichtig sein
oder vorübergehend die Nutzung unterbrechen.
Bei Gebrauch kann das Gerät gegebenenfalls Funkstörungen ausgesetzt sein,
die durch Mobiltelefone verursacht werden. Falls solche Störungen auftreten,
vergrößern Sie den Abstand zwischen dem Gerät und dem Mobiltelefon.
Wartung
Zum Reinigen des Geräts ein sauberes und weiches Tuch verwenden.
• Keine Lösungsmittel wie Benzin, Verdünner, Alkohol, Küchen-Reinigungsmittel,
einen mit Chemikalien getränkten Abstreifer usw. benutzen. Sonst könnte das
Äußere des Gehäuses deformiert werden, oder die Beschichtung könnte sich
lösen.
Konformitätserklärung
Hiermit erklärt Panasonic Corporation, dass dieses Gerät alle Grundanforderungen
und sonstigen relevanten Aufl agen der Direktive 1999/5/EC erfüllt.
Kunden können eine Kopie des Originals der Konformitätserklärung unserer
R&TTE-Produkte von der folgenden Webseite herunterladen:
http://www.doc.panasonic.de
Kontaktadresse: Panasonic Marketing Europe GmbH, Panasonic Testing Centre,
Winsbergring 15, 22525 Hamburg, Bundesrepublik Deutschland
Dieses Gerät ist ausschließlich für den Gebrauch in den folgenden Ländern
vorgesehen:
Großbritannien, Frankreich, Deutschland, Italien, Schweiz, Österreich,
Niederlande, Belgien, Spanien, Schweden, Norwegen, Dänemark, Finnland,
Ungarn, Tschechische Republik, Slowakien, Slowenien, Bulgarien, Polen,
Griechenland, Portugal, Rumänien
Dieses Produkt ist für allgemeine Verbraucher bestimmt (Kategorie 3).

SQT0818
15
7
DEUTSCH
Panasonic ist nicht verantwortlich zu machen, wenn bei einer drahtlosen
Übertragung Daten und/oder Informationen beeinträchtigt werden.
■
Verwendetes Frequenzband
Diese Gerät benutzt das 2,4 GHz-Frequenzband.
■
Zertifizierung dieses Geräts
• Dieses Gerät erfüllt die auferlegten Frequenzbeschränkungen und ist auf
Grundlage der entsprechenden Gesetze entsprechend zertifiziert. Darum ist
die Erteilung einer Funkerlaubnis nicht erforderlich.
• In einigen Ländern sind Handlungen, wie sie unten beschrieben sind,
gesetzlich verboten und können bestraft werden:
– Das Gerät auseinandernehmen/modifizieren.
– Das Etikett mit den Spezifikationen entfernen.
■
Nutzungseinschränkungen
• Die reibungslose drahtlose Übertragung zu oder von Bluetooth
®
-fähigen
Geräten und/oder deren Nutzung kann nicht in jedem Fall garantiert werden.
• Alle Geräte müssen den Standards entsprechen, die von Bluetooth SIG, Inc.
festgelegt sind.
•
Je nach Spezifikationen oder Einstellungen eines Gerätes kann möglicherweise keine
Verbindung hergestellt werden, oder einige Betriebsvorgänge unterscheiden sich.
• Dieses Gerät unterstützt Bluetooth
®
-Sicherheitsfunktionen. Aber je nach
Betriebsumgebung und/oder Einstellungen reichen diese
Sicherheitsfunktionen möglicherweise nicht aus. Seien Sie vorsichtig, wenn
Sie Daten drahtlos zu diesem System übertragen.
• Dieses System kann keine Daten zu einem Bluetooth
®
-Gerät übertragen.
■
Einsatzbereich
Verbindungen können nur im Umkreis von maximal 10 m hergestellt und aufrecht
erhalten werden.
Je nach Umgebung, Hindernissen oder Interferenzen kann der Bereich auch
kleiner sein.
■
Interferenzen durch andere Geräte
• Wird dieses Gerät in zu großer Nähe zu anderen Bluetooth
®
-Geräten oder
Geräten betrieben, die das 2,4 GHz-Frequenzband benutzen, kann es sein,
dass aufgrund von Funkwellen-Interferenzen, die durch diese Geräte
hervorgerufen werden, das Gerät nicht ordnungsgemäß arbeitet und dass
Störungen wie Störgeräusche oder Tonsprünge auftreten.
•
Dieses Gerät funktioniert möglicherweise nicht ordnungsgemäß, wenn die von einer
in der Nähe befindlichen Sendestation ausgestrahlten Funkwellen zu stark sind.
■
Bestimmungsgemäßer Gebrauch
• Dieses Gerät ist nur für den normalen, allgemeinen Einsatz.
• Benutzen Sie dieses Gerät nicht in der Nähe von Geräten oder in
Umgebungen, die auf Funkwellen-Interferenzen empfindlich regieren (zum
Beispiel in Flughäfen, in Hospitälern, in Forschungsstätten usw.)
Über Bluetooth
®
■
Allgemein
Stromversorgung
5 V DC, 500 mA
(Interner Akku: 3,6 V (Li-ion 690 mAh))
Betriebsdauer*
1
(SBC-Modus) Ungefähr 40 Stunden
Aufladezeit*
2
(25 ºC) Ungefähr 3,5 Stunden
Temperaturbereich bei Aufladen 10 ºC bis 35 ºC
Temperaturbereich bei Betrieb 0 ºC bis 40 ºC
Luftfeuchtigkeit bei Betrieb 35%RH bis 80%RH (nicht kondensierend)
Masse Ungefähr 155 g
*
1
Je nach Betriebsbedingungen kann die Betriebsdauer kürzer sein.
*
2
Erforderliche Zeit für das Aufladen von Leer zu Voll.
■
Bluetooth
®
Bluetooth
®
-Systemspezifikationen Version 3.0
Klassifizierung des Funkgeräts Klasse 2 (2,5 mW)
Verwendetes Frequenzband 2,4 GHz-Band FH-SS
Unterstützte Profile A2DP, AVRCP, HSP, HFP
Unterstützter Codec SBC
Betriebsdistanz Bis zu 10 m
■
Kopflautsprecher
Treiber-Einheiten Φ 40 mm
Impedanz 32 Ω
■
Anschlüsse
DC EINGANG 5 V DC, 500 mA
■
Mikrofon
Typ Mono
■
Zubehör
USB-Ladekabel 0,6 m
●
Technische Daten können ohne vorherige Ankündigung jederzeit geändert
werden.
Technische Daten

SQT0818
16
8
Bevor Sie den Kundendienst in Anspruch nehmen, prüfen Sie erst folgende Punkte.
Falls Sie sich bei einigen Punkten nicht sicher sind oder falls die vorgeschlagenen
Maßnahmen das Problem nicht lösen, fragen Sie Ihren Fachhändler.
Allgemein
Das Gerät reagiert nicht
• Schließen Sie das Gerät mit dem USB-Ladekabel an einen Computer an. Das
Gerät wird zurückgesetzt. (→ S. 5)
Stromversorgung und Aufladen
Das Gerät kann nicht aufgeladen werden
• Achten Sie darauf, dass der angeschlossene PC eingeschaltet ist und dass er
sich nicht im Standbymodus oder im Energiesparmodus befindet.
• Funktioniert der USB-Anschluss, den Sie derzeit benutzen? Falls Ihr PC weitere
USB-Anschlüsse hat, schließen Sie das Kabel an einen anderen USB-Anschluss
an.
• Falls diese Maßnahmen das Problem nicht lösen, ziehen Sie das
USB-Ladekabel vom Gerät ab und schließen Sie es dann wieder an.
• Falls die Aufladezeit und die Betriebsdauer kürzer werden, ist der Akku
möglicherweise zu abgenutzt. (Anzahl der Ladezyklen des eingebauten Akkus:
Ungefähr 500.)
Beim Aufladen leuchtet die LED nicht / Das Aufladen dauert länger
• Ist das (gelieferte) USB-Ladekabel fest am USB-Anschluss des Computers
angeschlossen? (→ S. 3)
• Stellen Sie sicher, dass der Akku bei einer Raumtemperatur zwischen 10 °C und
35 °C aufgeladen wird.
Das Gerät lässt sich nicht einschalten
• Ist das Gerät aufgeladen? Während des Aufladens kann das Gerät nicht
eingeschaltet werden. (→ S. 3)
Anleitung zur Fehlersuche
Bluetooth
®
-Gerät verbinden
Zum Gerät kann keine Verbindung hergestellt werden
• Löschen Sie beim Bluetooth
®
-Gerät die Kopplungsinformationen zu diesem
Gerät und versuchen Sie es dann noch einmal. (→ S. 3)
Ton und Audio-Lautstärke
Kein Ton
• Vergewissern Sie sich, dass dieses Gerät und das Bluetooth
®
-Gerät
ordnungsgemäß verbunden sind. (→ S. 3)
• Überzeugen Sie sich, dass auf dem Bluetooth
®
-Gerät Musik wiedergegeben
wird.
• Überzeugen Sie sich, dass das Gerät eingeschaltet ist und die Lautstärke nicht
zu leise gestellt ist.
• Koppeln Sie noch einmal das Bluetooth
®
-Gerät und den Kopfhörer und stellen
Sie die Verbindung her. (→ S. 3)
Leise
• Stellen Sie das Gerät lauter. (→ S. 4)
• Stellen Sie die Lautstärke des Bluetooth
®
-Geräts lauter.
Aussetzer im Ton vom Gerät / Schlechte Tonqualität
• Werden Signale blockiert, können Aussetzer im Ton auftreten. Achten Sie darauf,
dass Sie das Gerät nicht mit Ihrer Handfläche usw. abdecken.
• Möglicherweise ist das Gerät weiter als 10 m entfernt. Bringen Sie die Geräte
näher zusammen.
• Beseitigen Sie Hindernisse, die sich zwischen den beiden Geräten befinden.
• Schalten Sie WLAN-Geräte aus, wenn sie nicht benutzt werden.
• Wenn der Akku erschöpft ist, kann es zu Übertragungsproblemen kommen.
Laden Sie das Gerät neu auf. (→ S. 3)
Telefonieren
Sie können die andere Person nicht hören
• Vergewissern Sie sich, dass dieses Gerät und das Bluetooth
®
-fähige Telefon
eingeschaltet sind.
• Vergewissern Sie sich, dass dieses Gerät und das Bluetooth
®
-fähige Telefon
miteinander verbunden sind. (→ S. 3)
• Überprüfen Sie die Audio-Einstellungen beim Bluetooth
®
-fähigen Telefon.
Schalten Sie das zum Telefonieren benutzte Gerät auf den Kopfhörer, falls es auf
das Bluetooth
®
-fähige Telefon geschaltet ist. (→ S. 3)
• Wenn Sie die Stimme der anderen Person zu leise vernehmen, dann stellen Sie
sowohl beim Kopfhörer aus auch beim Bluetooth
®
-fähigen Telefon die Lautstärke
lauter.

SQT0818
17
9
DEUTSCH
Zur Entsorgung des Geräts sollte der Akku entfernt werden
Die folgenden Instruktionen dienen nicht
Reparaturzwecken, sondern der Entsorgung des
Geräts. Ist dieses Gerät auseinandergenommen
worden, kann es nicht wieder zusammengebaut werden.
Wenn Sie das Gerät entsorgen wollen, entfernen Sie
den darin installierten Akku und führen Sie ihn der
Wiederverwertung zu.
• Falls der Akku ausläuft, sollten Sie ihn herausnehmen.
• Demontierte Teile außerhalb der Reichweite von Kindern
aufbewahren.
1
Drehen Sie die Ohrkissen
A
nach oben und
legen Sie das Gerät auf eine flache Oberfläche
2
Halten Sie die Unterseite des rechten
Kopflautsprechers (R) fest und schieben Sie einen
(handelsüblichen) Kreuzschlitzschraubendreher
unter die obere Abdeckung
B
• Halten Sie Ihre Finger von der Spitze des
Schraubendrehers fern.
• Wählen Sie einen Schraubendreher, der groß genug für
den Bereich unter der oberen Abdeckung ist.
3
Verwenden Sie den Schraubendreher als Hebel und
drücken Sie die obere Abdeckung
B
nach oben
4
Nehmen Sie die obere Abdeckung
B
ab
5
Entfernen Sie die 4 Schrauben und nehmen Sie
die untere Abdeckung
C
ab
6
Halten Sie den Akku
D
fest und nehmen Sie ihn
heraus
Beachten Sie die Vorschriften zum Umgang mit
verbrauchten Akkus/Batterien
• Isolieren Sie die Anschlüsse mit Klebeband oder einem
ähnlichen Material.
• Nicht auseinandernehmen.
■
Akkus und Batterien
• Nicht Hitze oder offenem Feuer aussetzen.
• Batterien nicht für längere Zeit im Auto lassen, wenn
dieses direkter Sonnenbestrahlung ausgesetzt ist und
Türen und Fenster geschlossen sind.
•
Falscher Umgang mit Batterien kann dazu führen, dass die
Elektrolyt-Flüssigkeit ausläuft und Gegenstände beschädigt
werden, die mit dieser Flüssigkeit in Berührung kommen.
Falls eine Batterie ausläuft, fragen Sie Ihren Fachhändler,
was zu tun ist. Falls Elektrolyt-Flüssigkeit mit einem Körperteil
in Berührung kommt, diesen mit Wasser gründlich waschen.
• Informieren Sie sich bei den zuständigen Stellen vor
Ort oder bei Ihrem Fachhändler darüber, wie Batterien
vorschriftsmäßig entsorgt werden.
Entsorgung von Altgeräten und Batterien
Nur für die Europäische Union und
Länder mit Recyclingsystemen
Dieses Symbol, auf den
Produkten, der Verpackung und/
oder den Begleitdokumenten,
bedeutet, dass gebrauchte
elektrische und elektronische
Produkte sowie Batterien nicht
in den allgemeinen Hausmüll
gegeben werden dürfen.
Bitte führen Sie alte Produkte
und verbrauchte Batterien zur
Behandlung, Aufarbeitung bzw.
zum Recycling gemäß den
gesetzlichen Bestimmungen den
zuständigen Sammelpunkten zu.
Indem Sie diese Produkte und
Batterien ordnungsgemäß
entsorgen, helfen Sie dabei,
wertvolle Ressourcen zu
schützen und eventuelle
negative Auswirkungen auf die
menschliche Gesundheit und die
Umwelt zu vermeiden.
Für mehr Informationen
zu Sammlung und
Recycling, wenden Sie
sich bitte an Ihren örtlichen
Abfallentsorgungsdienstleister.
Gemäß Landesvorschriften
können wegen nicht
ordnungsgemäßer Entsorgung
dieses Abfalls Strafgelder
verhängt werden.
Hinweis für das Batteriesymbol
(Symbol unten):
Dieses Symbol kann in
Kombination mit einem
chemischen Symbol abgebildet
sein. In diesem Fall erfolgt
dieses auf Grund der
Anforderungen derjenigen
Richtlinien, die für die
betreffende Chemikalie erlassen
wurden.
1
3
R
A
B
B
L
2
4
6
B
C
D
5

SQT0818
18
2
6 7 8
9
10
11 12
2
1
3
4
5
Veuillez vérifier et identifier les
accessoires fournis.
1 Cordon de chargement USB
Table des
matières
Noms des pièces
Avant utilisation
Accessoires ........................................ 2
Droits d’auteur, etc.............................. 2
Noms des pièces ................................ 2
Préparation
Chargement ........................................ 3
Mettre sur marche/arrêt ...................... 3
Connexion d’un dispositif
Bluetooth
®
...................................... 3
Connexion une touche
(connexion par NFC) ...................... 4
Fonctionnement
Écouter de la musique ........................ 4
Passer un appel téléphonique ............ 5
Fonctions utiles................................... 5
Autre
Réinitialisation aux réglages
d’usine ............................................ 5
Précautions de sécurité ...................... 6
Entretien ............................................. 6
À propos du Bluetooth
®
...................... 7
Spécifications ..................................... 7
Guide de dépannage .......................... 8
Pour retirer la batterie lors de la
mise aux rebuts de cet appareil ..... 9
Cher client
Merci d’avoir porté votre choix sur cet
appareil.
Veuillez lire attentivement les
présentes instructions avant d’utiliser
ce produit, et conserver ce manuel
pour utilisation ultérieure.
Accessoires
Les illustrations du produit peuvent différer
du produit actuel.
1
Voyant LED*
• Le nombre de clignotements
ou la couleur indique l’état de
l’appareil.
(* ci-après appelé « voyant LED »)
2
Bouton Interrupteur /
Couplage
3
Borne de chargement
(DC IN)
• Branchez le cordon de
chargement USB (fourni)
à cette borne lors du
chargement. (→ P. 3)
4
Microphone
5
Zone tactile NFC
6
Précédent
7
Volume +
8
Suivant
9
Volume –
10
Lecture/Pause/Appel
11
Écouteur gauche
12
Écouteur droit
■
Note
• N’utilisez pas d’autres cordons de
chargement USB que celui fourni.
• Lorsque vous utilisez l’appareil,
ne couvrez pas l’écouteur droite
avec la paume de la main.
Ceci peut gêner la connexion
Bluetooth
®
.
Gauche Droite
Bas
●
Le nom de la marque Bluetooth
®
ainsi que les logos sont des marques
déposées appartenant à Bluetooth
SIG, Inc. et toute utilisation de ces
marques par Panasonic Corporation
est effectuée sous licence.
Les autres marques et noms
commerciaux appartiennent à leurs
propriétaires respectifs.
●
En règle générale, les autres
noms de systèmes et de produits
mentionnés dans ce document sont
des marques, déposées ou non, de
leurs développeurs respectifs.
Noter que les symboles ™ et
® n’apparaissent pas dans ce
document.
Droits
d’auteur, etc.

SQT0818
19
3
FRANÇAIS
La batterie rechargeable (installée dans l’appareil) est fournie déchargée.
Chargez la batterie avant d’utiliser l’appareil.
1
Connectez cet appareil à un
ordinateur en utilisant le cordon
de chargement USB
• Environ 3 secondes après le lancement
de la connexion, le voyant LED du haut-
parleur droit s’allume en rouge.
• Le voyant LED s’allume en rouge
pendant le chargement. Une fois le
chargement terminé, le voyant LED
s’éteint.
• Le chargement complet prend environ
3,5 heures une batterie complètement
déchargée.
Droite
Ordinateur
Voyant
LED
Cordon de chargement USB
(fourni)
■
Note
• La fonctionnalité Bluetooth
®
ne peut pas être utilisée lorsque cet appareil est
connecté à un ordinateur au moyen du cordon de chargement USB.
• Effectuez le rechargement dans une pièce dont la température est comprise
entre 10 °C et 35 °C. En dehors de cette plage de températures, le chargement
peut s’interrompre.
• Vous ne pouvez pas mettre l’appareil en marche pendant le chargement.
• N’utilisez pas d’autres cordons de chargement USB que celui fourni.
Attention : Utilisez uniquement le cordon de chargement USB fourni pour la
connexion à un ordinateur.
Chargement
Pour établir une connexion sans fil, enregistrez l’appareil à l’aide de dispositifs
Bluetooth
®
compatibles.
Préparation sur le dispositif Bluetooth
®
• Mettez en marche et activez la fonctionnalité Bluetooth
®
.
• Placez le dispositif dans un rayon d’un mètre de l’appareil.
•
Contrôlez le fonctionnement du dispositif en consultant son mode d’emploi, le cas échéant.
Première mise en marche
1
Mettez l’appareil en marche
• L’appareil commence à
rechercher le dispositif
Bluetooth
®
auquel se connecter
et le voyant LED sur l’écouteur
droite clignote alternativement en
bleu et en rouge. (Première mise
en marche depuis l’achat)
2
Lorsque l’appareil
(« RP-BTD5 ») est détecté
par le dispositif Bluetooth
®
,
sélectionnez-le
• Si vous êtes invité à entrer une
clé de connexion, entrez « 0000
(quatre zéros) ».
•
Si l’écran de sélection du profil
Bluetooth
®
s’affiche, sélectionnez
le profil « A2DP ». Si « A2DP »
n’est pas pris en charge ou
si vous souhaitez seulement
passer des appels téléphoniques,
sélectionnez le profil « HSP » ou
« HFP ». (Pour en savoir plus sur
les profils, voir « Écouter de la
musique » (→ P. 4) et « Passer
un appel téléphonique » (→ P. 5))
3
Contrôlez la connexion avec
le dispositif Bluetooth
®
sur
l’appareil
• Le voyant LED sur l’écouteur
droite commence par s’allumer
en bleu, puis s’allume et s’éteint.
Une fois la connexion établie, le
clignotement change.
Connexion après la seconde fois
<Connexion du même dispositif Bluetooth
®
>
Une fois l’appareil mis en marche, il
recherchera le dispositif Bluetooth
®
précédemment configuré et lancera
automatiquement la connexion à ce
dernier. Le voyant LED sur l’écouteur
droite commence par s’allumer en bleu,
puis s’allume et s’éteint. Une fois la
connexion établie, le clignotement change.
<Connexion d’un dispositif
Bluetooth
®
différent>
Désactivez la fonctionnalité Bluetooth
®
sur le dispositif précédemment connecté.
Vérifiez que l’appareil est éteint. Appuyez et
maintenez enfoncé le bouton de couplage
pendant environ cinq secondes. Un signal
sonore retentit. L’appareil commence à
rechercher d’autres dispositifs Bluetooth
®
.
Le voyant LED sur l’écouteur droite clignote
alternativement en bleu et en rouge.
Poursuivez avec les étapes 2 et 3.
Connexion d’un dispositif Bluetooth
®
■
Note
• Si une connexion à un dispositif
n’est pas établie dans un délai de
cinq minutes, l’appareil s’éteint.
Recommencez à partir de l’étape 1.
• Vous ne pouvez pas connecter en
même temps plusieurs dispositifs
Bluetooth
®
à l’appareil.
• Vous pouvez associer jusqu’à huit
dispositifs à cet appareil. Si un
neuvième dispositif est associé, le
dispositif dont la connexion est la
plus ancienne est remplacé. Pour
l’utiliser, associez-le à nouveau.
1
Appuyez et maintenez le bouton
d’interrupteur enfoncé pendant environ
3 secondes
• Un signal sonore retentit et le voyant LED sur
l’écouteur droite clignote.
Bouton d’interrupteur
Voyant
LED
Pour mettre sur arrêt
• Appuyez et maintenez le bouton d’interrupteur
enfoncé pendant environ
3 secondes. Un signal sonore retentit et l’appareil s’éteint.
■
Note
• Au bout de cinq minutes d’inactivité, l’appareil s’éteint automatiquement.
(Voir « Arrêt automatique » (→ P. 5))
Mettre sur marche/arrêt

SQT0818
20
4
Uniquement pour les dispositifs compatibles NFC
La fonctionnalité NFC (Communication en champ proche) permet à cet appareil
de se connecter facilement à un dispositif Bluetooth
®
compatible NFC. Il vous suffit
de toucher cet appareil avec votre dispositif Bluetooth
®
pour mettre cet appareil
automatiquement en marche, associer un dispositif Bluetooth
®
et établir une
connexion.
Préparation
Activez la fonctionnalité NFC du dispositif Bluetooth
®
.
1
Démarrez l’application de lecture de musique/vidéos sur le
dispositif Bluetooth
®
• Suivez les instructions sur l’écran de votre dispositif.
2
Touchez et maintenez votre dispositif sur la zone tactile NFC de
cet appareil (jusqu’à ce qu’une fenêtre contextuelle sur votre
dispositif indique que la connexion est établie)
• L’appareil est mis en marche. Le voyant LED sur l’écouteur droite commence
par s’allumer en bleu, puis s’allume et s’éteint. Une fois la connexion établie,
le clignotement change.
• Si la connexion n’est pas établie, touchez à un autre endroit.
3
Commencez à lire de la musique/vidéos sur votre dispositif
Bluetooth
®
■
Connexion à un autre dispositif
Touchez cet appareil avec un autre dispositif pour établir une nouvelle connexion
Bluetooth
®
.
Le dispositif précédemment connecté sera automatiquement déconnecté.
Écouter de la musique
Si le dispositif compatible Bluetooth
®
prend en charge les profils Bluetooth
®
« A2DP » et « AVRCP », vous pouvez écouter de la musique en utilisant les
commandes à distance de l’appareil.
• A2DP (Profil de distribution audio avancé) : Transmet du son à l’appareil.
• AVRCP (Profil de contrôle à distance audio/vidéo) :
Permet de contrôler le dispositif à distance avec l’appareil.
1
Connectez le dispositif Bluetooth
®
et l’appareil (→ P. 3)
2
Sélectionnez et lisez la musique sur le dispositif Bluetooth
®
• La musique sélectionnée sort par les écouteurs de l’appareil.
Connexion une touche (connexion par NFC)
Autonomie de la batterie
Type de batterie Autonomie
Batterie rechargeable (installée dans l’appareil) Environ 40 heures
L’autonomie de la batterie dépend des conditions d’utilisation.
■
Attention
• Le niveau sonore peut entraîner des fuites acoustiques de l’appareil.
• Le son de la musique peut être déformé si le volume est poussé au maximum.
Réduisez le volume jusqu’à ce qu’il n’y ait plus de déformations.
Télécommande
Vous pouvez contrôler le dispositif Bluetooth
®
en utilisant l’appareil.
• Selon les dispositifs Bluetooth
®
, certaines des fonctions ci-dessous ne
fonctionnent pas ou fonctionnent différemment lorsqu’elles sont utilisées par
l’intermédiaire de l’appareil.
(Exemple de fonctionnement)
Lecture/Pause/Appel
Appuyez
Lecture/Pause/
Appel
Précédent/Suivant
Appuyez pendant
la lecture
Retourner au
début de la piste
choisie
Appuyez et
maintenez enfoncé
Retour
Appuyez pendant
la lecture
Avance au début
de la piste suivante
Appuyez et
maintenez enfoncé
Avance rapide
Volume
+
Appuyez
Augmenter le
volume
Appuyez et
maintenez enfoncé
Augmenter le
volume en continu
−
Appuyez
Diminuer le
volume
Appuyez et
maintenez enfoncé
Diminuer le volume
en continu
Volume +
Volume –
Précédent
Suivant
Lecture/Pause/
Appel
Droite
■
Note
• Il existe 15 niveaux
d’ajustement du volume.
Lorsque le volume minimum ou
maximum est atteint, un signal
sonore retentit.
Strona się ładuje...
Strona się ładuje...
Strona się ładuje...
Strona się ładuje...
Strona się ładuje...
Strona się ładuje...
Strona się ładuje...
Strona się ładuje...
Strona się ładuje...
Strona się ładuje...
Strona się ładuje...
Strona się ładuje...
Strona się ładuje...
Strona się ładuje...
Strona się ładuje...
Strona się ładuje...
Strona się ładuje...
Strona się ładuje...
Strona się ładuje...
Strona się ładuje...
Strona się ładuje...
Strona się ładuje...
Strona się ładuje...
Strona się ładuje...
Strona się ładuje...
Strona się ładuje...
Strona się ładuje...
Strona się ładuje...
Strona się ładuje...
Strona się ładuje...
Strona się ładuje...
Strona się ładuje...
Strona się ładuje...
Strona się ładuje...
Strona się ładuje...
Strona się ładuje...
Strona się ładuje...
Strona się ładuje...
Strona się ładuje...
Strona się ładuje...
Strona się ładuje...
Strona się ładuje...
Strona się ładuje...
Strona się ładuje...
Strona się ładuje...
Strona się ładuje...
Strona się ładuje...
Strona się ładuje...
Strona się ładuje...
Strona się ładuje...
Strona się ładuje...
Strona się ładuje...
Strona się ładuje...
Strona się ładuje...
Strona się ładuje...
Strona się ładuje...
Strona się ładuje...
Strona się ładuje...
Strona się ładuje...
Strona się ładuje...
Strona się ładuje...
Strona się ładuje...
Strona się ładuje...
Strona się ładuje...
Strona się ładuje...
Strona się ładuje...
Strona się ładuje...
Strona się ładuje...
Strona się ładuje...
Strona się ładuje...
Strona się ładuje...
Strona się ładuje...
Strona się ładuje...
Strona się ładuje...
Strona się ładuje...
Strona się ładuje...
Strona się ładuje...
Strona się ładuje...
Strona się ładuje...
Strona się ładuje...
Strona się ładuje...
Strona się ładuje...
Strona się ładuje...
Strona się ładuje...
Strona się ładuje...
Strona się ładuje...
Strona się ładuje...
Strona się ładuje...
Strona się ładuje...
Strona się ładuje...
Strona się ładuje...
Strona się ładuje...
Strona się ładuje...
Strona się ładuje...
Strona się ładuje...
Strona się ładuje...
Strona się ładuje...
Strona się ładuje...
Strona się ładuje...
Strona się ładuje...
Strona się ładuje...
Strona się ładuje...
Strona się ładuje...
Strona się ładuje...
Strona się ładuje...
Strona się ładuje...
Strona się ładuje...
Strona się ładuje...
Strona się ładuje...
Strona się ładuje...
Strona się ładuje...
Strona się ładuje...
-
 1
1
-
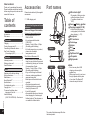 2
2
-
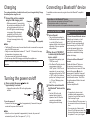 3
3
-
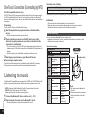 4
4
-
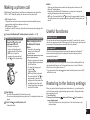 5
5
-
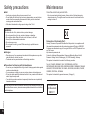 6
6
-
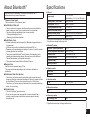 7
7
-
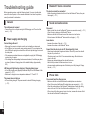 8
8
-
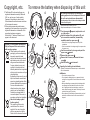 9
9
-
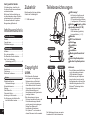 10
10
-
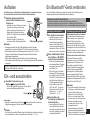 11
11
-
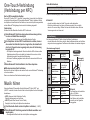 12
12
-
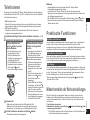 13
13
-
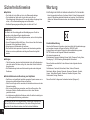 14
14
-
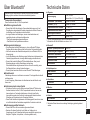 15
15
-
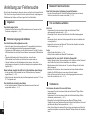 16
16
-
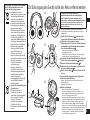 17
17
-
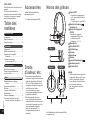 18
18
-
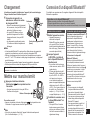 19
19
-
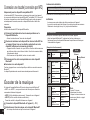 20
20
-
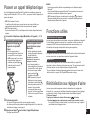 21
21
-
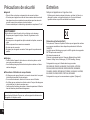 22
22
-
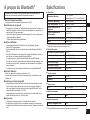 23
23
-
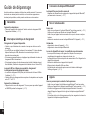 24
24
-
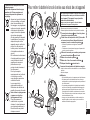 25
25
-
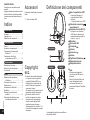 26
26
-
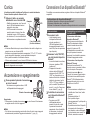 27
27
-
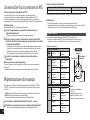 28
28
-
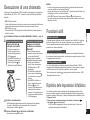 29
29
-
 30
30
-
 31
31
-
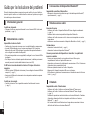 32
32
-
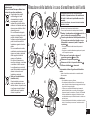 33
33
-
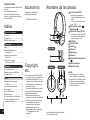 34
34
-
 35
35
-
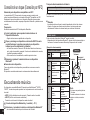 36
36
-
 37
37
-
 38
38
-
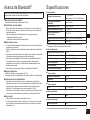 39
39
-
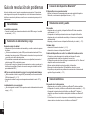 40
40
-
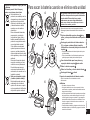 41
41
-
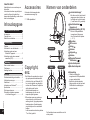 42
42
-
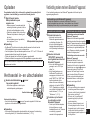 43
43
-
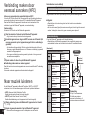 44
44
-
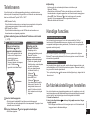 45
45
-
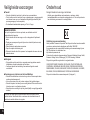 46
46
-
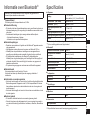 47
47
-
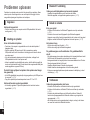 48
48
-
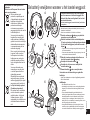 49
49
-
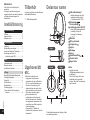 50
50
-
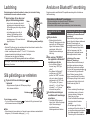 51
51
-
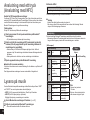 52
52
-
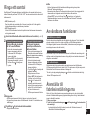 53
53
-
 54
54
-
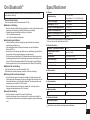 55
55
-
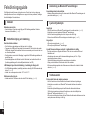 56
56
-
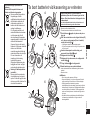 57
57
-
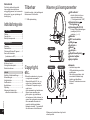 58
58
-
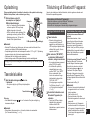 59
59
-
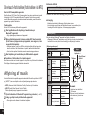 60
60
-
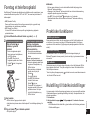 61
61
-
 62
62
-
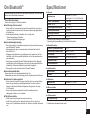 63
63
-
 64
64
-
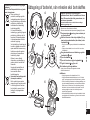 65
65
-
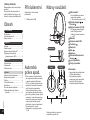 66
66
-
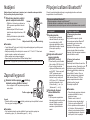 67
67
-
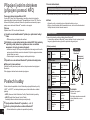 68
68
-
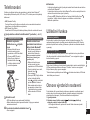 69
69
-
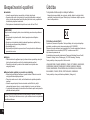 70
70
-
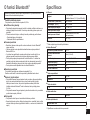 71
71
-
 72
72
-
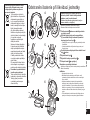 73
73
-
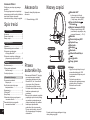 74
74
-
 75
75
-
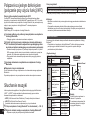 76
76
-
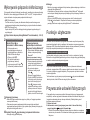 77
77
-
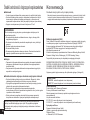 78
78
-
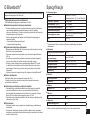 79
79
-
 80
80
-
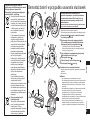 81
81
-
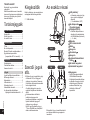 82
82
-
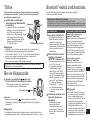 83
83
-
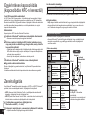 84
84
-
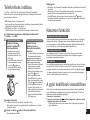 85
85
-
 86
86
-
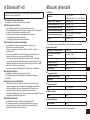 87
87
-
 88
88
-
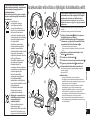 89
89
-
 90
90
-
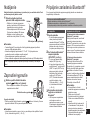 91
91
-
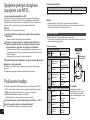 92
92
-
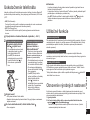 93
93
-
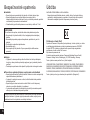 94
94
-
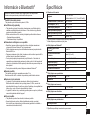 95
95
-
 96
96
-
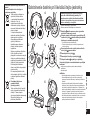 97
97
-
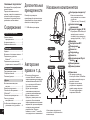 98
98
-
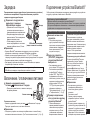 99
99
-
 100
100
-
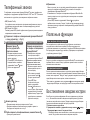 101
101
-
 102
102
-
 103
103
-
 104
104
-
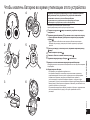 105
105
-
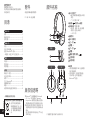 106
106
-
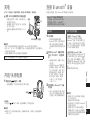 107
107
-
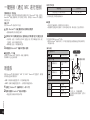 108
108
-
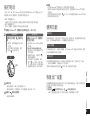 109
109
-
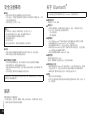 110
110
-
 111
111
-
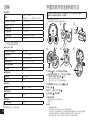 112
112
-
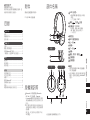 113
113
-
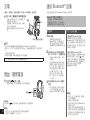 114
114
-
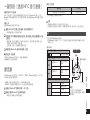 115
115
-
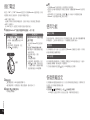 116
116
-
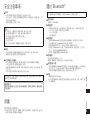 117
117
-
 118
118
-
 119
119
-
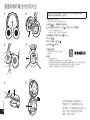 120
120
-
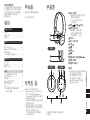 121
121
-
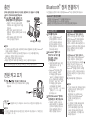 122
122
-
 123
123
-
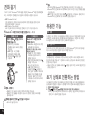 124
124
-
 125
125
-
 126
126
-
 127
127
-
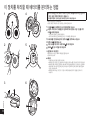 128
128
-
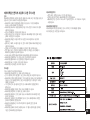 129
129
-
 130
130
-
 131
131
-
 132
132


Panasonic RP-BTD10E-K Instrukcja obsługi
- Typ
- Instrukcja obsługi
w innych językach
- italiano: Panasonic RP-BTD10E-K Manuale del proprietario
- Deutsch: Panasonic RP-BTD10E-K Bedienungsanleitung
- slovenčina: Panasonic RP-BTD10E-K Návod na obsluhu
- français: Panasonic RP-BTD10E-K Le manuel du propriétaire