Zelmer ZIR2415 Instrukcja obsługi
- Kategoria
- Okowy
- Typ
- Instrukcja obsługi
Niniejsza instrukcja jest również odpowiednia dla

ZIR2415
STACJA PAROWA
Паровая станция
/ Steam station
INSTRUKCJE UŻYTKOWANIA
Stacja parowa
ИНСТРУКЦИЯ ПО ПРИМЕНЕНИЮ
Паровая станция
NÁVOD K POUŽITÍ
Parní stanice
ИНСТРУКЦИИ ЗА УПОТРЕБА
Парогенератор за обработване на дрехи
NAVODILA ZA UPORABO
Parná stanica
ІНСТРУКЦІЯ ПО ЗАСТОСУВАННЮ
Парогенератор
USER MANUAL
Steam station
BENUTZERHANDBUCH
Dampfstation
HASZNÁLATI UTASÍTÁS
Gőzállomás
INSTRUCȚIUNI DE UTILIZARE
Stație de călcat cu aburi
PL
EN
DE
CZ
SK
HU
RO
RU
UA
BG
ZIR2415

9
3
4
6
5
10
8
2
1
12
7
11
13

3
PLPL
DZIĘKUJEMY ZA WYBÓR MARKI ZELMER. DOKŁADAMY STARAŃ, ABY PRODUKT DZIAŁAŁ W
SPOSÓB ZADOWALAJĄCY I PRZYJEMNY.
OSTRZEŻENIE
Przed rozpoczęciem korzystania z produktu prosimy uważnie przeczytać instrukcję obsługi i
przechowywać ją w bezpiecznym miejscu, aby móc z niej skorzystać w przyszłości.
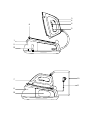
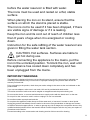
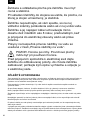
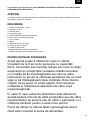
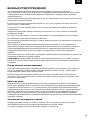
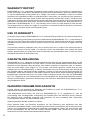
OPIS
1. Zaślepka wlotu wody
2. Zbiornik wody
3. Regulator pary
4. Spust pary
5. Lampka kontrolna temperatury
6. Pokrętło regulacji temperatury
7. Żelazko
8. Stacja
9. Blokada żelazka
10. Przewód łączący
11. Przewód zasilający
12. Przechowywanie kabla zasilającego
13. Wkład antywapienny
INSTRUKCJE DOTYCZĄCE BEZPIECZEŃSTWA
Urządzenie może być obsługiwane przez dzieci w
wieku od 8. roku życia oraz przez osoby o ograniczonej
sprawności zycznej, sensorycznej lub psychicznej i
osoby nieposiadające wystarczającego doświadczenia
oraz wiedzy pod warunkiem, że będą one nadzorowane
lub zostaną poinstruowane w zakresie bezpiecznej
obsługi urządzenia i będą rozumiały zagrożenia
związane z taką obsługą. Nie należy dopuszczać,
aby dzieci bawiły się urządzeniem. Dzieci nie mogą
przeprowadzać czynności czyszczenia ani konserwacji
urządzenia bez nadzoru.
Jeżeli przewód zasilania jest uszkodzony, dla
bezpieczeństwa musi zostać wymieniony przez
producenta, autoryzowany serwis lub odpowiednio
wykwalikowaną osobę.

4
PL
PL
Żelazka nie można zostawiać bez nadzoru, jeżeli jest
podłączone do zasilania.
Wtyczkę należy wyjąć z gniazda przed napełnieniem
zbiornika wodą.
Żelazko musi być używane i przechowywane na
stabilnej i płaskiej powierzchni.
Podczas umieszczania żelazka na podstawie
dopilnować, aby powierzchnia, na której leży podstawa,
była stabilna.
Żelazko nie może być używane, jeżeli zostało
upuszczone, przecieka lub nosi widoczne ślady
uszkodzeń.
Trzymać żelazko i przewód poza zasięgiem dzieci
poniżej 8. roku życia, jeżeli jest zasilane lub odstawione
do ochłodzenia.
Instrukcje bezpiecznego napełniania zbiornika wody
znajdują się w sekcji dotyczącej napełniania zbiornika
wody.
UWAGA. Gorące powierzchnie. Powierzchnie
mogą być gorące podczas używania żelazka.
Przed podłączeniem urządzenia do zasilania ustawić
żelazko w pozycji odblokowanej. Aby zablokować
żelazko, odczekać, aż żelazko ochłodzi się całkowicie, i
zostanie odłączone od zasilania.
WAŻNE OSTRZEŻENIA
Urządzenie przeznaczone jest wyłącznie do użytku domowego i w żadnym wypadku nie może być
używane do zastosowań komercyjnych lub przemysłowych. Nieprawidłowe używanie lub niewłaściwa
obsługa produktu powoduje unieważnienie gwarancji.
Przed podłączeniem urządzenia do sieci sprawdzić, czy napięcie zasilania jest takie samo, jak wskazane
na tabliczce znamionowej urządzenia.
W przypadku używania adaptera upewnić się, że może osiągnąć natężenie 16 A i ma wtyczkę z
uziemieniem.

5
PLPL
W trakcie korzystania z urządzenia przewód zasilający nie może być zaplątany ani owinięty wokół
urządzenia.
Nie używać, nie podłączać ani nie odłączać urządzenia od sieci, mając mokre dłonie lub stopy.
Nie ciągnąć za przewód zasilający w celu odłączenia urządzenia. Nie używać przewodu do wieszania
urządzenia.
Nie kierować strumienia pary bezpośrednio w stronę ludzi ani zwierząt.
Nie podstawiać urządzenia pod kran w celu napełnienia zbiornika. Nie zanurzać urządzenia w wodzie
ani innych płynach.
W przypadku jakiejkolwiek awarii lub uszkodzenia natychmiast odłączyć urządzenie od sieci
i skontaktować się z ocjalnym działem wsparcia technicznego. Aby zapobiec jakiemukolwiek
niebezpieczeństwu, nie należy otwierać obudowy urządzenia. Naprawy lub procedury dotyczące
urządzenia może wykonywać tylko wykwalikowany personel z ocjalnego działu wsparcia technicznego
marki.
Urządzenie należy czyścić według wskazówek znajdujących się w sekcji dotyczącej konserwacji
i czyszczenia.
EUROGAMA SP. Z O. O. nie ponosi odpowiedzialności za szkody poniesione przez ludzi, zwierzęta lub
przedmioty z powodu niestosowania się do ostrzeżeń.
Przed pierwszym użyciem
Przed użyciem stacji pary przeczytać instrukcję obsługi i upewnić się, że budowa stacji pary i jej funkcje
są zrozumiałe. Usunąć wszelkie materiały opakowaniowe i etykiety przed użyciem urządzenia po raz
pierwszy.
Przy pierwszym użyciu z urządzenia mogą szybko uwalniać się zapachy lub opary. Nie rozpylać pary po
raz pierwszy na ubraniach, ponieważ na stopie mogą znajdować się zabrudzenia.
Używana woda
Urządzenie należy napełniać wodą z kranu. Jeżeli woda w miejscu używania żelazka jest twarda lub
półtwarda, używać mieszanki wody z kranu z wodą destylowaną lub demineralizowaną zakupioną
w sklepie w proporcji, odpowiednio, 2:1 i 1:1 (woda destylowana:woda z kranu). Skontaktować się z
dostawcą wody w celu ustalenia rodzaju wody w miejscu używania żelazka. Nie używać wyłącznie
destylowanej lub demineralizowanej wody, wody deszczowej, wody zmiękczanej, wody zapachowej,
wody z innych urządzeń, np. z chłodziarek, klimatyzatorów, suszarek lub innych rodzajów wody
przygotowanej w domu.
Napełnianie zbiornika wody
Wyjąć zbiornik wody ze stacji i napełnić przez wlot wody. NIE przekraczać wskaźnika poziomu MAX.
Upewnić się, że zbiornik wody został prawidłowo umieszczony z powrotem w stacji.
INSTRUKCJA OBSŁUGI
NB: Jeżeli prasowanie parowe odbywa się po raz pierwszy lub produkt nie był używany przez
pewien czas, ustawić regulator temperatury na pozycję prasowania parowego i stale naciskać
przycisk pary do czasu, aż para nie pojawi się. Proces ten może potrwać kilka minut.
Ustawić stację pary na stabilnym podłożu – stole, blacie lub desce do prasowania.
Podłączyć jednostkę do gniazdka zasilającego i włączyć ją przyciskiem zasilania.
Ustawić temperaturę za pomocą pokrętła, wybierając rodzaj tkaniny do prasowania.
Uwaga: W przypadku prasowania parowego proponujemy ustawić pokrętło temperatury w pozycji MAX.
Jeżeli wskaźnik świetlny żelazka wyłączy się, urządzenie jest gotowe do użycia.
Uwaga: W czasie całej operacji wskaźnik świetlny pracy żelazka będzie włączał się i wyłączał w
nieregularnych odstępach. Jest to normalne zjawisko.
W celu uzyskania wyrzutu pary wybrać pozycję pary za pomocą regulatora pary i nacisnąć spust pary,

6
PL
PL
Wybrać ustawienie pary, naciskając i przytrzymując przycisk pary. Ustawienie pary można wyłączyć w
dowolnym czasie przez zwolnienie przycisku pary. Nacisnąć blokadę pary ze stałą parą bez naciskania
przycisku pary.
Wskazówki dotyczące prasowania
Prasowanie rozpocząć od tkanin wymagających niskiej temperatury, a na końcu prasować tkaniny
wymagające wyższej temperatury.
W przypadku tkanin z włókien mieszanych ustawić niższą temperaturę prasowania.
W przypadku ubrań wełnianych naciskać regularnie przycisk pary nad ubraniem bez bezpośredniego
dotykania go żelazkiem.
W przypadku grubych tkanin ustawić temperaturę w pozycji MAX.
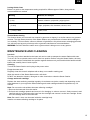
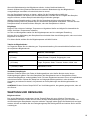
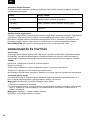
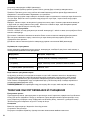
Tabela prasowania
Poniżej prezentujemy tabelę ustawień temperatury wymaganej do różnych rodzajów włókien wraz z
zalecaną metodą prasowania.
Oznakowanie Materiał, na przykład
. (1 kropka) Włókno octanowe, elastan, poliamid, polipropylen
. . (2 kropki)
włókno miedziowe, poliester, jedwab, włókno triacetatowe,
wiskoza, wełna
… (3 kropki) / MAX Bawełna, len
Prasowanie parowe w pionie
Ta funkcja umożliwia wygładzanie zagnieceń w ubraniach lub zasłonach w podobny sposób do
parownicy do ubrań. Wysokie ciśnienie pary w stacji pary może powodować strumienie pary podczas
trzymania żelazka w pionie. W celu uzyskania najlepszych wyników używać delikatnych lub jasnych
tkanin. Kierować parę tylko na ubrania w bezpiecznej przestrzeni i dopilnować stosowania zaleceń
producenta.
OSTRZEŻENIE: NIE kierować pary na ubranie, które jest noszone, ani na ubranie na osobie.
KONSERWACJA I CZYSZCZENIE
Blokada żelazka
Blokada łatwego przenoszenia przymocowana do podstawy może być używana do łatwego
przenoszenia stacji pary. W tym celu podnieść blokadę ruchem do góry do momentu zatrzaśnięcia w
odpowiedniej pozycji. Przed użyciem stacji pary uchwyt do łatwego przenoszenia musi być z powrotem
zablokowany na podstawie; nacisnąć i przytrzymać uchwyt, zwolnić przycisk i delikatnie opuścić go z
powrotem.
Czyszczenie
Wyłączyć stację pary i odłączyć wtyczkę od zasilania.
Opróżnić zbiornik wody.
Regularnie czyścić stopę ceramiczną wilgotnym, niemetalowym czyścikiem.
Wytrzeć zewnętrzne elementy stacji parowej miękką ściereczką.
NIE używać ściernych środków czyszczących, detergentów ani innych środków chemicznych do
czyszczenia stacji pary.
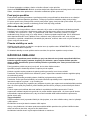
Wymiana wkładu antywapiennego
Regularnie wymieniać wkład zmiękczający wodę. Przy umiarkowanej eksploatacji (dwa razy w tygodniu)

7
PLPL
i w zależności od twardości wody w miejscu używania stacji pary wkład antywapienny zmiękczający
wodę należy wymieniać co 3–6 miesięcy.
Uwaga: Nie używać jednostki bez wkładu zmiękczającego wodę!
1. Wyjąć zbiornik wody ze stacji.
2. Pociągnąć wkład antywapienny i wyjąć go do wymiany. W celu wyjęcia wkładu odkręcić go i ostrożnie
wyjąć go na zewnątrz. Odłączyć przewód od wkładu i podłączyć go do nowego wkładu. Dokręcić nowy
wkład do zbiornika wody.
Uwaga: Zachować ostrożność – w korpusie wkładu może znajdować się woda.
Zainstalować nowy wkład zmiękczający wodę.

8
PL
PL
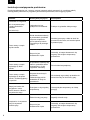
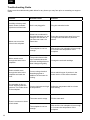
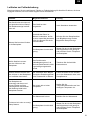
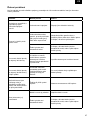
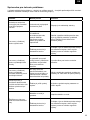
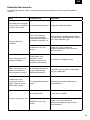
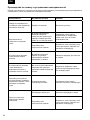
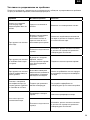
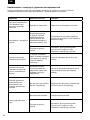
Instrukcja rozwiązywania problemów
Przed skontaktowaniem się z naszym centrum wsparcia należy zapoznać się z poniższą tabelą
rozwiązywania problemów w przypadku jakichkolwiek problemów, które mogą się pojawić
Problem Potencjalna przyczyna Rozwiązanie
Jednostka nie nagrzewa
ani nie wytwarza pary.
Lampka wskaźnika
zasilania
nie świeci się.
Jednostka nie jest
podłączona do zasilania.
Podłącz do gniazdka elektrycznego.
Przez otwory w stopie
wycieka woda
Woda skondensowała się
w przewodach, ponieważ
używasz urządzenia
po raz pierwszy lub nie
używałeś go od pewnego
czasu.
Naciskaj spust pary z dala od deski do
prasowania do czasu, aż żelazko będzie
wytwarzać parę.
Stopa nie jest
dostatecznie ciepła.
Odczekaj, aż stopa dostatecznie się
nagrzeje lub zwiększ temperaturę
prasowania.
Przez otwory w stopie
wydostają się białe
zacieki.
W produkcie wytworzył się
kamień, ponieważ wkład
antywapienny nie był
regularnie zmieniany.
Zmień wkład antywapienny.
Przez otwory w stopie
wydostają się brązowe
zacieki i zostawiają plamy
na pościeli.
Używasz chemicznych
produktów
odkamieniających lub
dodatków do wody do
prasowania.
Nie dodawaj tego rodzaju produktów do
zbiornika wody ani do komory pary.
Stopa jest brudna lub
przypalona i może
plamić ubrania. Ubranie
przywiera do stopy.
Prasujesz ze zbyt wysoką
temperaturą.
Ustaw pokrętło temperatury na niższą
pozycję.
Urządzenie nie wytwarza
pary lub wytwarza
niewiele pary.
Zbiornik wody jest pusty. Napełnij zbiornik wody.
Stopa nie jest
dostatecznie ciepła.
Odczekaj, aż stopa dostatecznie się
nagrzeje lub zwiększ temperaturę
prasowania.

9
PLPL
EKOLOGICZNA UTYLIZACJA
To urządzenie jest oznaczone zgodnie z Dyrektywą Europejską 2012/19/UE
oraz polską Ustawa z dnia 11 września 2015 r. „O zużytym sprzęcie elektrycznym
i elektronicznym” (Dz.U. z dn. 23.10.2015 poz. 11688) symbolem
przekreślonego kontenera na odpady.
Takie oznakowanie informuje, że sprzęt ten, po okresie jego użytkowania nie może być
umieszczany łącznie z innymi odpadami pochodzącymi z gospodarstwa domowego.
Użytkownik jest zobowiązany do oddania go prowadzącym zbieranie zużytego sprzętu elektrycznego
i elektronicznego. Prowadzący zbieranie, w tym lokalne punkty zbiórki, sklepy oraz gminne jednostki,
tworzą odpowiedni system umożliwiający oddanie tego sprzętu.
Właściwe postępowanie ze zużytym sprzętem elektrycznym i elektronicznym przyczynia się do
uniknięcia szkodliwych dla zdrowia ludzi i środowiska naturalnego konsekwencji, wynikających z
obecności składników niebezpiecznych oraz niewłaściwego składowania i przetwarzania takiego
sprzętu.
Mamy nadzieję, że produkt przyniesie Państwu wiele satysfakcji.

10
PL
EN
WE WOULD LIKE TO THANK YOU FOR CHOOSING ZELMER. WE WISH THE PRODUCT
PERFORMS TO YOUR SATISFACTION AND PLEASURE.
WARNING
Please read the instructions for use carefully prior to using the product. store these in a safe place for
future reference.
DESCRIPTION
1. Water Inlet Cover
2. Water Tank
3. Steam selector
4. Steam Trigger
5. Temperature pilot lamp
6. Temperature Control Dial
7. Iron
8. Station
9. Iron lock
10. Interconnection Cord
11. Power Cord
12. Power cord storage
13. Anti-scale cartridge
SAFETY INSTRUCTIONS
This appliance can be used by children aged from 8
years and above and persons with reduced physical,
sensory or mental capabilities or lack of experience
and knowledge if they have been given supervision or
instruction concerning use of the appliance in a safe
way and understand the hazards involved. Children
shall not play with the appliance. Cleaning and user
maintenance shall not be made by children without
supervision.
If the supply cord is damaged it must be replaced by
the manufacturer, its service agent or similarly qualied
persons in order to avoid a hazard.
The iron must not be left unattended while it is
connected to the supply mains.
The plug must be removed from the socket-outlet

11
PLEN
before the water reservoir is lled with water.
The irons must be used and rested on a at, stable
surface
When placing the iron on its stand, ensure that the
surface on which the stand is placed is stable.
The iron is not to be used if it has been dropped, if there
are visible signs of damage or if it is leaking.
Keep the iron and its cord out of reach of children less
than 8 years of age when it is energized or cooling
down.
Instruction for the safe relling of the water reservoir are
given in lling the water tank section.
CAUTION. Hot surfaces. Surfaces are liable to
get hot during use.
Before connecting the appliance to the mains, put the
iron in the unlocked position. To block the iron, wait until
the appliance has cooled down completely and has
been unplugged from the mains.
IMPORTANT WARNINGS
This appliance is designed for home use and should never be used for commercial or industrial use
under any circumstances. Any incorrect use or improper handling of the product shall render the
warranty null and void.
Prior to plugging in the product, check that your mains voltage is the same as the one indicated on the
product label.
If you use one adaptor, make sure it can reach 16 A and is provided with earth socket
The mains connection cable must not be tangled or wrapped around the product during use.
Do not use the device, or connect and disconnect to supply mains with the hands and / or feet wet.
Do not pull on the connection cord in order to unplug it or use it as a handle
Do not direct steam at people and animals.
Do not place the appliance under the tap to ll the water tank, or immerse it in water or other liquids.
Unplug the product immediately from the mains in the event of any breakdown or damage and contact
an Ofcial Technical support service. In order to prevent any risk of danger, do not open the device. Only
qualied technical personnel from the brand´s Ofcial Technical support service may carry out repairs or
procedures on the device.
Proceed according to the conservation and cleaning section of this manual for cleaning.

12
PL
EN
EUROGAMA SP. Z O. O. disclaims all liability for damages that may occur to people, animals or objects,
for the non-observance of these warnings.
Before the rst use
Before using the Steam Station, please ensure you read the user manual and understand all parts and
features of the Steam Station. Be sure to remove any packaging material and labels before using for the
rst time.
In the rst use they can break off odors or fumes that sent quickly. Do not spray for the rst time on
clothes and there may be traces of dirt on the soleplate.
Water to be used
The device is designed for use with tap water. If the water in your area is hard or semi-hard use mix
tap water with distilled or demineralized water purchased in stores, in the ratio 2:1 and 1:1 respectively
(distilled water: tap water). Check with your water supplier to determine the type of water in your area.
Never use 100% distilled or demineralized, rain water, softened water, scented water, water from other
appliances such as refrigerators, air conditioners, dryers or other types of home water preparation water.
Filling the Water Tank
Remove the water tank from the station and ll it through the water inlet cover. Do NOT ll over the MAX
level indicator.
Make sure when placing it back to the station that it ts correctly.
OPERATING INSTRUCTIONS
NB: If it is the rst time you have steam-ironed or if the product has not been used for some time,
turn the temperature control to a steam ironing position and press the steam button continuously
until steam comes out. This process can take a few minutes.
Place the Steam Station on a rm level table, bench or ironing board.
Plug the unit into a power outlet and switch on at the power point.
Adjust the temperature dial in terms of choose the kind of fabrics that you want to iron.
Note: If you want to use the steam ironing, we suggest you to adjust the temperature dial on MAX.
When the iron operating light indicator goes out the device will be ready for use.
Note: During the whole operating time, the iron operating light indicator will go on and off in erratic
intervals, this is normal.
To make the steam jet come out, select the steam position with the steam selector and press the steam
trigger, and if you want to stop the steam release the steam trigger, in a few seconds steam will stop.
Select the steam setting by pressing and holding the steam button. The steam setting can be switched
off at any time by releasing the steam button. Push the steam locker with continues steamer without
pressing the steam button.
Ironing Tips
Start with the fabrics to be ironed at a low temperature and nish with those that need higher
temperatures.
For mixed bre fabric, set the ironing temperature to a lower setting.
For woollen garments, press the steam trigger repeatedly over the garment without physically touching it
with the iron.
For thicker fabrics, raise the iron temperature at MAX position.

13
PLEN
Ironing Guide Chart
Below is a guide on the temperature setting required for different types of fabric, along with the
recommended iron method.
Marking Material, for example
. (1 dot) Acetate, elastane, polyamide, polypropylene
. . (2 dots) Cupro, polyester, silk, triacetate, viscose, wool
… (3 dots) / MAX Cotton, linen
Vertical Steam Ironing
This feature allows you to smooth out creases in garments or drapery in a similar manner to a garment
steamer. The high steam pressure of the Steam Station can provide bursts of steam while holding the
iron vertically. For best results, utilise on delicate or light fabrics. Only direct steam at hanging garments
in a safe area and ensure you always refer to garment manufacturer recommendations.
WARNING: DO NOT direct the steam onto a garment that is being worn or at any person.
MAINTENANCE AND CLEANING
Iron lock
The easy carry locker attached to the base unit can be used to transport the steam Station with ease.
To do so, lift it in an upward motion until it clicks into position. Before using the Steam Station, the easy
carry handle must be locked back into position against the base unit; press and hold the handle release
button and carefully lower it back to place.
Cleaning
Turn off the Steam Station and unplug at the power outlet.
Empty the water tank.
Regularly clean the ceramic soleplate with a damp, non-metallic washing pad.
Wipe the exterior of the Steam Station with a soft cloth.
Do NOT use abrasive cleaners, detergent or other chemicals to clean the Steam Station.
Change anti-scale cartridge
Replace the water softening cartridge regularly. At moderate use (twice a week) and depending on the
water hardness in your region the water softening anti-scale cartridge should be replaced every 3-6
months.
Note: Do not use the unit without the water softening cartridge!
1. Remove the water tank from the station.
2. Pull anti-calc cartridge upwards and remove it for changing. In order to remove it, rstly unscrew it and
carefully take it out. Disconnect the hose from the cartridge and connect it to the new cartridge. Screw
the new cartridge back to the water tank.
Note: Be careful - there can be water inside the cartridge body.
Install a new water-softening cartridge to its place.

14
PL
EN
Troubleshooting Guide
Please consult troubleshooting table below for any issues you may face prior to contacting our support
center.
Problem Possible cause Solution
Unit fails to heat up and
steam. Power indicator
light does not illuminate.
Unit is not plugged in. Plug into electrical outlet.
Water runs out of the
holes in the soleplate.
Water has condensed in
the pipes because you are
using for the rst time or
you have not used it for
some time.
Press the steam trigger away from your
ironing board until the iron produces
steam.
The soleplate is not hot
enough.
Wait until the iron soleplate is hot enough
or increase the temperature of the
soleplate.
White streaks come
through the holes in the
soleplate.
The product has a build-
up of scale because the
anti-calc cartridge has not
been changed regularly.
Change the anti-calc cartridge
Brown streaks come
through the holes in the
soleplate and stain the
linen.
You are using chemical
descaling agents or
additives in the water for
ironing.
Never add this type of product in the
water tank or in the steam chamber.
The soleplate is dirty or
brown and may stain the
garment. The clothe sticks
in the soleplate.
You are ironing at too high
a temperature.
Adjust the temperature dial to a lower
heat setting.
There is no steam or there
is little steam.
The water tank is empty. Fill the water tank.
The soleplate is not hot
enough.
Wait until the iron soleplate is hot enough
or increase the temperature of the
soleplate

15
PLEN
ADVISE ON DISPOSAL
This product complies with European Directive 2012/19/EU on electrical and electronic
devices, known as WEEE (Waste Electrical and Electronic Equipment), provides the legal
framework applicable in the European Union for the disposal and reuse of waste electronic
and electrical devices. Do not dispose of this product in the bin, instead going to the
electrical and electronic waste collection centre closest to your home.
We hope that you will be satised with this product.

16
PL
DE
WIR MÖCHTEN UNS BEI IHNEN BEDANKEN, DASS SIE SICH FÜR ZELMER ENTSCHIEDEN
HABEN. WIR HOFFEN, DASS DAS PRODUKT ZU IHRER ZUFRIEDENHEIT UND IHREM
VERGNÜGEN FUNKTIONIERT.
ACHTUNG
Bitte lesen Sie die Gebrauchsanweisung vor der Anwendung des Produkts aufmerksam durch.
Bewahren Sie diese zur späteren Einsichtnahme an einem sicheren Ort auf.
BESCHREIBUNG
1. Wassereinfüllabdeckung
2. Wassertank
3. Dampfwahlschalter
4. Dampfauslöser
5. Temperatur-Kontrollleuchte
6. Temperaturwahlscheibe
7. Bügeln
8. Station
9. Bügelverschluss
10. Verbindungskabel
11. Netzkabel
12. Aufbewahrung des Netzkabels
13. Anti-Kalk-Kartusche
SICHERHEITSHINWEISE
Dieses Gerät kann von Kindern ab 8 Jahren und
von Personen mit eingeschränkten körperlichen,
sensorischen oder geistigen Fähigkeiten oder
mangelnden Erfahrungen und Kenntnissen benutzt
werden, wenn sie beaufsichtigt werden oder in den
sicheren Gebrauch des Gerätes eingewiesen wurden
und die damit verbundenen Gefahren verstehen. Kinder
dürfen nicht mit dem Gerät spielen. Die Reinigung
und Wartung darf nicht von Kindern ohne Aufsicht
durchgeführt werden.
Bei Beschädigung des Netzkabels muss dieses
vom Hersteller, seinem Servicepartner oder ähnlich
qualizierten Personen ausgetauscht werden, um eine
Gefährdung zu vermeiden.
Das Bügeleisen darf nicht unbeaufsichtigt bleiben,

17
PLDE
solange es an das Stromnetz angeschlossen ist.
Der Stecker muss aus der Steckdose gezogen werden,
bevor der Wasserbehälter mit Wasser befüllt wird.
Die Bügeleisen müssen auf einer achen, stabilen
Oberäche verwendet und abgestellt werden
Wenn das Bügeleisen auf seinen Ständer gestellt wird,
ist darauf zu achten, dass die Oberäche, auf der der
Ständer steht, stabil ist.
Das Bügeleisen darf nicht benutzt werden, wenn es
fallen gelassen wurde, wenn es sichtbare Anzeichen
von Schäden aufweist oder wenn es undicht ist.
Bewahren Sie das Bügeleisen und sein Kabel
außerhalb der Reichweite von Kindern unter 8 Jahren
auf, wenn es mit Strom versorgt wird oder es gerade
abkühlt.
Anweisungen zur sicheren Auffüllung des
Wasserbehälters benden sich im Abschnitt zum
Wassertank.
VORSICHT. Heiße Oberächen. Die Oberächen
können bei der Anwendung heiß werden.
Bevor das Gerät an das Stromnetz angeschlossen wird,
stellen Sie das Bügeleisen in die entsperrte Position.
Um das Bügeleisen zu blockieren, warten Sie ab, bis
das Gerät komplett abgekühlt und vom Stromnetz
getrennt ist.
WICHTIGE WARNHINWEISE
Dieses Gerät ist für den Haushaltsgebrauch konzipiert und sollte unter keinen Umständen für den
gewerblichen oder industriellen Gebrauch verwendet werden. Jede unsachgemäße Verwendung oder
unsachgemäße Handhabung des Produkts führt zum Erlöschen der Garantie.
Überprüfen Sie vor dem Anschluss des Geräts, ob Ihre Netzspannung mit der auf dem Typenschild
angegebenen übereinstimmt.

18
PL
DE
Falls Sie einen Adapter verwenden, stellen Sie sicher, dass er imstande ist, 16 A zu erreichen und dass
er mit einer Schutzkontaktsteckdose ausgestattet ist.
Das Netzanschlusskabel darf während der Verwendung nicht verwickelt oder um das Produkt gewickelt
werden.
Benutzen Sie das Gerät nicht, schließen Sie es nicht an und trennen Sie es nicht vom Stromnetz, wenn
Sie nasse Hände und / oder Füße haben.
Ziehen Sie nicht am Netzkabel, um den Stecker zu ziehen, und verwenden Sie es nicht als Griff.
Dampf nicht auf Menschen und Tiere richten.
Stellen Sie das Gerät nicht unter den Wasserhahn, um den Wassertank zu befüllen, tauchen Sie es
zudem nicht in Wasser oder andere Flüssigkeiten.
Trennen Sie das Produkt im Falle einer Panne oder Beschädigung sofort vom Stromnetz und wenden
Sie sich an einen ofziellen technischen Kundendienst. Um Gefahren zu vermeiden, darf das Gerät nicht
geöffnet werden. Nur qualiziertes technisches Personal des ofziellen technischen Kundendienstes der
Marke darf Reparaturen oder Eingriffe an dem Gerät durchführen.
Verfahren Sie bei der Reinigung entsprechend des Abschnitts bezüglich Konservierung und Reinigung in
diesem Handbuch.
EUROGAMA SP. Z O. O. lehnt jede Haftung für Schäden ab, die an Menschen, Tieren oder
Gegenständen entstehen könnten, falls diese Warnhinweise nicht beachtet werden.
Vor dem ersten Gebrauch
Bevor Sie die Dampfstation benutzen, lesen Sie sich bitte die Bedienungsanleitung durch und
verstehen Sie sämtliche Teile und Funktionen der Dampfstation. Stellen Sie sicher, das gesamte
Verpackungsmaterial und Etiketten vor der ersten Anwendung zu entfernen.
Beim ersten Einsatz können Gerüche oder Dämpfe entstehen, die schnell entweichen. Sprühen Sie
das erste Mal nicht auf Kleidungsstücke, da Spuren von Schmutz auf der Basisplatte vorhanden sein
könnten.
Zu verwendendes Wasser
Das Gerät ist für die Anwendung mit Leitungswasser ausgerichtet. Falls das Wasser in Ihrer Umgebung
hart oder halbhart ist, vermischen Sie das Leitungswasser mit destilliertem oder entmineralisiertem
Wasser, das Sie in Geschäften gekauft haben, im Verhältnis von 2:1 bzw. 1:1 (destilliertes Wasser:
Leitungswasser). Prüfen Sie bei Ihrem Wasserversorger, um welche Art von Wasser es sich in
Ihrer Umgebung handelt. Verwenden Sie nie 100 % destilliertes oder entmineralisiertes Wasser,
Regenwasser, enthärtetes Wasser, Duftwasser, Wasser aus anderen Geräten wie Kühlschränken,
Klimaanlagen, Trocknern oder andere Arten von Haushaltswasser.
Befüllung des Wassertanks
Entfernen Sie den Wassertank von der Station und befüllen Sie ihn durch die Wassereinfüllabdeckung.
Befüllen Sie NICHT bis oberhalb der MAX-Füllstandsanzeige.
Achten Sie bei der Positionierung auf der Station darauf, dass es korrekt sitzt.
BETRIEBSANWEISUNGEN
ANM.: Falls Sie zum ersten Mal dampfbügeln oder falls das Produkt schon längere Zeit nicht
verwendet wurde, stellen Sie den Temperaturregler auf eine Dampfbügelposition und drücken Sie
den Dampfknopf kontinuierlich, bis Dampf herausaustritt. Dieser Vorgang kann ein paar Minuten
dauern.
Positionieren Sie die Dampfstation auf einen stabilen ebenen Tisch, einer Bank oder einem Bügelbrett.
Stecken Sie das Gerät in eine Steckdose und schalten Sie es ein.
Stellen Sie die Temperaturwahlscheibe derart ein, dass Sie die Art an Stoffen auswählen können, die Sie
bügeln möchten.
Hinweis: Falls Sie dampfbügeln möchten, empfehlen wir Ihnen, die Temperaturwahlscheibe auf MAX
einzustellen.

19
PLDE
Wenn die Betriebsanzeige des Bügeleisens erlischt, ist das Gerät betriebsbereit.
Hinweis: Während der gesamten Betriebszeit leuchtet die Betriebsanzeige des Bügeleisens in
unregelmäßigen Intervallen auf und erlischt, das ist normal.
Um den Dampfstrahl austreten zu lassen, wählen Sie die Dampfposition mithilfe des
Dampfwahlschalters und drücken Sie den Dampfauslöser, und falls Sie die Freigabe des Dampfes
stoppen möchten, wird der Dampf innerhalb weniger Sekunden gestoppt.
Wählen Sie die Dampfeinstellung, indem Sie die Dampftaste drücken und gedrückt halten. Die
Dampfeinstellung lässt sich jederzeit durch Loslassen der Dampftaste ausschalten. Drücken Sie den
Dampfverschluss mit kontinuierlichem Dämpfer, ohne die Dampftaste zu drücken.
Bügeltipps
Beginnen Sie mit den auf niedriger Temperatur zu bügelnden Stoffen und bügeln Sie letztendlich die
Stoffe, die höhere Temperaturen erfordern.
Im Falle von Mischgewebe stellen Sie die Bügeltemperatur auf eine niedrigere Einstellung.
Drücken Sie bei Wollkleidung den Dampfauslöser wiederholt über dem Kleidungsstück, ohne es mit dem
Bügeleisen zu berühren.
Für dickere Stoffe erhöhen Sie die Bügeltemperatur auf MAX-Position.
Tabelle als Bügelleitfaden
Im Folgenden nden Sie eine Anleitung zur Temperatureinstellung für unterschiedliche Stoffarten sowie
die empfohlene Bügelmethode.
Markierung Material, zum Beispiel
. (1 Punkt) Acetat, Elastan, Polyamid, Polypropylen, usw.
. . (2 Punkte) Cupro, Polyester, Seide, Triacetat, Viskose, Wolle, usw.
… (3 Punkte) / MAX Baumwolle, Leinen
Vertikales Dampfbügeln
Mit dieser Funktion lassen sich Falten in Kleidungsstücken oder Stoffen ähnlich wie bei einem
Kleidungsdampfer glätten. Der hohe Dampfdruck der Dampfstation kann zu Dampfstößen führen,
während das Bügeleisen vertikal gehalten wird. Für beste Ergebnisse benutzen Sie es auf empndlichen
oder leichten Stoffen. Richten Sie Dampf nur auf hängende Kleidungsstücke in einer sicheren
Umgebung und achten Sie darauf, sich jederzeit an die Empfehlungen des Kleidungsherstellers zu
halten.
ACHTUNG: Richten Sie den Dampf NICHT auf ein Kleidungsstück, das gerade getragen wird, oder auf
eine Person.
WARTUNG UND REINIGUNG
Bügelverschluss
Der an der Basiseinheit angebrachte, leichte Tragegriff lässt sich zum einfachen Transport der
Dampfstation anwenden. Heben Sie ihn hierfür mit einer Aufwärtsbewegung an, bis er einrastet. Vor
der Anwendung der Dampfstation muss der einfache Tragegriff wieder gegen die Basiseinheit verriegelt
werden; drücken und halten Sie den Entriegelungsknopf des Griffs gedrückt und senken Sie ihn wieder
vorsichtig ab.

20
PL
DE
Reinigung
Schalten Sie die Dampfstation aus und ziehen Sie den Netzstecker aus der Steckdose.
Entleeren Sie den Wassertank.
Reinigen Sie die Keramik-Basisplatte in regelmäßigen Abständen mit einem feuchten, nichtmetallischen
Waschpad.
Wischen Sie die Außenseite der Dampfstation mit einem weichen Tuch ab.
Verwenden Sie KEINE scheuernden Reiniger, Reinigungsmittel oder andere Chemikalien, um die
Dampfstation zu reinigen.
Anti-Kalk-Kartusche auswechseln
Tauschen Sie die Wasserenthärtungskartusche regelmäßig aus. Bei mäßiger Anwendung (zweimal
pro Woche) und je nach Wasserhärte in Ihrer Umgebung sollte die Anti-Kalk-Kartusche zur
Wasserenthärtungs alle 3-6 Monate ausgetauscht werden.
Hinweis: Verwenden Sie das Gerät nicht ohne die Wasserenthärtungskartusche!
1. Entfernen Sie den Wassertank von der Station.
2. Ziehen Sie die Anti-Kalk-Kartusche nach oben und entfernen Sie diese, um sie auszutauschen. Um
sie zu entfernen, schrauben Sie diese zuerst ab und nehmen sie vorsichtig heraus. Trennen Sie den
Schlauch von der Kartusche und verbinden Sie ihn mit der neuen Kartusche. Schrauben Sie die neue
Kartusche wieder in den Wassertank.
Hinweis: Gehen Sie vorsichtig vor - es könnte sich Wasser im Kartuschengehäuse benden.
Bringen Sie eine neue Wasserenthärtungskartusche an ihrem Platz an.
Strona się ładuje...
Strona się ładuje...
Strona się ładuje...
Strona się ładuje...
Strona się ładuje...
Strona się ładuje...
Strona się ładuje...
Strona się ładuje...
Strona się ładuje...
Strona się ładuje...
Strona się ładuje...
Strona się ładuje...
Strona się ładuje...
Strona się ładuje...
Strona się ładuje...
Strona się ładuje...
Strona się ładuje...
Strona się ładuje...
Strona się ładuje...
Strona się ładuje...
Strona się ładuje...
Strona się ładuje...
Strona się ładuje...
Strona się ładuje...
Strona się ładuje...
Strona się ładuje...
Strona się ładuje...
Strona się ładuje...
Strona się ładuje...
Strona się ładuje...
Strona się ładuje...
Strona się ładuje...
Strona się ładuje...
Strona się ładuje...
Strona się ładuje...
Strona się ładuje...
Strona się ładuje...
Strona się ładuje...
Strona się ładuje...
Strona się ładuje...
Strona się ładuje...
Strona się ładuje...
Strona się ładuje...
Strona się ładuje...
Strona się ładuje...
Strona się ładuje...
Strona się ładuje...
Strona się ładuje...
Strona się ładuje...
Strona się ładuje...
Strona się ładuje...
Strona się ładuje...
Strona się ładuje...
Strona się ładuje...
Strona się ładuje...
Strona się ładuje...
-
 1
1
-
 2
2
-
 3
3
-
 4
4
-
 5
5
-
 6
6
-
 7
7
-
 8
8
-
 9
9
-
 10
10
-
 11
11
-
 12
12
-
 13
13
-
 14
14
-
 15
15
-
 16
16
-
 17
17
-
 18
18
-
 19
19
-
 20
20
-
 21
21
-
 22
22
-
 23
23
-
 24
24
-
 25
25
-
 26
26
-
 27
27
-
 28
28
-
 29
29
-
 30
30
-
 31
31
-
 32
32
-
 33
33
-
 34
34
-
 35
35
-
 36
36
-
 37
37
-
 38
38
-
 39
39
-
 40
40
-
 41
41
-
 42
42
-
 43
43
-
 44
44
-
 45
45
-
 46
46
-
 47
47
-
 48
48
-
 49
49
-
 50
50
-
 51
51
-
 52
52
-
 53
53
-
 54
54
-
 55
55
-
 56
56
-
 57
57
-
 58
58
-
 59
59
-
 60
60
-
 61
61
-
 62
62
-
 63
63
-
 64
64
-
 65
65
-
 66
66
-
 67
67
-
 68
68
-
 69
69
-
 70
70
-
 71
71
-
 72
72
-
 73
73
-
 74
74
-
 75
75
-
 76
76


Zelmer ZIR2415 Instrukcja obsługi
- Kategoria
- Okowy
- Typ
- Instrukcja obsługi
- Niniejsza instrukcja jest również odpowiednia dla
w innych językach
- Deutsch: Zelmer ZIR2415 Benutzerhandbuch
- slovenčina: Zelmer ZIR2415 Používateľská príručka
- română: Zelmer ZIR2415 Manual de utilizare
Powiązane artykuły
-
Zelmer ZIR0500 Trip Instrukcja obsługi
-
-
-
-
-
-
Inne dokumenty
-
Beko SGA6124D Instrukcja obsługi
-
Philips GC7640/80 Instrukcja obsługi
-
Siemens TSI802810/01 Instrukcja obsługi
-
Morphy Richards JET STREAM ELITE Instrukcja obsługi
-
Siemens TB402820 Instrukcja obsługi
-
Siemens TB60XTRM/01 Instrukcja obsługi
-
Clatronic DBS 3461 Instrukcja obsługi
-
AEG DBS2800-U Instrukcja obsługi
-
Braun CareStyle Compact Instrukcja obsługi
-