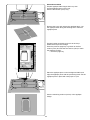
JANOME 001400E Instrukcja obsługi
- Kategoria
- Maszyny do szycia
- Typ
- Instrukcja obsługi
Ten podręcznik jest również odpowiedni dla

Instruction Book


IMPORTANT SAFETY INSTRUCTIONS
When using an electrical appliance, basic safety precautions should always be followed, including the
following:
This sewing machine is designed and manufactured for household use only.
Read all instructions before using this sewing machine.
DANGER
—
To reduce the risk of electric shock:
1. An appliance should never be left unattended when plugged in. Always unplug
this sewing
machine from the electric outlet immediately after using and before
cleaning.
WARNING
—
To reduce the risk of burns, re, electric shock, or injury to persons:
1. Do not allow to be used as a toy. Close attention is necessary when this sewing machine is used
by or near children.
2. Use this appliance only for its intended use as described in this owner’s manual.
Use only attachments recommended by the manufacturer as contained in this owner’s manual.
3. Never operate this sewing machine if it has a damaged cord or plug, if it is not working properly, if
it has been dropped or damaged, or dropped into water.
Return this sewing machine to the nearest authorized dealer or service center for examination,
repair, electrical or mechanical adjustment.
4. Never operate the appliance with any air opening blocked. Keep ventilation openings of this
sewing machine and foot controller free from accumulation of lint, dust and loose cloth.
5. Never drop or insert any object into any opening.
6. Do not use outdoors.
7. Do not operate where aerosol (spray) products are being used or where oxygen is being
administered.
8. To disconnect, turn all controls to the off (“O”) position, then remove plug from outlet.
9. Do not unplug by pulling on cord. To unplug, grasp the plug, not the cord.
10. Keep ngers away from all moving parts. Special care is required around the sewing machine
needle and/or cutting blade.
11. Always use the proper needle plate. The wrong plate can cause the needle to break.
12. Do not use bent needles.
13. Do not pull or push fabric while stitching. It may deect the needle causing it to break.
14. Switch this sewing machine off (“O”) when making any adjustment in the needle area, such as
threading the needle, changing the needle, threading the bobbin or changing the presser foot, and
the like.
15. Always unplug this sewing machine from the electrical outlet when removing covers, lubricating, or
when making any other adjustments mentioned in this owner’s manual.
SAVE THESE INSTRUCTIONS
Please note that on disposal, this product must be safely recycled in accordance with relevant
National legislation relating to electrical/electronic products. If in doubt please contact your
retailer for guidance. (European Union only)
For Europe only:
This appliance can be used by children aged from 8 years and above and persons with reduced
physical, sensory or mental capabilities or lack of experience and knowledge if they have been given
supervision or instruction concerning use of the appliance in a safe way and understand the hazards
involved. Children shall not play with the appliance. Cleaning and user maintenance shall not be made
by children without supervision.
For outside Europe (except U.S.A and Canada):
This appliance is not intended for use by persons (including children) with reduced physical, sensory or
mental capabilities, or lack of experience and knowledge, unless they have been given supervision or
instruction concerning use of the appliance by a person responsible for their safety.
Children should be supervised to ensure that they do not play with the appliance.

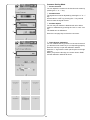
TABLE OF CONTENTS
GETTING READY TO SEW
Names of Parts ............................................................... 3
Standard Accessories .................................................4-5
Connecting the Power Supply ........................................ 6
Machine Operating Buttons ............................................ 6
Raising and Lowering the Presser Foot ......................... 7
Common Keys ................................................................ 7
Setting the Spool of Thread ........................................... 8
Extra spool pin ............................................................ 8
Winding the Bobbin ................................................... 8-10
Removing the bobbin .................................................. 8
Winding the bobbin ..................................................... 9
Inserting the bobbin .................................................. 10
Threading the Machine..................................................11
Built-in Needle Threader .............................................. 12
Replacing Needles ....................................................... 13
Fabric and Needle Chart .............................................. 13
On-screen Help ............................................................ 14
Removing and Attaching the Embroidery Foot ............ 15
Bobbin Holder for Embroidery (high tension) ............... 16
Embroidery Hoops ....................................................... 16
Stabilizers ..................................................................... 17
Types of the stabilizers .............................................. 17
Setting the Fabric in an Embroidery Hoop ................... 18
Attaching the Embroidery Hoop to the Machine .......... 19
Thread Holder .............................................................. 20
Selecting Built-in Embroidery Designs ......................... 20
Monogramming ............................................................ 21
Function Keys ............................................................... 22
Programming a Monogram...................................... 23-24
Color change ............................................................. 23
Monogram placement ............................................... 23
2-Letter monogram .................................................... 24
Editing a Monogram ..................................................... 25
Ready to Sew Window ............................................ 26-31
Function keys ............................................................ 26
Pattern information .................................................... 26
Stitch back/forward keys ........................................... 27
Jump key ................................................................... 27
Cross mark ................................................................ 27
Color section key ....................................................... 27
Trace key ................................................................... 28
Thread color/Jog key ................................................. 28
Fine position/angle adjustment key ........................... 29
Rotating a design ...................................................... 29
Moving a design ........................................................ 29
Color list key .............................................................. 30
Adjust key .................................................................. 30
Auto thread tension level ........................................ 30
Cutting the tails of jump threads............................. 30
Hoop back key ........................................................... 31
Starting to Sew Embroidery ......................................... 32
Editing Mode ...........................................................33-43
Selecting a hoop size ................................................ 33
Opening the embroidery designs .............................. 33
Editing tool bar information........................................ 34
Selecting a pattern .................................................... 34
Moving a pattern........................................................ 34
Duplicating a pattern ................................................. 35
Deleting a pattern ...................................................... 35
Resizing a pattern ..................................................... 35
Rotating a pattern ...................................................... 36
Flipping a pattern ...................................................... 36
Monogramming in an arc .......................................... 37
Grouping patterns ..................................................... 38
Customizing the display colors .................................. 39
Color grouping ........................................................... 40
Sewing order ............................................................. 41
Center positioning ..................................................... 41
Creating a square frame ............................................ 42
Single color sewing ................................................... 42
Zooming in the editing window .................................. 43
Pantry Designs for Applique ....................................44-45
Alternative method .................................................... 45
Celebration Designs ..................................................... 46
Bracelet Designs .......................................................... 47
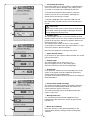
CUSTOMIZING MACHINE SETTINGS
Machine Setting Mode ................................................. 48
Registering the custom settings ................................ 48
Common Setting Mode ...........................................49-50
CUSTOMIZING EMBROIDERY MODE SETTINGS
Embroidery Mode Settings ...................................... 51-54
Language Selection Mode ........................................... 54
Saving and Opening a File ........................................... 55
Creating a new folder ................................................ 55
Deleting a le or folder .............................................. 56
Opening a le ............................................................ 56
Changing a name of the le or folder ........................ 57
CARE AND MAINTENANCE
Cleaning the Hook Area ............................................... 58
Cleaning the Thread Path ............................................ 59
Oiling the Machine...................................................60-64
Troubleshooting ............................................................ 65

3
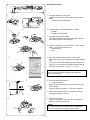
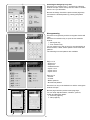
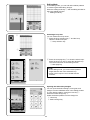
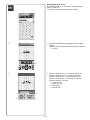
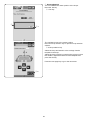
GETTING READY TO SEW
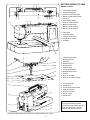
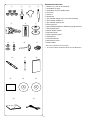
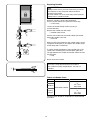
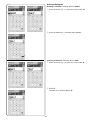
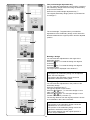
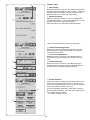
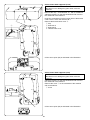
Names of Parts
Thread take-up lever
Upper thread guide
Pre-tension thread guide
Bobbin winder thread guide
Spool pin
Spool holder (large)
Hole for extra spool pin
Bobbin thread cutter
Bobbin winder spindle
Bobbin winder stopper
Face plate
Start/stop button
Thread cutter button
Visual touch screen
Carriage
Thread cutter/holder
Needle threader
Setscrew
Embroidery foot
Needle plate
Thread cutter
Lower thread guide
Needle clamp screw
Needle
Hook cover plate
Hook cover release button
Carrying handle
Handwheel
Touch panel stylus holder
USB port (type A)
Presser foot lifter
Power switch
Power inlet
q
w
e
r
t
y
u
i
o
!0
!1
!2
!3
!4
!5
!6
!7
!8
!9
@0
@1
@2
@3
@4
@5
@6
@7
@8
@9
#0
#1
#2
#3
* Design and specications are subject to change without prior notice.
q
!1
@9
#0
@8
t
y
u oi !0
w
e
!2
!3
!4
!5
!6
!7
!9
@1
@5
@6
@2
@3
!8
@4
@7
#2
#3
#1
NOTE:
To carry the sewing machine,
hold the carrying handle with your
hand, and support the sewing
machine with the other hand.
r
@0

4
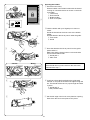
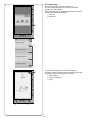
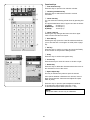
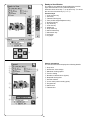
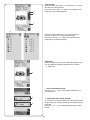
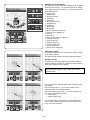
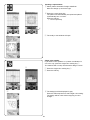
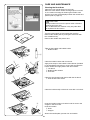
Standard Accessories
Bobbin x 5 (1 set on the machine)
Screwdriver (Large)
Screwdriver key (for needle plate)
Lint brush
Scissors
Needle set
Spool holder (large) X 2 (1 set on the machine)
Spool holder (small) X 2
Spool holder (special) X 2
Extra spool pin
Special bobbin holder for Embroidery (high tension)*
Touch panel stylus
Bobbin holder cleaner
Instruction book
Quick reference guide
Template CD
Instructional DVD
Soft machine cover
Power cable**
q
w
e
r
t
y
u
i
o
!0
!1
!2
!3
!4
!5
!6
!7
!8
!9
q w e r
t y u
i o !0 !1
!2 !3 !4
!5 !6 !7
!8 !9
** The power cable included may differ from the illustration.
* Set on the machine for some models.

5
@0 @1
@2 @3
*** The embroidery hoops supplied with your machine vary
depending on your model.
Embroidery hoop SQ14b (with template)***
Embroidery hoop RE20b (with template)***
Embroidery hoop SQ20b (with template)***
Clamp X 8
@0
@1
@2
@3

6
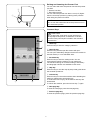
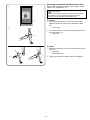
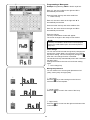
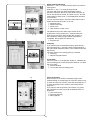
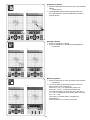
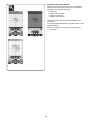
Connecting the Power Supply
z First make sure the power switch q is off.
x Insert the machine plug w of the power supply cord
into the power inlet e.
c Insert the power supply plug r into the wall outlet t,
and turn the power switch q on.
q Power switch
w Machine plug
e Power inlet
r Power supply plug
t Wall outlet
NOTE:
Make sure to use the power cable that came with the
machine.
If you turn off the power switch, wait for 5 seconds
before turning it on again.
WARNING:
While in operation, always keep your eyes on the
sewing area, and do not touch any moving parts such
as the thread take-up lever, handwheel or needle.
Always turn off the power switch and unplug the
machine from the power supply:
- when leaving the machine unattended.
- when attaching or removing parts.
- when cleaning the machine.
q
w
For the U.S.A. and Canada only
Polarized plug (one blade wider than the other):
To reduce the risk of electric shock, this plug is intended
to t in a polarized outlet only one way. If it does not t
fully in the outlet, reverse the plug. If it still does not t,
contact a qualied electrician to install the proper outlet.
Do not modify the plug in any way.
r
t
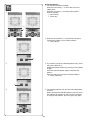
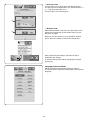
q Start/stop button
Press this button to start or stop the machine. The button
turns red when the machine is running, and green when
it stops.
w Thread cutter button
Press this button when you nish sewing to trim the
threads. The needle bar automatically rise after trimming
the threads.
NOTE:
If you press the start/stop button without lowering the
presser foot, the warning message e appears on the
visual touch screen.
Lower the presser foot and press the start/stop button.
Machine Operating Buttons
q w
e
e

7
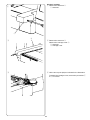
Raising and Lowering the Presser Foot
You can raise and lower the presser foot with the presser
foot lifter.
q Presser foot lifter
w Extra lifted position
You can raise the presser foot about 7 mm (1/4˝) higher
than the normal up position by exerting more pressure
when lifting the presser foot lifter.
NOTE:
Do not turn the hand wheel when the presser foot is in
the extra lifted position.
q
w
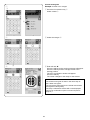
q Home key
Press this key to enter the category selection.
w Open le key
Press this key and the open le window will open.
You can open embroidery designs saved in the machine’s
internal memory or on a USB ash drive.
e Set mode key
Press this key to enter the setting mode. You can
customize the machine settings to your preference.
The machine settings for common settings, embroidery
and language selection are available in this mode.
r Help key
Press this key to view the step-by-step visual guide about
the essential operations.
t Lockout key
Press this key to lockout the machine when threading the
machine, replacing the accessories etc.
To reduce the risk of injury, all the buttons and keys are
deactivated.
To unlock the machine, press the lockout key t again.
y Next page key
To view the next page, press the next page key.
u Previous page key
To view the previous page, press the previous page key.
Common Keys
CAUTION:
Do not press the visual touch screen with hard or
sharp objects like pencils, screwdrivers or the like.
Use the touch panel stylus included in the standard
accessories.
q
w
e
r
t
yu

8
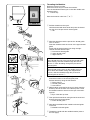
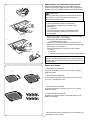
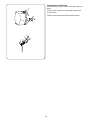
Extra spool pin
Use the extra spool pin when you need to wind a bobbin
without unthreading the machine while working on a
sewing project.
Insert the extra spool pin into the hole as shown.
Place a spool of thread on the extra spool pin and x the
spool with the spool holder.
q Extra spool pin
w Hole for extra spool pin
e Large spool holder
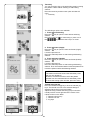
Setting the Spool of Thread
Lift up the spool pin. Place the spool of thread on the
spool pin.
Attach the large spool holder, and press it rmly against
the spool of thread.
NOTE:
Use the small spool holder to hold narrow or small
spools of thread.
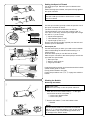
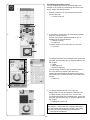
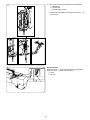
Winding the Bobbin
Removing the bobbin
CAUTION:
Press the lockout key or turn the power switch off.
z Slide the hook cover release button q to the right,
and remove the hook cover plate w.
q Hook cover release button
w Hook cover plate
x Remove the bobbin e from the bobbin holder.
e Bobbin
NOTE:
Use the plastic bobbins for horizontal hook marked
with a “J” r. Using other bobbins, such as pre-wound
paper bobbins, may cause stitching problems and/
or damage to the bobbin holder.
x
z
q
w
Use the spool holder (special) to hold the specic size of
the spool of threads as shown.
The sizes of the spools of thread are as follows;
The hole diameter of the spool has a range of 3/8˝ to
7/16˝ (9.5 to 10.5 mm)), and the spool length has a range
of 2 3/4˝ to 3˝ (70 to 75 mm).
q Spool holder (special)
w Hole diameter (3/8˝ to 7/16˝)
e Spool length (2 3/4˝ to 3˝)
Firmly insert the spool holder (special) into the hole and
hold the spool as illustrated.
q
q
w
w
e
Draw the thread to the left and forward around the bobbin
winder thread guide as shown.
Firmly pull the thread to the right.
Follow the procedure from x to , of page 9 to wind the
bobbin.
r
e
q
w
e

9
, Remove the bobbin.
Insert the thread into one of the slits of the ange
plate and pull the thread to cut.
NOTE:
For safety purposes, the machine will automatically
stop 1.5 minutes after starting bobbin winding.
x Put the bobbin on the bobbin winder spindle.
w Bobbin
e Bobbin winder spindle
c Pass the thread to the bobbin.
Hold the thread with both hands and wind it around
the bobbin clockwise several times.
z
w
x
b
Winding the bobbin
z Draw the thread from the spool.
Guide the thread around the bobbin winder thread
guide.
q Bobbin winder thread guide
v
n
q
e
c
i
t
r
v Insert the thread into one of the slits t of the ange
plate r and pull the thread to cut.
r Flange plate
t Slit
b Push the bobbin winder spindle e to the right.
The visual touch screen will show the bobbin winding
sign.
If you wish to wind the bobbin thread more quickly or
slowly, you can adjust the maximum bobbin winding
speed by pressing the “+” key y or “–” key u.
m
,
n Press the start/stop button i.
i Start/stop button
When the bobbin is fully wound, it will stop spinning
automatically.
Press the start/stop button i to stop the machine.
m Return the bobbin winder to its original position by
moving the spindle to the left.
e
y
u
NOTE:
Do not move the bobbin winder spindle while the
machine is running.

10
z
x
c
v
Inserting the bobbin
z Press the lockout key.
Place a bobbin in the bobbin holder with the thread
running off counterclockwise as shown on the hook
cover plate.
q Lockout key
w End of thread
e Bobbin holder
r Hook cover plate
x Hold the bobbin with your ngertip so it does not
rotate.
Guide the thread into the front notch of the bobbin
holder.
Pull the thread to the left to pass it under the guide.
t Front notch
y Guide
c Draw the thread to the left to pass it into the guide
path marked “1”.
Make sure that the thread comes out from the side
notch of the bobbin holder.
u Guide path 1
i Side notch
NOTE:
If the thread does not come out from the side notch,
rethread from step z.
v Continue to draw the thread along the guide path
marked “2” and pull the thread to the right through the
slit. The thread will be cut to a proper length and held
in place.
o Guide path 2
! 0 Slit (Thread cutter)
ew
r
t
y
u
Correct
i
i
i
Wrong
o
!0
b
r
b Set the left edge of the hook cover plate into opening.
Push down the hook cover plate to t in place.
q

11
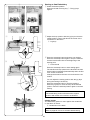
Threading the Machine
Raise the presser foot lifter.
Press the lockout key to lockout the machine.
Turn the handwheel toward you to raise the needle at its
highest position.
q
Lockout key
Pass the thread in order from
z
to
m
.
z Pull the thread from the spool.
Hold the thread with both hands and pass the thread
into the slit of the pre-tension thread guide.
w Slit
x Wind the thread around the pre-tension thread guide
once as shown.
Draw the thread around the corner of the upper thread
guide.
Firmly pull the thread toward you along the right
channel until the thread snaps.
e Pre-tension thread guide
r Upper thread guide
t Right channel
NOTE:
If the thread slips out of the pre-tension thread guide
while sewing, wind the thread through the hole as
shown y when threading through the pre-tension
thread guide.
c Draw the thread down along the right channel and
around the bottom of the thread guide plate.
Pull the thread up along the left channel.
t Right channel
i Thread guide plate
o Left channel
v While holding the thread at the spool, rmly draw the
thread up and to the back of the take-up lever. Draw
the thread forward to draw it into the eye of the take-
up lever.
!0 Eye of the take-up lever
b Then pull the thread down along the left channel and
through the lower thread guide.
!1 Lower thread guide
n Slide the thread behind the needle bar thread guide
on the left.
!2 Needle bar thread guide
m Thread the needle with the needle threader (refer to
the next page).
b n m
!1
NOTE:
If the thread coming out from the needle eye is too
short after auto thread cutting and skipped stitch
occurs, draw the thread through the pre-tension
thread guide as shown u.
!2
z
x
q
w
c
e
r
t
t
i
o
!0
v
y
u

12
Built-in Needle Threader
NOTE:
The needle threader can be used with a #11 to #14
needle.
Thread size 50 to 90 is recommended.
Do not use thread size 30 or thicker.
z Press the lockout key to lock the machine.
Lower the presser foot.
Turn the handwheel toward you to until the needle
thread sign w appears on the right upper corner of
the lockout window.
q Lockout key
w Needle threader sign
x Pull down the needle threader knob as far as it will go.
The threader hook comes out through the needle eye
from behind.
e Threader knob
r Threader hook
z
c
b
v
x
q
w
c Draw the thread from left to right, under the left guide,
threader hook and right guide.
Draw the thread around the right guide toward you.
t Left guide
y Right guide
v Raise the threader slowly so a loop of the thread is
pulled up through the needle eye.
u Threader loop
b Remove the thread end through the needle eye to the
rear.
r
e
t
y
u

13
Replacing Needles
CAUTION:
Always make sure to press the lockout key to lockout
the machine or turn the power switch off before
replacing the needle.
A loose needle or a loose screw may cause machine
malfunction or needle to break.
Raise the needle by turning the handwheel.
Turn the power switch off or press the lockout key.
q Lockout key
Loosen the needle clamp screw by turning it
counterclockwise.
Remove the needle from the clamp.
w Needle clamp screw
Insert a new needle into the needle clamp with the at
side of the needle to the rear.
e Flat side
When inserting the needle into the needle clamp, push it
up against the stopper pin and tighten the needle clamp
screw rmly with a screwdriver.
To check needle straightness, place the at side of the
needle onto something at (a needle plate, glass etc.).
The gap between the needle and the at surface should
be consistent.
r Gap
Never use a blunt needle.
r
NOTE:
Use size 11 blue tipped needle for ne fabrics.
For medium to heavy weight fabrics, use size 14
needles.
q
Fabric Thread Needle
Fine
Embroidery thread
Blue tip needle
or
EL x 705
Size 12/80
Medium
Heavy
weight
Universal needle #14
or
EL x 705
Size 14/90
Fabric and Needle Chart
Janome bobbin thread for embroidery is recommended
for bobbin.
e
w

14
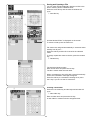
On-screen Help
Press the help key to open the help menu.
You can view instructions on 4 topics of essential
operations of the machine.
Select the help topic by pressing the book icon and the
step-by-step instruction will open.
q Help key
w Book icon
q
w
er
t
To view the next page, press the next page key.
To view the previous page, press the previous page key.
Press the X key to close the current window.
e Next page key
r Previous page key
t X key

15
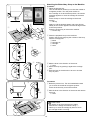
Removing and Attaching the Embroidery Foot
Remove the embroidery foot when removing the needle
plate for the maintenance, etc.
CAUTION:
Always make sure to press the lockout key to lockout
the machine or turn the power switch off before
removing or attaching the embroidery foot.
To remove:
z Turn the power switch off or press the lockout key.
Raise the needle by turning the handwheel toward
you.
q Lockout key
x Loosen the setscrew with the screwdriver and remove
the embroidery foot.
w Setscrew
To attach:
z Attach the embroidery foot to the presser bar from the
left side.
w Setscrew
e Embroidery foot
x Tighten the setscrew securely with the screwdriver.
z
x
z x
q
w
w
e

16
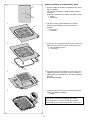
NOTE:
• The special bobbin holder for embroidery
(high tension) is marked with a yellow dot for
identication.
q Yellow dot
• The special bobbin holder for embroidery (high
tension) is already installed in the machine for
some models.
z Remove the needle, embroidery foot and needle plate
(refer to the pages 13, 15 and 58).
Take out the standard bobbin holder.
w Standard bobbin holder
x Insert the special bobbin holder into the hook race.
Make sure to match the knob of the bobbin holder with
the stopper on the machine.
Attach the needle plate, presser foot and needle.
e Knob
r Stopper
t Special bobbin holder for embroidery (high tension)
NOTE:
Use the standard bobbin holder when sewing quilting
designs that use the same thread for the bobbin as the
needle thread.
Bobbin Holder for Embroidery (high tension)
Replace the standard bobbin holder with the bobbin
holder for embroidery (high tension) when using bobbin
threads other than Janome bobbin thread for embroidery.
r
e
z
x
t
q
Embroidery Hoops
q Embroidery hoop SQ14b
A square embroidery hoop with a 14 cm (5.5˝) square
embroidery area.
w Embroidery hoop RE20b
An extra large embroidery hoop with a 14 cm by 20 cm
(5.5˝ by 7.9˝) embroidery area.
q w
re
e Embroidery hoop SQ20b
A square embroidery hoop with a 20 cm (7.9˝) square
embroidery area.
r Clamp (RE20b and SQ20b)
A clamp for holding the fabric to the embroidery hoops
RE20b and SQ20b.
w
* The embroidery hoops supplied with your machine vary
depending on your model.
CAUTION:
Always make sure to press the lockout key to lockout
the machine or turn the power switch off before
attaching the bobbin holder.

17
Stabilizers
To create the best quality embroidery, it is important to
use stabilizers.
How to use:
Attach the stabilizer to the wrong side of the fabric.
You may need to use more than one layer.
For rm fabrics, you may place a thin sheet of paper
under the fabric.
The non-adhesive type should be used when
embroidering fabric which cannot be ironed or for
sections which are difcult to iron.
Cut the stabilizer larger than the embroidery hoop and
set it on the hoop so that the entire piece is fastened to
the hoop to prevent any looseness in the fabric.
Attaching the stabilizer
Place the wrong side of fabric and the glossy side of
the stabilizer together. Fold up a corner of the stabilizer
and fuse it with an iron.
NOTE:
Fold up a corner of the stabilizer, to make it easier
to peel off the excess stabilizer after stitching.
Ironing temperatures vary depending on the kind of
adhesive stabilizer you are using.
Types of the stabilizers
NOTE:
Sticky type stabilizers can be used only for securing a small piece of fabric or work that cannot be secured in the
hoop, or for securing velvet and other napped fabric that would be permanently marked by the hoop.
Clean the bobbin holder after stitching as glue can get stuck on it.
Type Usage Property
Tear-away Stable woven fabrics Made from a ber that will tear easily.
Iron-on Knits and all kinds of unstable fabrics Adhesive type fusible with an iron.
Cut-away Knits and all kinds of unstable fabrics Non-woven fabric that does not tear.
Water soluble Cutwork or lace embroidery
Right side of looped fabrics such as towels to avoid loops
coming through the embroidery
A thin lm that will dissolve in water.
Heat-away Cutwork or lace embroidery A thin lm that will melt away with
heat.

18
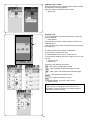
v Push the inner hoop and fabric into the outer hoop.
Tighten the screw on the outer hoop to stretch the
fabric. Make sure that the fabric is stretched tightly in
the hoop.
Remove the template.
c Loosen the hoop tightening screw on the outer hoop.
Place the inner hoop and fabric on the outer hoop.
t Hoop tightening screw
y Outer hoop
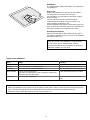
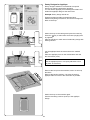
Setting the Fabric in an Embroidery Hoop
z Prepare a fabric and attach a stabilizer to the wrong
side of the fabric.
The fabric and stabilizer should be larger than the
hoop size.
Draw the centerlines on the fabric with tailor’s chalk.
q Fabric
w Centerlines
q
w
r
e
t
y
u
x Lay the inner hoop and template on the fabric,
matching the centerlines of the fabric with the
template.
e Inner hoop
r Template
z
x
c
v
b
b Clamp the fabric to the hoop with the clamps when
using hoop SQ20b or RE20b.
u Clamp
NOTE:
Thick layers of fabric and stabilizer may cause
skipped stitches, or broken threads and needles.
Avoid sewing on the layers thicker than 3 mm (1/8˝).
Strona jest ładowana ...
Strona jest ładowana ...
Strona jest ładowana ...
Strona jest ładowana ...
Strona jest ładowana ...
Strona jest ładowana ...
Strona jest ładowana ...
Strona jest ładowana ...
Strona jest ładowana ...
Strona jest ładowana ...
Strona jest ładowana ...
Strona jest ładowana ...
Strona jest ładowana ...
Strona jest ładowana ...
Strona jest ładowana ...
Strona jest ładowana ...
Strona jest ładowana ...
Strona jest ładowana ...
Strona jest ładowana ...
Strona jest ładowana ...
Strona jest ładowana ...
Strona jest ładowana ...
Strona jest ładowana ...
Strona jest ładowana ...
Strona jest ładowana ...
Strona jest ładowana ...
Strona jest ładowana ...
Strona jest ładowana ...
Strona jest ładowana ...
Strona jest ładowana ...
Strona jest ładowana ...
Strona jest ładowana ...
Strona jest ładowana ...
Strona jest ładowana ...
Strona jest ładowana ...
Strona jest ładowana ...
Strona jest ładowana ...
Strona jest ładowana ...
Strona jest ładowana ...
Strona jest ładowana ...
Strona jest ładowana ...
Strona jest ładowana ...
Strona jest ładowana ...
Strona jest ładowana ...
Strona jest ładowana ...
Strona jest ładowana ...
Strona jest ładowana ...
Strona jest ładowana ...
-
 1
1
-
 2
2
-
 3
3
-
 4
4
-
 5
5
-
 6
6
-
 7
7
-
 8
8
-
 9
9
-
 10
10
-
 11
11
-
 12
12
-
 13
13
-
 14
14
-
 15
15
-
 16
16
-
 17
17
-
 18
18
-
 19
19
-
 20
20
-
 21
21
-
 22
22
-
 23
23
-
 24
24
-
 25
25
-
 26
26
-
 27
27
-
 28
28
-
 29
29
-
 30
30
-
 31
31
-
 32
32
-
 33
33
-
 34
34
-
 35
35
-
 36
36
-
 37
37
-
 38
38
-
 39
39
-
 40
40
-
 41
41
-
 42
42
-
 43
43
-
 44
44
-
 45
45
-
 46
46
-
 47
47
-
 48
48
-
 49
49
-
 50
50
-
 51
51
-
 52
52
-
 53
53
-
 54
54
-
 55
55
-
 56
56
-
 57
57
-
 58
58
-
 59
59
-
 60
60
-
 61
61
-
 62
62
-
 63
63
-
 64
64
-
 65
65
-
 66
66
-
 67
67
-
 68
68


JANOME 001400E Instrukcja obsługi
- Kategoria
- Maszyny do szycia
- Typ
- Instrukcja obsługi
- Ten podręcznik jest również odpowiedni dla
w innych językach
- English: JANOME 001400E Owner's manual
Powiązane dokumenty
Inne dokumenty
-
Hasbro Hitclips Downloader Instrukcja obsługi
-
Alfa Network Next 40 Instruction book
-
Silvercrest SNM 33 A1 Instrukcja obsługi
-
ELNA EXCELLENCE 780 Instrukcja obsługi
-
Tristar SM-6000 Instrukcja obsługi
-
-
kleankin 834-322V80 instrukcja
-
 Frost King EZ833CDSP Instrukcja obsługi
-
Ceratech ACCURATUS 260 Instrukcja obsługi
