i-tec U3HDMIDVIDOCK Instrukcja obsługi
- Kategoria
- Stacje dokujące do notebooków
- Typ
- Instrukcja obsługi
Niniejsza instrukcja jest również odpowiednia dla


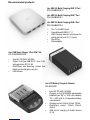
Recommended products
i-tec USB 3.0 Metal Charging HUB 10 Port
P/N: U3HUBMETAL10
i-tec USB 3.0 Metal Charging HUB 7 Port
P/N: U3HUBMETAL7
i-tec USB 3.0 Metal Charging HUB 4 Port
P/N: U3HUBMETAL4
10x / 7x / 4x USB 3.0 port
Compatible with USB 2.0 / 1.1
USB charging detection mechanism for
mobile devices for all 10 / 7 / 4 ports
Plug & Play
Power adapter
i-tec LCD Battery Charger 4-Channel
P/N: BACHR20
Input: AC 100-240V / 50-60Hz
Charging up to 4 NiCd/NiMH rechargeable
batteries type "AA" or "AAA" with capacity
180 – 3000 mAh in 4 independent battery
compartments
Charging current: 200mA, 500mA, 700mA
Discharging current: 100mA, 250mA,
350mA
USB slot for charging of mobile devices
(2.1A)
i-tec USB Smart Charger 5 Port 40W / 8A
P/N: CHARGER5P40W
Input: AC 100-240V / 50-60Hz
Output: 5x A-Type USB DC 5V / max. 2.4A;
total output max. DC 5V / 8A
iPad/iPhone and Samsung phones and
tablets can be charged on any port
LED indicator

EN
Read carefully the user manual before assembly - installation - commissioning.
Protect yourself and avoid damaging your equipment.
DE
Lesen Sie unbedingt die Gebrauchsanweisung vor Aufstellung – Installation –
Inbetriebnahme. Dadurch schützen Sie sich und vermeiden Schäden an Ihrem Gerät.
CZ
Pečlivě si přečtěte uživatelskou příručku před montáží – instalací – uvedením do
provozu. Ochráníte tím sebe a vyvarujete se poškození Vašeho zařízení.
PL
Przeczytaj uważnie instrukcję przed montażem / podłączeniem / użytkowaniem, aby
ustrzec się przed obrażeniami a urządzenie przed uszkodzeniem.
SK
Každopádne si prečítajte užívateľskú príručku pred zložením - inštaláciou - uvedením
do prevádzky. Ochránite sa tým a vyvarujete sa škodám na Vašom prístroji.
LT
Prieš montavimą-instaliavimą-eksploatavimą išsamiai perskaitykite vartotojo vadovą.
Tuo apsaugosite save ir išvengsite Jūsų įrenginio pažeidimo.

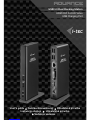
i-tec USB 3.0 Dual Docking Station
HDMI DVI Full HD Video
USB Charging Port
ENGLISH..................................................................................................... 04-07
DEUTSCH................................................................................................... 08-11
ČESKY........................................................................................................ 12-15
POLSKI....................................................................................................... 16-19
SLOVENSKY............................................................................................... 20-23
LIETUVOS................................................................................................... 24-27
WEEE............................................................................................................... 28
DECLARATION OF CONFORMITY................................................................. 29
FCC................................................................................................................... 30

INTRODUCTION
Thank you for purchasing the i-tec docking station that will allow you to connect your favorite pieces
of hardware such as a keyboard, mouse, external disk or USB printer through the USB ports, audio
system through the input for earphones and microphone, internet modem / LAN Ethernet PC network
through the LAN port, monitor through the DVI-I and HDMI port, etc. to your notebook / tablet / PC.
You can connect all of these pieces of hardware easily and fast to your notebook / tablet / PC by a
single USB 3.0 cable. You can display your data on modern LCD and plasma monitors and TV sets
because the docking station is equipped with a DVI-I and HDMI port. The graphic chip which makes
the “heart” of the docking station supports even the Full HD+ resolution (2048 x 1152 pixels). Each of
the six USB ports (1x USB 3.0 Fast, 1x USB 3.0 and 4x USB 2.0) can be used for charging but only the
port marked USB 3.0 Fast has a function in accordance with the BC 1.2 specification (for charging of
the iPad or Samsung tablets). Another advantage is that the docking station can be used either in a
vertical or a horizontal position.
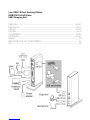
CONTENT OF THE PACKAGE
i-tec USB 3.0 docking station
Base plate
Power adapter
USB 3.0 cable (one end connector type A, the second end type B; 100 cm) – for connecting
to a notebook / PC
CD with the drivers and the manual
Quick Start
SYSTEM REQUIREMENTS
Hardware requirements: notebook / tablet with OS Win 8 / PC with a free port USB 3.0 / 2.0.
If you have USB 2.0, the data transfer speed will be reduced. Processor Intel Pentium 1.2
GHz and higher, 512 MB RAM.
Operating system: Windows Vista / 7 / 8 / 8.1 / 10 32/64 bit, Mac OS X.
For playing a DVD on an additional monitor the processor shall be at least Intel Pentium 2.0
and higher, 1 GB RAM and a screen resolution shall be 800x600 and 16 colors.
CAUTION!
Charging: The docking station supports charging of the connected USB mobile equipment such as
smartphones, ebook readers, multimedia players, GPS navigations and tablets (e.g. Asus, Toshiba,
Dell, GoClever, Prestigio, Emgeton, Sencor). Simply connect the equipment you want to charge
using the original cable to the USB port of the docking station with the connected power adaptor. The
only exceptions are the Apple or Samsung tablets which are supported as well but only on the USB
3.0 Fast port with the BC 1.2 specification. At the same time the docking station must be
disconnected from the computer/notebook and the inclosed power adaptor must be
connected.
USB 3.0: Before the installation on the USB 3.0 port make sure that you have the most recent drivers
installed for this port (for the USB 3.0 controller into notebook / tablet / PC). Products with the USB 3.0
SuperSpeed technology have been used since 2010; however, the drivers for the supported
equipment are still undergoing some fine tuning. Your notebook / tablet / PC needs to be equipped
Quick Start
NGLIS
E H
EN
04

with the USB 3.0 interface so that you can utilize the advantages of the fast USB 3.0 equipment. Its
problem free function is ensured by the chipset which needs to have the current drivers available.
Problems that you can encounter during the installation or use of our USB 3.0 equipment are very
often caused by the installed outdated drivers for the USB 3.0 controller or chipset of your notebook /
tablet / PC. Other problems can be caused by outdated firmware of the USB 3.0 port controller. Most
frequently it is one of the following manufacturers: Intel, Renesas (former NEC), Via (VLI), AS Media,
Fresco Logic, Etron.
You can find the most recent drivers for the i-tec products on our website www.i-tec-europe.eu in the
„Download“ tab for the individual products. The „Problems with USB 3.0“ tab includes a more detailed
description with links to the drivers and firmware for USB 3.0 controllers.
Note:
The installation of audio ports, reader and the USB HUB (for USB 3.0 / 2.0 ports type A) is
automatic from the system, the other ports need to be installed from the supplied CD.
Before the first connection of the docking station to a notebook / tablet / PC it is necessary first to
install the LAN and DVI-I port from the supplied CD and only then to connect the equipment to
the docking station.
INSTALLATION OF DRIVERS IN WINDOWS VISTA / 7 / 8 / 8.1 / 10 (32/64 BIT VERSION)
Before the first use do not connect the docking station to the notebook / tablet / PC, until you install the
corresponding drivers for the LAN and DVI-I port from the supplied CD. The equipment drivers need
to be installed only before the first use.
Insert the CD with the drivers to the CD drive or download the required software from our website
www.i-tec-europe.eu from the „Download“ tab for this product. Install the drivers according to the
following procedure:
For the LAN and DVI-I port select the installation from the Setup.exe file in the directory on the CD:/ or
run the downloaded file, select the language of the installation and follow the instructions on the
screen.
Note:
In Windows Vista / 7 / 8 / 8.1 / 10 install the DVI-I port as the „Administrator“. The monitor may be
flashing during the installation of the drivers – this is a standard process. After the completion of the
installation we recommend restarting the notebook / tablet / PC.
HARDWARE INSTALLATION (CONNECTING THE DOCKING STATION TO A NOTEBOOK /
TABLET / PC)
1) Turn ON the notebook / tablet / PC and connect the power adapter to the docking station.
2) Connect the power adapter to the AC 110 V / 230 V mains.
3) Connect the USB 3.0 cable to the USB port type B on the back on all of the docking station.
4) Connect the USB 3.0 cable to a free USB 3.0 / 2.0 port of your notebook / tablet / PC.
5) Subsequently, the automatic installation of the ports in the individual systems will start.
i-tec USB 3.0 Dual Docking Station
ENGLISH
EN
05

INSTALLATION OF DRIVERS IN MAC OS X
Before the first use do not connect the docking station to the MacBook / PC, until you install the
corresponding drivers for the LAN and DVI-I port from the supplied CD. The equipment drivers need
to be installed only before the first use.
Insert the CD with the drivers to the CD drive or download the required software from our website
www.i-tec-europe.eu from the „Download“ tab for this product. Install the drivers according to the
following procedure:
For the LAN and DVI-I port select the installation from the DisplayLink_MacOSX.dmg file in the
directory on the CD:/ or run the downloaded file. Decompress the file on the desktop of your MacBook
/ PC as a virtual disc, select “Drivers“ and then „DisplayLink Software Installer“. Then select the
language of the installation and follow the instructions on the screen. Enter the user password if
necessary. The monitor may be flashing during the installation of the drivers – this is a standard
process. After the completion of the installation restart the MacBook / PC.
HARDWARE INSTALLATION (CONNECTING THE DOCKING STATION TO A MACBOOK / PC)
1) Turn ON the MacBook / PC and connect the power adapter to the docking station.
2) Connect the power adapter to the AC 110 V / 230 V mains.
3) Connect the USB 3.0 cable to the USB port type B on the back panel of the docking station.
4) Connect the USB 3.0 cable to a free USB 3.0 / 2.0 port of your MacBook / PC.
5) Subsequently, the automatic installation of the ports in the individual systems will start.
6) After the completion of the installation restart the MacBook / PC.
FREQUENTLY ASKED QUESTIONS
Question: After installation of Windows 8.1 the equipment stopped functioning. In Windows 8 it
worked without problems.
Answer: Please install the most recent drivers from our website that you can find in the „Download“
tab for the given product. Windows 8.1 is supported from the DisplayLink 7.4 version.
Question: After installation of Mac OS X 10.9 Mavericks the equipment stopped functioning. In the
previous system version the equipment worked without problems.
Answer: Please install the most recent drivers from our website that you can find in the „Download“
tab for the given product. Mac OS X 10.9 Mavericks is supported from the DisplayLink 2.1 version.
Question: I am running Mac OS X and the audio output is not working.
Answer: Currently, the drivers for Mac OS X support audio from version 10.10.x Yosemmite and
higher if the device is connected to an USB 3.0 port. Audio can also be used when the device is
connected to an USB 2.0 port.
Question: The docking station is not functioning with a tablet and Windows 8.
Answer: Please install the most recent drivers 7.2 M0 or higher that can be downloaded from
http://www.displaylink.com/support/index.php.
Quick Start
NGLIS
E H
EN
06

Question: I have a problem with detecting the USB 3.0 docking station in the USB 3.0 port of my
notebook / tablet / PC.
Answer: The problem may be caused by outdated drivers for the USB 3.0 port of your notebook /
tablet / PC. Please read the description and download the most recent drivers for the USB 3.0 chipset
in your notebook / tablet / PC and installed them according to the instructions provided. The drivers
can be downloaded from http://www.displaylink.com/support/ticket.php?id=315.
Question: How to properly install the USB 3.0 docking station in Windows?
Answer: Do not connect the USB 3.0 docking station to the USB port of your notebook / tablet / PC
until you install the drivers. You need to install the most recent drivers for the DisplayLink (for internal
chipset DL-3700) that you can download from http://www.displaylink.com/support/index.php. After
you have installed the drivers and connected the USB 3.0 docking station to the USB port of your
notebook / tablet / PC the remaining drivers will be installed automatically. The control utility will be
activated only after connecting the monitor.
Question: Are there drivers for Windows 8 / 8.1 32/64 bit for the USB 3.0 docking station available?
Answer: Yes, for the graphic part you need to install the most recent drivers for the DisplayLink (for
i n t e r n a l c h i p s e t D L - 3 7 0 0 ) t h a t y o u c a n d o w n l o a d f r o m
http://www.displaylink.com/support/index.php. Do not connect the USB 3.0 docking station until you
install these drivers. After you have installed the drivers and connected the USB 3.0 docking station
to the USB port of your notebook / tablet / PC the remaining drivers will be installed automatically. The
control utility will be activated only after connecting the monitor.
Question: Can I get more detailed information on troubleshooting for the USB 3.0 docking station?
Answer: of course, you can find useful information on the DisplayLink website at
http://www.displaylink.com/support/knowledgebase.php on the FAQ tab or you can contact our
technical support.
Question: The equipment will not charge an Apple / Samsung tablet.
Answer: Unfortunately, despite the European standard on compatibility of charging equipment,
some companies protect their brand products and these can be charged only by the original /
licensed charging adapter. The docking station can be used for charging of the Apple / Samsung
tablets only on the USB 3.0 Fast port. At the same time the docking station must be disconnected
from the computer/notebook and the inclosed power adaptor must be connected.
Question: The LAN port is not working or its speed is only 10/100 Mb/s.
Answer: Check all cables between the docking station and the active component and fully press the
RJ-45 connectors. It is also helpful to change the Ethernet cable between the docking station and the
active network component (HUB, switch, router) for a certified cable.
For more information, please refer to the User’s Manual on the provided CD-ROM.
i-tec USB 3.0 Dual Docking Station
ENGLISH
EN
07

EINLEITUNG
Wir bedanken uns für den Kauf der i-tec Docking Station, die es Ihnen ermöglicht, alle Ihre Lieblingsgeräte,
wie z. B. Tastatur, Maus, externe Festplatte oder USB-Drucker mit Hilfe der USB-Anschlüsse, Audioanlage mit
Hilfe des Eingangs für Kopfhörer und Mikrophon, Internetmodem / LAN Ethernet PC Netzwerk mit Hilfe des
LAN-Ports, Display über DVI-I-Port usw., an Notebook / Tablet-PC / Computer anzuschließen. Alle erwähnten
Geräte können Sie an Ihr Notebook / Ihren Tablet-PC / Computer einfach und schnell mit einem einzigen USB
3.0 Kabel anschließen. Als Anzeigegerät können Sie moderne LCD- und Plasmadisplays und Fernseher
nutzen, da die Docking Station mit einem DVI-I-Port mit Adapter für VGA und HDMI ausgestattet ist.
Grafikchipsatz, der „das Herz“ der Docking Station bildet, unterstützt sogar die FullHD+ Auflösung (2048 x
1152 Pixel). Jeder der sechs USB Anschlüsse (1x USB 3.0 Fast, 1x USB 3.0 und 4x USB 2.0) verfügt über die
Ladefunktion, aber nur der als USB 3.0 Fast markierte Anschluss verfügt auch über die Funktion nach BC 1.2
Spezifikation (zum Aufladen von iPad oder Samsung Tablet-PCs). Vorteilhaft ist auch die Möglichkeit, die
Dockingstation in senkrechter oder waagerechter Position zu verwenden.
LIEFERUMFANG
i-tec USB 3.0 Docking Station
Untergestell
Netzadapter
USB 3.0 Kabel (ein Ende - Anschluss Typ A, anderes Ende - Typ B; 100 cm) – für den Anschluss an
Notebook / Tablet-PC / Computer
CD mit Treibern und Gebrauchsanweisung
Quick Start
SYSTEMANFORDERUNGEN
Hardwareanforderungen: Notebook / Tablet-PC mit BS Win 8 / Computer mit einem freien USB 3.0 / 2.0
Port. Falls Ihr Gerät über USB 2.0 Port verfügt, wird die Datenübertragungsgeschwindigkeit
eingeschränkt. Prozessor Intel Pentium 1.2 GHz und höher, 512 MB RAM.
Betriebssystem: Windows Vista / 7 / 8 / 8.1 / 10 32/64 Bit, Mac OS X.
Um DVD auf einem Zusatzmonitor abzuspielen, sind mindestens ein Intel Pentium 2.0 Prozessor und 1
GB RAM erforderlich. Die Bildschirmauflösung muss auf 800x600 Pixel und 16 Farben eingestellt sein.
HINWEIS!
Aufladen: Docking Station unterstützt das Aufladen von angeschlossenen Mobilgeräten, wie zum Beispiel
Smartphones, eBook-Reader, Multimediaplayer, Navigationsgeräten und Tablet-PCs (z.B. Asus, Toshiba,
Dell, GoClever, Prestigio, Emgeton, Sencor). Die aufzuladenden Geräte sind mit dem Originalkabel an den
USB-Anschluss der Docking Station anzuschließen und die Docking Station via Netzadapter an die
Stromversorgung. Eine Ausnahme bilden Apple oder Samsung Tablet-PCs, deren Versorgung auch
unterstützt wird, aber nur über den USB 3.0 Fast Port, der über die Spezifikation BC 1.2 verfügt. Zugleich
muss die Docking Station vom Computer/Notebook getrennt sein und via mitgeliefertem Netzadapter
an der Stromversorgung angeschlossen sein.
USB 3.0: Überprüfen Sie bitte vor der Installation an USB 3.0 Port, ob Sie die neuesten Treiber für den USB 3.0
Controller verwenden. Produkte mit der USB 3.0 SuperSpeed Technologie sind zwar bereits seit 2010 auf dem
Markt, die Treiber werden aber permanent verbessert. Um die Vorteile eines schnellen USB 3.0 Zugangs
nutzen zu können, brauchen Sie ein Gerät (Notebook/Tablet /PC) mit einer USB 3.0 Schnittstelle.
Probleme, die bei der Installation oder während der Nutzung unserer USB 3.0 Geräte auftreten, sind häufig auf
veraltete Treiber zurückzuführen. Weitere Ursache könnte veraltete Firmware des USB 3.0 Ports sein. Diese
Probleme treten häufig bei folgenden Herstellern auf: Intel, Renesas (früher NEC), Via (VLI), AS Media,
Fresco Logic, Etron.
Quick Start
EU SCD TH
DE
08

Die neuesten Treiber für i-tec Produkte finden Sie auf unserer Webseite www.i-tec-europe.eu unter
„Download“ bei den jeweiligen Produkten. Unter „USB 3.0 Probleme“ finden Sie eine ausführliche
Beschreibung mit Links zu den USB 3.0 Treibern und zu Firmware der USB 3.0 Controller.
Bemerkung:
Installation der Audio-Ports und USB-HUBs (für USB 3.0 / 2.0 Ports Typ A) erfolgt systemautomatisch,
andere Ports sind von der mitgelieferten CD zu installieren.
Vor dem ersten Anschluss der Docking Station an Ihr Notebook / Ihren Tablet-PC / Computer sind der
LAN und DVI-I Port von der mitgelieferten CD zu installieren. Danach kann die Docking Station
angeschlossen werden.
TREIBERINSTALLATION UNTER WINDOWS VISTA / 7 / 8 / 8.1 / 10 (32/64 BIT VERSION)
Schließen Sie die Docking Station an Ihr Notebook / Ihren Tablet-PC / Computer nicht an, bevor die
entsprechenden Treiber für LAN und DVI-I Port von der mitgelieferten CD installiert sind. Die Gerätetreiber
sind nur vor der ersten Verwendung zu installieren.
Legen Sie die CD mit Treibern ins Laufwerk ein oder laden Sie die gewünschte Software von unserer
Internetseite www.i-tec-europe.eu unter „Download“ bei diesem Produkt herunter. Die Treiber sind
folgendermaßen zu installieren:
Für LAN und DVI-I Port legen Sie die CD-ROM in Ihr Laufwerk ein und wählen die Installationsdatei Setup.exe
aus oder öffnen Sie die heruntergeladene Datei, wählen die Sprache der Installation aus und befolgen die
Anweisungen auf dem Bildschirm.
Bemerkung:
Für Windows Vista / 7 / 8 / 8.1 / 10 installieren Sie den DVI-I Port unter dem Benutzernamen „Administrator“.
Der Bildschirm kann während der Treiberinstallation blinken, es ist ein Standardprozess. Wir empfehlen, das
Gerät (Notebook / Tablet-PC / Computer) nach dem Beenden der Installation neu zu starten.
HARDWAREINSTALLATION (ANSCHLUSS DER DOCKING STATION AN NOTEBOOK / TABLET-PC /
COMPUTER)
1) Schalten Sie das Gerät (Notebook / Tablet-PC / Computer) ein und schließen Sie den Netzadapter an
Docking Station an.
2) Schließen Sie den Netzadapter an AC 110 V / 230 V Stromversorgung an.
3) Schließen Sie das USB 3.0 Kabel an USB-Port Typ B auf der Rückseite der Docking Station an.
4) Schließen Sie das USB 3.0 Kabel an einen freien USB 3.0 / 2.0 Port Ihres Notebooks / Tablet-PCs /
Computers an.
5) Nachfolgend kommt es zur automatischen Installation der Ports in einzelnen Systemen.
6) Nach dem Beenden der Installation starten Sie das Notebook / den Tablet-PC / Computer neu.
TREIBERINSTALLATION UNTER MAC OS X
Schließen Sie die Docking Station an Ihren MacBook / iMac nicht an, bevor die entsprechenden Treiber für
LAN und DVI-I Port von der mitgelieferten CD installiert sind. Die Gerätetreiber sind nur vor der ersten
Verwendung zu installieren.
Legen Sie die CD mit den Treibern ins Laufwerk ein oder laden Sie die gewünschte Software von unserer
Internetseite www.i-tec-europe.eu unter „Download“ bei diesem Produkt herunter. Die Treiber sind
folgendermaßen zu installieren:
i-tec USB 3.0 Dual Docking Station
T
DEUSCH
DE
09

Für LAN und DVI-I Port wählen Sie die Installation von der Datei DisplayLink_MacOSX.dmg im
Dateiverzeichnis auf CD:/ oder öffnen Sie die heruntergeladene Datei. Entpacken Sie die Datei auf die
Arbeitsfläche Ihres MacBooks / iMacs als eine virtuelle Festplatte, wählen Sie „Drivers“ und dann „DisplayLink
Software Installer“. Dann wählen Sie die Sprache der Installation aus und befolgen die Anweisungen auf dem
Bildschirm. Bei Bedarf geben Sie das Benutzerpasswort ein. Der Bildschirm kann während der
Treiberinstallation blinken, es ist ein Standardprozess. Der MacBook / iMac ist nach dem Beenden der
Installation neu zu starten.
HARDWAREINSTALLATION (ANSCHLUSS DER DOCKING STATION AN MACBOOK / IMAC)
1) Schalten Sie den MacBook / iPad / iMac ein und schließen Sie den Netzadapter an Docking Station an.
2) Schließen Sie den Netzadapter an AC 110 V / 230 V Stromversorgung an.
3) Schließen Sie das USB 3.0 Kabel an USB-Port Typ B auf der Rückseite der Docking Station an.
4) Schließen Sie das USB 3.0 Kabel an einen freien USB 3.0 / 2.0 Port Ihres MacBooks / iMacs an.
5) Nachfolgend kommt es zur automatischen Installation der Ports.
6) Nach dem Beenden der Installation starten Sie das MacBook / iMac neu.
OFT GESTELLTE FRAGEN
Frage: Nach der Installation von Windows 8.1 funktioniert das Gerät nicht mehr. Unter Windows 8 hat es
problemlos funktioniert.
Antwort: Installieren Sie bitte die neuesten Treiber von unserer Internetseite, die Sie auf der Unterseite des
Produkts unter „Download“ finden. Windows 8.1 wird ab der Version DisplayLink 7.4 unterstützt.
Frage: Nach der Installation von Mac OS X 10.9 Mavericks funktioniert das Gerät nicht mehr. Unter vorheriger
Betriebssystemversion hat es problemlos funktioniert.
Antwort: Installieren Sie bitte die neuesten Treiber von unserer Internetseite, die Sie auf der Unterseite des
Produkts unter „Download“ finden. Mac OS X 10.9 Mavericks wird ab der Version DisplayLink 2.1 unterstützt.
Frage: Der Audioausgang funktioniert unter Mac OS X nicht.
Antwort: Treiber für Mac OS X unterstützen zurzeit Audio von der Version 10.10.x Yosemmite und höher,
wenn das Gerät an einen USB 3.0 Port angeschlossen ist. Es ist sowie möglich, Audio beim Anschluss an USB
2.0 Port zu benutzen.
Frage: Die Docking Station funktioniert nicht mit meinem Tablet-PC und Windows 8.
Antwort: Installieren Sie bitte die neueste Treiberversion 7.2 M0 oder höher, die unter
http://www.displaylink.com/support/index.php herunterzuladen ist.
Frage: Ich habe Problem mit der Erkennung der USB 3.0 Docking Station im USB 3.0 Port von meinem
Notebook / Tablet-PC / Computer.
Antwort: Das Problem kann in veralteten Treibern für USB 3.0 Port in Ihrem Notebook / Tablet-PC / Computer
liegen. Lesen Sie bitte die Beschreibung durch und laden die neuesten Treiber für USB 3.0 Chipsatz Ihres
Notebooks / Tablet-PCs / Computesr herunter und installieren sie gemäss der Anleitung. Die Treiber sind unter
http://www.displaylink.com/support/ticket.php?id=315 herunterzuladen.
Frage: Wie soll die USB 3.0 Docking Station unter Windows BS richtig installiert werden?
Antwort: Schließen Sie die USB 3.0 Docking Station an USB Port Ihres Notebooks / Tablet-PCs / Computes
nicht an, bevor die Treiber installiert sind. Es ist nötig, die aktuellen Treiber von DisplayLink (für den internen
Chipsatz DL-3700) zu installieren, die unter http://www.displaylink.com/support/index.php herunterzuladen
sind. Nach der Treiberinstallation und dem Anschluss der USB 3.0 Docking Station an USB Port Ihres
Quick Start
EU SCD TH
DE
10

Notebooks / Tablet-PCs / Computesr werden die Treiber automatisch fertig installiert. Das Bedienfenster wird
erst nach dem Displayanschluss aktiviert.
Frage: Gibt es Treiber für Windows 8 / 8.1 32/64 Bit für USB 3.0 Docking Station?
Antwort: Ja, für den grafischen Teil ist es nötig, die aktuellen Treiber von DisplayLink (für den internen
Chipsatz DL-3700) http://www.displaylink.com/support/index.php zu installieren. Schließen Sie die USB 3.0
Docking Station nicht an, bevor diese Treiber installiert sind. Nach der Treiberinstallation und dem Anschluss
der USB 3.0 Docking Station an USB Port Ihres Notebooks / Tablet-PCs / Computesr werden die Treiber
automatisch fertig installiert. Das Bedienfester wird erst nach dem Displayanschluss aktiviert.
Frage: Tablet-PC von Apple / Samsung wird nicht geladen.
Antwort: Leider, trotz der europäischen Norm über die Unifizierung von Versorgungsgeräten schützen einige
Firmen Ihre Markenprodukte so, dass Sie nur mit Hilfe der lizenzierten Originalnetzadapter geladen werden
können. Apple / Samsung Tablet-PCs können nur über den USB 3.0 Fast Port aufgeladen werden. Zugleich
muss die Docking Station vom Computer/Notebook getrennt sein und via mitgeliefertem Netzadapter an der
Stromversorgung angeschlossen sein.
Frage: Der LAN-Port funktioniert nicht oder nur mit der Geschwindigkeit 10/100 Mbps.
Antwort: Überprüfen Sie die Verkabelung zwischen der Docking Station und dem aktiven Element und
stecken Sie die RJ-45 Anschlüsse nochmals richtig ein. Sie können auch das Ethernet Kabel zwischen der
Docking Station und dem aktiven Netzwerkelement (HUB, Switch, Router) gegen ein zertifiziertes Kabel
austauschen.
GebrauchsanweisungWeitere Informationen sind dem CD- zu entnehmen.
i-tec USB 3.0 Dual Docking Station
T
DEUSCH
DE
11

ÚVOD
OBSAH BALENÍ
SYSTÉMOVÉ POŽADAVKY
Děkujeme za zakoupení dokovací stanice i-tec, která Vám umožní připojit k notebooku / tabletu /
PC veškeré Vaše oblíbené zařízení jako např. klávesnici, myš, externí disk nebo USB tiskárnu
pomocí USB portů, audio systém pomocí vstupu pro sluchátka a mikrofon, internetový modem / LAN
Ethernet PC síť pomocí LAN portu, monitor přes DVI-I a HDMI port, atd. Všechna zmíněná zařízení
připojíte snadno a rychle k Vašemu notebooku / tabletu / PC jediným USB 3.0 kabelem. Jako
zobrazovací zařízení můžete využít moderní LCD a plazmové monitory a televizory, protože
dokovací stanice je vybavena DVI-I a HDMI portem. Grafický čip, který je „srdcem“ dokovací stanice,
podporuje dokonce Full HD+ rozlišení (2048 x 1152 pixelů). Každý ze šesti USB portů (1x USB 3.0
Fast, 1x USB 3.0 a 4x USB 2.0) má funkci nabíjení, avšak jen port označený USB 3.0 Fast má též
funkci dle BC 1.2 specifikace (pro nabíjení iPadu nebo Samsung tabletů). Výhodou je také možnost
použití dokovací stanice ve svislé i vodorovné poloze.
i-tec USB 3.0 dokovací stanice
Stojánek
Napájecí adaptér
USB 3.0 kabel (jeden konec konektoru typ A, druhý konec typ B; 100 cm) – pro připojení k
notebooku / PC
CD s ovladači a manuálem
Quick Start
Hardwarové požadavky: notebook / tablet s OS Win 8 / PC s volným portem USB 3.0 / 2.0.
Pokud máte USB 2.0, bude rychlost přenosů dat omezena. Procesor Intel Pentium 1.2 GHz a
vyšší, 512 MB RAM.
Operační systém: Windows Vista / 7 / 8 / 8.1 / 10 32/64 bit, Mac OS X.
Pro přehrávání DVD na přídavném monitoru je třeba mít minimálně procesor Intel Pentium 2.0
a vyšší, 1 GB RAM a nastaveno rozlišení obrazovky 800x600 a 16 barev.
UPOZORNĚNÍ!
Nabíjení: Dokovací stanice podporuje nabíjení připojených USB mobilních zařízení, jako jsou
smartphony, čtečky e-knih, multimediální přehrávače, navigace a tablety (např. Asus, Toshiba, Dell,
GoClever, Prestigio, Emgeton, Sencor). Nabíjené zařízení stačí připojit originálním kabelem na USB
port dokovací stanice, která musí mít připojený síťový napáječ. Výjimkou jsou tablety Apple nebo
Samsung, jejichž napájení je také podporováno, ale pouze na jednom z USB 3.0 portů (označen
Fast), který má specifikaci BC 1.2. Zároveň musí být dokovací stanice odpojena od
počítače/notebooku a přiložený napájecí zdroj musí být naopak připojen.
USB 3.0: Před samotnou instalací na USB 3.0 port se ujistěte, že pro něj (pro USB 3.0 řadič v
notebooku / tabletu / PC) máte nainstalovány nejnovější ovladače. Produkty s technologií USB 3.0
SuperSpeed se používají už od roku 2010, přesto stále dochází k jistému dolaďování ovladačů
podporovaných zařízení. Abyste mohli využívat výhod rychlého USB 3.0 zařízení, musíte mít
notebook / tablet / PC s USB 3.0 rozhraním. O jeho bezproblémovou funkčnost se stará tzv. chipset,
který musí mít k dispozici aktuální ovladače.
Quick Start
ES Y
ČK
CZ
12

Problémy, se kterými se můžete setkat při instalaci nebo použití našich USB 3.0 zařízení jsou velice
často způsobeny nainstalovanými neaktuálními ovladači pro USB 3.0 řadič nebo chipset vašeho
notebooku / tabletu / PC. Dalším zdrojem problémů bývají také neaktuální firmware řadiče USB 3.0
portu. Nejčastěji to bývá některý z následujících výrobců: Intel, Renesas (dříve NEC), Via (VLI), AS
Media, Fresco Logic, Etron.
Aktuální ovladače pro výrobky i-tec najdete na našem webu www.i-tec.cz v záložce „Download“ u
jednotlivých produktů. V záložce „Problémy USB 3.0“ je podrobnější popis s odkazy na ovladače a
firmware USB 3.0 řadičů.
Poznámka:
Instalace audio portů, čtečky a USB HUBU (pro USB 3.0 / 2.0 porty typu A) je automatická ze
systému, ostatní porty je třeba nainstalovat z dodaného CD.
Před prvním připojením dokovací stanice k notebooku / tabletu / PC je nutno nejprve
nainstalovat LAN a DVI-I port z přiloženého CD a pak až připojit dokovací stanici.
INSTALACE OVLADAČŮ VE WINDOWS VISTA / 7 / 8 / 8.1 / 10 (32/64 BIT VERZE)
Před prvním použitím nepřipojujte dokovací stanici k notebooku / tabletu / PC, dokud nenainstalujete
příslušné ovladače pro LAN a DVI-I port z přiloženého CD. Ovladače zařízení je třeba nainstalovat
pouze před prvním použitím.
Vložte CD s ovladači do mechaniky nebo si stáhněte požadovaný software na našem webu www.i-
tec.cz v záložce „Download“ u tohoto produktu. Ovladače nainstalujte dle následujícího postupu:
Pro LAN a DVI-I port zvolte instalaci ze souboru Setup.exe v adresáři na CD:/ nebo spusťte stažený
soubor, zvolte jazyk instalace a postupujte dle pokynů na obrazovce.
Poznámka:
Ve Windows Vista / 7 / 8 / 8.1 / 10 instalujte DVI-I port jako uživatel „Administrator“. Obrazovka může
v průběhu instalace ovladačů problikávat, jedná se o standardní proces. Po dokončení instalace
doporučujeme restart notebooku / tabletu / PC.
HARDWAROVÁ INSTALACE (PŘIPOJENÍ DOKOVACÍ STANICE K NOTEBOOKU / TABLETU /
PC)
1) Zapněte notebook / tablet / PC a připojte napájecí adaptér k dokovací stanici.
2) Zapojte napájecí adaptér do sítě AC 110 V / 230 V.
3) Zapojte USB 3.0 kabel do USB portu typu B na zadním panelu dokovací stanice.
4) Připojte USB 3.0 kabel do volného USB 3.0 / 2.0 portu vašeho notebooku / tabletu / PC.
5) Následně se zahájí automatická instalace portů v jednotlivých systémech.
6) Po dokončení instalace restartujte notebook / tablet / PC.
INSTALACE OVLADAČŮ V MAC OS X
Před prvním použitím nepřipojujte dokovací stanici k MacBooku / PC, dokud nenainstalujete
příslušné ovladače pro LAN a DVI-I port z přiloženého CD. Ovladače zařízení je třeba nainstalovat
pouze před prvním použitím.
i-tec USB 3.0 Dual Docking Station
ČKY
ES
CZ
13

Vložte CD s ovladači do mechaniky nebo si stáhněte požadovaný software na našem webu www.i-
tec.cz v záložce „Download“ u tohoto produktu. Ovladače nainstalujte dle následujícího postupu:
Pro LAN a DVI-I port zvolte instalaci ze souboru DisplayLink_MacOSX.dmg v adresáři na CD:/ nebo
spusťte stažený soubor. Soubor rozbalte na plochu vašeho MacBooku / PC jako virtuální disk, zvolte
“Drivers“ a následně „DisplayLink Software Installer“. Poté zvolte jazyk instalace a postupujte dle
pokynů na obrazovce, v případě potřeby zadejte heslo uživatele. Obrazovka může v průběhu
instalace ovladačů problikávat, jedná se o standardní proces. Po dokončení instalace restartujte
MacBook / PC.
HARDWAROVÁ INSTALACE (PŘIPOJENÍ DOKOVACÍ STANICE K MACBOOKU / PC)
1) Zapněte MacBook / PC a připojte napájecí adaptér k dokovací stanici.
2) Zapojte napájecí adaptér do sítě AC 110 V / 230 V.
3) Zapojte USB 3.0 kabel do USB portu typu B na zadním panelu dokovací stanice.
4) Připojte USB 3.0 kabel do volného USB 3.0 / 2.0 portu vašeho MacBooku / PC.
5) Následně se zahájí automatická instalace portů.
6) Po dokončení instalace restartujte MacBook / PC.
ČASTO KLADENÉ OTÁZKY
Otázka: Po instalaci Windows 8.1 přestalo zařízení fungovat. Na Windows 8 fungovalo bez
problémů.
Odpověď: Nainstalujte si prosím nejnovější ovladače z našich webových stránek, které naleznete u
produktů v záložce „Download“. Windows 8.1 jsou podporovány od verze DisplayLink 7.4.
Otázka: Po instalaci Mac OS X 10.9 Mavericks přestalo zařízení fungovat. Na předchozí verzi
fungovalo bez problémů.
Odpověď: Nainstalujte si prosím nejnovější ovladače z našich webových stránek, které naleznete u
produktů v záložce „Download“. Mac OS X 10.9 Mavericks je podporován od verze DisplayLink 2.1.
Otázka: Používám Mac OS X a nefunguje audio výstup.
Odpověď: Ovladače pro Mac OS X v současné době podporují audio od verze 10.10.x Yosemmite a
výše, pokud je zařízení připojeno do USB 3.0 portu. Audio je možné také využívat při zapojení do
USB 2.0 portu.
Otázka: Dokovací stanice mi nefunguje s tabletem a Windows 8.
Odpověď: Nainstalujte si prosím nejnovější verzi ovladačů 7.2 M0 nebo vyšší, která je ke stažení na
http://www.displaylink.com/support/index.php.
Otázka: Mám problém s detekcí USB 3.0 dokovací stanice v USB 3.0 portu svého notebooku /
tabletu / PC.
Odpověď: Problém může být v zastaralých ovladačích pro USB 3.0 port ve Vašem notebooku /
tabletu / PC. Prosím, přečtěte si popis a stáhněte si nejnovější ovladače pro USB 3.0 chipset ve
Vašem notebooku / tabletu / PC a instalujte podle uvedených instrukcí. Ovladače jsou ke stažení na
http://www.displaylink.com/support/ticket.php?id=315.
Quick Start
ES Y
ČK
CZ
14

Otázka: Jak správně nainstalovat USB 3.0 dokovací stanici v OS Windows?
Odpověď: Nepřipojujte USB 3.0 dokovací stanici do USB portu ve Vašem notebooku / tabletu / PC,
dokud nenainstalujete ovladače. Je nutno nainstalovat aktuální ovladače od DisplayLinku (pro
interní chipset DL-3700), které jsou ke stažení na http://www.displaylink.com/support/index.php. Po
instalaci ovladačů a po připojení USB 3.0 dokovací stanice do USB portu Vašeho notebooku / tabletu
/ PC se doinstalují ovladače automaticky. Ovládací utilita se aktivuje až po připojení monitoru.
Otázka: Jsou dostupné ovladače Windows 8 / 8.1 32/64 bit pro USB 3.0 dokovací stanici?
Odpověď: Ano, pro grafickou část je nutno nainstalovat aktuální ovladače od DisplayLinku (pro
interní chipset DL-3700) http://www.displaylink.com/support/index.php. Nepřipojujte USB 3.0
dokovací stanici, dokud nenainstalujete tyto ovladače. Po instalaci ovladačů a připojení USB 3.0
dokovací stanice do USB portu Vašeho notebooku / tabletu / PC se doinstalují ovladače automaticky.
Ovládací utilita se aktivuje až po připojení monitoru.
Otázka: Mohu získat podrobnější informace o problémech s USB 3.0 dokovací stanici?
Odpověď: Jistě, užitečné informace naleznete na stránkách DisplayLinku
http://www.displaylink.com/support/knowledge
base.php v záložce FAQ nebo se můžete obrátit na naši technickou podporu.
Otázka: Zařízení nenabíjí Apple / Samsung tablet.
Odpověď: Bohužel i přes evropskou normu o sloučení napájecích zařízení chrání některé firmy své
značkové výrobky tak, že se dají nabíjet jen originálním / licencovaným napájecím adaptérem. Na
dokovací stanici lze nabíjet Apple / Samsung tablety jen v portu USB 3.0 Fast. Zároveň musí být
dokovací stanice odpojena od počítače / notebooku a přiložený napájecí zdroj musí být naopak
připojen.
Otázka: Nepracuje LAN port nebo jen rychlostí 10/100 Mb/s.
Odpověď: Ověřte veškerou kabeláž mezi dokovací stanicí a aktivním prvkem a dotlačte konektory
RJ-45. Pomáhá i výměna Ethernet kabelu mezi dokovací stanicí a aktivním síťovým prvkem (HUB,
switch, router) za certifikovaný.
Další informace naleznete v manuálu na CD.
i-tec USB 3.0 Dual Docking Station
ČKY
ES
CZ
15

WSTĘP
Dziękujemy za zakup Stacji dokującej i-tec. Stacja dokująca pozwala w prosty sposób, za pomocą jednego
przewodu USB 3.0, podłączyć do laptopa / tableta / PC wiekszość potrzebnych urządzeń peryferyjnych,takich
jak drukarkę, klawiaturę, myszkę komputerową, dysk zewnętrzny za pomocą portu USB, system audio za
pomocą gniazda słuchawkowego, mikrofon, modem / LAN Ethernet za pomocą portu LAN, monitor za
pomocą portu DVI-I itp. Dzięki zastosowanemu złaczu DVI-I oraz dodatkowym adapterom VGA oraz HDMI
urządzenie pozwala na podłączenie każdego monitora lub nowoczesnego telewizora plazmowego lub LCD.
Zastosowany w urządzeniu chip graficzny umożliwia obsługę urządzenia w technologii Full HD+ (2048 x 1152
pikseli). Każdy z sześciu portów USB (1x USB 3.0 Fast, 1x USB 3.0 and 4x USB 2.0) posiada funkcję
ładowania, ale tylko port oznaczony USB 3.0 Fast posiada funkcję ładowania w specyfikacji BC 1.2 (do
ładowania iPada lub tabletu Samsung). Stacja może być ustawiona w pozycji poziomej lub pionowej.
ZAWARTOŚĆ OPAKOWANIA
i-tec USB 3.0 Stacja dokująca z podstawką
Podstawka
Zasilacz
Kabel USB 3.0 (jedna końcówka typu A, druga końcówka typu B; 100 cm) – do podłączenia laptopa /
tableta / PC
CD ze sterownikami oraz instrukcją
Instrukcja – Szybki start
WYMAGANIA SYSTEMOWE
Wymagania sprzętowe: notebook / tablet z OS Win 8 / PC z wolnym portem USB 3.0 / 2.0. Jeśli jest
dostępny tylko port USB 2.0, szybkość transferu danych będzie ograniczona. Procesor Intel Pentium
1.2 GHz lub szybszy, 512 MB RAM.
System operacyjny: Windows Vista / 7 / 8 / 8.1 / 10 32/64 bit, Mac OS X.
Aby odtwarzać DVD na dołączanym monitorze, spełnione muszą zostać następujące wymagania: Intel
Pentium 2.0 lub szybszy, 1 GB pamięci RAM, rozdzielczość wyświetlacza ustawiona na 800x600 z
16bitową paletą barw.
UWAGA!
Ładowanie: Stacja dokująca umożliwia ładowanie podłączonych urządzeń USB, takich jak smartfony,
czytniki ebooków, odtwarzacze multimedialne, nawigacje GPS oraz tablety (np. Asus, Toshiba, Dell,
GoClever, Prestigio, Emgeton, Sencor). Urządzenie do ładowania należy podłączyć przy pomocy
oryginalnego kabla USB do portu USB stacji dokującej, która musi być podpięta do zasilacza. Wyjątek
stanowią tablety Apple oraz Samsung, które mogą być ładowane jedynie za pomocą portu USB 3.0 Fast,
który obsługuje specyfikację BC 1.2. Podczas ładowania stacja dokująca musi być odłączona od
komputera natomiast podłączona do zasilacza.
USB 3.0: Przed zainstalowaniem sterowników pod interfejs USB 3.0 upewnij się, że twój sprzęt (laptop / tablet
/ PC) posiada najbardziej aktualne sterowniki portu USB 3.0.
Produkty z technologią SuperSpeed USB 3.0 są stosowane od 2010 r. Technologia ta jest nadal rozwijana, w
związku z tym sterowniki podlegają ciągłemu udoskonalaniu. Aby skorzystać z szybkiego transferu USB 3.0,
musisz posiadać notebook / tablet / PC z interfejsem USB 3.0.
Bezproblemową funkcjonalność oraz pracę stacji dokującej zapewnia tzw. chipset dla którego niezbędne jest
zastosowanie aktualnych sterowników.
Ewentualne problemy, które mogą wystapić podczas instalacji sterowników lub problemy związane z
prawidłową pracą stacji dokującej, bardzo często spowodowane są zastosowaniem nieaktualnych
sterowników kontrolera USB 3.0 lub chipseta Twojego laptopa / tableta / PC.
Quick Start
OL KI
PS
PL
16

Powodem problemów jest również nieaktualny firmware kontrolera USB 3.0, najczęściej takich producentów
jak: Intel, Renesans (dawniej NEC), Via ( VLI), AS Media, Fresco Logic, Etron.
Aktualne sterowniki dla produktów i-tec są do pobrania ze strony www.i-tec.pl, w zakładce „Download“ dla
każdego produktu. W zakładce „USB 3.0 problemy“ są szczegółowo opisane najcześciej występujące
problemy wraz z linkami do aktualnych sterowników i oprogramowania kontrolerów USB 3.0.
Informacja:
Instalacja portu audio oraz koncentratora USB (dla portów USB 3.0 / 2.0 typu A) jest przeprowadzana
automatycznie przez system, inne porty urządzeń instaluje się z dołączonego CD.
Przed podłączeniem stacji dokującej do laptopa / tabletu / PC należy najpierw zainstalować sterowniki
dla sieci LAN i portu DVI-I z dołączonej płyty CD, a następnie podłączyć do stacji dokującej.
INSTALACJA STEROWNIKA W SYSTEMIE WINDOWS VISTA / 7 / 8 / 8.1 / 10 (32/64 BIT)
Przed pierwszym użyciem nie podłączać stacji dokującej do laptopa / tableta / PC, dopóki nie zostaną
zainstalowane odpowiednie sterowniki dla sieci LAN oraz portu DVI-I z dołaczonej płyty CD. Sterowniki należy
zainstalować przed pierwszym użyciem stacji dokującej.
Włóż płytę CD ze sterownikami do napędu lub pobierz wymagane oprogramowanie z naszej strony www.i-
tec.pl z zakładki „Download“ dla tego produktu. Aby zainstalować sterowniki, wykonaj następujące
czynności:
Aby zainstalować sterowniki dla sieci LAN oraz portu DVI-I, z dołączonej płyty CD uruchom plik setup.exe
umieszczony w katalogu, lub uruchom pobrany ze strony internetowej plik, wybierz język instalacji i postępuj
zgodnie z instrukcjami wyświetlanymi na ekranie.
Informacja:
Do zainstalowania sterowników portu DVI-I w systemie Windows Vista / 7 / 8 / 8.1 / 10 użyj konta użytkownika
„Administrator“. Podczas instalacji sterowników ekran może migać, jednak jest to standardowy proces. Po
zakończeniu instalacji zalecane jest ponowne uruchomienie laptopa / tableta / PC.
INSTALACJA URZĄDZENIA (PODŁĄCZENIE STACJI DOKUJĄCEJ DO LAPTOPA / TABLETA / PC)
1) Włącz laptop / tablet / PC oraz podłącz zasilacz do tylnej części stacji dokującej.
2) Podłącz zasilacz do gniazda sieciowego AC 110 V / 230 V.
3) Podłącz kabel USB 3.0 do portu USB typu B na tylnim panelu stacji dokującej.
4) Podłącz kabel USB 3.0 do wolnego portu USB 3.0 / 2.0 notebooka / tableta / PC.
5) Następnie rozpocznie się automatyczna instalacja portu
6) Po zainstalowaniu urządzenia uruchom ponownie notebook / tablet / PC.
INSTALACJA STEROWNIKA DO MAC OS X
Przed pierwszym użyciem nie podłączać stacji dokującej do MacBooka / PC, dopóki nie zostaną
zainstalowane odpowiednie sterowniki dla sieci LAN oraz portu DVI-I z dołaczonej płyty CD. Sterowniki należy
zainstalować przed pierwszym użyciem stacji dokującej.
Włóż płytę CD ze sterownikami do napędu lub pobierz wymagane oprogramowanie z naszej strony z zakładki
„Download“ dla tego produktu. Aby zainstalować sterowniki, wykonaj następujące czynności:
Aby zainstalować sterowniki dla sieci LAN oraz portu DVI-I, z dołączonej płyty CD uruchom plik
DisplayLink_MacOSX.dmg z kataogu umieszczonego na łycie CD:/ lub uruchom pobrany plik. Rozpakuj plik
na pulpicie komputera MacBook / PC jako dysk wirtualny, wybierz „Drivers“, a następnie „DisplayLink
i-tec USB 3.0 Dual Docking Station
POLSKI
PL
17

Software Installer“. Następnie wybierz język instalacji i postępuj zgodnie z instrukcjami wyświetlanymi na
ekranie. Jeśli jest to konieczne, wprowadź hasło użytkownika. Podczas instalacji sterownika ekran może
migać, jest to standardowy proces. Po zakończeniu instalacji uruchom ponownie komputer MacBook / PC.
INSTALACJA URZĄDZENIA (PODŁĄCZENIE STACJI DOKUJĄCEJ DO MACBOOKA / PC)
1) Włącz MacBook / tablet / PC oraz podłącz zasilacz do tylnej części stacji dokującej.
2) Podłącz zasilacz do gniazda sieciowego AC 110 V / 230 V.
3) Podłącz kabel USB 3.0 do portu USB typu B na tylnim panelu stacji dokującej.
4) Podłącz kabel USB 3.0 do wolnego portu USB 3.0 / 2.0 MacBooka / tableta / PC.
5) Następnie rozpocznie się automatyczna instalacja portu.
6) Po zainstalowaniu urządzenia uruchom ponownie MacBook / PC.
CZĘSTO ZADAWANE PYTANIA
Pytanie: Po zainstalowaniu systemu Windows 8.1 urządzenie nie działa. Na Windows 8 działało bez
problemu.
Odpowiedź: Proszę zainstalować najnowsze sterowniki z naszej strony internetowej. Link do sterowników
znajdziesz w zakładce „Download“ na stronie produktu. Windows 8.1 jest obsługiwany przez DisplayLink 7.4
Pytanie: Po instalacji systemu Mac OS X 10.9 Maverics urządzenie przestało działać. Na poprzedniej wersji
działało bez problemu.
Odpowiedź: Proszę zainstalować najnowsze sterowniki z naszej strony internetowej. Link do sterowników
znajdziesz w zakładce „Download“ na stronie produktu. Mac OS X 10.9 Mavericks jest obsługiwany przez
DisplayLink 2.1
Pytanie: Mam zainstalowany system Mac OS X i wyjście audio nie działa.
Odpowiedź: Obecnie sterowniki dla systemu Mac OS X umożliwiają wsparcie audio w wersji 10.10.x
Yosemmite i wyższej, jeśli urządzenie jest podłączone do portu USB 3.0. Audio może być również
wykorzystywane, kiedy urządzenie jest podłączone do portu USB 2.0.
Pytanie: Dokovací stanice mi nefunguje s tabletem a Windows 8. Stacja dokująca nie działa z tabletem z
systemem Windows 8
Odpowiedź: Proszę zainstalować najnowszą wersję sterownika 7.2 M0 lub wyższe, który jest dostępny na
stronie http://www.displaylink.com/support/index.php.
Pytanie: Mam problem z wykryciem USB 3.0 Docking Station przez port USB 3.0 na swoim laptopie / Tablecie
/ PC.
Odpowiedź: Problemem mogą być nieaktualne sterowniki dla USB 3.0 Twojego notebooka / tableta / PC.
Proszę zapoznać się z opisem i pobierać najnowsze sterowniki dla chipsetu USB 3.0 dla notebooka / Tableta /
PC i zainstalować zgodnie z instrukcją. Sterowniki są dostępne do pobrania na
http://www.displaylink.com/support/ticket.php?id=315.
Pytanie: Jak prawidłowo zainstalować stację dokującą USB 3.0 w systemie operacyjnym Windows?
Odpowiedź: Nie podłączać stacji dokującej USB 3.0 z portem USB laptop / tablet / PC przed zainstalowaniem
sterowników. Konieczne jest, aby mieć najnowsze sterowniki z DisplayLink (wewnętrzny chipset DL-3700),
które są dostępne do pobrania na http://www.displaylink.com/support/index.php. Po zainstalowaniu
sterowników i podłączeniu Stacji dokującej USB 3.0 do portu USB laptopa / tabletu / PC sterowniki
automatycznie zostaną doinstalowane. Sterowniki zostaną aktywowane przez podłączenie do monitora.
Quick Start
OL KI
PS
PL
18

Pytanie: Czy są dostępne sterowniki pod Windows 8 / 8.1 32/64 bit dla Stacji dokującej USB 3.0?
Odpowiedź: Tak, do poprawnego działania grafiki jest konieczność zainstalowania aktualnych sterowników z
DisplayLink (wewnętrzny chipset DL-3700) http://www.displaylink.com/support/index.php. Nie podłączać
Stacji dokującej USB 3.0 do czasu zainstalowania tych sterowników. Po zainstalowaniu sterowników i
podłączeniu Stacji dokującej USB 3.0 do portu USB laptopa / tabletu / PC sterowniki automatycznie zostaną
doinstalowane. Sterowniki zostaną aktywowane przez podłączenie do monitora.
Pytanie: Gdzie można uzyskać więcej informacji na temat problemów ze Stacją dokującą USB 3.?
O d p o w i e d ź : P r z y d a t n e i n f o r m a c j e m o ż n a z n a l e ź ć n a s t r o n i e D i s p l a y L i n k
http://www.displaylink.com/support/knowledgebase.php w zakładce FAQ lub skontaktować się z pomocą
techniczną.
Pytanie: Urządzenie nie ładuje tabletów Apple / Samsung.
Odpowiedź: Niestety, pomimo normy europejskiej w sprawie konsolidacji urządzeń zasilania zasilania,
niektóre firmy chronią swoje markowe produkty, i mogą być ładowane przez tylko oryginalne / licencjonowane
zasilacze. Stacja dokująca umożliwia ładowanie tabletów Apple / Samsung jedynie za pomocą portu USB 3.0
Fast. Podczas ładowania stacja dokująca musi być odłączona od komputera natomiast podłączona do
zasilacza.
Pytanie: Dlaczego nie działa port LAN, albo działa prędkością tylko 10/100 Mb/s?
Odpowiedź: Należy sprawdzić połączenia wszystkich kabli pomiędzy stacją dokującą a aktywnym
komponentem oraz docisnąć do końca konektory RJ-45. Rozwiązaniem może być również wymiana kabla
Ethernet na certyfikowany pomiędzy stacją dokującą a aktywnym komponentem (HUB, switch, router).
Dalsze informacje znaleźć można w instrukcji zamieszczonej na CD.
i-tec USB 3.0 Dual Docking Station
POLSKI
PL
19
Strona się ładuje...
Strona się ładuje...
Strona się ładuje...
Strona się ładuje...
Strona się ładuje...
Strona się ładuje...
Strona się ładuje...
Strona się ładuje...
Strona się ładuje...
Strona się ładuje...
Strona się ładuje...
Strona się ładuje...
-
 1
1
-
 2
2
-
 3
3
-
 4
4
-
 5
5
-
 6
6
-
 7
7
-
 8
8
-
 9
9
-
 10
10
-
 11
11
-
 12
12
-
 13
13
-
 14
14
-
 15
15
-
 16
16
-
 17
17
-
 18
18
-
 19
19
-
 20
20
-
 21
21
-
 22
22
-
 23
23
-
 24
24
-
 25
25
-
 26
26
-
 27
27
-
 28
28
-
 29
29
-
 30
30
-
 31
31
-
 32
32


i-tec U3HDMIDVIDOCK Instrukcja obsługi
- Kategoria
- Stacje dokujące do notebooków
- Typ
- Instrukcja obsługi
- Niniejsza instrukcja jest również odpowiednia dla
w innych językach
- slovenčina: i-tec U3HDMIDVIDOCK Používateľská príručka


