ANTAIRA USB-HUB4K Instrukcja instalacji
- Kategoria
- Koncentratory interfejsów
- Typ
- Instrukcja instalacji

1
Thank you for purchasing this high-speed 4-port USB2.0 hub. It provides
an ideal solution to expand 4 USB2.0 ports from one single USB2.0 host
port. It provides metal case with Screw Lock feature for upstream and
downstream USB ports. It provides excellent reliability and
performance for most of the applications.
Features:
Compliant with USB Specification Revision 2.0
Rigid and Wall-mountable Metal Case
Supports Screw Lock Mechanism for Upstream and Downstream
Connectors to Enhance Reliability
Supports High-speed and or Full-speed Packet
Protocol Sequencer for Endpoint 0/1
Provides 7 Downstream Facing Ports
Supports 480Mbps, 12Mbps and 1.5Mbps Speed
Supports Self-powered and Bus-powered Mode
Port #1
Port#4
4-Port USB2.0 Metal Hub with Screw Lock
Mechanism
Installation Guide
1. Introduction
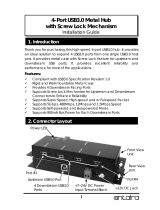
2. Connector Layout
Downstream USB2.0 Ports
Power LED
+5V DC Jack, w/ Screw Lock
USB2.0 Connector (upstream
port, w/ Screw Lock)

4S/8S RS232 to USB Multi Serial Adapter w/ Metal Case
2
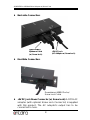
Back side Connection:
Front Side Connection:
+5V DC Jack Power Connector (w/ Screw Lock): A DC5V AC
adapter (with optional Screw Lock Connector) is supplied
with this product. The AC adapter’s output has to be
connected to here.
+5V DC Jack
(AC Adapter w/ Screw Lock)
Type-B USB2.0
Upstream Cable
(w/ Screw Lock)
Downstream USB2.0 Port w/
Screw Lock Cable

4S/8S RS232 to USB Multi Serial Adapter w/ Metal Case
3
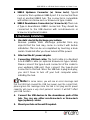
USB2.0 Upstream Connector (w/ Screw Lock): Type-B
connector from upstream USB2.0 port. It is connected from
host or another USB2.0 hub. The connector is compatible
with either non-Screw-Lock or Screw-Lock type cables.
USB2.0 Downstream Connectors (w/ Screw Lock): There are
4 Type-A downstream USB2.0 connectors. They should be
connected to the USB devices with non-Screw-Lock or
Screw-Lock (optional) cables.
1. Use static electricity discharge precautions.
Remove possible static discharge potential from any
objects that the hub may come in contact with before
installation. This can be accomplished by touching a bare
metal chassis rail after you have turned off the power.
2. Attached the AC power adapter.
3. Connecting USB Host cable: The host cable is a standard
A-to-B USB2.0 cable (or optional Screw-Lock type cables).
Please connect the type-A end connector of the cable to
your upstream USB port, then connect the type-B end
connector to this hub. Since the USB hub is plug-and-play,
you don’t have to turn off your host computer when
installing the hub.
Note: In some cases, you will see an error message said
that the USB Hub caused the USB bus power over the current limit,
please ignore this message since the hub is hot plug and its power
capacitor will cause a very short period of current. It will NOT affect
your USB function.
4. Connect the USB devices to the downstream ports of this
hub. You can use either non-Screw-Lock or Screw-Lock
type (optional) cables.
5. Mount your hub on the wall if required.
3. Hardware Installation

4S/8S RS232 to USB Multi Serial Adapter w/ Metal Case
4
To check the USB hub installation in Windows device manager, please
follow the following steps:
1. Click Start
2. Click Control Panel
3. Click System
4. Click Device Manager button
5. Double click Universal Serial Bus Controller
6. Double click Generic USB Hub, the message will show that this
device is working properly.
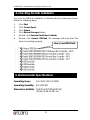
Operating temp.: 0 to 55
8C (32 to 1318F)
Operating humidity: 5 to 95% RH
Dimensions (LxWxH): 7.03”(L)x2.43”(W)x0.92”(H)
(17.85 x 6.16 x 2.34 cm)
5. Environmental Specifications
4. Checking the Hub Installation
Here is your USB2.0 Hub
-
 1
1
-
 2
2
-
 3
3
-
 4
4


ANTAIRA USB-HUB4K Instrukcja instalacji
- Kategoria
- Koncentratory interfejsów
- Typ
- Instrukcja instalacji
w innych językach
- English: ANTAIRA USB-HUB4K Installation guide