

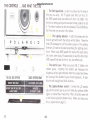
www.orphancameras.com

YOUR
FIRST
PICTURE!
To
be
sure
that
it's
with
flash,
exactly
as
BUT,
before
y.ou
start,
please
read
this
book
carefully
so
you
will
know
how
to
use
the
camera
and
where
to look
for
any
jnformation.
lf
you
do
not
follow
the instructions, you
will
not
get
good
pictures.
a
success,
we
suggest
that
you
make
it
indoors
described
on
page
20.
www.orphancameras.com

CONTENTS
Getting
Acquainted
Know
your
camera.
. . .
How
to
make a
picture:
a
quick
look..
How
to open
and close
the camera.
. .
. .
How to
hold
the camera
How to aim
and
focus
the
camera
.
.
. . .
The controls
. .
. and
what
theY
do
How
the
L/D
control
makes
prints
lighter or
darker.....
What
you
should
know about
your
film
Operation
How to
load a film
pack
How to set
the camera
for
daylight
and
flash
pictures...
How to attach
the
flashgun...
How to
make f
lash
pictures.
. .
How to
make
daylight
pictures
...
.. i
How
to
develop
the
picture
Check
the temperature
lf
no
yellow
tab
appears
when
you pull
the
white
tab....
Care of
the
print
.r....
How to use
the
Cold-Clip
with color
film. . . .
You must take
care of
your
camera
Howto use3000 speed
film
in dim
lightwithoutflash..
When to
use the
ente HT suN
oNLY
setting.
...
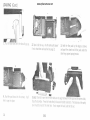
Miscellaneous
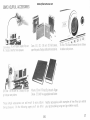
Some
helpf
ul accessories.
.
. .
Close-ups
and
portraits
are easy
with these
devices....
A filter
can
pep
up black
and white
scenic
pictures......
Copies and
en
largements
Picture troubles,
their cause
and cure.
Protect film
and camera
from
heat
Where
to write
for information.
Wa
rranty.
Polaroid repair
stations
and offices..
. ..
CAUTION
notice
1L
L2
29
30
32
34
36
2
4
6
7
8
10
37
3B
39
40
4L
46
46
46
47
48
13
16
18
20
22
24
27
28
350
www.orphancameras.com

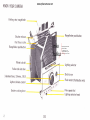
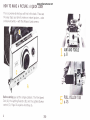
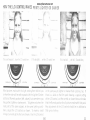
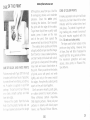
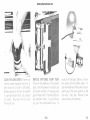
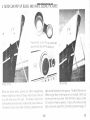
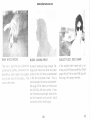
KNOW
YOUR
CAMERA
Fold ing
view/rangef
inder
Sh utter
release
Fast focus
scale
Rangef inder push
button
White
tab
slot
Yellow
tab slot door
3-ef ement
lens,
114mm.
,I18.8
Lig
hten
/darken
control
Shutter
cocking
lever
ql#
Rangef
inder
push
button
Lig hting
selector
Electric
eye
Flash
outlet
(flashbulbs
only)
Film
speed
dial
Lighting
selector
knob
ffi
,T
-1
350
www.orphancameras.com
mike
butkus
Digitally signed by mike butkus
DN: cn=mike butkus,
o=orphancameras, ou=29,
[email protected], c=US
Date: 2017.10.31 11:03:05 -04'00'

Battery
compartment
(change
batteries
yearly,
see
page
33)
Steel
rollers
(lmportant:
keep them
clean
as described
on
page
32)
View/focus window
3so
www.orphancameras.com

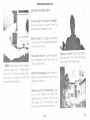
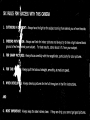
HOW
TO MAKE
A PICTURE:
A
QUtcK
LOOK
This
is a
preview
of whatyou
willfind
in
this
book.
These
are
the
easy steps
you
take
to make
an instant picture
-
color
or black
and
white
-
with
this Polaroid
Land camera.
.|
t
I
AIM
p.8
1f
Before starting
you
set
the simple
controls
:
Dial
(A),
the
Lighting
Selector
(B),
and
the
control
(C).
Page
10
explains
what
they
do.
4
The Film
Speed
Lighten/Darkerr
5
PU
LL
p.
25
AND
FOCUS
YELLOW
TAB
350
www.orphancameras.com

SHOOT
p.
20
C
WAIT
'---)
p.
25
S
EPARATE
p.
26
I
F:lJ
BLAcK
&
wHrrE
?
RESET
J
p.2L
A
PULL WHITE
TAB
+
p.24
www.orphancameras.com

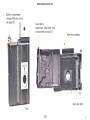
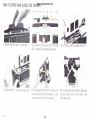
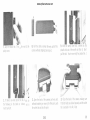
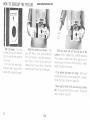
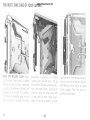
HOW
TO
OPEN
AND
CLOSE
THE
CAMERA
F<:'L
1.
Magnet holds
cover
down.
Lift
back edse.
2.
To remove
it,
push
spring
(A)
and lif
t hinge
(B).
To replace,
slide hinge
down
over
spring.
w
5.
Pull
camera
f
ront out
as far
as it
will
go.
Be
sure
locking
bar
(A)
snaps
into
place.
If
not,
ycu
nlay
get
blurred
or all black
pictures.
.rrc'T
I
"4:*-------r
6.
To close
camera,
press
down
on locking
bar
and
push
camera
front
in
until
it locks.
Fold
finder
down
gently.
3. Lift finder
up and
back; magnet will
grrp
it.
www.orphancameras.com

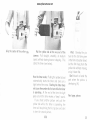
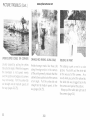
HOW TO HOLD TH
E
CAM ERA
er'
W
,|;;ffi
i.;
1ii.,.;,.,,,-.
,,
HORIZONTAL:
Grip
the
two
ends. Place
your
foref ingers
on
the
No.
1 buttons;you
can
easily
shift
the right forefinger
to
the No.
2 button.
To
steady
the
camera,
press
your
eltrows
into
yoLrr
ribs;
rest
the
camera against
your
nose.
VERTICAL:
Grip the camera
as
pictu
re, tu
rn
it
so
you
r right
hand
against
yorrr
foreheacl and
face.
you
would
for a
horizontal
is
below. Brace
the camera
ffi
ffi
f,
'&
350
www.orphancameras.com

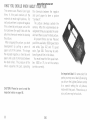
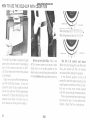
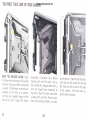
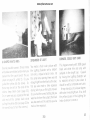
HOW TO
AIM
AND FOCUS THE
CAMERA
It's
easy
to
get
sharp, well framed
pictures
with
tlte
Model
350.
lt
has
a combined
viewfinder
and
rangefinder
made
specially
for it
by
the famous German firmZeiss
lkon.
As
you
look through
the window
(A)
you'll
see
two things:
First, the
viewf
inde r
-
a wh
ite
f ra
me line that
shows
how
much
of
the
scene
will be in the
picture.
Second, the range-
finder a bright
spot
in the center.
Hold
the
camera
horizontal
as shown.
Place
your
fore-
fingers
on
both
No.
1 buttons and
move
them allthe way to
your
left.
Look
through the finder window
and aim the bright
spot in the
center
at a
subject
about
4
ft.
away.
You
should see
two images of
your
target in the bright
spot.
This
means the
camera is
not
focused
for that distance;
if
you
made
a
picture
now
it
would be
out of
focus
and f uzzy.
Push
the
No. 1
buttons back and forth untilthe
two
images
in the
bright
spot
become
one
sharp and
clear.
Now
the
camera is focused.
The trame automatically
adjusts
to
show
what will
be
in
the
picture.
Center
your
subject. Shoot.
For
vertical
pictures,
you
can focus
with the
camera hori-
zontal;
turn
it
to
vertical
position
to aim
and
shoot.
The
closest
focusing
distance
with the
rangefinder
is
about
3r/z
ft
lf
you
want to come closer
than
3r/zft,
you
must
use
either
the
portrait
or
close-up
kit
described
on
page
38.
Look
through
here.
Aim
bright
spot at subject.
t'**
Push No.
I
buttons back
and
forth;watch
the bright
spot.
3s0
www.orphancameras.com

ilI.JT
CF FOCUS:
i
i,irll.ltrt:-,
ititttl
tlti.t',,,,o
irtr
i..{_r''\
ilt
.ritr,1i;:tl
t:.
trll,it'[)
,:il1
Cli:,rr
thl
tir
Kccp
your
eyc
centercd in the
finder
window
or
you
will
bc
unablc
to
see the
briqht
spot.
:J50
www.orphancameras.com

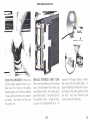
HET
CONTROLS
AND WHAT
THEY
DO
7s-rso.300
sPEED
t
-
The
Film
Speed Dial:
lt
sets the
camera
for the kind
of
film
you
are
using.
For
75
speed color
film, turn
it
to
75;
for
3000
speed black
and
white
film turn
it
to
3OOO.
The
dial
has
a
strong
spring and must
be turned
quite
far to
set
it.
The
other numbers
on the dial
(besides
75 and
3OOO)
are
for
films
that may
be
sold
in the
future.
:r i'
':1.
The Lighting
Selector:
lt
sets the
camera
for the
kind
of
light
with
which
the
picture
will
be taken.
Move
the
knob (B)
sideways
to
put
the
yellow
square
in the
Lighting
Selector (C)
next
to the label
describing
the
lighting
condi.
tions.
When
using
3000
speed
film look
at the
3ooo
SpEED
oNt-y
side;when
using 75
speed
color
(or
any
film
other
than
3000
speed film)
look at
the
75, 150, soo
spEEo
side.
:-.
The electric
eye: When
you
press
No.
2
button,
the
shutter
opens. Instantly, the
electric
eye
measures
the
brightness
of the light
reflected from
the
subject
and
times
the
closing
of
the
shutter to
give
correct
exposure.
lt does
this for both daylight
and
flash
pictures.
r:"
The Lighten/Darken control:
Turning
the
L/D
control
adjusts the
electric eye so
you
can make
your
picture
a litile
lighter or darker than
it
would
be
if
the
L/D control
were
left
at the Normal
position
(shown
here).
When
and how
to do
this
is explained
on
page
11.
n
;::l
;'*
3OOO
SPEED ONLY
j
10
350
www.orphancameras.com

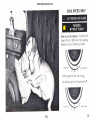
HOW
THE L/D
CONTROL
MAKES
PRITVTS
LIGHTER
OR
DARKER
"d{gif
"'
w.ffi
M\
wt. \
Tltrs
rs
wellexposed,
.
ieave
ihe
L D
control here
lf
rt
s too
light
set
tire
L D
conirol
here
lf rt
s too
dark
set the
L'D
control here
L!GHTEN
,
-"0"
a
*
"d.
ry
i:l
Most pictures
made
with
the
light
conring
from behirrd
you
or f rom
the
side will
be well
exposed with
ihe
Lighteni
Darken
control
at
Normal
position (lefi.
above), but
sometimes
yor_t
may
prefer
a lighter
or
darker print.
To
lighten
or
darken
the
next print
of
the same
subject, in
the sarne lighting condi-
tions,
adlusr
the L.1 D
control
as sfrown. To
make
a small
clrange,
turrr orrly
to tlte f
irst
srnall
rnark.
LJser
the L/D cclrrtroi
in
the
sarne
way
to
lighten or
darken
flash
pictures,
too. lf
there
is
a label
on the
film
pack
showing
a special
setting
of tlre L,,D control,
set the
control as
shown there and
make
that the
Normal
positiorr
for
all
pictures
made
with
that
pack.
Any acllustment
of tfre L/D control
shorrlci
be irr
additir:n
to
tlrat stre.ciu
I
settirrs:.
350
11
www.orphancameras.com

WHAT
YOU
SHOULD
KNOW
ABOUT
YOUR
FILM
This
camera
uses
Polaroid
Land
pack
the
chemicals
between
the
negative
films.
A
film
pack
contains
all
the
and
print
paper
to
form a
picture
materials
to make
eight
pictures.
For
"sandwich".
each
picture
there
is a
piece
of
negative
The picture
develops
outside
the
film,
?
Sheet
of
print
paper,
and
a
thin
camera.
After
the
recommended
de-
foil
container
(the
pod)
filled
with
the
velopment
time
you
separate
the
sand-
jelly-like
chemicals
needed
to
develop
wich
and
there
is
your
finished
picture.
the
picture.
At
present
there
are
two
polaroid
After
snapping
the
picture,
you
start
pack
f ilms
available:
3O0O
speed black
development
by
pulling
a
piece
of and
white,
Type
IO7,
?n d
75
speed
paper
out
of
the
camera.
This
drags
color,
Type 108.
There
may
be
addi-
the
exposed negative,
a
sheet
of
print
tionaltypes
of film
in the
future.
paper,
and
a
pod
of
chemicals
between
You must
know
the
film
speed num-
two
steel
rollers.
The
pressure
of
the
ber,
3000
or
75, to
set the
camera
rollers
squashes
the
pod,
spreading
controls
correcily.
CAUTION: Please
be
sure
to
read
the
im
portant
notice
on
page
48.
An
important
label:
On
some color
film
packs
you
may
see a label
(A)
advising
you
to
turn
the
LightenlDarken
control
to
a
speciai
setting
for all
pictures
made
with
that
pack.
Please
do
so, or
your
pictures
may
be
too dark.
L2
3s0
www.orphancameras.com

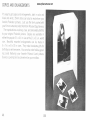
HOW
TO
LOAD
A
FILM
PACK
Open
the
top of
the
box.
Pull
out
the
film
package. Handle it
tently,
caref
ully.
Hold
the
package
near
the edges.
Don't
press
hard
on the
middle
of the
package.
Starting
at
the
corner,
tear open
the entire
side
of
the
foil
bag along
the
dottecl
line and
remo're
the
film
pack.
Discard
the
moisture
absorbing
card
supplied
with color
film.
Handle
the
pack
fr
E:
As
soon
as
you
open
the
film
pack
you
will
begin
to
accumu-
late
waste
paper.
There
will
be more
when
you
develop
the
pictures.
We
hope that
it won't
become
litter
in
the
streets
or be scattered
around
the
landscape.
What
to
do with the
waste
paper?
Usually,
it will
fit
into
an
empty foil bag
or
f ilm box.
Or,
if
you're
planning
to
take
f ots
of outdoor
pictures,
bring
along
a
paper
bag
or
other
container
for waste.
Everyone
wilt appreciate
this
little
extra
effort
on
your
Part.
by
the edges
only.
With
color
filnr tlrere's
a
set
of
mounts;
with
black
and
white
f
ilm
there's
a
coater.
Please
read
the
instruction
sheet.
Save
the
box to carry
prints
in safely.
lt
can
also
be
very useful
when
coating
black
and
white
prints.
Always
open
the
package
and load
film
in
the
shade,
not
in direct
sunlight,
to
avoid
fogging the
film.
A
#e
350
13
www.orphancameras.com

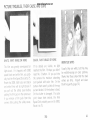
LOADING
(Cont.)
1.
Push
theback
door
latch
;
the
door
will
pop
up.
*V's
2.
}pen
it
all the way.
Are
the rollers
(A)
clean?
lf not,
clean
them
as
described
on
page
32.
3. Hold
the
film
pack
by
the edges
as
shown,
and
push
the closed
end
of
the
pack
under
the
door
hrnge
against
spring
tension.
4.
Push
the
pack
down
into
the
camera.
you'll
feel
it
snap
iirto
place.
L4
5.
&
6.
Check
to
be
sure
that
the
white
tabs are
not
caught
between
the film
pack
and
the
camera
body.
Close
the back
door. Press
both
sides firmly
to
be
sure
that both
sides latch.
The
black
tab of
the
safeiy
cover
must
strck out
of
the
small
slot.
lf not,
reopen
the back,
lead
the
tab out.
350
www.orphancameras.com

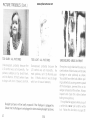
7.
Grip
the
black
safety
cover.
1. lf there's
no
white tab
in
the
fcllowrrrg
in
the
shade
bright
sunlight
tab.
This
the
end of the
the
No.4
or
i ndoors,
8. Pull
the
safety
cover
camera
without
stopping.
2.
Cpen the
back of
the
camera
part
way
and,
without
disturbing
or moving
the
film
pack, push
the
white
tab
out
into
the
open
9.
With the safety
cover
out, a
wltite
tab
(A)
should
stick
out
of the
small
slot
(No.
4). Don't
pull
the
tab.
You're
now
ready
for
picture
No.
1.
3.
Close
the
back
of
the
camera,
making sure
that
both
sides
are
locked
securely
and the
white
tab
is outside
in tiie
No.4
slot
all
the
way out
of the
Don't rip it.
350
15
www.orphancameras.com

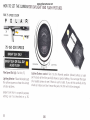
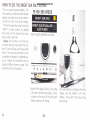
HOW
TO
SET
THE
CAMERA
FOR
75
SPEED
COLOR
POLAR
Film
Speed Dial (A):
Set it
to75.
Lighting
Selector;
Move
the knob
to
set
the
yellow
square
as
shown
for almost
allcolor
pictures.
BRIcHT
SUN ONLy
is
a special purpose
setting;
use
it
as
described
on
p.36.
FOR
DAYLIGHT
AND
FLASH
PICTURES
;
I
Lighten
lDarken
control:
Set
it
to
the Normal
position
(shown)
unless
a label
on the
back
of the
film
pack
(A)
shows
a
speciai
setting.
you
can
open
the
back
of a loaded
camera
to
see
if there
is
such
a label.
lf
you
do
this
carefully
in
the
shade
or
indoors
and
don't
move
the pack,
the
film
wiit
not
be damased.
75-150.300
SPEED
15
350
www.orphancameras.com

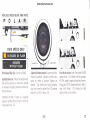
FOR 3OOO SPEED
BLACK
AND
WHITE
POLI\R
3$CICI 5PEED
OHLf*
Film Speed
Dial
(A):
Set it to 3000.
Lighting
Selector:
Move
the
knob to set
the
yellow
square as shown
for almost
alloutdoor
daylight
pictures
and for all
f
lash
pictu
res.
rNDooRS
WITHOUT
FLASH is a special
purpose
setting for
dim light; use it as
described
on
p.34.
LIGHTEN
Lighten/Darken
control:
Leave
it at the
Normal
position
(shown)
unless
you
want to
make
a
picture
lighter
or
darker. For some
dim light
pictures
you
may
have
to move the
L/D
control
toward LTcHTEN. See
p.
34.
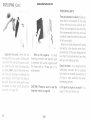
Fast
focus scale: Use it only with
3000
speed
film.
lt's shown set for
groups
5-10
ft. away
(upper
picture)
and
every-
thing
past
l0
ft.
(lower
picture).
Set it,
aim, and
shoot.
lt's handy
for fast
action shots
and scenes.
ffi
ffi
i
a
1
t
t
:wi"-
350
L7
www.orphancameras.com
Strona się ładuje...
Strona się ładuje...
Strona się ładuje...
Strona się ładuje...
Strona się ładuje...
Strona się ładuje...
Strona się ładuje...
Strona się ładuje...
Strona się ładuje...
Strona się ładuje...
Strona się ładuje...
Strona się ładuje...
Strona się ładuje...
Strona się ładuje...
Strona się ładuje...
Strona się ładuje...
Strona się ładuje...
Strona się ładuje...
Strona się ładuje...
Strona się ładuje...
Strona się ładuje...
Strona się ładuje...
Strona się ładuje...
Strona się ładuje...
Strona się ładuje...
Strona się ładuje...
Strona się ładuje...
Strona się ładuje...
Strona się ładuje...
Strona się ładuje...
Strona się ładuje...
Strona się ładuje...
Strona się ładuje...
-
 1
1
-
 2
2
-
 3
3
-
 4
4
-
 5
5
-
 6
6
-
 7
7
-
 8
8
-
 9
9
-
 10
10
-
 11
11
-
 12
12
-
 13
13
-
 14
14
-
 15
15
-
 16
16
-
 17
17
-
 18
18
-
 19
19
-
 20
20
-
 21
21
-
 22
22
-
 23
23
-
 24
24
-
 25
25
-
 26
26
-
 27
27
-
 28
28
-
 29
29
-
 30
30
-
 31
31
-
 32
32
-
 33
33
-
 34
34
-
 35
35
-
 36
36
-
 37
37
-
 38
38
-
 39
39
-
 40
40
-
 41
41
-
 42
42
-
 43
43
-
 44
44
-
 45
45
-
 46
46
-
 47
47
-
 48
48
-
 49
49
-
 50
50
-
 51
51
-
 52
52
-
 53
53


w innych językach
- English: Polaroid 350 User manual
Powiązane artykuły
Inne dokumenty
-
Minolta Maxxum Flash 400AF Instrukcja obsługi
-
Fujifilm Instax Square SQ6 Blush Gold Instrukcja obsługi
-
-
Sony ILCA 99M2 Instrukcja obsługi
-
-
Sony ILCE-7SM2 Instrukcja obsługi
-
Mode Alpha 6500 18-135mm (ILCE-6500M/B) Instrukcja obsługi
-