
A6 PCS
6 PCS
8 PCS
6
8 PCS
2 PCS
2 PCS
1PC
1 PC
8 PCS
6 PCS
14 PCS
PCS
B
C
G
H
I
J
K
L
D
E
F
1
2
3
4
5
6
7
10
11
12
9
8
2
1 PC
M
2 PCS
1 PC
1 PC
N
O
P
2 PCSQ
2 PCS
4 PCS
1 PC
R
S
T
1
7
10
11
3
2
5
A
A
B
B
L
L
W 4 PCS
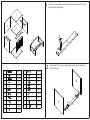
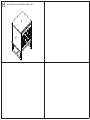
On piece 5, secure the Door rebound device (O) using screws (D). Use the
pre-drilled holes for guidance.
Attach piece 2 & 3 to piece 5 using wooden dowels (L), cam dowels (A)
and cam locks (B).
O
D
5

34
56
LL
LL
3
2
13
2
1
9
1
3
2
9
6
8
7
7
5
L
L
L
L
A
A
A
A
B
B
B
B
C
C
I
M
P
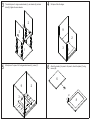
Then attach piece 1 using wooden dowels (L), cam dowels (A) and cam
locks (B), tighten the cross dowels.
Slot piece 9 into the ridges.
Attach piece 7 to piece 2 & 3 using wooden dowels (L), screw (C). Attach the handle (I) to piece 6. On piece 8, attach the plates (P) using
screws (M).

78
910
C
C
C
C
K
K
K
S
K
K
K
S
6
3
2
5
2
3
4
11
11
12
10
10
11
11
12
10
E
W
x4
L
L
L
L
9
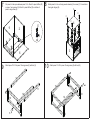
Put piece 6 to the space between piece 1 & 5. Attach 2 x panel stiffner (W)
on piece 1 using screw (E). Attach 2 x panel stiffner (W) on bottom of
piece 6 using screw (E).
1
Attach piece 4 to the unit using wooden dowels (L) & screws (C). Connect door
8 using bar hinges (N).
8
N
N
Attach piece 11 & 12 to piece 10 using screw (K) with tool (S). Attach piece 11 & 12 to piece 10 using screw (K) with tool (S).

11
J
JJ
J
J
J
J
J
10
10
4
2
S
G
R
F
QF
Q
D
T
12
13 14
22
11
1
39
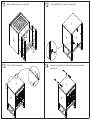
Attach 2 section using screw (J) with tool (S). Attach panel stiffner (T) on piece 9 using screw (D).
Attach strip (R) using screw (G). Secure the unit to a wall in your chosen location using wall plugs (Q)
and screws (F).

15 The unit should now be assembled and ready to use.
2
1
-
 1
1
-
 2
2
-
 3
3
-
 4
4
-
 5
5


Baxton Studio WES-005-Natural/Black-ET Assembly Instructions
- Typ
- Assembly Instructions
- Ten podręcznik jest również odpowiedni dla
w innych językach
Inne dokumenty
-
Wren Kitchens 2070 & 2250mm Walk-in Tower Unit Assembly Guide
-
 VERTO 65H110 Instrukcja obsługi
-
Abus TVAC31210 instrukcja
-
mothercare Salcombe Wardrobe instrukcja
-
Atlantic Venus 198CD Assembly Instruction
-
-
Technics SBS500 Instrukcja obsługi
-
Yamaha YST-C10 Instrukcja obsługi
-
Yamaha Clavinova Digital Piano Instrukcja obsługi
