
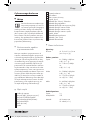
3
1
A
B
C
4
5
21
20
19
18
4
9
10
11
3
8
2
3
12
13
5 2
6
7
17 16 15
14
63925_silv_Digitale_Küchenwaage_content_LB4.indd 3 21.02.11 17:45

4 GB
Table of Contents
Introduction
Proper Use .................................................................................................................Page 5
Description of parts ...................................................................................................Page 5
Technical data ...........................................................................................................Page 5
Includes ......................................................................................................................Page 6
Safety Instructions
General Safety Instructions ......................................................................................Page 6
Electrical safety .........................................................................................................Page 7
Safety Instructions for Batteries ................................................................................Page 7
Installation ...........................................................................................................Page 7
Bringing into use
Setting the time ..........................................................................................................Page 8
Operation
Using the time display ...............................................................................................Page 8
Using the scale ..........................................................................................................Page 8
Using the temperature display .................................................................................Page 9
Using the alarm function ...........................................................................................Page 9
Using the digital timer ...............................................................................................Page 10
Resetting the settings .................................................................................................Page 10
Replacing the batteries .............................................................................................Page 10
Troubleshooting ..............................................................................................Page 11
Cleaning and Maintenance ....................................................................Page 11
Disposal ..................................................................................................................Page 11
63925_silv_Digitale_Küchenwaage_content_LB4.indd 4 21.02.11 17:45

5 GB
Introduction
Digital Kitchen Scale
Introduction
Before assembling and using the
device for the first time, take time to
familiarise yourself with the product
first. In addition please refer carefully to the in-
stallation and operating instructions below and
to the safety advice. Only use the product as
described and for the designated areas of ap-
plication. Please keep these instructions in a
safe place. If you hand this product on to a third
party, you must also pass on all documents
relating to the product.
Proper Use
This appliance is designed to weigh out and
tare quantities of food. The digital kitchen
scale
measures the weight of non-aggressive, non-cor-
rosive and non-abrasive liquids or solids. It is not
intended for weighing medication or prohibited
materials.
As well as having a digital countdown
timer and an alarm, the device also displays the
temperature and the time of day. Any use other
than that described above or any modification
of the product is not permissible and will result
in damage. Misuse may also result in other life-
threatening risks and injury. The product is for
private use only and is not intended for medical
or commercial use.
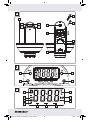
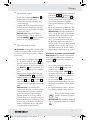
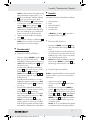
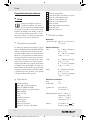
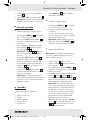
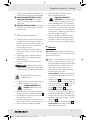
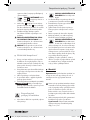
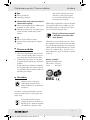
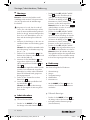
Description of parts
1
Weighing bowl
2
TARE button (“zero reset”)
3
SET / WEIGHT MODE button
4
Digital timer / UNIT / Alarm / - button
5
MODE / + button
6
Dowel (ø 6 mm)
7
Screw
8
Battery compartment
9
Glass plate
10
Wall bracket
11
Reset button
12
°Celsius / °Fahrenheit indicator
13
Grams / millilitres indicator
14
Pounds (lb) and fluid ounces (floz) indicator
15
Milk-weighing mode indicator
16
Water-weighing mode indicator
17
Weight-weighing mode indicator
18
Alarm symbol
19
Battery charge state indicator
20
Tare indicator
21
Digital timer indicator
Technical data
Dimensions:
Folded up: approx. 12.9 x 21.9 x
5.6 cm (W x H x D)
Measuring range:
Weight: 0 – 5100 g, accuracy
± (0.1 % + 1 g)
0 – 11 lb 4 oz, accuracy
± (0.1 % + 1 oz)
Water: 0 – 5100 ml, accuracy
± (0.1 % + 1 ml)
0 – 179.5 floz, accuracy
± (0.1 % + 1 floz)
Milk: 0 – 4950 ml, accuracy
± (0.1 % + 1 ml)
0 – 174.2 floz, accuracy
± (0.1 % + 1 floz)
Measurement divisions:
Weight: 1 g
Water / milk: 1 ml
Digital timer: Up to 99 minutes and
59 seconds (± 1 s)
Temperature display: 0.0 °C – 50.0 °C,
accuracy ± 2.0 °C
32.0 °F – 122.0 °F,
accuracy ± 3.6 °F
63925_silv_Digitale_Küchenwaage_content_LB4.indd 5 21.02.11 17:45

6 GB
Introduction / Safety Instructions
Battery: 2 x CR2032, 3 V
(included)
Material:
Housing /
Weighing bowl: Plastic
Includes
Immediately after unpacking please check the
package contents for completeness and if all
parts and the product are in good condition. Do
not under any circumstances use the product if
the delivery is incomplete.
1 Kitchen scale
1 Weighing bowl
1 Wall bracket
2 Batteries type CR2032, 3 V
2 Dowels (ø 6 mm)
2 Screws
1 Operating manual
Safety Instructions
KEEP ALL THE SAFETY ADVICE AND
INSTRUCTIONS IN A SAFE PLACE FOR
FUTURE REFERENCE!
General Safety Instructions
WARNING!
DANGER
OF DEATH AND ACCIDENTS
FOR TODDLERS AND CHIL-
DREN! Never leave children unsupervised
with the packaging material. The packaging
material represents a danger of suffocation.
Children frequently underestimate the
dangers. Always keep children away from
the packaging material.
WARNING!
DANGER TO LIFE!
Batteries can be swallowed, which may
represent a danger to life. If a battery has
been swallowed, medical help is required
immediately.
Children or persons who lack the knowledge
or experience to use the device or whose
physical, sensory or intellectual capacities
are limited must never be allowed to use the
device without supervision or instruction by a
person responsible for their safety. Children
must never be allowed to play with the device.
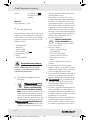
5 kg
CAUTION! RISK OF INJURY!
Do not place more than 5 kg on
the scale. This could damage
the product.
Do not expose the product to
– extreme temperatures,
– strong vibrations,
– heavy mechanical loads,
– direct sunlight
– magnetic fields,
– moisture.
These can damage the product.
Protect the product from electrostatic charge /
discharge. This could hinder the internal
data exchange, which causes errors in the
LCD readout.
Check the product for damage before use.
Never use a damaged product.
WARNING!
Never open the housing of
the product. This can result in injury and
damage to the product. Repairs must be
carried out by an electrician only.
Do not allow anyone inexperienced to use the
product. Make sure that anyone intending
to use the product has read the operating
manual and is capable of operating the
product safely.
The product may not function properly if it is
subject to electrical interference or high-
frequency radio transmissions. If this is the
case, briefly remove the batteries from the
product
and replace them again. Proceed
as described
in the section on “Replacing
the batteries“.
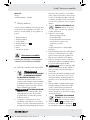
FOOD-SAFE! The taste and
smell of your food are not
detrimentally affected by the
weighing bowl
1
.
63925_silv_Digitale_Küchenwaage_content_LB4.indd 6 21.02.11 17:45

7 GB
Safety Instructions / Installation
Use the weighing bowl
1
only for weighing
food. Do not place other things on the
weighing bowl
1
or the kitchen scale.
Failure to observe this advice may result in
damage to the product.
When you press the buttons on the display,
do so carefully. Do not use sharp objects to
press the buttons.
Ꮨ CAUTION! RISK OF ELECTRIC
SHOCK! Before installation please ensure
that there is no concealed wiring where you
are intending to drill.
CAUTION! WATER DAMAGE! Before
installation please ensure that there are
no concealed water pipes where you are
intending to drill.
Electrical safety
Do not hang the device above hot surfaces
or in the vicinity of open flames, otherwise the
housing may melt. Ensure that the device is
not at risk in the closed or in the opened state.
Keep the device away from sources of water
or moisture. Water penetration increases
the risk of electric shock.
Never use the scale with wet hands.
Remove the batteries if the device breaks
down or is defective.
Do not use the device if it is damaged.
WARNING!
Never open the device’s
housing. Always have any repairs carried out
or replacement parts fitted by an electrical
equipment repair specialist only.
Safety Instructions
for Batteries
Remove the batteries from the device if they
are not going to be used for a prolonged
period.
CAUTION! DANGER OF
EXPLOSION! The batteries
must never be recharged!
Make sure that the polarity is correct when
you insert a battery. This is indicated in the
battery compartment
8
.
If necessary, clean the batteries and device
contacts before inserting the batteries.
Remove spent batteries immediately from
the device. There is an increased danger of
leaks!
Batteries must not be disposed of in the
normal domestic waste!
Every consumer is legally obliged to dis-
pose of batteries in the proper manner!
CAUTION! DANGER OF
EXPLOSION! Keep batteries
away from children; do not
throw batteries in the fire, short-circuit bat-
teries or take them apart.
If the above instructions are not complied
with, the batteries may discharge them-
selves beyond their end voltage. There is
then a danger of leaking. If the batteries
have leaked inside your device, you should
remove them immediately in order to pre-
vent damage to the device!
Avoid contact with the skin, eyes and mu-
cous membranes. Any parts of the body
coming into contact with battery acid should
be rinsed off with copious amounts of water
and / or a doctor contacted if necessary!
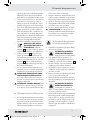
Installation
Note: You can use this product either wall
mounted or as a tabletop unit. In the following we
will describe how to mount the product to a wall.
Ensure that you do not strike electrical ca-
bles, gas or water pipes when you are
working with a drill. If necessary, check the
area using a suitable detector before you
drill. Read the operating instructions for
your drill.
Install the scale in such a way that it functions
perfectly and can be used properly.
Note: The recommended maximum height
of the kitchen scale when mounted to a wall
is approx. approx. 1.5 m.
63925_silv_Digitale_Küchenwaage_content_LB4.indd 7 21.02.11 17:45

8 GB
Installation / Bringing into use / Operation
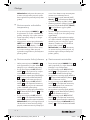
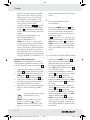
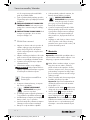
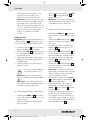
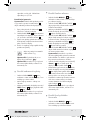
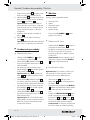
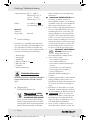
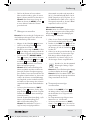
1. Remove the wall bracket
10
from the back of
the housing by sliding it downwards (Fig. A).
2. Mount the wall bracket
10
vertically in the
desired position on the wall with the sup-
plied screws
7
and dowels
6
.
Note: The supplied dowels are intended for
use in ordinary solid masonry. Seek expert
advice on suitable fixings if the device is to
be fixed to another type of wall construction.
3. Pull the separation strip out of the battery
compartment
8
.
4.
Then mount the scale on to the wall bracket
10
.
Note: Measuring accuracy may be detri-
mentally affected if the device is not in-
stalled vertically.
Bringing into use
Setting the time
Press the MODE / + button
5
until the
device enters the clock mode.
Press the SET / WEIGHT MODE button
3
to enter the settings mode. The minute dis-
play value flashes.
You can use the MODE / + button
5
or the
Digital timer / UNIT / Alarm / - button
4
to set the value.
Note: If you keep these buttons
4
,
5
pressed, you can accelerate the process
and reach the desired value more quickly.
Press the SET / WEIGHT MODE button
3
to store the set value and move on to setting
the hour display value. The hour value flashes.
You can use the MODE / + button
5
or the
Digital timer / UNIT / Alarm / - button
4
to
set the value.
Press the SET / WEIGHT MODE button
3
to store the set value and leave the settings
mode.
Note: If no key is pressed within 10 seconds,
the set value will stop flashing and the time
is set to the value shown in the display.
Operation
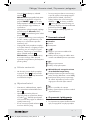
The device has five functions:
1. Time display
2. Weighing
3. Temperature display
4. Alarm function
5. Digital countdown timer
You can switch between the various func-
tions by pressing the MODE / + button
5
.
Using the time display
Press the MODE / + button
5
until the de-
vice enters the clock mode.
The display shows the time (hours:minutes).
If you wish to change the time to another
value, proceed as described in the section
“Setting the time”.
Note: The device continues to show the
time unless the device is switched to anoth-
er function by you pressing the MODE /
+ button
5
.
Using the scale
Note: When using this product as a tabletop
unit, make sure it is placed on a solid and flat
surface for the weighing process.
Fold down the glass plate
9
.
Place the weighing bowl
1
on the device’s
weighing platform.
If necessary press the MODE / + button
5
until the device enters the weighing mode.
This comes after the time display.
You can press the SET / WEIGHT MODE
button
3
to switch between the weighing
mode settings for weight
17
, water
16
and
milk
15
. The selected weighing mode set-
ting is indicated by a small bar indicator in
the display.
63925_silv_Digitale_Küchenwaage_content_LB4.indd 8 21.02.11 17:45

9 GB
Operation
Note: In the weighing mode settings for
water and milk, the device displays the vol-
ume (ml / floz) of the liquid in the bowl. This
function is intended to replace the use of a
measuring jug for liquids. Please note that
in particular the volume of milk depends on
the fat content, the origin of the milk and
other factors. The volume displayed there-
fore corresponds to an average value.
You can press the Digital timer / UNIT /
Alarm / - button
4
to switch between the
displayed units
13
,
14
. The following units
can be used in the measurements:
Weight: Gram (default setting), oz, lb
Water: ml (default setting), floz
Milk: ml (default setting), floz
Note: The measurement unit oz (ounce) is
still in common use for foods and is the
equivalent of approx. 28.35 g. The meas-
urement unit lb (libra = Latin for pound) is
the equivalent of approx. 453.59 g and
equals 16 oz. The measurement unit floz
(fluid ounce) is the equivalent of approx.
28.4 ml. 100 ml is therefore the equivalent
of approx. 3.5 floz.
Weighing out foods:
Note: When you are weighing heavy items,
place them slowly and carefully on to the
weighing bowl
1
to avoid damaging the kitch-
en scale.
1. Place an ingredient into the weighing bowl
1
. The weight is immediately shown in the
display.
2. Press the TARE button
2
to zero reset the
display. The display shows “0” and the tare
indicator
20
will light up.
3. Now add the desired quantity of the second
ingredient. You can read the added quantity
directly in the display.
4. Repeat steps 2 and 3 until all the required
ingredients have been added.
5 kg
Note that the maximum load on
the scale is 5 kg.
Note: If the scale is overloaded, then the
display shows “
”.
Note: If no button is pressed within a period
of two minutes, the kitchen scale’s display
automatically shows the time.
Using the temperature
display
Press the MODE / + button
5
until the
device enters the temperature mode. This
comes after the weighing mode.
Temperature measurement is carried out at
an interval of approximately 10 seconds.
You can press the Digital timer / UNIT /
Alarm / - button
4
to switch the indicator
12
between °C and °F.
Note: If no button is pressed within a period
of two minutes, the kitchen scale’s display
automatically shows the time.
Using the alarm function
Press the MODE / + button
5
until the
device enters the alarm mode. This comes
after the temperature display.
Press the SET / WEIGHT MODE button
3
to enter the settings mode. The minute value
flashes.
You can use the MODE / + button
5
or the
Digital timer / UNIT / Alarm / - button
4
to
set the value.
Press the SET / WEIGHT MODE button
3
to store the set value and move on to setting
the hours. The hour value flashes.
You can use the MODE / + button
5
or the
Digital timer / UNIT / Alarm / - button
4
to
set the value.
Press the SET / WEIGHT MODE button
3
to store the set value and leave the settings
mode.
Note: If no key is pressed within 10 seconds,
the set value will stop flashing and the alarm
time is set to the value shown in the display.
63925_silv_Digitale_Küchenwaage_content_LB4.indd 9 21.02.11 17:45

10 GB
Operation
Press the Digital timer / UNIT / Alarm / -
button
4
to start the alarm function. The
Alarm symbol
18
appears in the display.
You can switch off the alarm function by
pressing the Digital timer / UNIT / Alarm / -
button
4
again. The Alarm symbol
18
disappears from the display.
When the set alarm time is reached, an
audible alarm signal sounds for about one
minute.
No audible alarm signal sounds if the set
time is reached when the device is in the
weighing mode. Instead the Alarm symbol
18
flashes in the display.
Note: If no button is pressed within a period
of two minutes, the kitchen scale’s display
automatically shows the time.
Using the digital timer
Press the MODE / + button
5
until the
device enters the digital timer mode. This
comes after the alarm function.
Press the SET / WEIGHT MODE button
3
to enter the settings mode. The seconds
display value flashes.
You can use the MODE / + button
5
or the
Digital timer / UNIT / Alarm / - button
4
to
set the value.
Press the SET / WEIGHT MODE button
3
to store the set value and move on to setting
the minute display value. The minute display
value flashes.
You can use the MODE / + button
5
or the
Digital timer / UNIT / Alarm / - button
4
to
set the value.
Press the SET / WEIGHT MODE button
3
to store the set value and leave the settings
mode.
Press the Digital timer / UNIT / Alarm /
- button
4
to start the digital timer. The digital
timer indicator
21
appears in the display.
Note: While the digital timer continues to
run, you can switch the device to another
function by pressing the MODE / + button
5
.
The digital timer indicator
21
then continues
to appear in the display.
You can switch off the digital timer by press-
ing the Digital timer / UNIT / Alarm /
- button
4
again. The digital timer indicator
21
disappears from the display.
When the set time expires, an audible alarm
signal sounds for about one minute and the
previously set time appears on the display.
No audible alarm signal sounds if the set
time is reached when the device is in the
weighing mode. Instead the digital timer
indicator
21
flashes in the display.
Note: If no button is pressed within a period
of two minutes, the kitchen scale’s display
automatically shows the time.
Resetting the settings
The reset button
11
can be found on the
back of the housing. Press this button to reset
all the settings to the default factory settings.
Replacing the batteries
When the batteries become weaker, the
battery charge state indicator
19
in the
display will light up.
Replace the batteries as soon as the symbol
“
” appears in the display. Weak or ex-
hausted batteries can affect the accuracy of
the measurement results.
Open the battery compartment
8
on the
back of the scale.
Remove the discharged batteries and dispose
of them properly in accordance with the ap-
plicable regulations (see section “Disposal”).
Insert two new batteries type CR2032,
3 V
into the battery compartment
8
.
Make sure you fit the batteries the right way
round (polarity). The correct polarity is
shown under the battery compartment
8
.
Then close the battery compartment
8
.
63925_silv_Digitale_Küchenwaage_content_LB4.indd 10 21.02.11 17:45

11 GB
Troubleshooting / Cleaning and Maintenance / Disposal
Troubleshooting
= Fault
= Cause
= Solution
=
= The scale is unstable or not quite plumb.
= Ensure the device is firmly fixed in place
and exactly plumb.
=
= The scale is overloaded.
= Remove the overload.
= Displays out2, then switches to the
clock display
= The scale was loaded with 1000 g before
you switched into weighing mode.
= Remove the overload within 10 seconds.
The display returns to the weighing mode
within five seconds.
=
= The batteries are too weak to weigh.
= Replace the batteries (see section “Replac-
ing the batteries”).
Cleaning and Maintenance
Do not use chemical cleaners, scouring
agents or sharp objects for cleaning. These
can damage the product.
Never immerse the product in water or other
liquids. This can damage the product.
Clean the product with a slightly dampened,
non-fluffing cloth. To remove more stubborn
dirt, you can also dampen the cloth with a
weak soap solution.
Disposal
The packaging is made entirely of
recyclable materials, which you may
dispose of at local recycling facilities.
Contact your local refuse disposal authority for
more details of how to dispose of your worn-out
product.
To help protect the environment,
please dispose of the product prop-
erly when it has reached the end of
its useful life and not in the household
waste. Information on collection
points and their opening hours can
be obtained from your local authority.
Faulty or used batteries must be recycled in
accordance with Directive 2006 / 66 / EC.
Please return the batteries and / or the device
to the available collection points.
Pb
Environmental damage
through incorrect disposal of
the batteries!
Batteries may not be disposed of with the usual
domestic waste. They may contain toxic heavy
metals and are subject to hazardous waste
treatment rules and regulations. The chemical
symbols for heavy metals are as follows:
Cd = cadmium, Hg= mercury, Pb = lead. That is
why you should dispose of used batteries at a
local collection point.
Product Description:
Digital Kitchen Scale
Model No.: Z30170
Version: 04 / 2011
EMC
63925_silv_Digitale_Küchenwaage_content_LB4.indd 11 21.02.11 17:45

12 PL
Spis zawartości
Wstęp
Zastosowanie zgodne z przeznaczeniem ...........................................................Strona 13
Opis części .............................................................................................................Strona 13
Dane techniczne ....................................................................................................Strona 13
Zawartość kompletu...............................................................................................Strona 14
Wskazówki bezpieczeństwa
Ogólne wskazówki bezpieczeństwa ....................................................................Strona 14
Zabezpieczenia elektryczne .................................................................................Strona 15
Wskazόwki bezpieczeństwa dotyczące baterii ..................................................Strona 15
Montaż .................................................................................................................Strona 16
Uruchomienie
Nastawienie czasu ................................................................................................Strona 16
Obsługa ............................................................................................................... Strona 16
Wskaźnik czasu .....................................................................................................Strona 17
Zastosowanie wagi ................................................................................................Strona 17
Zastosowanie wskaźnika temperatury .................................................................Strona 18
Zastosowanie funkcji alarmu .................................................................................Strona 18
Zastosowanie minutnika ........................................................................................Strona 18
Cofanie nastawień .................................................................................................Strona 19
Wymiana baterii ....................................................................................................Strona 19
Usuwanie usterek ....................................................................................... Strona 19
Czyszczenie i pielęgnacja ..................................................................... Strona 19
Usuwanie ...........................................................................................................Strona 20
63925_silv_Digitale_Küchenwaage_content_LB4.indd 12 21.02.11 17:45

13 PL
Wstęp
Cyfrowa waga kuchenna
Wstęp
Przed uruchomieniem urządzenia po
raz pierwszy zapoznaj się z nim. Pro-
szę uważnie przeczytać następującą
instrukcję montażu i obsługi oraz wskazόwki
bezpieczeństwa. Użytkuj urządzenie tylko tak,
jak to opisano i tylko w podanych dziedzinach
zastosowania. Przechowuj starannie niniejszą
instrukcję. Przy przekazywaniu urządzenia oso-
bom trzecim, przekaż wraz z nią również całą
przynależną dokumentację.
Zastosowanie zgodne
z przeznaczeniem
Niniejsze urządzenie jest przeznaczone do
ważenia i odważania artykułów spożywczych
w ilościach używanych zwykle w gospodarstwie
domowym. Cyfrowa waga kuchenna nie służy
do ustalania wagi cieczy agresywnych i żrących
oraz szorujących materiałów stałych. Nie jest
przeznaczona do ważenia lekarstw i niedozwo-
lonych materiałów. Służy ona zarόwno do wska-
zywania temperatury i czasu oraz wyposażona
jest w funkcję minutnika oraz alarmu. Użycie inne
niż wyżej opisane lub dokonywanie zmian pro-
duktu nie jest dozwolone i może prowadzić do
jego uszkodzenia. Skutkiem tego może także dojść
do innych niebezpieczeństw i urazów. Produkt
przeznaczony jest do użytku domowego, nie
do użytku medycznego lub handlowego.
Opis części
1
Szalka do ważenia
2
Przycisk TARE („Położenie zerowe“)
3
Przycisk SET/WEIGHT MODE
4
Przycisk Minutnik/UNIT/Alarm/-
5
Przycisk MODE/+
6
Kołek (ø 6 mm)
7
Śruba
8
Pojemnik na baterie
9
Płyta szklana
10
Zamocowanie do ściany
11
Przycisk „Reset”
12
Wskaźnik dla °Celsius/°Fahrenheit
13
Wskaźnik dla gram/mililiter
14
Wskaźnik dla funt (lb) oraz uncja cieczy (floz)
15
Wskaźnik dla trybu ważenie mleka
16
Wskaźnik dla trybu ważenie wody
17
Wskaźnik dla trybu ważenie ciężaru
18
Symbol „Alarm“
19
Wskaźnik ładowania baterii
20
Wskaźnik „Tara“ (Tara)
21
Wskaźnik dla minutnika
Dane techniczne
Wymiary:
Złożona: ok. 12,9 x 21,9 x 5,6 cm
(szer. x wys. x gł.)
Zakres pomiaru:
Ciężar: 0 – 5100 g, odchylenie
± (0,1 % + 1 g)
0 – 11 lb 4 oz, odchyle-
nie
± (0,1 % + 1 oz)
Woda: 0 – 5100 ml, odchylenie
± (0,1 % + 1 ml)
0 – 179,5 floz, odchyle-
nie ± (0,1 % + 1 floz)
Mleko: 0 – 4950 ml, odchylenie
± (0,1 % + 1 ml)
0 – 174,2 floz, odchyle-
nie ± (0,1 % + 1 floz)
Podział pomiaru:
Ciężar: 1 g
Woda/Mleko: 1 ml
Minutnik: do 99 minut oraz
59 sekund (± 1 s)
63925_silv_Digitale_Küchenwaage_content_LB4.indd 13 21.02.11 17:45

14 PL
Wstęp / Wskazówki bezpieczeństwa
Wskaźnik
temperatury: 0,0 °C – 50,0 °C,
Odchylenie ± 2,0 °C
32,0 °F – 122,0 °F,
Odchylenie ± 3,6 °F
Baterie: 2 x CR2032, 3 V
(załączone w zakresie
dostawy)
Materiał:
Obudowa /
Szalka do ważenia: Tworzywo sztuczne
Zawartość kompletu
Prosimy o sprawdzenie zawartości - bezpośrednio
po rozpakowaniu produktu - pod kątem komplet-
ności i stanu elementów. Nie należy składać
produktu, jeżeli zawartość opakowania jest
niekompletna.
1 Waga kuchenna
1 Szalka do ważenia
1 Zamocowanie do ściany
2 Baterie CR2032, 3 V
2 Kołki (ø 6 mm)
2 Śruby
1 Instrukcja obsługi
Wskazówki
bezpieczeństwa
PRZECHOWUJ WSZYSTKIE WSKAZÓWKI
DOTYCZĄCE BEZPIECZEŃSTWA ORAZ
INSTRUKCJE NA PRZYSZŁOŚĆ!
Ogólne wskazówki
bezpieczeństwa
OSTRZEŻENIE!
NIE-
BEZPIECZEŃSTWO UTRATY
ŻYCIA I NIESZCZĘŚLIWEGO
WYPADKU DLA MAŁYCH DZIECI I
DZIECI! Nigdy nie pozostawiaj dzieci bez
nadzoru z materiałem opakowania. Istnieje
niebezpieczeństwo uduszenia się materiałem
opakowania. Dzieci często nie dostrzegają
niebezpieczeństwa. Trzymaj zawsze dzieci
z daleka od materiału opakowania.
OSTRZEŻENIE!
NIEBEZPIECZEŃ-
STWO UTRATY ŻYCIA! Baterie mogą
zostać połknięte, co może zagrażać życiu.
Jeżeli bateria została połknięta, to należy
natychmiast skorzystać z pomocy lekarskiej.
Niniejsze urządzenie nie jest przeznaczone
do tego, żeby mogło być użytkowane przez
osoby (włącznie z dziećmi) o ograniczonych
zdolnościach fizycznych, sensorycznych lub
umysłowych lub osoby z brakiem doświad-
czenia i / lub brakiem wiedzy, chyba że
osoby takie będą nadzorowane przez
osobę odpowiedzialną za ich bezpieczeń-
stwo lub otrzymają od ciebie instrukcje, jak
należy użytkować urządzenie. Dzieci powinny
być nadzorowane, aby upewnić się, że nie
bawią się urządzeniem.
5 kg
OSTROŻNIE! NIEBEZPIE-
CZEŃSTWO OBRAŻEŃ
CIAŁA! Nie obciążaj wagi
ciężarem powyżej 5 kg. Produkt mógłby
zostać uszkodzony.
Nie należy wystawiać urządzenia na
– ekstremalne temperatury,
– silne wibracje,
– działanie silnych obciążeń mechanicznych,
– bezpośrednie promieniowanie słoneczne,
– magnetyczne otoczenie,
– działanie wilgoci.
W przeciwnym razie grozi to uszkodzeniem
produktu.
Produkt należy chronić przed ładowaniem /
rozładowaniem elektrostatycznym. Mogą one
spowodować utrudnienie w wewnętrznej
wymianie danych, co może wywołać błąd
w wyświetlaczu LCD.
Przed pierwszym użyciem należy skontrolo-
wać produkt czy nie jest uszkodzony. Uszko-
dzonego produktu nie powinno się używać.
OSTRZEŻENIE!
Nie należy nigdy
otwierać obudowy produktu. Następstwem
63925_silv_Digitale_Küchenwaage_content_LB4.indd 14 21.02.11 17:45

15 PL
Wskazówki bezpieczeństwa
tego mogą być urazy i uszkodzenie produktu.
Naprawy powinny być przeprowadzane
przez fachowca od urządzeń elektrycznych.
Osoby bez doświadczenia w obchodzeniu
się produktem, nie powinny go używać.
Należy się upewnić, że każdy, kto używa
produkt, zapoznał się z instrukcją obsługi i
jest w stanie obsługiwać bezpiecznie produkt.
Funkcje produktu mogą zostac zakłócone
przez pole magnetyczne / źródła fal o wy-
sokiej częstotliwości. W przypadku stwier-
dzenia zakłóceń w działaniu produktu
należy
wyjąć z niego baterie i ponownie je włożyć
.
Należy w tym przypadku postępować
zgodnie z rozdziałem „Wymiana baterii”.
NADAJE SIĘ DO BEZPO-
ŚREDNIEGO KONTAKTU Z
ŻYWNOŚCIĄ! Szalka do
ważenia
1
nie wywiera żadnego wpływu
na właściwości smakowe oraz zapachowe.
Szalkę do ważenie
1
należy stosować
jedynie do ważenia przeznaczonych do
tego artykułόw żywnościowych. Nie należy
ustawiać innych przedmiotόw na szalce do
ważenia
1
wzgl. na wadze kuchennej.
Nie przestrzegając niniejszego może dojść
do uszkodzenia produktu.
Proszę ostrożnie naciskać przyciski na wy-
świetlaczu. Proszę nie używać szpiczastych
przedmiotόw do naciskania na przyciski.
OSTROŻNIE! ZAGROŻENIA PORA-
ŻENIA PRĄDEM ELEKTRYCZNYM!
Przed dokonaniem odwiertόw należy się
upewnić, że w miejscu tym nie przechodzą
instalacje elektryczne.
OSTROŻNIE! SZKODY WODNE! Przed
dokonaniem odwiertόw należy się upewnić,
że w miejscu tym nie przechodzą rurociągi.
Zabezpieczenia elektryczne
W celu zapobiegania zniszczenia obudowy,
nie należy zawieszać niniejszego urządze-
nia ponad gorącymi powierzchniami lub w
pobliżu otwartego ognia. Proszę zapewnić,
aby nie narażać urządzenia w stanie zło-
żonym, ani w stanie rozłożonym.
Niniejsze urządzenie należy przechowywać
z dala od wilgoci. Wnikanie wody zwiększa
zagrażenie porażenia prądem elektrycznym.
Proszę nie stosować wagi z mokrymi rękami.
W przypadku zakłόceń lub awarii urządze-
nia należy usunąć z niego baterie.
Proszę nie używać uszkodzonego produktu.
OSTRZEŻENIE!
Nie należy otwierać
obudowy urządzenia. Dokonywania napraw
lub wymiany części należy zlecać jedynie
fachowcom w zakresie elektryki.
Wskazόwki bezpieczeń-
stwa dotyczące baterii
Usuń baterie z urządzenia, gdy przez dłuższy
czas nie były używane.
OSTROŻNIE! NIEBEZPIE-
CZEŃSTWO EKSPLOZJI!
Nigdy ponownie nie ładuj baterii!
Przy wkładaniu baterii upewnij się, że
zachowujesz odpowiednią biegunowość.
Pokazana jest ona w kieszeni na baterie
8
.
W razie potrzeby oczyść zestyk baterii i
urządzenia przed założeniem baterii.
Wyczerpane baterie niezwłocznie usuwaj z
urządzenia. Istnieje zwiększone niebezpie-
czeństwo wycieku!
Baterie nie należą do odpadów pochodzą-
cych z gospodarstw domowych!
Każdy użytkownik jest ustawowo zobowią-
zany do prawidłowego usuwania baterii do
odpadów!
OSTROŻNIE! NIEBEZPIE-
CZEŃSTWO EKSPLOZJI!
Trzymaj baterie z daleka od
dzieci, nie wrzucaj ich do ognia, nie zwieraj
ich ani nie rozbieraj na części.
W przypadku nieprzestrzegania wskazówek
baterie mogą zostać rozładowane poza ich
napięcie końcowe. Istnieje wówczas niebez-
pieczeństwo wycieku. Gdyby baterie miały
wycieknąć w twoim urządzeniu, to natych-
miast je wyjmij, aby zapobiec uszkodzeniom
urządzenia!
63925_silv_Digitale_Küchenwaage_content_LB4.indd 15 21.02.11 17:45

16 PL
Wskazówki bezpieczeństwa / Montaż / Uruchomienie / Obsługa
Unikaj kontaktu ze skórą, oczyma i śluzów-
kami. W razie kontaktu z kwasem bateryjnym
przepłucz odnośne miejsce dużą ilością
wody i / lub wezwij lekarza!
Montaż
Wskazówka: Produkt może być stosowany
w montażu naściennym jak i w wersji stojącej.
W dalszej części opisano montaż naścienny.
Przed rozpoczęciem prac z narzędziami
do wiercenia należy sprawdzić położenie
przewodόw elektrycznych, rurociągόw
gazowych lub wodnych. Przed dokonaniem
odwiertόw w ścianie należy ewentualnie
dokonać pomiaru za pomocą wyszukiwarki.
W tym celu należy przeczytać rόwnież
instrukcję narzędzi do dokonywania
odwiertόw.
Proszę montować wagę w ten sposόb, aby
zagwarantować jej sprawną funkcjonalność.
Wskazówka: Zalecana maksymalna wy-
sokość wagi kuchennej do montażu ścien-
nego wynosi ok. 1,5 m.
1. Proszę usunąć zamocowanie do ściany
10
,
znajdujące się na odwrotnek stronie obudowy,
przesuwając je w dόł (rys. A).
2. Zamocowanie do ściany
10
należy zamon-
tować na wyszukanym miejscu na ścianie
za pomocą dostarczonych śrub
7
oraz
kołkόw
6
.
Wskazόwka: Kołki załączone w dostawie
przeznaczone są dla normalnych, trwałych
murόw. W przypadku innego rodzaju murόw
należy zasięgnąć informacji w fachowych
placόwkach handlowych na temat odpo-
wiedniego materiału mocującego.
3. Proszę usunąć pasek zabezpieczający z
pojemnika na baterie
8
.
4. Proszę następnie założyć wagę w lini pio-
nowej na zamocowaniu do ściany
10
.
Wskazόwka: Montaż wagi w pozycji
innej, aniżeli pionowej może mieć znaczny
wpływ na dokładność pomiarόw.
Uruchomienie
Nastawienie czasu
Proszę nacisnąć przycisk MODE/+
5
, aż
do pojawienia się w trybie czasu.
Proszę nacisnąć przycisk SET/WEIGHT
MODE
3
, aby znaleźć się w trybie usta-
wienia. Wskaźnik minut pulsuje.
W celu ustawienia wartości mogą państwo
używać przycisk MODE/+
5
lub przycisk
Minutnik/UNIT/Alarm/-
4
.
Wskazówka: Gdy przytrzyma się wci-
śnięte przyciski
4
,
5
możliwe jest szyb-
sze ustawienie wartości.
Proszę nacisnąć przycisk SET/WEIGHT
MODE
3
, w celu zapisania ustawionej
wartości oraz przejścia do nastawienia
godziny. Wskaźnik godzin pulsuje.
W celu ustawienia wartości mogą państwo
używać przycisk MODE/+
5
lub Minutnik/
UNIT/Alarm/-
4
.
Proszę nacisnąć przycisk SET/WEIGHT
MODE
3
, w celu zapisania ustawionej
wartości oraz opuszczenia trybu nastawiania.
Wskazόwka: Jeśli w przeciągu kolejnych
10 sekund nie zostaje naciśnięty kolejny
przycisk, nastawiona wartość przestaje
pulsować. Czas zostaje automatycznie
nastawiony na wskazaną wartość.
Obsługa
Niniejsze urządzenie dysponuje pięcioma
funkcjami:
1. Wskaźnik czasu
2. Waga
3. Wskaźnik temperatury
4. Funkcja alarmu
5. Minutnik
Za pomocą przycisku MODE/+
5
mogą
państwo przełączać pomiądzy
poszczegόlnymi funkcjami.
63925_silv_Digitale_Küchenwaage_content_LB4.indd 16 21.02.11 17:45

17 PL
Obsługa
Wskaźnik czasu
Proszę nacisnąć przycisk MODE/+
5
, aż
do pojawienia się w trybie czasu.
W wyświetlaczu zostaje wskazany czas
(Godziny:Minuty).
W przypadku, kiedy chcą państwo ustawić
czas na inną wartość, należy postępować
zgodnie ze sposobem opisanym w rozdziale
„Nastawienie czasu“.
Wskazόwka: Niniejsze urządzenie
wskazuje tak długo czas, aż za pomocą
przycisku MODE/+
5
dokonane zostanie
przejście do innej funkcji urządzenia.
Zastosowanie wagi
Wskazówka: W przypadku stosowania jako
urządzenie stojące produkt musi być na potrze-
by ważenia umieszczony na płaskiej i stabilnej
powierzchni.
Proszę rozłożyć w dόł płytę szklaną
9
.
Proszę ustawić szalkę do ważenia
1
na
płycie do ważenia niniejszego urządzenia.
W razie konieczności należy nacisnąć przy-
cisk MODE/+
5
, aż do pojawienia się w
trybie ważenia. Następuje on po wskaźniku
czasu.
Mogą państwo rόwnież używać przycisk
SET/WEIGHT MODE
3
, w celu przełą-
czania pomiędzy nastawieniami pomiarowymi
dla ciężaru
17
, wody
16
oraz mleka
15
.
Wybrane nastawienie pomiarowe zostaje
wskazane w wyświetlaczu za pośrednictwem
balki.
Wskazόwka: Przy nastawieniach
pomiarowych dla wody oraz mleka zostaje
wskazana mierzona pojemność (ml/floz)
tych cieczy. Niniejsza funkcja zastępuje
pojemnik pomiarowy do cieczy. Należy
zwracać uwagę, że w szczegόlności objętość
mleka uzależniona jest od zawartości w nim
tłuszczu, jego pochodzenia oraz dalszych
faktorόw. Wskazana objętość odpowiada
w tym przypadku średniej wartości.
Aby dokonać zmiany pomiędzy wskazanymi
jednostkami
13
,
14
, mogą państwo użyć
przycisku Minutnik/UNIT/Alarm/-
4
. W
nastawieniach pomiarowych mogą zostać
zastosowane następujące jednostki:
Ciężar: gram (nastawienie podstawowe),
oz, lb
Woda: ml (nastawienie podstawowe), floz
Mleko: ml (nastawienie podstawowe), floz
Wskazόwka: Jednostka pomiarowa oz
(ounce = angl. dla uncji) jest od czasu do
czasu zastosowana dla artykułόw żywno-
ściowych oraz odpowiada wartości ok.
28,35 g. Jednostka pomiarowa lb (libra =
łac. dla funta) odpowiada wartości ok.
453,59 g wzgl. 16 oz. Jednostka pomiarowa
floz (fluid ounce= angl. dla uncji cieczy)
odpowiada wartości ok. 28,4 ml. 100 ml
odpowiada tym samym wartości ok. 3,5 floz.
Doważanie artykułόw żywnościowych:
Wskazówka: Przy ważeniu ciężkich przed-
miotów, należy je kłaść powoli i ostrożnie na
szalę wagi
1
, aby zapobiec uszkodzeniu
wagi kuchennej.
1. Proszę nałożyć następną część masy na
szalkę do ważenia
1
. Ciężar zostaje
wskazany w wyświetlaczu.
2. Proszę nacisnąć przycisk TARE
2
, aby
zresetować wyświetlacz. W wyświetlaczu
ukazuje się wartość „0“ oraz zapala się
wskaźnik „Tara“
20
.
3. Proszę następnie dodać wymaganą ilość
następnej partii. Mogą państwo od razu
odczytać w wyświetlaczu wartość dodanej
masy.
4. Proszę powtarzać kroki 2 oraz 3, aż wszyst-
kie potrzebne artykuły zostaną zważone.
5 kg
Proszę zwracać uwagę, że mak-
symalne obciążenie wagi wynosi
5 kg.
Wskazόwka: W przypadku przeciążenia
wagi, w wyświetlaczu ukazuje się wskaźnik
„
“.
63925_silv_Digitale_Küchenwaage_content_LB4.indd 17 21.02.11 17:45

18 PL
Obsługa
Wskazówka: Jeżeli przez dwie minuty nie
zostanie wciśnięty żaden przycisk, wyświe-
tlacz wagi kuchennej automatycznie pokaże
godzinę.
Zastosowanie wskaźnika
temperatury
Proszę nacisnąć przycisk MODE/+
5
, aż
do pojawienia się w trybie wskaźnika tem-
peratury. Następuje on po trybie ważenia.
Pomiar temperatury następuje w odstępie
ok. 10 sekund.
Mogą państwo używać przycisk Minutnik/
UNIT/Alarm/-
4
, aby w wskaźniku
12
dokonywać zmiany pomiędzy °C oraz °F.
Wskazówka: Jeżeli przez dwie minuty
nie zostanie wciśnięty żaden przycisk,
wyświetlacz wagi kuchennej automatycznie
pokaże godzinę.
Zastosowanie funkcji alarmu
Należy nacisnąć przycisk MODE/+
5
,
aż do pojawienia się w trybie alarmu.
Następuje on po wskaźniku temperatury.
Proszę nacisnąć przycisk SET/WEIGHT
MODE
3
, aż do pojawienia się w trybie
nastawiania. Wskaźnik minut pulsuje.
Mogą państwo używać przycisk MODE/+
5
lub używać przycisk Minutnik/UNIT/
Alarm/-
4
, w celu ustawienia wartości.
Proszę nacisnąć przycisk SET/WEIGHT
MODE
3
, w celu zapisania nastawionej
wartości oraz do przejścia do nastawienia
godzin. Wskaźnik godzin pulsuje.
Mogą państwo używać przycisk MODE/+
5
lub Minutnik/UNIT/Alarm/-
4
, w celu
ustawienia wartości.
Proszę nacisnąć przycisk SET/WEIGHT
MODE
3
, w celu zapisania nastawionej
wartości oraz opuszczenia trybu nastawiania.
Wskazόwka: Jeśli w przeciągu kolejnych
10 sekund nie zostanie naciśnięty kolejny
przycisk, nastawiona wartość przestaje pul-
sować. Czas alarmu zostaje automatycznie
nastawiony na wskazaną wartość.
Proszę nacisnąć przycisk Minutnik/UNIT/
Alarm/-
4
, w celu załączenia alarmu. W
wyświetlaczu ukazuje się symbol „Alarm“
18
.
Alarm mogą państwo wyłączyć, przyciskając
ponownie przycisk Minutnik/UNIT/Alarm/-
4
. W wyświetlaczu wygasa symbol
„Alarm“
18
.
W trakcie osiągnięcia nastawionego czasu
alarmu, rozlega się na okres jednej minuty
sygnał alarmu.
W przypadku, kiedy urządzenie znajduje
się w trybie ważenia, a osiągnięty zostanie
nastawiony czas, nie rozlega się sygnał
alarmowy. Zamiast tego w wyświetlaczu
pulsuje symbol „Alarm“
18
.
Wskazówka: Jeżeli przez dwie minuty
nie zostanie wciśnięty żaden przycisk, wy-
świetlacz wagi kuchennej automatycznie
pokaże godzinę.
Zastosowanie minutnika
Proszę nacisnąć przycisk MODE/+-Taste
5
,
aż do pojawienia się w trybie minutnika.
Następuje on po funkcji alarmu.
Proszę nacisnąć przycisk SET/WEIGHT
MODE
3
, w celu pojawienia się w trybie
nastawiania. Wskaźnik sekund pulsuje.
Mogą państwo używać przycisk MODE/+
5
lub przycisk Minutnik/UNIT/Alarm/-
4
,
w celu nastawienia wartości.
Proszę nacisnąć przycisk SET/WEIGHT
MODE
3
, w celu zapisania nastawionej
wartości oraz przejścia do nastawienia
minut. Wskaźnik minut pulsuje.
Mogą państwo używać przycisk MODE/
+
5
lub przycisk Minutnik/UNIT/Alarm/-
4
, w celu nastawienia wartości.
Proszę nacisnąć przycisk SET/WEIGHT
MODE
3
, w celu zapisania nastawionej
wartości oraz opuszczenia trybu nastawiania.
Proszę nacisnąć przycisk Minutnik/UNIT/
Alarm/-
4
, w celu uruchomienia minutnika.
63925_silv_Digitale_Küchenwaage_content_LB4.indd 18 21.02.11 17:45

19 PL
Obsługa / Usuwanie usterek / Czyszczenie i pielęgnacja
W wyświetlaczu ukazuje się wskaźnik
minutnika
21
.
Wskazόwka: W przypadku, kiedy minut-
nik pracuje, mogą państwo za pomocą
przycisku MODE/+
5
przejść do innej
funkcji urządzenia. Wskaźnik minutnika
21
zostaje w dalszym ciągu wskazany w
wyświetlaczu.
Mogą państwo wyłączyć minutnik, naciskając
ponownie przycisk Minutnik/UNIT/
Alarm/-
4
. W wyświetlaczu gaśnie wskaź-
nik minutnika
21
.
Po upływie nastawionego czasu rozlega się
na okres 1 minuty sygnał alarmowy oraz
ukazuje się w wyświetlaczu uprzednio
nastawiony czas.
W przypadku, kiedy urządzenie znajduje
się w trybie ważenia, a osiągnięty zostanie
nastawiony czas, nie rozlega się sygnał
alarmowy. Zamiast tego w wyświetlaczu
pulsuje wskaźnik minutnika
21
.
Wskazówka: Jeżeli przez dwie minuty
nie zostanie wciśnięty żaden przycisk,
wyświetlacz wagi kuchennej automatycznie
pokaże godzinę.
Cofanie nastawień
Na odwrotnej stronie obudowy znajduje
się przycisk „Reset“
11
. Proszę nacisnąć
niniejszy przycisk, aby cofnąć nastawienia
na nastawienia wstępne.
Wymiana baterii
W momencie osłabienia baterii, zapala
się w wyświetlaczu wskaźnik ładowania
baterii
19
.
Wymiany baterii należy dokonać
najpόźniej, kiedy w wyświetlaczu ukazuje
się symbol “
”. Słaba lub pusta bateria
może wywierać duży wpływ na dokładność
wynika pomiarowego.
Proszę otworzyć pojemnik na baterie
8
na stronie odwrotnej wagi.
Proszę usunąć puste baterie oraz usunąć je
w sposόb zgodny z obowiązującymi prze-
pisami (zobacz rozdział „Usuwanie“).
Należy założyć dwie nowe baterie typu
CR2032, 3 V
do komory na baterie
8
. Należy przy tym zwracać uwagę na
właściwą polaryzację. Jest ona oznakowana
pod komorą na baterie
8
.
Proszę następnie zamknąć pojemnik na
baterie
8
.
Usuwanie usterek
= Usterka
= Powόd
= Rozwiązanie
=
= Waga nie jest ustawiona stabilnie lub
dokładnie pionowo.
= Należy zwracać uwagę na stabilne zamo-
cowanie oraz dokładne pionowe usytuowanie.
=
= Waga jest przeciążona.
= Należy usunąć przeciążenie.
= Wskaźnik out2, następnie zmiana
do wskaźnika temperatury
= Przed przełączeniem trybu ważenia wagę
należy obciążyć ładunkiem o masie1000g.
= Przeciążenie należy usunąć w przeciągu
10 sekund. Wyświetlacz powraca w prze-
ciągu pięciu sekund do trybu ważenia.
=
= Baterie są za słabe do ważenia.
= Należy wymienić baterie (zobacz rozdział
„Wymiana baterii“).
Czyszczenie i pielęgnacja
Do czyszczenia nie używać środków chemicz-
nych, szorujących lub ostrych przyrządów.
63925_silv_Digitale_Küchenwaage_content_LB4.indd 19 21.02.11 17:45

20 PL
Czyszczenie i pielęgnacja / Usuwanie
W przeciwnym razie produkt może zostać
uszkodzony.
Nie wkładać produktu nigdy do wody lub
innych cieczy. W przeciwnym razie produkt
może zostać uszkodzony.
Produkt należy czyścić lekko wilgotną,
niemechacącą się szmatką. W razie
mocniejszego zabrudzenia szmatkę można
namoczyć w wodzie z odrobiną mydła.
Usuwanie
Opakowanie wykonane jest z
materiałów przyjaznych środowisku,
które można usuwać w miejscowych
punktach przetwarzania materiałów
wtórnych.
Informacje o możliwościach dotyczących wyrzu-
cania otrzymać można w urzędzie miejskim lub
gminnym.
Nie należy wyrzucać zużytego pro-
duktu, w celu ochrony środowiska,
do domowego kosza na śmieci, lecz
w odpowiednio do tego przeznaczo-
nych miejscach. Informacji o punktach
zbiorczych i ich godzinach otwarcia
udziela odpowiedni urząd.
Uszkodzone lub zużyte baterie muszą być pod-
dane procesowi recyklingu zgodnie z wytyczną
2006 / 66 / EC. Baterie i / lub urządzenie należy
zdać w lokalnym punkcie zbiorczym.
Pb
Zagrożenie dla środowiska
na skutek niewłaściwego
usuwania baterii!
Baterii nie należy wyrzucać do odpadów komu-
nalnych. Mogą one zawierać trujące metale
ciężkie i musza być traktowane jako odpady
niebezpieczne. Metale ciężkie przedstawiane
są następującymi symbolami chemicznymi:
Cd = kadm, Hg = rtęć, Pb = ołów. Dlatego zużyte
baterie należy przekazywać do komunalnych
punktów gromadzenia odpadów szkodliwych.
Oznaczenie produktu:
Cyfrowa waga kuchenna
Nr modelu: Z30170
Wersja: 04 / 2011
EMC
63925_silv_Digitale_Küchenwaage_content_LB4.indd 20 21.02.11 17:45

21 HU
Tartalomjegyzék
Bevezető
Rendeltetésszerű használat ...................................................................................Oldal 22
Alkatrészek leírása .................................................................................................Oldal 22
Műszaki adatok .....................................................................................................Oldal 22
Tartalom .................................................................................................................. Oldal 23
Biztonsági figyelmeztetés
Általános biztonsági tudnivalók ............................................................................Oldal 23
Elektromos biztonság .............................................................................................Oldal 24
Az elemekre vonatkozó biztonsági tudnivalók ....................................................Oldal 24
Szerelés ...............................................................................................................Oldal 24
Üzembevétel
A pontos idő beállítása..........................................................................................Oldal 25
Kezelés
Pontos idő kijelzés ..................................................................................................Oldal 25
A mérleg használata ..............................................................................................Oldal 25
A hőmérséklet kijelzés hesználata ........................................................................Oldal 26
A riasztás-funkció használata.....................................................................................Oldal 26
A rövid idő mérés alkalmazása ............................................................................Oldal 27
A beállítások visszaállítása ....................................................................................Oldal 27
Az elemek cseréje ..................................................................................................Oldal 27
Hibák elhárítása ..........................................................................................Oldal 28
Tisztítás és ápolás .......................................................................................Oldal 28
Megsemmisítés .............................................................................................. Oldal 28
63925_silv_Digitale_Küchenwaage_content_LB4.indd 21 21.02.11 17:45

22 HU
Bevezető
Digitális konyhamérleg
Bevezető
Az első üzembevétel előtt ismerked-
jen a
készülékkel.
Olvassa el ehhez
figyelmesen a következő szerelési és
kezelési utasítást és a Biztonsági tudnivalókat.
A készüléket csak a leírtaknak megfelelően és a
megadott alkalmazási területeken használja.
Őrizze meg jól ezt az utasítást. A készülék
továbbadása esetén harmadiknak kézbesítse
vele annak a teljes dokumentációját is.
Rendeltetésszerű használat
Ez a készülék a háztartásokban szokásos
mennyiségű élelmiszereknek a megmérésére és
utánmérésére készült. A digitális konyhai mérleg
nem agresszív, nem maró és nem dörzsölő folya-
dékok és szilárd anyagok súlyának megállapítá-
sára szolgál. Nem gyógyszerek és tiltott anyagok
mérésére készült. Ugyanúgy a hőmérséklet és a
pontos idő kijelzésére is szolgál és rövid idő
mérővel és riasztási funkcióval is rendelkezik. A
leírtaktól eltérő használat vagy a termék átalakí-
tása nem megengedett és károsodásához vezet.
Ezen felül további veszélyek és életveszélyes
sérülések lehetnek a következmények. A termék
csak magánhasználatra, nem orvosi vagy
keresekedelmi alkalmazásra készült.
Alkatrészek leírása
1
Mérőtál
2
TARE-gomb („Nullázás“)
3
SET/WEIGHT MODE-gomb
4
Rövid idő mérés/UNIT/Alarm/- -gomb
5
MODE/+-gomb
6
Tipli (ø 6 mm)
7
Csavar
8
Elemrekesz
9
Üveglap
10
Falitartó
11
Reset-gomb
12
°Celsius/°Fahrenheit kijelzés
13
Gramm/Milliliter kijelzés
14
Font (lb) és folyékony uncia (floz) kijelzés
15
Tej mérés-módus kijelzés
16
Víz mérés-módus kijelzés
17
Súly mérés-módus kijelzés
18
Riasztás-szimbólum
19
Elem-töltésjelző
20
Tara-kijelzés (Tare)
21
Rövid idő mérés kijelzése
Műszaki adatok
Méretek:
összecsukva: kb. 12,9 x 21,9 x 5,6 cm
(sz x ma x mé)
Mérési tartományok:
Súly: 0 – 5100 g, eltérés ±
(0,1 % + 1 g)
0 – 11 lb 4 oz, eltérés ±
(0,1 % + 1 oz)
Víz: 0 – 5100 ml, eltérés ±
(0,1 % + 1 ml)
0 – 179,5 floz, eltérés ±
(0,1 % + 1 floz)
Tej: 0 – 4950 ml, eltérés ±
(0,1 % + 1 ml)
0 – 174,2 floz, eltérés ±
(0,1 % + 1 floz)
Mérési beosztás:
Súly: 1 g
Víz/tej: 1 ml
Rövid idő mérés: 99 perc és
59 másodpercig (± 1 s)
Hőmérséklet kijelzés: 0,0 °C – 50,0 °C,
Eltérés ± 2,0 °C
32,0 °F – 122,0 °F,
Eltérés ± 3,6 °F
63925_silv_Digitale_Küchenwaage_content_LB4.indd 22 21.02.11 17:45
Strona się ładuje...
Strona się ładuje...
Strona się ładuje...
Strona się ładuje...
Strona się ładuje...
Strona się ładuje...
Strona się ładuje...
Strona się ładuje...
Strona się ładuje...
Strona się ładuje...
Strona się ładuje...
Strona się ładuje...
Strona się ładuje...
Strona się ładuje...
Strona się ładuje...
Strona się ładuje...
Strona się ładuje...
Strona się ładuje...
Strona się ładuje...
Strona się ładuje...
Strona się ładuje...
Strona się ładuje...
Strona się ładuje...
Strona się ładuje...
Strona się ładuje...
Strona się ładuje...
Strona się ładuje...
Strona się ładuje...
Strona się ładuje...
Strona się ładuje...
Strona się ładuje...
Strona się ładuje...
Strona się ładuje...
Strona się ładuje...
Strona się ładuje...
Strona się ładuje...
Strona się ładuje...
Strona się ładuje...
Strona się ładuje...
Strona się ładuje...
-
 1
1
-
 2
2
-
 3
3
-
 4
4
-
 5
5
-
 6
6
-
 7
7
-
 8
8
-
 9
9
-
 10
10
-
 11
11
-
 12
12
-
 13
13
-
 14
14
-
 15
15
-
 16
16
-
 17
17
-
 18
18
-
 19
19
-
 20
20
-
 21
21
-
 22
22
-
 23
23
-
 24
24
-
 25
25
-
 26
26
-
 27
27
-
 28
28
-
 29
29
-
 30
30
-
 31
31
-
 32
32
-
 33
33
-
 34
34
-
 35
35
-
 36
36
-
 37
37
-
 38
38
-
 39
39
-
 40
40
-
 41
41
-
 42
42
-
 43
43
-
 44
44
-
 45
45
-
 46
46
-
 47
47
-
 48
48
-
 49
49
-
 50
50
-
 51
51
-
 52
52
-
 53
53
-
 54
54
-
 55
55
-
 56
56
-
 57
57
-
 58
58
-
 59
59
-
 60
60


w innych językach
- slovenčina: Silvercrest Z30170 Používateľská príručka
Powiązane artykuły
Inne dokumenty
-
ELDOM WK350 ARI Instrukcja obsługi
-
Emos EV021 Instrukcja obsługi
-
eta Bambi 9778 Instrukcja obsługi
-
eta Grami 3777 Instrukcja obsługi
-
-
Zelmer ZKS1451 Instrukcja obsługi
-
-
-
Auriol Z29652A Instructions For Use Manual
-