EN INSTALLATION INSTRUCTIONS
1. Product description
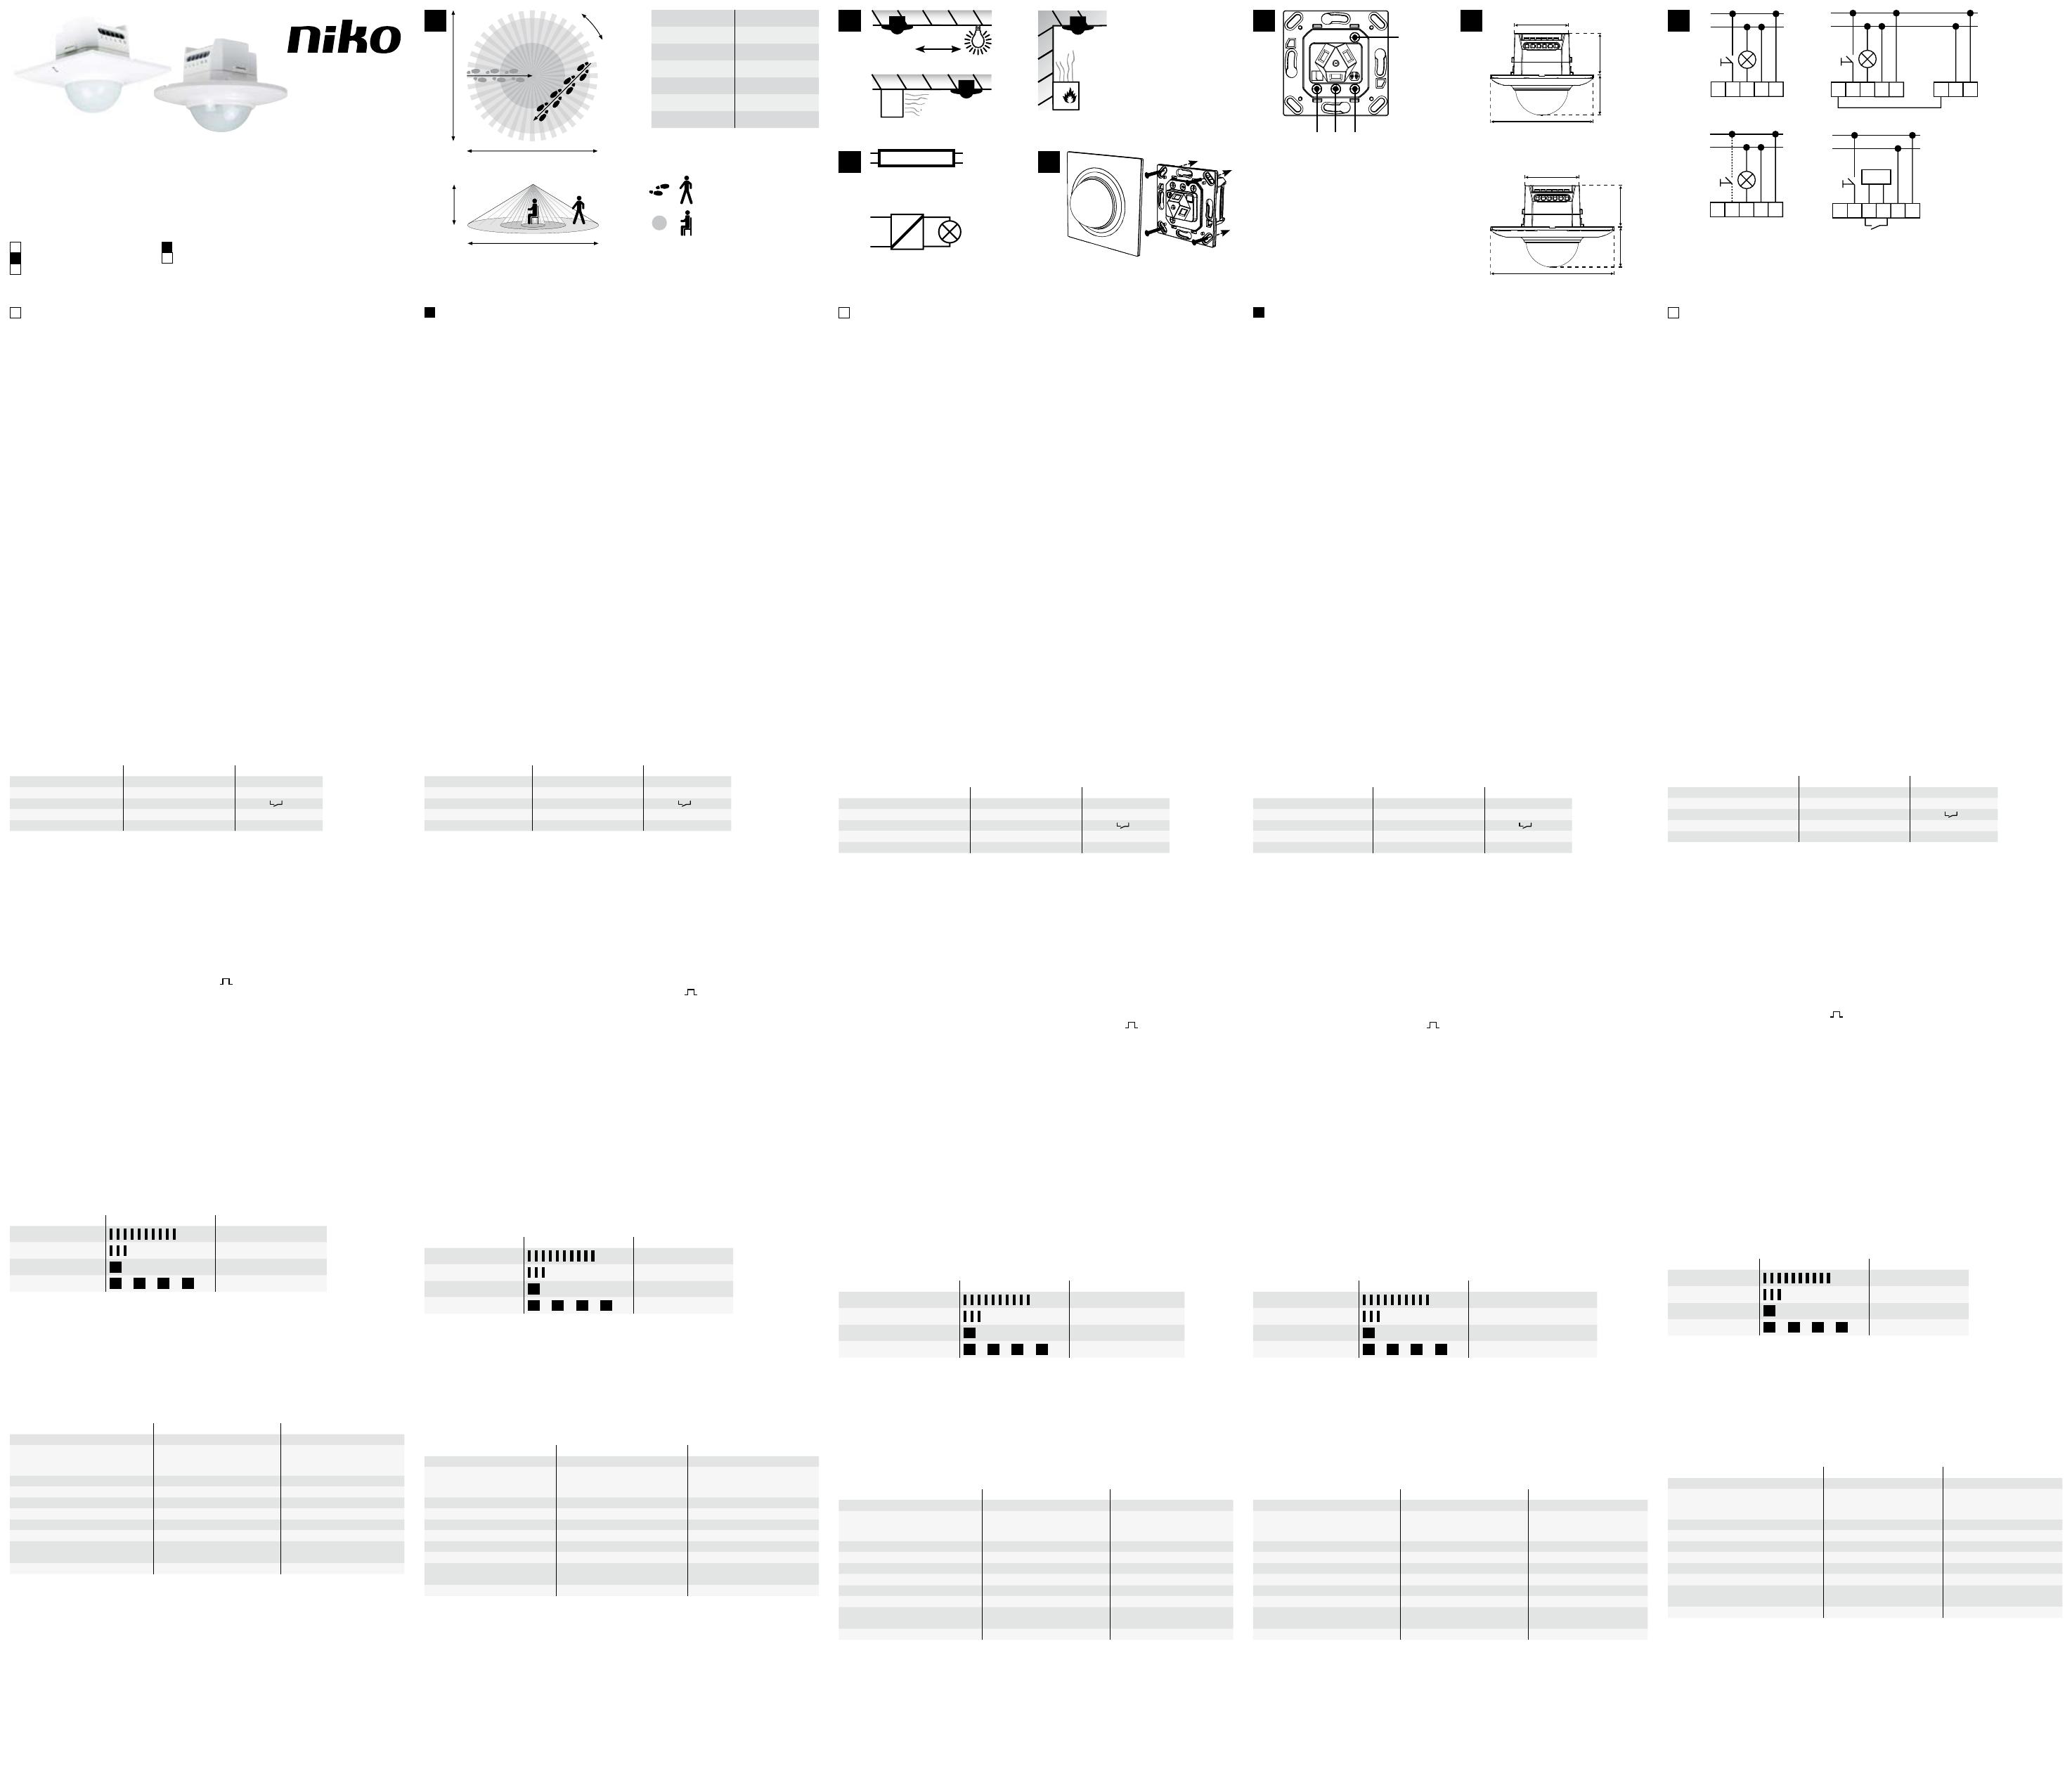
The device detects the movements and the presence of persons using a passive infrared sensor (PIR).
It reacts most sensitively to movements which are tangential to the monitored area (1a).
Movements directly towards the detector have a reduced sensitivity of approx. -50% (1b).
The detector does not switch until the brightness drops below the set value (twilight threshold).
The switching duration is extended as long as movements (entire area 1d) or the presence of persons
(presence area 1e) are detected. The detector detects an increase in daylight after switching on and, if there is
sufficient daylight, switches off automatically. Products which are indicated as accessories are not included
in the scope of delivery.
2. Application
The detector is suitable for indoor use for lighting control.
Outdoor applications require the use of the an IP55 housing (accessory).
Adhere to the following during installation:
– Install only on stable ceilings.
– Mask moving objects in the monitored area by covering up the lens.
– Do not place any lamps underneath or next to the detector at a distance of less than 1 m away (2a).
– Do not install in direct cold (2b) or hot air flows (2c).
3. Safety notes
!
Ensure that the electrical lines are de-energised before installation.
Installation is only permitted by electricians in compliance with local legislation.
4. Installation (4)
The detector is intended for ceilling installation at a height of 2 to 6 m.
The diameter Ø of the monitored area depends on the installed height (1c).
For a Master / Secondary application the Master must be installed in a position with medium
brightness.
Install the detector as follows:
– Remove the front cover.
– Wire the detector according to item 5.
– Fasten the detector in the flush-mounting box.
– Configure device accrding to item 7.
– Mount the front cover.
5. Wiring (7a–7d)
The electrical circuit must be protected with a circuit breaker. The external push-button switches the
current conduction line to the R terminal. Use push-buttons without a glow lamp and keep wires short.
A maximum of 10 secondary detectors can be connected to the S terminal. Keep wires short.
1) Beim SG 360 Präsenz PF ist der Schaltausgang potentialfrei
Detector type SG 360 Presence 16 m, Plus SG 360 Presence PF
Current conduction line L L
Neutral conductor N N
Switching output relay L’ 1)
External push-button (optional) R R
Secondary detector (optional) S S
1) On the SG 360 Presence PF the switching output is floating.
6. Connection of loads
High inrush currents shorten the service life of the relay which is integrated in the detector. Adhere to the technical
specifications provided by the manufacturer of the lamps and lighting equipment to avoid overloading the relay
(3a–b). To keep the circuit well-arranged, we recommend switching no more than 3–4 detectors in parallel. If there
is an above-average number of switching cycles or in case of increased loads, we recommend switching the load via
an external contactor.
7. Configuration
The detector is ready for operation about 1 min after mains connection. Parameter changes must be made during
operation eighter by adjusting the device’s potentiometers or using the remote control (accessory).
Time: TIME determines the delay after the last movement (5b). If the relay output is wired to
an automatic staircase switch, set TIME to pulse mode ( ).
Twilight threshold: LUX gradually sets the trigger threshold of the twilight sensor between Z day mode and 4
night mode (5a).
Range: SENS sets the detection range of the PIR sensor (5c).
Mode: MODE toggels between semi-automatic (SEMI-AUTO) and automatic mode (AUTO) (5d).
8. External button
SEMI-AUTO mode requires the connection of an external push-button as the light has to be switched on using the
push-button (7a). In AUTO mode the external push-button (7c) is optional because the light is switched on automa-
tically upon motion detection. The light can be switched on and off at any time by the push-button.
Both conditions (ON and OFF) are extended with each detection. After the last detection, the condition is still active
for the set delay time. Press and hold the push-button to switch the detector to the 6 h ON and 6 h OFF conditions.
The conditions 6 h ON and 6 h OFF are cancelled before the time elapses by pressing the push-button again briefly:
– Press push-button for 0.1–2.0 seconds ➡ automatic mode (ON / OFF)
– Press and hold push-button for 2.0–4.0 seconds ➡ 6 h ON
– Press and hold push-button for > 4.0 seconds ➡ 6 h OFF
9. Display
The following statuses are indicated by the LED. Parameter changes can be made at the detector’s potetiometers or
by using the remote control (accessory). When a parameter change is confirmed, the detector briefly
switches off the relay output.
Status LED indication Duration
Start-up approx. 1 min, short flashes
Parameter change 3x short flashes
Movement detection 1x long flash
6 h ON or 6 h OFF 6 hours, long flashes
10. Troubleshooting
The 16 m presence detectors are compatible with the 30 m lens (accessory).
If the range is insufficient, the lens can be replaced.
The switching output does not switch: The switching output switches too frequently:
– Twilight threshold too high – Reduce the range
– Check the lamp / fuse protection – Cover the lens
– Check the mode – Twilight threshold too low
11. Technical data
Detector type SG 360 Presence PF SG 360 Presence 16 m, Plus
Supply voltage 230 V / 50 Hz 230 V / 50 Hz
Switching power max. 5 A (0–30 V DC, 0–230 V AC)
LED 100 W
max. 2000 W, 8.7 A (cos ϕ = 1.0
max. 1000 VA, 4.35 A (cos ϕ = 0.5)
LED 300 W
Detection area 360° 360°
Detection range max. 14 m at 3 m height max. 14 m at 3 m height
Lux level control 5–2000 lx 5–2000 lx
Timer control Pulse, 10 s to 20 min Pulse, 10 s to 20 min
Protection type IP20 IP20
Temperature range -20 to +40 °C -20 to +40 °C
Dimensions (L x W x H) round cover
Dimensions (L x W x H) rectangular cover
Ø 105x35 mm (Edition RA)
88x88x35 mm
Ø 105x35 mm (Edition RA)
88x88x35 mm
Connection terminal Ø 1.5 mm Ø 1.5 mm
DINSTALLATIONSANLEITUNG
1. Produktbeschreibung
Der Melder erkennt Personenbewegungen und Personenanwesenheit mittels Passiv-Infrarot Sensor (PIR).
Er reagiert am empfindlichsten bei Bewegungen, die tangential zum überwachten Bereich verlaufen (1a).
Bewegungen welche direkt auf den Melder zu erfolgen, haben eine reduzierte Empfindlichkeit von ca. -50% (1b).
Der Melder schaltet erst, wenn der eingestellte Helligkeitswert (Dämmerungsschwelle) unterschritten ist.
Die Schaltdauer wird verlängert solange Personenbewegungen (gesamter Bereich 1d) oder Personenanwesenheit
(Präsenzbereich 1e) detektiert werden. Der Melder detektiert die Zunahme des Tageslichts nach dem Einschalten
und schaltet bei genügen Tageslicht automatisch aus. Produkte welche als Zubehör erwähnt werden sind nicht
im Lieferumfang.
2. Anwendung
Der Melder ist für den Innenbereich zur Steuerung von Leuchten geeignet.
Für Anwendungen im Aussenbereich ist das IP55 Gehäuse (Zubehör) zu verwenden.
Bei der Installation beachten:
– Nur an stabilen Decken montieren.
– Bewegliche Gegenstände im überwachten Bereich durch Abkleben der Linse ausblenden.
– Keine Leuchten unterhalb oder weniger als 1 m neben dem Melder platzieren (2a).
– Nicht in direkten Kälte- (2b) oder Wärmeluftstrom (2c) montieren.
3. Sicherheitshinweise
!
Vor der Installation prüfen, dass die elektrischen Leitungen spannungsfrei sind.
Die Installation darf nur durch Elektrofachpersonal unter Einhaltung der landesüblichen
Vorschriften erfolgen.
4. Montage (4)
Der Melder ist für eine Deckenmontage von 2 bis 6 m Höhe vorgesehen.
Der Durchmesser Ø des überwachten Bereichs ist abhängig von der Montagehöhe (1c).
Master / Sekundär Anwendung ist der Master an einer Position mit mittlerer Helligkeit zu montieren.
Zur Montage:
– Frontabdeckung entfernen.
– Melder gemäss Punkt 5 verdrahten.
– Melder in Unterputzdose befestigen.
– Konfiguration gemäss Punkt 7 durchführen.
– Frontabdeckung befestigen.
5. Verdrahtung (7a–7d)
Der Stromkreis muss mit einem Leistungsschutzschalter abgesichert sein. Der externe Taster schaltet den
stromführenden Leiter zum R-Eingang. Impulstaster ohne Glimmlampe verwenden und Leitungen kurz halten.
Am S-Eingang können maximal 10 Sekundärmelder angeschlossen werden, Leitungen kurz halten.
1) Beim SG 360 Präsenz PF ist der Schaltausgang potentialfrei
Melder Typ SG 360 Präsenz 16 m, Plus SG 360 Präsenz PF
Stromführender Leiter L L
Neutralleiter N N
Schaltausgang Relais L’ 1)
Externer Taster (optional) R R
Sekundärmelder (optional) S S
1) Beim SG 360 Präsenz PF ist der Schaltausgang potentialfrei.
6. Anschluss von Verbrauchern
Hohe Einschaltströme verkürzen die Lebendsauer des im Melder integrierten Relais. Beachten Sie die technischen
Angaben des Leuchten- bzw. Leuchtmittelherstellers, damit das Relais nicht überbelastet wird (3a–b). Um den
Schaltkreis übersichtlich zu halten, empfehlen wir maximal 3–4 Melder parallel zu schalten. Bei überdurchschnittlich
häufigen Schaltzyklen oder bei erhöhten Lasten, empfehlen wir die Last über ein externes Relais / einen externen
Lastschutzschalter zu schalten.
7. Konfiguration
Der Melder ist ca. 1 Minute nach dem Anschluss ans Stromnetz betriebsbereit. Parameteränderungen
müssen im Betrieb erfolgen: Die Parameter werden direkt an den Reglern am Melder oder über
die Fernbedienung (Zubehör) eingestellt.
Zeit: Mit TIME wird die Nachlaufzeit nach der letzten Bewegung bestimmt (5b). Ist der Relaisausgang
auf einen Lichtautomaten verdrahtet, muss der TIME Regler auf Impuls ( ) gesetzt werden.
Dämmerungsschwelle: Mit LUX wird die Ansprechschwelle des Dämmerungssensors stufenlos
zwischen Z Tagbetrieb und 4 Nachtberieb eingestellt (5a).
Reichweite: Mit SENS wird die Reichweite des PIR-Sensors eingestellt (5c).
Modus: Mit MODE wird zwischen dem Halbautomatik (SEMI-AUTO) und dem Automatikmodus (AUTO) gewählt (5d).
8. Externer Taster
Im SEMI-AUTO Modus ist der externe Taster zwingend anzuschliessen, da das Einschalten des Lichts über den
Taster erfolgen muss (7a). Im AUTO Modus ist der externe Taster optional (7c), weil das Licht bei einer Personen-
detektion automatisch einschaltet. Das Licht kann jederzeit über den Taster ein- und ausgeschaltet werden.
Der Zustand (ON oder OFF) wird bei jeder Erfassung verlängert. Nach der letzen Erfassung ist der Zustand noch
für die eingestellte Zeitdauer aktiv. Durch langes Drücken des Tasters schaltet der Melder in die Zustände
6 h ON und 6 h OFF. Die Zustände 6 h ON und 6 h OFF werden durch erneutes kurzzeitiges Drücken des Tasters
vorzeitig beendet:
– Taster 0,1–2,0 s drücken ➡ Automatikmodus (ON / OFF)
– Taster 2,0–4,0 s gedrückt halten ➡ 6 h ON
– Taster > 4,0 s gedrückt halten ➡ 6 h OFF
9. Anzeige
Die folgenden Zustände werden mittels LED angezeigt. Parameteränderungen können an den Drehschaltern
oder über die Fernbedienung (Zubehör) erfolgen. Bei der Übernahme einer Parameteränderung schaltet der
Melder den Relaisausgang kurzzeitig aus.
Zustand Anzeige LED Dauer
Aufstarten ca. 1 min, kurz blinken
Parameter Änderung 3x kurz blinken
Bewegungsdetektion 1x lang blinken
6 h ON oder 6 h OFF 6 Stunden, lang blinken
10. Störungsbeseitigung
Die 16 m Präsenzmelder sind kompatibel zur 30 m Linse (Zubehör).
Bei zu niedriger Reichweite kann die Linse gewechselt werden.
Schaltausgang schaltet nicht: Schaltausgang schaltet zu häufig:
– Dämmerungsschwelle zu hoch – Reichweite reduzieren
– Leuchte / Sicherung prüfen – Linse abkleben
– Modus prüfen – Dämmerungsschwelle zu niedrig
11. Technische Daten
Melder Typ SG 360 Präsenz PF SG 360 Präsenz 16 m, Plus
Nennspannung 230 V / 50 Hz 230 V / 50 Hz
Schaltleistung Relais max. 5 A (0–30 V DC, 0–230 V AC)
LED 100 W
max. 2000 W, 8,7 A (cos ϕ = 1,0)
max. 1000 VA, 4,35 A (cos ϕ = 0,5)
LED 300 W
Erfassungsbereich 360° 360°
Reichweite max. 14 m bei 3 m Höhe max. 14 m bei 3 m Höhe
Dämmerungsregler 5–2000 lx 5–2000 lx
Zeitregler Impuls, 10 s bis 20 min Impuls, 10 s bis 20 min
Schutzart IP20 IP20
Temperaturbereich -20 bis +40 °C -20 bis +40 °C
Masse (L x B x H) runde Abdeckung
Masse (L x B x H) eckige Abdeckung
Ø 105x35 mm (Edition RA)
88x88x35 mm
Ø 105x35 mm (Edition RA)
88x88x35 mm
Anschlussklemme Ø 1,5 mm Ø 1,5 mm
FNOTICE D’INSTALLATION
1. Description du produit
Le détecteur détecte les mouvements et la présence de personnes par un capteur infrarouge passif (PIR).
Il réagit le plus sensiblement aux mouvements tangentiels par rapport à la zone surveillée (1a).
Les mouvements qui sont directement sur le détecteur ont une sensibilité réduite d’env. -50% (1b).
Le détecteur s’allume lorsque la valeur de luminosité réglée (seuil crépusculaire) n’est pas atteinte.
La durée d’allumage est prolongée tant que des mouvements de personne (ensemble de la zon 1d) ou
une présence de personne (zone de présence 1e) sont détectées. Le détecteur détecte l’augmentation de
la lumière du jour après la mise en marche, et s’éteint automatiquement lorsqu’il y a suffisamment de
lumière du jour. Les accessoires mentionnés ne font pas partie de la livraison.
2. Utilisation
Le détecteur est adapté pour l’intérieur pour la commande des appareils d’éclairage.
Pour les utilisations à l’extérieur, il faut utiliser le boîtier IP55 (accessoire).
Tenir compte des points suivants lors de l’installation :
– Ne monter que sur des plafonds stables.
– Masquer les objets qui bougent dans la zone surveillée en collant du ruban adhésif sur la lentille.
– Ne pas mettre d’appareils d’éclairage sous le détecteur ou à moins d’un mètre à côté du détecteur (2a).
– Ne pas monter directement dans les courants d’air froids (2b) ni chauds (2c).
3. Consignes de sécurité
!
Avant l’installation, vérifier la mise hors tension des câbles.
L’installation doit exclusivement être effectuée par des électriciens
spécialisés dans le respect des normes nationales.
4. Montage (4)
Le détecteur est prévu pour un montage au plafond de 2 à 6 m de hauteur.
Le diamètre Ø de la zone surveillée dépend de la hauteur de montage (1c).
Pour une utilisation Master / Secondaire, il faut monter le Master à un endroit
avec une luminosité moyenne.
Pour le montage :
– Enlever le cache avant.
– Câbler le détecteur suivant le paragraphe 5.
– Fixer le détecteur dans un boîtier encastré.
– Faire la configuration suivant le paragraphe 7.
– Fixer le cache avant.
5. Câblage (7a–7d)
Le circuit électrique doit être protégé par un disjoncteur de puissance. Le bouton externe commute le conducteur
porteur de courant de l’entrée R. Utiliser des commutateurs d’impulsions sans lampe à décharge lumineuse, et des
câbles courts. A l’entrée S, il est possible de raccorder 10 détecteurs secondaires au maximum, les câbles doivent
être courts.
1) Beim SG 360 Präsenz PF ist der Schaltausgang potentialfrei
Type de détecteur SG 360 Présence 16 m, Plus SG 360 Présence PF
Conducteur porteur de courant L L
Conducteur neutre N N
Sortie de commutation du relais L’ 1)
Bouton externe (en option) R R
Détecteur secondaire (en option) S S
1) Avec le SG 360 Présence PF, la sortie de commutation est sans potentiel.
6. Raccordement de consommateurs
Des courants d’enclenchement élevés réduisent la durée de vie du relais intégré dans le détecteur. Tenir compte
des indications techniques du fabricant d’appareils d’éclairage et d’ampoules, pour que le relais ne soit pas soumis
à une surcharge (3a–b). Pour que le circuit soit configuré d’une manière adaptée, nous recommandons de monter
en parallèle au maximum 3 à 4 détecteurs. En cas de cycles de commutation particulièrement fréquents ou en
cas de charges élevées, nous recommandons de commuter la charge par un relais externe / un disjoncteur de
charge externe.
7. Configuration
Le détecteur est fonctionnel env. 1 minute après le raccordement au secteur. Les modifications des
paramètres doivent se faire en service : Les paramètres sont réglés directement sur les régulateurs du
détecteur ou par la télécommande (accessoires).
Temps : TIME détermine le temps de poursuite après le dernier mouvement (5b). Si la sortie du relais
est câblée sur une minuterie, il faut régler le régulateur TIME sur impulsion ( ).
Seuil crépusculaire : LUX permet de régler progressivement le seuil de réponse du capteur crépusculaire
entre Z le fonctionnement la journée et 4 le fonctionnement la nuit (5a).
Portée : SENS permet de régler la porté du capteur PIR (5c).
Mode : MODE permet de sélectionner entre le mode semi-automatique (SEMI-AUTO)
et le mode automatique (AUTO) (5d).
8. Bouton externe
En mode SEMI-AUTO, il faut obligatoirement raccorder le bouton externe, car l’allumage de la lumière doit se
faire avec ce bouton (7a). En mode AUTO, le bouton externe est en option (7c), parce que la lumière s’allume
automatiquement lorsqu’une personne est détectée. La lumière peut être allumée ou éteinte à tout moment
avec le bouton.
L’état (ON ou OFF) est prolongé à chaque détection. Après la dernière détection, l’état est encore activé pendant
la durée réglée. En appuyant longtemps sur le bouton, le détecteur est commuté dans les états 6 h ON et 6 h OFF.
Les états 6 h ON et 6 h OFF sont désactivés prématurément en rappuyant brièvement sur le bouton :
– Appuyer sur le bouton pendant 0,1 à 2,0 s ➡ Mode automatique (ON / OFF)
– Maintenir le bouton enfoncé pendant 2,0 à 4,0 s ➡ 6 h ON
– Maintenir le bouton enfoncé pendant > 4,0 s ➡ 6 h OFF
9. Affichage
Les états suivants sont indiqués par la LED. Les paramètres peuvent être modifiés avec les commutateurs
rotatifs ou par la télécommande (accessoire). Lorsqu’une modification de paramètre est enregistrée, le détecteur
désactive brièvement la sortie du relais.
Etat Affichage LED Durée
Démarrage Env. 1 min, clignotement bref
Modification des paramètres 3x clignotement bref
Détection de mouvements 1x clignotement long
6 h ON ou 6 h OFF 6 heures, clignotement long
10. Dépannage
Les détecteurs de présence 16 m sont compatibles avec la lentille 30 m (accessoire).
Si la portée n’est pas assez importante, il est possible de changer la lentille.
La sortie de commutation ne commute pas : La sortie de commutation commute trop souvent :
– Seuil crépusculaire trop élevé – Réduire la portée
– Contrôler l’appareil d’éclairage / le fusible – Coller du ruban adhésif sur la lentille
– Contrôler le mode – Seuil crépusculaire trop bas
11. Caractéristiques techniques
Type de détecteur SG 360 Présence PF SG 360 Présence 16 m, Plus
Tension nominale 230 V / 50 Hz 230 V / 50 Hz
Puissance de commutation relais max. 5 A (0–30 V DC, 0–230 V AC)
LED 100 W
max. 2000 W, 8,7 A (cos ϕ = 1,0)
max. 1000 VA, 4,35 A (cos ϕ = 0,5)
LED 300 W
Angle de détection 360° 360°
Portée max. 14 m pour 3 m de hauteur max. 14 m pour 3 m de hauteur
Réglage crépusculaire 5–2000 lx 5–2000 lx
Temporisation Impulsion, 10 s à 20 min Impulsion, 10 s à 20 min
Type de protection IP20 IP20
Température d’utilisation -20 à +40 °C -20 à +40 °C
Dimensions (L x l x H) cache rond
Dimensions (L x l x H) cache rectangulaire
Ø 105x35 mm (Edition RA)
88x88x35 mm
Ø 105x35 mm (Edition RA)
88x88x35 mm
Borne de raccordement Ø 1,5 mm Ø 1,5 mm
IISTRUZIONI PER L’INSTALLAZIONE
1. Descrizione del prodotto
Il rilevatore riconosce movimenti e presenza di persone mediante sensore a infrarossi passivo
(PIR – acronimo di Passive InfraRed).
La maggiore sensibilità si ha in presenza di movimenti che avvengono tangenzialmente all’area monitorata (1a).
La sensibilità per movimenti che avvengono direttamente sul rilevatore è ridotta di ca. -50% (1b).
Il rilevatore si attiva solo quando la luminosità è inferiore al valore impostato (soglia crepuscolare).
La durata di attivazione viene prolungata per il tempo in cui vengono rilevati movimenti di persone (intera are 1d)
o presenza di persone (area di presenza 1e). Dopo l’attivazione il rilevatore riconosce il crescendo della luce del
giorno e, quando questa è sufficiente, si disattiva automaticamente. I prodotti menzionati quali accessori non sono
compresi nell’ambito di fornitura.
2. Applicazione
In ambiente interno il rilevatore è adatto per comandare luci.
Per applicazioni in area esterna deve essere utilizzata la custodia IP55 (accessorio).
All’installazione rispettare quanto segue:
– Montare solo su coperture stabili.
– Occultare oggetti mobili presenti nell’area monitorata mascherando la lente.
– Non collocare alcuna luce al di sotto o a una distanza inferiore a 1 m accanto al rilevatore (2a).
– Non effettuare il montaggio nel flusso diretto d’aria fredda (2b) o d’aria calda (2c).
3. Indicazioni di sicurezza
!
Prima dell’installazione verificare che i cavi elettrici siano privi di tensioni.
L’installazione è consentita solo ad elettricisti specializzati nel rispetto delle
comuni disposizioni nazionali.
4. Montaggio (4)
Il rilevatore è previsto per montaggio a soffitto, ad altezze comprese tra 2 e 6 m.
Il diametro Ø dell’area monitorata dipende dall’altezza di montaggio (1c).
In caso di applicazione Master / Secondario, il Master deve essere montato
in una posizione con luminosità media.
Per il montaggio:
– Rimuovere la copertura frontale.
– Effettuare il cablaggio del rilevatore come indicato al punto 5.
– Fissare il rilevatore alla presa a muro.
– Effettuare la configurazione come indicato al punto 7.
– Fissare la copertura frontale.
5. Cablaggio (7a–7d)
Il circuito elettrico deve essere protetto con un disgiuntore. Il tasto esterno attiva il cavo sotto tensione
per l’ingresso R. Utilizzare tasti a impulso senza lampada a bagliore mantenendo i fili corti.
All’ingresso S possono essere collegati massimo 10 rilevatori secondario, mantenendo i fili corti.
1) Beim SG 360 Präsenz PF ist der Schaltausgang potentialfrei
Tipo di rilevatore SG 360 Presenza 16 m, Plus SG 360 Presenza PF
Cavo sotto tensione L L
Cavo neutro N N
Uscita di commutazione relè L’ 1)
Tasto esterno (opzionale) R R
Rilevatore secondario (opzionale) S S
1) Nell’SG 360 Presenza PF l’uscita di commutazione è a potenziale zero.
6. Collegamento delle utenze
Correnti di attivazione alte riducono la durata del relè integrato nel rilevatore. Per non sovraccaricare il relè,
rispettare le indicazioni tecniche del produttore delle luci o delle lampade (3a–b). Affinché la disposizione del
circuito di commutazione sia mantenuta ben chiara, si raccomanda di collegare in parallelo massimo 3–4 rilevatori.
In caso di frequenti cicli di commutazione sopra la media o di carichi eccessivi, si raccomanda di commutare
il carico tramite un relè/interruttore automatico dei carichi esterno.
7. Configurazione
Il rilevatore è pronto per il funzionamento dopo ca. 1 minuto dal collegamento alla rete di alimentazione.
Le modifiche dei parametri devono essere eseguite in funzionamento: I parametri vengono impostati
direttamente nel regolatore del rilevatore oppure da telecomando (accessorio).
Tempo: Con TIME viene determinato il tempo di funzionamento supplementare dall’ultimo movimento (5b).
Se l’uscita relè è cablata in un dispositivo di comando a commutazione automatica, il regolatore
TIME deve essere impostato su «impulso» ( ).
Soglia crepuscolare: Con LUX viene impostata in continuo la soglia di risposta del sensore
crepuscolare tra Z funzionamento diurno e 4 funzionamento notturno (5a).
Campo di rilevamento: Con SENS viene impostato il campo di rilevamento del sensore PIR (5c).
Modalità: Con MODE viene effettuata la selezione tra modalità semiautomatica (SEMI-AUTO)
e modalità automatica (AUTO) (5d).
8. Tasto esterno
In modalità SEMI-AUTO deve essere obbligatoriamente collegato il tasto esterno in quanto l’accensione della
luce deve essere effettuata dal tasto (7a). In modalità AUTO il tasto esterno è opzionale (7c) perché la luce si
accende automaticamente al rilevamento di una persona. La luce può essere accesa e spenta in qualunque
momento dal tasto.
Per ciascun rilevamento lo stato (ON o OFF) viene prolungato. Dopo l’ultimo rilevamento, lo stato è ancora
attivo per la durata impostata. Premendo il tasto a lungo, il rilevatore si commuta agli stati 6 h ON e 6 h OFF.
Ripremendo brevemente il tasto, gli stati 6 h ON e 6 h OFF vengono terminati in anticipo:
– Pressione del tasto per 0,1–2,0 s ➡ Modalità automatica (ON / OFF)
– Mantenimento della pressione del tasto per 2,0–4,0 s ➡ 6 h ON
– Mantenimento della pressione del tasto per > 4,0 s ➡ 6 h OFF
9. Indicazione
Gli stati che seguono vengono visualizzati mediante LED. Le modifiche dei parametri possono essere eseguite
agendo sull’interruttore rotante oppure da telecomando (accessorio). All’acquisizione di una modifica dei
parametri, il rilevatore disattiva per breve tempo l’uscita relè.
Stato Indicazione LED Durata
Avvio ca. 1 min, lampeggiamento breve
Modifica parametri 3 lampeggiamenti brevi
Rilevamento movimento 1 lampeggiamento lungo
6 h ON o 6 h OFF 6 ore, lampeggiamento lungo
10. Eliminazione dei guasti
I rilevatori di presenza 16 m sono compatibili con lente da 30 m (accessorio).
Se il campo di rilevamento è troppo basso, la lente può essere cambiata.
L’uscita di commutazione non si attiva: L’uscita di commutazione si attiva troppo frequentemente:
– Soglia crepuscolare troppo alta – Ridurre il campo di rilevamento
– Controllare luce / fusibile – Mascherare la lente
– Controllare la modalità – Soglia crepuscolare troppo bassa
11. Dati tecnici
Tipo di rilevatore SG 360 Presenza PF SG 360 Presenza 16 m, Plus
Tensione nominale 230 V / 50 Hz 230 V / 50 Hz
Potenza di apertura relè max. 5 A (0–30 V DC, 0–230 V AC)
LED 100 W
max. 2000 W, 8,7 A (cos ϕ = 1,0)
max. 1000 VA, 4,35 A (cos ϕ = 0,5)
LED 300 W
Raggio di azione 360° 360°
Campo di rilevazione max. 14 m a 3 m d’altezza max. 14 m a 3 m d’altezza
Regolatore del crepuscolo 5–2000 lx 5–2000 lx
Regolatore tempo Impulso, da 10 s a 20 min Impulso, da 10 s a 20 min
Tipo di protezione IP20 IP20
Temperatura da -20 a +40 °C da -20 a +40 °C
Dimensioni (Lu x La x H) copertura tonda
Dimensioni (Lu x La x H) copertura quadra
Ø 105x35 mm (Edition RA)
88x88x35 mm
Ø 105x35 mm (Edition RA)
88x88x35 mm
Morsetto Ø 1,5 mm Ø 1,5 mm
Presence detector 16 m, 360°
Präsenzmelder 16 m, 360°
Détecteur de présence 16 m, 360°
Rilevatore di presenza 16 m, 360°
Czujnik obecności o zasięgu 16 m, 360°
I
PL
D
F
EN
27
1
34
56
360°
ca. 50%
100%
Ø
N
L
L’
S R N
L
L’
S R N
H max. Ø 16 m
2,5 m 12 m
3,0 m 14 m
3,5 m 16 m
4,0 m 16 m
5,0 m 16 m
6,0 m 16 m
7a
7c
N L
S R
HLK
7d
N
L
L’
S R LS N
N
Master Secondary
7b2a
2b
2c
1a
1b
1c
5a 5b 5c
35 mm 36 mm
>1m
1d
1e
5d
Edition RA
35 mm 36 mm
Swiss Garde 360 Presence Master
Edition 06-2021
Art.-Nr. 25451, 25456, 25457, 25463
3a
3b
max. 1000 VA cos ϕ = 0,5
230 V AC DC
PL INSTRUKCJA INSTALACJI
1. Opis produktu
Czujnik wykrywa ruchy i obecność osoby w pomieszczeniu dzięki pasywnej czujce podczerwieni (PIR).
Czujnik jest najbardziej czuły na ruchy przebiegające po stycznej do monitorowanego obszaru (1a).
Ruchy przebiegające bezpośrednio w kierunku czujnika mają czułość niższą o ok. -50% (1b).
Czujnik uruchomi się dopiero wtedy, gdy jasność będzie niższa od ustawionej wartości (próg zmierzchowy).
Czas przełączania jest wydłużany dopóty, dopóki wykrywane są ruchy (cały obsza 1d) lub obecność osób
(strefa obecności 1e). Po włączeniu czujnik wykryje wzrost natężenia oświetlenia światła dziennego i
przy odpowiednim natężeniu tego światła automatycznie się wyłączy. Produkty wymienione jako akcesoria
nie są objęte zakresem dostawy.
2. Zastosowanie
Czujnik jest przeznaczony do sterowania oświetleniem wewnątrz pomieszczeń.
Do zastosowań w obszarze zewnętrznym wymagana jest obudowa IP55 (akcesoria).
Podczas instalacji pamiętać, aby:
– Przeprowadzać montaż tylko na stabilnych sufitach.
– Poprzez zaklejenie soczewki ukryć ruchome przedmioty w monitorowanym obszarze.
– Nie umieszczać źródeł światła pod czujnikiem ani w odległości mniejszej niż 1 m od czujnika (2a).
– Nie montować w miejscu bezpośrednio narażonym na strumień zimnego (2b) lub ciepłego powietrza (2c).
3. Wskazówki bezpieczeństwa
!
Przed instalacją sprawdzić, czy wszystkie przewody elektryczne znajdują się w stanie beznapięciowym.
Instalacja może być wykonana tylko przez wykwalifikowanych elektryków zgodnie z przepisami
krajowymi.
4. Montaż (4)
Czujnik przeznaczony jest do montażu sufitowego na wysokości 2 do 6 m.
Średnica Ø monitorowanego obszaru zależy od wysokości montażu (1c).
Zastosowanie Master / Drugorzędne – czujnik Master należy zamontować w miejscu o średniej
jasności.
W celu dokonania montażu:
– Zdjąć pokrywkę.
– Wykonać oprzewodowanie czujnika wg punktu 5.
– Zamocować czujnik w puszce podtynkowej.
– Dokonać konfiguracji wg punktu 7.
– Zamocować pokrywkę.
5. Oprzewodowanie (7a–7d)
Obwód prądowy musi być zabezpieczony wyłącznikiem instalacyjnym. Przycisk zewnętrzny przełącza przewód
pod napięciem na wejście R. Zastosować przycisk impulsowy bez lampki neonowej, przewody powinny być krótkie.
Na wejściu S podłączyć maksymalnie 10 czujników drugorzędne, przewody powinny być krótkie.
1) Beim SG 360 Präsenz PF ist der Schaltausgang potentialfrei
Typ czujnika SG 360 Presence 16 m, Plus SG 360 Presence PF
Przewód pod napięciem L L
Przewód zerowy N N
Wyjście załączania przekaźnika L’ 1)
Przycisk zewnętrzny (opcjonalnie) R R
Czujnik drugorzędne (opcjonalnie) S S
1) W modelu SG 360 Presence PF wyjście załączania jest bezpotencjałowe.
6. Podłączenie odbiorników
Wysokie prądy załączeniowe skracają żywotność przekaźnika zintegrowanego w czujniku. Przestrzegać danych
technicznych producenta lamp i urządzeń oświetleniowych, aby nie dopuścić do przeciążenia przekaźnika (3a–b).
W celu zapewnienia przejrzystości układu przełączającego, zalecamy równoległe załączanie maks. 3–4 czujników.
W przypadku zwiększonej liczby cykli łączeniowych lub większych obciążeń, zalecamy załączanie obciążenia za
pomocą zewnętrznego przekaźnika / zewnętrznego wyłącznika ochronnego mocy.
7. Konfiguracja
Po upływie ok. 1 minuty od momentu podłączenia do prądu czujnik jest gotowy do pracy. Zmiany parametrów
dokonywane są w czasie pracy: Parametry należy ustawić bezpośrednio na regulatorach czujnika lub za pomocą
pilota zdalnego sterowania (akcesoria).
Czas: Funkcja TIME służy do określania czasu opóźnienia liczonego od ostatniego ruchu (5b).
Jeśli wyjście przekaźnika jest połączone z automatycznym wyłącznikiem światła,
należy ustawić regulator TIME na impuls ( ).
Próg zmierzchowy: Funkcja LUX umożliwia bezstopniową regulację progu załączenia czujnika zmierzchu
między trybem dziennym Z a trybem nocnym 4 (5a).
Zakres detekcji: Funkcja SENS umożliwia regulację zakresu detekcji pasywnej czujki podczerwieni (5c).
Tryb: Funkcja MODE umożliwia przełączanie między trybem półautomatycznym (SEMI-AUTO)
a automatycznym (AUTO) (5d).
8. Przycisk zewnętrzny
W trybie SEMI-AUTO należy bezwzględnie podłączyć przycisk zewnętrzny, gdyż za jego pomocą włączane jest
światło (7a). W trybie AUTO przycisk zewnętrzny jest opcjonalny (7c), ponieważ światło włącza się automatycznie
w przypadku wykrycia obecności. Za pomocą przycisku można w dowolnej chwili włączać i wyłączać światło.
Stan (ON lub OFF) jest wydłużany przy każdej detekcji. Po ostatniej detekcji stan pozostaje aktywny jeszcze
przez ustawiony czas trwania. Przytrzymanie przycisku powoduje przejście czujnika w stany 6 h ON i 6 h OFF.
Ponowne krótkie naciśnięcie przycisku powoduje przedwczesne zakończenie stanów 6 h ON i 6 h OFF:
– Przytrzymanie przycisku przez 0,1–2,0 s ➡ Tryb automatyczny (ON / OFF)
– Przytrzymanie przycisku przez 2,0–4,0 s ➡ 6 h ON
– Przytrzymanie przycisku przez > 4,0 s ➡ 6 h OFF
9. Wyświetlacz
Podane stany wyświetlane są za pomocą diod LED. Zmiany parametrów mogą być dokonywane za pomocą
przełączników obrotowych lub pilota zdalnego sterowania (akcesoria). Przy przejmowaniu zmiany
parametru czujnik na krótko wyłączy wyjście przekaźnika.
Stan LED Wyświetlacz Czas trwania
Uruchomienie ok. 1 min, krótkie miganie
Zmiana parametrów 3x długie miganie
Detekcja ruchu 1x długie miganie
6 h ON lub 6 h OFF 6 godzin, długie miganie
10. Usuwanie zakłóceń
Czujniki obecności o zasięgu 16 m są kompatybilne z soczewką 30 m (akcesoria).
W przypadku zbyt małego zakresu detekcji możliwa jest wymiana soczewki.
Wyjście załączania nie uruchamia się: Wyjście załączania uruchamia się zbyt często:
– Zbyt wysoki próg zmierzchowy – Zmniejszyć zakres detekcji
– Sprawdzić lampkę / bezpiecznik – Odkleić soczewkę
– Sprawdzić tryb pracy – Zbyt niski próg zmierzchowy
11. Dane techniczne
Typ czujnika SG 360 Presence PF SG 360 Presence 16 m, Plus
Zasilanie 230 V / 50 Hz 230 V / 50 Hz
Moc wyjścia przekaźnikowego max. 5 A (0–30 V DC, 0–230 V AC)
LED 100 W
max. 2000 W, 8,7 A (cos ϕ = 1,0)
max. 1000 VA, 4,35 A (cos ϕ = 0,5)
LED 300 W
Kąt detekcji 360° 360°
Zakres detekcji max. 14 m przy wysokości 3 m max. 14 m przy wysokości 3 m
Regulacja światła 5–2000 lx 5–2000 lx
Regulator czasu Impuls, 10 s do 20 min Impuls, 10 s do 20 min
Stopień ochrony IP20 IP20
Zakres temperatury -20 do +40 °C -20 do +40 °C
Wymiary (dł. x szer. x wys.) pokrywa okrągła
Wymiary (dł. x szer. x wys.) pokrywa kanciasta
Ø 105x35 mm (Edition RA)
88x88x35 mm
Ø 105x35 mm (Edition RA)
88x88x35 mm
Zacisk przyłączeniowy Ø 1,5 mm Ø 1,5 mm

