AMP Lighting ADL Series Installation & Maintenance Manual
- Typ
- Installation & Maintenance Manual

AMP
®
Low Voltage Landscape Lighting
AMP
®
Deck Lights (Integrated)
ADL Series
INSTALLATION & MAINTENANCE GUIDE
Help Hotline:
1-813-978-3900 • Mon-Fri 9am-6pm (EST)
www.amplighting.com

AMP
®
Deck Lights (Integrated)
ADL Series
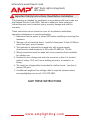
Important Safety Instructions: Read Before Installation
INSTALLATION & MAINTENANCE GUIDE
This luminaire is intended for installation in accordance with local codes and
the National Electric Code (NEC). Failure to adhere to these codes and
instructions may result in serious injury, property damage and void the
warranty.
These instructions do not intend to cover all variations in installation,
operation maintenance or mounting situation.
1. Make sure that the power is turned OFF before installing or servicing this
luminaire.
2. Warning: risk of electrical shock. Install all luminaires 10 feet (3.05M) or
more from pool, spa or fountain.
3. This luminaire is intended to be used only with a power supply
(transformer) rated maximum of 300 watts (25 AMPS) at 15 volts.
4. Wiring connections must be made with wire connectors that is suitable
for outdoor use.
5. Position the low voltage wire and wire connector so that it is located
within 6 inches (15.2 cm) from a building structure, a luminaire, or
tting.
6. The main low voltage cable is intended for shallow burial - less than 6
inches (152 mm).
7. If additional lengths of low voltage cable is required, please contact
www.amplighting.com or call 1-813-978-3900.
!
www.amplighting.com
–2–
SAVE THESE INSTRUCTIONS

[email protected] • 813.978.3900
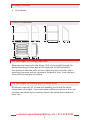
Product Dimensions
Pro Technique for Hiding Lead Wire
Pro Technique for Hiding Splice Connections
–3–
Package Contents
A. (1) Luminaire
3”
Determine the location for the xture. Drill a hole straight through the
desired mounting location and run the lead wire out the backside of
the location so that the wires are not visible from the front side. Use a
matching trim piece and cut a groove in the back of trim. Cover the lead
wires with the matching trim piece.
All xtures come with 25’ of lead wire enabling you to hide the splice
connections out of sight. If you must make a splice connection in view, use
an inline heat shrink style connection that is less visible than traditional
twist caps.
1”
3”
3”
1.5”
3”
3.5”
3”
1.5”

AMP
®
Deck Lights (Integrated)
ADL Series
INSTALLATION & MAINTENANCE GUIDE
–4–
www.amplighting.com
–4–
Remove Cover
Install Cover
1
3
Rotate the cover clockwise until it
stops, then lift the cover straight o.
Note: The rst time may be dicult
because the luminaire has a very
tight o-ring seal and a grease sealant
for moisture protection.
Align the notches on the cover to the
base. Firmly rotate the cover until it
locks.
Luminaire
Cover
Cover
Base
Base
Install Base
2
Attach the base on the wall making
sure the arrow is pointing in the
correct direction and secure with the
lock screws.
Note: Wall anchors are required for
certain installation conditions (e.g.
Brick wall, Concrete Wall, etc). Mark
holes on the wall from the base for
the wall anchors. Remove the base
and drill proper holes on the wall,
then insert the wall anchors.
Base
Lock
Screw
Wall Anchor

[email protected] • 813.978.3900
–5–
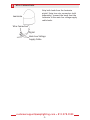
Wire Connections
4
Strip both leads from the luminaire
pigtail. Using two wire connectors (sold
separately), connect the leads from the
luminaire to the main low voltage supply
cable leads.
Luminaire
Wire Connectors
Main Low Voltage
Supply Cable
Pigtail

AMP
®
Deck Lights (Integrated)
ADL Series
INSTALLATION & MAINTENANCE GUIDE
–6–
www.amplighting.com
–6–


is.ADL-600x-ver4.pdf
Specications and product details subject to change without notice.
© Copyright 2018, AMP
®
Lighting, Lutz FL USA 33549 • All rights reserved.
[email protected] • 813.978.3900
Help Hotline:
1-813-978-3900 • Mon-Fri 9am-6pm (EST)
www.amplighting.com
-
 1
1
-
 2
2
-
 3
3
-
 4
4
-
 5
5
-
 6
6
-
 7
7
-
 8
8


AMP Lighting ADL Series Installation & Maintenance Manual
- Typ
- Installation & Maintenance Manual
w innych językach
- English: AMP Lighting ADL Series
Powiązane artykuły
-
 AMP Lighting RenaissancePro ADL-2011-4-B-BZ Installation & Maintenance Manual
-
 AMP Lighting ADL-2012-B-BZ Instrukcja instalacji
-
 AMP Lighting Deck-DesignPro Classic Instrukcja instalacji
-
 AMP Lighting AHS-7004-B-BZ Instrukcja instalacji
-
 AMP Lighting ASL-6012-B-BZ Instrukcja instalacji
-
 AMP Lighting AviatorPro Instrukcja instalacji
-
 AMP Lighting AHS-7006-X-B-BZ Series Installation & Maintenance Manual
-
 AMP Lighting HydraPro AUL-8001-25-B-BZ Instrukcja instalacji
-
 AMP Lighting VAL-91 Series Installation & Maintenance Manual


