
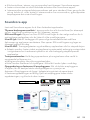
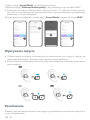
Soundcore Liberty 3 Pro
USER MANUAL

English 01
Čeština 12
Dansk 23
Deutsch 34
ελληνικά 45
Español 57
Suomi 68
Français 79
Magyar 90
Italiano 101
Nederlands 112
Norsk 123
Język polski 134
Português 145
Portugues do Brasil 156
Pусский 167
Slovenský Jazyk 179
Slovenski Jezik 190
Svenska 201
Türkçe 212
日本語 223
한국어 234
简体中文 245
繁體中文 256
ةيِبَرَعل 266
תי ִ
רבִע276

01 EN
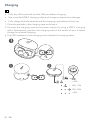
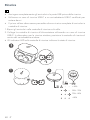
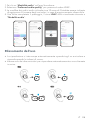
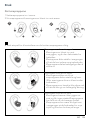
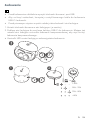
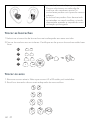
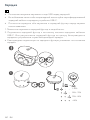
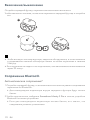
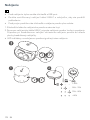
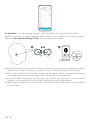
Charging
• Fully dry off the earbuds and the USB port before charging.
• Use a certified USB-C charging cable and charger to prevent any damage.
• Fully charge both the earbuds and the charging case before the first use.
1. Place the earbuds in the charging case and close it.
2. Connect the charging case to the power supply by using a USB-C charging
cable. Alternatively, position the charging case at the center of your wireless
charger for wireless charging.
• The LED indicators on the charging case indicate the charging status.
< 30%
30% - 70%
70% - 95%
>95%
or
21

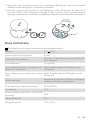
EN 02
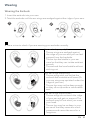
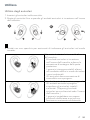
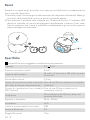
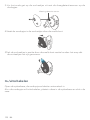
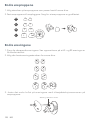
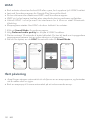
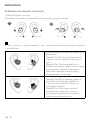
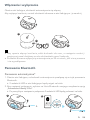
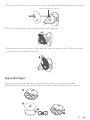
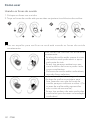
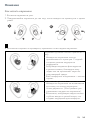
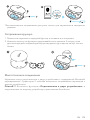
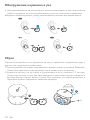
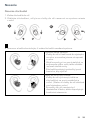
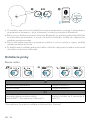
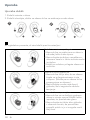
Wearing
Wearing the Earbuds
1. Insert the earbuds into your ears.
2. Twist the earbuds until the ear wings are wedged against the ridge of your ears.
12
• Use a mirror to check if you are wearing your earbuds correctly.
Your earbuds properly fit.
• The ear wings are wedged against
the ridge of your ear and you can feel
support from the backside.
• The ear tips feel stable in your ear
canal so that they can isolate ambient
sounds.
• The earbuds feel comfortable without
sticking out.
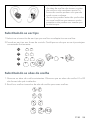
Your ear wings are too big.
• The ear wings stick out so that the
earbuds feel unstable and loose. (Or
your ear wings are squished under the
ridge of your ear.)
• The ear tips may not be deep enough
so they do not provide a comfortable
seal.
Your ear wings are too small.
• The ear wings do not touch the ridge
of your ear and get no support. The
earbuds may fall out when you move
your head.
• The ear tips may be so deep in your
ear canal that they cause too much
pressure and cannot be worn for a
long time.

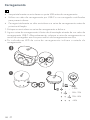
03 EN
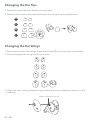
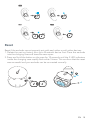
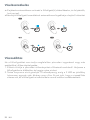
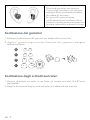
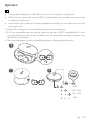
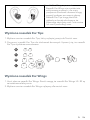
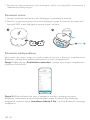
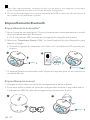
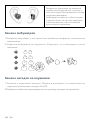
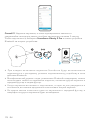
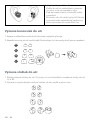
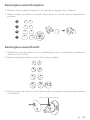
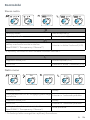
Changing the Ear Tips
1. Select the size of ear tips that fit your ears best.
2. Attach the ear tips to the earbuds. Ensure the ear tips are firmly attached.
XS 0 0
1 1
S
2 2
M
3 3
L
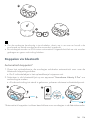
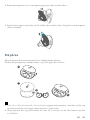
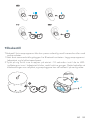
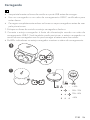
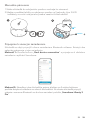
Changing the Ear Wings
1. Remove the current ear wings. Note that L2 and R2 ear wings are pre-installed.
2. Choose the best ear wing size for your ears.
R1
L1
R0
L0
R2
L2
R3
L3
R3
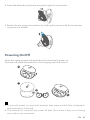
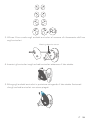
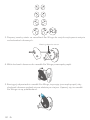
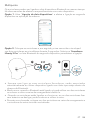
3. Align the oval hole on the ear wings with the wearing detection sensor on the
earbuds.
Wearing detection sensor

EN 04
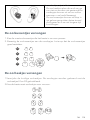
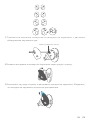
4. Insert the earbuds into the ear wings through the narrow side.
5. Stretch the ear wings into position by holding the narrow side. Ensure the ear
wings are not folded.
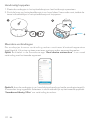
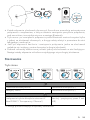
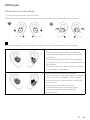
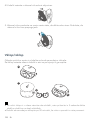
Powering On/Off
Open the charging case, the earbuds will automatically power on.
To power off, place the earbuds in the charging case and close it.
ON
OFF
1
2
• To manually power on, wear both earbuds, then press and hold the touchpad on
both earbuds for 3 seconds.
• The earbuds will automatically power off after 30 minutes if they are not being
worn and are not connected.

05 EN
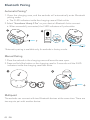
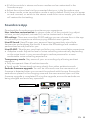
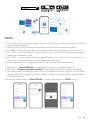
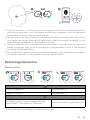
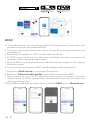
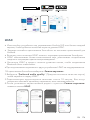
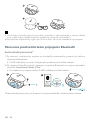
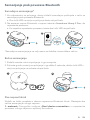
Bluetooth Pairing
Automatic Pairing*
1. Open the charging case, and the earbuds will automatically enter Bluetooth
pairing mode.
• The 2 LED indicators inside the charging case will flash white.
2. Select "Soundcore Liberty 3 Pro" on your device's Bluetooth list to connect.
• When successfully connected, the 2 LED indicators will pulse white.
1
PAIRING
2
Soundcore
Liberty 3 Pro
Soundcore
Liberty 3 Pro
CONNECTED
*Automatic pairing is available only for earbuds in factory mode.
Manual Pairing
1. Place the earbuds in the charging case and leave the case open.
2. Press and hold the button on the charging case for 3 seconds until the 2 LED
indicators inside the charging case flash white.
2
1
3s
PAIRING
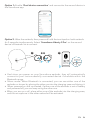
Multipoint
The earbuds can connect with two Bluetooth devices at the same time. There are
two ways to pair with another device.

EN 06
Option 1: Enable "Dual device connection" and connect to the second device in
the Soundcore app.
Option 2: Wear the earbuds, then press and hold the touchpad on both earbuds
for 5 seconds simultaneously. Select "Soundcore Liberty 3 Pro" on the second
device's Bluetooth list to connect.
L R
5s 5s
12
Soundcore
Liberty 3 Pro
Soundcore
Liberty 3 Pro
• Each time you power on your Soundcore earbuds, they will automatically
connect to your last successfully connected device if available within the
Bluetooth range.
• Mono mode: When Bluetooth is connected, you can use either one of the
earbuds on its own by placing the other one into the charging case and closing it.
• When powered on and connected, if either one of the earbuds is out of battery
and powered off, you can keep using the other one.
• When you are on a call, place either one of the earbuds into the charging case,
and the microphone in the other earbud will be activated.

07 EN
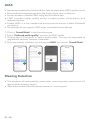
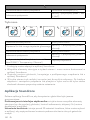
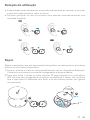
Controls
Stereo Mode
L / R L / R
LR
×2 ×2 1s
HearID ANC /
Transparency
L / R
2s
×2
Play/Pause Tap twice (R)
Next track Tap twice (L)
Switch ambient sound modes
(HearID ANC / Transparency / Normal*) Press and hold for 2 seconds (L/R)
*You can add "Normal" in the Soundcore app.
Answer/End a call Tap twice (L/R)
Reject a call Press and hold for 1 second (L/R)
Mono Mode
HearID ANC / Transparency
×3×2 1s
×2 1s
Siri
Play/Pause Tap twice
Activate Siri or other voice assistant software Press and hold for 1 second
Answer/End a call Tap twice
Reject a call Press and hold for 1 second
Switch ambient sound modes*
(HearID ANC / Transparency / Normal) Tap three times
* You can enable this function in the Soundcore app.

EN 08
• All of the controls in stereo and mono modes can be customized in the
Soundcore app.
• Adjust the volume level via the connected device or in the Soundcore app.
• In stereo mode, noise cancellation mode is set by default. Each time you power
on and connect, or switch to the stereo mode from mono mode, your earbuds
will restore the last setting.
Soundcore App
Download the Soundcore app to enhance your experience.
User interface customization: In stereo mode, all of the controls (e.g. adjust
volume, control playback, activate Siri) can be customized in the app.
EQ settings: There are more than 20 EQ settings you can choose from in the app
to optimize your experience while enjoying different music genres.
HearID Sound: HearID maps your personal hearing sensitivity at multiple
frequencies and analyzes the results. It traces the EQ settings and creates a
personalized sound profile for you.
HearID ANC: Take the ear canal test and tailor your noise cancellation experience.
• Adaptive mode: Adjust the level of noise cancelling automatically depending
on the noise levels in your surroundings to reduce pressure for a more
comfortable noise cancelling experience.
Transparency mode: Stay aware of your surroundings by allowing ambient
sounds in.
• Fully transparent: Hear all ambient sounds.
• Vocal mode: Voices stand out more clearly from other ambient sounds.
Earbuds firmware upgrade: You will be informed once the new version of
firmware is detected when you connect the earbuds with the app. Ensure the
earbuds are placed in the charging case and the case remains open until the
firmware upgrade is completed. During the upgrade, ensure the earbuds are
being charged and avoid any operation.

09 EN
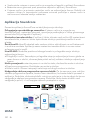
LDAC
• Use devices powered by Android 8.0 or later to experience LDAC quality sound.
• Download the Soundcore app from the Android app store in advance.
• You can enable or disable LDAC using the Soundcore app.
• LDAC provides higher quality sound, increases power consumption, and
reduces playtime.
• Enable LDAC in a low interference environment to ensure a stable Bluetooth
connection.
• The earbuds do not support LDAC when connected to two devices.
1. Click on "Sound Mode" in the Soundcore app.
2. Select "Preferred audio quality" to switch to LDAC codec.
3. It takes about 10 seconds to switch audio codes. You may be requested to
upgrade the earbuds' firmware if available.
4. Once successfully switched, you will see the LDAC icon next to "Sound Mode".
14
2
3
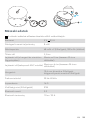
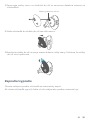
Wearing Detection
• The playback will automatically pause when removing either earbud and will
resume when wearing it again.
• Wear either earbud to automatically answer an incoming call.

EN 10
L / R
L / RL R
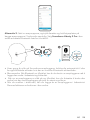
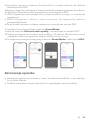
Reset
Reset if the earbuds cannot properly pair with each other or with other devices.
1. Delete the pairing history from your Bluetooth device first. Place the earbuds
into the charging case and leave the case open.
2. Press and hold the button on the case for 10 seconds until the 2 LED indicators
inside the charging case rapidly flash white 3 times. This confirms that the reset
was successful and your earbuds can be connected normally.
×3
2
10s
1

11 CS
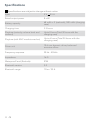
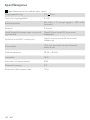
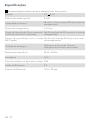
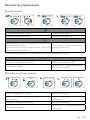
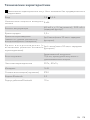
Specifications
Specifications are subject to change without notice.
Input 5 V 0.5 A
Rated output power 8 mW
Battery capacity 68 mAh x 2 (earbuds); 500 mAh (charging
case)
Charging time 3.5 hours
Playtime (varies by volume level and
content)
Up to 8 hours (Total 32 hours with the
charging case)
Playtime (with ANC mode turned on) Up to 6 hours (Total 24 hours with the
charging case)
Driver unit 10.6 mm dynamic driver, balanced
armature driver
Frequency response 20 Hz - 40 kHz
Impedance 16 Ω
Waterproof level (Earbuds) IPX4
Bluetooth version 5.2
Bluetooth range 10 m / 33 ft

HU 98
LDAC
• Az LDAC-minőségű hangzást Android 8.0 vagy újabb rendszert futtató
eszközökön élvezheti.
• Töltse le előre a Soundcore alkalmazást az Android alkalmazásboltjából.
• Az LDAC-t a Soundcore alkalmazás használatával engedélyezheti és tilthatja le.
• Az LDAC jobb minőségű hangot biztosít, ám növeli az energiafogyasztást és
csökkenti a lejátszási időt.
• Az LDAC-t olyan környezetben engedélyezze, ahol alacsony az interferencia,
mivel csak így biztosítható a stabil Bluetooth-kapcsolat.
• A fülhallgató nem támogatja az LDAC-t, ha két eszközhöz csatlakozik.
1. Kattintson a „Sound Mode” lehetőségre a Soundcore alkalmazásban.
2. Válassza a „Preferred audio quality” lehetőséget az LDAC kodekre váltáshoz.
3. Az audiokodek váltása körülbelül 10 másodpercet vesz igénybe. A rendszer
megkérheti a fülhallgató firmware-ének frissítésére, amennyiben rendelkezésre
áll hozzá frissítés.
4.A sikeres váltás után a „Sound Mode” mellett megjelenik az LDAC ikonja.
14
2
3

99 HU
Viselésérzékelés
• A lejátszás automatikusan szünetel a fülhallgató(k) eltávolításakor, és folytatódik,
ha újra viseli.
• Bármelyik fülhallgató használatával automatikusan fogadhatja a bejövő hívásokat.
L / R
L / RL R
Visszaállítás
Ha a fülhallgatókat nem tudja megfelelően párosítani egymással vagy más
eszközökkel, állítsa alaphelyzetbe.
1. Először törölje a párosítási előzményeket a Bluetooth-eszközről. Helyezze a
fülhallgatókat a töltőtokba, és hagyja nyitva a tokot.
2. Tartsa lenyomva a tok gombját 10 másodpercig, amíg a 2 LED-es jelzőfény
háromszor egymás után fehéren nem villan. Ez azt jelzi, hogy a visszaállítás
sikeres volt, és a fülhallgató mindkét oldala normál módon csatlakoztatható.

HU 100
×3
2
10s
1
Műszaki adatok
A műszaki adatokat előzetes értesítés nélkül módosíthatjuk.
Bemenet 5 V 0,5 A
Névleges kimeneti teljesítmény 8 mW
Akkukapacitás 68 mAh x 2 (fülhallgató); 500 mAh (töltőtok)
Töltési idő 3,5 óra
Lejátszási idő (a hangerő és a tartalom
függvényében)
Maximum 8 óra (összesen 32 óra a
töltőtokkal)
Lejátszási idő (bekapcsolt ANC móddal) Maximum 6 óra (összesen 24 óra a
töltőtokkal)
Hangszóró 10,6 mm dinamikus fülhallgató,
kiegyensúlyozott armatúra fülhallgató
Frekvenciaátvitel 20 Hz–40 kHz
Impendencia 16 Ω
Vízállósági szint (fülhallgatók) IPX4
Bluetooth-verzió 5.2
Bluetooth-tartomány 10 m / 33 ft

101 IT
Ricarica
• Asciugare completamente gli auricolari e la porta USB prima della ricarica.
• Utilizzare un cavo di ricarica USB-C e un caricabatterie USB-C certificati per
evitare danni.
• Il primo utilizzo deve essere preceduto da una ricarica completa di auricolari e
custodia di ricarica.
1. Riponi gli auricolari nella custodia di ricarica e chiudila.
2. Collega la custodia di ricarica all'alimentatore utilizzando un cavo di ricarica
USB-C. In alternativa, per la ricarica wireless, posiziona la custodia di ricarica al
centro del caricabatterie wireless.
• Gli indicatori LED sulla custodia di ricarica indicano lo stato di ricarica.
< 30%
30% - 70%
70% - 95%
>95%
or
21

IT 102
Utillizzo
Utilizzo degli auricolari
1. Inserisci gli auricolari nelle orecchie.
2. Ruota gli auricolari fino a quando gli archetti auricolari si incastrano nell'incavo
dell'orecchio.
12
• Aiutati con uno specchio per assicurarti di indossare gli auricolari nel modo
corretto.
Gli auricolari si adattano alla forma
dell'orecchio.
• Gli archetti auricolari si incastrano
nell'incavo dell'orecchio e danno la
sensazione di sostegno dalla parte
posteriore.
• I gommini rimangono stabili e fermi
nel condotto uditivo in modo da isolare
i suoni ambientali.
• Gli auricolari danno sensazione di
comodità e non sporgono.
Gli archetti auricolari sono troppo grandi.
• Gli archetti auricolari sporgono
e rendono gli auricolari instabili
e allentati. (Oppure gli archetti
auricolari sono schiacciati sotto l'incavo
dell'orecchio.)
• I gommini potrebbero non essere
profondi a sufficienza e quindi non
forniscono una tenuta confortevole.

103 IT
Gli archetti auricolari sono troppo piccoli.
• Gli archetti auricolari non toccano
l'incavo dell'orecchio e non ricevono
sostegno.Muovere la testa potrebbe
far cadere gli auricolari.
• Se i gommini entrano troppo
profondamente nel condotto uditivo
possono causare pressione eccessiva e
rendere impossibile indossarli a lungo.
Sostituzione dei gommini
1. Seleziona la dimensione dei gommini più adatta alle tue orecchie.
2. Applica i gommini sugli auricolari. Assicurati che i gommini rimangano
saldamente fissati.
XS 0 0
1 1
S
2 2
M
3 3
L
Sostituzione degli archetti auricolari
1. Rimuovi gli archetti auricolari in uso. Nota: gli archetti auricolari L2 e R2 sono
preinstallati.
2. Scegli la dimensione degli archetti auricolari più adatta alle tue orecchie.

IT 104
R1
L1
R0
L0
R2
L2
R3
L3
R3
3. Allinea il foro ovale sugli archetti auricolari al sensore di rilevamento dell'uso
sugli auricolari.
Wearing detection sensor
4. Inserisci gli auricolari negli archetti auricolari attraverso il lato stretto.
5. Allunga gli archetti auricolari in posizione stringendo il lato stretto. Assicurati
che gli archetti auricolari non siano piegati.
Strona się ładuje...
Strona się ładuje...
Strona się ładuje...
Strona się ładuje...
Strona się ładuje...
Strona się ładuje...
Strona się ładuje...
Strona się ładuje...
Strona się ładuje...
Strona się ładuje...
Strona się ładuje...
Strona się ładuje...
Strona się ładuje...
Strona się ładuje...
Strona się ładuje...
Strona się ładuje...
Strona się ładuje...
Strona się ładuje...
Strona się ładuje...
Strona się ładuje...
Strona się ładuje...
Strona się ładuje...
Strona się ładuje...
Strona się ładuje...
Strona się ładuje...
Strona się ładuje...
Strona się ładuje...
Strona się ładuje...
Strona się ładuje...
Strona się ładuje...
Strona się ładuje...
Strona się ładuje...
Strona się ładuje...
Strona się ładuje...
Strona się ładuje...
Strona się ładuje...
Strona się ładuje...
Strona się ładuje...
Strona się ładuje...
Strona się ładuje...
Strona się ładuje...
Strona się ładuje...
Strona się ładuje...
Strona się ładuje...
Strona się ładuje...
Strona się ładuje...
Strona się ładuje...
Strona się ładuje...
Strona się ładuje...
Strona się ładuje...
Strona się ładuje...
Strona się ładuje...
Strona się ładuje...
Strona się ładuje...
Strona się ładuje...
Strona się ładuje...
Strona się ładuje...
Strona się ładuje...
Strona się ładuje...
Strona się ładuje...
Strona się ładuje...
Strona się ładuje...
Strona się ładuje...
Strona się ładuje...
Strona się ładuje...
Strona się ładuje...
Strona się ładuje...
Strona się ładuje...
Strona się ładuje...
Strona się ładuje...
Strona się ładuje...
Strona się ładuje...
Strona się ładuje...
Strona się ładuje...
Strona się ładuje...
Strona się ładuje...
Strona się ładuje...
Strona się ładuje...
Strona się ładuje...
Strona się ładuje...
Strona się ładuje...
Strona się ładuje...
Strona się ładuje...
Strona się ładuje...
Strona się ładuje...
Strona się ładuje...
Strona się ładuje...
Strona się ładuje...
Strona się ładuje...
Strona się ładuje...
Strona się ładuje...
Strona się ładuje...
Strona się ładuje...
Strona się ładuje...
-
 1
1
-
 2
2
-
 3
3
-
 4
4
-
 5
5
-
 6
6
-
 7
7
-
 8
8
-
 9
9
-
 10
10
-
 11
11
-
 12
12
-
 13
13
-
 14
14
-
 15
15
-
 16
16
-
 17
17
-
 18
18
-
 19
19
-
 20
20
-
 21
21
-
 22
22
-
 23
23
-
 24
24
-
 25
25
-
 26
26
-
 27
27
-
 28
28
-
 29
29
-
 30
30
-
 31
31
-
 32
32
-
 33
33
-
 34
34
-
 35
35
-
 36
36
-
 37
37
-
 38
38
-
 39
39
-
 40
40
-
 41
41
-
 42
42
-
 43
43
-
 44
44
-
 45
45
-
 46
46
-
 47
47
-
 48
48
-
 49
49
-
 50
50
-
 51
51
-
 52
52
-
 53
53
-
 54
54
-
 55
55
-
 56
56
-
 57
57
-
 58
58
-
 59
59
-
 60
60
-
 61
61
-
 62
62
-
 63
63
-
 64
64
-
 65
65
-
 66
66
-
 67
67
-
 68
68
-
 69
69
-
 70
70
-
 71
71
-
 72
72
-
 73
73
-
 74
74
-
 75
75
-
 76
76
-
 77
77
-
 78
78
-
 79
79
-
 80
80
-
 81
81
-
 82
82
-
 83
83
-
 84
84
-
 85
85
-
 86
86
-
 87
87
-
 88
88
-
 89
89
-
 90
90
-
 91
91
-
 92
92
-
 93
93
-
 94
94
-
 95
95
-
 96
96
-
 97
97
-
 98
98
-
 99
99
-
 100
100
-
 101
101
-
 102
102
-
 103
103
-
 104
104
-
 105
105
-
 106
106
-
 107
107
-
 108
108
-
 109
109
-
 110
110
-
 111
111
-
 112
112
-
 113
113
-
 114
114


w innych językach
- italiano: Soundcore Q30 Manuale utente
- slovenčina: Soundcore Q30 Používateľská príručka
- português: Soundcore Q30 Manual do usuário
- dansk: Soundcore Q30 Brugermanual
Powiązane artykuły
-
Soundcore Liberty Air 2 Wireless Earbuds Instrukcja obsługi
-
Soundcore Soundcore Life P2 Instrukcja obsługi
-
-
-
Soundcore Life Dot 2 Instrukcja obsługi
-
Soundcore Life A2 NC Instrukcja obsługi
-