
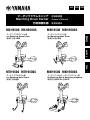
MSH9500 MSH9500S
MTH9500 MTH9500S
MBH9500 MBH9500S
MKH9500 MKH9500S
Marching Drum Carrier Owner’s Manual
for Marching Snare Drum
for Marching Multi-Toms
for Marching Bass Drum
for Marching Bell & Marching Xylophone
ZHENJA
English

MSH9500 MSH9500S
for Marching Snare Drum
MBH9500 MBH9500S
for Marching Bass Drum
MTH9500 MTH9500S
for Marching Multi-Toms
MKH9500 MKH9500S
for Marching Bell & Marching Xylophone
Marching Drum Carrier
Owner’s Manual
English

Marching Drum Carrier Owner's Manual
2
PRECAUTIONS
PLEASE READ CAREFULLY BEFORE PROCEEDING
Always follow the basic precautions listed below to avoid the possibility of physical injury to
you or others, or damage to the instrument or other property.
When children use the product, make sure that a guardian provides through instruction as given in this man-
ual. Please keep this manual in a safe and handy place for future reference.
CAUTION
Always follow the basic precautions listed below to avoid the possibility of physical injury to you or others, or
damage to the instrument or other property. These precautions include, but are not limited to, the following:
• Tighten all screws securely once adjustments have
been made. If any screw is loose there is a danger that
the drum may slip during performances or extraneous
noises may be produced.
• To adjust the carrier use the provided tools only. Fail-
ure to do so can cause the instrument falling over or
result in injury.
• When tilting up the instrument always hold the instru-
ment with your hand as it might flip back and injure
bystanders.
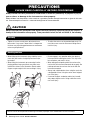
• When tilting the instrument up or returning it to the
playing position, keep your hands away from areas
marked A as shown in the illustration. Hands and/or
fingers can get caught in this area resulting in injury.
• Do not engage in any operation other than playing
instrument while wearing the carrier. This may cause
loss of balance and result in injury.
• When taking off and putting down the carrier or the
carrier with the instrument mounted, do so gently. Do
not drop or throw the carrier or the carrier with the
instrument mounted.
• Always take suitable breaks when using the carrier for
a long period of time. Using the carrier when fatigued
can cause injury.
• If some of the parts are broken and/or lost, immedi-
ately stop using the carrier. Using a defective carrier
can cause injury.
Assembly
Handling cautions
Yamaha cannot be responsible for damage caused by improper use or modifications to the instrument.

Marching Drum Carrier Owner's Manual
3
Handling
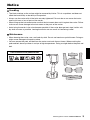
• The black coatings on the surface might be removed by friction. This is no problem and does not
affect the functionality or durability of the product.
• Always use the carrier with all the bolts securely tightened. Failure to do so can cause the instru-
ment to fall over or loss of parts of the carrier.
• When tilting up the instrument make sure that the instrument does not hit against the carrier. Failure
to do so can cause damage to the instrument or the parts of the carrier.
• Avoid using the carrier in the rain whenever possible. If the carrier does get wet, wipe it with a soft,
dry cloth as soon as possible. Leaving the carrier wet can result in it becoming rusted.
Maintenance
• When cleaning the carrier, use a soft and dry cloth. Do not use benzine or paint thinners. Doing so
might cause damage to the paint surface.
• You can remove the pads and belt from the carrier and wash them at home. When washing the
pads and belt, do not put them in a dryer at high temperatures. Doing so might deform the pads and
belt.
Care instructions for pads and belt
Notice

Marching Drum Carrier Owner's Manual
4
Welcome
Thank you for purchasing the Yamaha Marching Drum Carrier.
This product is a carrier for marching instruments, designed with enhanced adjust-
ability to fit different body sizes. Please read this Owner's Manual carefully before
using the product in order to take full advantage of its various features. When you
have finished reading the manual, keep it in a safe, accessible place, and refer to it
when you need to better understand an operation or function.
MSH9500 MSH9500S
MTH9500 MTH9500S
MBH9500 MBH9500S
MKH9500 MKH9500S
for Marching Snare Drum
page 5 - 10
for Marching Multi-Toms
page 5 - 7
page 12
for Marching Bass Drum
page 5 - 7
page 11
for Marching Bell & Marching Xylophone
page 5 - 7
page 13 - 14
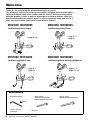
• Hexagonal Wrench • Wrench 8mm
(MSH9500 MSH9500S
MKH9500 MKH9500S only)
Accessories
4mm
• Warranty
• Owner's Manual
(this book)
• Wrench 10mm
(MSH9500 MSH9500S only)

Marching Drum Carrier Owner's Manual
5
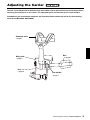
Carriers can be adjusted to fit different body sizes. Make sure to adjust the carrier to the player before
mounting the instrument on the carrier. The adjustable parts are the same for all carrier models.
Intended only for instructional purposes, the illustration below shows the carrier for the marching
snare drum (MSH9500, MSH9500S).
Belly plate
page 6
Shoulder rests
page 7
Arm holder
page 7
Belt
page 7
Arm
page 6
Adjusting the Carrier

Marching Drum Carrier Owner's Manual
6
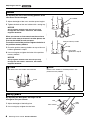
Adjusting the Carrier
By adjusting the arms, the mounting position of the
instrument can be changed.
1 Adjust the height of the arms and the spread angles.
2 Tighten the bolts of the arm holders with a tuning key.
NOTICE
Always tighten the bolts with the arms passing
through the arm holders. Otherwise, the holders
might be deformed.
When you remove an instrument from the carrier to
put the carrier away or to move it to other places, the
arms can be folded for safe transport.
To mark the arm holder positions tighten the bolts of
the position-memory holders.
3 Place the position-memory holders on top of the arm
holders tightened in step 2.
4 Use a tuning key to tighten the bolts of the position-
memory holders.
NOTICE
Always tighten the bolts with the arms passing
through the arm holders. Otherwise, the holders
might be deformed.
By adjusting the belly plate, the height can be
changed to suit your stature.
1 Adjust the height of the belly plate.
2
Use a tuning key to tighten the four bolts.
Arms
Belly plate
Arm holder
Arm
Bolt
Position-memory holder
Arm holder
tightened in step
2.
Bolt
Folded
Both bolts of the arm holders are loosened.
Reset
Refix the arm holders at marked positions with
position-memory holders.
Loose
Loose
Belly
plate
Bolt
Plain washer

Marching Drum Carrier Owner's Manual
7
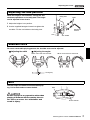
Adjusting the Carrier
When the height is not sufficient, change the arm
attachment positions on the belly plate. The height
can be adjusted in four levels.
1 Adjust the height of arm position.
2 Use the supplied hexagonal wrench to tighten the
two bolts. Fix the arm holders to the belly plate.
For more comfortable playing posture, the shoulder rests can be adjusted.
The belt helps to stabilize instrument while play-
ing. Pull on both ends to fasten the belt.
Do not engage in any operation other than
playing instrument while wearing the car-
rier. This can cause loss of balance and
result in injury.
Adjusting the arm position
Shoulder rests
Belt
Belly plate
Bolts
Hexagonal
wrench
Arm holder
Arm
Adjusting the width Adjusting the angles
When set to the most forward:
When set to the most rearward:
Tuning key
Touch fastener
Belt

Marching Drum Carrier Owner's Manual
8
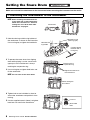
Make sure to install the attachment to the instrument before mounting the instrument on the carrier.
NOTE When installing the attachment to a
snare drum with a slide-attachment,
follow the instructions of “Previous
settings for snare drum with slide-
attachment” on page 9.
1 Hold the tube lugs with the lug holders of
the attachment as shown in the illustration.
Use a tuning key to tighten the both bolts.
2 To prevent the snare drum from slipping
down while playing it, make sure that the
upper part of the attachment is always
touching the suspension ring.
3 Use a tuning key to tighten both bolts and
fix the attachment.
NOTE You can also set the drum tilted.
4 Tighten both snare hold bolts by hand to
secure the attachment and prevent it from
moving.
5 Use the supplied wrench (10mm) to tighten
both lock nuts and fix the attachment.
1. Installing the attachment to the instrument
Attachment
Snare drum lug
(tube lug type)
Hold with the
lug holder.
Partially tighten
the bolts with a
tuning key.
Touching to the
suspension ring.
Tighten the bolts to fix
the attachment.
When setting the
drum tilted.
Snare hold
bolts
Lock nut
Setting the Snare Drum

Marching Drum Carrier Owner's Manual
9
Setting the Snare Drum
Previous settings for snare drum with slide-attachment
Before installing the attachment to the snare drum, you must remove the lug holders from the
attachment and assemble the tongue plate MAST600 (sold separately).
1 Remove both lug holders (see illustration) from
the attachment.
2 Fix the tongue plate (sold separately) with the
longer side up, on the center holes of attach-
ment.
3 Insert the tongue plate assembled with the
attachment into the slide of the snare drum.
4 Tighten the snare hold bolts by hand to secure
the attachment and prevent it from moving.
5 Use the supplied wrench (10mm) to tighten
both lock nuts and fix the attachment to the
snare drum.
Attachment
Lug holders
Tongue plate
MAST600 (sold separately)
Longer side up
Tongue plate
Slide
Snare hold
bolt
Lock nut

Marching Drum Carrier Owner's Manual
10
Setting the Snare Drum
To adjust the angle, first put the carrier and instru-
ment (properly mounted) down on a floor, for
secure operation.
1 Turn the angle adjustment bolts on the right and left
sides by hand to adjust the angles for the most com-
fortable playing position. Make sure that the angles
are even.
2 Use the supplied wrench (8mm) to tighten the lock
nut and fix the angle of the instrument.
2. Mounting the instrument on the carrier
3. Adjusting the angle of the instrument
1 Insert the arms into the arm brackets of the attach-
ment installed to the instrument.
2 Tighten the arm fixing screws by hand.
Marching snare drum
Arms
Carrier
Attachment
Arm fixing screw
Arm bracket
Arms
Tilt the instrument up
toward yourself.
Lock nut
Angle
adjustment bolt

Marching Drum Carrier Owner's Manual
11
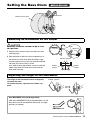
Setting the Bass Drum
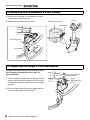
Mounting should be carried out by at least
two persons.
1 Snap the drum harness hooks into the bass drum
attaching rings.
2 With the heads of the bass drum perpendicular to
the drummer's body, open both the holder's right
and left support arms so they are centered and hold
the body of the drum firmly in place.
Also, when making adjustments, make sure that the
holder itself does not come into contact with the
drum body and lugs.
The height of the instrument can be changed by
reversing the arms.
To reverse the arms, reposition the rubber sup-
ports.
Mounting an instrument on the carrier
Adjusting the height of the instrument
Carrier
Arms
Marching bass drum
Attaching
ring
Equally spaced
Hook
Rubber
support
Rubber
support
Rubber supports
Arm MBARMHP1418 (sold separately)
With arms MBARMHP1418 (sold separately), an 18"
bass drum can be mounted on the carrier at a high
position (as shown).
MBARMHP1418

Marching Drum Carrier Owner's Manual
12
1 Insert the arms of carrier into the arm brackets of
the instrument.
2 Tighten the arm fixing screws by hand to fix the
arms.
To adjust the angle, first put the carrier and instru-
ment (properly mounted) down on a floor, for
secure operation.
1 Turn the angle adjustment bolts on the right and left
sides by hand to adjust the arms to the most com-
fortable playing angles. Make sure that the angles
are even.
2 Use the wrench (8mm) supplied with the multi-toms
to tighten the lock nuts and fix the angle of the
instrument.
1. Mounting the instrument on the carrier
2. Adjusting the angle of the instrument
Arms
Carrier
Marching multi-toms
Arm fixing screw
Arm bracket
Arm
Angle
adjustment bolt
Lock nut
Tilt up the instrument toward yourself.
Setting the Marching Multi-Toms

Marching Drum Carrier Owner's Manual
13
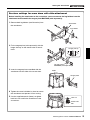
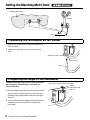
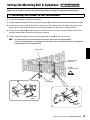
Make sure to install the frame to the instrument before mounting the instrument on the carrier.
1 Lay the marching bell & xylophone face down.
2 Use the supplied hexagonal wrench to loosen the screws A on the carrier frame so that the brackets can slide.
3 Set the carrier frame on the instrument, as shown in the illustration below, and slide the brackets on the
carrier frame so that they align with the carrier mounting plates on the bottom of the instrument.
4 Use the four fixing bolts B on the brackets to fix the carrier frame to the instrument. Tighten each of the
four bolts little by little in succession until they are secure.
5 Use the supplied hexagonal wrench to firmly tighten the screws A on the carrier frame.
NOTE • To remove the carrier frame from the instrument, loosen the four fixing bolts B.
• If you are having trouble re-installing the carrier frame after it has been removed, go through the
same procedure as described above.
1. Installing the frame to the instrument
Carrier frame
Carrier
mounting plate
B
A
A
B
A
A
Arm brackets
Hexagonal
wrench
Hexagonal
wrench
Brackets with
wing bolts
Setting the Marching Bell & Xylophone

Marching Drum Carrier Owner's Manual
14
Setting the Marching Bell & Xylophone
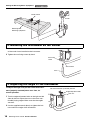
1 Insert the arms of the carrier into the arm brackets
of the carrier frame installed to the instrument.
2 Tighten the arm fixing screws by hand.
To adjust the angle, first put the carrier and instru-
ment (properly mounted) down on a floor, for
secure operation.
1 Turn the angle adjustment bolts on the right and left
sides by hand to adjust the arms to the most com-
fortable playing angles. Make sure that the angles
are even.
2 Use the supplied wrench (8mm) to tighten the lock
nuts and fix the angle of the instrument.
2. Mounting the instrument on the carrier
3. Adjusting the angle of the instrument
Carrier frame
Arms
Carrier
Marching bell/
Marching xylophone
Arm fixing
screw
Arm bracket
Arm
Angle adjustment bolt
Lock nut
Tilt the instrument up toward yourself.

Manual Development Group
© 2017 Yamaha Corporation
Published 08/2018 改版 POCP*.*-**C0
Printed in Japan
ZW01190 版次:C0
-
 1
1
-
 2
2
-
 3
3
-
 4
4
-
 5
5
-
 6
6
-
 7
7
-
 8
8
-
 9
9
-
 10
10
-
 11
11
-
 12
12
-
 13
13
-
 14
14
-
 15
15
-
 16
16


w innych językach
- čeština: Yamaha MTH-9500 Návod k obsluze
- español: Yamaha MTH-9500 El manual del propietario
- italiano: Yamaha MTH-9500 Manuale del proprietario
- Deutsch: Yamaha MTH-9500 Bedienungsanleitung
- português: Yamaha MTH-9500 Manual do proprietário
- français: Yamaha MTH-9500 Le manuel du propriétaire
- English: Yamaha MTH-9500 Owner's manual
- dansk: Yamaha MTH-9500 Brugervejledning
- русский: Yamaha MTH-9500 Инструкция по применению
- Nederlands: Yamaha MTH-9500 de handleiding
- română: Yamaha MTH-9500 Manualul proprietarului
Powiązane artykuły
-
Yamaha MKH-9200S Instrukcja obsługi
-
-
-
Yamaha MSH-9150 Instrukcja obsługi
-
-
-
-
-
-