
MCC2581E EN User manual 2
LV Lietošanas instrukcija 18
LT Naudojimo instrukcija 35
PL Instrukcja obsługi 52
SK Návod na používanie 70
SL Navodila za uporabo 87

CONTENTS
1. SAFETY INFORMATION . . . . . . . . . . . . . . . . . . . . . . . . . . . . . . . . . . . . . . . . . . . . . . . . . . . . . . 3
2. SAFETY INSTRUCTIONS . . . . . . . . . . . . . . . . . . . . . . . . . . . . . . . . . . . . . . . . . . . . . . . . . . . . . . 5
3. PRODUCT DESCRIPTION . . . . . . . . . . . . . . . . . . . . . . . . . . . . . . . . . . . . . . . . . . . . . . . . . . . . . 7
4. BEFORE FIRST USE . . . . . . . . . . . . . . . . . . . . . . . . . . . . . . . . . . . . . . . . . . . . . . . . . . . . . . . . . . 7
5. CONTROL PANEL . . . . . . . . . . . . . . . . . . . . . . . . . . . . . . . . . . . . . . . . . . . . . . . . . . . . . . . . . . . 8
6. DAILY USE . . . . . . . . . . . . . . . . . . . . . . . . . . . . . . . . . . . . . . . . . . . . . . . . . . . . . . . . . . . . . . . . . 8
7. AUTOMATIC PROGRAMMES . . . . . . . . . . . . . . . . . . . . . . . . . . . . . . . . . . . . . . . . . . . . . . . . . 12
8. USING THE ACCESSORIES . . . . . . . . . . . . . . . . . . . . . . . . . . . . . . . . . . . . . . . . . . . . . . . . . . . 13
9. ADDITIONAL FUNCTIONS . . . . . . . . . . . . . . . . . . . . . . . . . . . . . . . . . . . . . . . . . . . . . . . . . . . 14
10. HELPFUL HINTS AND TIPS . . . . . . . . . . . . . . . . . . . . . . . . . . . . . . . . . . . . . . . . . . . . . . . . . . . 15
11. CARE AND CLEANING . . . . . . . . . . . . . . . . . . . . . . . . . . . . . . . . . . . . . . . . . . . . . . . . . . . . . . 16
12. TROUBLESHOOTING . . . . . . . . . . . . . . . . . . . . . . . . . . . . . . . . . . . . . . . . . . . . . . . . . . . . . . . 16
13. INSTALLATION . . . . . . . . . . . . . . . . . . . . . . . . . . . . . . . . . . . . . . . . . . . . . . . . . . . . . . . . . . . . 17
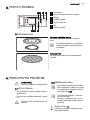
FOR PERFECT RESULTS
Thank you for choosing this AEG product. We have created it to give you impeccable
performance for many years, with innovative technologies that help make life simpler –
features you might not find on ordinary appliances. Please spend a few minutes reading to get
the very best from it.
Visit our website for:
Get usage advice, brochures, trouble shooter, service information:
www.aeg.com
Register your product for better service:
www.aeg.com/productregistration
Buy Accessories, Consumables and Original spare parts for your appliance:
www.aeg.com/shop
CUSTOMER CARE AND SERVICE
We recommend the use of original spare parts.
When contacting Service, ensure that you have the following data available.
The information can be found on the rating plate. Model, PNC, Serial Number.
Warning / Caution-Safety information
General information and tips
Environmental information
Subject to change without notice.
2
www.aeg.com

1. SAFETY INFORMATION
Before the installation and use of the appliance, careful-
ly read the supplied instructions. The manufacturer is
not responsible if an incorrect installation and use cau-
ses injuries and damages. Always keep the instructions
with the appliance for future reference.
1.1 Children and vulnerable people safety
WARNING!
Risk of suffocation, injury or permanent disability.
• This appliance can be used by children aged from 8
years and above and persons with reduced physical,
sensory or mental capabilities or lack of experience
and knowledge if they are supervised by an adult or a
person who is responsible for their safety.
• Do not let children play with the appliance. Children
under 3 years must not be left unsupervised in the vi-
cinity of the appliance.
• Keep all packaging away from children.
• Keep children and pets away from the appliance
when it operates or when it cools down. Accessible
parts are hot.
• If the appliance has a child safety device, we recom-
mend that you activate it.
• Cleaning and user maintenance shall not be made by
children without supervision.
• Keep the appliance and its cord out of reach of chil-
dren less than 8 years.
1.2 General Safety
• This appliance is intended to be used in household
and similar applications such as:
– staff kitchen areas in shops, offices and other work-
ing environments;
ENGLISH 3

– farm houses;
– by clients in hotels, motels and other residential
environments;
– bed and breakfast type environments.
• Internally the appliance becomes hot when in opera-
tion. Do not touch the heating elements that are in
the appliance. Always use oven gloves to remove or
put in accessories or ovenware.
• Do not use a steam cleaner to clean the appliance.
• Before maintenance cut the power supply.
• If the door or door seals are damaged, the appliance
must not be operated until it has been repaired by a
competent person.
• The appliances are not intended to be operated by
means of an external timer or separate remote-con-
trol system.
• Only a competent person can carry out any service or
repair operation that involves the removal of a cover
which gives protection against exposure to micro-
wave energy.
• Do not heat liquids and other foods in sealed con-
tainers. They are liable to explode.
• Only use utensils that are suitable for use in micro-
wave ovens.
• When heating food in plastic or paper containers,
keep an eye on the appliance due to the possibility of
ignition.
• The appliance is intended for heating food and bev-
erages. Drying of food or clothing and heating of
warming pads, slippers, sponges, damp cloth and
similar may lead to risk of injury, ignition or fire.
• If smoke is emitted, switch off or unplug the appli-
ance and keep the door closed in order to stifle any
flames.
4
www.aeg.com

• Microwave heating of beverages can result in delayed
eruptive boiling. Care must be taken when handling
the container.
• The contents of feeding bottles and baby food jars
shall be stirred or shaken and the temperature
checked before consumption, in order to avoid
burns.
• Eggs in their shell and whole hard-boiled eggs
should not be heated in the appliance since they may
explode, even after microwave heating has ended.
• The appliance should be cleaned regularly and any
food deposits removed.
• Failure to maintain the appliance in a clean condition
could lead to deterioration of the surface that could
adversely affect the life of the appliance and possibly
result in a hazardous situation.
• The temperature of accessible surfaces may be high
when the appliance is operating.
• The microwave oven shall not be placed in a cabinet
unless it has been tested in a Cabinet.
• The rear surface of appliances shall be placed against
a wall.
• Do not use harsh abrasive cleaners or sharp metal
scrapers to clean the glass door since they can
scratch the surface, which may result in shattering of
the glass.
• If the supply cord is damaged, it must be replaced by
the manufacturer, an authorized Service or similarly
qualified persons in order to avoid a hazard.
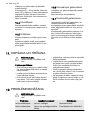
2.
SAFETY INSTRUCTIONS
2.1 Installation
WARNING!
Only a qualified person must in-
stall this appliance.
ENGLISH 5

• Remove all the packaging.
• Do not install or use a damaged appli-
ance.
• Obey the installation instruction sup-
plied with the appliance.
• The appliance can be placed almost
anywhere in the kitchen. Make sure
the oven is placed on a flat, level sur-
face and that vents as well as the sur-
face underneath the appliance are not
blocked (for sufficient ventilation).
Electrical connection
WARNING!
Risk of fire and electrical shock.
• All electrical connections should be
made by a qualified electrician.
• The appliance must be earthed.
• Make sure that the electrical informa-
tion on the rating plate agrees with
the power supply. If not, contact an
electrician.
• If the appliance is connected to the
socket via an extension cord, make
sure the cord is earthed.
• Make sure not to cause damage to the
mains plug and to the mains cable.
Contact the Service or an electrician to
change a damaged mains cable.
• Do not pull the mains cable to discon-
nect the appliance. Always pull the
mains plug.
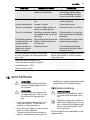
2.2 Use
WARNING!
Risk of injury, burns or electric
shock or explosion.
• Use this appliance in a household en-
vironment.
• Do not change the specification of this
appliance.
• Make sure that the ventilation open-
ings are not blocked.
• Do not let the appliance stay unatten-
ded during operation.
• Do not apply pressure on the open
door.
• Do not use the appliance as a work
surface and do not use the cavity for
storage purposes.
2.3 Care and Cleaning
WARNING!
Risk of injury, fire or damage to
the appliance.
• Before maintenance, deactivate the
appliance and disconnect the mains
plug from the mains socket.
• Clean regularly the appliance to pre-
vent the deterioration of the surface
material.
• Do not allow food spills or cleaner res-
idue to accumulate on door sealing
surfaces.
• Remaining fat or food in the appliance
can cause fire.
• Clean the appliance with a moist soft
cloth. Only use neutral detergents. Do
not use abrasive products, abrasive
cleaning pads, solvents or metal ob-
jects.
• If you use an oven spray, obey the
safety instructions on the packaging.
2.4 Disposal
WARNING!
Risk of injury or suffocation.
• Disconnect the appliance from the
mains supply.
• Cut off the mains cable and discard it.
6
www.aeg.com

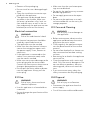
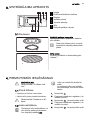
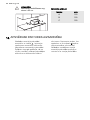
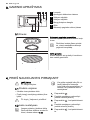
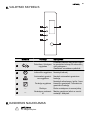
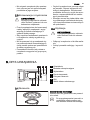
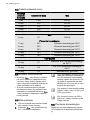
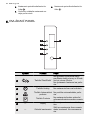
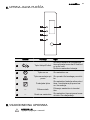
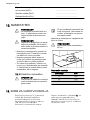
3. PRODUCT DESCRIPTION
7 56
1 2 3 4
1
Lamp
2
Safety interlock system
3
Display
4
Control panel
5
Waveguide cover
6
Grill
7
Turntable shaft
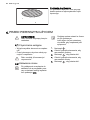
3.1 Accessories
Turntable set
Glass cooking tray and roller guide.
Always use the turntable set to
prepare food in the appliance.
Grill Rack
For grilling food and combi cooking.
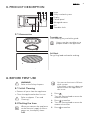
4. BEFORE FIRST USE
WARNING!
Refer to the Safety chapters.
4.1 Initial Cleaning
• Remove all parts from the appliance.
• Clean the appliance before first use.
Refer to chapter "Care and
Cleaning".
4.2 Setting the time
When you connect the appliance
to the electrical supply or after a
power cut, the display shows
0:00.
You can set the time in 24 hour
clock system.
If the clock is not set it does not
operate when the appliance is
not in use.
1.
Press .
2.
Turn the Setting knob to enter the
amount of hours.
3.
Press to confirm.
4.
Turn the Setting knob to enter the
amount of minutes.
5.
Press to confirm.
ENGLISH 7

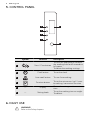
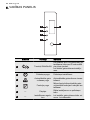
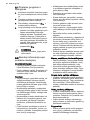
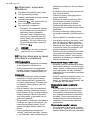
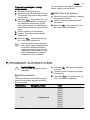
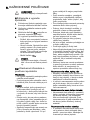
5. CONTROL PANEL
1
2
3
4 5
6
Symbol Function Description
1
Start / Clear button
To start the appliance or increase
the cooking time for 60 seconds at
full power.
To delete the cooking settings.
2
Clock button To set the clock.
3
Auto cook button To use Auto cooking.
4
Function button
To set the microwave / grill / com-
bi cooking / convection function.
5
— Display
Shows the settings and current
time.
6
— Setting knob
To set the cooking time or weight.
To defrost.
6. DAILY USE
WARNING!
Refer to the Safety chapters.
8
www.aeg.com

6.1 Activating and
deactivating the appliance
1.
Repeatedly press the Function but-
ton to set the desired function.
2.
Turn the Setting knob to set the de-
sired time.
3.
Press to confirm and activate
the appliance.
4.
To deactivate the appliance you can:
– wait until the appliance deacti-
vates automatically when the time
comes to an end.
– open the door. The appliance
stops automatically. Close the
door to continue cooking. Use this
option to inspect the food.
–
press
.
CAUTION!
Do not let the appliance operate
when there is no food in it.
6.2 General information about
using the appliance
General:
• After you deactivate the appliance, let
the food stand for some minutes.
• Remove the aluminium foil packaging,
metal containers, etc. before you pre-
pare the food.
Cooking:
• If possible, cook food covered with
material suitable for use in the micro-
wave. Only cook food without a cover
if you want to keep it crusty
• Do not overcook the dishes by setting
the power and time too high. The
food can dry out, burn or catch fire in
some places.
• Do not use the appliance to cook
eggs or snails in their shells, because
they can explode. With fried eggs,
pierce the yolks first.
• Prick food with "skin" or "peel", such
as potatoes, tomatoes, sausages, with
a fork several times before cooking so
that the food does not explode.
• For chilled or frozen food, set a longer
cooking time.
• Dishes which contain sauce must be
stirred from time to time.
• Vegetables that have a firm structure,
such as carrots, peas or cauliflower,
must be cooked in water.
• Turn larger pieces after half of the
cooking time.
• If possible, cut vegetables into similar-
sized pieces.
• Use flat, wide dishes.
• Do not use cookware made of porce-
lain, ceramic or earthenware with small
holes, e. g. on handles or unglazed
bottoms. Moisture going into the
holes can cause the cookware to crack
when it is heated.
• The glass cooking tray is a work space
for heating food or liquids. It is neces-
sary for the operation of the micro-
wave.
Defrosting meat, poultry, fish:
• Put the frozen, unwrapped food on a
small upturned plate with a container
below it so that the defrosting liquid
collects in the container.
• Turn the food after half of the defrost-
ing time. If possible, divide and then
remove the pieces that started to de-
frost.
Defrosting butter, portions of gateau,
quark:
• Do not fully defrost the food in the ap-
pliance, but let it defrost at room tem-
perature. This gives a more even re-
sult. Fully remove all metal or alumini-
um packaging before defrosting.
Defrosting fruit, vegetables:
• Do not fully defrost fruit and vegeta-
bles, which are to be further prepared
while raw, in the appliance. Let them
defrost at room temperature.
• You can use a higher microwave pow-
er to cook fruit and vegetables without
defrosting them first.
Ready meals:
• You can prepare ready meals in the
appliance only if their packaging is
suitable for microwave use.
• You must follow the manufacturer's in-
structions printed on the packaging
(e.g. remove the metal cover and
pierce the plastic film).
ENGLISH 9

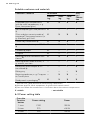
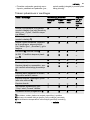
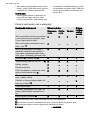
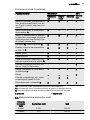
Suitable cookware and materials
Cookware / Material Microwave Grill-
ing /
Convec-
tion
Defrost-
ing
Heat-
ing
Cook-
ing
Ovenproof glass and porcelain
(with no metal components, e. g.
Pyrex, heat-proof glass)
X X X X
Non-ovenproof glass and porcelain
1)
X -- -- --
Glass and glass ceramic made of
ovenproof / frost-proof material (e.
g. Arcoflam), grill shelf
X X X X
Ceramic
2)
, earthenware
2)
X X X --
Heat-resistant plastic up to 200 °C
3)
X X X --
Cardboard, paper X -- -- --
Clingfilm X -- -- --
Roasting film with microwave safe
closure
3)
X X X --
Roasting dishes made of metal, e.
g. enamel, cast iron
-- -- -- X
Baking tins, black lacquer or sili-
con-coated
3)
-- -- -- X
Baking tray -- -- -- X
Browning cookware, e. g. Crisp pan
or Crunch plate
-- X X --
Ready meals in packaging
3)
X X X X
1)
With no silver, gold, platinum or metal plating / decorations
2)
Without quartz or metal components, or glazes which contain metals
3)
You must follow the manufacturer’s instructions about the maximum temperatures.
X suitable -- not suitable
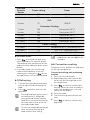
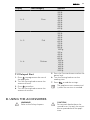
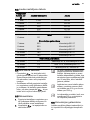
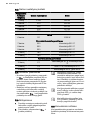
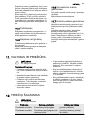
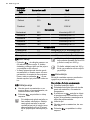
6.3 Power setting table
Press the
Function
button
Power setting Power
1 time P100 900 W
2 times P70 630 W
3 times P50 450 W
10
www.aeg.com

Press the
Function
button
Power setting Power
4 times P30 270 W
5 times P10 90 W
Grill
6 times G1 1020 W
Convection Cooking
7 times 230 Convection 230 °C
8 times 220 Convection 220 °C
9 times 200 Convection 200 °C
10 times 180 Convection 180 °C
11 times 160 Convection 160 °C
Combi Cooking
12 times C1 Microwaves 40 %, Convection 230 °C
13 times C2 Grill 70 %, Convection 230 °C
14 times C3 Microwave 55 %, Grill 45 %
6.4 Quick Start
•
Press
to activate the appliance
for 60 seconds at full function power.
The cooking time increases by 60 sec-
onds with each additional press of the
button.
• In standby mode, turn the Setting
knob counterclockwise to set the
cooking time, then press
to start
the appliance at full microwave power.
6.5 Defrosting
1.
Turn the Setting knob counterclock-
wise to input the desired weight of
food.
2.
Press to confirm and start the
appliance.
For weight defrosting the time is
set automatically. Weight de-
frosting should not be used on
food that is left out of the freezer
for more than 20 min, or for fro-
zen ready-made food.
To activate weight defrosting you
must use more than 200 g of
food and less than 3000 g.
To defrost less than 200 g of
food place it on the edge of the
turntable.
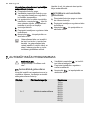
6.6 Convection cooking
For better results, preheat the appliance
to the right temperature.
Convection cooking with preheating
function:
1. Press the Function button.
2. Repeatedly press the Function but-
ton or turn the Setting knob to set
the temperature.
3.
Press
to confirm and start pre-
heating. When you hear an acoustic
signal, the temperature is set and
flashes on the display.
4. Put in the food.
5. Turn the Setting knob to input the
time.
6.
Press
to confirm and start the
appliance.
ENGLISH 11

You can input the cooking time
only when the appliance is pre-
heated. If you don’t input the
cooking time in 5 minutes, 5
acoustic signals sound and the
appliance turns to standby
mode.
Skip step 4 to cook without the preheat-
ing function.
6.7 Grilling or Combi Cooking
1. Repeatedly press the Function but-
ton to set the desired function.
2. Turn the Setting knob to input the
time.
3.
Press
to confirm and start the
appliance.
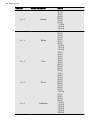
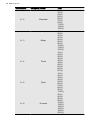
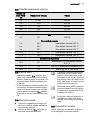
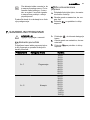
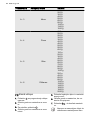
7. AUTOMATIC PROGRAMMES
WARNING!
Refer to the Safety chapters.
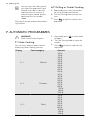
7.1 Auto Cooking
You can easily cook or reheat favorite
food using Auto Cooking function.
1.
Repeatedly press to select food
category.
2.
Turn the Setting knob to input the
weight.
3.
Press to confirm and start the
appliance.
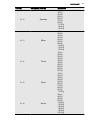
Display Food category Amount
A - 1 ReHeat
100 g
150 g
200 g
250 g
300 g
350 g
400 g
450 g
500 g
600 g
A - 2 Potatoes
200 g
300 g
400 g
500 g
600 g
700 g
900 g
1100 g
1300 g
1500 g
A - 3 Meat
100 g
200 g
300 g
400 g
500 g
600 g
800 g
1000 g
1300 g
1500 g
12
www.aeg.com

Display Food category Amount
A - 4 Pizza
100 g
200 g
250 g
300 g
350 g
400 g
450 g
500 g
550 g
600 g
A - 5 Fish
100 g
200 g
300 g
400 g
500 g
600 g
700 g
800 g
900 g
1000 g
A - 6 Chicken
200 g
400 g
600 g
800 g
1000 g
1200 g
1400 g
1600 g
1800 g
2000 g
7.2 Delayed Start
1.
Press
to programme the start of
the appliance.
2. Turn the Setting knob to enter the
amount of hours.
3.
Press
to confirm.
4. Turn the Setting knob to enter the
amount of minutes.
5. Press the Function button and set the
power level.
6. Turn the Setting knob to set the
cooking time.
7.
Press
to end the settings.
The appliance starts automatical-
ly when the set time is reached.
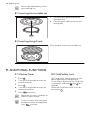
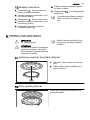
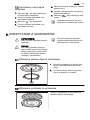
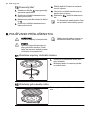
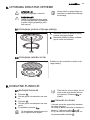
8. USING THE ACCESSORIES
WARNING!
Refer to the Safety chapters.
CAUTION!
Do not cook food without the
turntable set. Use only the turnta-
ble set provided with the appli-
ance.
ENGLISH 13

Never cook food directly on the
glass cooking tray.
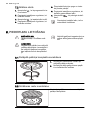
8.1 Inserting the turntable set
1.
Place the roller guide around the
turntable shaft.
2.
Place the glass cooking tray on the
roller guide
8.2 Inserting the grill rack
Place the grill rack on the turntable set.
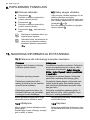
9. ADDITIONAL FUNCTIONS
9.1 Kitchen Timer
1.
Press .
2.
Turn the Setting knob to enter the
amount of hours.
3.
Press .
4.
Turn the Setting knob to enter the
amount of minutes.
5.
Press to confirm.
When the set time is reached, an
acoustic signal sounds.
Timer still works when you open
the door or pause the appliance.
Press
to cancel.
9.2 Child Safety Lock
The Child Safety Lock prevents an acci-
dental operation of the appliance.
To activate or deactivate the Child Safe-
ty Lock press and hold
and for 3
seconds.
When the Child Safety Lock is on, dis-
play shows
.
14
www.aeg.com

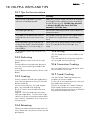
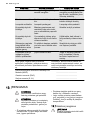
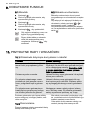
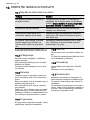
10. HELPFUL HINTS AND TIPS
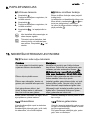
10.1 Tips for the microwave
Problem Remedy
You cannot find details for the
amount of food prepared.
Look for a similar food. Increase or shorten
the length of the cooking times according
to the following rule: Double the amount
= almost double the time, Half the
amount = half the time
The food got too dry. Set shorter cooking time or select lower mi-
crowave power.
The food is not defrosted, hot or
cooked after the time came to an
end.
Set longer cooking time or set higher pow-
er. Note that large dishes need longer
time.
After the cooking time comes to
an end, the food is overheated at
the edge but is still not ready in
the middle.
Next time set a lower power and a longer
time. Stir liquids halfway through, e.g.
soup.
To get better results for rice use a flat,
wide dish.
10.2 Defrosting
Always defrost roast with the fat side
down.
Do not defrost covered meat because
this may cause cooking instead of de-
frosting.
Always defrost whole poultry breast side
down.
10.3 Cooking
Always remove chilled meat and poultry
from the refrigerator at least 30 minutes
before cooking.
Let the meat, poultry, fish and vegeta-
bles stay covered after cooking.
Brush a little oil or melted butter over
the fish.
Add 30 - 45 ml of cold water for every
250 g of vegetables. Cut the fresh vege-
tables into even size pieces before cook-
ing. Cook all vegetables with a cover on
the container.
10.4 Reheating
When you reheat packed ready meals al-
ways follow the instruction written on the
packaging.
10.5 Grilling
Grill flat food items in the middle of the
grill rack.
Turn the food over halfway through the
set time and continue grilling.
10.6 Convection Cooking
You can cook food as in traditional oven.
No microwaves are used.
10.7 Combi Cooking
Use the Combi Cooking to keep the
crispness of certain foods.
At the half of the cooking time, turn over
the foods then continue.
There are 3 modes for Combi Cooking.
Each mode combines the microwave,
grill and convection functions at different
time periods and power levels.
ENGLISH 15

11. CARE AND CLEANING
WARNING!
Refer to the Safety chapters.
Notes on cleaning:
• Clean the front of the appliance with a
soft cloth with warm water and a
cleaning agent.
• To clean metal surfaces, use a usual
cleaning agent.
• Clean the appliance interior after each
use. Then you can remove dirt more
easily and it does not burn on.
• Clean stubborn dirt with a special
cleaner.
• Clean all accessories regularly and let
them dry. Use a soft cloth with warm
water and a cleaning agent.
• To soften the hard to remove remains,
boil a glass of water at full microwave
power for 2 to 3 minutes.
• To remove odours, mix a glass of wa-
ter with 2 tsp of lemon juice and boil
at full microwave power for 5 minutes.
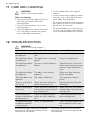
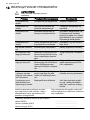
12. TROUBLESHOOTING
WARNING!
Refer to the Safety chapters.
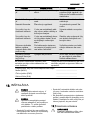
Problem Possible cause Remedy
The appliance does
not operate.
The appliance is deactiva-
ted.
Activate the appliance.
The appliance does
not operate.
The appliance is not plug-
ged in.
Plug in the appliance.
The appliance does
not operate.
The fuse in the fuse box is
blown.
Check the fuse. If the fuse
blows more than one time,
contact a qualified electri-
cian.
The appliance does
not operate.
The door is not closed
properly.
Make sure that nothing
blocks the door.
The lamp does not
operate.
The lamp is defective. The lamp has to be re-
place.
There is sparking in
the cavity.
There are metal dishes or
dishes with metal trim.
Remove the dish from the
appliance.
There is sparking in
the cavity.
There are metal skewers or
aluminium foil that touches
the interior walls.
Make sure that the skewers
and foil does not touch the
interior walls.
The turntable set
makes scratching or
grinding noise.
There is an object or dirt
below the glass cooking
tray.
Clean the area below the
glass cooking tray.
The appliance stop
to operate without
a clear reason.
There is a malfunction. If this situation repeats call
the customer service cen-
ter.
If you cannot find a solution to the prob-
lem yourself, contact your dealer or the
customer service centre.
The necessary data for the customer
service center is on the rating plate on
the appliance.
16
www.aeg.com

We recommend that you write the data here:
Model (MOD.) .........................................
Product number (PNC) .........................................
Serial number (S.N.) .........................................
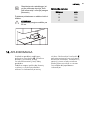
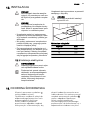
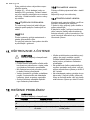
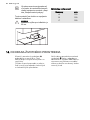
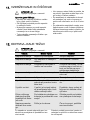
13. INSTALLATION
CAUTION!
Do not block the air vents. If you
do that, the appliance can over-
heat.
CAUTION!
Do not connect the appliance to
adapters or extension leads. This
can cause overloading and risk of
fire.
• The appliance is for a kitchen counter
top use only. It must be placed on a
stable and flat surface.
• Put the appliance far away from steam,
hot air and water splashes.
• If you transport the appliance in cold
weather, do not activate it immediate-
ly after the installation. Let is stand in
the room temperature and absorb the
heat.
13.1 Electrical installation
WARNING!
Only a qualified person must do
the electrical installation.
The manufacturer is not responsi-
ble if you do not follow the safety
precautions from the chapter
"Safety Information".
This appliance is supplied with a main
cable and main plug.
CAUTION!
Minimum installation height is 85
cm.
C
A
B
Minimal distances
Dimension mm
A 150
B 150
C 150
14. ENVIRONMENT CONCERNS
Recycle the materials with the
symbol
. Put the packaging in
applicable containers to recycle it.
Help protect the environment and
human health and to recycle waste
of electrical and electronic
appliances. Do not dispose
appliances marked with the symbol
with the household waste. Return the
product to your local recycling
facility or contact your municipal
office.
ENGLISH 17

SATURS
1. DROŠĪBAS INFORMĀCIJA . . . . . . . . . . . . . . . . . . . . . . . . . . . . . . . . . . . . . . . . . . . . . . . 19
2. DROŠĪBAS NORĀDĪJUMI . . . . . . . . . . . . . . . . . . . . . . . . . . . . . . . . . . . . . . . . . . . . . . . . 21
3. IZSTRĀDĀJUMA APRAKSTS . . . . . . . . . . . . . . . . . . . . . . . . . . . . . . . . . . . . . . . . . . . . . 23
4. PIRMS PIRMĀS IESLĒGŠANAS . . . . . . . . . . . . . . . . . . . . . . . . . . . . . . . . . . . . . . . . . . . 23
5. VADĪBAS PANELIS . . . . . . . . . . . . . . . . . . . . . . . . . . . . . . . . . . . . . . . . . . . . . . . . . . . . . 24
6. IZMANTOŠANA IKDIENĀ . . . . . . . . . . . . . . . . . . . . . . . . . . . . . . . . . . . . . . . . . . . . . . . . 25
7. AUTOMĀTISKĀS PROGRAMMAS . . . . . . . . . . . . . . . . . . . . . . . . . . . . . . . . . . . . . . . . . 28
8. PIEDERUMU LIETOŠANA . . . . . . . . . . . . . . . . . . . . . . . . . . . . . . . . . . . . . . . . . . . . . . . 30
9. PAPILDFUNKCIJAS . . . . . . . . . . . . . . . . . . . . . . . . . . . . . . . . . . . . . . . . . . . . . . . . . . . . 31
10. NODERĪGI IETEIKUMI UN PADOMI . . . . . . . . . . . . . . . . . . . . . . . . . . . . . . . . . . . . . . . . 31
11. KOPŠANA UN TĪRĪŠANA . . . . . . . . . . . . . . . . . . . . . . . . . . . . . . . . . . . . . . . . . . . . . . . . 32
12. PROBLĒMRISINĀŠANA . . . . . . . . . . . . . . . . . . . . . . . . . . . . . . . . . . . . . . . . . . . . . . . . . 32
13. UZSTĀDĪŠANA . . . . . . . . . . . . . . . . . . . . . . . . . . . . . . . . . . . . . . . . . . . . . . . . . . . . . . . . 33
VISLABĀKAJIEM REZULTĀTIEM
Pateicamies, ka izvēlējāties AEG produktu. Esam to radījuši, lai ilgstoši nodrošinātu
nevainojamu veiktspēju, izmantojot novatoriskas tehnoloģijas, kas palīdz vienkāršot dzīvi, –
iespējas, ko neatradīsiet parastās ierīcēs. Lūdzu, veltiet dažas minūtes lasīšanai, lai sasniegtu
vislabākos rezultātus.
Apmeklējiet mūsu mājaslapu:
Atradīsiet lietošanas padomus, brošūras, informāciju par traucējumu novēršanu un
apkopi:
www.aeg.com
Reģistrējiet savu produktu, lai uzlabotu pakalpojumu:
www.aeg.com/productregistration
Iegādājieties ierīcei oriģinālās rezerves daļas, materiālus un piederumus:
www.aeg.com/shop
KLIENTU APKALPOŠANA UN PAKALPOJUMI
Iesakām izmantot oriģinālās rezerves daļas.
Sazinoties ar apkalpes dienestu, pārliecinieties, vai jums ir šādi dati.
Šo informāciju var atrast tehnisko datu plāksnītē. Modelis, izstrādājuma Nr., sērijas numurs.
Drošības informācija brīdinājumam un piesardzībai.
Vispārīgā informācija un piemēri
Vides informācija
Izmaiņu tiesības rezervētas.
18
www.aeg.com

1. DROŠĪBAS INFORMĀCIJA
Pirms ierīces uzstādīšanas un lietošanas rūpīgi izlasiet
pievienotos norādījumus. Ražotājs neatbild par bojāju‐
miem, ko radījusi ierīces nepareiza uzstādīšana vai lie‐
tošana. Saglabājiet šos norādījumus ierīces tuvumā
turpmākām uzziņām.
1.1 Bērnu un nespējīgu cilvēku drošība
BRĪDINĀJUMS
Nosmakšanas, savainošanās vai pastāvīgas invali‐
ditātes risks.
• Šo ierīci drīkst izmantot bērni no 8 gadu vecuma un
cilvēki ar ierobežotām fiziskām, uztveres vai garīgām
spējām, vai pieredzes un zināšanu trūkumu, ja viņus
uzrauga pieaugušais vai par viņu drošību atbildīgā
persona.
• Neļaujiet bērniem rotaļāties ar ierīci. Bērnus, kas jau‐
nāki par 3 gadiem, nedrīkst atstāt bez uzraudzības ie‐
rīces tuvumā.
• Glabājiet iesaiņojuma materiālus bērniem nepieeja‐
mās vietās.
• Neļaujiet bērniem un dzīvniekiem tuvoties ierīcei tās
darbības vai dzesēšanas laikā. Pieejamās sastāvda‐
ļas ir karstas.
• Ja ierīce aprīkota ar bērnu drošības ierīci, iesakām to
aktivizēt.
• Tīrīšanu un lietotāja veikto apkopi nedrīkst veikt bērni
bez uzraudzības.
• Turiet ierīci un tās elektrības vadu bērniem, kas ir jau‐
nāki par 8 gadu vecumu, nepieejamā vietā.
1.2 Vispārīgi drošības norādījumi
• Ierīce paredzēta izmantošanai mājsaimniecībā un lī‐
dzīgiem mērķiem, piemēram:
LATVIEŠU 19

– darbinieku virtuves zonās veikalos, birojos un citās
darba vietās;
– lauku saimniecībās;
– klientu vajadzībām viesnīcās, moteļos un citās dzī‐
vojamās telpās;
– privāto viesnīcu (Bed and Breakfast) apstākļos.
• Ierīces iekšpuse darbības laikā sakarst. Nepieskarie‐
ties sildelementiem ierīces iekšpusē. Vienmēr izman‐
tojiet cepeškrāsns cimdus, izņemot vai ievietojot pa‐
pildpiederumus vai cepeškrāsns traukus.
• Netīriet ierīci ar tvaika tīrītāju.
• Pirms apkopes veikšanas atvienojiet strāvas padevi.
• Ja durvis vai durvju blīves ir bojāti, ierīci nedrīkst iz‐
mantot, līdz bojājums tiks novērsts autorizētā apkal‐
pošanas centrā.
• Ierīces nav paredzētas izmantošanai ar ārēju laika
slēdzi vai atsevišķu tālvadības sistēmu
• Tikai kompetenta persona var veikt apkopes vai re‐
montdarbus, kas saistīti ar pārsega, kas aizsargā pret
pakļaušanu mikroviļņu enerģijai, noņemšanu.
• Nesildiet šķidrumus un citu pārtiku noslēgtos traukos.
Tie var uzsprāgt.
• Izmantojiet tikai tādus piederumus, kas ir piemēroti iz‐
mantošanai mikroviļņu krāsnīs.
• Uzsildot pārtiku plastmasas vai papīra traukos, uzrau‐
giet ierīci iespējamās aizdegšanās dēļ.
• Ierīce paredzēta pārtikas un dzērienu uzsildīšanai.
Pārtiks kaltēšana, drēbju žāvēšana vai sildošo spil‐
ventiņu, čību, sūkļu, mitru drānu un līdzīgu priekšmetu
sildīšana var izraisīt traumu, aizdegšanās vai uguns‐
grēka risku.
• Ja ierīce izdala dūmus, izslēdziet to vai atvienojiet no
elektrības padeves un neveriet vaļā durvis, lai apslā‐
pētu liesmas.
20
www.aeg.com
Strona się ładuje...
Strona się ładuje...
Strona się ładuje...
Strona się ładuje...
Strona się ładuje...
Strona się ładuje...
Strona się ładuje...
Strona się ładuje...
Strona się ładuje...
Strona się ładuje...
Strona się ładuje...
Strona się ładuje...
Strona się ładuje...
Strona się ładuje...
Strona się ładuje...
Strona się ładuje...
Strona się ładuje...
Strona się ładuje...
Strona się ładuje...
Strona się ładuje...
Strona się ładuje...
Strona się ładuje...
Strona się ładuje...
Strona się ładuje...
Strona się ładuje...
Strona się ładuje...
Strona się ładuje...
Strona się ładuje...
Strona się ładuje...
Strona się ładuje...
Strona się ładuje...
Strona się ładuje...
Strona się ładuje...
Strona się ładuje...
Strona się ładuje...
Strona się ładuje...
Strona się ładuje...
Strona się ładuje...
Strona się ładuje...
Strona się ładuje...
Strona się ładuje...
Strona się ładuje...
Strona się ładuje...
Strona się ładuje...
Strona się ładuje...
Strona się ładuje...
Strona się ładuje...
Strona się ładuje...
Strona się ładuje...
Strona się ładuje...
Strona się ładuje...
Strona się ładuje...
Strona się ładuje...
Strona się ładuje...
Strona się ładuje...
Strona się ładuje...
Strona się ładuje...
Strona się ładuje...
Strona się ładuje...
Strona się ładuje...
Strona się ładuje...
Strona się ładuje...
Strona się ładuje...
Strona się ładuje...
Strona się ładuje...
Strona się ładuje...
Strona się ładuje...
Strona się ładuje...
Strona się ładuje...
Strona się ładuje...
Strona się ładuje...
Strona się ładuje...
Strona się ładuje...
Strona się ładuje...
Strona się ładuje...
Strona się ładuje...
Strona się ładuje...
Strona się ładuje...
Strona się ładuje...
Strona się ładuje...
Strona się ładuje...
Strona się ładuje...
Strona się ładuje...
Strona się ładuje...
-
 1
1
-
 2
2
-
 3
3
-
 4
4
-
 5
5
-
 6
6
-
 7
7
-
 8
8
-
 9
9
-
 10
10
-
 11
11
-
 12
12
-
 13
13
-
 14
14
-
 15
15
-
 16
16
-
 17
17
-
 18
18
-
 19
19
-
 20
20
-
 21
21
-
 22
22
-
 23
23
-
 24
24
-
 25
25
-
 26
26
-
 27
27
-
 28
28
-
 29
29
-
 30
30
-
 31
31
-
 32
32
-
 33
33
-
 34
34
-
 35
35
-
 36
36
-
 37
37
-
 38
38
-
 39
39
-
 40
40
-
 41
41
-
 42
42
-
 43
43
-
 44
44
-
 45
45
-
 46
46
-
 47
47
-
 48
48
-
 49
49
-
 50
50
-
 51
51
-
 52
52
-
 53
53
-
 54
54
-
 55
55
-
 56
56
-
 57
57
-
 58
58
-
 59
59
-
 60
60
-
 61
61
-
 62
62
-
 63
63
-
 64
64
-
 65
65
-
 66
66
-
 67
67
-
 68
68
-
 69
69
-
 70
70
-
 71
71
-
 72
72
-
 73
73
-
 74
74
-
 75
75
-
 76
76
-
 77
77
-
 78
78
-
 79
79
-
 80
80
-
 81
81
-
 82
82
-
 83
83
-
 84
84
-
 85
85
-
 86
86
-
 87
87
-
 88
88
-
 89
89
-
 90
90
-
 91
91
-
 92
92
-
 93
93
-
 94
94
-
 95
95
-
 96
96
-
 97
97
-
 98
98
-
 99
99
-
 100
100
-
 101
101
-
 102
102
-
 103
103
-
 104
104


w innych językach
- slovenčina: AEG MCC2581E-M Používateľská príručka
- English: AEG MCC2581E-M User manual
Powiązane artykuły
Inne dokumenty
-
Electrolux EMC28950S Instrukcja obsługi
-
Electrolux EMS30400OX Instrukcja obsługi
-
Samsung NQ50J9530BS/EO Instrukcja obsługi
-
-
-
-
-
Aeg-Electrolux HK654070FB Instrukcja obsługi
-
Acme Made GE100 Instrukcja obsługi