
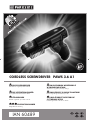
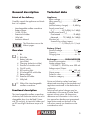
CORDLESS SCREWDRIVER PAWS 3.6 A1
AKKU-WECHSELBITSCHRAUBER
Originalbetriebsanleitung
CORDLESS SCREWDRIVER
Translation of original operation manual
A
KUMULATOROWA WKRETARKA Z
WYMIENNYMI BITAMI
Tłumaczenie oryginalnej instrukcji obsługi
A
KU ŠROUBOVÁK
Překlad originálního provozního návodu
AKUMULÁTOROVÝ SKRUTKOVAC
S VÝMENOU BITOV
Preklad originá lneho návodu na obsluhu
AKUMULATORSKI VIJACNIK Z NASTAVKI
Prevod originalnega navodila za uporabo
AKKUS VÁLTÓBITCSAVAROZÓ
Az originál használati utasítás fordítása
IAN 60489
60489_par_Akku-Wechselbitschalter_cover_PL_HU_SI_CZ_SK.indd 2 30.05.14 10:36

GB Translation of original operation manual Page
PL Tłumaczenie oryginalnej instrukcji obsługi Strona
HU Az originál használati utasítás fordítása Oldal
SI Prevod originalnega navodila za uporabo Stran
CZ Překlad originálního provozního návodu Strana
SK Preklad originálneho návodu na obsluhu Strana
DE / AT / CH Originalbetriebsanleitung Seite
Before reading, unfold the page containing the illustrations and familiarise yourself with all functions
of the device.
Przed przeczytaniem proszę rozłożyć stronę z ilustracjami, a następnie proszę zapoznać się
z wszystkimi funkcjami urządzenia.
Olvasás előtt kattintson az ábrát tartalmazó oldalra és végezetül ismerje meg a készülék mindegyik
funkcióját.
Pred branjem odprite stran s slikami in se nato seznanite z vsemi funkcijami naprave.
Před čtením si otevřete stranu s obrázky a potom se seznamte se všemi funkcemi přístroje.
Pred čítaním si odklopte stranu s obrázkami a potom sa oboznámte so všetkými funkciami prístroja.
Klappen Sie vor dem Lesen die Seite mit den Abbildungen aus und machen Sie sich anschließend
mit allen Funktionen des Gerätes vertraut.
60489_par_Akku-Wechselbitschalter_cover_PL_HU_SI_CZ_SK.indd 3 30.05.14 10:36
4
16
29
43
55
67
79

1 2 3
4
5
6
7
8
9
11
10
3

4
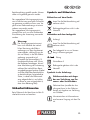
GB
Content
Introduction .................................4
Intended purpose .........................4
General description ......................5
Extent of the delivery ........................5
Overview ........................................5
Functional description .......................5
Technical data ..............................5
Safety instructions ........................6
Symbols and icons ...........................6
Symbols on the appliance .................6
Symbols on the recharger ..................6
General safety instructions for power
tools ...............................................6
Charging the battery .................. 10
Recharging the battery .................. 11
Checking the battery charge level ... 11
Operation ..................................11
1. Direction switch ......................... 11
2. Bit selection from the
bit changeable drum .................. 11
3. Use extension bit holder .............. 12
4. Switching on/off ........................ 12
5. Bit change in the
bit changeable drum .................. 12
Cleaning and maintenance .........12
Cleaning ..................................... 12
Maintenance ................................ 13
Storage ...................................... 13
Disposal and protection of the
environment ..............................13
Guarantee .................................13
Repair Service ............................14
Service-Center ............................15
Importer ....................................15
Replacement parts .....................15
Translation of the original EC
declaration of conformity ............ 93
Introduction
Congratulations on the purchase of your
new device. With it, you have chosen a
high quality product.
During production, this equipment has
been checked for quality and subjected
to a nal inspection. The functionality of
your equipment is therefore guaranteed. It
cannot be ruled out that residual quantities
of water or lubricants will remain on or in
the equipment/hose lines in isolated cases.
This is not a fault or defect and it repre-
sents no cause for concern.
The operating instructions constitute part of
this product. They contain important infor-
mation on safety, use and disposal.
Before using the product, familiarise your-
self with all of the operating and safety
instructions. Use the product only as de-
scribed and for the applications specied.
Keep this manual safely and in the event
that the product is passed on, hand over
all documents to the third party.
Intended purpose
The device is intended for drilling screws in
and out in wood, metal or plastic.
The user or operator is responsible for ac-
cidents causing injury to other people or
damage to property.
The manufacturer cannot be held liable
for damage when the trimmer is not used
in conformity with its intended purpose or
due to incorrect operation.

5
GB
General description
Extent of the delivery
Carefully unpack the appliance and check
that it is complete:
- Interchangeable cordless screwdriver
- Battery-charger
- 14 Bits, 25 mm
- Extension bit holder
- Utility belt
- Instruction Manual
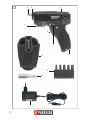
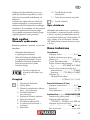
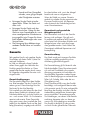
The illustrations are on the
fold-out pages.
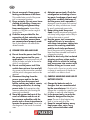
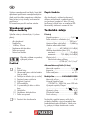
Overview
1 Bit
2 Bit holder
3 Battery Indicator
(not visible)
4 Charging socket (not visible)
5 Direction of rotation switch
6 On/off switch
7 LED working light
8 5 Exchange bits with holder
9 Battery-charger
10 Extension bit holder
11 Utility belt
12 Slide of the interchangeable
cordless screwdriver
Functional description
The interchangeable cordless screwdriver
clockwise/anti-clockwise rotation has a bit
changeable drum (can be tted 9 times
with 25 mm bits), a 6-point bit holder and
an LED work light. Maximum torque of 4
Nm.
Technical data
Appliance
Motor voltage..........................3,6 V
Idling speed (n
0
) ....................200 min
-1
Weight
(without battery charger) ........0,486 kg
Sound power level
(L
pA
) ...............62,2 dB(A), K= 3 dB(A)
Sound power level (L
wA
)
Guaranteed ........................76 dB(A)
Measured ........ 73,2 dB(A); K= 3 dB(A)
Vibration (a
n
) ......................................
Screwdriving without impact
.................... 0,198 m/s
2
, K= 1,5 m/s
2
Battery (Li-Ion)
Nominal voltage ......................3,6 V
Capacity .................................. 1,5 Ah
Charging time ..........................ca. 3 h
Recharger ............ JLH060600500B
Nominal consumption ....................9 W
Uptake voltage/Input
...100-240 V~, 50-60 Hz, max. 500 mA
Voltage output/Output
....................................6 V
500 mA
Output power .......................max. 6 W
Protection class .............................
II
Protection category ...................... IPX0
Noise and vibration values have been
determined according to the standards and
regulations mentioned in the declaration of
conformity.
Technical and optical changes may be
undertaken in the course of further devel-
opment without notice. All dimensions,
references and information in this instruc-
tion manual are therefore not guaranteed.
Legal claims made on the basis of the
instruction manual can therefore not be
considered as valid.

6
GB
The stated vibration emission value was
measured in accordance with a standard
testing procedure and may be used to com-
pare one power tool to another.
The stated vibration emission value may
also be used for a preliminary exposure
assessment.
Warning: The vibration emission
value may differ during actual use
of the power tool from the stated
value depending on the manner in
which the power tool is used.
Safety precautions aimed at protect-
ing the user should be based on esti-
mated exposure under actual usage
conditions (all parts of the operating
cycle are to be considered, includ-
ing, for example, times during which
the power tool is turned off and
times when the tool is turned on but
is running idle).
Safety instructions
Ensure that the safety instructions are ob-
served when operating the appliance.
Symbols and icons
Symbols on the appliance:
Carefully read these Operating In-
structions.
Electrical appliances must not be dis-
posed of with the domestic waste.
Symbols on the recharger:
Warning!
Before using for the rst time, care-
fully read through the user manual
The recharger is for indoor use
only.
Pole orientation
Protection class II
Electrical appliances must not be dis-
posed of with the domestic waste.
Symbols in the manual
Warning symbols with in-
formation on damage and
injury prevention.
Instruction symbols (the instruction is
explained at the place of the excla-
mation mark) with information on
preventing damage.
Help symbols with information on
improving tool handling.
General safety instructions
for power tools
WARNING! Read all safety
directions and instructions.
Omissions in the compliance with
safety directions and instructions
can cause electrical shock, re
and/or severe injuries.
Retain all safety directions and in-
structions for future use.
The term “Power Tools” used in the safety
instructions refers to mains-operated power
tools (with power cord) and to battery-oper-
ated power tools (without power cord).

7
GB
e) When operating a power tool
outdoors, use an extension cord
suitable for outdoor use. Use of a
cord suitable for outdoor use reduces the
risk of electric shock.
f) If operating a power tool in a
damp location is unavoidable,
use a residual current device
(RCD) protected supply. Use of an
RCD reduces the risk of electric shock.
3) PERSONAL SAFETY
a) Stay alert, watch what you are
doing and use common sense
when operating a power tool. Do
not use a power tool while you
are tired or under the inuence
of drugs, alcohol or medication.
A moment of inattention white operating
power tools may result in serious personal
injury.
b) Use personal protective equip-
ment. Always wear eye protec-
tion. Protective equipment such as dust
mask, non-slip safety shoes, hard hat, or
hearing protection used for appropriate
conditions will reduce personal injuries.
c) Prevent unintentional starting.
Ensure the switch is in the off-po-
sition before connecting to power
source and/or battery pack,
picking up or carrying the tool.
Carrying power tools with your nger on
the switch or energising power tools that
have the switch on invites accidents.
d) Remove any adjusting key or
wrench before turning the power
tool on. A wrench or a key left attached
to a rotating part of the power tool may
result in personal injury.
1) WORK AREA SAFETY
a) Keep work area clean and well
lit. Cluttered or dark areas invite acci-
dents.
b) Do not operate power tools in
explosive atmospheres, such as
in the presence of ammable
Iiquids, gases or dust. Power tools
create sparks which may ignite the dust
or fumes.
c) Keep children and bystanders
away while operating a power
tool. Distractions can cause you to lose
control.
2) ELECTRICAL SAFETY
a) Power tool plugs must match the
outlet. Never modify the plug in
any way. Do not use any adapter
plugs with earthed (grounded)
power tools. Unmodied plugs and
matching outlets will reduce risk of electric
shock.
b) Avoid body contact with earthed
or grounded surfaces, such as
pipes, radiators, ranges and re-
frigerators. There is an increased risk
of electric shock if your body is earthed
or grounded.
c) Do not expose power tools to rain
or wet conditions. Water entering a
power tool will increase the risk of electric
shock.
d) Do not abuse the cord. Never use
the cord for carrying, pulling or
unplugging the power tool. Keep
cord away from heat, oil, sharp
edges or moving parts. Damaged
or entangled cords increase the risk of
electric shock.

8
GB
e) Do not overreach. Keep proper
footing and balance at all times.
This enables better control of the power
tool in unexpected situations.
f) Dress properly. Do not wear loose
clothing or jewellery. Keep your
hair, clothing and gloves away
from moving parts. Loose clothes,
jewellery or long hair can be caught in
moving parts.
g) If devices are provided for the
connection of dust extraction and
collection facilities, ensure these
are connected and properly used.
Use of dust collection can reduce dust-
related hazards.
4) POWER TOOL USE AND CARE
a) Do not force the power tool. Use
the correct power tool for your
application. The correct power tool will
do the job better and safer at the rate for
which it was designed.
b) Do not use the power tool if the
switch does not turn it on and off.
Any power tool that cannot be controlled
with the switch is dangerous and must be
repaired.
c) Disconnect the plug from the
power source and/or the bat-
tery pack from the power tool
before making any adjust -ments,
changing accessories, or storing
power tools. Such preventive safety
measures reduce the risk of starting the
power tool accidentaIly.
d) Store idle power tools out of the
reach of children and do not al-
low persons unfamiliar with the
power tool or these instructions to
operate the power tool. Power tools
are dangerous in the hands of untrained
users.
e) Maintain power tools. Check for
misalignment or binding of mov-
ing parts, breakage of parts and
any other condition that may af-
fect the power tool’s operation. If
damaged, have the power tool repaired
before use. Many accidents are caused
by poorly maintained power tools.
f) Keep cutting tools sharp and
clean. Properly maintained cutting tools
with sharp cutting edges are less Iikely to
bind and are easier to control.
g) Use the power tool, accessories
and tool bits etc. in accordance
with these instructions, taking into
account the working conditions
and the work to be performed.
Use of the power tool for operations dif-
ferent from those intended could result in
a hazardous situation.
h) Hold the device by the insulated
gripping surfaces when perfor-
ming work in which the cutting
tool may come into contact with
hidden wiring or its own cord.
Contact with a live wire can also cause
a charge in metal parts of the device
and result in an electric shock.
5) CAREFUL HANDLING AND USE OF
BATTERY DEVICES
a) Charge the batteries only in
chargers that are recommended
by the manufacturer. Risk of re if a
charger that is suitable for a specic type
of battery is used with other batteries.
b) In the power tools, use only the
batteries designed for the pur-
pose. The use of other batteries may
result in injuries and risk of re.
c) Keep the unused battery away
from paper clips, coins, keys,
nails, screws and other small

9
GB
metal objects, which could cause
bridging of the contacts. A short
circuit between the battery contacts may
cause burns or re.
d) If used incorrectly, liquid may
leak from the battery. Avoid
contact with this. In the event of
accidental contact, rinse off with
water. If the liquid gets into eyes,
seek medical assistance. Leaking
battery uid may cause skin irritations or
burns.
6) SERVICE
Have your power tool serviced by
a qualied repair person using
only identical replacement parts.
This will ensure that the safety of the
power tool is maintained.
7) SPECIAL SAFETY DIRECTIONS FOR
BATTERY-OPERATED TOOLS
a) Ensure that the device is switched
off before inserting the battery.
Inserting a battery into a power tool that
is switched on may result in accidents.
b) Recharge the batteries indoors
only because the battery charger
is designed for indoor use only.
c) To reduce the electric shock haz-
ard, unplug the battery charger
from the mains before cleaning
the charger.
d) Do not subject the battery to
strong sunlight over long periods
and do not leave it on a heater.
Heat damages the battery and there is a
risk of explosion.
e) Allow a hot battery to cool before
charging.
f) Do not open up the battery and
avoid mechanical damage to the
battery. Risk of short circuit and fumes
may be emitted that irritate the respiratory
tract. Ensure fresh air and seek medical
assistance in the event of discomfort.
g) Do not use non-rechargeable bat-
teries!
8) CORRECT HANDLING OF THE BAT-
TERY CHARGER
• This device can be used by children
aged 8 and over and by people with
reduced physical, sensory or mental
capacities or with a lack of experience
or knowledge, if they are supervised or
have been instructed regarding safe use
of the device and understand the result-
ing risks. Children are not permitted to
play with the device. Cleaning and user
maintenance are not to be undertaken by
children without supervision.
• Keep the equipment away from children
and pets. Children should be supervised
in order to ensure that they do not play
with the equipment.
• To charge the battery, use only
the charger supplied.
Risk of re and explosion. This ensures
that the safety of the device is maintained.
• Before each use, check the charg-
er, cable and plug and have them
repaired by qualied profession-
als and only with original parts.
Do not use a defective charger and do
not open it up yourself. This ensures that
the safety of the device is maintained.
• Connect the charger only to a
socket with an earth. Ensure that
the mains voltage matches the
specications on the charger rat-
ing plate. Risk of electric shock.

10
GB
• Disconnect the charger from the
mains before closing or opening
connection to the battery / power
tool / device.
• Keep the charger clean and away
from wet and rain. Do not use
the charger outdoors. Dirt and the
entry of water increase the risk of electric
shock.
• Operate the charger only with
the appropriate original batteries.
Charging other batteries may result in
injuries and risk of re.
• Avoid mechanical damage to the
charger. This can result in internal short
circuits.
• Do not operate the charger on a
combustible surface (e.g. paper,
textiles). Risk of re due to heating dur-
ing charging.
• If the power cable for this equipment is
damaged, it must be replaced by the
manufacturer, a customer service agent of
the same or a similarly qualied person in
order to prevent hazards.
• The battery of the appliance is not fully
charged at the time of delivery. It there-
fore needs to be fully recharged before
you use it for the rst time. Slot the bat-
tery into the base and plug the battery
charger into a mains outlet.
• When the battery is fully charged, unplug
the charger from the mains and from the
appliance.
• Do not charge the battery continuously
since this may damage the battery cells.
Note: Repeatedly charging small capaci-
ties may damage the battery cells. Re-
charge the battery only if the appliance is
becoming slow.
• Do not use the charger to charge non-
rechargeable batteries.
9) RESIDUAL RISKS
Even if properly operating and handling this
electric tool, some residual risks will remain.
Due to its construction and build, this electric
tool may present the following hazards:
a) Cuts
b) Ear damage if working without ear pro-
tection.
c) Damage to your health caused by swing-
ing your hands and arms when operating
the appliance for longer periods of time
or if the unit is not held or maintained
properly.
Warning! During operation, this
electric tool generates an electro-
magnetic eld which, under certain
circumstances, may impair the
functionality of active or passive
medical implants. To reduce the risk
of serious or lethal injuries, we rec-
ommend that persons with medical
implants consult their doctor and the
manufacturer of their medical im-
plant before operating the machine.
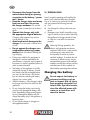
Charging the battery
Do not expose the battery to
extreme conditions such as
heat or impact. Risk of injury
from escaping electrolytic so-
lution! After eye/skin contact,
rinse the affected areas with
water or a neutraliser and
consult a doctor.

11
GB
Charge the battery in a dry room
only.
There is a risk of injury due to elec-
tric shock.
Only use the original charger from
the package to charge the battery.
Mind not to charge the appliance
for more than 3 hours at a time. If
you do, the battery and the appli-
ance may be damaged and longer
charging times would be a waste
of energy. Excessive charging will
void the warranty.
• Charge the battery before the rst
time of use. Do not briey charge
the battery several time in a row.
• Recharge the battery when you no-
tice that the appliance is becoming
slower.
• Always take heed of the applicable
safety instructions as well as the en-
vironmental protection regulations
and information.
• The warranty excludes all defects
caused by improper handling.
Recharging the battery
1. Connect the charger plug to the
charging socket (
4) of the de-
vice.
2. Plug the battery charger (
9)
into a mains outlet.
3. When the battery is fully re-
charged unplug the battery
charger (
9) from the mains.
Red LED lights up Battery charging
Green LEDs light up Battery fully
charged
Checking the battery charge
level
The battery’s charge level is indicated by
the charge state indicator (
3).
The state of charge of the battery is displa-
yed by illuminating the appropriate LED
lights. In order to activate the display, the
on/off switch (
6) must be pressed.
Green LED lights up
Battery fully charged
Red LED lights up
Battery needs to be charged
Operation
1. Direction switch
You can toggle between right and left ro-
tation by pushing the direction of rotation
switch (
5).
If you move the direction switch (
5) to
the middle position, the device is secured
against being switched on.
The direction changed may
only be performed in stand-
still mode!
2. Bit selection from the
bit changeable drum
Push the slide of the interchangeable cord-
less screwdriver (
B
12) forward.
Turn the bit changeable drum to the left or
right until the desired bit is located on top
and is in line with the bit holder (
2). The
bit changeable drum engages audibly.

12
GB
Push the slide of the interchangeable cord-
less screwdriver (
B
12) to the back.
Only grab the side of the
slide of the interchangeable
cordless screwdriver.
Caution, risk of injury caused
by pinching!
The selected bit is automatically xed in
the bit holder (
2).
3. Use extension bit holder
Remove the current bit ( 1) from the bit
holder (
2).
Insert the extension bit holder (
10) into the
bit holder (
2). It may be that you need to
rotate the extension bit holder (
10) slightly
because of the 6-point bit holder. Complete-
ly insert the extension bit holder (
10) into
the bit holder (
2). The extension bit holder
(
10) is held rmly by the duct and the
magnetic holder.
To remove the extension bit holder (
10),
simply remove the extension bit holder from
the bit holder (
2).
4. Switching on/off
Press the on/off switch ( 6) to start the de-
vice. To turn it off, release the on-off button.
If you move the direction switch (
5) to
the middle position, the device is secured
against being switched on.
The LED lamp can continue to be used by
activating the switch block. To do so, press
the on/off switch.
5. Bit change in the
bit changeable drum
Select the bit that should be replaced (see
chapter „2. Bit selection from the bit chan-
geable drum“). To remove the bit, simply
remove the bit from the bit holder (
2).
Insert a suitable 6-point bit in the bit holder
(
2). Because of the 6-point bit holder, it
may be that you need to rotate the bit slight-
ly. Slide the bit right into the bit holder (
2). The bit is held rmly by the duct and the
magnetic holder.
Cleaning and
maintenance
Contact our Service Centre about
repairs and servicing not described
in this manual. Only use OEM
parts. Risk of injury!
The following cleaning and servicing
should be done regularly. This will ensure
a long and reliable service life.
Cleaning
Do not spray the appliance
with water and do not im-
merse it in water. Electric
shock hazard!
• Keep clean the ventilation slots, motor
housing and handles of the appliance.
Use a damp cloth or a brush.
Do not use cleaning agents or solvents.
You may otherwise irreparably dam-
age the appliance.

13
GB
Maintenance
The appliance is maintenance free.
Storage
• Keep the device supplied, dry and out
of reach of children.
• Store the battery only in a partially
charged state. The state of charge
should be 40 – 60 % over a longer
storage period.
• During a longer storage period, check
the state of charge of the battery and
recharge if necessary roughly every
3months.
• Store the equipment between 10° C
and 25° C. During storage, avoid ex-
treme cold or heat so the battery does
not lose power. In order to keep the
battery well charged, avoid exposing
the appliance to extreme heat or cold
in storage
Disposal and protection
of the environment
Be environmentally friendly. Return the
tool, accessories and packaging to a recy-
cling centre when you have nished with
them.
Machines do not belong with domes-
tic waste.
Do not dispose of the device with
the battery installed in household
waste, re (risk of explosion) or
water. Damaged batteries may
damage the environment and your
health if toxic fumes or liquids leak
out.
• Dispose of the equipment with the
battery discharged. Do not open the
equipment or the battery.
• Dispose of the equipment in accord-
ance with the local regulations. Take
the equipment to a collection point,
where it will be recycled in an environ-
mentally friendly manner. For informa-
tion about this, ask your local waste
management company or our service
centre.
• Defective units returned to us will be
disposed of for free.
Guarantee
Dear Customer,
This equipment is provided with a 3-year
guarantee from the date of purchase.
In case of defects, you have statutory rights
against the seller of the product. These
statutory rights are not restricted by our
guarantee presented below.
Terms of Guarantee
The term of the guarantee begins on the
date of purchase. Please retain the original
receipt. This document is required as proof
of purchase.
If a material or manufacturing defect
occurs within three years of the date of
purchase of this product, we will repair or
replace – at our choice – the product for
you free of charge. This guarantee requires
the defective equipment and proof of pur-
chase to be presented within the three-year
period with a brief written description of
what constitutes the defect and when it oc-
curred.
If the defect is covered by our guarantee,
you will receive either the repaired product
or a new product. No new guarantee pe-
riod begins on repair or replacement of the
product.

14
GB
Guarantee Period and Statutory
Claims for Defects
The guarantee period is not extended by
the guarantee service. This also applies for
replaced or repaired parts. Any damages
and defects already present at the time of
purchase must be reported immediately af-
ter unpacking. Repairs arising after expiry
of the guarantee period are chargeable.
Guarantee Cover
The equipment has been carefully pro-
duced in accordance with strict quality
guidelines and conscientiously checked
prior to delivery.
The guarantee applies for all material and
manufacturing defects. This guarantee
does not extend to cover product parts that
are subject to normal wear and may there-
fore be considered as wearing parts (e.g.
lters or attachments) or to cover damage
to breakable parts (e.g. switches, batteries,
or parts made of glass).
This guarantee shall be invalid if the prod-
uct has been damaged, used incorrectly or
not maintained. Precise adherence to all of
the instructions specied in the operating
manual is required for proper use of the
product. Intended uses and actions against
which the operating manual advises or
warns must be categorically avoided.
The product is designed only for private
and not commercial use. The guarantee
will be invalidated in case of misuse or
improper handling, use of force, or inter-
ventions not undertaken by our authorised
service branch.
Processing in Case of Guarantee
To ensure efcient handling of your query,
please follow the directions below:
• Please have the receipt and item num-
ber (IAN 60489) ready as proof of
purchase for all enquiries.
• Please nd the item number on the rat-
ing plate.
• Should functional errors or other de-
fects occur, please initially contact the
service department specied below by
telephone or by e-mail. You will then
receive further information on the pro-
cessing of your complaint.
• After consultation with our customer
service, a product recorded as defective
can be sent postage paid to the service
address communicated to you, with the
proof of purchase (receipt) and speci-
cation of what constitutes the defect
and when it occurred. In order to avoid
acceptance problems and additional
costs, please be sure to use only the ad-
dress communicated to you. Ensure that
the consignment is not sent carriage
forward or by bulky goods, express or
other special freight. Please send the
equipment inc. all accessories supplied
at the time of purchase and ensure ad-
equate, safe transport packaging.
Repair Service
For a charge, repairs not covered by
the guarantee can be carried out by
our service branch, which will be happy to
issue a cost estimate for you.
We can handle only equipment that has
been sent with adequate packaging and
postage.

15
GB
Attention: Please send your equipment to
our service branch in clean condition and
with an indication of the defect.
Equipment sent carriage forward or by
bulky goods, express or other special
freight will not be accepted.
We will dispose of your defective devices
free of charge when you send them to us.
Importer
Please note that the following address is
not a service address. Please initially con-
tact the service centre specied above.
Grizzly Tools GmbH & Co. KG
Am Gewerbepark 2
64823 Groß-Umstadt
Germany
www.grizzly-service.eu
Service-Center
Service Great Britain
Tel.: 0871 5000 720
(£ 0.10/Min.)
E-Mail: [email protected].uk
IAN 60489
Spare parts and accessories can be obtained at
www.grizzly-service.eu
If you do not have internet access, please contact the Service Centre via
telephone (see “Sercice-Center” Page 15). Please have the order number
mentioned below ready.
Replacement parts
5 Exchange bits with holder .....................................................................91103180
Utility belt ...............................................................................................91103181
Extension bit holder ..................................................................................91103182
Battery-charger ........................................................................................91103183
GB

16
PL
Spis treœci
Wstęp ........................................16
Przeznaczenie ............................16
Opis ogólny ...............................17
Zawartość opakowania ....................17
Przegląd .......................................17
Opis działania ..............................17
Dane techniczne ......................... 17
Zasady bezpieczeństwa ............. 18
Symbole i piktogramy ..................... 18
Symbole na urządzeniu .................. 18
Symbole na ładowarce ................... 18
Symbole w instrukcji obsługi ............ 18
Ogólne zasady bezpieczeństwa ...... 19
Proces ładowania .......................23
Ładowanie akumulatora ................... 23
Sprawdzanie stanu naładowania aku-
mulatora ....................................... 24
Instrukcja montażu ....................24
1. Przełącznik kierunku obrotów ...... 24
2. Wybór końcówki z bębna
wymiany końcówek .................... 24
3. Użycie przedłużki końcówki
wkrętarskiej .............................. 24
4. Włączanie / wyłączanie ............ 24
5. Wymiana końcówki w bębnie
wymiany końcówek ................... 25
Oczyszczani i konserwacja ..........25
Oczyszczani .................................. 25
Konserwacja .................................. 25
Przechowywanie urządzenia ......25
Usuwanie i ochrona środowiska 26
Gwarancja .................................26
Serwis naprawczy .....................27
Service-Center ............................28
Importer ....................................28
Deklaracja zgodności
znormami UE ............................94
Wstęp
Gratulujemy zakupu nowego urządzenia.
Zdecydowali się Państwo na zakup warto-
ściowego produktu. Niniejsze urządzenie
sprawdzono w trakcie produkcji pod kątem
jakości, a także dokonano jego kontroli
ostatecznej. W ten sposób zapewniona jest
jego sprawność. Nie da się wykluczyć tego,
że w pojedynczych przypadkach w urzą-
dzeniu lub przy nim wzgl. w wężach mogą
się znaleźć pozostałości wody lub smaru.
Nie jest to brakiem ani uszkodzeniem, czy
powodem do troski o urządzenie.
Instrukcja obsługi jest częścią składową
produktu. Zawiera ona ważne wskazówki
dotyczące bezpieczeństwa, eksploatacji i
utylizacji. Przed rozpoczęciem użytkowania
produktu należy się zapoznać ze wszyst-
kimi wskazówkami dotyczącymi obsługi i
bezpieczeństwa. Produkt należy użytkować
tylko zgodnie z opisem i podanym przezna-
czeniem. Instrukcję należy przechowywać
starannie, a w przypadku przekazania
produktu osobom trzecim należy dostarczyć
nabywcy kompletną dokumentację.
Przeznaczenie
Urządzenie służy do wkręcania i
wykręcania śrub oraz do wiercenia
w drewnie, metalu lub w tworzywach
sztucznych. Każdy inny sposób używania
urządzenia, który nie jest jednoznacznie
określony jako dozwolony w niniejszej
instrukcji obsługi, może spowodować
uszkodzenie urządzenia i stanowić
poważne zagrożenie dla użytkownika. Nie
używaj tego urządzenia do przycinania
żywopłotów i/lub krzewów ozdobnych.

17
PL
Użytkownik odpowiedzialny jest za wy-
padki lub obrażenia wywołane u innych
osób oraz za powstałe uszkodzenie ich
własności.
Producent nie odpowiada za szkody wy-
wołane niezgodnym z przeznaczeniem
użytkowaniem lub nieprawidłową obsługą
urządzenia. To urządzenie nie jest przezna-
czone do zastosowania komercyjnego.
W przypadku użytkowania komercyjnego
wygasają prawa z tytułu gwarancji.
Opis ogólny
Zawartość opakowania
Rozpakuj urządzenie i sprawdź, czy jest ono
kompletne:
- Wkrętarka akumulatorowa
z wymiennym końcówkami
- Wskaźnik ładowania (ładowarka)
- 14 wymiennych końcówek, 25 mm
- Przedłużka końcówek wkrętarskich
- Torba do mocowania na pasku
- Instrukcja obsługi
Rysunki znajdziesz na
przedniej odchylanej stro-
nie.
Przegląd
1 Wymiennych końcówek
2 Uchwyt bitów
3 Wskaźnik naładowania (akumu-
lator) / (nie widoczne)
4 Gniazdo ładowania
(nie widoczne)
5 Przełącznik kierunku obrotów
6 Włącznik-wyłącznik
7 Oświetlenie robocze LED
8 5 wymiennych końcówek z
uchwytem
9 Ładowarka
10 Przedłużka końcówek
wkrętarskich
11 Torba do mocowania na pasku
12 Suwak wkrętarki
Opis działania
Wkrętarka akumulatorowa z wymiennym
końcówkami z wyborem kierunku obrotów
w lewo/ w prawo posiada bęben wymia-
ny końcówek (ładowany 9 końcówkami 25
mm), 6-kątny uchwyt końcówek i lampkę
LED. Maksymalny moment obrotowy wyno-
si 4 Nm.
Dane techniczne
Urządzenie
Napięcie silnika .......................3,6 V
Prędkość obrotowa przy pracy
jałowej (n
0
) ...........................200 min
-1
Ciężar (bez ładowarka) ..........0,486 kg
Poziom ciśnienia akustycznego
(L
pA
) ................62,2 dB(A), K=3 dB(A)
Poziom ciśnienia akustycznego (L
wA
)
gwarantowany ....................76 dB(A)
zmierzony ......... 73,2 dB(A); K=3 dB(A)
Wibracje (a
n
) .....................................
Wkręcanie bez udaru
.....................0,198 m/s
2
, K= 1,5 m/s
2
Bateria blokowa (Li-Ion)
Napięcie znamionowe .............3,6 V
Pojemność ................................ 1,5 Ah
Czas ładowania .......................ca. 3 h
Ładowarka .......... JLH060600500B
Znamionowy pobór prądu .............9 W
Napięcie wejściowe/Input
...100-240 V~, 50-60 Hz, max. 500 mA
Napięcie wyjściowe/Output
....................................6 V
500 mA
Moc wyjściowa ....................max. 6 W

18
PL
Klasa zabezpieczenia ................... II
Typ zabezpieczenia ..................... IPX0
Zmiany techniczne i optyczne mogą być
wprowadzane bez zapowiedzi w trakcie
procesu dalszego rozwoju urządzenia.
Wszelkie wymiary, wskazówki i dane
podane w niniejszej instrukcji obsługi są
w związku z tym podawane w sposób
niewiążący. Roszczenia zgłaszane na
podstawie treści instrukcji obsługi są nie-
ważne.
Podana wartość emisji drgań została
zmierzona metodą znormalizowaną i
może być wykorzystywana do porównań
urządzenia elektrycznego z innymi urzą-
dzeniami.
Podana wartość emisji drgań może też
służyć do szacunkowej oceny stopnia eks-
pozycji użytkownika na drgania.
Ostrzeżenie:
Wartość emisji drgań może się
różnić w czasie korzystania z urzą-
dzenia od podanej wartości, jest
to zależne od sposobu używania
urządzenia.
Istnieje konieczność określenia i zasto-
sowania środków ochrony użytkownika,
opartych na ocenie ekspozycji w rzeczy-
wistych warunkach używania urządzenia
(należy przy tym uwzględnić wszystkie
części cyklu roboczego, na przykład okre-
sy czasu, w których urządzenie elektrycz-
ne jest wyłączone bądź jest włączone, ale
pracuje bez obciążenia).
Zasady bezpieczeństwa
Przy używaniu z urządzenia przestrzegaj
zasad bezpieczeństwa.
Symbole i piktogramy
Symbole na urządzeniu:
Uważnie przeczytaj instrukcję
obsługi.
Urządzeń elektrycznych nie należy
wyrzucać razem z odpadami domo-
wymi
Symbole na ładowarce:
Uwaga!
Uważnie przeczytaj instrukcję obsłu-
gi.
Ładowarka jest przeznaczona tylko
do stosowania w pomieszczeniach.
Polaryzacja
Klasa zabezpieczenia II
Urządzeń elektrycznych nie należy
wyrzucać razem z odpadami domo-
wymi
Symbole w instrukcji obsługi
Symbol niebezpieczeństwa z
informacjami na temat ochro-
ny osób i zapobiegania szko-
dom materialnym.
Znak nakazu (w miejscu wykrzyknika
objaśnienie nakazu) z informacjami
na temat zapobiegania szkodom.
Znak informacyjny ze wskazówka-
mi ułatwiającymi posługiwanie się
urządzeniem.

19
PL
• Używaj odpowiedniej odzieży robo-
czej i osobistego wyposażenia ochron-
nego! Zawsze noś okulary ochronne
lub zabezpieczenie oczu, nauszniki,
buty z cholewą lub buty z podeszwą
przeciwpoślizgową i mocne, długie
spodnie oraz rękawice robocze.
Zmniejsza to ryzyko zranienia.
Nie zakładaj długich ubrań ani bi-
żuterii, ponieważ mogą one zostać
pochwycone przez ruchome części
urządzenia. Nie używaj urządzenia,
jeżeli jesteś boso lub masz na nogach
otwarte sandały.
• Przy pracy zapewnij sobie stabilną
postawę. Zachowaj szczególną ostroż-
ność przy pracy na pochyłościach.
Dzięki temu możliwe będzie zachowa-
nie lepszej kontroli nad urządzeniem
w nieoczekiwanych sytuacjach.
• Nie pracuj z urządzeniem, jeżeli jesteś
zmęczony albo jeżeli piłeś alkohol
czy przyjmowałeś tabletki. Zawsze
dostatecznie wcześnie rób przerwy na
odpoczynek.
Pracuj wyłącznie przy dobrym oświe-
tleniu.
• Nie pracuj na deszczu, podczas złej
pogody lub w wilgotnym otoczeniu.
Dostanie się wody do wnętrza urzą-
dzenia zwiększa ryzyko porażenia
prądem.
• Element osłonowy i środki ochrony
osobistej chronią Twoje zdrowie oraz
zdrowie innych osób i zapewniają
prawidłową pracę urządzenia.
Nie pracuj uszkodzonym, niekomplet-
nym lub przebudowanym bez zgody
producenta urządzeniem. Nigdy nie
używaj urządzenia z uszkodzonym
wyposażeniem ochronnym. Przed
użyciem sprawdź bezpieczeństwo
urządzenia, a szczególnie przewód
Ogólne zasady bezpieczeń-
stwa
Przed rozpoczęciem pracy z urzą-
dzeniem spalinowym zapoznaj się
dokładnie z wszystkimi jego ele-
mentami. Przećwicz sposób pracy
z urządzeniem i poproś doświad-
czonego użytkownika lub specjali-
stę o wyjaśnienie funkcji i sposobu
działania urządzenia oraz technik
pracy. Upewnij się, że w razie na-
głej potrzeby możesz natychmiast
wyłączyć urządzenie. Nieprawidło-
we użytkowanie urządzenia może
prowadzić do ciężkich zranień.
Uwaga! Przy korzystaniu z urzą-
dzeń elektrycznych należy prze-
strzegać podanych poniżej podsta-
wowych środków bezpieczeństwa,
zabezpieczających przed poraże-
niem prądem elektrycznym, zranie-
niem i pożarem:
Praca z urządzeniem:
• Urządzenie nie może być obsługiwa-
ne przez dzieci. Pracy z urządzeniem
zabrania się ponadto osobom, które
nie znają całej instrukcji obsługi. Pra-
wo i przepisy lokalne mogą określać
minimalny wiek użytkownika urządze-
nia.
• Trzymaj urządzenie z daleka od lu-
dzi – przede wszystkim dzieci – oraz
zwierząt domowych. Jeżeli w pobliżu
przebywają ludzie (a przede wszyst-
kim dzieci) czy zwierzęta domowe,
przerwij pracę! Zawsze zachowuj
wokół siebie odstęp bezpieczeństwa
równy 5 m. Spod urządzenia mogą
być wyrzucane kamyki i żwir, które
mogą spowodować zranienie.

20
PL
zasilający prądem elektrycznym,
włącznik-wyłącznik i osłonę ochronną.
• Przy włączaniu urządzenia oraz przy
pracującym silniku trzymaj mechanizm
tnący z dala od wszelkich części cia-
ła, a przede wszystkim od rąk i stóp.
Niebezpieczeństwo zranienia.
• Nie uruchamiaj urządzenia, gdy jest
ono obrócone lub gdy nie znajduje się
w pozycji roboczej. Niebezpieczeń-
stwo zranienia.
• Wyłączaj urządzenie i wyjmuj akumu-
lator:
- gdy zostawiasz urządzenie bez nad-
zoru,
- przed oczyszczeniem urządzenia lub
wykonaniem przy nim jakichkolwiek
czynności,
- przy wymianie mechanizmu tnącego.
Te środki ostrożności uniemożliwią
przypadkowe uruchomienie urządze-
nia.
• Uważaj, by przy włączaniu i podczas
pracy urządzenia tarcza tnąca nie do-
tykała kamieni, żwiru, drutów i innych
przedmiotów.
• Po wyłączeniu urządzenia mechanizm
tnący obraca się jeszcze przez kilka
sekund.
Nigdy nie próbuj zatrzymywać mecha-
nizmu tnącego ręką! Zawsze czekaj,
aż mechanizm zatrzyma się sam. Nie-
bezpieczeństwo zranienia.
• Stosuj tylko oryginalne płytki tnące.
Używanie płytki metalowej zamiast
płytki z tworzywa sztucznego jest za-
bronione i może spowodować wypa-
dek!
• Nie używaj urządzenia do przycina-
nia trawy, która nie rośnie na ziemi,
np. trawy rosnącej na murach, skałach
itp.
• Nie przechodź z pracującym urządze-
niem przez żwirowane drogi i alejki.
Wyrzucane kamienie mogą spowodo-
wać zranienie.
• Nie używaj urządzenia w pobliżu
palnych cieczy lub gazów. Nieprze-
strzeganie tej wskazówki pociąga za
sobą niebezpieczeństwo pożaru lub
wybuchu.
• Użytkownik odpowiada w obrębie
pracy wobec osób trzecich za szkody
spowodowane używaniem urządze-
nia.
• Uważaj, by otwory wentylacyjne nie
były zatkane.
• Przechowuj urządzenie w suchym,
zamkniętym i niedostępnym dla dzieci
miejscu.
• Używaj tylko dostarczonych i za-
lecanych przez producenta części
zamiennych i akcesoriów. Pozwoli to
zachować bezpieczeństwo użytkowa-
nia urządzenia.
• Nie próbuj samodzielnie naprawiać
urządzenia. Wszelkie prace, które nie
są podane w niniejszej instrukcji obsłu-
gi, mogą być wykonywane wyłącznie
przez autoryzowane przez nas punkty
serwisowe.
• Nie wolno zezwalać na używanie ma-
szyny przez dzieci lub osoby, które nie
zapoznały się z opisanymi tu instruk-
cjami.
• Proszę przerwać używanie maszyny,
jeśli w pobliżu znajdują się inne osoby
- przede wszystkim dzieci lub zwierzę-
ta.
• Maszynę używać tylko przy świetle
dziennym lub przy dobrym oświetle-
niu.
• Ręce i stopy trzymać zawsze w bez-
piecznym odstępie od zespołu tnące-
go, w szczególności podczas urucha-
miania silnika.
• Nigdy nie montować metalowych ele-
mentów tnących.
Strona się ładuje...
Strona się ładuje...
Strona się ładuje...
Strona się ładuje...
Strona się ładuje...
Strona się ładuje...
Strona się ładuje...
Strona się ładuje...
Strona się ładuje...
Strona się ładuje...
Strona się ładuje...
Strona się ładuje...
Strona się ładuje...
Strona się ładuje...
Strona się ładuje...
Strona się ładuje...
Strona się ładuje...
Strona się ładuje...
Strona się ładuje...
Strona się ładuje...
Strona się ładuje...
Strona się ładuje...
Strona się ładuje...
Strona się ładuje...
Strona się ładuje...
Strona się ładuje...
Strona się ładuje...
Strona się ładuje...
Strona się ładuje...
Strona się ładuje...
Strona się ładuje...
Strona się ładuje...
Strona się ładuje...
Strona się ładuje...
Strona się ładuje...
Strona się ładuje...
Strona się ładuje...
Strona się ładuje...
Strona się ładuje...
Strona się ładuje...
Strona się ładuje...
Strona się ładuje...
Strona się ładuje...
Strona się ładuje...
Strona się ładuje...
Strona się ładuje...
Strona się ładuje...
Strona się ładuje...
Strona się ładuje...
Strona się ładuje...
Strona się ładuje...
Strona się ładuje...
Strona się ładuje...
Strona się ładuje...
Strona się ładuje...
Strona się ładuje...
Strona się ładuje...
Strona się ładuje...
Strona się ładuje...
Strona się ładuje...
Strona się ładuje...
Strona się ładuje...
Strona się ładuje...
Strona się ładuje...
Strona się ładuje...
Strona się ładuje...
Strona się ładuje...
Strona się ładuje...
Strona się ładuje...
Strona się ładuje...
Strona się ładuje...
Strona się ładuje...
Strona się ładuje...
Strona się ładuje...
Strona się ładuje...
Strona się ładuje...
Strona się ładuje...
Strona się ładuje...
Strona się ładuje...
Strona się ładuje...
Strona się ładuje...
Strona się ładuje...
Strona się ładuje...
Strona się ładuje...
-
 1
1
-
 2
2
-
 3
3
-
 4
4
-
 5
5
-
 6
6
-
 7
7
-
 8
8
-
 9
9
-
 10
10
-
 11
11
-
 12
12
-
 13
13
-
 14
14
-
 15
15
-
 16
16
-
 17
17
-
 18
18
-
 19
19
-
 20
20
-
 21
21
-
 22
22
-
 23
23
-
 24
24
-
 25
25
-
 26
26
-
 27
27
-
 28
28
-
 29
29
-
 30
30
-
 31
31
-
 32
32
-
 33
33
-
 34
34
-
 35
35
-
 36
36
-
 37
37
-
 38
38
-
 39
39
-
 40
40
-
 41
41
-
 42
42
-
 43
43
-
 44
44
-
 45
45
-
 46
46
-
 47
47
-
 48
48
-
 49
49
-
 50
50
-
 51
51
-
 52
52
-
 53
53
-
 54
54
-
 55
55
-
 56
56
-
 57
57
-
 58
58
-
 59
59
-
 60
60
-
 61
61
-
 62
62
-
 63
63
-
 64
64
-
 65
65
-
 66
66
-
 67
67
-
 68
68
-
 69
69
-
 70
70
-
 71
71
-
 72
72
-
 73
73
-
 74
74
-
 75
75
-
 76
76
-
 77
77
-
 78
78
-
 79
79
-
 80
80
-
 81
81
-
 82
82
-
 83
83
-
 84
84
-
 85
85
-
 86
86
-
 87
87
-
 88
88
-
 89
89
-
 90
90
-
 91
91
-
 92
92
-
 93
93
-
 94
94
-
 95
95
-
 96
96
-
 97
97
-
 98
98
-
 99
99
-
 100
100
-
 101
101
-
 102
102
-
 103
103
-
 104
104


Parkside 60489 Original Operation Manual
- Typ
- Original Operation Manual
- Niniejsza instrukcja jest również odpowiednia dla
w innych językach
- Deutsch: Parkside 60489
- slovenčina: Parkside 60489
Powiązane artykuły
-
Parkside PBSA 20-Li A1 - IAN 313555 Instrukcja obsługi
-
-
Parkside PASS 3.6 A1 Operation And Safety Notes Original Operating Instructions
-
-
Parkside PAS 3.6 A1 Operation and Safety Notes
-
Parkside PAS 4 C4 Instrukcja obsługi
-
Parkside PBHA 12 A1 - IAN 312202 Instrukcja obsługi
-
Parkside PABSW 10.8 A1 Original Operating Instructions
-
-
Inne dokumenty
-
Güde GPS 7 Instrukcja obsługi
-
AL-KO Easy Flex WL 2020 LED Light Instrukcja obsługi
-
Meister i-drill MAS36ip3 Translation Of The Original Instructions
-
Ferm CDM1140 Instrukcja obsługi
-
AL-KO Easy Flex PS 2035 Plant Sprayer Instrukcja obsługi
-
-
GE IO61X-BAT-KIT Safety And Quick Start Manual
-
LIVARNO 114063 Instrukcja obsługi