
Montage- und
Gebrauchsanleitung
Installation and
operating instructions
Notice de montage
et d’utilisation
Montage- en
gebruikshandleiding
Instrukcja montażu
i użytkowania
DE04101
DE10104
DE05101
DE06101
DE06111
DE08101
DE08111
9001071768
de Deutsch 2
en English 12
fr Français 22
nl Nederlands 32
pl Polski 42

2
de
Sicherheitshinweise
Dieses Gerät ist für den Haus-
halt oder für haushaltsähnliche,
nicht gewerbliche Anwendungen
bestimmt. Haushaltsähnliche
Anwendungen umfassen z. B. die
Verwendung in Mitarbeiterküchen
von Läden, Büros, landwirtschaft-
lichen und anderen gewerblichen
Betrieben, sowie die Nutzung
durch Gäste von Pensionen,
kleinen Hotels und ähnlichen
Wohneinrichtungen.
■ Das Gerät wie in Text und Bild
beschrieben montieren und
bedienen. Wir übernehmen
keine Haftung für Schäden, die
durch Nichtbeachtung dieser
Anleitung entstehen.
■ Dieses Gerät ist für den Ge-
brauch bis zu einer Höhe von
2 000 m über dem Meeresspie-
gel bestimmt.
■ Das Gerät nur in einem frost-
freien Raum installieren und
lagern (Restwasser).
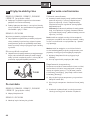
Stromschlaggefahr!
Schalten Sie im Fehlerfall
sofort die Netzspannung
ab (DE05101, DE06101,
DE06111, DE08101,
DE08111) oder ziehen Sie
den Netzstecker (DE04101,
DE10104).
Bei einer Undichtig-
keit am Gerät sofort die
Kaltwasser zuleitung
schließen.
■ Das Gerät nur von einem
Fachmann anschließen und
in Betrieb nehmen lassen.
■ Um Gefährdungen zu ver-
meiden, dürfen Reparaturen
und Wartung nur von einem
Fachmann durchgeführt
werden.
■ Vor der Montage die Wasser-
zuleitung absperren. Das elektri-
sche Anschlusskabel muss span-
nungsfrei sein. Sicherungen
herausdrehen oder ausschalten.
■ Öffnen Sie niemals das
Gerät, ohne die Stromzufuhr
zum Gerät unterbrochen zu
haben.
■ Den Durchlauferhitzer nur
an eine Kaltwasserleitung
anschließen.
■ Erst den Wasseranschluss vor-
nehmen, das Gerät spülen und
danach den Elektroanschluss
durchführen.
■ Die gesetzlichen Vorschriften,
die Anschlussbedingungen der
Elektrizitäts- und Wasser-Versor-
gungsunternehmen einhalten.
■ Bei Installation des Gerätes
oder des elektrischen Zu-
behörs die IEC60364-7-701
(DIN VDE 0100 Teil 701)
einhalten.

3
de
■ Installationsseitig muss eine
allpolige Trennvorrichtung mit
mindestens 3 mm Kontaktöff-
nung eingebaut sein.
■ Der Durchlauferhitzer ist ein
Gerät der Schutzklasse I und
muss an den Schutzleiter an-
geschlossen werden.
■ Festanschlussgeräte müssen
dauerhaft an fest verlegte
Leitungen angeschlossen wer-
den. Der Leitungsquerschnitt
muss der zu installierenden
Leistung entsprechen.
■ Vorsicht: Geerdete Wasser-
leitungen können das Vorhan-
densein eines Schutzleiters
vortäuschen.
■ Der Durchlauferhitzer ist für den
Anschluss an DVGW-geprüfte
Kunststoffrohre geeignet.
■ Nach der Montage dürfen
keine spannungsführenden
Teile berührbar sein.
■ Bei Arbeiten am Wassernetz
das Gerät vom elektrischen
Netz trennen. Nach Abschluss
der Arbeiten wie bei der ersten
Inbetriebnahme vorgehen.
■ Am Gerät dürfen keine Verände-
rungen vorgenommen werden.
■ Dieses Gerät kann von Kindern
ab 8 Jahren und darüber sowie
von Personen mit verringer-
ten physischen, sensorischen
oder mentalen Fähigkeiten
oder Mangel an Erfahrung und
Wissen benutzt werden, wenn
sie beaufsichtigt oder bezüglich
des sicheren Gebrauchs des
Gerätes unterwiesen wurden
und die daraus resultierenden
Gefahren verstehen. Kinder
dürfen nicht mit dem Gerät
spielen. Reinigung und Benut-
zer-Wartung dürfen nicht von
Kindern ohne Beaufsichtigung
durchgeführt werden.
■ Kinder vom Gerät fern halten.
■ Kinder beaufsichtigen, um zu
verhindern, dass sie mit dem
Gerät spielen.
■ Das Warmwasserrohr kann
heiß werden. Kinder darauf
hinweisen.
■ Wenn die Netzanschlussleitung
dieses Gerätes beschädigt wird,
muss sie durch den Hersteller
oder seinen Kundendienst oder
eine ähnlich qualifizierte Per-
son ersetzt werden, um Gefähr-
dungen zu vermeiden.
■ Keine Scheuermittel oder
anlösende Reinigungsmittel
verwenden.
■ Keinen Dampfreiniger
benutzen.
■ Das Entkalken des Gerätes darf
nur durch einen Fachmann
erfolgen.

4
de
Herzlichen Glückwunsch zum Kauf dieses Gerätes
aus unserem Hause Siemens. Sie haben ein hoch-
wertiges Produkt erworben, das Ihnen viel Freude
bereiten wird.
Die Montage- und Gebrauchsanleitung bitte
sorgfältig durch lesen, danach handeln und
aufbewahren!
Montageanleitung
Montieren Sie den Durchlauferhitzer, wie im
Bildteil beschrieben. Beachten Sie die Hinweise
im Text.
Die Bildseiten finden Sie in der Mitte der Anleitung
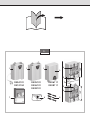
Auspacken
■ Das neue Gerät auf Transportschäden
kontrollieren!
■ Verpackung und gegebenenfalls Altgerät um-
weltgerecht entsorgen.
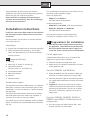
I.
Lieferumfang
1 Gehäuse
2 Befestigung (3 Schrauben, 3 Dübel)
3 Betriebsanzeige
(nur bei DE06111 und DE08111)
4 Montagebügel
5 Montagewinkel
6 Strahlregler
7 Schriftgut
Produktbeschreibung
Der elektronische Durchlauferhitzer ist sowohl
für den offenen (drucklosen) und geschlossenen
(druckfesten) Anschluss geeignet. Er erwärmt das
Wasser, während es durch das Gerät fließt.
Der Durchlauferhitzer schaltet sich ein und erhitzt
das Wasser, wenn der Warmwasserhahn geöffnet
wird. Er schaltet sich wieder aus, wenn Sie den
Wasserhahn schließen.
Das Gerät darf nicht mit vorgewärmten Wasser
betrieben werden, sonst löst die Übertemperatur-
sicherung aus.
Diese Montage- und Gebrauchsanleitung beschreibt
verschiedene Gerätetypen:
Übertischgeräte:
– DE06111 und DE08111:
für elektrischen Festanschluss
Untertischgeräte:
– DE04101 und DE10104: mit Netz stecker
anschließen
– DE05101, DE06101 und DE08101:
für elektrischen Festanschluss
Nur für Geräte mit Festanschluss:
Das Gerät stimmt mit IEC 61000-3-12 überein.
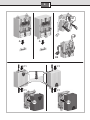
II.
Montagevorbereitung
■ Vor der Montage die Wasserzuleitung ab-
sperren. Das elektrische Anschluss kabel muss
spannungsfrei sein. Sicherungen heraus-
drehen oder ausschalten.
Für alle Geräte
Für die Montage muss ein Freiraum von ca. 60 mm
nach allen Seiten um das Gerät vorhanden sein.
■ Technische Gerätedaten beachten.
■ Montagebügel aus der Rückwand ausbrechen
(A).
Nur für DE04101 und DE10104
■ Für die Zuleitung eine der seitlich vorgesehenen
Aussparungen ausbrechen (B1).
■ Die Zuleitung auf die gewünschte Länge durch
die Aussparung nach außen führen (B2).
■ Wichtig: Das Gerät nur an eine vorschriftsmäßig
installierte Schutzkontakt-Steckdose anschließen.
Kein Verlänge rungskabel verwenden. Wenn erfor-
derlich, Gerät mit längerer Leitung ausrüsten.
Nur für DE05101, DE06101, DE06111,
DE08101 und DE08111 (Festanschluss)
■ Verriegelungen oben und unten drücken (C1),
dann Gehäusedeckel abnehmen (C2).

5
de
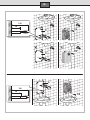
III.
Wandmontage
Untertischgeräte
■ Montageschablone D an der Wand befestigen.
■ Löcher anzeichnen, bohren und Dübel einsetzen.
■ Den Montagebügel mit den Schrauben an der
Wand anbringen (D1).
Nur für Geräte mit Festanschluss:
■ Anschlusskabel durch die Kabeltülle führen,
Gerät in den Montagebügel einhängen und am
Montagewinkel anschrauben (D2).
Nur für Geräte mit Netzstecker:
■ Gerät in den Montagebügel einhängen und am
Montagewinkel anschrauben (D3).
Übertischgeräte
■ Montageschablone E an der Wand befestigen.
■ Löcher anzeichnen, bohren und Dübel einsetzen.
■ Montagebügel an der Wand befestigen (E1).
■ Anschlusskabel durch die Kabeltülle führen,
Gerät in den Montagebügel einhängen und am
Montagewinkel anschrauben (E2).
Nur für DE05101, DE06101, DE06111,
DE08101 und DE08111 (Festanschluss)
■ Bei elektrischem Anschluss auf Putz sind die
Varianten der Zuleitungsdurchführung auf der
Montageschablone zu beachten.
■ Die Kabeltülle muss das Anschlusskabel fest
umschließen, um den Feuchtigkeitsschutz zu
gewährleisten. Bei Beschädigung die Öffnung
wasserfest verschließen.
■ Die für die Montage vorgesehenen Öffnungen in
der Rückwand verwenden.
IV.
Wasseranschluss
Links: druckfest (geschlossen);
rechts: drucklos (offen)
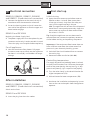
■ Das Gerät ist nur für die Erwärmung von Wasser
mit einem spezifischen elektrischen Widerstand
von ≥ 1 300 Ωcm bei 15 °C zugelassen. Der spe-
zifische Wasserwiderstand kann bei dem zustän-
digen Wasser-Versorgungsunternehmen erfragt
werden.
Montage
■ Auf den axialen Sitz der Anschlussrohre in den
Stutzen achten.
■ Überwurfmuttern an den Stutzen mit einem
Maulschlüssel fest anziehen und mit geeignetem
Maulschlüssel gegenhalten.
■ T-Stück (für den druckfesten Anschluss) und
flexibler Anschlussschlauch sind im Fachhandel
erhältlich.
■ Beim drucklosen Anschluss dürfen nur die freige-
gebenen drucklosen Armaturen verwendet wer-
den (Sonderzubehör: Einhebelmischer BZ13062,
Zweigriffarmatur BZ13051).
■ Um das Strahlbild des Wasserauslaufs zu verän-
dern, den Perlator aus der Armatur durch den
beigelegten Strahlregler ersetzen.
Temperatur regeln
Die Zulauftemperatur (im Winter eventuell niedriger)
und Druckschwankungen können die Auslauftempe-
ratur beeinflussen.
■ Für höhere Temperaturen das Ventil gefühlvoll
zudrehen (F1).
■ Für niedrigere Temperaturen Kaltwasser zu-
mischen (F2).

6
de
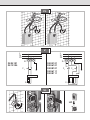
V.
Elektroanschluss
DE05101, DE06101, DE06111, DE08101
und DE08111 (Festanschluss)
■ Gerät entsprechend dem Anschlussschema an
der Klemmleiste anschließen.
■ Gehäusedeckel aufsetzen und auf die Geräterück-
wand aufschieben, sodass die Verriegelungen
oben und unten einrasten.
DE04101 und DE10104
Wechseln der Anschlussleitung:
■ Die Anschlussleitung darf nur von einem von uns
kon zessionierten Kundendienst ausgewechselt
werden, um Gefährdungen zu vermeiden. Der
Netzstecker muss vor dem Wechsel gezogen sein.
Für alle Geräte
■ Den Durchlauferhitzer entlüften: Dazu Warm-
wasserhahn ganz öffnen und das Gerät etwa
1 Minute durchspülen (G), bis keine Blasen mehr
austreten.
1 min
G
Nach der Montage
DE05101, DE06101, DE06111, DE08101
und DE08111 (Festanschluss)
■ Sicherungen einschalten.
DE04101 und DE10104
■ Netzstecker einstecken.
VI.
Erstinbetriebnahme
Startspülung
■ Warmwasserhahn öffnen und mindestens
1 Minute lang (Durchfluss mindestens 2 Liter pro
Minute) Wasser beziehen. Erst dann (Sicherheit)
beginnt das Gerät zu heizen.
Info: Wird der Wasserbezug vorzeitig abgebro-
chen, heizt das Gerät nicht. Warmwasserhahn
erneut öffnen und mindestens 1 Minute lang
Wasser beziehen.
Tipp: Startet das Gerät aufgrund von zu geringem
Durchfluss nicht, Perlator, Strahlregler oder Ähnliches
zum Starten entfernen und Vorgang wiederholen.
Wichtig: Erreicht der Durchlauferhitzer aufgrund
von zu geringem Wasserleitungsdruck in Ihrer Haus-
installation keinen genügenden Durchfluss:
■ Sicherungen ausschalten bzw. Netzstecker ziehen.
■ Durchflussmengenbegrenzer entfernen
(H1 – H4).
Temperatur regeln
Die Zulauftemperatur (im Winter eventuell niedri-
ger) und Druckschwankungen können die Auslauf-
temperatur beeinflussen (siehe Bild IV, links: druck-
fest [geschlossen], rechts: drucklos [offen]).
■ Für höhere Temperaturen das Ventil gefühlvoll
zudrehen (F1).
■ Für niedrigere Temperaturen Kaltwasser zu-
mischen (F2).
■ Bitte dem Benutzer die Montage- und Gebrauchs-
anleitung übergeben und das Gerät erklären.

7
de
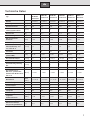
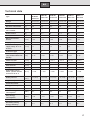
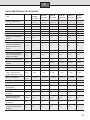
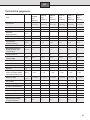
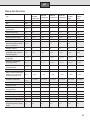
Technische Daten
Typ
DE04101
DE10104
Untertisch
DE05101
Untertisch
DE06101
Untertisch
DE08101
Untertisch
DE06111
Übertisch
DE08111
Übertisch
Bauart
druckfest druckfest druckfest druckfest druckfest druckfest
Leistung
[kW] 3,6 4,5 6 7,2 6 7,2
Elektroanschluss
[V] 230 230 230 230 230 230
Mindestens
Leitungsquerschnitt
[mm²] 1,5 2,5 4 4 4 4
Nennstrom
[A] 15,7 19,1 26 31,3 26 31,3
Absicherung
[A] 16 20 32 32 32 32
Wasseranschluss
Gewinde
[Zoll] G 3/8 G 3/8 G 3/8 G 3/8 G 1/2 G 1/2
Zulauftemp. max.
[°C] 20 20 20 20 20 20
Warmwasserleistung
bei Zulauftemp. von
12 °C bis 38 °C
[l/min] 1,9 2,4 3,2 3,9 3,2 3,9
Schutzart
IP 24 24 24 24 24 24
Einschaltfließdruck
(ohne DMB)
[bar] < 0,25 < 0,25 < 0,25 < 0,25 < 0,25 < 0,25
Einschaltdurchfluss
[l/min] 1,8 1,8 / 1,9 1,8 / 2,1 1,8 / 2,3 1,8 / 2,1 1,8 / 2,3
Ausschaltdurchfluss
[l/min] 1,6 1,6 / 1,7 1,6 / 2,0 1,6 / 2,2 1,6 / 2,0 1,6 / 2,2
Durchflussbegrenzung
bei
[l/min] 2 2 3 4 3 4
Gewicht
[kg] 1,1 1,1 1,1 1,1 1,1 1,1
Einsatzbereich in
Wässern: spezifischer
elektrischer Widerstand
bei 15 °C
[Ωcm] ≥ 1 300 ≥ 1 300 ≥ 1 300 ≥ 1 300 ≥ 1 300 ≥ 1 300
Nenndruck
[MPa
(bar)]
1,0 (10,0) 1,0 (10,0) 1,0 (10,0) 1,0 (10,0) 1,0 (10,0) 1,0 (10,0)
Steckerfertig
✓
– – – – –
Festanschluss
–
✓ ✓ ✓ ✓ ✓
Energieeffizienzklasse
A A A A A A
Lastprofil
XXS XXS XXS XXS XXS XXS
Jahresenergieverbrauch
[kWh] 467 470 470 471 470 471
Täglicher
Stromverbrauch
[kWh] 2,145 2,150 2,154 2,161 2,154 2,161
Schallleistungspegel
[dB] 15 15 15 15 15 15
Warmwasserberei-
tungs-Energieeffizienz
[%] 39,4 39,3 39,2 39,1 39,2 39,1

8
de
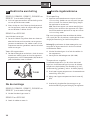
Gebrauchsanleitung
Bitte die ausführlichen Sicherheitshinweise am An-
fang dieser Anleitung durchlesen und beachten!
■ Wichtig: Das Gerat niemals Frost aussetzen!
Stromschlaggefahr!
Schalten Sie im Fehlerfall sofort die
Netzspannung ab (DE05101, DE06101,
DE06111, DE08101, DE08111) oder ziehen
Sie den Netzstecker (DE04101, DE10104).
■ Bei einer Undichtigkeit am Gerät sofort die
Kaltwasserzuleitung schließen.
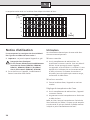
Bedienung
Die elektronischen Durchlauferhitzer dieser Baureihe
arbeiten automatisch.
Einschalten
■ Den Wasserhahn ganz öffnen. Der Durchlauf-
erhitzer schaltet sich ein. Das Wasser wird er-
hitzt, während es durch das Gerät fließt.
Die Übertischgeräte DE06111 und DE08111 sind
mit einer automatischen Betriebsanzeige ausge-
stattet. Die Betriebsanzeige leuchtet bei halber
Leistung gelb und bei voller Leistung rot, abhän-
gig von der Wasserdurchflussmenge.
Ausschalten
■ Den Wasserhahn schließen, das Gerät schaltet
sich aus.
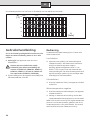
Wassertemperatur regulieren
■ Wasserhahn ganz öffnen, das Gerät schaltet ein.
■ Nun durch Reduzierung der Durchflussmenge
des Wassers die Temperatur erhöhen.
Info: Im Winter kann es bei einer niedrigeren Kalt-
wasser-Zulauftemperatur vorkommen, dass die Aus-
lauftemperatur nicht erreicht wird. Bitte wie unter
„Wasseranschluss“ beschrieben vorgehen.
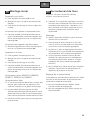
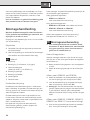
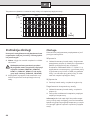
Die Auslauftemperatur am Wasserhahn ist abhängig von der Durchflussmenge des Wassers:
0
10
20
30
40
50
7,2 kW6,0 kW4,5 kW3,6 kW
1,21,4 1,61,8 2,02,2 2,42,6 2,83,0 3,23,4 3,63,8 4,04,2
ΔT
[°C]
Q
[l/min]

9
de
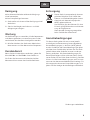
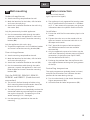
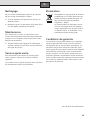
Reinigung
Keine Scheuermittel oder anlösende Reinigungs-
mittel verwenden.
Keinen Dampfreiniger benutzen.
■ Gerät außen mit einem milden Reinigungsmittel
abwischen.
■ Sieb im Strahlregler von Schmutz- und Kalk-
ablagerungen reinigen.
Wartung
Um Gefährdungen zu vermeiden, dürfen Reparaturen
und Wartungsarbeiten nur von einem von uns kon-
zessionierten Kundendienst durchgeführt werden.
■ Bei allen Arbeiten das Gerät vom elektrischen
Netz trennen und den Wasserzulauf absperren.
Kundendienst
Wenn Sie den Kundendienst anfordern, geben Sie
bitte die E-Nr. und die FD-Nr. Ihres Gerätes an.
Sie finden die Nummern zwischen den beiden
Wasseranschlussstutzen des Durchlauferhitzers.
Entsorgung
Dieses Gerät ist entsprechend der euro-
päischen Richtlinie 2012/19/EU über
Elektro- und Elektronik altgeräte (waste
electrical and elec tronic equipment –
WEEE) gekennzeichnet.
Die Richtlinie gibt den Rahmen für eine
EU-weit gültige Rücknahme und Verwer-
tung der Alt geräte vor.
Über aktuelle Entsorgungswege bitte
beim Fachhändler informieren.
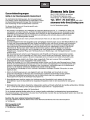
Garantiebedingungen
Für dieses Gerät gelten die von unserer jeweils
zuständigen Landesvertretung herausgegebenen
Garantiebedingungen, in dem das Gerät gekauft
wurde. Sie können die Garantiebedingungen jeder-
zeit über Ihren Fachhändler, bei dem Sie das Gerät
gekauft haben oder direkt bei unserer Landesver-
tretung anfordern. Die Garantiebedingungen für
Deutschland folgen auf der nächsten Seite, die Ad-
ressen finden Sie am Ende dieser Anleitung. Darüber
hinaus sind die Garantiebedingungen auch im Inter-
net unter der benannten Webadresse hinterlegt. Für
die In anspruchnahme von Garantieleistungen ist in
jedem Fall die Vorlage des Kaufbeleges erforderlich.
Änderungen vorbehalten.

10
de
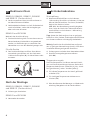
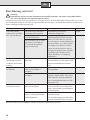
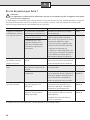
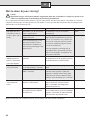
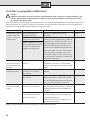
Eine Störung, was tun?
Achtung!
Reparaturen dürfen nur vom Fachmann durchgeführt werden. Sie setzen sich großer Gefahr
aus, wenn das Gerät unsachgemäß repariert wird.
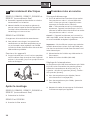
Funktioniert Ihr Gerät nicht wie gewünscht, so liegt es oft nur an einer Kleinigkeit. Bitte prüfen Sie, ob auf-
grund folgender Hinweise die Störung selbst behoben werden kann. Sie vermeiden dadurch die Kosten für
einen unnötigen Kundendiensteinsatz.
Störung Ursache Behebung Wer
Das Gerät startet
(heizt) nicht, es fließt
kein warmes Wasser.
Die Sicherung in der Haus-
installation hat ausgelöst.
Die Sicherung in der Haus-
installation überprüfen.
Kunde
Stromausfall oder
Erst inbetrieb nahme.
Startspülung:
Warmwasserhahn öffnen und min-
destens 30 Sekunden lang (Durch-
fluss mindestens 2 Liter pro Minute)
Wasser beziehen. Erst dann (Sicher-
heit) beginnt das Gerät zu heizen.
Startet das Gerät aufgrund von zu
geringem Durchfluss nicht, Perlator,
Brausekopf oder ähnliches zum
Starten entfernen und Vorgang
wiederholen.
Kunde
Die Lufterkennung im Gerät
registriert Luft im Wasser
und schaltet die Heizleis-
tung kurzzeitig ab.
Die gewünschte Aus-
lauftemperatur wird
im Winter nicht mehr
erreicht.
Die Zulauftemperatur ist
gesunken.
Wassermenge am Wasserhahn so
weit reduzieren, bis die gewünschte
Warmwassertemperatur erreicht
wird.
Kunde
Zu geringer Durchfluss
von Wasser.
Das Sieb im Wasserhahn
oder im Duschkopf ist
verstopft.
Das Sieb entnehmen und reinigen
oder entkalken.
Kunde
Das Sieb im Heizblock ist
verstopft.
Sieb ausbauen, reinigen und wieder
einbauen. Gerät spülen. Falls nötig,
diese Prozedur so lange wiederho-
len, bis keine Partikel mehr im Sieb
vorhanden sind.
Fachmann
Das Wasser wird nicht
ausreichend warm.
Der Sicherungsautomat im
Gerät hat ausgelöst.
Den Sicherungsautomaten im Gerät
durch einen Fachmann überprüfen
lassen. Die erlaubte Zulauftempera-
tur kontrollieren.
Fachmann
Zu hoher Durchfluss und/
oder zu niedrige Kaltwasser-
Zulauftemperatur.
Den Durchfluss über das Eckventil
regulieren lassen.
Den Durchflussbegrenzer kontrollie-
ren oder einen kleineren einsetzen
Fachmann
Konnte die Störung nicht behoben werden, bitte den Kundendienst anrufen.

11
de
09/14

12
en
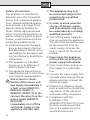
Safety information
This appliance is intended for
domestic use or for household-
based, non-commercial applica-
tions. Household-based applica-
tions include, e.g. usage in em-
ployees catering facilities for
shops, offices, agricultural and
other commercial operations, as
well as usage by guests of guest
houses, small hotels and similar
residential establishments.
■ Install and operate the appli-
ance as described in the text
and illustrations. We do not ac-
cept liability for damage result-
ing from failure to heed these
instructions.
■ This appliance is intended
for use up to an altitude of
2000 m above sea level.
■ The appliance may only be in-
stalled and stored in a frost-free
room (due to residual water).
Risk of electric shock!
Switch off the mains volt-
age supply immediately if
a fault occurs (DE05101,
DE06101, DE06111,
DE08101, DE08111) or dis-
connect the plug from the
mains supply (DE04101,
DE10104).
Immediately shut off the
cold water supply to the
appliance should it leak.
■ The appliance may only
be connected and put into
operation by a qualified
professional.
■ In order to avoid potential
sources of danger, repairs
and maintenance may only
be undertaken by a suitably
qualified specialist.
■ Shut off the water supply be-
fore connecting the appliance.
The electrical connection must
be disconnected from the
mains supply. Unscrew the
fuse or switch off the circuit
breaker.
■ Never open the appliance
without disconnecting the
power supply beforehand.
■ Only connect the continuous-
flow heater to a cold water
line.
■ Connect the water supply first,
circulate water through the ap-
pliance and then connect the
electrical supply.
■ Observe the statutory regula-
tions as well as the connection
regulations of the electrical
and water utility companies.
■ Compliance with the
IEC60364-7-701
(DIN VDE 0100 Part 701) must
be observed during installa-
tion of the appliance or the
electrical accessories.

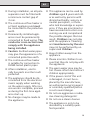
13
en
■ During installation, an all-pole
separator must be fitted with
a minimum contact gap of
3 mm.
■ The continuous-flow heater is
a Class I appliance and must
be connected to the protective
earth.
■ Permanently installed appli-
ances must be permanently
connected to fixed wiring. The
conductor cross-section must
comply with the appliance
being installed.
■ Caution: Earthed water pipes
may give the appearance of a
connected protective earth.
■ The continuous-flow heater
is suitable for connection to
DVGW-tested plastic pipes.
■ After installation, electri-
cally live parts must be touch
protected.
■ The appliance should be dis-
connected from the electrical
mains supply when working
on the water supply. After ser-
vice work is complete, proceed
as during the first-time appli-
ance start-up.
■ No changes may be made to
the appliance.
■ This appliance can be used by
children aged 8 years and old-
er as well as by persons with
diminished bodily, sensory or
mental perception, or those
who lack knowledge or experi-
ence, if they are monitored or
have received instruction con-
cerning use and comprehend
the possible dangers that can
result. Children may not play
with the appliance. Cleaning
and maintenance by the user
may not be performed by un-
supervised children.
■ Keep children away from the
appliance.
■ Please monitor children to en-
sure that they do not play with
the appliance.
■ The warm water pipe may be
hot. Please inform and instruct
children appropriately.
■ If the power cord of this unit
is damaged, it must be re-
placed by the manufacturer,
an authorised servicing agent
or a similarly qualified person
so as to avoid danger.
■ Do not use aggressive or abra-
sive cleaning detergents!
■ Do not use a steam cleaner.
■ The appliance is only to be
descaled by a suitably quali-
fied specialist.

14
en
Congratulations on purchasing this Siemens
appliance. You have acquired a top-quality product,
which will give you a lot of enjoyment.
Please read this installation and operating in-
struction manual carefully, then act accordingly!
Store for future reference.
Installation instructions
Install the continuous-flow heater as described in
the illustrated section. Observe the instructions
in the text.
The illustrations can be found in the centre of the
instruction manual.
Unpacking
■ Inspect the new appliance for transport damage!
■ Please dispose of the packaging, and if appli-
cable, the old appliance in an environmentally-
friendly manner.
I.
Scope of delivery
1 Housing
2 Mounting (3 screws, 3 wall plugs)
3 Operation indicator
(only on DE06111 and DE08111)
4 Installation bracket
5 Mounting bracket
6 Aerator
7 Documentation
Product description
The electronic continuous-flow heater is suitable for
both open (unpressurised) and closed (pressurised)
connections. It heats the water as it passes through
the appliance.
The continuous-flow heater switches on and heats
the water when the warm water tap is opened. It
switches off as soon as the tap is closed.
The appliance may not be operated with pre-heated
water, as otherwise the overtemperature protection
will trip.
This installation and operating instruction manual
describes various appliance types:
Over-sink appliances:
– DE06111 and DE08111:
for fixed electrical connection
Undersink appliances:
– DE04101 and DE10104: with plug connection
– DE05101, DE06101 and DE08101:
for fixed electrical connection
Only for permanently installed appliances:
The device is compliant to IEC 61000-3-12.
II.
Preparations for installation
■ Shut off the water supply before connecting
the appliance. The electrical connection must
be disconnected from the mains supply. Un-
screw the fuse or switch off the circuit breaker.
For all appliances
A clearance of about 60 mm on all sides of the
appliance is required for installation.
■ Observe the technical appliance data.
■ Break out the installation bracket from the rear
of the appliance (A).
Only for DE04101 and DE10104
■ Break out one of the side knock-outs (B1) pro-
vided for an incoming electrical supply cable.
■ Feed the desired length of the incoming electri-
cal supply cable downwards through the knock-
out (B2).
■ Important: Connect the unit only to a mains
socket with protective contact that is installed
according to regulations. Do not use an exten-
sion cord. If necessary, equip the unit with a
longer cord.
Only for DE05101, DE06101, DE06111,
DE08101 and DE08111 (fixed electrical
connection)
■ Press the upper and lower latches (C1), then
remove the housing cover (C2).

15
en
III.
Wall mounting
Undersink appliances
■ Attach mounting template D to the wall.
■ Mark the locations for the holes; drill the holes
and insert the wall plugs.
■ Attach the installation bracket to the wall using
the screws (D1).
Only for permanently installed appliances:
■ Pass the connection cable through the cable
grommet, suspend the appliance in the instal-
lation bracket and screw it onto the mounting
bracket (D2).
Only for appliances with mains plug:
■ Suspend the appliance in the installation bracket
and screw it onto the mounting bracket (D3).
Over-sink appliances
■ Attach mounting template E to the wall.
■ Mark the locations for the holes; drill the holes
and insert the wall plugs.
■ Attach the installation bracket to the wall (E1).
■ Pass the connection cable through the cable
grommet, suspend the appliance in the instal-
lation bracket and screw it onto the mounting
bracket (E2).
Only for DE05101, DE06101, DE06111,
DE08101 and DE08111 (fixed electrical
connection)
■ The variants for feed through of cables using
flush mounting electrical connection should be
observed on the mounting template.
■ The cable grommet must completely enclose the
connection cable to guarantee optimum protec-
tion against dampness. The opening must be
sealed watertight if it is damaged.
■ Use the openings provided on the rear for
mounting.
IV.
Water connection
Left: pressurised (closed);
right: unpressurised (open)
■ The appliance is only approved for heating water
with a specific electric resistance of ≥ 1 300 Ωcm
at 15 °C. Your water utility company can give you
information about the specific water resistance.
Installation
■ Ensure the axial fit of the connection pipes in the
nozzles.
■ Tighten the union nuts on the nozzles with an
open-end wrench and counter hold with a suit-
able open-end wrench.
■ The T-piece (for the pressurised connection)
and flexible connection hose are available
commercially.
■ Only the approved unpressurised valves may be
used when connecting without pressure (Special
accessories: Single-lever mixer tap BZ13062,
Two handle fixture BZ13051).
■ Exchange the perlator from the tap fixture with
the supplied aerator to change the spray pattern
of the tap.
Controlling temperature
The supply temperature (probably lower in winter)
and pressure fluctuations can influence the tem-
perature of the water leaving the tap.
■ Turn the valve slowly in the closed direction for
higher temperatures (F1).
■ Add cold water for lower temperatures (F2).

16
en
V.
Electrical connection
DE05101, DE06101, DE06111, DE08101
and DE08111 (fixed electrical connection)
■ Connect the appliance on the terminal strip in
accordance with the connection schematic.
■ Put on the housing cover and push it onto the
rear wall of the appliance so that the upper and
lower latches engage.
DE04101 and DE10104
Replacing the Power Supply Cord:
■ The power supply cord must be replaced by our
customer service only in order to avoid a hazard.
The mains plug must be pulled before replacing.
For all appliances
■ Vent the continuous-flow heater: Fully open
the warm water tap and flush out the appliance
for about 1 minute (G), until bubbles no longer
emerge.
1 min
G
After installation
DE05101, DE06101, DE06111, DE08101
and DE08111 (fixed electrical connection)
Switch on the fuses.
DE04101 and DE10104
■ Insert the plug into the mains socket.
VI.
First start-up
Initial rinsing
■ Open the warm water tap and allow water to
flow for at least 1 minute (flow-rate at least
2 litres per minute). Only then (for safety rea-
sons) will the appliance begin to heat.
Info: The appliance will not heat if the dispensed
water flow is interrupted prematurely. Open the
warm water tap again and allow water to flow
for at least 1 minute.
Tip: Should the appliance not start because of a
reduced flow-rate, remove the perlator, aerator or
similar before starting and repeating the process.
Important: If the continuous-flow heater does not
have sufficient water flow due to low water line
pressure in your domestic plumbing system:
■ Switch off the circuit-breakers/fuses or remove
the mains plug.
■ Remove the flow-rate limiter (H1 – H4).
Controlling temperature
The supply temperature (probably lower in winter)
and pressure fluctuations can influence the temper-
ature of the water leaving the tap (see Fig. IV, left:
pressurised [closed], right: unpressurised [open]).
■ Turn the valve slowly in the closed direction for
higher temperatures (F1).
■ Add cold water for lower temperatures (F2).
■ Hand over the installation and operating instruc-
tions to the user and explain how the appliance
operates.

17
en
Technical data
Type
DE04101
DE10104
Undersink
DE05101
Undersink
DE06101
Undersink
DE08101
Undersink
DE06111
Over-sink
DE08111
Over-sink
Design
pressurised pressurised pressurised pressurised
pressurised pressurised
Power
[kW] 3.6 4.5 6 7.2 6 7.2
Electrical connection
[V] 230 230 230 230 230 230
Minimum cable
cross-section
[mm²] 1.5 2.5 4 4 4 4
Rated current
[A] 15.7 19.1 26 31.3 26 31.3
Fuse protection
[A] 16 20 32 32 32 32
Water connection
thread
[Inch] G 3/8 G 3/8 G 3/8 G 3/8 G 1/2 G 1/2
Supply temp. max.
[°C] 20 20 20 20 20 20
Warm water output at
supply temp. of 12 °C
to 38 °C
[l/min] 1.9 2.4 3.2 3.9 3.2 3.9
Protection type
IP 24 24 24 24 24 24
Switch on flow pres-
sure (without flow rate
limiter)
[bar] < 0.25 < 0.25 < 0.25 < 0.25 < 0.25 < 0.25
Switch on flow
[l/min] 1.8 1.8 / 1.9 1.8 / 2.1 1.8 / 2.3 1.8 / 2.1 1.8 / 2.3
Switch off flow
[l/min] 1.6 1.6 / 1.7 1.6 / 2.0 1.6 / 2.2 1.6 / 2.0 1.6 / 2.2
Flow lomit at
[l/min] 2 2 3 4 3 4
Weight
[kg] 1.1 1.1 1.1 1.1 1.1 1.1
Application area in
water: specific electric
resistance at 15 °C
[Ωcm] ≥ 1 300 ≥ 1 300 ≥ 1 300 ≥ 1 300 ≥ 1 300 ≥ 1 300
Rated pressure
[MPa
(bar)]
1.0 (10.0) 1.0 (10.0) 1.0 (10.0) 1.0 (10.0) 1.0 (10.0) 1.0 (10.0)
Plug-in ready
✓
– – – – –
Fixed connection
–
✓ ✓ ✓ ✓ ✓
Energy efficiency class
A A A A A A
Load profile
XXS XXS XXS XXS XXS XXS
Annual energy
consumption
[kWh] 467 470 470 471 470 471
Daily energy
consumption
[kWh] 2.145 2.150 2.154 2.161 2.154 2.161
Sound power level
[dB] 15 15 15 15 15 15
Hot water heating
energy efficiency
[%] 39.4 39.3 39.2 39.1 39.2 39.1

18
en
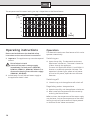
Operating instructions
Please read and observe the detailed safety
instructions at the start of these instructions!
■ Important: The appliance may never be exposed
to frost!
Risk of electric shock!
Switch off the mains voltage supply
immediately if a fault occurs (DE05101,
DE06101, DE06111, DE08101, DE08111) or
disconnect the plug from the mains supply
(DE04101, DE10104).
■ Immediately shut off the cold water supply to
the appliance should it leak.
Operation
The electronic continuous-flow heaters of this series
operate automatically.
Switching on
■ Open the tap fully. The electronic continuous-
flow heater switches on. The water is heated as
it flows through the appliance.
The over-sink appliances DE06111 and DE08111
feature an automatic operation indicator. The
operation indicator lights yellow at half power
and red at full power, dependent on the water
flow rate.
Switching off
■ Close the tap, and the appliance will switch off.
Regulating water temperature
■ Open the tap fully, and the appliance switches on.
■ Now increase the temperature of the water by
reducing the flow of water.
Info: In winter, the temperature of the water supply
may be lower, so that the temperature of the water
leaving the tap will not be reached. Please proceed
as described under “Water connection”.
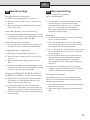
0
10
20
30
40
50
7,2 kW6,0 kW4,5 kW3,6 kW
1,21,4 1,61,8 2,02,2 2,42,6 2,83,0 3,23,4 3,63,8 4,04,2
ΔT
[°C]
Q
[l/min]
The temperature of the water leaving the tap is dependent on the flow of water:

19
en
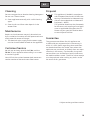
Cleaning
Do not use aggressive or abrasive cleaning detergents!
Do not use a steam cleaner.
■ Clean appliance externally with a mild cleaning
agent.
■ Clean the dirt and lime scale deposits in the
aerator filter.
Maintenance
Repairs and maintenance may only be carried out
by an authorised customer service representative to
avoid potential sources of danger.
■ The electrical mains supply and the water supply
must be shut off before all work on the appliance.
Customer Service
We ask you to always provide the E-No. and the
FD-No. of your appliance when calling in a custom-
er service engineer.
You will find the number between both water con-
nection nozzles of the continuous-flow heater.
Disposal
This appliance is labelled in accordance
with European Directive 2012/19/EU con-
cerning used electrical and electronic ap-
pliances (waste electrical and electronic
equipment – WEEE).
The guideline determines the framework
for the return and recycling of used appli-
ances as appli cable throughout the EU.
Please ask your specialist retailer about
current disposal facilities
Guarantee
The guarantee conditions for this appliance are
as defined by our representative in the country in
which it is sold. Details regarding these conditions
can be obtained from the dealer, from whom the
appliance was purchased, or directly from our repre-
sentative in the country. Furthermore, the guaran-
tee conditions can also be found on the Internet at
the website address stated. The bill of sale or receipt
must be produced when making any claims under
the terms of this guarantee.
Subject to change without notice.

20
en
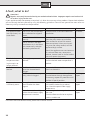
A fault, what to do?
Attention!
Repairs must only be carried out by an authorised technician. Improper repairs can lead to risk
of serious injury to the user.
If your appliance does not operate as required, it is often due to a very minor problem. Please check whether
you can remedy the fault yourself by using the following guidelines. You will save yourself the costs of an un-
necessary visit by customer service personnel.
Fault Cause Solution Who
The appliance does
not start (heat), no
water flows.
The fuse in the house electri-
cal installation has tripped/
blown.
Check the fuse in the house electrical
installation.
Customer
Power failure or initial
start-up.
Starts rinsing:
Open the warm water tap and allow
water to flow for at least 30 seconds
(flow-rate at least 2 litres per minute).
Only then (for safety reasons) will the
appliance begin to heat.
Should the appliance not start because
of a reduced flow-rate, remove the
perlator, shower head or similar before
start and repeat the process.
Customer
The air sensor in the appli-
ance detects air in the water
and momentarily switches
the heating element off.
The desired water
temperature leav-
ing the tap is no
longer reached.
The supply temperature has
reduced.
Reduce the water flow on the taps
until the desired water temperature is
reached.
Customer
Water flow-rate is
too low.
The filter in either the water
tap or the showerhead is
clogged.
Remove the filter and either
clean it or descale it.
Customer
The filter in the corner regu-
lating valve is clogged.
Remove, clean and reinstall the filter.
Circulate water through the appliance.
If necessary, repeat this procedure until
the filter is free of particles.
Servicing
expert
The water is not
sufficiently warm.
The appliance‘s automatic
circuit breaker has been
tripped.
Get the appliance’s automatic cir-
cuit breaker checked by an electri-
cian. Check the permissible supply
temperature.
Servicing
expert
Water flow-rate is too high
and/or the cold water supply
temperature is too low.
Use the angle valve to regulate the
flow-rate.
Check the flow-rate limiter or replace
it with a smaller one.
Servicing
expert
If the fault could not be eliminated, please call customer service.
Strona się ładuje...
Strona się ładuje...
Strona się ładuje...
Strona się ładuje...
Strona się ładuje...
Strona się ładuje...
Strona się ładuje...
Strona się ładuje...
Strona się ładuje...
Strona się ładuje...
Strona się ładuje...
Strona się ładuje...
Strona się ładuje...
Strona się ładuje...
Strona się ładuje...
Strona się ładuje...
Strona się ładuje...
Strona się ładuje...
Strona się ładuje...
Strona się ładuje...
Strona się ładuje...
Strona się ładuje...
Strona się ładuje...
Strona się ładuje...
Strona się ładuje...
Strona się ładuje...
Strona się ładuje...
Strona się ładuje...
Strona się ładuje...
Strona się ładuje...
Strona się ładuje...
Strona się ładuje...
Strona się ładuje...
Strona się ładuje...
Strona się ładuje...
Strona się ładuje...
-
 1
1
-
 2
2
-
 3
3
-
 4
4
-
 5
5
-
 6
6
-
 7
7
-
 8
8
-
 9
9
-
 10
10
-
 11
11
-
 12
12
-
 13
13
-
 14
14
-
 15
15
-
 16
16
-
 17
17
-
 18
18
-
 19
19
-
 20
20
-
 21
21
-
 22
22
-
 23
23
-
 24
24
-
 25
25
-
 26
26
-
 27
27
-
 28
28
-
 29
29
-
 30
30
-
 31
31
-
 32
32
-
 33
33
-
 34
34
-
 35
35
-
 36
36
-
 37
37
-
 38
38
-
 39
39
-
 40
40
-
 41
41
-
 42
42
-
 43
43
-
 44
44
-
 45
45
-
 46
46
-
 47
47
-
 48
48
-
 49
49
-
 50
50
-
 51
51
-
 52
52
-
 53
53
-
 54
54
-
 55
55
-
 56
56


w innych językach
- Deutsch: Siemens DE08111 Benutzerhandbuch
- français: Siemens DE08111 Manuel utilisateur
- Nederlands: Siemens DE08111 Handleiding
Powiązane artykuły
Inne dokumenty
-
Bosch TR4000, TR4000R DHW Cylinder Instrukcja obsługi
-
clage DCX 12 Next L Skrócona instrukcja obsługi
-
-
TOA HS-150B Skrócona instrukcja obsługi
-
-
STIEBEL ELTRON 185473 Instrukcja instalacji
-
-
Dimplex DEE 2103 Instrukcja obsługi