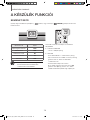
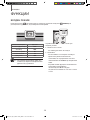
Samsung HW-J355 Instrukcja obsługi
- Kategoria
- Głośniki soundbar
- Typ
- Instrukcja obsługi

Wireless Audio - Soundbar
Imagine the possibilities
Thank you for purchasing this Samsung product.
To receive more complete service, please register your product at
www.samsung.com/register
User manual
HW-J355
HW-J355_EN_AH68-02984J_ENG-00-20161123.indd 1 2016/11/25 11:28:39
Strona jest ładowana ...

32
ENG
SAFETY INFORMATION
SAFETY INFORMATION
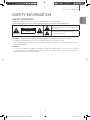
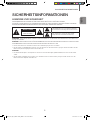
SAFETY WARNINGS
TO REDUCE THE RISK OF ELECTRIC SHOCK, DO NOT REMOVE THE COVER (OR BACK).
NO USER-SERVICEABLE PARTS ARE INSIDE. REFER SERVICING TO QUALIFIED SERVICE PERSONNEL.
CAUTION
RISK OF ELECTRIC SHOCK DO
NOT OPEN
This symbol indicates “dangerous voltage” inside
the product that presents a risk of electric shock or
personal injury.
This symbol indicates important instructions
accompanying the product.
WARNING : To reduce the risk of fire or electric shock, do not expose this appliance to rain or moisture.
CAUTION : TO PREVENT ELECTRIC SHOCK, MATCH WIDE BLADE OF PLUG TO WIDE SLOT, FULLY INSERT.
• This apparatus shall always be connected to a AC outlet with a protective grounding connection.
• To disconnect the apparatus from the mains, the plug must be pulled out from the mains socket, therefore the mains plug
shall be readily operable.
CAUTION
• Do not expose this apparatus to dripping or splashing. Do not put objects filled with liquids, such as vases on the apparatus.
• To turn this apparatus off completely, you must pull the power plug out of the wall socket. Consequently, the power plug
must be easily and readily accessible at all times.
HW-J355_EN_AH68-02984J_ENG-00-20161123.indd 3 2016/11/25 11:28:39

54
SAFETY INFORMATION
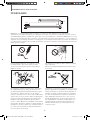
During thunderstorms, disconnect the AC plug from the
wall outlet. Voltage peaks due to lightning could damage
the unit.
Protect the product from moisture (i.e. vases), and
excess heat (e.g. a fireplace) or equipment creating
strong magnetic or electric fields. Disconnect the power
cable from the AC supply if the unit malfunctions. Your
product is not intended for industrial use. It is for
personal use only. Condensation may occur if your
product has been stored in cold temperatures. If
transporting the unit during the winter, wait approximately
2 hours until the unit has reached room temperature
before using.
Do not expose the unit to direct sunlight or other heat
sources. This could lead to overheating and cause the
unit to malfunction.
The batteries used with this product contain chemicals
that are harmful to the environment. Do not dispose of
batteries in the general household trash. A warning that
batteries (battery pack or batteries installed) shall not be
exposed to excessive heat such as sunshine, fire or the
like. Do not short circuit, disassemble, or overheat the
batteries. Danger of explosion if battery is incorrectly
replaced. Replace only with the same or equivalent type.
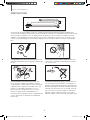
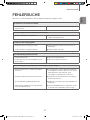
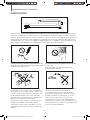
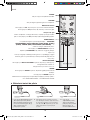
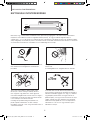
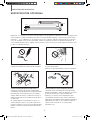
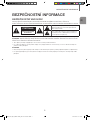
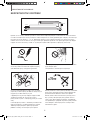
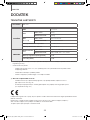
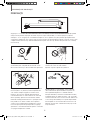
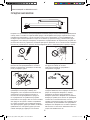
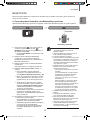
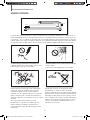
PRECAUTIONS
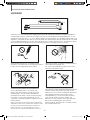
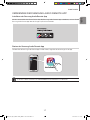
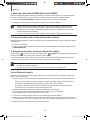
Ensure that the AC power supply in your house complies with the power requirements listed on the identification
sticker located on the back of your product. Install your product horizontally, on a suitable base (furniture), with enough
space around it for ventilation (
7~10 cm
). Make sure the ventilation slots are not covered. Do not place the unit on
amplifiers or other equipment which may become hot. This unit is designed for continuous use. To fully turn off the
unit, disconnect the AC plug from the wall outlet. Unplug the unit if you intend to leave it unused for a long period of
time.
99.1mm 99.1mm
68.6
mm
99.1mm
HW-J355_EN_AH68-02984J_ENG-00-20161123.indd 4 2016/11/25 11:28:41

54
ENG
CONTENTS
2 FEATURES
2 Licenses
3 SAFETY INFORMATION
3 Safety Warnings
4 Precautions
6 GETTING STARTED
6 Before reading the User’s Manual
6 What’s Included
7 DESCRIPTIONS
7 Top/Front Panel
8 Rear Panel
8 Installing the Ferrite Core on the Subwoofer
Speaker Cable
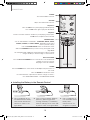
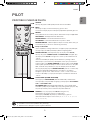
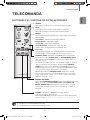
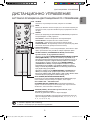
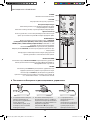
9 REMOTE CONTROL
9 Remote Control Buttons and Functions
11 CONNECTIONS
11 Installing the Wall Mount
12 Detaching the Wall Mount
12 Installing the bracket without referring to
the Wall-mount Installation Guide
13 Connecting an External Device using Audio
(analogue) cable or Optical (digital) cable
14 FUNCTIONS
14 Input Mode
15 Bluetooth
17 USING SAMSUNG AUDIO REMOTE APP
18 TV SoundConnect
19 USB
20 Software update
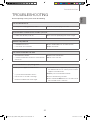
21 TROUBLESHOOTING
22 APPENDIX
22 Specifications
CONTENTS
●
Figures and illustrations in this User Manual are
provided for reference only and may differ from
actual product appearance.
●
An administration fee may be charged if either
(a) An engineer is called out at your request and
there is no defect with the product (i.e. where
the user manual has not been read).
(b) You bring the unit to a repair centre and there
is no defect with the product (i.e. where the
user manual has not been read).
●
You will be informed of the administration fee
amount before a technician visits.
HW-J355_EN_AH68-02984J_ENG-00-20161123.indd 5 2016/11/25 11:28:41

76
GETTING STARTED
GETTING STARTED
BEFORE READING THE USER’S MANUAL
Note the following terms before reading the user manual.
+ Icons used in this manual
Icon Term Definition
Caution
Indicates a situation where a function does not operate or settings may be canceled.
Note
Indicates tips or instructions on the page that help you operate a function.
+ Safety Instructions and Troubleshooting
1) Be sure to familiarize yourself with the Safety Instructions before using this product. (See page 3)
2) If a problem occurs, check Troubleshooting. (See page 21)
+ Copyright
©2015 Samsung Electronics Co.,Ltd.
All rights reserved; no part of this user’s manual may be reproduced or copied without the prior written permission of
Samsung Electronics Co.,Ltd.
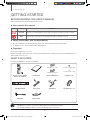
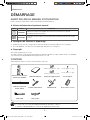
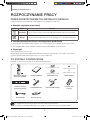
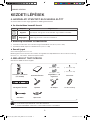
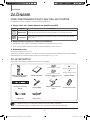
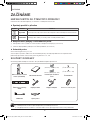
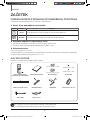
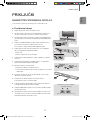
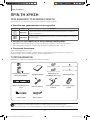
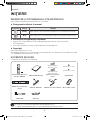
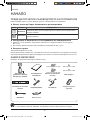
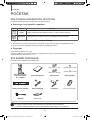
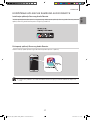
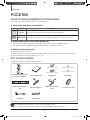
WHAT’S INCLUDED
Check for the supplied accessories shown below.
(Wall Mount L: 1EA)
(Wall Mount R: 1EA)
(Holder-screw2: 2EA)
(Holder-screw1: 2EA)
Remote Control / Lithium
Battery (3V : CR2032)
User Manual Bracket-Wall Mount Holder-screw
Wall Mount Guide Power Cord DC Adapter
Toroidal Ferrite core
USB Cable Optical Cable
●
The appearance of the accessories may differ slightly from the illustrations above.
●
Use the dedicated USB cable to connect external USB devices to the unit.
HW-J355_EN_AH68-02984J_ENG-00-20161123.indd 6 2016/11/25 11:28:42

76
ENG
DESCRIPTIONS
DESCRIPTIONS
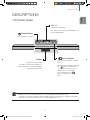
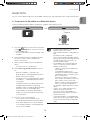
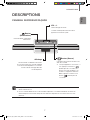
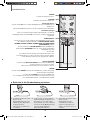
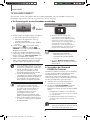
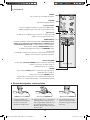
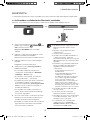
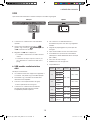
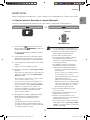
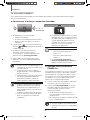
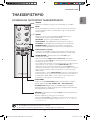
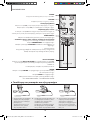
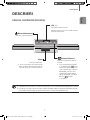
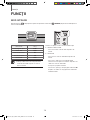
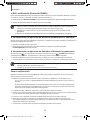
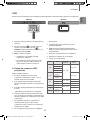
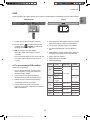
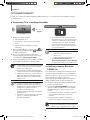
TOP/FRONT PANEL
(Power) Button
Turns the power on and off.
VOL -/+
Controls the volume level.
The numeric value of the volume level appears in
the front panel display.
Display
Displays the current mode.
● If there is no input from the product or
remote control for 25 seconds, the display
will dimmer automatically.
(Source) Button
Selects the D.IN, AUX, BT, TV, USB
input.
While the unit is powered on, pressing
the (
) button for more than 3
seconds sets the button to act as
MUTE button. To cancel MUTE
button setup, press the (
)
button for more than 3 seconds
again.
●
When you turn on this unit, there will be a 4 to 5 second delay before it produces sound.
●
If you want to enjoy the sound only from the Soundbar, you must turn off the TV's speakers in the Audio
Setup menu of your TV. Refer to the owner's manual supplied with your TV.
HW-J355_EN_AH68-02984J_ENG-00-20161123.indd 7 2016/11/25 11:28:43

98
DESCRIPTIONS
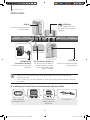
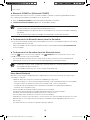
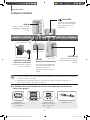
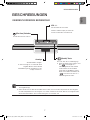
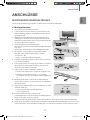
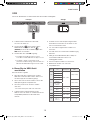
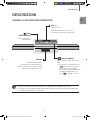
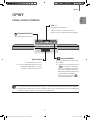
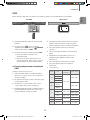
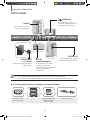
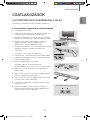
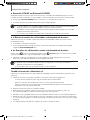
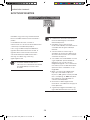
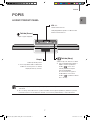
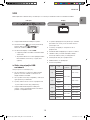
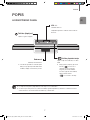
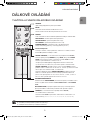
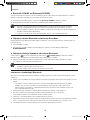
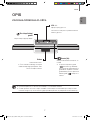
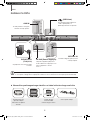
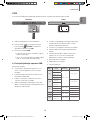
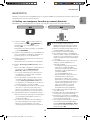
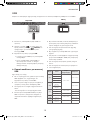
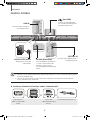
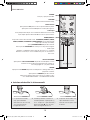
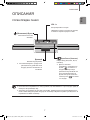
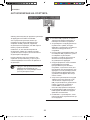
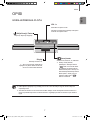
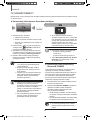
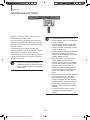
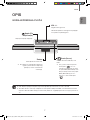
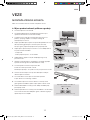
REAR PANEL
AUX IN
OPTICAL IN
(USB Port)
Connect USB devices such as
MP3 players here to play files on
the devices.
OPTICAL IN
Connect to the digital (optical) output
of an external device.
AUX IN
Connect to the Analog output of
an external device.
DC 24V (Power Supply In)
Connect the DC power adaptor to
the power supply jack, and then
connect the AC power adaptor
plug to a wall outlet.
SUBWOOFER
( Connector Terminal)
Connect the connector jack of the
Subwoofer.
●
When disconnecting the power cable of the AC power adaptor from the wall outlet, pull the plug.
Do not pull the cable.
●
Do not connect this unit or other components to an AC outlet until all connections between components
are complete.
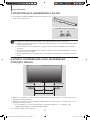
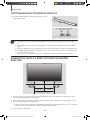
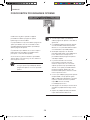
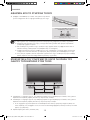
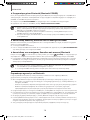
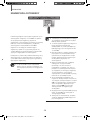
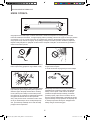
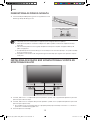
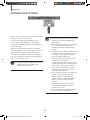
+ Installing the Ferrite Core on the Subwoofer Speaker Cable
Lift up to release the
lock and open the core.
Place the Subwoofer
speaker cable on the
opened core.
Close the lock.
HW-J355_EN_AH68-02984J_ENG-00-20161123.indd 8 2016/11/25 11:28:44
Strona jest ładowana ...
Strona jest ładowana ...
Strona jest ładowana ...
Strona jest ładowana ...

1312
ENG
CONNECTIONS
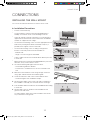
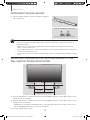
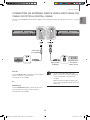
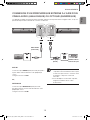
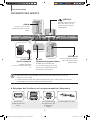
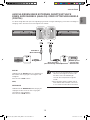
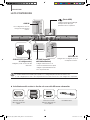
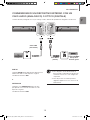
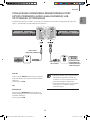
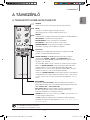
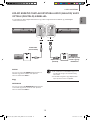
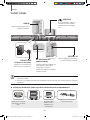
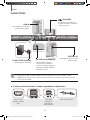
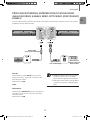
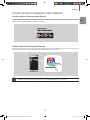
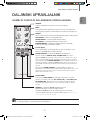
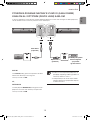
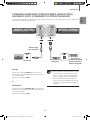
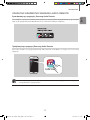
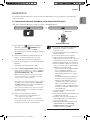
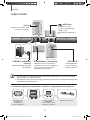
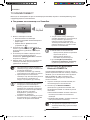
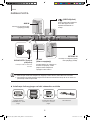
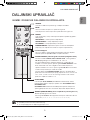
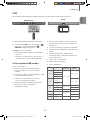
CONNECTING AN EXTERNAL DEVICE USING AUDIO (ANALOG)
CABLE OR OPTICAL (DIGITAL) CABLE
This unit comes equipped with one optical in digital jack and one audio analog in jack, giving you two ways to connect
it to a TV.
Audio Cable
(not supplied)
Optical Cable
(supplied)
BD/ DVD player/
Set-top box/
Game console
AUX IN
Connect AUX IN (Audio) on the main unit to the AUDIO
OUT jack of the TV or Source Device.
Change the function to AUX.
or,
OPTICAL IN
Connect OPTICAL IN (Audio) on the main unit to the
OPTICAL OUT jack of the TV or Source Device.
Change the function to D.IN.
●
Do not connect the power cord of this
product or your TV to the wall outlet until all
connections between components are
complete.
●
Before moving or installing this product, be
sure to turn off the power and disconnect the
power cord.
HW-J355_EN_AH68-02984J_ENG-00-20161123.indd 13 2016/11/25 11:28:48

1514
FUNCTIONS
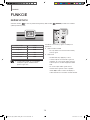
FUNCTIONS
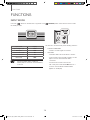
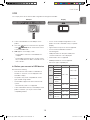
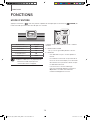
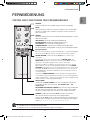
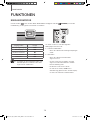
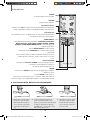
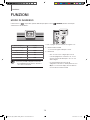
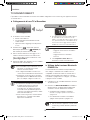
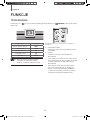
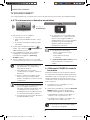
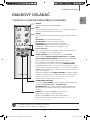
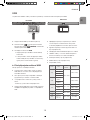
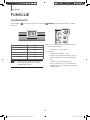
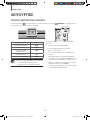
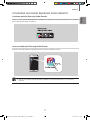
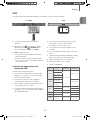
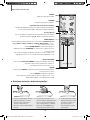
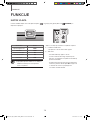
INPUT MODE
Press the ( ) button on the main unit’s
top
p
anel or the (
SOURCE) button on the remote control to select
the mode you want.
Input mode Display
Optical Digital input
D.IN
AUX input
AUX
BLUETOOTH mode
BT
TV SoundConnect
TV
USB mode
USB
●
Use the provided cable if a USB flash
memory device cannot be connected directly
to the unit.
The unit turns off automatically in the following situations:
●
D.IN/BT/TV/USB Mode
- If there is no audio signal for 5 minutes.
●
AUX Mode
- If the AUX cable is disconnected for 5 minutes.
- In Auto Power Down On mode, If there is no KEY
input for 8 hours when the AUX cable is
connected.
- To turn the Auto Power Down function
ON or OFF, press and hold the
p
button for 5
seconds. OFF/ON-AUTO POWER DOWN
appears on the display.
HW-J355_EN_AH68-02984J_ENG-00-20161123.indd 14 2016/11/25 11:28:48
Strona jest ładowana ...
Strona jest ładowana ...

1716
ENG
FUNCTIONS
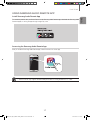
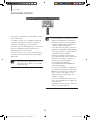
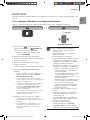
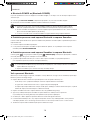
USING SAMSUNG AUDIO REMOTE APP
Install Samsung Audio Remote App
To control the product with your Smart Device via the Samsung Audio Remote app, download the Samsung Audio
Remote App by accessing the app through Google Play store.
Accessing the Samsung Audio Remote App
After you install the Samsung Audio Remote app, follow the instructions in the app.
●
The APP function only supports Android mobile phone devices running Android OS 3.0 or later.
HW-J355_EN_AH68-02984J_ENG-00-20161123.indd 17 2016/11/25 11:28:50
Strona jest ładowana ...

1918
ENG
FUNCTIONS
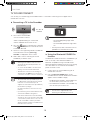
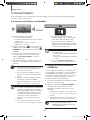
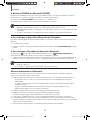
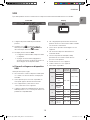
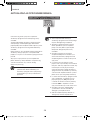
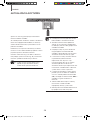
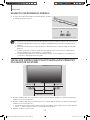
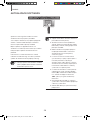
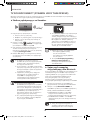
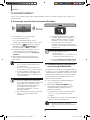
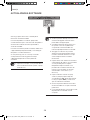
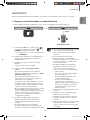
USB
You can play music files located on USB storage devices through the Soundbar.
Display
USB port
1. Connect the USB device to the USB port of the
product.
2. Press the ( ) button on the main unit’s top panel
or the
(SOURCE) button on the remote control
to select the USB mode.
3. USB appears on the display screen.
●
The Soundbar connection to the USB device is
complete.
●
The Soundbar automatically turns off (Auto Power
Off) if no USB device has been connected for more
than 5 minutes.
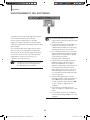
+ Before you connect a USB device
Be aware of the following:
●
If the file name of a file or folder on a USB device
exceeds 10 characters, it is not displayed on the
Soundbar's display.
●
This product may not be compatible with certain
types of USB storage media.
●
The Soundbar supports the FAT16 and FAT32 file
systems.
- The NTFS file system is not supported.
●
Connect USB devices directly to the USB port of the
product. Otherwise, you may encounter a USB
compatibility problem.
●
Do not connect multiple storage devices to the
product via a multi-card reader. It may not operate
properly.
●
Digital camera PTP protocols are not supported.
●
Do not remove the USB device while it is
transferring files.
●
DRM-protected music files (MP3, WMA) from
commercial web sites cannot be played.
●
External HDDs are not supported.
●
Mobile phone devices are not supported.
●
File Format Type Compatibility list:
Format Codec Sampling Rate Bitrate
*.mp3
MPEG 1 Layer2
16KHz ~ 48KHz
80kbps~320kbps
MPEG 1 Layer3
MPEG 2 Layer3
MPEG 2.5 Layer3
*.wma
Wave_Format_
MSAudio1
56kbps~128kbps
Wave_Format_
MSAudio2
*.aac
AAC
16KHz ~ 96KHz
48kbps~320kbps
AAC-LC 128kbps~192kbps
HE-AAC 24KHz ~ 96KHz 48kbps~64kbps
*.wav -
16KHz ~ 48KHz
up to 3000kbps
*.ogg OGG 1.1.0 50kbps~500kbps
*.flac
FLAC 1.1.0,
FLAC 1.2.1
16KHz ~ 96KHz up to 3000kbps
HW-J355_EN_AH68-02984J_ENG-00-20161123.indd 19 2016/11/25 11:28:51
Strona jest ładowana ...
Strona jest ładowana ...

2322
APPENDIX
APPENDIX
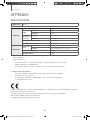
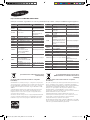
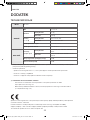
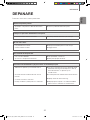
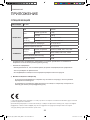
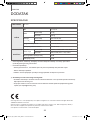
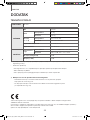
SPECIFICATIONS
Model name
HW-J355
GENERAL
USB
5 V / 0.5 A
Weight
Main Unit
1.6 Kg
Subwoofer
2.84 Kg
Dimensions
(W x H x D)
Main Unit
943 x 58 x 65 mm
Subwoofer
152 x 300 x 284 mm
Operating Temperature Range
+5°C~+35°C
Operating Humidity Range
10 % to 75 %
AMPLIFIER
Rated Output
Power
Main Unit
30 W/CH, 8 OHM, THD = 10%, 1 kHz
Subwoofer
60 W, 3 OHM, THD = 10%, 100 Hz
S/N Ratio (Analog Input)
60 dB
Separation (1kHz)
50 dB
* S/N ratio, distortion, separation, and usable sensitivity are based on measurements using AES (Audio Engineering
Society) guidelines.
* Nominal specification
- Samsung Electronics Co., Ltd reserves the right to change the specifications without notice.
- Weight and dimensions are approximate.
- For the power supply and Power Consumption, refer to the label attached to the product.
a Open Source License Notice
- For further information on Open Sources used in this product, please visit the website:
http://opensource.samsung.com
- To send inquiries and requests regarding open sources, contact Samsung via Email
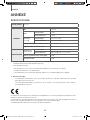
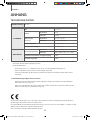
Hereby, Samsung Electronics, declares that this equipment is in compliance with the essential requirements and other
relevant provisions of Directive 1999/5/EC.
The original Declaration of Conformity may be found at http://www.samsung.com, go to Support >
Search Product Support and enter the model name.
This equipment may be operated in all EU countries.
HW-J355_EN_AH68-02984J_ENG-00-20161123.indd 22 2016/11/25 11:28:52

2322
[Correct disposal of batteries in this product]
(Applicable in countries with separate collection systems)
This marking on the battery, manual or packaging indicates that the
batteries in this product should not be disposed of with other household
waste at the end of their working life. Where marked, the chemical
symbols Hg, Cd or Pb indicate that the battery contains mercury,
cadmium or lead above the reference levels in EC Directive 2006/66.
If batteries are not properly disposed of, these substances can cause
harm to human health or the environment.
To protect natural resources and to promote material reuse, please
separate batteries from other types of waste and recycle them through
your local, free battery return system.
Correct Disposal of This Product
(Waste Electrical & Electronic Equipment)
(Applicable in countries with separate collection systems)
This marking on the product, accessories or literature indicates that the
product and its electronic accessories (e.g. charger, headset, USB cable)
should not be disposed of with other household waste at the end of their
working life. To prevent possible harm to the environment or human
health from uncontrolled waste disposal, please separate these items
from other types of waste and recycle them responsibly to promote the
sustainable reuse of material resources.
Household users should contact either the retailer where they purchased
this product, or their local government office, for details of where and
how they can take these items for environmentally safe recycling.
Business users should contact their supplier and check the terms and
conditions of the purchase contract. This product and its electronic
accessories should not be mixed with other commercial wastes for
disposal.
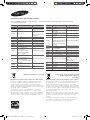
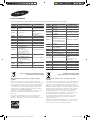
Contact SAMSUNG WORLD WIDE
If you have any questions or comments relating to Samsung products, please contact the SAMSUNG customer care
Centre.
Area Contact Centre
Web Site
`
Europe
AUSTRIA
0800 - SAMSUNG (0800 -
7267864)
www.samsung.com/at/support
BELGIUM 02-201-24-18
www.samsung.com/be/support
(Dutch)
www.samsung.com/be_fr/
support (French)
BOSNIA 051 331 999 www.samsung.com/support
BULGARIA 07001 33 11 , sharing cost www.samsung.com/bg/support
CROATIA 062 726 786 www.samsung.com/hr/support
CZECH 800 - SAMSUNG (800-726786) www.samsung.com/cz/support
DENMARK 70 70 19 70 www.samsung.com/dk/support
FINLAND 030-6227 515 www.samsung.com/fi/support
FRANCE 01 48 63 00 00 www.samsung.com/fr/support
GERMANY
0180 6 SAMSUNG bzw.
0180 6 7267864*
(*0,20 €/Anruf aus dem dt.
Festnetz, aus dem Mobilfunk
max. 0,60 €/Anruf)
www.samsung.com/de/support
CYPRUS
8009 4000 only from landline, toll
free
www.samsung.com/gr/support
GREECE
80111-SAMSUNG (80111 726
7864) only from land line
(+30) 210 6897691 from mobile
and land line
HUNGARY
0680SAMSUNG (0680-726-786)
0680PREMIUM (0680-773-648)
http://www.samsung.com/hu/
support
ITALIA 800-SAMSUNG (800.7267864) www.samsung.com/it/support
Area Contact Centre
Web Site
LUXEMBURG 261 03 710 www.samsung.com/support
MONTENEGRO 020 405 888 www.samsung.com/support
SLOVENIA
080 697 267
090 726 786
www.samsung.com/si/support
NETHERLANDS
0900-SAMSUNG (0900-7267864)
(€ 0,10/Min)
www.samsung.com/nl/support
NORWAY 815 56480 www.samsung.com/no/support
POLAND
0 801-172-678* lub +48 22
607-93-33 **
* (całkowity koszt połączenia jak za
1 impuls według taryfy operatora
** (koszt połączenia według taryfy
operatora)
www.samsung.com/pl/support
PORTUGAL 808 20 7267 www.samsung.com/pt/support
ROMANIA
08008 SAMSUNG (08008 726
7864) TOLL FREE No.
www.samsung.com/ro/support
SERBIA 011 321 6899 www.samsung.com/rs/support
SLOVAKIA 0800 - SAMSUNG(0800-726 786) www.samsung.com/sk/support
SPAIN 0034902172678 www.samsung.com/es/support
SWEDEN 0771 726 7864 (SAMSUNG) www.samsung.com/se/support
SWITZERLAND 0848 726 78 64 (0848-SAMSUNG)
www.samsung.com/ch/support
(German)
www.samsung.com/ch_fr/
support (French)
U.K 0330 SAMSUNG (7267864) www.samsung.com/uk/support
EIRE 0818 717100 www.samsung.com/ie/support
LITHUANIA 8-800-77777 www.samsung.com/lt/support
LATVIA 8000-7267 www.samsung.com/lv/support
ESTONIA 800-7267 www.samsung.com/ee/support
HW-J355_EN_AH68-02984J_ENG-00-20161123.indd 23 2016/11/25 11:28:52

Wireless Audio - Soundbar
Imaginez les possibilités
Merci d’avoir choisi un appareil Samsung.
Pour recevoir une assistance plus complète, veuillez enregistrer votre produit sur
www.samsung.com/register
Manuel d'utilisation
HW-J355
HW-J355_EN_AH68-02984J_FRA-00-20161123.indd 1 2016/11/23 10:16:48
Strona jest ładowana ...

32
FRA
INFORMATIONS RELATIVES À LA SÉCURITÉ
INFORMATIONS RELATIVES À LA
SÉCURITÉ
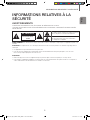
AVERTISSEMENTS
POUR ÉVITER LES RISQUES DE CHOC ÉLECTRIQUE, NE DÉMONTEZ PAS LE CAPOT.
L’APPAREIL NE CONTIENT PAS DE PIÈCES RÉPARABLES PAR L’UTILISATEUR ; S’ADRESSER À UN SERVICE APRÈS-
VENTE QUALIFIÉ.
ATTENTION
RISQUE DE CHOC
ÉLECTRIQUE. NE PAS
OUVRIR
Ce symbole avertit l’utilisateur de la présence d’une
tension dangereuse à l’intérieur de l’appareil.
Ce symbole avertit l’utilisateur de la présence de
directives importantes dans la documentation
accompagnant cet appareil.
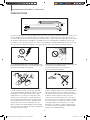
AVERTISSEMENT: Afin de diminuer les risques d’incendie ou de choc électrique, n’exposez pas cet appareil à la pluie ou à l’
humidité.
ATTENTION : Pour prévenir les chocs électriques, branchez la fiche au fond, en prenant soin d'insérer la tige large dans la
fente large.
• Cet appareil doit toujours être branché à une prise terre.
• Pour déconnecter l’appareil du circuit principal, la prise doit être débranchée de la prise principale ; il est de ce fait
nécessaire que la prise principale soit facile d'accès.
ATTENTION
• Évitez toute projection d’eau sur l’appareil. Ne posez jamais d’objet contenant un liquide (ex : un vase) dessus.
• Pour éteindre complètement l'appareil, vous devez retirer le cordon d'alimentation de la prise murale. Par conséquent, le
cordon d'alimentation doit être facilement accessible à tout moment.
HW-J355_EN_AH68-02984J_FRA-00-20161123.indd 3 2016/11/23 10:16:49
Strona jest ładowana ...

54
FRA
SOMMAIRE
SOMMAIRE
2 CARACTÉRISTIQUES
2 Licence
3 INFORMATIONS RELATIVES
À LA SÉCURITÉ
3 Avertissements
4 Précautions
6 DÉMARRAGE
6 Avant de lire le manuel d'utilisation
6 Contenu
7 DESCRIPTIONS
7 Panneau supérieur/façade
8 Panneau Arrière
8 Installation du noyau torique en ferrite
sur le câble des enceintes du caisson de
graves
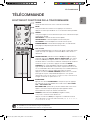
9 TÉLÉCOMMANDE
9 Boutons et fonctions de la
télécommande
11 BRANCHEMENTS
11 Installation de la fixation murale
12 Démontage de la fixation murale
12 Installation du support sans se reporter
au Guide d'installation de la fixation
murale
13 Connexion d'un périphérique externe à
l'aide d'un câble Audio (analogique) ou
Optique (numérique)
14 FONCTIONS
14 Mode D’entrée
15 Bluetooth
17 UTILISATION DE L'APPLICATION
SAMSUNG AUDIO REMOTE
18 TV SoundConnect
19 USB
20 Mise à jour logicielle
21 TÉPANNAGE
22 ANNEXE
22 Spécifications
● Les figures et les illustrations du présent Manuel
d'utilisation sont fournies à titre de référence
uniquement et peuvent différer de l'apparence du
produit réel.
● Des frais supplémentaires pourront vous être
facturés dans les cas suivants :
(a) Vous demandez l'intervention d'un ingénieur,
mais il s'avère que l'appareil ne présente
aucune anomalie (par ex. vous n'avez pas lu ce
Manuel d'utilisation).
(b) Vous portez l'unité à un centre de réparation,
mais il s'avère que celle-ci ne présente aucune
défaillance (par ex. vous n'avez pas lu ce
Manuel d'utilisation).
● Le montant de ces frais administratifs vous sera
notifié avant que tout travail ou toute visite à votre
domicile ne soit effectuée).
HW-J355_EN_AH68-02984J_FRA-00-20161123.indd 5 2016/11/23 10:16:50
Strona jest ładowana ...

76
FRA
DESCRIPTIONS
DESCRIPTIONS
PANNEAU SUPÉRIEUR/FAÇADE
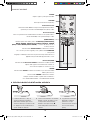
Bouton
(Alimentation)
Permet d’allumer et d’éteindre
l’alimentation.
VOL -/+
Permet de régler le volume.
La valeur numérique du niveau du volume
apparaît à l'écran de la façade.
Affichage
Affiche le mode actuellement sélectionné.
● Si aucune entrée n'est reçue de l'appareil
ou la télécommande pendant 25 secondes,
la luminosité de l'affichage diminuera
automatiquement.
Bouton (Source)
Permet de sélectionner les entrées D.IN,
AUX, BT, TV, USB.
● Lorsque l’appareil est sous tension, si
vous appuyez sur le bouton (
)
pendant plus de 3 secondes, le
bouton fonctionne en MUTE. Pour
annuler la configuration du bouton
MUTE, appuyez à nouveau sur le
bouton (
) pendant plus de
3 secondes.
● Lorsque vous mettez l'unité sous tension, il faut compter 4 ou 5 secondes de retard avant le
déclenchement du son.
● Si vous souhaitez bénéficier du son du Soundbar uniquement, vous devrez éteindre les enceintes du
téléviseur depuis le menu Audio Setup de votre téléviseur. Reportezvous au manuel fourni avec votre
téléviseur.
HW-J355_EN_AH68-02984J_FRA-00-20161123.indd 7 2016/11/23 10:16:52

98
DESCRIPTIONS
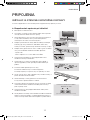
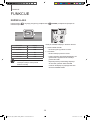
PANNEAU ARRIÈRE
AUX IN
OPTICAL IN
DC 24V
(Entrée de l'alimentation)
Branchez la prise de l'adaptateur
CC à la prise d’alimentation (jack),
puis branchez la fiche de
l'adaptateur CA dans une prise
murale.
(Port USB)
Connectez ici des périphériques
USB comme des lecteurs MP3
pour lire des fichiers sur les
périphériques.
OPTICAL IN
Permet la connexion à la sortie
(optique) numérique d’un appareil
externe.
AUX IN
Permet la connexion à la sortie
analogique d’un périphérique
externe.
● Lorsque vous débranchez le câble d’alimentation de l'adaptateur CA de la prise murale, veillez à maintenir
la fiche. Ne tirez pas sur le câble.
● Ne branchez pas cette unité ou d'autres composants sur une prise CA jusqu'à ce que tous ces
branchements entre les composants sont terminés.
CAISSON DE GRAVES
(Borne du connecteur)
Connectez la prise du connecteur
du caisson de graves.
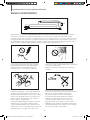
+ Installation du noyau torique en ferrite sur le câble des enceintes du
caisson de graves
Soulevez pour
déverrouiller et ouvrir le
noyau en ferrite.
Placez le câble des
enceintes du caisson de
graves sur le noyau
ouvert.
Verrouillez le noyau.
HW-J355_EN_AH68-02984J_FRA-00-20161123.indd 8 2016/11/23 10:16:52
Strona jest ładowana ...
Strona jest ładowana ...
Strona jest ładowana ...

1312
BRANCHEMENTS
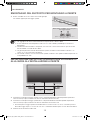
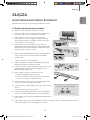
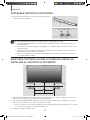
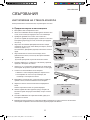
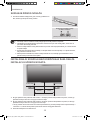
DÉMONTAGE DE LA FIXATION MURALE
1. Tirez la Soundbar vers le haut comme indiqué sur l’illustration pour
la détacher de la fixation murale.
● Ne vous appuyez pas sur l’unité montée et évitez de la soumettre à des chocs ou des chutes.
● Fixez fermement l’unité au mur afin qu’elle ne tombe pas. La chute de l’appareil peut provoquer des
blessures ou endommager le produit.
● Lorsque l’unité est fixée au mur, veillez à ce qu’un enfant ne tire pas sur les câbles de connexion au risque
de faire tomber l’appareil.
● Pour optimiser l'installation d'une fixation murale, installez les enceintes à au moins 5 cm sous le téléviseur,
si le téléviseur est monté sur le mur.
● Pour votre sécurité, dans le cas où vous ne l’utilisez pas en montage mural, veuillez installer l’unité sur une
surface plane sécurisée où elle ne risque pas de tomber.
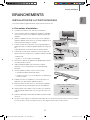
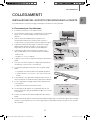
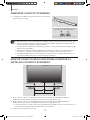
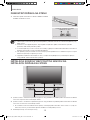
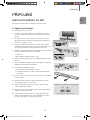
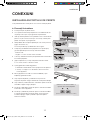
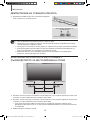
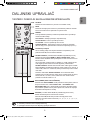
INSTALLATION DU SUPPORT SANS SE REPORTER AU GUIDE
D'INSTALLATION DE LA FIXATION MURALE
5 cm minimum5 cm minimum
11.6 cm 13 cm
Minimum : 23,9 à 24,6 cm
1. Placez la "Fixation rurale Gauche" sur la surface souhaitée du mur, tout en s'assurant qu'elle soit parallèle au sol
comme indiqué ci-dessus. Ensuite, insérez une vis dans l'orifice à son extrémité droite.
2. Placez la "Fixation rurale Droite" sur la surface souhaitée du mur, tout en s'assurant qu'elle soit parallèle au sol
comme indiqué ci-dessus. Ensuite, insérez une vis dans l'orifice à son extrémité gauche.
• Si les Fixation rurale Gauche/Droite doivent être fixées en dessous du téléviseur, vérifiez que les positions de
leurs orifices de fixation mentionnés aux étapes 1 et 2 soient correctement alignées avec le centre de la partie
inférieure du téléviseur.
3. Insérez les vis dans les autres orifices non utilisés.
Utilisation de la Soundbar avec le système
de fixation murale
[Démontage de la Soundbar
du système de fixation murale]
HW-J355_EN_AH68-02984J_FRA-00-20161123.indd 12 2016/11/23 10:16:55

1312
FRA
BRANCHEMENTS
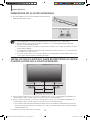
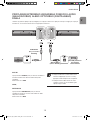
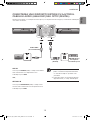
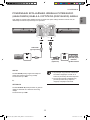
CONNEXION D'UN PÉRIPHÉRIQUE EXTERNE À L'AIDE D'UN
CÂBLE AUDIO (ANALOGIQUE) OU OPTIQUE (NUMÉRIQUE)
Cet appareil est équipé d'une prise d'entrée numérique optique et d'une prise d'entrée analogique audio, ce qui vous
permet de disposer deux méthodes de connexion au téléviseur.
Câble Audio
(non fourni)
Câble Optique
(fourni)
Lecteur BD/
DVD/Décodeur/
Console de jeux
AUX IN
Connectez la prise AUX IN (Audio) de l’unité principale à
la prise AUDIO OUT du téléviseur ou du périphérique
source.
Changez la fonction en AUX.
ou,
OPTICAL IN
Connectez la prise OPTICAL IN (Audio) de l’unité
principale à la prise OPTICAL OUT du téléviseur ou du
périphérique source.
Changez la fonction en D.IN.
● Ne branchez pas le cordon d’alimentation de
ce produit ou de votre téléviseur dans la prise
murale avant que toutes les connexions entre
les différents composants n’aient été
effectuées.
● Avant de déplacer ou d'installer ce produit,
éteignez-le et débranchez le cordon
d'alimentation.
HW-J355_EN_AH68-02984J_FRA-00-20161123.indd 13 2016/11/23 10:16:55
Strona jest ładowana ...
Strona jest ładowana ...
Strona jest ładowana ...
Strona jest ładowana ...
Strona jest ładowana ...
Strona jest ładowana ...
Strona jest ładowana ...
Strona jest ładowana ...
Strona jest ładowana ...
Strona jest ładowana ...
Strona jest ładowana ...
Strona jest ładowana ...
Strona jest ładowana ...
Strona jest ładowana ...
Strona jest ładowana ...
Strona jest ładowana ...
Strona jest ładowana ...
Strona jest ładowana ...
Strona jest ładowana ...
Strona jest ładowana ...
Strona jest ładowana ...
Strona jest ładowana ...
Strona jest ładowana ...
Strona jest ładowana ...
Strona jest ładowana ...
Strona jest ładowana ...
Strona jest ładowana ...
Strona jest ładowana ...
Strona jest ładowana ...
Strona jest ładowana ...
Strona jest ładowana ...
Strona jest ładowana ...
Strona jest ładowana ...
Strona jest ładowana ...
Strona jest ładowana ...
Strona jest ładowana ...
Strona jest ładowana ...
Strona jest ładowana ...
Strona jest ładowana ...
Strona jest ładowana ...
Strona jest ładowana ...
Strona jest ładowana ...
Strona jest ładowana ...
Strona jest ładowana ...
Strona jest ładowana ...
Strona jest ładowana ...
Strona jest ładowana ...
Strona jest ładowana ...
Strona jest ładowana ...
Strona jest ładowana ...
Strona jest ładowana ...
Strona jest ładowana ...
Strona jest ładowana ...
Strona jest ładowana ...
Strona jest ładowana ...
Strona jest ładowana ...
Strona jest ładowana ...
Strona jest ładowana ...
Strona jest ładowana ...
Strona jest ładowana ...
Strona jest ładowana ...
Strona jest ładowana ...
Strona jest ładowana ...
Strona jest ładowana ...
Strona jest ładowana ...
Strona jest ładowana ...
Strona jest ładowana ...
Strona jest ładowana ...
Strona jest ładowana ...
Strona jest ładowana ...
Strona jest ładowana ...
Strona jest ładowana ...
Strona jest ładowana ...
Strona jest ładowana ...
Strona jest ładowana ...
Strona jest ładowana ...
Strona jest ładowana ...
Strona jest ładowana ...
Strona jest ładowana ...
Strona jest ładowana ...
Strona jest ładowana ...
Strona jest ładowana ...
Strona jest ładowana ...
Strona jest ładowana ...
Strona jest ładowana ...
Strona jest ładowana ...
Strona jest ładowana ...
Strona jest ładowana ...
Strona jest ładowana ...
Strona jest ładowana ...
Strona jest ładowana ...
Strona jest ładowana ...
Strona jest ładowana ...
Strona jest ładowana ...
Strona jest ładowana ...
Strona jest ładowana ...
Strona jest ładowana ...
Strona jest ładowana ...
Strona jest ładowana ...
Strona jest ładowana ...
Strona jest ładowana ...
Strona jest ładowana ...
Strona jest ładowana ...
Strona jest ładowana ...
Strona jest ładowana ...
Strona jest ładowana ...
Strona jest ładowana ...
Strona jest ładowana ...
Strona jest ładowana ...
Strona jest ładowana ...
Strona jest ładowana ...
Strona jest ładowana ...
Strona jest ładowana ...
Strona jest ładowana ...
Strona jest ładowana ...
Strona jest ładowana ...
Strona jest ładowana ...
Strona jest ładowana ...
Strona jest ładowana ...
Strona jest ładowana ...
Strona jest ładowana ...
Strona jest ładowana ...
Strona jest ładowana ...
Strona jest ładowana ...
Strona jest ładowana ...
Strona jest ładowana ...
Strona jest ładowana ...
Strona jest ładowana ...
Strona jest ładowana ...
Strona jest ładowana ...
Strona jest ładowana ...
Strona jest ładowana ...
Strona jest ładowana ...
Strona jest ładowana ...
Strona jest ładowana ...
Strona jest ładowana ...
Strona jest ładowana ...
Strona jest ładowana ...
Strona jest ładowana ...
Strona jest ładowana ...
Strona jest ładowana ...
Strona jest ładowana ...
Strona jest ładowana ...
Strona jest ładowana ...
Strona jest ładowana ...
Strona jest ładowana ...
Strona jest ładowana ...
Strona jest ładowana ...
Strona jest ładowana ...
Strona jest ładowana ...
Strona jest ładowana ...
Strona jest ładowana ...
Strona jest ładowana ...
Strona jest ładowana ...
Strona jest ładowana ...
Strona jest ładowana ...
Strona jest ładowana ...
Strona jest ładowana ...
Strona jest ładowana ...
Strona jest ładowana ...
Strona jest ładowana ...
Strona jest ładowana ...
Strona jest ładowana ...
Strona jest ładowana ...
Strona jest ładowana ...
Strona jest ładowana ...
Strona jest ładowana ...
Strona jest ładowana ...
Strona jest ładowana ...
Strona jest ładowana ...
Strona jest ładowana ...
Strona jest ładowana ...
Strona jest ładowana ...
Strona jest ładowana ...
Strona jest ładowana ...
Strona jest ładowana ...
Strona jest ładowana ...
Strona jest ładowana ...
Strona jest ładowana ...
Strona jest ładowana ...
Strona jest ładowana ...
Strona jest ładowana ...
Strona jest ładowana ...
Strona jest ładowana ...
Strona jest ładowana ...
Strona jest ładowana ...
Strona jest ładowana ...
Strona jest ładowana ...
Strona jest ładowana ...
Strona jest ładowana ...
Strona jest ładowana ...
Strona jest ładowana ...
Strona jest ładowana ...
Strona jest ładowana ...
Strona jest ładowana ...
Strona jest ładowana ...
Strona jest ładowana ...
Strona jest ładowana ...
Strona jest ładowana ...
Strona jest ładowana ...
Strona jest ładowana ...
Strona jest ładowana ...
Strona jest ładowana ...
Strona jest ładowana ...
Strona jest ładowana ...
Strona jest ładowana ...
Strona jest ładowana ...
Strona jest ładowana ...
Strona jest ładowana ...
Strona jest ładowana ...
Strona jest ładowana ...
Strona jest ładowana ...
Strona jest ładowana ...
Strona jest ładowana ...
Strona jest ładowana ...
Strona jest ładowana ...
Strona jest ładowana ...
Strona jest ładowana ...
Strona jest ładowana ...
Strona jest ładowana ...
Strona jest ładowana ...
Strona jest ładowana ...
Strona jest ładowana ...
Strona jest ładowana ...
Strona jest ładowana ...
Strona jest ładowana ...
Strona jest ładowana ...
Strona jest ładowana ...
Strona jest ładowana ...
Strona jest ładowana ...
Strona jest ładowana ...
Strona jest ładowana ...
Strona jest ładowana ...
Strona jest ładowana ...
Strona jest ładowana ...
Strona jest ładowana ...
Strona jest ładowana ...
Strona jest ładowana ...
Strona jest ładowana ...
Strona jest ładowana ...
Strona jest ładowana ...
Strona jest ładowana ...
Strona jest ładowana ...
Strona jest ładowana ...
Strona jest ładowana ...
Strona jest ładowana ...
Strona jest ładowana ...
Strona jest ładowana ...
Strona jest ładowana ...
Strona jest ładowana ...
Strona jest ładowana ...
Strona jest ładowana ...
Strona jest ładowana ...
Strona jest ładowana ...
Strona jest ładowana ...
Strona jest ładowana ...
Strona jest ładowana ...
Strona jest ładowana ...
Strona jest ładowana ...
Strona jest ładowana ...
Strona jest ładowana ...
Strona jest ładowana ...
Strona jest ładowana ...
Strona jest ładowana ...
Strona jest ładowana ...
Strona jest ładowana ...
Strona jest ładowana ...
Strona jest ładowana ...
Strona jest ładowana ...
Strona jest ładowana ...
Strona jest ładowana ...
Strona jest ładowana ...
Strona jest ładowana ...
Strona jest ładowana ...
Strona jest ładowana ...
Strona jest ładowana ...
Strona jest ładowana ...
Strona jest ładowana ...
Strona jest ładowana ...
Strona jest ładowana ...
Strona jest ładowana ...
Strona jest ładowana ...
Strona jest ładowana ...
Strona jest ładowana ...
Strona jest ładowana ...
Strona jest ładowana ...
-
 1
1
-
 2
2
-
 3
3
-
 4
4
-
 5
5
-
 6
6
-
 7
7
-
 8
8
-
 9
9
-
 10
10
-
 11
11
-
 12
12
-
 13
13
-
 14
14
-
 15
15
-
 16
16
-
 17
17
-
 18
18
-
 19
19
-
 20
20
-
 21
21
-
 22
22
-
 23
23
-
 24
24
-
 25
25
-
 26
26
-
 27
27
-
 28
28
-
 29
29
-
 30
30
-
 31
31
-
 32
32
-
 33
33
-
 34
34
-
 35
35
-
 36
36
-
 37
37
-
 38
38
-
 39
39
-
 40
40
-
 41
41
-
 42
42
-
 43
43
-
 44
44
-
 45
45
-
 46
46
-
 47
47
-
 48
48
-
 49
49
-
 50
50
-
 51
51
-
 52
52
-
 53
53
-
 54
54
-
 55
55
-
 56
56
-
 57
57
-
 58
58
-
 59
59
-
 60
60
-
 61
61
-
 62
62
-
 63
63
-
 64
64
-
 65
65
-
 66
66
-
 67
67
-
 68
68
-
 69
69
-
 70
70
-
 71
71
-
 72
72
-
 73
73
-
 74
74
-
 75
75
-
 76
76
-
 77
77
-
 78
78
-
 79
79
-
 80
80
-
 81
81
-
 82
82
-
 83
83
-
 84
84
-
 85
85
-
 86
86
-
 87
87
-
 88
88
-
 89
89
-
 90
90
-
 91
91
-
 92
92
-
 93
93
-
 94
94
-
 95
95
-
 96
96
-
 97
97
-
 98
98
-
 99
99
-
 100
100
-
 101
101
-
 102
102
-
 103
103
-
 104
104
-
 105
105
-
 106
106
-
 107
107
-
 108
108
-
 109
109
-
 110
110
-
 111
111
-
 112
112
-
 113
113
-
 114
114
-
 115
115
-
 116
116
-
 117
117
-
 118
118
-
 119
119
-
 120
120
-
 121
121
-
 122
122
-
 123
123
-
 124
124
-
 125
125
-
 126
126
-
 127
127
-
 128
128
-
 129
129
-
 130
130
-
 131
131
-
 132
132
-
 133
133
-
 134
134
-
 135
135
-
 136
136
-
 137
137
-
 138
138
-
 139
139
-
 140
140
-
 141
141
-
 142
142
-
 143
143
-
 144
144
-
 145
145
-
 146
146
-
 147
147
-
 148
148
-
 149
149
-
 150
150
-
 151
151
-
 152
152
-
 153
153
-
 154
154
-
 155
155
-
 156
156
-
 157
157
-
 158
158
-
 159
159
-
 160
160
-
 161
161
-
 162
162
-
 163
163
-
 164
164
-
 165
165
-
 166
166
-
 167
167
-
 168
168
-
 169
169
-
 170
170
-
 171
171
-
 172
172
-
 173
173
-
 174
174
-
 175
175
-
 176
176
-
 177
177
-
 178
178
-
 179
179
-
 180
180
-
 181
181
-
 182
182
-
 183
183
-
 184
184
-
 185
185
-
 186
186
-
 187
187
-
 188
188
-
 189
189
-
 190
190
-
 191
191
-
 192
192
-
 193
193
-
 194
194
-
 195
195
-
 196
196
-
 197
197
-
 198
198
-
 199
199
-
 200
200
-
 201
201
-
 202
202
-
 203
203
-
 204
204
-
 205
205
-
 206
206
-
 207
207
-
 208
208
-
 209
209
-
 210
210
-
 211
211
-
 212
212
-
 213
213
-
 214
214
-
 215
215
-
 216
216
-
 217
217
-
 218
218
-
 219
219
-
 220
220
-
 221
221
-
 222
222
-
 223
223
-
 224
224
-
 225
225
-
 226
226
-
 227
227
-
 228
228
-
 229
229
-
 230
230
-
 231
231
-
 232
232
-
 233
233
-
 234
234
-
 235
235
-
 236
236
-
 237
237
-
 238
238
-
 239
239
-
 240
240
-
 241
241
-
 242
242
-
 243
243
-
 244
244
-
 245
245
-
 246
246
-
 247
247
-
 248
248
-
 249
249
-
 250
250
-
 251
251
-
 252
252
-
 253
253
-
 254
254
-
 255
255
-
 256
256
-
 257
257
-
 258
258
-
 259
259
-
 260
260
-
 261
261
-
 262
262
-
 263
263
-
 264
264
-
 265
265
-
 266
266
-
 267
267
-
 268
268
-
 269
269
-
 270
270
-
 271
271
-
 272
272
-
 273
273
-
 274
274
-
 275
275
-
 276
276
-
 277
277
-
 278
278
-
 279
279
-
 280
280
-
 281
281
-
 282
282
-
 283
283
-
 284
284
-
 285
285
-
 286
286
-
 287
287
-
 288
288
-
 289
289
-
 290
290
-
 291
291
-
 292
292
-
 293
293
-
 294
294
-
 295
295
-
 296
296
-
 297
297
-
 298
298
-
 299
299
-
 300
300
-
 301
301
-
 302
302
-
 303
303
-
 304
304
-
 305
305
-
 306
306
-
 307
307
-
 308
308
-
 309
309
-
 310
310
-
 311
311
-
 312
312
-
 313
313
-
 314
314
-
 315
315
-
 316
316
-
 317
317
-
 318
318
-
 319
319
-
 320
320
-
 321
321
-
 322
322


Samsung HW-J355 Instrukcja obsługi
- Kategoria
- Głośniki soundbar
- Typ
- Instrukcja obsługi
w innych językach
- čeština: Samsung HW-J355 Uživatelský manuál
- italiano: Samsung HW-J355 Manuale utente
- Deutsch: Samsung HW-J355 Benutzerhandbuch
- slovenčina: Samsung HW-J355 Používateľská príručka
- français: Samsung HW-J355 Manuel utilisateur
- English: Samsung HW-J355 User manual
- română: Samsung HW-J355 Manual de utilizare
Powiązane dokumenty
-
Samsung HW-J355 Instrukcja obsługi
-
Samsung HW-J250 Instrukcja obsługi
-
-
Samsung HW-J8500R Skrócona instrukcja obsługi
-
Samsung HW-J6001R Skrócona instrukcja obsługi
-
-
-
Samsung HW-J6010 Instrukcja obsługi
-
Samsung HW-H551 Instrukcja obsługi
-