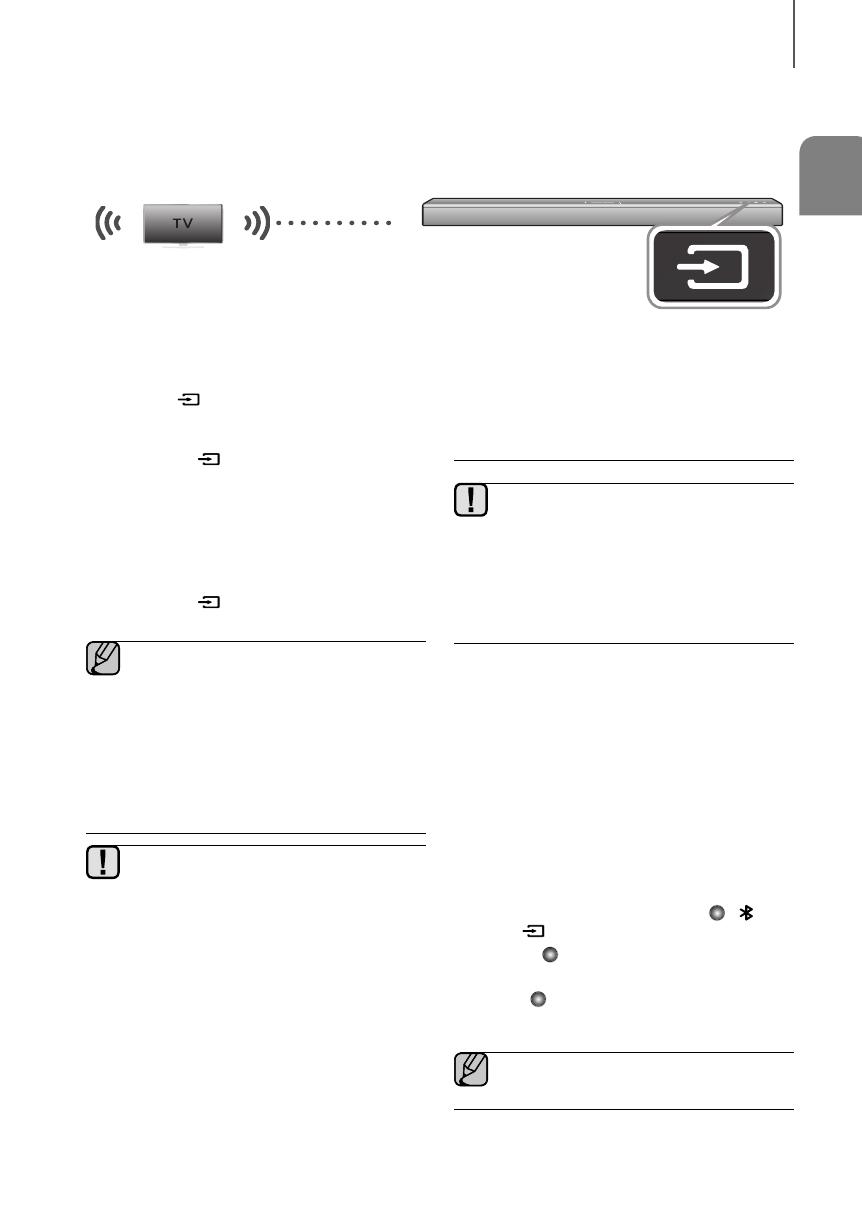
Samsung HW-J250 Skrócona instrukcja obsługi

Typ
Skrócona instrukcja obsługi
Wireless Audio - Soundbar
Imagine the possibilities
Thank you for purchasing this Samsung product.
To receive more complete service, please register your product at
www.samsung.com/register
User manual
HW-J250
2
FEATURES
FEATURES
TV SoundConnect
TV SoundConnect lets you listen to audio from your TV on your Soundbar via a Bluetooth connection and lets you
control the sound.
Special Sound Effects
You can select different Sound Effects - Voice (Red ) / Sports (Green ) / 3D Sound Plus (White ) /
STANDARD (Original Sound) - depending on the type of content you want to enjoy.
Multi-function Remote Control
You can use the supplied remote control to control various operations with the simple press of a button.
USB Host Support
You can connect and play music files from external USB storage devices such as MP3 players, USB flash memory,
etc. using the Soundbar's USB HOST function.
Bluetooth Function
You can connect a Bluetooth device to the Soundbar and enjoy music with high quality stereo sound, all without wires!
Using the Samsung Audio Remote App
To control the product with your Smart Device via the Samsung Audio Remote app, download the Samsung
Audio Remote App by accessing the app through the Google Play store.
LICENSES
Manufactured under license from Dolby Laboratories. Dolby, Dolby Audio, Pro Logic, and the double-D symbol are
trademarks of Dolby Laboratories.
For DTS patents, see http://patents.dts.com. Manufactured under license from DTS Licensing Limited. DTS, the
Symbol, DTS in combination with the Symbol, and DTS 2.0 Channel are registered trademarks or trademarks of DTS,
Inc. in the United States and/or other countries. © DTS, Inc. All Rights Reserved.
3
ENG
SAFETY INFORMATION
SAFETY INFORMATION
SAFETY WARNINGS
TO REDUCE THE RISK OF ELECTRIC SHOCK, DO NOT REMOVE THE COVER (OR BACK).
NO USER-SERVICEABLE PARTS ARE INSIDE. REFER SERVICING TO QUALIFIED SERVICE PERSONNEL.
CAUTION
RISK OF ELECTRIC SHOCK DO
NOT OPEN
This symbol indicates “dangerous voltage” inside
the product that presents a risk of electric shock or
personal injury.
This symbol indicates important instructions
accompanying the product.
WARNING : To reduce the risk of fire or electric shock, do not expose this appliance to rain or moisture.
CAUTION : TO PREVENT ELECTRIC SHOCK, MATCH WIDE BLADE OF PLUG TO WIDE SLOT, FULLY INSERT.
This apparatus shall always be connected to a AC outlet with a protective grounding connection.
To disconnect the apparatus from the mains, the plug must be pulled out from the mains socket, therefore the mains plug
shall be readily operable.
CAUTION
Do not expose this apparatus to dripping or splashing. Do not put objects filled with liquids, such as vases on the apparatus.
To turn this apparatus off completely, you must pull the power plug out of the wall socket. Consequently, the power plug
must be easily and readily accessible at all times.
4
SAFETY INFORMATION
During thunderstorms, disconnect the AC plug from the
wall outlet. Voltage peaks due to lightning could damage
the unit.
Protect the product from moisture (i.e. vases), and
excess heat (e.g. a fireplace) or equipment creating
strong magnetic or electric fields. Unplug the power
cable from the AC wall socket if the unit malfunctions.
Your product is not intended for industrial use. It is for
personal use only. Condensation may occur if your
product has been stored in cold temperatures. If
transporting the unit during the winter, wait approximately
2 hours until the unit has reached room temperature
before using.
Do not expose the unit to direct sunlight or other heat
sources. This could lead to overheating and cause the
unit to malfunction.
The battery used with this product contains chemicals
that are harmful to the environment. Do not dispose of
the battery in the general household trash. Do not
expose the battery to excess heat, direct sunlight, or fire.
Do not short circuit, disassemble, or overheat the battery.
Danger of explosion if the battery is replaced incorrectly.
Replace only with the same or equivalent type.
D
uri
ng
thu
nde
rst
orms
dis
connec
tt
he
AC
plu
D
on
ot
expose
th
eu
nit
to
di
rec
ts
unl
igh
to
ro
th
PRECAUTIONS
Ensure that the AC power supply in your house complies with the power requirements listed on the identification
sticker located on the back of your product. Install your product horizontally, on a suitable base (furniture), with enough
space around it for ventilation (
7~10 cm
). Make sure the ventilation slots are not covered. Do not place the unit on
amplifiers or other equipment which may become hot. This unit is designed for continuous use. To fully turn off the
unit, disconnect the AC plug from the wall outlet. Unplug the unit if you intend to leave it unused for a long period of
time.
li h li ihh i li d
h
99.1mm 99.1mm
68.6
mm
99.1mm
WARNING: DO NOT INGEST BATTERY. CHEMICAL BURN HAZARD. The remote control supplied
with this product contains a coin/button cell battery. If the coin/button cell battery is swallowed, it can
cause severe internal burns in just 2 hours and can lead to death. Keep new and used batteries away
from children. If the battery compartment does not close securely, stop using the remote and make
sure to keep it away from children. If you think the battery might have been swallowed or placed inside any part of the
body, seek immediate medical attention.
5
ENG
CONTENTS
2 FEATURES
2 Licenses
3 SAFETY INFORMATION
3 Safety Warnings
4 Precautions
6 GETTING STARTED
6 Before reading the User’s Manual
6 What’s Included
7 DESCRIPTIONS
7 Top/Front Panel
8 Rear Panel
9 REMOTE CONTROL
9 Remote Control Buttons and Functions
11 CONNECTIONS
11 Installing the Wall Mount
12 Detaching the Wall Mount
13 Installing the bracket without referring to
the Wall-mount Installation Guide
14 Connecting an External Device using Audio
(analog) cable or Optical (digital) cable
15 FUNCTIONS
15 Input Mode
16 Bluetooth
18 Using the Samsung Audio Remote APP
19 TV SoundConnect
20 USB
21 Software update
22 TROUBLESHOOTING
23 APPENDIX
23 Specifications
CONTENTS
Figures and illustrations in this User Manual are
provided for reference only and may differ from
actual product appearance.
An administration fee may be charged if either
(a) An engineer is called out at your request and
there is no defect with the product (i.e. where
the user manual has not been read).
(b) You bring the unit to a repair centre and there
is no defect with the product (i.e. where the
user manual has not been read).
You will be informed of the administration fee
amount before a technician visits.
6
GETTING STARTED
GETTING STARTED
BEFORE READING THE USER’S MANUAL
Note the following terms before reading the user manual.
Icons used in this manual
Icon Term Definition
Caution
Indicates a situation where a function does not operate or settings may be canceled.
Note
Indicates tips or instructions on the page that help you operate a function.
Safety Instructions and Troubleshooting
1) Be sure to familiarize yourself with the Safety Instructions before using this product. (See page 3)
2) If a problem occurs, check Troubleshooting. (See page 22)
Copyright
©2015 Samsung Electronics Co.,Ltd.
All rights reserved; no part of this user’s manual may be reproduced or copied without the prior written permission of
Samsung Electronics Co.,Ltd.
WHAT’S INCLUDED
Check for the supplied accessories shown below.
(Wall Mount L: 1EA)
(Wall Mount R: 1EA)
(Holder-screw2: 2EA)
(Holder-screw1: 2EA)
Remote Control / Lithium
Battery (3V : CR2032)
User Manual
Bracket-Wall Mount
Holder-screw
Wall Mount Guide
Power Cord DC Adapter Optical Cable
USB Cable
The appearance of the accessories may differ slightly from the illustrations above.
Use the dedicated USB cable to connect external USB devices to the unit.
7
ENG
DESCRIPTIONS
(Power) Button
Turns the power on and off.
STANDBY indicator (Red
)
Bluetooth POWER ON indicator
(Green )
VOL -/+
Controls the volume level.
LED
Displays the current mode.
Display Color Input mode
White
D.IN (Optical Digital input)
mode
Red
AUX input mode
Green
White
White
USB mode
Red
Voice Mode
Green
Sports Mode
White
3D Sound Plus Mode
(Source) Button
Selects the D.IN, AUX, TV, BT, USB
input.
While the unit is powered on,
pressing the (
) button for more
than 3 seconds sets the button to
act as the MUTE button. To cancel
MUTE button setup, press the
(
) button for more than 3
seconds again.
DESCRIPTIONS
TOP/FRONT PANEL
When you turn on this unit, there will be a 4 to 5 seconds delay before it produces sound.
If you want to enjoy sound only from the Soundbar, you must turn off the TV's speakers in the Audio Setup
menu of your TV. Refer to the owner's manual supplied with your TV.
8
GETTING STARTED
REAR PANEL
When disconnecting the power cable of the AC power adaptor from the wall outlet, pull the plug.
Do not pull the cable.
Do not connect this unit or other components to an AC outlet until all connections between components
are complete.
(USB Port)
Connect USB devices such
as MP3 players here to play
files on the devices.
OPTICAL IN
Connect to the digital (optical) output
of an external device.
AUX IN
Connect to the Analog output of
an external device.
DC 14V (Power Supply In)
Connect the DC power adaptor to
the power supply jack, and then
connect the AC power adaptor plug
to a wall outlet.
9
ENG
REMOTE CONTROL
D.IN
AUX
Installing the Batteries in the Remote Control
1. Use a suitable coin to turn
the remote control's battery
cover counter clockwise to
remove it as shown in the
figure above.
2. Insert a 3V lithium battery. Keep the
positive (+) pole facing up when
inserting the battery. Put the battery
cover on and align the '●' marks
side by side as shown in the figure
above.
3. Use a suitable coin to turn the
remote control battery cover
clockwise as far as it will go to
fix it in place.
REMOTE CONTROL
REMOTE CONTROL BUTTONS AND FUNCTIONS
Bluetooth POWER
Press the Bluetooth POWER button on the remote to turn the
Bluetooth Power On function on and off.
See pages 17 and 19 for details.
POWER
Turns the Soundbar on and off.
VOLUME
Adjusts the volume level of the unit.
If you set the volume to Max or Min,
LEDs turn on.
Bluetooth
Press the Bluetooth button to select Bluetooth mode.
D.IN
Press the D.IN button to select Digital In mode.
Skip Back
If there is more than one file on the device you are playing, and you press
the # button, the previous file is selected.
Play/Pause
Press the ► button to pause a file temporarily.
Press the ► button again to play the selected file.
AUX
Press the AUX button to select the AUX mode.
10
REMOTE CONTROL
D.IN
AUX
Soundbar is a Samsung proprietary name.
Operate the TV using the TV's remote control.
USB
Press the USB button to select the USB mode.
REPEAT
Press to set the REPEAT function during music playback from a USB
device.
OFF-REPEAT : Cancels Repeat Playback (White
).
TRACK-REPEAT : Repeatedly play a track (Red
).
ALL-REPEAT : Repeatedly play all tracks (Green
).
RANDOM-REPEAT : Plays tracks in random order. (A track that has
already been played may be played again.) ( The Red
and Green
blink alternately.)
TV SOUND CONNECT
Press the TV SOUND CONNECT button to select TV SoundConnect
mode.
SOUND EFFECT
Press the SOUND EFFECT button on the remote control to select a
sound mode (Voice, Sports, 3D Sound Plus, STANDARD). Select the
STANDARD mode if you want to enjoy the original sound. We
recommend that you select a Sound Effect mode based on the source
material and your personal taste.
Voice : (Red )
Sports : (Green )
3D Sound Plus : (White )
AUTO POWER
Auto Power Link : Synchronizes the Soundbar to a connected Optical
source via the Optical jack so it turns on automatically when you turn on
your TV.
Press the AUTO POWER button. Each time the button is pressed, the
selection changes as follows :
AUTO POWER Link ON: Green
and White
blink.
AUTO POWER Link OFF: Red and White
blink.
MUTE
Push the Mute button to turn the volume down to 0. Press again to
restore the sound to the previous volume level. If you turn mute on, the
current function LED blinks.
Skip Forward
If there is more than one file on the device you are playing, and you
press the $ button, the next file is selected.
WOOFER LEVEL
You can control the woofer volume.
Press
or button on the WOOFER LEVEL button to increase or
decrease the woofer volume. You can select SW (-12, -6, -5, -4, -3, -2,
-1, 0, +1, +2, +3, +4, +5, +6). When you select the SW -12 or SW +6,
the function LED lights.
To adjust woofer level using mobile APP (Samsung Audio Remote),
use #, $ buttons to decrease or increase woofer level within 3
seconds since WOOFER button is pressed.
11
ENG
CONNECTIONS
CONNECTIONS
INSTALLING THE WALL MOUNT
You can use the wall mount bracket to mount this unit on a wall.
Installation Precautions
Install on a vertical wall only.
For the installation, avoid a location with high temperature or
humidity, or a wall that cannot sustain the weight of the set.
Check the strength of the wall. If the wall is not strong enough to
support the unit, reinforce the wall or install the unit on a different
wall that can support the unit's weight.
Purchase and use the fixing screws or anchors appropriate for the
kind of wall you have (plaster board, iron board, wood, etc.). If
possible, screw the support screws into wall studs.
Purchase wall mounting screws according to the type and thickness
of the wall you will mount the Soundbar on.
- Diameter : M5
- Length: 1 3/8 inches (35 mm) or longer recommended.
Connect cables from the unit to external devices before you install it
on the wall.
Make sure the unit is turned off and unplugged before you install it.
Otherwise, it may cause an electric shock.
To install the Soundbar on a wall, follow these steps:
1. Place the installation guide against the wall surface.
The installation guide must be level.
If the TV is mounted on the wall, install the Soundbar at least 2
inches (5 cm) below the TV.
2. Mark the location where the screws will go through on the wall,
and then remove the installation guide. Next, drill holes for the
screws using an appropriately sized drill bit.
3. Fasten the wall mounts and screws to the marked locations.
The left and right mounts are different shapes. Make sure to
position them correctly.
4. Secure the two holder screws to the screw holes on the back of
the Soundbar's main body, one on the left and one on the right.
5. Insert the USB cable into the back of the Soundbar before installing
it on the wall.
6. Set the holder screws on the back of the Soundbar into the grooves of the wall mounts.
For safe installation, make sure to push the holder screws all the way to the bottom of the grooves.
2 inches
(5 cm) or more
Wall Mounting the Soundbar
12
CONNECTIONS
DETACHING THE WALL MOUNT
1. Pull the Soundbar upwards as shown in the figure to separate it
from the wall mounts.
Do not hang onto the installed unit and avoid striking or dropping the unit.
Secure the unit firmly to the wall so that it does not fall off. If the unit falls off, it may cause an injury or
damage the product.
When the unit is installed on a wall, please make sure that children do not pull any of the connecting
cables, as it may cause it to fall.
For the optimal performance of a wall mount installation, install the speaker system at least 2 inches (5 cm)
below the TV, if the TV is mounted on the wall.
For your safety, if you do not mount the unit on the wall, install it on a secure, flat surface where it is unlikely
to fall.
Detaching the Soundbar from the Wall Mounts
13
ENG
CONNECTIONS
INSTALLING THE BRACKET WITHOUT REFERRING TO THE
WALL-MOUNT INSTALLATION GUIDE
2 inches
(5 cm) or more
2 inches
(5 cm) or more
6.3 inches
(16 cm)
6.9 inches
(17.5 cm)
Minimum 12.9 ~ 13.2 inches
(32.8 ~ 33.5cm)
1. Place Wall Mount L on the desired wall surface parallel to the floor as shown above. Mark the location of the
screw holes on the wall. Drill holes for the screws at the places you have marked.
2. Match the screw holes on Wall Mount L to the screw holes on the wall, and then screw one screw through the
hole in its right end. Tighten the screw until it is firmly fixed to the wall.
3. Place Wall Mount R on the desired wall surface parallel to the floor and aligned with Wall Mount L as shown above. Mark the
location of the screw holes on the wall. Drill holes for the screws at the places you have marked.
4. Match the screw holes on Wall Mount R to the screw holes on the wall, and then screw one screw through the
hole in its right end. Tighten the screw until it is firmly fixed to the wall.
If you are mounting the Wall Mounts beneath the TV, make sure to position the mounts 5 cm or more below
the TV and to align the mounts with the center of the TV as shown above.
5. Insert screws through the remaining holes, and then tighten.
14
CONNECTIONS
CONNECTING AN EXTERNAL DEVICE USING AUDIO (ANALOG)
CABLE OR OPTICAL (DIGITAL) CABLE
This unit comes equipped with one digital optical in jack and one analog audio in jack (Aux In), giving you two ways to
connect it to a TV.
Audio Cable
(not supplied)
Optical Cable
(supplied)
BD/ DVD player/
Set-top box/
Game console
AUX IN
Connect AUX IN (Audio) on the main unit to the AUDIO
OUT jack of the TV or Source Device.
To use, change the function to AUX.
or,
OPTICAL IN
Connect OPTICAL IN (Audio) on the main unit to the
OPTICAL OUT jack of the TV or Source Device.
To use, change the function to D.IN.
Do not connect the power cord of this
product or your TV to the wall outlet until all
connections between components are
complete.
Before moving or installing this product, be
sure to turn off the power and disconnect the
power cord.
15
ENG
FUNCTIONS
FUNCTIONS
INPUT MODE
Press each mode button on the remote control or the ( ) button on the main unit’s top panel to select the
mode you want.
Input mode Display
D.IN (Optical Digital in)
(White)
AUX input
(Red)
TV SoundConnect
(Green)
BLUETOOTH mode
(White)
USB mode (White)
Use the provided cable if a USB flash
memory device cannot be connected directly
to the unit.
The unit turns off automatically in the following situations:
D.IN/BT/TV/USB Mode
- If there is no audio signal for 5 minutes.
AUX Mode
- If the AUX cable is disconnected for 5 minutes.
- In Auto Power Down On mode, if there is no KEY
input for 8 hours when the AUX cable is
connected.
- To turn the Auto Power Down function ON or OFF,
press and hold the & button for 5 seconds.
Auto Power
Down
LED
ON
Green
and Red
blink
OFF
Red
and Red
blink
16
FUNCTIONS
BLUETOOTH
You can connect a Bluetooth device to the Soundbar and enjoy music with high quality stereo sound, all without wires!
To connect the Soundbar to a Bluetooth device
Check if the Bluetooth device supports the Bluetooth compliant stereo headset function.
Bluetooth device
Connect
1. Press
the (
) button on the main unit’s top
panel
or press the Bluetooth button on the
remote control to display the icon LED.
The LED will blink indicating that the
Bluetooth device is not connected yet.
2. Select the Bluetooth menu on the Bluetooth device
you want to connect. (Refer to the Bluetooth
device's user manual.)
3. Select the Stereo headset menu on the Bluetooth
device.
You will see a list of scanned devices.
4. Select "[Samsung] Soundbar J-Series" from the
list.
If the Bluetooth device is successfully connected
to the Soundbar, then the
LED will stop
blinking.
If the Bluetooth device has failed to pair with the
Soundbar, delete the previous "[Samsung]
Soundbar J-Series" found by the Bluetooth
device and have it search for the Soundbar again.
5. Play music on the connected device.
You can listen to the music playing on the
connected Bluetooth device over the Soundbar.
In BT mode, the Play/Pause/Next/Prev functions
are not available. However, these functions are
available in Bluetooth devices supporting AVRCP.
If asked for a PIN code when connecting a
Bluetooth device, enter <0000>.
Only one Bluetooth device can be paired at a
time.
The Bluetooth connection will be terminated
when you turn the Soundbar off.
The Soundbar may not perform Bluetooth
search or connection correctly under the
following circumstances:
- If there is a strong electrical field around
the Soundbar.
- If several Bluetooth devices are
simultaneously paired with the Soundbar.
- If the Bluetooth device is turned off, not in
place, or malfunctions.
- Note that such devices as microwave
ovens, wireless LAN adaptors, fluorescent
lights, and gas stoves use the same
frequency range as the Bluetooth device,
which can cause electric interference.
The Soundbar supports SBC data (44.1kHz,
48kHz).
Connect only to a Bluetooth device that
supports the A2DP (AV) function.
You cannot connect the Soundbar to a
Bluetooth device that supports only the HF
(Hands Free) function.
Once paired, if the Soundbar is in D.IN, AUX,
or USB mode, selecting "[Samsung]
Soundbar J-Series" from the list on your
Bluetooth device will automatically change
the Soundbar's mode to BT.
17
ENG
FUNCTIONS
Bluetooth POWER on (Bluetooth POWER)
When the Bluetooth Power On function is on and the Soundbar is turned off, if a previously paired Bluetooth device
tries to pair with the Soundbar, the Soundbar turns on automatically.
1. To turn Bluetooth Power ON, press the Bluetooth POWER button on the remote while the Soundbar is turned
on.
2. The Green or Red
, White , and Green
LEDs appear on the Soundbar's display.
Bluetooth POWER LED
ON
Green
, Green and White blink
OFF
Red
, Green and White blink
Available only if the Soundbar is listed among the Bluetooth device’s paired devices. (The Bluetooth device
and the Soundbar must have been previously paired at least once.)
The Soundbar will appear in the Bluetooth device’s searched devices list only when the Bluetooth LED is
blinking.
In the TV SoundConnect mode, the Soundbar cannot be paired to another Bluetooth device.
To disconnect the Bluetooth device from the Soundbar
You can disconnect the Bluetooth device from the Soundbar. For instructions, see the Bluetooth device's user manual.
The Soundbar will be disconnected.
When the Soundbar is disconnected from the Bluetooth device, the will blink on the Soundbar's top display.
To disconnect the Soundbar from the Bluetooth device
Press one of the other mode buttons
on the remote control or the ( ) button on the main unit’s top panel
to
switch from
to another mode or turn off the Soundbar.
The connected Bluetooth device will wait a certain amount of time for a response from the Soundbar before
terminating the connection. (Disconnection time may differ, depending on the Bluetooth device)
In Bluetooth connection mode, the Bluetooth connection will be lost if the distance between the Soundbar
and the Bluetooth device exceeds 16.25 ft. (5 m).
The Soundbar automatically turns off after 5 minutes in the Ready state.
More About Bluetooth
Bluetooth is a technology that enables Bluetooth-compliant devices to interconnect easily with each other using a
short wireless connection.
A Bluetooth device may cause noise or malfunction, depending on usage, if:
- A part of your body is in contact with the receiving/transmitting system of the Bluetooth device or the
Soundbar.
- It is subject to electrical variation from obstructions caused by a wall, corner, or office partition.
- It is exposed to electrical interference from same frequency-band devices including medical equipment,
microwave ovens, and wireless LANs.
Pair the Soundbar with the Bluetooth device while they are close together.
The further the distance between the Soundbar and Bluetooth device, the worse the quality is.
If the distance exceeds the Bluetooth operational range, the connection is lost.
In poor reception areas, the Bluetooth connection may not work properly.
The Bluetooth connection only works when it is close to the unit. The connection will be automatically cut off if the
Bluetooth device is out of range. Even within range, the sound quality may be degraded by obstacles such as
walls or doors.
This wireless device may cause electric interference during its operation.
18
FUNCTIONS
USING THE SAMSUNG AUDIO REMOTE APP
Installing the Samsung Audio Remote App
To control the product with your Smart Device via the Samsung Audio Remote app, download the Samsung Audio
Remote App from the Google Play store.
Starting the Samsung Audio Remote App
After you install the Samsung Audio Remote app, follow the instructions in the app.
The Samsung Audio Remote APP is only supported on phones running Android OS 3.0 or above.
19
ENG
FUNCTIONS
TV SOUNDCONNECT
You can enjoy TV sound through your Soundbar when it is connected to a Samsung TV that supports the TV
SoundConnect function.
Connecting a TV to the Soundbar
Connect
1. Turn on the TV and Soundbar.
Set the "Add New Device" menu selection of the
TV to "On".
2. Press the
( )
button on the main unit’s top panel
or the
TV SOUND CONNECT
button on the
remote control to select the TV mode.
The Green
LED will blink indicating that TV
is not connected yet.
3. On the TV, a message asking whether to enable the
TV SoundConnect function appears. "[Samsung]
Soundbar" is displayed on the TV screen.
4. Select <Yes> using the TV remote to finish
connecting the TV and Soundbar.
The Green LED will stop blinking when the
TV has successfully connected.
Switching the Soundbar’s mode from TV to
another mode automatically terminates TV
SoundConnect.
To connect the Soundbar to another TV, the
existing connection must be terminated.
To terminate the existing connection, press
and hold the & button on the remote for 5
seconds to connect to the other TV, follow
Steps 1 through 4 above.
The TV SoundConnect (SoundShare) function
is supported by some Samsung TVs released
from 2012 on. Check whether your TV
supports the TV SoundConnect
(SoundShare) function before you begin. (For
further information, refer to the TV’s user
manual.)
If your Samsung TV was released before 2014,
check the SoundShare setting menu.
If the distance between the TV and Soundbar
exceeds 16.25 ft. (5m), the connection may
not be stable or the audio may stutter. If this
occurs, relocate the TV or Soundbar so that
they are within operational range, and then
re-establish the TV SoundConnect
c
onnection.
TV SoundConnect Operational Ranges:
- Recommended pairing range: within 20
inches (within 50cm)
- Recommended operational range: within
16.25 ft. (5m)
The Play/Pause, Next, Prev buttons are not
operable in TV SoundConnect mode.
Using the Bluetooth POWER On
function
The Bluetooth POWER On function is available after you
have successfully connected the Soundbar to a
Bluetooth compatible TV using TV SoundConnect.
When the Bluetooth POWER On function is ON, turning
the connected TV on or off will turn the Soundbar's
power on and off as well.
1. Connect the TV to your Soundbar using the TV
SoundConnect function.
2. Press the Bluetooth POWER button on the
Soundbar remote. The Green or Red
, , and
Green
LEDs appear on the Soundbar's display.
Green : The Soundbar turns on and off when
you turn the TV on or off.
Red : The Soundbar only turns off when you
turn the TV off.
This function is supported by some Samsung
TVs released from 2013 on.
20
FUNCTIONS
USB
You can play music files located on USB storage devices through the Soundbar.
Display
USB port
1. Connect the USB device to the USB port on the
product.
2. Press the
( )
button on the main unit’s top panel
or the
USB
button on the remote control to select
the USB mode.
The LED will blink indicating that the USB
device is not connected yet or the Soundbar is in
stop/pause mode or the USB is in "no data"
mode.
The LED will stop blinking when the USB
device has successfully connected.
The Soundbar automatically turns off if no USB
device has been connected for more than 5
minutes.
Before you connect a USB device
Be aware of the following:
This product may not be compatible with certain
types of USB storage media.
The Soundbar supports the FAT16 and FAT32 file
systems.
- The NTFS file system is not supported.
Connect USB devices directly to the USB port of the
product. Otherwise, you may encounter a USB
compatibility problem.
Do not connect multiple storage devices to the
product via a multi-card reader. It may not operate
properly.
Digital camera PTP protocols are not supported.
Do not remove the USB device while it is
transferring files.
DRM-protected music files (MP3, WMA) from
commercial web sites cannot be played.
External HDDs are not supported.
Mobile phone devices are not supported.
File Format Type Compatibility list:
Format Codec Sampling Rate Bitrate
*.mp3
MPEG 1 Layer2
16KHz ~ 48KHz
80kbps~320kbps
MPEG 1 Layer3
MPEG 2 Layer3
MPEG 2.5
Layer3
*.wma
Wave_Format_
MSAudio1
56kbps~128kbps
Wave_Format_
MSAudio2
*.aac
AAC
16KHz ~ 96KHz
48kbps~320kbps
AAC-LC 128kbps~192kbps
HE-AAC 24KHz ~ 96KHz 48kbps~64kbps
*.wav
-
16KHz ~ 48KHz
up to 3000kbps
*.ogg
OGG 1.1.0 50kbps~500kbps
*.flac
FLAC 1.1.0,
FLAC 1.2.1
16KHz ~ 96KHz up to 3000kbps
  • Page 1 1
  • Page 2 2
  • Page 3 3
  • Page 4 4
  • Page 5 5
  • Page 6 6
  • Page 7 7
  • Page 8 8
  • Page 9 9
  • Page 10 10
  • Page 11 11
  • Page 12 12
  • Page 13 13
  • Page 14 14
  • Page 15 15
  • Page 16 16
  • Page 17 17
  • Page 18 18
  • Page 19 19
  • Page 20 20
  • Page 21 21
  • Page 22 22
  • Page 23 23
  • Page 24 24
  • Page 25 25
  • Page 26 26
  • Page 27 27
  • Page 28 28
  • Page 29 29
  • Page 30 30
  • Page 31 31
  • Page 32 32
  • Page 33 33
  • Page 34 34
  • Page 35 35
  • Page 36 36
  • Page 37 37
  • Page 38 38
  • Page 39 39
  • Page 40 40
  • Page 41 41
  • Page 42 42
  • Page 43 43
  • Page 44 44
  • Page 45 45
  • Page 46 46
  • Page 47 47
  • Page 48 48
  • Page 49 49
  • Page 50 50
  • Page 51 51
  • Page 52 52
  • Page 53 53
  • Page 54 54
  • Page 55 55
  • Page 56 56
  • Page 57 57
  • Page 58 58
  • Page 59 59
  • Page 60 60
  • Page 61 61
  • Page 62 62
  • Page 63 63
  • Page 64 64
  • Page 65 65
  • Page 66 66
  • Page 67 67
  • Page 68 68
  • Page 69 69
  • Page 70 70
  • Page 71 71
  • Page 72 72
  • Page 73 73
  • Page 74 74
  • Page 75 75
  • Page 76 76
  • Page 77 77
  • Page 78 78
  • Page 79 79
  • Page 80 80
  • Page 81 81
  • Page 82 82
  • Page 83 83
  • Page 84 84
  • Page 85 85
  • Page 86 86
  • Page 87 87
  • Page 88 88
  • Page 89 89
  • Page 90 90
  • Page 91 91
  • Page 92 92
  • Page 93 93
  • Page 94 94
  • Page 95 95
  • Page 96 96
  • Page 97 97
  • Page 98 98
  • Page 99 99
  • Page 100 100
  • Page 101 101
  • Page 102 102
  • Page 103 103
  • Page 104 104
  • Page 105 105
  • Page 106 106
  • Page 107 107
  • Page 108 108
  • Page 109 109
  • Page 110 110
  • Page 111 111
  • Page 112 112
  • Page 113 113
  • Page 114 114
  • Page 115 115
  • Page 116 116
  • Page 117 117
  • Page 118 118
  • Page 119 119
  • Page 120 120
  • Page 121 121
  • Page 122 122
  • Page 123 123
  • Page 124 124
  • Page 125 125
  • Page 126 126
  • Page 127 127
  • Page 128 128
  • Page 129 129
  • Page 130 130
  • Page 131 131
  • Page 132 132
  • Page 133 133
  • Page 134 134
  • Page 135 135
  • Page 136 136
  • Page 137 137
  • Page 138 138
  • Page 139 139
  • Page 140 140
  • Page 141 141
  • Page 142 142
  • Page 143 143
  • Page 144 144
  • Page 145 145
  • Page 146 146
  • Page 147 147
  • Page 148 148
  • Page 149 149
  • Page 150 150
  • Page 151 151
  • Page 152 152
  • Page 153 153
  • Page 154 154
  • Page 155 155
  • Page 156 156
  • Page 157 157
  • Page 158 158
  • Page 159 159
  • Page 160 160
  • Page 161 161
  • Page 162 162
  • Page 163 163
  • Page 164 164
  • Page 165 165
  • Page 166 166
  • Page 167 167
  • Page 168 168
  • Page 169 169
  • Page 170 170
  • Page 171 171
  • Page 172 172
  • Page 173 173
  • Page 174 174
  • Page 175 175
  • Page 176 176
  • Page 177 177
  • Page 178 178
  • Page 179 179
  • Page 180 180
  • Page 181 181
  • Page 182 182
  • Page 183 183
  • Page 184 184
  • Page 185 185
  • Page 186 186
  • Page 187 187
  • Page 188 188
  • Page 189 189
  • Page 190 190
  • Page 191 191
  • Page 192 192
  • Page 193 193
  • Page 194 194
  • Page 195 195
  • Page 196 196
  • Page 197 197
  • Page 198 198
  • Page 199 199
  • Page 200 200
  • Page 201 201
  • Page 202 202
  • Page 203 203
  • Page 204 204
  • Page 205 205
  • Page 206 206
  • Page 207 207
  • Page 208 208
  • Page 209 209
  • Page 210 210
  • Page 211 211
  • Page 212 212
  • Page 213 213
  • Page 214 214
  • Page 215 215
  • Page 216 216
  • Page 217 217
  • Page 218 218
  • Page 219 219
  • Page 220 220
  • Page 221 221
  • Page 222 222
  • Page 223 223
  • Page 224 224
  • Page 225 225
  • Page 226 226
  • Page 227 227
  • Page 228 228
  • Page 229 229
  • Page 230 230
  • Page 231 231
  • Page 232 232
  • Page 233 233
  • Page 234 234
  • Page 235 235
  • Page 236 236
  • Page 237 237
  • Page 238 238
  • Page 239 239
  • Page 240 240
  • Page 241 241
  • Page 242 242
  • Page 243 243
  • Page 244 244
  • Page 245 245
  • Page 246 246
  • Page 247 247
  • Page 248 248
  • Page 249 249
  • Page 250 250
  • Page 251 251
  • Page 252 252
  • Page 253 253
  • Page 254 254
  • Page 255 255
  • Page 256 256
  • Page 257 257
  • Page 258 258
  • Page 259 259
  • Page 260 260
  • Page 261 261
  • Page 262 262
  • Page 263 263
  • Page 264 264
  • Page 265 265
  • Page 266 266
  • Page 267 267
  • Page 268 268
  • Page 269 269
  • Page 270 270
  • Page 271 271
  • Page 272 272
  • Page 273 273
  • Page 274 274
  • Page 275 275
  • Page 276 276
  • Page 277 277
  • Page 278 278
  • Page 279 279
  • Page 280 280
  • Page 281 281
  • Page 282 282
  • Page 283 283
  • Page 284 284
  • Page 285 285
  • Page 286 286
  • Page 287 287
  • Page 288 288
  • Page 289 289
  • Page 290 290
  • Page 291 291
  • Page 292 292
  • Page 293 293
  • Page 294 294
  • Page 295 295
  • Page 296 296
  • Page 297 297
  • Page 298 298
  • Page 299 299
  • Page 300 300
  • Page 301 301
  • Page 302 302
  • Page 303 303
  • Page 304 304
  • Page 305 305
  • Page 306 306
  • Page 307 307
  • Page 308 308
  • Page 309 309
  • Page 310 310
  • Page 311 311
  • Page 312 312
  • Page 313 313
  • Page 314 314
  • Page 315 315
  • Page 316 316
  • Page 317 317
  • Page 318 318
  • Page 319 319
  • Page 320 320
  • Page 321 321
  • Page 322 322
  • Page 323 323
  • Page 324 324
  • Page 325 325
  • Page 326 326
  • Page 327 327
  • Page 328 328
  • Page 329 329
  • Page 330 330
  • Page 331 331
  • Page 332 332
  • Page 333 333
  • Page 334 334
  • Page 335 335
  • Page 336 336

Samsung HW-J250 Skrócona instrukcja obsługi

Typ
Skrócona instrukcja obsługi