
HT-SB95
User manual
2.0 Soundbar Home Theatre System
EN ESDE FR IT PL

2
Trademarks:
The Bluetooth® word mark and logos are registered trademarks
owned by Bluetooth SIG,. Inc.
The terms HDMI, HDMI High-Denition Multimedia Interface, and
the HDMI Logo are trademarks or registered trademarks of HDMI
Licensing Administrator, Inc.

EN
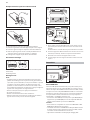
Important safety instructions
CAUTION
RISK OF ELECTRIC SHOCK
DO NOT OPEN
Please, read these safety instructions and respect
the following warnings before the appliance is
operated:
The lightning ash with arrowhead symbol, within an
equilateral triangle, is intended to alert the user to the
presence of uninsulated “dangerous voltage” within the
product’s enclosure that may be of sucient magnitude
as to constitute a risk of electric shock to persons.
The exclamation point within an equilateral triangle is
intended to alert the user to the presence of important
operating and maintenance (servicing) instructions in the
literature accompanying the appliance.
In order to prevent re always
keep candles and other open
ames away from this product.
Warning:
• Always follow basic safety precautions when using this applience,
especially when children are present.
• Children should be supervised to ensure that they do not play with
the appliance.
• Do not damage the power cord, neither do not place any heavy ob-
jects on it, do not strech it or bend it. Also do not attach extension
cables. Damage to the power cord may occur re or electric shock.
• If the supply cord is damaged, it must be replaced by the manufac-
turer, a service agent or similarly qualied persons in order to avoid
a hazard.
• Ensure that the unit is plugged into an AC 220-240V~ 50/60Hz pow-
er outlet. Using higher voltage may cause the unit to malfunction or
even re catching.
• If the power plug does not t into your outlet, do not force the plug
into an electrical socket if it does not t.
• Turn o the unit before unplugging it from power source to com-
pletely switch it o.
• Do not disconnect or connect the power cord with wet hands. It
may cause an electric shock.
• Disconnect the power cord if it is not used for a long time.
• Ensure that the mains plug is always easily accessible.
• This product does not contain any parts that are serviceable by the
user. In case of a fault, contact the manufacturer or authorised ser-
vice department. Exposing the internal parts inside the device may
endanger your life. The manufacturers guarantee does not extend
to faults caused by repairs carried out by unauthorised third parties.
• Do not use this product immediately after unpacking. Wait until it
warms up to room temperature before using it.
• Ensure this product is used in moderate climates only (not in tropi-
cal/subtropical climates).
• Place product on a at, stable surface that is not subject to
vibrations.
• Ensure the product and its parts is not overhanging the edge of the
supporting furniture.
• To reduce the risk of fire, electric shock or damage to this product,
do not expose it to direct sunlight, dust, rain and moisture. Never
expose it to dripping or splashing and do not place objects filled
with liquids on or near the product.
• Do not place objects lled with liquids, such as vases, on the
apparatus.
• Do not install near any heat sources such as radiators, heat registers,
stoves, or other apparatus (including ampliers) that produce heat.
• Do not place the product where the humidity is high and ventilation
is poor.
• Ensure a minimum distance of 5 cm around the apparatus for
sucient ventilation. Do not block any ventilation openings of this
product. Always ensure that the ventilation openings are not cove-
red with items such as newspapers, table-cloths, curtains, etc.
• NEVER let anyone, especially children, push anything into holes,
slots or any other openings in the unit’s casing as this could result in
a fatal electric shock.
• Storms are dangerous for all electric appliances. If the mains or ae-
rial wiring is struck by lightning, the appliance might get damaged,
even if it is turned o. You should disconnect all the cables and
connectors of the appliance before a storm.
• Excessive sound pressure from earphones and headphones can
cause hearing loss.
Maintenance
• Unplug the power cable from the power source before cleaning the
appliance.
• Use a soft and clean rag to clean the outside of the unit. Never clean
it with chemicals or detergent.
Batteries
• Observe the correct polarity when inserting
the batteries.
• Do not expose batteries to high temperatures
and do not place them on locations where the
temperature might increase quickly, e.g. near
the re or on the direct sunshine.
• Do not expose batteries to excessive radiant
heat, do not throw them into the re, do not
disassemble them and do not try to recharge
un-rechargeable batteries. They could leak or explode.
• Never use dierent batteries together or mix new and old ones.
• When the Remote Control is not to be used for a long time (more
than a month), remove the battery from the Remote Control to
prevent it from leaking.
• If the batteries leak, wipe away the leakage inside the battery
compartment and replace the batteries with new ones.
• Do not use any batteries other than those specied.
Do not ingest battery, chemical burn hazard
• If the battery is swallowed, it can cause severe internal burns in
just 2 hours and lead to death. Keep new and used batteries away
from children. If the battery compartment does not close securely,
stop using the product and keep it away from children. If you think
batteries might have been swallowed or placed inside any part of
the body, seek immediate medical attention.
Disposal of this equipment and Batteries
• Do not dispose of this product or its batteries as un-
sorted municipal waste. Return it to a designated col-
lection point for the recycling of WEEE in accordance
with local law. By doing so, you will help to conserve
resources and protect the environment.
• Most of the EU countries regulate the disposal of bat-
teries by law. Contact your retailer or local authorities
for more information.
• The shown above appears on electrical and electro-
nivcal equipment and batteries (or the packaging) to
remind users of this. If “Hg” or ‘Pb’ appears below the
CAUTION
RISK OF ELECTRIC SHOCK
DO NOT OPEN
CAUTION
RISK OF ELECTRIC SHOCK
DO NOT OPEN

4
symbol, this mean that the battery cantains traces of mercury (Hg)
or lead (Pb), respectively.
• Users are requested to use existing return facilities for used equip-
ment and batteries.
CE Statement:
• Hereby, Sharp Consumer Electronics Poland sp. z o.o. declares that
this audio device is in compliance with the essential requirements
and other relevant provisions of RED Directive 2014/53/EU. The full
text of the EU declaration of conformity is available by following the
link http://www.sharpconsumer.eu/documents-of-conformity

EN
Accessories
• 1x Remote control
• 1x User manual
• 1x Quick Start Guide
• 1x EU power cord
• 2x Wall Bracket
• 1x Set of wall-mounting screws
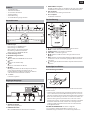
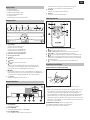
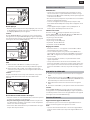
Controls
4
3
12
5 6 7 8
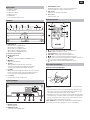
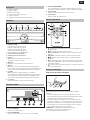
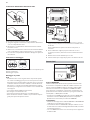
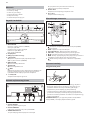
1. LED Indicators
Red indicator: In STANDBY mode.
Green indicator: In AUX mode.
Orange indicator: In Optical mode.
Blue indicator: In Bluetooth mode.
White indicator: In HDMI ARC mode.
2. Remote Control Sensor
3. Wall bracket screws
4.
button
Switch the unit between ON and STANDBY mode.
5.
button
Select the play function.
6.
button
Select the Bluetooth mode. Press and hold to
activate the pairing function in Bluetooth mode or
disconnect the existing paired Bluetooth device.
7.
/ PAIR
Play/pause/resume playback in Bluetooth mode. Press and
hold to activate the pairing function in Bluetooth mode
or disconnect the existing paired Bluetooth device.
8. +/- buttons
Increase/decrease the volume level.
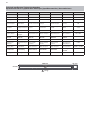
Inputs/Outputs
1 2 3 4 5
1. OPTICAL Socket
Opticial input jack.
2. HDMI ARC Socket
Connect to a TV via HDMI cable.
3. SERVICE ONLY Socket
The USB socket is for service only. It is not designed to
charge smartphones, tablets or similar devices.
4. AUX Socket
Connect to an external audio device.
5. AC~ Socket
Connect power cord.
Remote control
1. – Switch the unit between ON and STANDBY mode.
2. MUTE – Mute or resume the sound.
3. Function buttons – Select the play function.
4. VOL+/VOL- – Increase/decrease the volume level.
5.
/ – Skip to previous/next track in Bluetooth mode.
6. PAIR – Press to activate the pairing function in Bluetooth mode or
disconnect the existing paired Bluetooth device.
7.
– Play/pause/resume playback in Bluetooth mode.
First time installation
Remote control preparation
The provided Remote Control allows the unit to be operated from a
distance.
• Even if the Remote Control is operated within the eective range
6m, remote control operation may be impossible if there are any
obstacles between the unit and the remote control.
• If the Remote Control is operated near other products which gene-
rate infrared rays, or if other remote control devices using infra-red
rays are used near the unit, it may operate incorrectly. Conversely,
the other products may operate incorrectly.
FIRST-TIME USE: The unit has a pre-installed lithium CR2025 battery.
Remove the protective tab to activate the remote control battery.

6
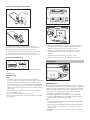
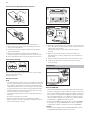
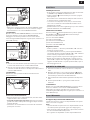
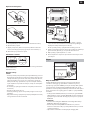
Remote control battery replacement
1
2
4
3
1
2
4
3
The remote control requires a CR2025, 3V Lithium battery.
1. Push the tab on the side of the battery tray towards the tray.
2. Now slide the battery tray out of the remote control.
3. Remove the old battery. Place a new CR2025 battery into the
battery tray with the correct polarity (+/-) as indicated.
4. Slide the battery tray back into the slot in the remote control.
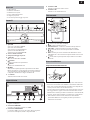
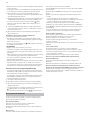
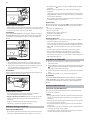
Placement and Mounting
A B
A: Normal Placement (place Soundbar on leveled surface in front of
TV)
B: Wall Mounting
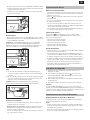
Wall Mounting
NOTE:
ū Installation must be carried out by qualied personnel only.
Incorrect assembly can result in severe personal injury and property
damage (if you intend to install this product yourself, you must
check for installations such as electrical wiring and plumbing that
may be buried inside the wall). It is the installer’s responsibility to
verify that the wall will safely support the total load of the unit and
wall brackets.
ū Additional tools (not included) are required for the installation.
ū Do not overtighten screws.
ū Keep this instruction manual for future reference.
ū Use an electronic stud nder to check the wall type before drilling
and mounting.
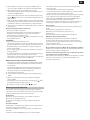
708 mm
708 mm
Ø5.5~6mm
32mm
1
4
2
3
2~3mm
708 mm
708 mm
Ø5.5~6mm
32mm
1
4
2
3
2~3mm
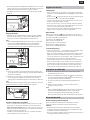
1. Drill 4 parallel holes (Ø 5.5~6 mm each according to wall type) in
the wall. The distance between the holes should be 708 mm.
Firmly x 1 dowel into each hole in the wall if necessary.
2. Tighten the wall mount brackets on the wall with screws and
screwdriver (not included). Make sure the they are securely
installed.
3. Loosen the screws at the back of the unit for 2~3 mm.
4. Lift the unit onto the wall mount brackets and slot into place.
Connections
HDMI ARC input
The ARC (Audio Return Channel) function allows you to send audio
from your ARC- compliant TV to your sound bar through a single HDMI
connection. To enjoy the ARC function, please ensure your TV is both
HDMI-CEC and ARC compliant and set up accordingly. When correctly
set up, you can use your TV remote control to adjust the volume
output (VOL +/- and MUTE) of the sound bar.
ū Connect the HDMI cable (not included) from unit‘s HDMI (ARC)
socket to the HDMI (ARC) socket on your ARC compliant TV. Then
press the remote control to select HDMI ARC.
TIPS:
• Your TV must support the HDMI-CEC and ARC function. HDMI-CEC
and ARC must be set to On.
• The setting method of HDMI-CEC and ARC may dier depending
on the TV. For details about ARC function, please refer to your TV
owner’s manual.
• Only HDMI cables of version 1.4 or higher can support the ARC
function.

EN
OPTICAL input
• Remove the protective cap of the OPTICAL socket, then connect an
OPTICAL cable (not included) to the TV’s OPTICAL OUT socket and
the OPTICAL socket on the unit.
TIP:
While in HDMI ARC/OPTICAL mode, if there’s no sound output from
the unit and the HDMI ARC/OPTICAL lights ashes quickly, you may
need to activate PCM signal output on your source device (eg. TV, DVD
or Blu-ray player).
AUX
A. Use a RCA to 3.5mm audio cable (not included) to connect the TV’s
audio output sockets to the AUX socket on the unit.
B. Use a 3.5mm to 3.5mm audio cable (not included) to connect the
TV’s or external audio device headphone socket to the AUX socket
on the unit.
TIP:
When you use the headphone output on the TV set, you will be able to
adjust the volume level directly using the TV remote control.
Connect to Power
• Before connecting the AC power cord, ensure you have completed
all other connections.
• Risk of product damage! Ensure that the power supply voltage
corresponds to the voltage printed on the back or the underside
of the unit.
• Connect the mains cable to the AC~ Socket of the unit and then into
a mains socket.
Basic Operation
Standby/ON
• When you rst connect the unit to the main socket, the unit will be
in STANDBY mode. The POWER indicator will light up red.
• Press the
button on the remote control to switch the main unit
ON or OFF.
• Disconnect the main plug from the main socket if you want to
switch the unit o completely.
ū If a TV or an external device (Only for AUX socket) is connected, the
unit will switch on automatically when the TV or the external device is
switched on.
ū When the unit has no input signal for over 15 minutes, it will auto-
matically switch to Standby mode.
Select Modes
Press the button on the unit repeatedly or press the AUX, BT
(Bluetooth), OPTICAL, HDMI ARC buttons on the remote control to
select the desired mode.
Red indicator: In STANDBY mode.
Green indicator: In AUX mode.
Orange indicator: In Optical mode.
Blue indicator: In Bluetooth mode.
White indicator: In HDMI ARC mode.
Adjust the Volume
ū Press the + / - buttons on the unit or press the VOL+ / VOL- buttons
on the remote control to adjust the volume.
ū If you wish to turn the sound o, press the MUTE button on the
remote control. Press the MUTE button again or press the VOL+ /
VOL- buttons on the unit or on the remote control to resume normal
listening.
ū While adjusting the volume, the status indicator ashes quickly.
ū While the volume level reaches its maximum level, if you press the
VOL+ button again, the status indicator ashes once. While the
volume level reaches its minimum level, if you press the VOL- button
again, the status indicator ashes once.
AUX/OPTICAL/HDMI ARC
1. Ensure that the unit is connected to the TV or audio device.
2. While in ON mode, press the
button on the unit repeatedly or
press the AUX, OPTICAL, HDMI ARC buttons on the remote control
to select the desired mode.
3. Operate your audio device directly for playback features.
4. Press the VOL +/– button to adjust the volume to your desired
level.
TIP:
While in HDMI ARC/OPTICAL mode, if there’s no sound output from
the unit and the HDMI ARC/OPTICAL lights ashes quickly, you may
need to activate PCM signal output on your source device (eg. TV, DVD
or Blu-ray player).
Bluetooth Operation
Pair Bluetooth-enabled Devices
The rst time you connect your Bluetooth device to this player, you
need to pair your device to this player.
NOTE:
ū The operational range between this player and a Bluetooth device is
approximately 8 meters (without any object between the Bluetooth
device and the unit).
ū Before you connect a Bluetooth device to this unit, ensure you know
the device’s capabilities.
ū Compatibility with all Bluetooth devices is not guaranteed.

8
ū Any obstacle between this unit and a Bluetooth device can reduce
the operational range.
ū If the signal strength is weak, your Bluetooth receiver may discon-
nect, but it will re-enter pairing mode automatically.
1. While in ON mode, press the (Bluetooth) button on the remote
control or on the unit to select Bluetooth mode. The Blue indicator
will light ash.
2. Activate your Bluetooth device and select the search mode.
“SHARP HT-SB95” will appear on your Bluetooth device list.
ū If you cannot nd the unit, press and hold the “
/PAIR” button
on the unit or press the „PAIR“ button on the remote control to be
searchable.
3. Select “SHARP HT-SB95” in the pairing list. After the “Paired”
voice prompt, the system is successfully connected and the Blue
indicator will light up solidly.
4. Begin playing music from the connected Bluetooth device.
To disconnect the Bluetooth function, you can:
ū Switch to another function on the unit.
ū Disable the Bluetooth function on your device.The device is
successfully disconnected from the unit after the “Disconnected”
voice prompt.
ū Press and hold the “
/PAIR” button on the unit or press the „PAIR“
button on the remote control.
TIPS:
• Enter „0000“ for the password if necessary.
• If no other Bluetooth device pairs with this player in 2 minutes, the
player will reconnect to the previous connection.
• The player will also be disconnected when your device is moved
beyond the operational range.
• If you want to reconnect your device to this player, place it within
the operational range.
• If the device is moved beyond the operational range, when it is
brought back, please check if the device is still connected to the
player.
• If the connection is lost, follow the instructions above to pair your
device to the player again.
Listen to Music from Bluetooth Device
ū If the connected Bluetooth device supports Advanced Audio Dis-
tribution Prole (A2DP), you can listen to the music stored on the
device through the soundbar‘.
ū If the device also supports Audio Video Remote Control Prole
(AVRCP), you can use the soundbar‘s remote control to play music
stored on the device.
1. Pair your device with the player.
2. Play music via your device (if it supports A2DP).
3. Use supplied remote control to control play (if it supports AVRCP).
ū To pause/resume play, press the “
/PAIR” button on the unit or the
„PAIR“ button on the remote control.
ū To skip to a track, press the
/ buttons on the remote control.
Troubleshooting
To keep the warranty valid, never try to repair the system yourself. If
you encounter problems when using this unit, review the following
before requesting service.
No power
Ensure that the AC cord is properly connected.
Ensure that there is power at the AC outlet.
Press standby button on the remote control or soundbar to turn the
soundbar on.
No sound
Increase the volume. Press Volume Up on the remote control or on the
right side of the soundbar.
Press MUTE on the remote control to ensure the soundbar is not
muted.
Press source buttons to select a dierent input source.
When using either of the Digital input, if there is no audio:
ū Try setting the TV output to PCM or
ū Connect directly to your Blu-ray/other source, some TVs do not pass
through digital audio.
Your TV may be set to variable audio output. Conrm that the audio
output setting is set to FIXED or STANDARD, not VARIABLE. Consult
your TV’s user manual for more detailed information.
If using Bluetooth, ensure that the volume on your source device is
turned up and that the device is not muted.
Remote control does not work
Before you press any playback control button, rst select the correct
source.
Reduce the distance between the remote control and the unit.
Insert the battery with its polarities (+/-) aligned as indicated.
Replace the battery.
Aim the remote control directly at the sensor on the front of the unit.
I hear buzzing or humming
Ensure all cables and wires are securely connected.
Connect a dierent source device (TV, Blu-ray player, etc) to see if the
buzzing persists. If it does not, the problem may be with the original
device.
Connect your device to a dierent input on the soundbar.
I can’t nd the Bluetooth name of this unit on my
Bluetooth device
Ensure the Bluetooth function is activated on your Bluetooth device.
Re-pair the unit with your Bluetooth device.
This is a 15 mins power o function, one of the ERPII
standard requirement for saving power
When the unit’s external input signal level is too low, the unit will be
turned o automatically in 15 minutes. Please increase the volume
level of your external device.

DE
Wichtige Sicherheitsanweisungen
VORSICHT
GEFAHR AUF STROMSCHLAG
NICHT ÖFFNEN
Bitte lesen Sie sich diese Sicherheitsanweisungen
durch und beachten Sie, bevor Sie das
Gerät in Betrieb nehmen, auf die folgenden
Warnhinweise:
Das Dreieckszeichen mit Blitzsymbol verweist auf nicht
isolierte „gefährliche Spannungen“ im Gerätegehäuse,
die so hoch sein können, dass sie eine Gefahr von
Stromschlägen bilden.
Das Dreieckszeichen mit Ausrufungszeichen verweist auf
wichtige Funktions - und Wartungshinweise (Reparatur) in
der dem Gerät beigelegten Bedienungsanleitung.
Halten Sie Kerzen und o enes
Feuer von diesem Produkt fern,
um einen Brand zu vermeiden.
Warnung:
• Halten Sie sich während der Nutzung dieses Geräts immer an die
allgemeinen Sicherheitshinweise, insbesondere, wenn Kinder in der
Nähe sind.
• Kinder sollten beaufsichtigt werden, um sicherzustellen, dass sie
nicht mit dem Gerät spielen.
• Das Stromkabel darf weder beschädigt, noch dürfen schwere
Objekte darauf abgelegt werden, außerdem dürfen Sie es nicht
dehnen oder verbiegen. Schließen Sie auch keine Verlängerungs-
kabel an. Schäden am Stromkabel können zu einem Feuer oder
Stromschlag führen.
• Wenn das Stromversorgungskabel beschädigt ist, muss es vom
Hersteller, einem Servicetechniker oder einer ähnlich qualizierten
Person ausgetauscht werden, um Gefährdungen zu vermeiden.
• Stellen Sie sicher, dass die Einheit an eine AC 220-240V ~ 50/60 Hz
Steckdose angeschlossen wird. Eine höhere Spannung kann zu Fehl-
funktionen oder sogar zu einem Brand führen.
• Wenn der Stecker nicht in die Steckdose passt, dürfen Sie keine Ge-
walt anwenden, um einen nicht passenden Stecker in die Steckdose
zu drücken.
• Schalten Sie die Einheit aus, bevor Sie sie von der Stromversorgung
trennen, um sie so vollständig abzuschalten.
• Vermeiden Sie es, das Stromkabel mit nassen Händen anzuschlie-
ßen oder zu trennen. Dies könnte andernfalls zu einem Stromschlag
führen.
• Trennen Sie das Stromkabel, wenn es längere Zeit nicht verwendet
wird.
• Stellen Sie sicher, dass der Hauptstecker immer leicht zugänglich ist.
• Dieses Produkt enthält keine Teile, die vom Benutzer gewartet wer-
den können. Setzen Sie sich im Fall eines Defekts mit dem Hersteller
oder der autorisierten Kundenabteilung in Verbindung. Teile aus
dem Inneren des Geräts freizulegen kann lebensgefährlich sein. Die
Garantie der Hersteller gilt nicht für Defekte, die durch von nicht
autorisierte Dritten durchgeführte Reparaturen entstehen.
• Benutzen Sie dieses Produkt nicht direkt nach dem Auspacken.
Warten Sie, bis es sich auf Zimmertemperatur erwärmt hat, ehe sie
es einschalten.
• Stellen Sie sicher, dass dieses Produkt ausschließlich in Umge-
bungen mit mildem Klima verwendet wird (kein tropisches oder
subtropisches Klima).
• Stellen Sie das Produkt auf eine ache, stabile Oberäche, die
keinen Erschütterungen ausgesetzt ist.
• Das Produkt und dessen Teile dürfen nicht über die Kante delelte
tragenden Möbelstücks hinausragen.
• Um das Risiko eines Feuers, Stromschlags oder Schäden an diesem
Produkt zu reduzieren, sollten Sie es nicht direktem Sonnenlicht,
Staub, Regen oder Feuchtigkeit aussetzen. Setzen Sie es niemals
tropfendem oder spritzendem Wasser aus und positionieren Sie kei-
ne mit Flüssigkeiten gefüllten Objekte auf oder neben dem Produkt.
• Setzen Sie keine mit Flüssigkeit gefüllten Objekte wie Vasen auf
das Gerät.
• Installieren Sie das Produkt nicht in der Nähe von Heizquellen, wie
etwa Heizungen, Heizregister, Öfen oder anderen Apparaten (ein-
schließlich Verstärker), die Hitze produzieren.
• Platzieren Sie das Gerät nicht an Orten mit hoher Feuchtigkeit und
mangelhafter Belüftung.
H. Sorgen Sie für einen Mindestabstand von 5 cm rund um das Gerät,
um eine ausreichende Belüftung sicherzustellen. Vermeiden
Sie es, Belüftungsönungen an diesem Produkt zu blockieren.
Sorgen Sie immer dafür, dass die Belüftungsönungen nicht
durch Gegenstände, z. B. Zeitungen, Tischdecken, Gardinen usw.
verdeckt sind.
• Lassen Sie NIEMALS jemanden, ganz besonders nicht Kinder, etwas
in die Löcher, Spalten oder anderen Önungen des Gerätegehäuses
stopfen, da dies zu einem folgenschweren Stromschlag führen kann.
• Gewitter sind für alle elektrischen Geräte gefährlich. Wenn das
Strom- oder Antennenkabel vom Blitz getroen wird, kann das Ge-
rät, auch wenn es ausgeschaltet ist, beschädigt werden. Bei einem
herannahenden Gewitter sollten Sie alle Kabel und Stecker des
Gerätes ausstecken.
• Ein exzessiver Schalldruck von Kopfhörern kann zu einem Hörver-
lust führen.
Wartung
• Trennen Sie vor dem Reinigen des Geräts das Stromkabel von der
Stromquelle.
• Verwenden Sie einen weichen und sauberen Lappen, um die
Außenächen der Einheit zu reinigen. Verwenden Sie beim Reinigen
niemals Chemikalien oder Reinigungsmittel.
Batterien
• Achten Sie beim Einlegen der Batterien auf die
richtige Polarität.
• Setzen Sie Batterien keinen hohen Temperatu-
ren aus und legen Sie sie nicht an Stellen ab, wo
sich die Temperatur schnell erhöht, z. B. neben
einem Feuer oder in die direkte Sonnenein-
strahlung.
• Setzten Sie Batterien keiner übermäßigen
Strahlungswärme aus, werfen Sie sie nicht ins
Feuer oder bauen sie auseinander und versuchen Sie nicht, nicht
auadbare Batterien aufzuladen. Sie könnten undicht werden oder
explodieren.
• Verwenden Sie niemals unterschiedliche Batterien oder vermischen
neue mit alten.
• Wenn Sie die Fernbedienung für längere Zeit nicht verwenden (län-
ger als einen Monat), sollten Sie die Batterie aus der Fernbedienung
nehmen, um ein Auslaufen zu verhindern.
• Wenn die Batterien auslaufen, wischen Sie die ausgelaufene Flüssig-
keit im Batteriefach weg und ersetzen die Batterien durch neue.
• Verwenden Sie immer nur die angegebenen Batterien.
CAUTION
RISK OF ELECTRIC SHOCK
DO NOT OPEN
CAUTION
RISK OF ELECTRIC SHOCK
DO NOT OPEN

10
Batterie nicht verschlucken, Gefahr von chemischen
Verbrennungen
• Wenn die Batterie verschluckt wird, kann dies zu schweren inneren
Verbrennungen innerhalb von nur 2 Stunden führen und tödlich
sein. Bewahren Sie neue und gebrauchte Batterien für Kinder unzu-
gänglich auf. Wenn das Batteriefach nicht fest geschlossen werden
kann, sollten Sie das Gerät nicht weiter verwenden und es für Kinder
unzugänglich aufbewahren. Wenn Sie vermuten, dass Batterien
verschluckt oder in irgendein Körperteil eingeführt wurden, müssen
Sie sofort medizinische Hilfe in Anspruch nehmen.
Entsorgung dieses Geräts und von Batterien
• Entsorgen Sie dieses Produkt oder dessen Batterien
niemals über den normalen Hausmüll. Geben Sie es
entsprechend den gesetzlichen Regelungen vor Ort
bei dem für das Recycling von WEEE vorgesehenen
Sammelpunkt ab. Damit helfen Sie, Ressourcen einzu-
sparen und die Umwelt zu schützen.
• In den meisten EU-Ländern gelten für die Entsorgung
von Batterien besondere Gesetze und Vorschriften.
Weitere Informationen erhalten Sie von Ihrem Händler
oder den örtlichen Behörden.
• Der oben aufgeführte Text erscheint auf elektrischen
und elektronischen Geräten und Batterien (oder der
Verpackung), um Nutzer entsprechend zu erinnern. Wenn unter
dem Symbol „Hg“ oder „Pb“ erscheint, bedeutet dies, dass die Batte-
rie jeweils Spuren von Quecksilber (Hg) oder Blei (Pb)enthält.
• Nutzer werden darum gebeten, für gebrauchte Geräte und Batterien
bestehende Rückgabeeinrichtungen zu nutzen.
CE-Konformitätserklärung:
• Die Sharp Consumer Electronics Poland sp. z o.o. erklärt hiermit,
dass dieses Audiogerät die wesentlichen Anforderungen und
weitere entsprechende Vorschriften der RED-Verordnung 2014/53/
EU einhält. Der vollständige Text der EU-Konformitätserklärung ist
unter folgender Internetadresse erhältlich:
http://www.sharpconsumer.eu/documents-of-conformity

DE
Zubehör
• 1x Fernbedienung
• 1x Benutzerhandbuch
• 1x Schnellstart-Handbuch
• 1x EU Stromkabel
• 2x Wandhalterung
• 1x Satz Wandbefestigungsschrauben
Steuerelemente
4
3
12
5 6 7 8
1. LED-Anzeigen
Rote Anzeige: Im STANDBY-Modus.
Grüne Anzeige: Im AUX-Modus.
Orange Anzeige: Im optischen Modus.
Blaue Anzeige: Im Bluetooth-Modus.
Weiße Anzeige: Im HDMI ARC-Modus.
2. Fernbedienungssensor
3. Wandhalterungsschrauben
4.
taste
Zwischen ON und STANDBY-Modus wechseln.
5.
taste
Wählen Sie die Funktion Play.
6.
taste
Wählen Sie einen Bluetooth-Modus.
7.
/ PAIR
Wiedergabe im Bluetooth-Modus abspielen/anhalten/
weiter abspielen. Drücken und halten, um die
Kopplungsfunktion im Bluetooth-Modus zu aktivieren
oder um das bestehende Bluetooth-Gerät
8. +/- tasten
Lautstärke regulieren.
Eingänge/Ausgänge
1 2 3 4 5
1. OPTICAL Steckplatz
Optische Eingangsbuchse.
2. HDMI ARC Anschluß
Über ein HDMI-Kabel mit dem Fernseher verbinden.
3. SERVICE ONLY Steckplatz
Der USB-Steckplatz dient nur der Wartung. Er eignet sich nicht für
das Auaden von Smartphones, Tablets oder ähnlichen Geräten.
4. AUX Steckplatz
Mit einem externen Audiogerät verbinden.
5. AC~ Steckplatz
Stromkabel anschließen.
Fernbedienung
1. – Einheit zwischen ON und STANDBY-Modus wechseln.
2. MUTE – Stumm oder Ton wieder aktivieren.
3. Funktionstasten – Play-Funktion auswählen.
4. VOL+/VOL- – Lautstärke regulieren.
5.
/ – Im Bluetooth-Modus zum vorherigen/nächsten Track
springen.
6. PAIR – Drücken, um die Kopplungsfunktion im Bluetooth-Modus
zu aktivieren oder das vorhandene gekoppelte Bluetooth-Gerät
zu trennen.
7.
– Wiedergabe im Bluetooth-Modus abspielen/anhalten/weiter
abspielen.
Erstmalige Installation
Fernsteuerung einrichten
Dank der beigefügten Fernbedienung kann das Gerät aus der Ferne
bedient werden.
• Selbst wenn die Fernbedienung innerhalb des eektiven Bereichs
von 6 m bedient wird, kann ihr Betrieb unmöglich sein, wenn sich
zwischen der Einheit und der Fernbedienung Hindernisse benden.
• Wenn die Fernbedienung in der Nähe von anderen Produkten, die
Infrarotstrahlen generieren, betrieben wird, oder wenn andere
Fernsteuerungsgeräte, die Infrarotstrahlen verwenden, in der Nähe
der Einheit verwendet werden, arbeitet diese womöglich nicht
ordnungsgemäß. Umgekehrt arbeiten auch die anderen Geräte
womöglich fehlerhaft.
ERSTMALIGE VERWENDUNG: Die Einheit verfügt über
eine vorinstallierte CR2025 Lithiumbatterie. Entfernen Sie die
Schutzabdeckung, um die Batterie der Fernbedienung zu aktivieren.

12
Batterie der Fernbedienung austauschen
1
2
4
3
1
2
4
3
Die Fernbedienung benötigt eine CR2025, 3V Lithiumbatterie.
1. Drücken Sie den Verschluss an der Seite des Batteriefachs in
Richtung Fach.
2. Dann schieben Sie die Batteriefachabdeckung aus der
Fernbedienung.
3. Entfernen Sie die alte Batterie. Setzen Sie eine neue CR2025
Batterie mit der entsprechend den Angaben korrekten Polarität
(+/-) in das Batteriefach.
4. Bringen Sie die Batteriefachabdeckung wieder an der
Fernbedienung an.
Platzierung und Befestigung
A B
A: Normale Platzierung (Setzen Sie die Soundbar auf eine ebene
Oberäche vor dem Fernseher)
B: Wandmontierung
Wandmontierung
HINWEIS:
ū Die Installation darf nur von einem qualizierten Fachmann vorge-
nommen werden. Eine unsachgemäße Montage kann zu schweren
Verletzungen oder Geräteschäden führen (wenn Sie dieses Produkt
selbst installieren möchten, müssen Sie die Wand auf Installationen
im Inneren wie elektrische Kabel und Rohrleitungen prüfen). Die
Person, welche die Installation vornimmt, muss sicherstellen, dass
die Wand die Gesamtlast der Einheit und Halterungsvorrichtungen
tragen kann.
ū Für die Installation werden zusätzliche Werkzeuge (nicht beigefügt)
benötigt.
ū Ziehen Sie die Schrauben nicht zu fest.
ū Bewahren Sie die Betriebsanleitung zum Nachschlagen zu einem
späteren Zeitpunkt auf.
ū Nutzen Sie einen elektronischen Balkensucher, um vor dem Bohren
und Montieren den Wandtyp zu prüfen.
708 mm
708 mm
Ø5.5~6mm
32mm
1
4
2
3
2~3mm
708 mm
708 mm
Ø5.5~6mm
32mm
1
4
2
3
2~3mm
1. Bohren Sie 4 parallele Löcher (jeweils Ø 5,5 – 6 mm entsprechend
dem Wandtyp) in die Wand. Der Abstand zwischen den Löchern
sollte 708 mm betragen.
Fixieren Sie bei Bedarf in jedem Loch in der Wand einen Dübel.
2. Ziehen Sie die an der Wand montierten Halterungen mit
Schrauben und Schraubendreher (nicht im Lieferumfang
enthalten) an der Wand fest. Achten Sie darauf, dass sie sicher
montiert sind.
3. Lösen Sie die Schrauben an der Rückseite der Einheit um 2 – 3 mm.
4. Heben Sie die Einheit an die Wandhalterungen und schieben Sie
sie ein.
Anschlüsse
HDMI ARC-Eingang
Die ARC-Funktion (Audio Return Channel) erlaubt Ihnen, Audio von
Ihrem ARC-kompatiblen Fernseher über einen einzigen HDMI-
Anschluss an Ihre Soundbar zu schicken. Um die ARC-Funktion zu
genießen, stellen Sie bitte sicher, dass Ihr Fernseher sowohl HDMI-CEC
als auch ARC-kompatibel ist, und richten Sie ihn entsprechend ein. Bei
korrekter Einrichtung können Sie Ihre Fernsehfernbedienung nutzen,
um die Lautstärke (VOL +/- und MUTE) der Soundbar zu regulieren.
ū Schließen Sie das HDMI-Kabel (nicht beigefügt) vom HDMI
(ARC)-Steckplatz der Einheit an den HDMI (ARC)-Steckplatz an Ihrem
ARC-kompatiblen Fernseher an. Wählen Sie dann per Knopfdruck
auf Ihrer Fernbedienung HDMI ARC aus.
TIPPS:
• Ihr Fernseher muss die HDMI-CEC und ARC-Funktion unterstützen.
HDMI-CEC und ARC müssen auf On gestellt sein.

DE
• Die Einstellungsmethoden HDMI-CEC und ARC können je nach Fern-
sehgerät variieren. Für weitere Details zur ARC-Funktion nehmen Sie
bitte die Bedienungsanleitung Ihres Fernsehers zur Hand.
• Nur HDMI Kabel der Version 1.4 oder höher unterstützen die ARC
Funktion
Eingang OPTICAL
• Entfernen Sie die Schutzabdeckung, schließen Sie dann ein OPTI-
CAL-Kabel (nicht enthalten) an den Steckplatz OPTICAL OUT des
Fernsehers und den Steckplatz OPTICAL auf der Einheit an.
TIPP:
H. Wenn im HDMI ARC/OPTICAL-Modus kein Sound von der Einheit
kommt und die HDMI ARC/OPTICAL-Lichter schnell blinken,
müssen Sie womöglich den PCM-Signalausgang auf Ihrem
Quellengerät (z. B. Fernseher, DVD oder Blu-Ray Player) aktivieren.
AUX
A. Nutzen Sie ein RCA zu 3,5 mm Audiokabel (nicht beigefügt), um
die Steckplätze des TV-Audioausgangs mit dem AUX-Steckplatz an
der Einheit zu verbinden.
B. Nutzen Sie ein 3,5 mm zu 3,5 mm Audiokabel (nicht beigefügt),
um die Kopfhörersteckplätze des Fernsehers oder externen
Audiogeräts mit dem AUX-Steckplatz an der Einheit zu verbinden.
TIPP:
Bei Anschluss über den Kopfhörer Ausgang des TV Gerätes, benutzen
Sie die TV Fernbedienung um die Lautstärke zu regulieren.
An eine Stromquelle anschließen
• Bevor Sie das Wechselstromkabel anschließen, müssen Sie sicher-
stellen, dass Sie alle anderen Anschlüsse vorgenommen haben.
• Risiko von Geräteschäden! Stellen Sie sicher, dass die Stromversor-
gungsspannung der auf der Rückseite oder Unterseite der Einheit
angegebenen Spannung entspricht.
• Schließen Sie das Hauptkabel an den AC~-Steckplatz der Einheit
und anschließend an eine Steckdose an.
Allgemeiner Betrieb
Standby/ON
• Wenn Sie die Einheit das erste Mal an eine Steckdose anschließen,
bendet sie sich im STANDBY-Modus. Die POWER-Anzeige leuchtet
rot auf.
• Drücken Sie die
entsprechende Taste auf der Fernbedienung, um
die Haupteinheit ein- oder auszuschalten (ON/OFF).
• Ziehen Sie den Hauptstecker aus der Netzsteckdose, wenn Sie die
Einheit vollständig abschalten möchten.
ū Wenn ein Fernseher oder ein externes Gerät (nur für AUX-Steckplatz)
angeschlossen ist, schaltet sich die Einheit automatisch ein, wenn der
Fernseher oder das externe Gerät eingeschaltet ist.
ū Wenn die Einheit für mehr als 15 Minuten kein Eingangssignal emp-
fängt, wechselt sie automatisch in den Standby-Modus.
Modi wählen
Drücken Sie mehrmals die -Taste auf der Einheit oder die Tasten
AUX, BT (Bluetooth), OPTICAL, HDMI ARC auf der Fernbedienung, um
den gewünschten Modus auszuwählen.
Rote Anzeige: Im STANDBY-Modus.
Grüne Anzeige: Im AUX-Modus.
Orange Anzeige: Im optischen Modus.
Blaue Anzeige: Im Bluetooth-Modus.
Weiße Anzeige: Im HDMI ARC-Modus.
Lautstärkeregelung
ū Drücken Sie die Tasten + / - auf der Einheit oder tasten VOL+ / VOL-
auf der Fernbedienung, um die Lautstärke anzupassen.
ū Wenn Sie den Ton vollständig abschalten möchten, drücken Sie die
MUTE-Taste auf der Fernbedienung. Drücken Sie die MUTE-Taste
erneut oder drücken Sie die Tasten VOL+ / VOL- auf der Einheit oder
der Fernbedienung, um den Ton wieder einzuschalten.
ū Während des Einstellens der Lautstärke blinkt die Statusanzeige.
ū Wenn Sie die Taste VOL+ erneut drücken und die Lautstärke ihre
maximale Stufe erreicht hat, blinkt die Statusanzeige einmal auf.
Wenn Sie die Taste VOL- erneut drücken und die Lautstärke ihre
minimale Stufe erreicht hat, blinkt die Statusanzeige einmal auf.
AUX/OPTICAL/HDMI ARC
1. Stellen Sie sicher, dass die Einheit an den Fernseher oder das
Audiogerät angeschlossen ist.
2. Drücken Sie im ON-Modus mehrmals die
-Taste auf der Einheit
oder die Tasten AUX, OPTICAL, HDMI ARC auf der Fernbedienung,
um den gewünschten Modus auszuwählen.
3. Sie können Ihr Audiogerät direkt für Wiedergabefunktionen
nutzen.
4. Drücken Sie die Taste VOL +/–, um die Lautstärke auf die
gewünschte Stufe zu stellen.
TIPP:
I. Wenn im HDMI ARC/OPTICAL-Modus kein Sound von der Einheit
kommt und die HDMI ARC/OPTICAL-Lichter schnell blinken,
müssen Sie womöglich den PCM-Signalausgang auf Ihrem
Quellengerät (z. B. Fernseher, DVD oder Blu-Ray Player) aktivieren.
Bluetooth-Betrieb
Bluetooth-fähige Geräte koppeln
Wenn Sie Ihr Bluetooth-Gerät das erste Mal mit diesem Player
verbinden, müssen Sie Ihr Gerät an diesen Player koppeln.
HINWEIS:
ū Der Betriebsbereich zwischen diesem Player und einem Blue-
tooth-Gerät beträgt ungefähr 8 Meter (ohne ein Objekt zwischen
dem Bluetooth-Gerät und der Einheit).
ū Bevor Sie ein Bluetooth-Gerät mit dieser Einheit verbinden, müssen
Sie die Eigenschaften des Geräts kennen.

14
ū Eine Kompatibilität mit allen Bluetooth-Geräten kann nicht garan-
tiert werden.
ū Jedes Hindernis zwischen dieser Einheit und einem Bluetooth-Gerät
kann den Betriebsbereich reduzieren.
ū Wenn die Signalstärke schwach ist, könnte Ihr Bluetooth-Empfänger
möglicherweise nicht verbunden sein, dieser geht jedoch auto-
matisch wieder in den Kopplungsmodus.
1. Drücken Sie im ON-Modus die (Bluetooth) Taste auf der
Fernbedienung oder auf der Einheit, um den Bluetooth-Modus
auszuwählen. Die Blue-Anzeige leuchtet auf.
2. Aktivieren Sie Ihr Bluetooth-Gerät und wählen Sie den Suchmodus.
„SHARP HT-SB95“ erscheint in der Bluetooth-Geräteliste.
ū Wenn Sie das Gerät nicht nden können, drücken und halten Sie die
Taste “
/ PAIR” am Gerät oder drücken Sie die Taste “PAIR” auf der
Fernbedienung, um durchsuchbar zu sein.
3. Wählen Sie in der Kopplungsliste „SHARP HT-SB95“ aus. Nach der
„Paired“-Sprachansage ist das System erfolgreich verbunden und
die Blue-Anzeige leuchtet dauerhaft.
4. Beginnen Sie mit dem Abspielen von Musik vom verbundenen
Bluetooth-Gerät.
Um die Bluetooth-Funktion zu deaktivieren, können Sie
Folgendes tun:
ū Wechseln Sie zu einer anderen Funktion auf der Einheit.
ū Deaktivieren Sie die Bluetooth-Funktion auf Ihrem Gerät. Das Gerät
ist nach der „Disconnected“-Sprachansage erfolgreich von der
Einheit getrennt.
ū Drücken und halten Sie die Taste “
/ PAIR” am Gerät oder drücken
Sie die Taste “PAIR” auf der Fernbedienung.
TIPPS:
• Geben Sie, wenn nötig „0000“ als Passwort ein.
• Wenn innerhalb von zwei Minuten kein anderes Bluetooth-Gerät
an diesen Player gekoppelt wird, kehrt der Player wieder zur vor-
herigen Verbindung zurück.
• Der Player wird auch getrennt, wenn Ihr Gerät den Betriebsbereich
verlässt.
• Wenn Sie Ihr Gerät wieder mit diesem Player verbinden möchten,
platzieren Sie es innerhalb des Betriebsbereichs.
• Wenn das Gerät den Betriebsbereich verlässt und dann zurück-
gebracht wird, prüfen Sie bitte, ob das Gerät noch mit dem Player
verbunden ist.
• Wenn die Verbindung verloren ist, folgen Sie bitte den oben an-
gegebenen Instruktionen, um Ihr Gerät wieder an den Player zu
koppeln.
Musik vom Bluetooth-Gerät hören
ū Wenn das verbundene Bluetooth-Gerät Advanced Audio Distribu-
tion Prole (A2DP) unterstützt, können Sie über die Soundbar die
auf dem Gerät gespeicherte Musik hören‘.
ū Wenn das Gerät auch Audio Video Remote Control Prole (AVRCP)
unterstützt, können Sie die Fernbedienung der Soundbar nutzen,
um die auf dem Gerät gespeicherte Musik abzuspielen.
1. Koppeln Sie Ihr Gerät an den Player.
2. Spielen Sie über Ihr Gerät Musik ab (wenn es A2DP unterstützt).
3. Verwenden Sie zum Abspielen die mitgelieferte Fernbedienung
(wenn diese AVRCP unterstützt).
ū Um die Wiedergabe zu unterbrechen / fortzusetzen, drücken Sie die
Taste “
/ PAIR” am Gerät oder die Taste “PAIR” auf der Fernbedie-
nung.
ū Um einen Track zu überspringen, drücken Sie die Tasten
/ auf
der Fernbedienung.
Problembehandlung
Damit die Garantie ihre Gültigkeit behält, dürfen Sie nie versuchen,
das System selbst zu reparieren. Wenn Sie Probleme bei der
Verwendung der Einheit haben, beschäftigen Sie sich zuerst mit
Folgendem, bevor Sie Hilfe anfordern.
Kein Strom
Stellen Sie sicher, dass das Wechselstromkabel ordnungsgemäß
angeschlossen ist.
Stellen Sie sicher, dass die Steckdose ordnungsgemäß funktioniert.
Drücken Sie die Standby-Taste auf der Fernbedienung oder Soundbar,
um die Soundbar einzuschalten.
Kein Ton
Erhöhen Sie die Lautstärke. Drücken Sie auf der Fernsteuerung oder
auf der rechten Seite der Soundbar auf Volume Up.
Drücken Sie MUTE auf der Fernsteuerung, um sicherzustellen, dass die
Soundbar nicht auf stumm geschaltet ist.
Drücken Sie die Quellentasten, um eine andere Eingangsquelle
auszuwählen.
Beachten Sie Folgendes, wenn Sie bei der Nutzung eines digitalen
Eingangs keinen Ton haben:
ū Versuchen Sie, den Ausgang des Fernsehers auf PCM zu setzen, oder
ū Verbinden Sie ihn direkt mit Ihrem Blu-Ray-Player/einer anderen
Quelle. Einige Fernseher geben digitales Audio nicht weiter.
Ihr Fernseher ist womöglich für einen variablen Audio-Ausgang
eingestellt. Bestätigen Sie, dass die Einstellung des Audio-Ausgangs
auf FIXED oder STANDARD gesetzt ist, nicht auf VARIABLE. Ziehen Sie
für weitere Informationen das Handbuch Ihres Fernsehers zu Rate.
Stellen Sie bei der Verwendung von Bluetooth sicher, dass die
Lautstärke Ihres Quellengeräts aufgedreht und Ihr Gerät nicht
stummgeschaltet ist.
Fernbedienung funktioniert nicht
Bevor Sie eine Wiedergabetaste drücken, müssen Sie zuerst die
richtige Quelle auswählen.
Reduzieren Sie den Abstand zwischen der Fernbedienung und der
Einheit.
Setzen Sie die Batterie entsprechend der angezeigten Polarität (+/-)
ein.
Ersetzen Sie die Batterie.
Zielen Sie mit der Fernbedienung direkt auf den Sensor vorne an der
Einheit.
Ich höre ein Summen oder Brummen
Stellen Sie sicher, dass alle Kabel und Drähte fest angeschlossen sind.
Schließen Sie ein anderes Quellengerät an (Fernseher, Blu-Ray-Player,
usw.), um zu prüfen, ob das Summen auch in diesem Fall auftritt. Wenn
dies nicht der Fall ist, liegt das Problem womöglich am ursprünglichen
Gerät.
Schließen Sie Ihr Gerät an einen anderen Eingang der Soundbar an.
Ich kann den Bluetooth-Namen dieser Einheit nicht auf meinem
Bluetooth-Gerät nden
Vergewissern Sie sich, dass die Bluetooth-Funktion auf Ihrem
Bluetooth-Gerät aktiviert ist.
Koppeln Sie die Einheit wieder an Ihr Bluetooth-Gerät.
Das Gerät ist mit einer 15-minütigen Stromabschaltfunktion
ausgestattet, einer der ERPII-Standardanforderungen zum
Einsparen von Strom
Wenn die Stärke des externen Eingangssignals der Einheit zu schwach
ist, wird die Einheit nach 15 Minuten automatisch abgeschaltet. Bitte
erhöhen Sie die Lautstärke Ihres externen Geräts.

ES
Instrucciones de seguridad importantes
ADVERTENCIA
RIESGO DE DESCARGA ELÉCTRICA
NO ABRIR
Lea estas instrucciones de seguridad y respete
las siguientes advertencias antes de utilizar el
aparato:
La nalidad del símbolo del rayo con cabeza de echa,
dentro de un triángulo equilátero, es avisar al usuario de
la presencia de „tensión peligrosa“ sin aislamiento dentro
de la carcasa del producto, que puede ser de suciente
magnitud como para provocar descargas eléctricas para
las personas.
La nalidad de la marca de admiración dentro de un
triángulo equilátero es avisar al usuario de la presencia
de instrucciones importantes de uso y mantenimiento
(servicio) en el manual que acompaña al aparato.
Para evitar incendios mantenga
siempre las velas u otras llamas al
descubierto lejos del producto.
Advertencia:
• Respete siempre las precauciones básicas de seguridad cuando
utilice este electrodoméstico, especialmente cuando si hay niños
presentes.
• Los niños deben ser supervisados para asegurarse de que no juegan
con el aparato.
• No dañe el cable de alimentación, no coloque objetos pesados
encima, no lo estire ni lo doble. Asimismo, no conecte alargadores.
Los daños en el cable de alimentación pueden ocasionar incendios
o descargas eléctricas.
• Si el cable de alimentación presenta algún daño, deberá ser sustitui-
do por el fabricante, el servicio técnico o personas con una cualica-
ción similar para evitar que se produzcan situaciones de peligro.
• Asegúrese de que la unidad está conectada a una toma de corriente
de CA de 220-240 V y ~ 50/60 Hz. El uso de una tensión superior
puede causar el mal funcionamiento de la unidad o incluso presen-
tar riesgo de incendio.
• Si el enchufe no encaja en la toma, no lo fuerce.
• Apague la unidad antes de desenchufarla de la corriente para
desconectarla por completo.
• No conecte ni desconecte el cable de alimentación con las manos
mojadas, ya que podría producirse una descarga eléctrica.
• Desconecte el cable de alimentación si la unidad no se va a utilizar
durante un periodo prolongado de tiempo.
• Asegúrese de que el enchufe de alimentación resulta fácilmente
accesible.
• Este producto no contiene ninguna pieza que pueda ser reparada
por el usuario. En caso de avería, póngase en contacto con el
fabricante o el servicio técnico autorizado. La exposición de ciertas
partes internas del dispositivo puede poner en peligro su vida. La
garantía del fabricante no cubre las averías resultantes de reparacio-
nes llevadas a cabo por terceros.
• No utilice este producto inmediatamente tras desembalar. Espere a
que se caliente a la temperatura ambiente antes de utilizarlo.
• Asegúrese de utilizar el producto en climas moderados únicamente
(no en climas tropicales o subtropicales).
• Coloque el producto en una supercie plana estable y no expuesta
a vibraciones.
• Asegúrese de que el producto y sus partes no sobresalen de los
bordes del mueble sobre el que se coloca.
• Para reducir el riesgo de incendio, descarga eléctrica o daño en
el producto, no lo exponga directamente a la luz del sol, polvo,
lluvia o humedad. No exponga nunca este producto a gotas o
derramamientos y no coloque objetos llenos de líquido sobre o
cerca de este.
• No coloque objetos con líquidos, como jarrones, sobre el aparato.
• No instale el aparato cerca de ninguna fuente de calor, como radia-
dores, salidas de aire caliente, estufas u otros aparatos (incluidos
amplicadores) que produzcan calor.
• No coloque el producto en espacios húmedos o con ventilación
deciente.
• Asegúrese de dejar una distancia mínima de 5 cm en torno al
aparato para garantizar una ventilación adecuada. No obstruya las
aberturas de ventilación de este producto. Evite siempre la obst-
rucción de las ranuras de ventilación con objetos como periódicos,
manteles, cortinas, etc.
• No permita que nadie, especialmente los niños, introduzca elemen-
tos en los oricios, ranuras ni en ninguna apertura de la carcasa de
la unidad, ya que podrían dar lugar a descargas eléctricas mortales.
• Las tormentas son peligrosas para todos los aparatos eléctricos. Si
el cable de alimentación o el cableado de la antena es alcanzado
por un rayo, el aparato puede resultar dañado, incluso si no está
encendido. Debe desconectar todos los cables y conectores del
aparato antes de una tormenta.
• La presión acústica excesiva de los auriculares y los cascos puede
causar la pérdida del sentido auditivo.
Mantenimiento
• Desenchufe el cable de alimentación de la toma de corriente antes
de limpiar la unidad.
• Utilice un paño suave y limpio para limpiar la parte exterior de la
unidad. No utilice nunca productos químicos ni detergentes.
Pilas
• Tenga en cuenta la polaridad correcta al
insertar las pilas.
• No exponga las pilas a altas temperaturas y no
las coloque en lugares en los que la tempera-
tura pueda experimentar cambios bruscos, p.
ej., cerca de un fuente de fuego o en contacto
directo con la luz solar.
• No exponga las pilas a calor radiante excesivo, no las arroje al fuego,
no las desmonte y no intente recargar pilas no recargables, ya que
podrían producirse fugas o explotar.
• No combine nunca pilas de diferente tipo y no mezcle pilas nuevas
y pilas viejas.
• Si el mando a distancia no se va a utilizar durante un largo periodo
de tiempo (más de un mes), retire la pila para evitar fugas.
• Si las baterías presentan fugas, limpie la parte interior del comparti-
mento y sustitúyalas por pilas nuevas.
• No utilice pilas diferentes a las especicadas.
No ingiera las pilas, ya que pueden causar quemaduras químicas.
• La ingestión de pilas puede causar quemaduras internas graves en
tan solo 2 horas y producir la muerte. Mantenga las pilas nuevas
y usadas lejos de los niños. Si el compartimiento de la pila no
se cierra correctamente, deje de usar el producto y manténgalo
alejado de los niños. Si cree que se pueden haber tragado las pilas
o introducido en alguna parte del cuerpo, busque atención médica
inmediatamente.
CAUTION
RISK OF ELECTRIC SHOCK
DO NOT OPEN
CAUTION
RISK OF ELECTRIC SHOCK
DO NOT OPEN

16
Eliminación de este equipo y las pilas
• No elimine este producto o sus pilas como residuos
urbanos no clasicados. Entréguelos en un punto
de recogida designado para el reciclado de aparatos
electrónicos y eléctricos de acuerdo con la ley local.
De esta forma, ayudará a conservar los recursos y a
proteger el medio ambiente.
• La mayor parte de los países de UE regulan la elimina-
ción de las pilas mediante leyes. Póngase en contacto
con su distribuidor y con las autoridades locales para
obtener más información.
• Se incluye el símbolo anterior en el equipo eléctrico y
electrónico, y las baterías (o el embalaje) para recordar
a los usuarios de esta circunstancia. Si aparece “Hg” o “Pb” debajo
del símbolo, eso signica que las pilas contienen trazas de mercurio
(Hg) o plomo (Pb), respectivamente.
• Se solicita a los usuarios que utilicen las instalaciones de devolución
existentes para equipos usados.
Declaración CE:
• Por la presente, Sharp Consumer Electronics Poland sp. z o.o. declara
que este dispositivo sonoro cumple los requisitos esenciales y
otras disposiciones pertinentes de la Directiva RED 2014/53/UE.
El texto completo de la declaración de conformidad de la UE está
disponible en el siguiente enlace http://www.sharpconsumer.eu/
documents-of-conformity

ES
Accesorios
• 1x mando a distancia
• 1x guía del usuario
• 1x Guía de inicio rápido
• 1x cable de alimentación para la UE
• 2x soportes de pared
• 1x conjunto de tornillos para montaje en pared
Controles
4
3
12
5 6 7 8
1. Indicadores LED
Indicador rojo: En modo de espera
Indicador verde: En modo auxiliar
Indicador naranja: En modo óptico
Indicador azul: En modo Bluetooth
Indicador blanco: En modo HDMI ARC.
2. Sensor del mando a distancia
3. Tornillos para soporte de pared
4.
botón
Permite alterna la unidad entre el modo de
encendido y el modo en espera.
5.
botón
Permite seleccionar la función de reproducción.
6.
botón
Permite seleccionar el modo Bluetooth. Mantenga pulsado
para activar la función de emparejamiento en modo Bluetooth
o desconecte el dispositivo Bluetooth emparejado existente.
7.
/ PAIR
Permite reproducir, realizar una pausa o reanudar la
reproducción en modo Bluetooth. Mantenga presionado para
activar la función de emparejamiento en modo Bluetooth o
desconecte el dispositivo Bluetooth emparejado existente.
8. +/- botones
Permiten aumentar o reducir el nivel de volumen.
Entradas/salidas
1 2 3 4 5
1. Conexión OPTICAL
Conexión de entrada óptica.
2. Conexión HDMI ARC
Permite conectar un televisor a través de un cable HDMI.
3. Conexión SERVICE ONLY
La conexión USB solo es para nes de mantenimiento. No está
diseñada para cargar smartphones, tablets o dispositivos similares.
4. Conexión AUX
Permite conectar un dispositivo de audio externo.
5. Conexión AC~
Conecte el cable de alimentación.
Mando a distancia
1. – Permite alternar la unidad entre el modo de encendido y el
modo en espera.
2. MUTE – Permite silenciar o activar el sonido.
3. Botones de función – Permiten seleccionar la función de repro-
ducción.
4. VOL+/VOL- – Permiten aumentar o reducir el nivel de sonido.
5.
/ – Permiten saltar a la pista anterior o siguiente en modo
Bluetooth.
6. PAIR – Mantenga pulsado para activar la función de emparejam-
iento en modo Bluetooth o desconecte el dispositivo Bluetooth
emparejado existente.
7.
– Permite reproducir, realizar una pausa o reanudar la reproduc-
ción en modo Bluetooth.
Primera instalación
Preparación del mando a distancia
El mando a distancia suministrado permite utilizar la unidad a
distancia.
• Incluso si se utiliza dentro de un rango de distancia de 6 m, el
mando a distancia puede no responder adecuadamente si existen
obstáculos entre la unidad y el mando a distancia.
• Si el mando a distancia se utiliza cerca de otros productos que
generan rayos infrarrojos o si otros dispositivos de control remoto
utilizan rayos infrarrojos cerca de la unidad, el mando a distancia
podría no funcionar correctamente. También podría ocurrir que
otros productos no funcionen correctamente.
PRIMER USO: La unidad lleva preinstalada una batería
de litio CR2025. Retire la pestaña de protección
para activar la pila del mando a distancia.

18
Colocación de la pila del mando a distancia
1
2
4
3
1
2
4
3
1
2
4
3
El mando a distancia requiere una pila de litio CR2025 de 3 V.
1. Presione la pestaña situada al lado de la bandeja de la pila en
dirección al compartimento.
2. A continuación, retire la bandeja de la pila fuera del mando a
distancia deslizándola.
3. Retire la pila antigua. Coloque una nueva pila CR2025 en la
bandeja de la pila con la polaridad correcta (+/-) como se indica.
4. Deslice la bandeja de la pila en la ranura del mando a distancia.
Colocación y montaje
A B
A: Colocación normal (coloque la barra de sonido en una supercie
nivelada delante del televisor)
B: Montaje en pared
Montaje en pared
NOTA:
ū Las instalación debe llevarla a cabo personal cualicado. El montaje
incorrecto puede dar lugar a lesiones personales graves o daños en
la propiedad (si decide instalar este producto usted mismo, debe
comprobar las instalaciones, como los conductos de electricidad o
de agua que puedan pasar por detrás de la pared). Es responsabi-
lidad del instalador vericar que la pared puede soportar la carga
total de la unidad y los soportes de pared.
ū Se necesitan herramientas adicionales (no suministradas) para la
instalación.
ū No apriete excesivamente los tornillos.
ū Conserve el manual de instrucciones para futuras consultas.
ū Utilice un detector electrónico de vigas para comprobar el tipo de
pared antes de taladrar o montar.
708 mm
708 mm
Ø5.5~6mm
32mm
1
4
2
3
2~3mm
708 mm
708 mm
Ø5.5~6mm
32mm
1
4
2
3
2~3mm
1. Taladre dos oricios paralelos (con un diámetro de 5,5 a 6 mm cada
uno en función del tipo de pared) en la pared. La distancia entre los
oricios debe ser de 708 mm.
Introduzca un pasador en cada oricio de la pared si fuera
necesario.
2. Apriete los soportes de montaje en pared con tornillos y un
destornillador (no se incluye). Asegúrese de que están jados de
forma segura.
3. Aoje los tornillos de la parte posterior de la unidad de 2 a 3 mm.
4. Coloque la unidad sobre los soportes de montaje en pared y
encaje en su lugar.
Conexiones
Entrada HDMI ARC
• La función ARC (Audio Return Channel) permite enviar audio desde
un televisor compatible con ARC a la barra de sonido a través de una
única conexión HDMI. Para disfrutar de la función ARC, asegúrese de
que su televisor es compatible con HDMI-CEC y ARC, y que congú-
relo correspondientemente. Si se congura correctamente, puede
utilizar el mando a distancia de su televisor para ajustar la salida de
volumen (VOL +/- y MUTE) de su barra de sonido.
ū Conecte el cable HDMI (no incluido) desde la conexión HDMI (ARC)
de la unidad a la conexión HDMI (ARC) de su televisor compatible
con ARC. Pulse el mando a distancia para seleccionar HDMI ARC.
CONSEJO:
• El televisor debe admitir las funciones HDMI-CEC y ARC Las funcio-
nes HDMI-CEC y ARC deben establecerse en activas.

ES
• El método de ajuste de las funciones HDMI-CEC y ARC puede diferir
en función del televisor. Para obtener detalles sobre la función ARC,
consulte el manual de su televisor.
• Solamente los cables de HDMI con versión 1.4 o superior pueden
soportar la función ARC.
Entrada óptica
• Retire el tapón protector de la conexión OPTICAL, conecte el cable
OPTICAL (no incluido) en la conexión OPTICAL OUT del televisor y la
conexión OPTICAL en la unidad.
CONSEJO: En el modo HDMI ARC/OPTICAL, si no se escucha sonido
desde la unidad y los indicadores HDMI ARC/OPTICAL parpadean
rápidamente, puede que necesite activar la salida de señal PCM en su
dispositivo de salida (p. ej., televisor, DVD o reproductor Blu-ray).
AUX
A. Use un cable de audio RCA a 3,5 mm (no suministrado) para
conectar las salidas de audio del televisor a una conexión AUX de
la unidad.
B. Use un cable de audio de 3,5 mm a 3,5 mm (no suministrado) para
conectar la salida del televisor o de los auriculares externos del
dispositivo a una conexión AUX de la unidad.
CONSEJO: Cuando utilice la salida de auriculares, usted podrá
ajustar el volumen directamente utilizando el mando a distancia.
Conexión a la corriente
• Antes de conectar el cable de alimentación de CA, asegúrese de
completar el resto de conexiones.
• Riesgo de daños en el producto. Asegúrese de que la tensión de
alimentación se corresponde con la tensión indicada en la parte
posterior o inferior de la unidad.
• Conecte el cable principal a la toma AC~ de la unidad y, a continua-
ción, a una toma de corriente.
Funcionamiento básico
Modo en espera/encendido
• La unidad se encenderá en modo de espera cuando se conecta por
primera vez a una toma de corriente, El indicador de encendido se
iluminará en color rojo.
• Pulse en
botón del mando a distancia para encender o apagar la
unidad principal.
• Desconecte el enchufe de la toma de alimentación si desea apagar
la unidad completamente.
ū Si se ha conectado un televisor o dispositivo externo (solo en el
caso de la conexión AUX), la unidad se encenderá automáticamente
cuando dichos dispositivos se enciendan.
ū Si la unidad no recibe señal de entrada durante más de 15 minutos,
se activará automáticamente el modo en espera.
Selección de modos
Pulse el botón de la unidad varias veces o los botones AUX,
BT (Bluetooth), OPTICAL o HDMI ARC del mando a distancia para
seleccionar el modo deseado.
• Indicador rojo: En modo de espera.
• Indicador verde: En modo auxiliar.
• Indicador naranja: En modo óptico.
• Indicador azul: En modo Bluetooth.
• Indicador blanco: En modo HDMI ARC.
Ajuste del volumen
ū Pulse los botones +/- de la unidad o botones VOL+/VOL- del mando
a distancia para ajustar el volumen.
ū Si desea silenciar el sonido, pulse el botón MUTE del mando a dis-
tancia. Pulse el botón MUTE de nuevo o los botones VOL+/VOL- de
la unidad o del mando a distancia para reanudar el sonido normal.
ū Al ajustar el volumen, el indicador de estado parpadea rápidamente.
ū Si pulsa el botón VOL+ cuando el volumen ha alcanzado su nivel
máximo, el indicador de estado parpadeará una vez. Si pulsa el
botón VOL- cuando el volumen ha alcanzado su nivel mínimo, el
indicador de estado parpadeará una vez.
AUX/OPTICAL/HDMI ARC
1. Asegúrese de que la unidad está conectada al televisor o el
dispositivo de audio.
2. Con la unidad encendida, pulse el botón
varias veces o los
botones AUX, OPTICAL o HDMI ARC del mando a distancia para
seleccionar el modo deseado.
3. Utilice el dispositivo de audio directamente para aplicar funciones
de reproducción.
4. Pulse el botón VOL +/- para ajustar el volumen al nivel deseado.
CONSEJO:
En el modo HDMI ARC/OPTICAL, si no se escucha sonido desde la
unidad y los indicadores HDMI ARC/OPTICAL parpadean rápidamente,
puede que necesite activar la salida de señal PCM en su dispositivo de
salida (p. ej., televisor, DVD o reproductor Blu-ray).
Funcionamiento de la función Bluetooth
Emparejamiento de dispositivos Bluetooth
La primera vez que conecte su dispositivo Bluetooth al reproductor,
necesitará emparejarlo al reproductor.
NOTA:
ū El rango operativo entre el reproductor y un dispositivo Bluetooth
es de aproximadamente 8 metros (sin ningún objeto entre el dispo-
sitivo Bluetooth y la unidad).
ū Antes de conectar un dispositivo Bluetooth a esta unidad, asegúrese
de conocer las funciones del dispositivo.

20
ū No se garantiza la compatibilidad con todos los dispositivos Blue-
tooth.
ū Cualquier obstáculo entre esta unidad y un dispositivo Bluetooth
puede reducir el rango operativo.
ū Si la señal es débil, su receptor Bluetooth puede desconectarse, pero
volverá a entrar en modo de emparejamiento automáticamente.
1. Con la unidad encendida, pulse el botón (Bluetooth) de la unidad
o del mando a distancia para seleccionar el modo Bluetooth. El
indicador azul parpadeará.
2. Active el dispositivo Bluetooth y seleccione el modo de búsqueda.
Aparecerá „SHARP HT-SB95“ en la lista del dispositivo Bluetooth.
ū Si no puede encontrar la unidad, mantenga pulsado el botón “
/ PAIR” del mando a distancia para activa la función de búsqueda.
Tras el mensaje sonoro “Pairing”, el indicador azul parpadeará
visiblemente.
3. Seleccione „SHARP HT-SB95“ en la lista de emparejamiento.
Tras el mensaje sonoro „Pairing“, el sistema se conectará
satisfactoriamente y el indicador azul se iluminará sin parpadear.
4. Empiece a reproducir música desde el dispositivo Bluetooth
conectado.
Para desconectar la función Bluetooth, puede:
ū Cambiar a otra función de la unidad.
ū Desactive la función Bluetooth de su dispositivo. El dispositivo se
desconectará correctamente de la unidad después del mensaje de
voz „Disconnected“.
ū Mantenga pulsado el botón “
/ PAIR” del mando a distancia.
CONSEJO:
• Introduzca „0000“ como contraseña si fuera necesario.
• Si no se empareja otro dispositivo Bluetooth con este reproductor
en el transcurso de dos minutos, el reproductor se reconectará a la
conexión previa.
• El reproductor también se desconectará cuando el dispositivo deje
de estar en el rango operativo.
• Si desea conectar su dispositivo al reproductor, sitúelo dentro del
rango operativo.
• Si el dispositivo vuelve a situarse dentro del rango operativo, despu-
és de dejar de estarlo, compruebe si sigue conectado al reproductor.
• Si se pierde la conexión, siga las instrucciones anteriores para volver
a emparejar el dispositivo al reproductor.
Escuchar música desde un dispositivo Bluetooth
ū Si el dispositivo Bluetooth conectado admite Advanced Audio Dis-
tribution Prole (A2DP), puede escuchar la música almacenada en
dicho dispositivo a través de la barra de sonido.
ū Si el dispositivo también admite Audio Video Remote Control Prole
(AVRCP), puede utilizar el mando a distancia de la barra de sonido
para reproducir música almacenada en dicho dispositivo.
1. Empareje el dispositivo con el reproductor.
2. Reproduzca música a través del dispositivo (si admite A2DP).
3. Use el mando a distancia suministrado para controlar la
reproducción (si admite AVRCP).
ū Para pausar la reproducción y reanudarla, pulse el botón
/ PAIR
del mando a distancia.
ū Para saltar una pista, pulse los botones
/ del mando a distancia.
Resolución de problemas
Para conservar la validez de la garantía, no intente reparar nunca el
sistema por sí mismo. Si observa problemas al usar esta unidad, revise
los siguientes elementos antes de dirigirse al servicio técnico.
No hay alimentación
Asegúrese de que el cable de CA está adecuadamente conectado.
Asegúrese de que la toma de CA tiene corriente.
Pulse el botón de modo en espera del mando a distancia o de la barra
de sonido para encender la barra de sonido.
No se oye sonido
Aumente el volumen. Pulse el botón para subir el volumen del mando
a distancia o el botón situado en la parte derecha de la barra de
sonido.
Pulse el botón MUTE del mando a distancia para asegurarse de que la
barra de sonido no se ha silenciado.
Pulse los botones de fuente para seleccionar una señal de entrada
diferente.
Si no hay audio al usar cualquier de las entradas digitales:
ū Pruebe a ajustar la salida del televisor a PCM o
ū Conecte directamente a su dispositivo Blu-ray u otra fuente; algunos
televisores no transmiten audio digital.
Su televisor puede estar establecido en salida de audio variable.
Conrme que el ajuste de salida de audio está congurado en FIXED
o STANDARD, no en VARIABLE. Consulte el manual de usuario del
televisor para obtener más información.
Si usa Bluetooth, asegúrese de que el volumen de su dispositivo
fuente está activado y de que el dispositivo no está en silencio.
El mando a distancia no funciona
Antes de pulsar cualquier botón de control de reproducción,
seleccione la fuente correcta.
Reduzca la distancia entre el mando a distancia y la unidad.
Inserte la pila con las polaridades (+/-) alineadas como se indica.
Sustituya la pila.
Dirija el mando distancia directamente hacia el sensor en la parte
frontal de la unidad.
Oigo sonido como zumbidos y silbidos
Asegúrese de que todos los cables están correctamente conectados.
Conecte un dispositivo fuente diferente (televisor, reproductor Blu-
ray, etc.) para comprobar si el zumbido continúa. Si se deja de oír, el
problema puede estar en el dispositivo original.
Conecte el dispositivo a una entrada diferentes en la barra de sonido.
No puedo encontrar el nombre Bluetooth de esta unidad en mi
dispositivo Bluetooth
Asegúrese de que la función Bluetooth está activada en su dispositivo
Bluetooth.
Vuelva a emparejar la unidad con su dispositivo Bluetooth.
Se trata de una función de apagado tras 15 minutos, uno de los
requisitos estándar de ERPII para ahorrar energía
Cuando el nivel de señal de entrada externo de la unidad es
demasiado bajo, la unidad se desactivará automáticamente en 15
minutos. Aumente el nivel de volumen del dispositivo externo.
Strona się ładuje...
Strona się ładuje...
Strona się ładuje...
Strona się ładuje...
Strona się ładuje...
Strona się ładuje...
Strona się ładuje...
Strona się ładuje...
Strona się ładuje...
Strona się ładuje...
Strona się ładuje...
Strona się ładuje...
Strona się ładuje...
Strona się ładuje...
Strona się ładuje...
Strona się ładuje...
Strona się ładuje...
Strona się ładuje...
Strona się ładuje...
Strona się ładuje...
-
 1
1
-
 2
2
-
 3
3
-
 4
4
-
 5
5
-
 6
6
-
 7
7
-
 8
8
-
 9
9
-
 10
10
-
 11
11
-
 12
12
-
 13
13
-
 14
14
-
 15
15
-
 16
16
-
 17
17
-
 18
18
-
 19
19
-
 20
20
-
 21
21
-
 22
22
-
 23
23
-
 24
24
-
 25
25
-
 26
26
-
 27
27
-
 28
28
-
 29
29
-
 30
30
-
 31
31
-
 32
32
-
 33
33
-
 34
34
-
 35
35
-
 36
36
-
 37
37
-
 38
38
-
 39
39
-
 40
40


Sharp HT-SB95 2.0 Soundbar Home Theatre System Instrukcja obsługi
- Typ
- Instrukcja obsługi
- Niniejsza instrukcja jest również odpowiednia dla
w innych językach
- español: Sharp HT-SB95 2.0 Soundbar Home Theatre System Manual de usuario
- italiano: Sharp HT-SB95 2.0 Soundbar Home Theatre System Manuale utente
- Deutsch: Sharp HT-SB95 2.0 Soundbar Home Theatre System Benutzerhandbuch
- français: Sharp HT-SB95 2.0 Soundbar Home Theatre System Manuel utilisateur
- English: Sharp HT-SB95 2.0 Soundbar Home Theatre System User manual
Powiązane artykuły
-
Sharp HT-SBW110 Instrukcja obsługi
-
Sharp HT-SB107 Instrukcja obsługi
-
Sharp HT-SB140(MT) Instrukcja obsługi
-
Sharp HT-SB95 Instrukcja obsługi
-
-
Sharp HT-SB147 Instrukcja obsługi
-
Sharp HT-SB150 Instrukcja obsługi
-
-
Sharp HT-SBW160 Instrukcja obsługi
-
Inne dokumenty
-
Blaupunkt LS180 instrukcja
-
JVC TH-E321B Instrukcja obsługi
-
-
Bigben SB402BT Instrukcja obsługi
-
JVC TH-E431B Instrukcja obsługi
-
JVC TH-E741B Instrukcja obsługi
-
Grundig GSB 910 S Instrukcja obsługi
-
Samsung HW-J355 Instrukcja obsługi
-
-